Author

Ryan

Browsing

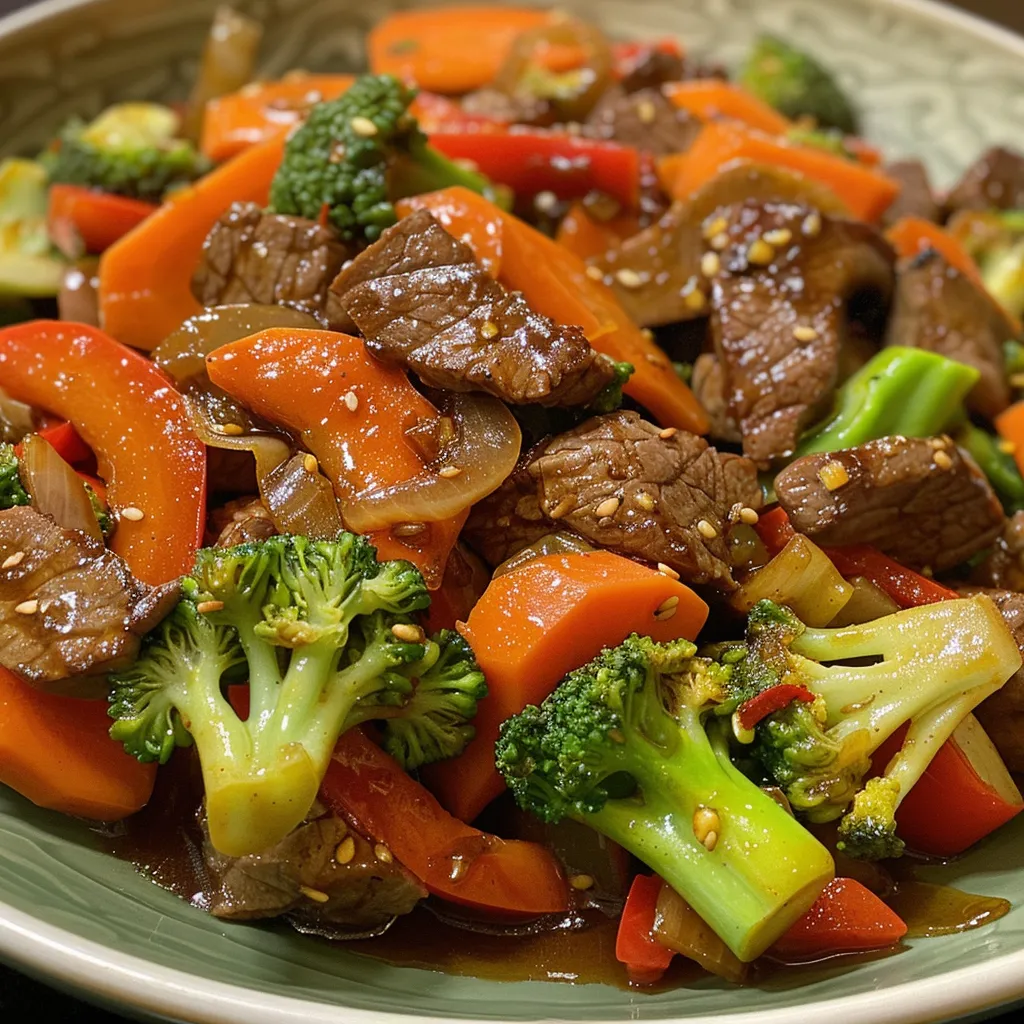
Unlock the Secrets to a Flavor-Packed Gluten Free Beef Stir Fry

Welcome to your next culinary adventure! If you’re ready to dive into a gluten free beef stir fry that’s bursting with flavor and packed with nutrients, you’ve come to the right place. This dish is not just a meal; it’s an experience that brings together vibrant vegetables, tender beef, and a savory sauce that will leave your taste buds dancing. Whether you’re a seasoned chef or just starting out, this recipe is designed to be easy, fun, and delicious. Let’s get cooking!

Why You’ll Love This Recipe

This isn’t just any beef stir fry; it’s a flavor bomb that’s also gluten-free! Here are five reasons why this recipe will win your heart:

  • Quick & Easy: Ready in under 30 minutes, perfect for a busy weeknight.
  • Nutritious: Packed with colorful veggies that provide essential vitamins and minerals.
  • Flavorful Sauce: A perfect blend of umami and sweetness that enhances every bite.
  • Customizable: Feel free to swap in your favorite vegetables or protein for a personal touch.
  • Meal Prep Friendly: Great for make-ahead lunches or dinners that taste just as good reheated.

Ingredients You’ll Need

Gather these simple ingredients to create your delicious stir fry:

  • 1.5 lbs Flank Steak or Sirloin
  • 3 cups Broccoli Florets
  • 2 large Bell Peppers
  • 2 medium Carrots
  • 1 cup Snow Peas
  • 1/2 cup Gluten-Free Tamari or Soy Sauce
  • 1/4 cup Beef Broth
  • 2 tbsp Rice Vinegar
  • 2 tbsp Honey or Maple Syrup
  • 1 tbsp Fresh Ginger, grated
  • 3 cloves Garlic, minced
  • 1 tbsp Cornstarch or Arrowroot Powder
  • 1 tbsp Sesame Oil
  • 2 tbsp Avocado Oil or High-Heat Oil
  • Sesame seeds (optional garnish)
  • Green onions (sliced, optional garnish)

Ingredient Substitutions & Variations

Feel free to get creative! Here are some substitutions and variations you might consider:

  • Beef: Use chicken breast, shrimp, or tofu for a different protein option.
  • Vegetables: Add or substitute with snap peas, zucchini, mushrooms, or bok choy for a unique twist.
  • Sweetener: If you prefer, use agave syrup or coconut sugar instead of honey.
  • Gluten-Free Sauce: For a soy-free option, use coconut aminos in place of tamari.

Step-by-Step Instructions

Let’s get down to business! Follow these easy steps to create your gluten free beef stir fry:

  1. Prepare the Beef: Thinly slice the flank steak against the grain into bite-sized strips. In a medium bowl, combine the beef with 1 tablespoon of the gluten-free tamari and 1 teaspoon of cornstarch. Toss to coat evenly and set aside.
  2. Make the Stir Fry Sauce: In a separate small bowl, whisk together the remaining gluten-free tamari, beef broth, rice vinegar, honey, grated fresh ginger, minced garlic, sesame oil, and the remaining cornstarch. Whisk until smooth.
  3. Chop the Vegetables: Prepare all your vegetables—cut broccoli into small florets, slice bell peppers into thin strips, and julienne carrots.
  4. Cook the Beef: Heat 1 tablespoon of avocado oil in a large skillet or wok over high heat. Add the marinated beef in a single layer, searing for 1-2 minutes per side until browned. Remove and set aside.
  5. Stir Fry the Vegetables: Add the remaining avocado oil to the same pan. Start with the carrots and broccoli; stir-fry for 3-4 minutes until crisp-tender.
  6. Add Remaining Veggies: Toss in the sliced bell peppers and snow peas. Stir-fry another 2-3 minutes until all veggies are bright and crisp-tender.
  7. Combine and Sauce: Return the cooked beef to the pan. Give the stir fry sauce a quick whisk, then pour it over the beef and vegetables.
  8. Thicken the Sauce: Bring to a simmer, stirring constantly for 1-2 minutes until the sauce thickens and coats all ingredients.
  9. Serve Immediately: Remove from heat. Garnish with sesame seeds and sliced green onions, if desired. Serve hot over your favorite rice or noodles.

Pro Tips for Success

Here are some expert insights to ensure your stir fry turns out perfectly:

  • High Heat: Always cook on high heat to get that perfect sear on the beef and keep your vegetables crisp.
  • Don’t Overcrowd: Cook the beef in batches if necessary to prevent steaming instead of searing.
  • Prep Ahead: Chop your vegetables and marinate the beef ahead of time for quick assembly.
  • Thickening the Sauce: If the sauce is too thin, whisk in a little more cornstarch mixed with water until desired consistency is reached.
  • Storage: Store leftovers in an airtight container in the fridge for up to 3 days.
  • Reheat Properly: Reheat gently in a skillet over medium heat to maintain texture.
  • Flavor Boost: For an extra flavor kick, add a splash of lime juice just before serving.
  • Garnish: Fresh herbs like cilantro or basil can elevate the dish even more.

Common Mistakes & Troubleshooting

Even the best chefs make mistakes! Here’s how to avoid common pitfalls:

  • Overcooking Vegetables: Keep an eye on your veggies; they should be tender-crisp, not mushy.
  • Beef Too Tough: Always slice against the grain for tender beef strips.
  • Too Salty: If your sauce is too salty, add a pinch of sugar or a splash of vinegar to balance it out.

Storage & Make-Ahead Instructions

Planning ahead? Here’s how to store and prep this dish:

  • Refrigerate: Store leftovers in an airtight container for up to 3 days.
  • Freeze: For longer storage, freeze in portions for up to 2 months. Thaw in the fridge overnight before reheating.
  • Make-Ahead: Marinate the beef and chop vegetables a day in advance to speed up cooking time.

FAQs About Gluten Free Beef Stir Fry

Here are some frequently asked questions about this delicious dish:

  • Is this recipe truly gluten-free? Yes! Using gluten-free tamari or soy sauce ensures the dish is safe for those with gluten intolerance.
  • Can I prepare this gluten free beef stir fry ahead of time? Absolutely! You can marinate the beef and chop the veggies ahead to make cooking faster.
  • What’s the best cut of beef for stir fry? Flank steak or sirloin are great options for their tenderness and flavor.
  • How do I make my stir fry sauce thicker? Simply mix a bit more cornstarch with water and whisk it into the sauce while simmering.
  • Can I use frozen vegetables? Yes, but fresh vegetables will yield the best texture and flavor.
  • What can I serve with this stir fry? Serve over rice, quinoa, or gluten-free noodles for a complete meal.
  • What’s the best way to store leftovers? Keep in an airtight container in the fridge for up to 3 days.
  • Can I make this vegetarian? Yes! Substitute beef with tofu or tempeh and use vegetable broth instead of beef broth.

Nutritional Benefits & Dietary Adaptations

This gluten free beef stir fry is not only delicious but also nutritious!

  • Protein-Packed: The beef provides ample protein necessary for muscle repair and growth.
  • Vitamins & Minerals: Broccoli, bell peppers, and carrots offer a variety of vitamins, including A, C, and K.
  • Low Carb Option: Serve it over cauliflower rice for a low-carb alternative.

Equipment Recommendations

To make your cooking experience smooth, here’s a list of essential tools:

  • Wok or Large Skillet: Ideal for high-heat cooking and stir-frying.
  • Sharp Knife: A good knife is crucial for thinly slicing the beef and vegetables.
  • Cutting Board: A sturdy cutting board will make your prep work easier.
  • Measuring Cups & Spoons: Essential for precise ingredient measurements.

Serving Suggestions

Want to take your meal to the next level? Here are some serving ideas:

  • Rice: Serve over steamed jasmine or brown rice for a hearty meal.
  • Noodles: Try it with gluten-free rice noodles for a delightful twist.
  • Salad: Pair with a fresh green salad for added crunch and nutrition.

Now that you have all the tools and tips to make a stellar gluten free beef stir fry, let’s wrap it up! Remember, cooking is all about having fun and experimenting. Don’t be afraid to add your own flair to this recipe. Enjoy your time in the kitchen, and happy cooking!

gluten free beef stir fry

Prep Time 15 minutes
Cook Time 15 minutes
Total Time 30 minutes
Servings 4 servings
Calories 350
A quick and healthy gluten-free beef stir fry packed with colorful vegetables and savory sauce, perfect for a weeknight dinner.

Ingredients

Meat

  • 1.5 lbs Flank Steak or Sirloin (Thinly sliced against the grain)
  • 3 cups Broccoli Florets
  • 2 large Bell Peppers (Sliced into thin strips)
  • 2 medium Carrots (Peel and thinly slice)
  • 1 cup Snow Peas (Trim ends)
  • 1/2 cup Gluten-Free Tamari or Soy Sauce
  • 1/4 cup Beef Broth
  • 2 tbsp Rice Vinegar
  • 2 tbsp Honey or Maple Syrup
  • 1 tbsp Fresh Ginger (Grated)
  • 3 cloves Garlic (Minced)
  • 1 tbsp Cornstarch or Arrowroot Powder
  • 1 tbsp Sesame Oil
  • 2 tbsp Avocado Oil or High-Heat Oil

Garnishes

  • to taste Sesame seeds (optional garnish)
  • to taste Green onions (sliced, optional garnish)

Instructions 

  • Slice beef into strips, coat with 1 tbsp tamari and 1 tsp cornstarch. Set aside.
  • Whisk remaining tamari, beef broth, vinegar, honey, ginger, garlic, sesame oil, and cornstarch to make sauce.
  • Stir-fry beef in hot oil until browned, then remove from pan.
  • Add remaining oil, stir-fry carrots and broccoli for 3-4 minutes, then add bell peppers and snow peas for another 2-3 minutes.
  • Return beef to pan, pour sauce, and simmer until thickened, about 1-2 minutes. Garnish and serve hot.

Notes

Use high-quality gluten-free tamari for best flavor. Serve over rice or noodles if desired.
Calories: 350kcal
Cost: $15
Course: Main Course
Cuisine: Asian
Keyword: Beef, gluten-free, Stir-Fry

Picture this: it’s Monday morning, and you’re ready to tackle the week ahead. But wait—what’s for lunch? Enter the star of your meal prep game: Lemon Garlic Chicken Meal Prep. This vibrant dish is not only packed with flavor but also incredibly easy to whip up. You can enjoy tender chicken, vibrant veggies, and a tangy punch that makes healthy eating a delight. Let’s dive into why this recipe will become your go-to for delicious, nutritious meals all week long!

Why You’ll Love This Recipe

This Lemon Garlic Chicken Meal Prep isn’t just another chicken dish; it’s a culinary experience that transforms your meals into a celebration of flavors. Here are five reasons you’ll fall in love with it:

  • Flavor Explosion: The fresh lemon juice and minced garlic create a marinade that infuses the chicken with a bright, zesty flavor.
  • Meal Prep Friendly: Perfect for those busy weeks, this dish holds up wonderfully in the fridge, ensuring you have healthy meals ready to go.
  • Simple Ingredients: With just a handful of pantry staples, you can whip up this dish without breaking a sweat.
  • Customizable: Add your favorite veggies or swap the chicken for another protein to keep your meals exciting.
  • Health Benefits: Packed with lean protein and fresh veggies, this meal helps you stay energized throughout the day.

Ingredients You’ll Need

Let’s get ready to cook! Here’s what you need to make this zesty dish:

  • ¼ cup fresh lemon juice: Brightens the dish and adds a refreshing zing.
  • 2 tablespoons olive oil: Keeps the chicken juicy and enhances flavor.
  • 2 cloves garlic, minced: The star of the show—adds depth and richness.
  • 2 teaspoons dried oregano: A classic herb that complements the lemon and chicken beautifully.
  • ½ teaspoon paprika: Adds a subtle smokiness and vibrant color.
  • ½ teaspoon salt: Essential for balancing flavors.
  • ½ teaspoon black pepper: For a touch of heat.
  • 24 ounces boneless, skinless chicken breasts: The protein base of your meal prep.
  • 1.5 pounds yellow potatoes, cut into 1-inch pieces: Provides hearty texture and absorbs flavors.
  • 1 tablespoon olive oil: For roasting the potatoes.
  • 1 teaspoon garlic powder: For an added garlic kick.
  • 1 teaspoon salt (plus more to taste): For seasoning.
  • 1 teaspoon black pepper (plus more to taste): To suit your taste.
  • 4 small zucchinis, sliced into 1-inch pieces: Adds freshness and nutrition.

How to Make Lemon Garlic Chicken Meal Prep

Ready to get cooking? Follow these steps for a delicious meal prep:

  1. Whip Up the Marinade: In a bowl, mix lemon juice, olive oil, minced garlic, oregano, paprika, salt, and pepper. Add the chicken breasts, ensuring they are well-coated. Let them marinate for at least 30 minutes (or overnight for more flavor!).
  2. Prepare the Potatoes: Preheat your oven to 400°F (200°C). Toss the cut potatoes with olive oil, garlic powder, salt, and pepper. Spread them out on a baking sheet.
  3. Roast the Potatoes: Bake for 25-30 minutes or until golden and crispy, flipping halfway through for even cooking.
  4. Cook the Chicken: While the potatoes are roasting, heat a skillet over medium-high heat. Sear the marinated chicken for about 6-7 minutes on each side until cooked through and golden brown. Let it rest for a few minutes, then slice.
  5. Sauté the Zucchini: In the same skillet, add a little more oil and toss in the zucchini. Sauté for about 3-5 minutes until tender but still vibrant.
  6. Assemble Your Meal Prep Containers: Divide the roasted potatoes, sautéed zucchini, and sliced chicken into your meal prep containers. You can garnish with extra lemon slices or fresh herbs for an extra touch.

Pro Tips for Making Lemon Garlic Chicken Meal Prep

Juicy Lemon Garlic Chicken served with yellow potatoes and sliced zucchini in meal prep containers.

These expert insights will elevate your meal prep game:

  • Marinate Overnight: For an even deeper flavor, marinate the chicken overnight in the fridge.
  • Experiment with Veggies: Feel free to swap in seasonal vegetables like bell peppers or broccoli for a nutrition boost.
  • Check for Doneness: Use a meat thermometer to ensure chicken reaches an internal temperature of 165°F (75°C).
  • Storage Hacks: Use glass containers for easy reheating and to avoid plastic waste.
  • Make It Spicy: Add red pepper flakes to the marinade if you like a bit of kick.
  • Double the Recipe: Make a larger batch for a week’s worth of meals!
  • Keep It Fresh: Add fresh herbs like parsley or basil right before serving for added flavor.
  • Meal Prep Hacks: Prepare the chicken and potatoes on the weekend for grab-and-go meals during the week.

Common Mistakes and Troubleshooting

Even the best chefs make mistakes! Here’s how to troubleshoot:

  • Dry Chicken: If the chicken turns out dry, it might have been overcooked. Invest in a meat thermometer to avoid this.
  • Flavorless Potatoes: Ensure you season your potatoes adequately before roasting; they need flavor!
  • Overcooked Zucchini: Sauté zucchini just until tender; you want it to retain some crunch.

Variations to Try

Mix things up with these fun variations:

  • Herb Lemon Chicken: Add fresh herbs like rosemary or thyme to the marinade for an aromatic twist.
  • BBQ Lemon Chicken: Swap the lemon for BBQ sauce for a smoky, tangy flavor.
  • Spicy Garlic Chicken: Incorporate chili powder or jalapeños into the marinade for heat.
  • Vegan Option: Replace chicken with marinated tofu or chickpeas for a plant-based version.

Storage and Make-Ahead Instructions

This recipe is perfect for meal prep and can be stored in the fridge for up to 4 days. Simply:

  • Allow the chicken and veggies to cool completely before storing.
  • Use airtight containers to keep everything fresh.
  • Reheat in the microwave or oven, adding a splash of water to keep it moist.

FAQs about Lemon Garlic Chicken Meal Prep

Got questions? Let’s clear things up!

  • Can I freeze Lemon Garlic Chicken Meal Prep? Yes, this dish freezes well! Just ensure it’s in an airtight container.
  • How long does it take to make? The total prep and cooking time is about 40-50 minutes.
  • Can I use different vegetables? Absolutely! Feel free to add any of your favorite veggies.
  • What sides go well with this meal? Quinoa, brown rice, or a fresh salad are perfect companions!
  • Is this recipe gluten-free? Yes, all the ingredients are naturally gluten-free!
  • How do I know when the chicken is done? Use a meat thermometer to check for an internal temperature of 165°F (75°C).
  • Can I make this meal spicy? Yes! Add chili powder or hot sauce to the marinade for a spicy kick.
  • What’s the best way to reheat leftovers? The microwave works great, but for best results, reheat in the oven to keep everything crispy.

Nutrition Tips and Dietary Adaptations

Want to boost the nutrition of this recipe? Here are some tips:

  • Whole Grain Options: Pair with whole grain rice or quinoa for added fiber.
  • Low-Calorie Swap: Use skinless chicken thighs for a juicier, more flavorful option.
  • Vegetarian Delight: Substitute the chicken with roasted chickpeas for a protein-rich vegetarian meal.
  • Low-Carb Version: Skip the potatoes and serve with extra veggies or cauliflower rice.

Equipment Recommendations

Make the cooking process even smoother with these handy tools:

  • Sharp Knife: For precise cutting of chicken and vegetables.
  • Cutting Board: A sturdy board makes prep a breeze.
  • Mixing Bowls: For marinating and mixing ingredients.
  • Skillet: A non-stick skillet is ideal for cooking the chicken and sautéing vegetables.
  • Baking Sheet: Perfect for roasting potatoes to crispy perfection.
  • Meal Prep Containers: Keep your meals organized and fresh!

Serving Suggestions

Serve your Lemon Garlic Chicken Meal Prep with:

  • Fresh Lemon Wedges: A squeeze of lemon just before eating brightens flavors.
  • Herb Garnish: Fresh parsley or cilantro adds a pop of color and flavor.
  • Side Salad: A crisp green salad pairs beautifully with this dish.

Now that you’re armed with all the knowledge and tips, it’s time to take on the kitchen! Enjoy your culinary adventure with this zesty Lemon Garlic Chicken Meal Prep that promises to brighten your week!

Lemon Garlic Chicken Meal Prep

Prep Time 15 minutes
Cook Time 30 minutes
Total Time 45 minutes
Servings 4 servings
Calories 450
A flavorful and healthy meal prep featuring tender chicken breasts with lemon and garlic, roasted potatoes, and zucchini for a complete, nutritious dish.

Ingredients

Marinade & Seasonings

  • ¼ cup fresh lemon juice
  • 2 tablespoons olive oil
  • 2 cloves garlic, minced
  • 2 teaspoons dried oregano
  • ½ teaspoon paprika
  • ½ teaspoon salt
  • ½ teaspoon black pepper

Chicken & Vegetables

  • 24 ounces boneless, skinless chicken breasts (4 (6-ounce) pieces)
  • 1.5 pounds yellow potatoes, cut into 1-inch pieces
  • 1 tablespoon olive oil
  • 1 teaspoon garlic powder
  • 1 teaspoon salt (plus more to taste)
  • 1 teaspoon black pepper (plus more to taste)
  • 4 small zucchinis, sliced into 1-inch pieces

Instructions 

  • Marinate chicken with lemon juice, olive oil, garlic, oregano, paprika, salt, and pepper for 10 minutes.
  • Preheat oven to 400°F (200°C). Toss potatoes with olive oil, garlic powder, salt, and pepper.
  • Arrange chicken, potatoes, and zucchini on a baking sheet. Roast for 25-30 minutes until cooked through.
  • Divide into meal prep containers and serve.

Notes

Adjust seasoning to taste and ensure chicken is fully cooked before serving.
Calories: 450kcal
Cost: $15
Course: Main Course
Cuisine: American
Keyword: Chicken, Lemon, Meal Prep

The Ultimate One Pot Beef Taco Pasta: A Flavor Fiesta Awaits!

Are you ready to dive into a deliciously easy One Pot Beef Taco Pasta that brings the fiesta to your dinner table? This recipe is packed with bold flavors, hearty ingredients, and cheesy goodness that will have everyone asking for seconds. Perfect for busy nights, this meal is not just about filling your stomach—it’s about bringing joy and excitement back to cooking!

In this guide, we’ll explore why this recipe is a game-changer, provide you with detailed ingredient breakdowns, expert tips, variations, and everything else you need to make this dish a hit in your kitchen!

Why You’ll Love This Recipe

This One Pot Beef Taco Pasta isn’t just any ordinary dish; it’s a culinary escape to vibrant flavors and satisfying textures. Here are five reasons why you’ll fall head over heels for this recipe:

  • Quick and Easy: Ready in under 30 minutes, this dish is perfect for those nights when time is tight but you still want a wholesome meal.
  • Minimal Cleanup: Cooking everything in one pot means less time scrubbing dishes and more time enjoying your meal.
  • Flavor-Packed: With a delightful blend of spices and savory beef, each bite is a fiesta of flavors.
  • Customizable: Tailor the recipe to your taste with various toppings and ingredient swaps to keep things fresh and exciting.
  • Family-Friendly: A hit with kids and adults alike, this dish is sure to please the whole family!

Ingredient Breakdown

Let’s dive into the star players of this recipe! Here’s what you’ll need:

  • Ground Beef: 1 pound (450g) of lean ground beef for a healthier option or regular for richer flavor.
  • Taco Seasoning: 2 tablespoons. Store-bought is great, but making your own adds a personal touch.
  • Pasta: 8 ounces (225g) of short pasta like penne, rotini, or shells. Gluten-free pasta works too!
  • Diced Tomatoes: 1 can (14.5 ounces) for a juicy base.
  • Tomato Sauce: 1 cup to enhance the richness of the dish.
  • Beef Broth: 2 cups for flavor and moisture, or water if you prefer.
  • Cheese: 1 cup shredded (cheddar, Monterey Jack, or Mexican blend) to melt into gooey perfection.
  • Olive Oil: 1 tablespoon (optional) for sautéing.
  • Garlic: 2 cloves minced (optional) for an aromatic kick.
  • Black Beans: 1/2 cup (optional) for added protein and fiber.
  • Corn Kernels: 1/2 cup (optional) for sweetness and texture.
  • Jalapeños or Bell Peppers: 1/4 cup (optional) for a spicy or sweet twist.

Pro Tips for Perfect One Pot Taco Pasta

Side angle of a hearty plate of One Pot Beef Taco Pasta, featuring colorful toppings and melted cheese.

Want to elevate your cooking game? Here are some expert insights:

  • Watch the Liquid: Keep an eye on the liquid level during cooking. If it starts to dry out, add more broth or water.
  • Spice It Up: Adjust the heat by adding chili powder or fresh jalapeños to your taste.
  • Cheese Last: Stir in cheese at the end for the best melt and gooeyness.
  • Prep Ahead: Chop your veggies and measure out ingredients ahead of time for quicker prep.
  • Use a Lid: Cover the pot while cooking to help retain moisture and speed up cooking time.
  • Mix and Match: Feel free to substitute proteins or veggies based on what you have on hand!
  • Meal Prep Friendly: This dish stores well in the fridge for easy reheating throughout the week.
  • Garnish Creatively: Top with fresh cilantro, sour cream, or avocado for extra flair!

Common Mistakes and Troubleshooting

Even the best chefs run into hiccups! Here’s how to avoid common pitfalls:

  • Overcooked Pasta: Keep an eye on the pasta as it cooks. Al dente is the way to go!
  • Too Dry: If your dish turns out dry, add a splash of beef broth or water and stir well.
  • Too Spicy: If you accidentally overdo the heat, balance it with a dollop of sour cream or a sprinkle of sugar.
  • Flavorless: Always taste as you go! Adjust seasonings to your liking.

Delicious Variations

Make this dish your own by trying out these fun variations:

  • Vegetarian Version: Substitute ground beef with lentils or your favorite plant-based protein.
  • Cheesy Taco Bake: After cooking, transfer to a baking dish, top with extra cheese, and broil until bubbly.
  • Southwest Style: Add black beans, corn, and diced bell peppers for a southwestern twist.
  • Spicy Kick: Stir in Sriracha or hot sauce while cooking for an added layer of heat!

Storage and Make-Ahead Instructions

This One Pot Beef Taco Pasta is perfect for meal prep! Here’s how to store it:

  • Refrigeration: Store in an airtight container for up to 4 days in the fridge.
  • Freezing: Freeze in portions for up to 3 months. Thaw overnight in the fridge before reheating.
  • Reheating: Reheat on the stovetop with a splash of water or broth to revive its creamy texture.

FAQs About One Pot Beef Taco Pasta

Got questions? We’ve got answers!

  • Can I use a different type of pasta? Absolutely! Any short pasta works well; just adjust cooking times as needed.
  • What can I substitute for ground beef? Try ground turkey, chicken, or plant-based meat alternatives for a lighter option.
  • Can I make this dish spicy? Yes! Add more taco seasoning or fresh jalapeños for heat!
  • How long does this dish last in the fridge? It lasts 3-4 days stored in an airtight container.
  • Can I add more vegetables? Definitely! Feel free to stir in spinach, diced zucchini, or any favorite veggies!
  • Is this recipe gluten-free? Use gluten-free pasta and check your broth and taco seasoning.
  • Can I make it dairy-free? Omit the cheese or use a dairy-free alternative!
  • What do I serve with this dish? Top with fresh cilantro, avocado slices, or a squeeze of lime for extra flavor!

Nutritional Tips and Dietary Adaptations

This dish can fit into various dietary needs:

  • High Protein: The ground beef and beans add protein, making it filling and satisfying.
  • Low Carb: Substitute pasta with spiralized zucchini or cauliflower rice for a lower-carb option.
  • Rich in Fiber: Black beans and corn boost fiber content, aiding digestion and keeping you full!

Equipment Recommendations

Here’s what you’ll need to whip up this delicious dish:

  • Large Pot: A sturdy one-pot is essential for even cooking.
  • Wooden Spoon: Perfect for stirring and scraping those delicious bits off the bottom.
  • Measuring Cups and Spoons: Accurate measurements lead to the best results!

Serving Suggestions

Make your meal even more enjoyable with these serving ideas:

  • Garnishes: Top with fresh cilantro, diced avocado, or a dollop of sour cream.
  • Side Dishes: Serve with a simple green salad or tortilla chips for crunch!
  • Drinks: Pair with a refreshing iced tea or a cold margarita to complete the fiesta vibe!

Conclusion

There you have it! The One Pot Beef Taco Pasta is not just a meal; it’s a celebration of flavors, textures, and fun! With its vibrant ingredients and quick preparation, it’s no wonder this dish has become a family favorite. Whether you’re whipping it up on a busy weeknight or impressing guests at a gathering, this recipe is sure to steal the show. So grab your ingredients, put on some music, and let’s create a dish that brings joy and excitement back to your table!

One Pot Beef Taco Pasta

Prep Time 10 minutes
Cook Time 20 minutes
Total Time 30 minutes
Servings 4 servings
Calories 650
A quick and flavorful one-pot meal combining beef, pasta, and taco seasonings for a satisfying dinner.

Ingredients

Meat

  • 1 pound ground beef ((450g))

Seasoning

  • 2 tablespoons taco seasoning

Pasta

  • 8 ounces pasta ((225g, such as penne, rotini, or shells))

Canned Tomatoes

  • 1 can diced tomatoes ((14.5 ounces))

Tomato Sauce

  • 1 cup tomato sauce

Broth or Water

  • 2 cups beef broth or water

Cheese

  • 1 cup shredded cheese ((cheddar, Monterey Jack, or Mexican blend))

Optional Oils & Aromatics

  • 1 tablespoon olive oil ((optional))
  • 2 cloves garlic ((minced, optional))

Optional Vegetables

  • 0.5 cup black beans ((optional))
  • 0.5 cup corn kernels ((optional))
  • 0.25 cup jalapeños or diced bell peppers ((optional))

Instructions 

  • In a large pot, cook ground beef until browned. Add garlic and cook for 1 minute.
  • Add taco seasoning, diced tomatoes, tomato sauce, and broth. Stir to combine.
  • Bring to a boil, then reduce heat and simmer until pasta is cooked and liquid is absorbed, about 15 minutes.
  • Stir in shredded cheese and optional vegetables. Serve hot.

Notes

Feel free to customize with your favorite toppings or vegetables.
Calories: 650kcal
Cost: $12
Course: Main Course
Cuisine: Mexican
Keyword: Beef, pasta, Tacos

Unlocking the Crunch: The Ultimate Crispy Honey Garlic Tofu Recipe

Dive into the delicious world of Crispy Honey Garlic Tofu! This easy, mouthwatering recipe combines the perfect crunch with a sweet and savory glaze. Perfect for busy weeknights or as a standout dish for gatherings, it proves that healthy eating can be exciting and flavorful!

Why You’ll Love This Recipe

This crispy honey garlic tofu recipe isn’t just about taste; it’s about the wonderful benefits it brings to your table. Here are five compelling reasons to try it:

  • Quick to Prepare: Ready in just 30 minutes, this dish is a lifesaver for busy evenings.
  • Flavor Explosion: The combination of sweet honey and savory garlic creates a sauce that’s irresistible.
  • Versatile Dish: Serve it over rice, in a wrap, or as a topping for salads, making it perfect for any meal.
  • Plant-Based Goodness: This recipe is suitable for vegans (just swap honey for maple syrup) and packed with protein!
  • Meal Prep Friendly: Make it ahead of time and enjoy leftovers throughout the week.

Ingredients You’ll Need

Gather these ingredients for a delightful cooking experience:

  • 14 oz Extra-Firm Tofu: Pressed and cut into 1-inch cubes for the perfect texture.
  • 1/4 cup Cornstarch: Essential for achieving that crispy coating you crave.
  • 2-3 tbsp Avocado Oil: A great high-heat neutral oil for frying.
  • Salt and Black Pepper: To taste, enhancing the flavors of your dish.
  • 1/4 cup Soy Sauce: Low-sodium if preferred, this adds depth to the sauce.
  • 3 tbsp Honey: For sweetness; substitute with maple syrup for a vegan option.
  • 3 cloves Garlic: Minced, for that aromatic punch.
  • 1 tbsp Rice Vinegar: Adds brightness to the sauce.
  • 1 tsp Sesame Oil: For a nutty flavor boost.
  • 1 tsp Cornstarch (mixed with 2 tsp water): This will help thicken your sauce.

How to Make Crispy Honey Garlic Tofu (Step-by-Step)

Side view of golden-brown crispy tofu coated in honey garlic sauce on a plate.

Let’s get cooking! Follow these easy steps for your new favorite dish:

  • Step 1: Press the Tofu: Press the tofu for at least 30 minutes to remove excess moisture. Cut into 1-inch cubes.
  • Step 2: Coat the Tofu: In a medium bowl, toss the tofu cubes with 1/4 cup cornstarch, salt, and pepper until evenly coated.
  • Step 3: Prepare the Sauce: In a small saucepan, whisk together soy sauce, honey, minced garlic, rice vinegar, and sesame oil. Set aside.
  • Step 4: Cooking Methods: To Pan-Fry: Heat avocado oil in a large non-stick skillet over medium-high heat. Add tofu in a single layer and fry for 2-3 minutes per side, until golden and crispy. To Air Fry: Preheat air fryer to 400°F (200°C). Cook tofu in a single layer for 15-20 minutes, shaking halfway, until crispy.
  • Step 5: Thicken the Sauce: While tofu cooks, bring the sauce mixture to a simmer. Whisk in the cornstarch slurry and cook for 1-2 minutes until thickened.
  • Step 6: Toss & Serve: Remove sauce from heat. Add the crispy tofu and gently toss to coat. Garnish with sesame seeds and green onions, if desired, and serve immediately.

Pro Tips for Perfecting Your Crispy Honey Garlic Tofu

Want to elevate your tofu game even more? Check out these expert insights:

  • Choose the Right Tofu: Opt for extra-firm tofu for the best texture. It holds up well during cooking and crisps nicely.
  • Don’t Skip the Pressing: Removing moisture is crucial for achieving that coveted crunch.
  • Experiment with Flavors: Feel free to add spices like chili flakes or ginger for an extra kick!
  • Monitor the Cooking Time: Keep an eye on your tofu; you want it golden brown and crispy, not burnt!
  • Meal Prep Tips: Make a double batch for easy lunches throughout the week. It keeps well in the fridge!
  • Garnish Wisely: Fresh herbs like cilantro or green onions can brighten the dish and enhance presentation.
  • Use a Non-Stick Pan: This will make cooking and cleanup so much easier, especially for frying.
  • Adjust Sweetness: Tailor the honey or maple syrup to your taste; you can make it sweeter or more savory!
  • Add Veggies: Toss in some broccoli or snap peas for a colorful and nutritious addition!

Common Mistakes and Troubleshooting

Even the best chefs make mistakes! Here’s how to avoid common pitfalls:

  • Soggy Tofu: If the tofu isn’t crispy, it may not have been pressed enough or cooked at the right temperature.
  • Too Much Sauce: If your tofu is swimming in sauce, remember to coat it lightly. You can always serve extra sauce on the side!
  • Burnt Garlic: Avoid cooking garlic too long; it can turn bitter. Add it to the sauce just before simmering.
  • Overcrowding the Pan: Ensure the tofu is in a single layer while frying. This helps it crisp up evenly.
  • Not Enough Cornstarch: Make sure to coat your tofu well for that perfect crunchy exterior.

Variations of Crispy Honey Garlic Tofu

Why not mix things up? Here are some delicious variations:

  • Spicy Honey Garlic Tofu: Add chili paste or red pepper flakes to the sauce for a spicy kick.
  • Maple Soy Tofu: Substitute honey with maple syrup for a unique twist and vegan-friendly option.
  • Garlic Ginger Tofu: Add freshly grated ginger to the sauce for an aromatic flavor boost.
  • Tofu Stir-Fry: Toss in your favorite vegetables like bell peppers or snap peas for a complete meal.

Storage and Make-Ahead Instructions

This recipe is perfect for meal prep! Here’s how to store and reheat:

  • Refrigeration: Store leftover tofu in an airtight container in the fridge for up to 4 days.
  • Freezing: You can freeze cooked tofu, but it may lose some of its texture. Use within 1 month.
  • Reheating: Reheat in the air fryer or oven to restore crispiness. Avoid the microwave to keep the texture intact.

FAQ about Crispy Honey Garlic Tofu

Got questions? We’ve got answers!

  • Can I use silken tofu? No, silken tofu is too delicate for this recipe; stick with extra-firm tofu.
  • Is this recipe gluten-free? Yes, just use gluten-free soy sauce or tamari.
  • How can I make this dish spicier? Add red pepper flakes or sriracha to the sauce for heat!
  • Can I use a different sweetener? Absolutely! Maple syrup is a great alternative to honey.
  • What should I serve with this tofu? It pairs well with rice, quinoa, or in wraps and salads.
  • How do I know when the tofu is done? It should be golden brown and crispy on all sides.
  • Can I bake the tofu instead? Yes, bake at 400°F (200°C) for 25-30 minutes, turning halfway.
  • What if my sauce is too thick? Simply add a splash of water or more soy sauce to thin it out.

Nutrition Tips and Dietary Adaptations

This Crispy Honey Garlic Tofu is not only delicious but nutritious! Here’s how you can adapt it:

  • Low-Carb Option: Serve over cauliflower rice instead of traditional grains.
  • High-Protein Variation: Pair with quinoa or serve alongside lentils for extra protein!
  • Dairy-Free: This recipe is naturally dairy-free, perfect for those with lactose intolerance.
  • Low-Sodium Option: Use low-sodium soy sauce and reduce the amount of added salt.

Equipment Recommendations

Here’s what you’ll need to create this dish:

  • Non-Stick Skillet: Ideal for frying the tofu without sticking.
  • Air Fryer: For a healthier, crispy alternative without excess oil.
  • Mixing Bowls: Essential for tossing and preparing the tofu and sauce.
  • Measuring Cups and Spoons: Accurate measurements are key to great dishes!

Serving Suggestions

Make your meal complete with these serving ideas:

  • Over Steamed Rice: A classic combo that balances the flavors beautifully.
  • In a Lettuce Wrap: For a fun, low-carb option, use large lettuce leaves as wraps.
  • As a Salad Topping: Sprinkle over your favorite salad for a protein-packed boost.
  • With Noodles: Toss with rice noodles and veggies for a delightful stir-fry.

With this irresistibly crispy honey garlic tofu recipe, you’re not just making a meal; you’re creating a culinary experience that bursts with flavor and excitement. So roll up your sleeves and get ready to impress your taste buds and those you share it with!

Crispy Honey Garlic Tofu (That's Actually Crispy!)

Prep Time 10 minutes
Cook Time 20 minutes
Total Time 30 minutes
Servings 4 servings
Calories 250
A delicious vegan dish featuring crispy tofu coated in a sweet and savory honey garlic sauce, perfect for a quick and satisfying meal.

Ingredients

Protein

  • 14 oz Extra-Firm Tofu (pressed and cut into 1-inch cubes)
  • 1/4 cup Cornstarch
  • 2-3 tbsp Avocado Oil (or other high-heat neutral oil)
  • to taste Salt and Black Pepper
  • 1/4 cup Soy Sauce (low-sodium if preferred)
  • 3 tbsp Honey (or maple syrup)
  • 3 cloves Garlic (minced)
  • 1 tbsp Rice Vinegar
  • 1 tsp Sesame Oil
  • 1 tsp Cornstarch (mixed with 2 tsp water)

Instructions 

  • Press tofu for 30 minutes, then cut into 1-inch cubes.
  • Toss tofu with cornstarch, salt, and pepper until coated.
  • Whisk soy sauce, honey, garlic, rice vinegar, and sesame oil; simmer and add cornstarch slurry to thicken.
  • Fry tofu in oil until golden and crispy, or air fry at 400°F for 15-20 minutes.
  • Gently toss crispy tofu in sauce, garnish, and serve immediately.

Notes

For extra crispiness, double coat the tofu with cornstarch.
Calories: 250kcal
Cost: $12
Course: Main Course
Cuisine: Asian
Keyword: Tofu

Kick Up Your Dinner Vibes with Szechuan Chicken!

Welcome to a culinary adventure that’s about to transform your dinner routine! If you’re ready to say goodbye to boring meals and hello to vibrant, spicy flavors, then this Quick & Easy Szechuan Chicken is your ticket to flavor town! Loaded with tender chicken, colorful veggies, and a kick of spice, this dish is not just a feast for the taste buds but also a celebration of wholesome ingredients. Let’s dive into how to make this delightful dish that will invigorate your taste buds and keep your dinner exciting!

Why You’ll Love This Recipe

There are so many reasons to adore this Szechuan Chicken recipe! Here are just a few:

  • Quick to Prepare: In under 30 minutes, you can serve up a delicious, homemade meal that rivals takeout.
  • Flavor Explosion: The combination of hoisin sauce, soy sauce, and Szechuan peppercorns creates a sweet and spicy flavor that’s simply irresistible.
  • Healthier Option: Using fresh ingredients means you can control what goes into your meal, making it a healthier choice compared to takeout.
  • Customizable: Whether you like it mild or spicy, you can adjust the heat level to suit your taste!
  • Great for Meal Prep: This dish stores well, making it perfect for leftovers or meal prep for the week.

Ingredients Breakdown

Before we jump into cooking, let’s take a closer look at the ingredients you’ll need to whip up this Szechuan Chicken, including some handy substitutes.

  • Chicken: 1 lb of boneless, skinless chicken breast or thighs works best. You can also use tofu for a vegetarian option.
  • Bell Peppers: 2/3 cup each of red and green bell peppers adds color and crunch. Feel free to swap in your favorite veggies like broccoli or snap peas!
  • Onion: 1/2 cup diced onion enhances the flavor profile. Yellow or white onions work great here.
  • Dried Chilies: 20 dried red chilies bring the heat! You can adjust the amount based on your spice preference.
  • Ginger and Garlic: 5 slices of ginger and 3 cloves of minced garlic add depth and aroma.
  • Cornstarch: Used for coating and thickening, you can substitute with potato starch if needed.
  • Vegetable Oil: 1/4 cup is ideal for frying, but any neutral oil will do.
  • Hoisin Sauce: 4 tablespoons provide a sweet and savory base to the dish.
  • Soy Sauce: Regular soy sauce adds saltiness—2 tablespoons will do the trick.
  • Brown Sugar: 2 tablespoons balance the flavors; light or dark brown sugar works.
  • Sesame Oil: 2 teaspoons for that nutty aroma.
  • Szechuan Peppercorn Powder: 1.5 tsp (optional) for that distinctive tongue-tingling sensation.
  • Chicken Broth: 1/2 cup low-sodium broth or cold water enhances the sauce’s flavor.
  • Baking Soda: 1/2 tsp—don’t skip this as it helps tenderize the chicken!

Instructions: How to Make Szechuan Chicken

Side view of stir-fried Szechuan chicken featuring vibrant vegetables and spices.

Ready to cook? Let’s get started with these simple steps!

  1. Dice the chicken into 1-inch pieces and transfer to a large bowl.
  2. Add the marinade ingredients listed above to the chicken, cover, and marinate for at least 20 minutes (or overnight in the fridge for even better flavor).
  3. In a separate bowl, combine your sauce ingredients until well blended. Set aside.
  4. Coat the marinated chicken with 1/4 cup of cornstarch, ensuring it’s evenly coated.
  5. Heat 1/4 cup of vegetable oil in a large pan or wok over medium-high heat. Fry the chicken until golden brown, about 4-5 minutes per side. Remove the chicken and set it aside, reserving 1 tablespoon of oil in the pan.
  6. Add the dried red chilies to the pan and stir-fry for about 20 seconds.
  7. Next, toss in the diced onions, ginger, and bell peppers. Stir-fry for another 30 seconds until fragrant.
  8. Pour the sauce into the pan and let it simmer until thickened.
  9. Once thickened, return the fried chicken to the pan, tossing to coat evenly in the sauce.
  10. Remove from heat and serve immediately over hot rice!

Pro Tips for the Best Szechuan Chicken

Want to take your Szechuan Chicken to the next level? Here are some expert insights:

  • Marination time: For maximum flavor, let the chicken marinate overnight.
  • Don’t overcrowd the pan: Fry chicken in batches to ensure it gets crispy.
  • Adjust the heat: If you’re not a fan of too much spice, reduce the number of dried chilies.
  • Use fresh ingredients: Fresh garlic and ginger make a significant flavor difference.
  • Leftover sauce: If you have leftover sauce, it can be used for other stir-fried dishes!
  • Vegetable swaps: Experiment with different vegetables like carrots or snap peas for added nutrition.
  • Cooking oil: A high smoke point oil like canola or peanut oil is ideal for frying.
  • Serving suggestion: This dish pairs beautifully with steamed rice or noodles.

Common Mistakes and Troubleshooting

Even the best chefs make mistakes! Here are some common pitfalls to avoid:

  • Overcooked chicken: Be cautious not to overcook the chicken, as it can become dry. Stay vigilant during frying!
  • Too much sauce: If your dish seems overly saucy, add more veggies to balance it out.
  • Not enough heat: If the dish lacks spice, try adding a pinch of red pepper flakes or more Szechuan peppercorns.
  • Burnt garlic: Add garlic towards the end of cooking to prevent it from burning and becoming bitter.

Variations to Try

Mix things up with these fun variations of Szechuan Chicken:

  • Vegetable Szechuan: Replace chicken with tofu or tempeh and load up on extra vegetables for a vegetarian option.
  • Sweet and Spicy: Add pineapple chunks for a sweet twist that balances the heat.
  • Extra Crispy: Double fry the chicken for an ultra-crispy texture.
  • Spicy Garlic: Incorporate more minced garlic and chili paste for a punchier flavor.

Storage and Make-Ahead Instructions

Want to save some for later? Here’s how to store your Szechuan Chicken:

  • Refrigerator: Store in an airtight container for up to 3 days. Reheat in the microwave or on the stovetop.
  • Freezer: This dish can be frozen for up to 2 months. Thaw in the fridge overnight before reheating.
  • Make Ahead: Marinate the chicken a day in advance for maximum flavor and convenience!

Comprehensive FAQ

Got questions? We’ve got answers! Here’s a list of frequently asked questions about this Szechuan Chicken recipe:

  • Can I use frozen chicken? Yes, just ensure it’s thoroughly thawed before marinating.
  • Is Szechuan Chicken always spicy? Traditionally, yes! But you can adjust the heat to your liking.
  • What can I serve with Szechuan Chicken? It pairs well with steamed rice, noodles, or a fresh salad.
  • Can I make this dish gluten-free? Absolutely! Use tamari instead of soy sauce and ensure your hoisin sauce is gluten-free.
  • What if I can’t find Szechuan peppercorns? You can use black pepper as a substitute, though the flavor will differ.
  • Is this recipe kid-friendly? You can adjust the spice level to make it more suitable for children.
  • How can I make it less oily? Use less oil for frying or choose a healthier cooking method.
  • Can I add more vegetables? Definitely! Feel free to experiment with your favorite veggies.

Nutrition Tips and Dietary Adaptations

This Szechuan Chicken recipe is not just delicious—it can also fit into various dietary preferences:

  • High Protein: Chicken is a great source of lean protein, perfect for muscle recovery.
  • Low Carb: Skip the rice for a low-carb option and serve it over leafy greens instead.
  • Vegan Option: Use tofu or tempeh as your protein source and keep the rest of the ingredients the same.
  • Allergy-Friendly: Substitute soy sauce with coconut aminos for a soy-free option.

Equipment Recommendations

Here’s what you’ll need to successfully whip up this Szechuan Chicken:

  • Wok or Large Skillet: Essential for stir-frying at high heat.
  • Cutting Board and Knife: For prepping your ingredients.
  • Measuring Cups and Spoons: Accurate measurements are key to perfecting the dish.
  • Mixing Bowls: For marinating and mixing sauces.

Serving Suggestions

Ready to serve up your Szechuan Chicken? Here are some tasty serving ideas:

  • Over Rice: Serve it over a bed of fluffy steamed jasmine rice to soak up all that delicious sauce.
  • With Noodles: Toss it with stir-fried noodles for a complete meal.
  • As a Meal Prep: Divide portions into meal prep containers for easy lunches throughout the week!
  • Garnish: Top with sliced green onions or sesame seeds for an extra touch of flavor and presentation.

So there you have it! A comprehensive guide to making the best Quick & Easy Szechuan Chicken that will not only tantalize your taste buds but also become a staple in your weeknight dinner rotation. Now get cooking, and remember, cooking is not just about the food; it’s about the joy of creating something delicious. Enjoy your culinary journey!

Quick & Easy Szechuan Chicken

Prep Time 15 minutes
Cook Time 15 minutes
Total Time 30 minutes
Servings 4 servings
Calories 450
A flavorful and spicy Chinese-inspired dish featuring tender chicken coated in a savory Szechuan sauce, perfect for a quick weeknight dinner.

Ingredients

Protein

  • 1 lb chicken breast (or skinless boneless chicken thighs)
  • 2/3 cup red bell pepper (diced)
  • 2/3 cup green bell pepper (diced)
  • 1/2 cup onion (diced)
  • 20 dried red chilies (or 2 fresh chopped red chillies) dried red chilies (or fresh)
  • 5 slices ginger (peeled)
  • 1/4 cup cornstarch (or potato starch)
  • 1/4 cup vegetable oil (or neutral oil)
  • 3 cloves garlic (minced)
  • 4 tablespoons hoisin sauce
  • 2 tablespoons regular soy sauce
  • 2 tablespoons brown sugar (light or dark brown sugar both work)
  • 2 teaspoons sesame oil
  • 1.5 tsp sichuan peppercorn powder (optional)
  • 1 tbsp cornstarch (or potato starch)
  • 1/2 cup chicken broth (low sodium or cold water)
  • 1.5 tbsp cornstarch (or potato starch)
  • 1.5 tbsp water (cold)
  • 1/2 tsp baking soda (do not skip!)
  • 1 tbsp vegetable oil (or any neutral oil)

Instructions 

  • Dice chicken into 1-inch pieces and marinate with ingredients for at least 20 minutes.
  • Toss chicken with 1/4 cup cornstarch until evenly coated.
  • Fry chicken in hot oil until golden, then remove and set aside.
  • Stir-fry dried chilies, onions, ginger, and bell peppers for 30 seconds.
  • Add sauce ingredients, simmer until thickened, then toss in fried chicken. Serve immediately.

Notes

Adjust spice level by adding or reducing dried chilies.
Calories: 450kcal
Cost: $15
Course: Main Course
Cuisine: Chinese
Keyword: Chicken

Kickstart Your Day with a Pineapple and Kale Smoothie

Discover the magic of a Pineapple and Kale Smoothie! This quick, refreshing blend of tropical fruits and nutrient-packed kale is the perfect way to kickstart your day with energy and flavor. Not only does it make for a **delicious breakfast smoothie**, but it also serves as a **nutrient powerhouse** that can help you feel vibrant and revitalized!

Why You’ll Love This Recipe

This kale pineapple smoothie isn’t just a treat for your taste buds; it’s a health booster! Here are five compelling reasons why you’ll adore this recipe:

  • Quick and Easy: Ready in just 5 minutes, this smoothie is perfect for busy mornings or a quick snack.
  • Nutrient-Dense: Packed with vitamins A and C, this smoothie supports your immune system and keeps your skin glowing.
  • Refreshing Flavor: The sweetness of pineapple and mango combined with the earthiness of kale creates a uniquely delicious blend.
  • Customizable: With a few simple swaps, you can tailor this recipe to suit your taste and dietary needs.
  • Great for Meal Prep: Make several servings at once, and you’ll have nutritious snacks ready to go!

Ingredient Breakdown

Let’s dive into the ingredients that make this smoothie not only delicious but also healthy!

  • Pineapple (0.5 dl): Provides natural sweetness and a tropical flair. You can use fresh or frozen pineapple for convenience.
  • Mango (0.5 dl): Enhances the smoothie’s creaminess and adds a boost of vitamins. Feel free to swap with banana if you prefer.
  • Kale (1 dl): A nutritional powerhouse high in fiber and vitamins. If you’re not a fan of kale, you can substitute with spinach.
  • Vanilla Yogurt (0.5 dl): Adds creaminess and a subtle vanilla flavor. Use a **dairy-free yogurt** for a vegan option.
  • Milk (1 dl): Can be any variety—almond, dairy, coconut—whatever you prefer!

Pro Tips for the Perfect Smoothie

To ensure your kale pineapple smoothie is nothing short of amazing, consider these expert insights:

  • Use Frozen Fruits: They create a thicker, creamier texture and keep your smoothie cold.
  • Blend in Stages: Start with the greens and liquids, then add fruits to ensure a smooth blend.
  • Experiment with Add-Ins: Try adding chia seeds, protein powder, or a splash of honey for extra nutrition.
  • Adjust Consistency: If your smoothie is too thick, add more milk. If it’s too thin, toss in a bit more fruit.
  • Garnish Creatively: Top with sliced fruits, nuts, or seeds for an appealing presentation.
  • Taste and Adjust: Always taste before serving! A drizzle of honey or a squeeze of lime can elevate the flavor.
  • Keep it Fresh: Drink immediately for the best taste and nutrient retention.
  • Use Quality Ingredients: Fresh, organic produce can significantly enhance the flavor and nutritional value.

Avoid These Common Mistakes

Even the most enthusiastic chefs can make a few blunders. Here’s how to sidestep the common pitfalls!

  • Overloading on Greens: Too much kale can make your smoothie bitter. Start with smaller amounts and adjust to your taste.
  • Ignoring Liquid: If you skip the liquid, you’ll end up with a chunky mess instead of a creamy smoothie.
  • Not Blending Long Enough: Take the time to blend thoroughly to ensure a smooth texture.
  • Forget to Prep: Prepping your ingredients ahead of time can save you from last-minute scrambling.

Delicious Variations

Feel free to switch things up! Here are four tasty variations to consider:

  • Berry Delight: Swap out pineapple for mixed berries like strawberries and blueberries for a **berry kale smoothie**.
  • Nutty Banana Bliss: Add a banana and a tablespoon of almond butter for a creamy twist.
  • Green Ginger Zing: Toss in a small piece of fresh ginger for an extra flavor kick.
  • Coconut Dream: Use coconut milk instead of regular milk and add shredded coconut for a tropical vibe.

Make-Ahead and Storage Instructions

Want to prepare your smoothies in advance? Here’s how:

  • Pre-Prep: Chop and freeze fruits in advance. Store in a freezer bag for easy access.
  • Storage: If you have leftovers, store in an airtight container in the fridge for up to 24 hours, but best consumed fresh.
  • Freezing Smoothies: Pour your smoothie into ice cube trays to freeze. Blend the cubes later for a quick drink!

Frequently Asked Questions

Got questions? We’ve got answers!

  • Can I use other greens besides kale? Absolutely! Spinach or Swiss chard work great too.
  • Is this smoothie vegan? Yes, just use a plant-based yogurt and milk!
  • How can I make it sweeter? A touch of honey or maple syrup works wonders.
  • Can I add protein powder? Definitely! It makes a great post-workout drink.
  • What’s the best way to clean my blender? Fill it halfway with warm water and a drop of dish soap, blend, then rinse!
  • How long will it last in the fridge? It’s best consumed within 24 hours for maximum freshness.
  • Can I add oats for fiber? Yes! Rolled oats can be blended in for extra texture and fiber.
  • What goes well with this smoothie? Pair it with whole-grain toast or a handful of nuts for a balanced breakfast.

Nutritional Insights and Dietary Adaptations

This smoothie is naturally low in calories yet high in essential nutrients. Here’s a breakdown:

  • Calories: Approximately 187 kcal per serving.
  • Vitamins: Rich in vitamins A and C, great for skin health.
  • Fiber: Supports digestion and keeps you feeling full.
  • Protein: Add a scoop of protein powder for a post-workout boost!

Essential Equipment

To whip up this delightful smoothie, you’ll need:

  • High-Speed Blender: For a smooth and creamy texture, invest in a quality blender.
  • Measuring Cups: Accurate measurements ensure consistency in taste.
  • Straws or Cups: Don’t forget your favorite smoothie cups or eco-friendly straws!

Serving Suggestions

How you serve your smoothie can elevate the experience:

  • Garnish: Top with fresh fruit slices or a sprinkle of chia seeds.
  • Pair with Snacks: Enjoy alongside a handful of nuts or a granola bar for a satisfying snack.
  • Drinkware: A fun, colorful glass can make your smoothie feel even more inviting!

Now that you’re armed with all the knowledge you need, it’s time to blend up your own kale pineapple smoothie! Remember, healthy eating doesn’t have to be boring—it can be a fun and vibrant experience. So grab your ingredients, fire up that blender, and enjoy every sip of this energizing treat!

Pineapple and Kale Green Smoothie

Prep Time 5 minutes
Total Time 5 minutes
Servings 2 cups
Calories 150
A refreshing and healthy smoothie combining tropical fruits with nutrient-rich kale for a vibrant start to your day.

Ingredients

Fruits

  • 0.5 dl pineapple
  • 0.5 dl mango
  • 1 dl kale (roughly 2-3 leaves)

Dairy

  • 0.5 dl vanilla yoghurt
  • 1 dl milk

Instructions 

  • Add all the ingredients in a blender and mix together.

Notes

Use fresh or frozen fruits for best flavor.
Calories: 150kcal
Cost: $5
Course: Breakfast, Drink
Keyword: fruit, Kale, Smoothie

Unleash Flavor with This Sizzling Beef Stir Fry!

Welcome to a culinary adventure that will transform your weeknight dinners! This Beef Stir Fry is not just a meal; it’s a vibrant explosion of flavor and nutrition! Packed with colorful vegetables and tender beef, this dish is quick to prepare and sure to energize your day. Ready to dive into cooking? Let’s get sizzling!

Why You’ll Love This Recipe

  • Quick and Convenient: Perfect for those busy weeknights, this dish comes together in under 30 minutes, allowing you to whip up a healthy meal without the hassle.
  • Customizable: Use whatever veggies you have on hand—this recipe is versatile! Feel free to experiment with your favorites or whatever’s in season.
  • Flavor-Packed: The combination of soy sauce, garlic, and ginger creates a savory sauce that elevates the dish to a whole new level. It’s all about that perfect balance of flavors!
  • Healthy Eating Made Easy: With lean protein and a rainbow of vegetables, this beef stir fry is a nutritious option that satisfies your hunger while keeping your health goals on track.
  • Ideal for Meal Prep: Make a big batch to enjoy throughout the week. It reheats beautifully, making it a go-to for quick lunches or dinners!

Ingredient Breakdown

Let’s dive into what you’ll need for this delicious stir fry:

  • 1 lb beef sirloin: Thinly sliced against the grain for tenderness. You can also use flank steak or even chicken for a different protein.
  • 2 tablespoons cornstarch: This helps to coat the beef, giving it a crispy texture when cooked.
  • 2 tablespoons vegetable oil: For frying. Feel free to substitute with sesame oil for added flavor.
  • Colorful Vegetables: Include 1 red bell pepper, 1 green bell pepper, 1 cup broccoli florets, and 1 carrot, all sliced for even cooking. You can also toss in snap peas, zucchini, or mushrooms!
  • 3 cloves garlic and 1 teaspoon fresh ginger: Fresh is best for a burst of flavor. Mince the garlic and grate the ginger for maximum impact.
  • 1/3 cup soy sauce: The star of the sauce! Use low-sodium soy sauce to keep it healthier.
  • 2 tablespoons oyster sauce: This adds depth and umami to the dish.
  • 1 tablespoon brown sugar: To balance the savory flavors. You can swap this for honey if you prefer.
  • 1 tablespoon sesame oil: For that delicious, nutty flavor.
  • 1/2 cup beef broth: Adds moisture and richness to the sauce.
  • 1 tablespoon cornstarch mixed with 2 tablespoons cold water: This slurry will help thicken your sauce.

How to Make This Beef Stir Fry

Side angle of juicy beef stir fry with bell peppers and broccoli.

Now that we have our ingredients, let’s jump into the step-by-step process:

  • Step 1: Prep Everything First
    Before turning on the stove, get all your ingredients prepped. Slice your beef thinly against the grain—this helps it stay tender. Toss it with cornstarch and set aside while you chop your vegetables. Trust me, once the cooking starts, it goes fast!
  • Step 2: Mix the Sauce
    In a small bowl, whisk together soy sauce, oyster sauce, brown sugar, sesame oil, and beef broth. Stir in your cornstarch slurry and set it aside—this is going to bring the whole dish together!
  • Step 3: Sear the Beef
    Heat 1 tablespoon of oil in a large skillet or wok over medium-high heat. Add the beef in a single layer—don’t overcrowd the pan! Cook for about 2-3 minutes until browned, then remove and set aside.
  • Step 4: Stir Fry the Veggies
    In the same pan, add the remaining tablespoon of oil. Toss in the garlic and ginger, stirring just until fragrant—about 30 seconds. Add your onions, carrots, and broccoli. Stir fry for 2-3 minutes, then toss in the bell peppers. Cook for another 2-3 minutes until the veggies are crisp-tender.
  • Step 5: Bring It All Together
    Return the beef to the skillet and pour in the sauce. Toss everything together and let it cook for another 2-3 minutes, until the sauce thickens and beautifully coats the meat and veggies.
  • Step 6: Serve and Enjoy
    Serve hot over steamed rice, noodles, or even cauliflower rice for a low-carb option. Sprinkle some sesame seeds or sliced green onions on top if you’re feeling fancy!

Pro Tips for the Perfect Stir Fry

  • Prep Ahead: Chop your vegetables and marinate your beef early. This makes the cooking process much smoother!
  • High Heat is Key: Ensure your pan is hot enough to sear the beef quickly, locking in juices and flavor.
  • Don’t Overcrowd: Cook the beef in batches if necessary. Overcrowding leads to steaming rather than searing.
  • Fresh Ingredients: Use fresh garlic and ginger for the best flavor—dried spices won’t cut it!
  • Adjust to Taste: Feel free to tweak the sauce ingredients to suit your taste. Want it sweeter? Add more sugar. Need more umami? A splash of fish sauce works wonders.
  • Use a Wok: If you have one, a wok is ideal for stir frying because it heats evenly and retains heat well.
  • Keep It Moving: Stir constantly during cooking to prevent burning and to allow for even cooking.
  • Garnish for Flair: A sprinkle of sesame seeds or fresh herbs can brighten up your dish visually and flavor-wise!

Common Mistakes and Troubleshooting

Even the best chefs make mistakes! Here are some common pitfalls to avoid:

  • Overcooked Vegetables: Aim for a crisp-tender texture. If they’re mushy, you’ve cooked them too long.
  • Too Much Sauce: If your stir fry is swimming in sauce, it’s likely too much. Always start with less and add more as needed.
  • Beef Not Tender Enough: Make sure you slice against the grain and let it marinate in cornstarch to keep it tender.
  • Burnt Garlic: Garlic cooks quickly! If it turns brown, it will taste bitter. Keep an eye on it!

Delicious Variations to Try

Want to mix things up? Check out these fun variations:

  • Teriyaki Beef Stir Fry: Swap the soy sauce for teriyaki sauce for a sweeter twist!
  • Spicy Beef Stir Fry: Add some red pepper flakes or Sriracha for a spicy kick!
  • Vegetarian Option: Replace the beef with tofu or tempeh for a plant-based version that’s just as filling.
  • Asian Noodle Stir Fry: Toss in cooked noodles instead of serving over rice for a hearty meal!

Storage and Make-Ahead Instructions

This stir fry is perfect for meal prep! Here’s how to store it:

  • Refrigerate: Store leftovers in an airtight container for up to 3 days. Reheat in the microwave or on the stove until warmed through.
  • Freezing: Freeze in portions for up to 2 months. Thaw overnight in the fridge before reheating.
  • Make-Ahead: You can chop your veggies and marinate the beef a day in advance. Just cook it up when you’re ready!

Frequently Asked Questions

Got questions? We’ve got answers!

  • Can I use frozen vegetables?
    Yes! Just make sure to thaw and drain them well before adding to the stir fry.
  • What if I don’t have beef broth?
    You can use water or vegetable broth as a substitute.
  • Can I make this stir fry gluten-free?
    Absolutely! Use tamari instead of soy sauce and ensure your oyster sauce is gluten-free.
  • Is this dish low-carb?
    Yes! Serve it over cauliflower rice or enjoy it alone for a low-carb meal!
  • How can I add more protein?
    Add extra beef or incorporate some edamame for a protein boost.
  • Can I use other cuts of beef?
    Yes! Flank steak or ribeye also work well in this recipe.
  • How do I know when the beef is cooked?
    It should be browned on the outside and slightly pink on the inside. Aim for medium rare to avoid toughness.
  • What sides pair well?
    Serve with steamed veggies, jasmine rice, or a light salad for a complete meal!

Nutrition Tips and Dietary Adaptations

Eating healthy doesn’t have to be dull! Here are some tips:

  • Boost the Fiber: Add more vegetables like spinach, kale, or mushrooms for extra fiber and nutrients.
  • Swap for Whole Grains: Use brown rice or quinoa instead of white rice for added fiber and protein.
  • Lower the Sodium: Opt for low-sodium soy sauce and broth to keep your meal heart-healthy.
  • Include Healthy Fats: A sprinkle of nuts or seeds can add healthy fats and crunch!

Essential Equipment Recommendations

To make your beef stir fry experience seamless, consider these tools:

  • Wok or Large Skillet: For even heat distribution, a wok is ideal, but a heavy skillet works too.
  • Sharp Knife: A good knife is essential for slicing beef and vegetables quickly and efficiently.
  • Cutting Board: A sturdy cutting board will make your prep work easier.
  • Measuring Cups and Spoons: For accurate ingredient measurements.

Serving Suggestions

Finish off your beef stir fry with some creative serving ideas:

  • Garnish: Top with sesame seeds or sliced green onions for a pop of color and flavor.
  • Serve with Sides: Pair with steamed rice, noodles, or a fresh salad for a well-rounded meal.
  • Enjoy with Sauce: Serve with extra soy sauce or your favorite hot sauce on the side for those who like it spicy!

Final Thoughts

There you have it—everything you need to create a mouthwatering Beef Stir Fry that will wow your taste buds and impress your family! Cooking can be fun, exciting, and stress-free, and this recipe is a perfect example. So grab your ingredients, heat up that pan, and let’s make magic happen in the kitchen!

Beef Stir Fry with Vegetables

Prep Time 15 minutes
Cook Time 10 minutes
Total Time 25 minutes
Servings 4 servings
Calories 450
A quick and flavorful beef stir fry loaded with colorful vegetables, perfect for a weeknight dinner.

Ingredients

Meat

  • 1 lb beef sirloin, thinly sliced against the grain
  • 2 tablespoons cornstarch
  • 2 tablespoons vegetable oil

Vegetables

  • 1 red bell pepper, sliced red bell pepper (sliced)
  • 1 green bell pepper, sliced green bell pepper (sliced)
  • 1 cup broccoli florets
  • 1 carrot, thinly sliced carrot (thinly sliced)
  • 1 small yellow onion, sliced yellow onion (sliced)
  • 3 cloves garlic, minced garlic (minced)
  • 1 teaspoon fresh ginger, grated
  • 1/3 cup soy sauce
  • 2 tablespoons oyster sauce
  • 1 tablespoon brown sugar
  • 1 tablespoon sesame oil
  • 1/2 cup beef broth
  • 1 tablespoon cornstarch mixed with water (slurry)

Instructions 

  • Prep all ingredients: slice beef thinly, toss with cornstarch, and chop vegetables.
  • Mix soy sauce, oyster sauce, brown sugar, sesame oil, beef broth, and cornstarch slurry to make the sauce.
  • Heat oil in a skillet, sear beef for 2-3 minutes until browned, then remove.
  • Stir fry garlic and ginger, then add vegetables and cook until crisp-tender, about 2-3 minutes.
  • Return beef to pan, add sauce, and cook 2-3 minutes until thickened. Serve hot.

Notes

Serve over rice or noodles for a complete meal.
Calories: 450kcal
Cost: $15
Course: Main Course
Cuisine: Asian
Keyword: Beef, Stir-Fry, Vegetables

Unleash Flavor: Your Guide to Thai Coconut Red Curry with Steak

Welcome to a culinary adventure where the vibrant flavors of Thai cuisine meet the succulence of steak! Prepare to delight your taste buds with this Thai Coconut Red Curry with Steak, a quick and nourishing dish that turns your dinner into a sensational experience. This dish brings together tender beef, creamy coconut milk, and aromatic spices for a meal that’s not just nutritious but also bursting with flavor. Ready to dive in? Let’s get cooking!

Why You’ll Love This Recipe

  • Quick and Easy: Perfect for busy weeknights, this dish can be whipped up in under 30 minutes!
  • Flavor Explosion: The combination of coconut milk and red curry paste creates a rich and aromatic sauce that’s simply irresistible.
  • Versatile Ingredients: Use whatever veggies you have on hand or swap out the steak for chicken or tofu!
  • Healthy Comfort Food: Packed with protein and healthy fats, this curry is both satisfying and nutritious.
  • One-Pan Wonder: Minimize cleanup time with this simple yet flavorful one-pan recipe.

Ingredient Breakdown

Let’s get to the heart of the dish! Here’s what you’ll need to make this Thai Red Curry Beef:

  • 1 Pre Top Sirloin: Thinly sliced, it absorbs the flavors beautifully. You can substitute with flank steak or chicken if desired.
  • 1 tbsp Grapeseed Oil: This oil has a high smoke point, making it ideal for sautéing. Olive oil is a great alternative.
  • 6 Basil Leaves: Fresh basil adds a fragrant touch. Thai basil is particularly delightful if you can find it.
  • 1 can Full-Fat Coconut Milk: Creamy and rich, it’s essential for that luscious sauce. Light coconut milk can be used for a lower-calorie option.
  • 2 tbsp Red Curry Paste: This is the star of the show! Adjust the amount for spice levels.
  • 1 inch Ginger: Fresh ginger adds warmth and a hint of spice. Ground ginger can substitute in a pinch.
  • 1 Lime, juiced: Fresh lime juice brightens up the dish.
  • 1 Onion: Thinly sliced, it adds sweetness and depth.
  • 1 Red Bell Pepper: Adds crunch and color. Feel free to mix in other veggies like zucchini or snap peas.
  • 1 clove Garlic: Minced for that aromatic base.
  • 1/2 cup Broth: Vegetable or chicken broth works well to enhance flavor.

Pro Tips for Perfecting Your Curry

  • Slice Thin: Ensure your steak is sliced very thinly against the grain for tenderness.
  • Prep Ahead: Chop your vegetables and measure out your ingredients before cooking to streamline the process.
  • Adjust Spice: Taste as you go! Add more curry paste for a spicier kick.
  • Let it Simmer: Allow the curry to simmer for at least five minutes to meld the flavors.
  • Fresh Herbs: Garnish with additional fresh herbs like cilantro for an extra flavor boost.
  • Serving Temperature: Serve hot over rice or noodles for the best experience.
  • Storage: This curry keeps well in the fridge. Store in an airtight container for up to 3 days.
  • Garnish Smart: Top with lime wedges and chopped scallions before serving.

Common Mistakes and Troubleshooting

Even the best chefs make mistakes! Here are some common pitfalls and how to avoid them:

  • Overcooking the Meat: Cook the steak just until it’s no longer pink to keep it tender.
  • Too Thick or Too Thin: If your sauce is too thick, add more broth or coconut milk. If it’s too thin, let it simmer longer.
  • Not Enough Flavor: Always taste as you go and adjust seasoning with salt, lime, or additional curry paste.
  • Burnt Garlic: Add garlic towards the end of sautéing to prevent it from burning.

Variations to Try

Feeling adventurous? Here are some fun twists on the classic:

  • Vegetable Delight: Replace steak with a variety of your favorite vegetables like broccoli, carrots, and mushrooms.
  • Coconut Curry Chicken: Substitute steak for chicken breast or thighs for a different protein.
  • Spicy Shrimp Curry: Add shrimp instead of beef for a quick-cooking seafood option.
  • Vegan Version: Use tofu or chickpeas and substitute vegetable broth for a hearty plant-based dish.

Storage and Make-Ahead Instructions

This Thai Coconut Red Curry is perfect for meal prep! Here’s how to store and reheat it:

  • Refrigeration: Store leftovers in an airtight container for up to 3 days.
  • Freezing: This curry can be frozen for up to 2 months. Thaw in the refrigerator overnight before reheating.
  • Reheating: Gently reheat on the stove over low heat, adding a splash of broth if needed.

Frequently Asked Questions

Got questions? Here’s what you need to know:

  • Can I use low-fat coconut milk? Yes, but it will affect the creaminess of the sauce.
  • How can I make it spicier? Add more red curry paste or include fresh chili peppers.
  • What should I serve with it? Serve over jasmine rice, quinoa, or rice noodles to soak up all that delicious sauce.
  • Can I make this in advance? Yes, the flavors intensify when made ahead of time!
  • What if I don’t have red curry paste? You can make a homemade version or substitute with green curry paste.
  • Is this recipe gluten-free? Yes! Just ensure your broth is gluten-free.
  • What’s the best way to store leftovers? In an airtight container in the fridge or freezer.
  • How long does this dish last? Up to 3 days in the fridge or 2 months in the freezer.

Nutrition Tips and Dietary Adaptations

This dish is not just delicious; it’s also packed with nutrients!

  • Protein-Rich: The steak provides a great source of protein to fuel your day.
  • Healthy Fats: Coconut milk offers healthy fats that can help you feel full and satisfied.
  • Low-Carb Option: Serve over steamed vegetables instead of rice for a lower-carb meal.

Essential Equipment Recommendations

Here’s what you’ll need to make this recipe a success:

  • Large Skillet: A sturdy skillet is ideal for sautéing and simmering.
  • Sharp Knife: For easy slicing of meat and veggies, a sharp knife is essential.
  • Wooden Spoon: Use to stir and scrape up those delicious bits from the pan.

Serving Suggestions

Bring your dish to life with these serving ideas:

  • Garnish: Fresh lime wedges and chopped cilantro make perfect garnishes.
  • Pairing: Serve with a light salad or steamed greens for a balanced meal.
  • Rice Options: Try jasmine rice, brown rice, or cauliflower rice for a healthier base.

In conclusion, making a Thai Coconut Red Curry with Steak is not only simple but also a delightful way to infuse your dinner with exciting flavors! With this comprehensive guide, you’re now equipped to create a dish that’s not just nourishing but also a feast for the senses. So grab your ingredients, roll up your sleeves, and get ready to impress yourself and your loved ones with this vibrant culinary experience!

Thai Coconut Red Curry with Steak

Prep Time 10 minutes
Cook Time 15 minutes
Total Time 25 minutes
Servings 4 servings
Calories 450
A flavorful Thai-inspired dish featuring tender steak in a rich coconut curry sauce, perfect for a quick and satisfying meal.

Ingredients

Protein

  • 1 piece Pre Top Sirloin, sliced very thin

Oil

  • 1 tbsp grapeseed oil

Herbs & Spices

  • 6 leaves basil leaves

Canned Goods

  • 1 can full-fat coconut milk
  • 2 tbsp Red curry paste

Fresh Produce

  • 1 inch ginger
  • 1 piece lime, juiced
  • 1 piece onion, thinly sliced
  • 1 red bell pepper, thinly sliced
  • 1 clove garlic, minced

Broth

  • 1/2 cup broth

Instructions 

  • Heat oil in a skillet over medium-high heat. Sauté onion until translucent, then add red pepper, ginger, and garlic; cook until softened.
  • Add curry paste and salt; stir to combine. Pour in broth and simmer, scraping up bits.
  • Stir in basil leaves, lime juice, and coconut milk; bring to a boil, then simmer for 5 minutes.
  • Add steak slices and cook until just done. Season with salt and pepper.
  • Remove from heat and serve with rice or greens. Enjoy!

Notes

Use thinly sliced sirloin for quick cooking and tender results.
Calories: 450kcal
Cost: $15
Course: Main Course
Cuisine: Thai
Keyword: Steak

Dive into the Comfort of Beef Stroganoff

Welcome to a culinary adventure where rich flavors and heartwarming comfort unite! Beef Stroganoff is a classic dish that brings together tender strips of beef, earthy mushrooms, and a creamy sauce, all served over a bed of egg noodles. Whether you’re planning a cozy dinner at home or looking to impress friends with your cooking skills, this dish is a showstopper! With this comprehensive guide, you’ll learn how to create the ultimate Beef Stroganoff that’s not just delicious but also easy to prepare. Let’s get started!

Why You’ll Love This Recipe

This Beef Stroganoff recipe is not just a meal; it’s an experience! Here’s why you’ll adore it:

  • Quick and Easy: With a total prep and cook time of just under an hour, this dish is perfect for busy weeknights.
  • Flavor-Packed: The combination of sautéed mushrooms and a creamy sauce elevates the taste to a whole new level.
  • Comfort Food: It’s the ideal dish for cozy nights, filling your home with warm aromas and your belly with satisfaction.
  • Customizable: Easily adapt the recipe to suit dietary needs or personal preferences, making it versatile for everyone.
  • Leftover Friendly: This dish tastes even better the next day, making it great for meal prep or leftovers!

Essential Ingredients and Their Roles

To create the best Beef Stroganoff, you’ll need the following ingredients:

  • 1 pound boneless sirloin or tenderloin steak: Tender cuts provide the best texture and flavor.
  • 8 ounces fresh mushrooms: Button or cremini mushrooms add an earthy depth.
  • 1 medium onion: Sweet onions caramelize beautifully, enhancing the dish’s overall flavor.
  • 2 cloves garlic: Fresh garlic adds aromatic undertones.
  • 1 cup sour cream: This is the creamy component that elevates the sauce.
  • 1 cup low-sodium beef broth: A flavorful base that enriches the sauce.
  • 1 tablespoon Worcestershire sauce: Adds a savory depth that complements the beef.
  • 1 tablespoon all-purpose flour: Helps to thicken the sauce and create a silky texture.
  • 8 ounces egg noodles: The traditional base for serving this dish, but you can substitute with rice or gluten-free noodles.

Preparation Steps for Your Beef Stroganoff

Side view of a hearty Beef Stroganoff dish, showcasing tender beef and mushrooms in a rich sauce.

Ready to bring your Beef Stroganoff to life? Follow these steps:

  1. Sauté chopped onions in olive oil until translucent (about 3-4 minutes). Add minced garlic and cook for an additional minute.
  2. Incorporate sliced mushrooms and cook until softened, stirring occasionally (around 5-6 minutes).
  3. Remove the vegetables from the skillet and set aside. In the same skillet, brown the sliced beef over medium-high heat until seared but not fully cooked (about 3-4 minutes).
  4. Create a roux by adding flour to the skillet, stirring for about 1 minute. Gradually pour in beef broth and Worcestershire sauce, stirring until smooth.
  5. Reduce heat to low, then add sour cream, stirring until well combined. Return the beef and vegetables to the skillet, simmering for a few minutes to meld the flavors.
  6. Serve over cooked egg noodles, garnished with fresh parsley or chives if desired.

Expert Tips for the Perfect Beef Stroganoff

Maximize your cooking game with these pro tips:

  • Use a cast-iron skillet: This helps to achieve a perfect sear on your beef.
  • Slice against the grain: This ensures your beef is tender and easy to chew.
  • Adjust sour cream: For a lighter sauce, use Greek yogurt as a substitute for some or all of the sour cream.
  • Let it simmer: Allowing the dish to simmer gently melds the flavors beautifully.
  • Experiment with mushrooms: Try adding a mix of different mushrooms for a more complex flavor.
  • Keep it low and slow: Avoid cooking on high heat to prevent tough meat.
  • Garnish wisely: Fresh herbs like parsley or dill can brighten the dish and add visual appeal.
  • Make it cheesy: Consider adding a sprinkle of Parmesan cheese for an extra layer of flavor.

Avoid Common Mistakes

Steer clear of these common pitfalls:

  • Overcooking the beef: This can lead to tough, chewy meat. Only sear it until browned.
  • Skipping the roux: This step is crucial for a creamy, thick sauce. Don’t rush it!
  • Using high-sodium broth: Opt for low-sodium beef broth to control the saltiness of your dish.
  • Too much heat: Cook over medium heat to prevent burning the sauce.

Delicious Variations to Try

Feeling adventurous? Here are some fun variations:

  • Vegetarian Stroganoff: Substitute beef with hearty mushrooms and add lentils for protein.
  • Spicy Kick: Add some crushed red pepper flakes for a little heat.
  • Herb-infused: Incorporate fresh thyme or rosemary for a fragrant touch.
  • One-Pot Wonder: Combine all ingredients in a slow cooker for a hands-off approach.

Storage and Make-Ahead Instructions

Want to enjoy your Beef Stroganoff later? Here’s how:

  • Refrigerator: Store leftovers in an airtight container for up to 3 days.
  • Freezer: Freeze in portions for up to 3 months. Thaw overnight in the fridge before reheating.
  • Reheating: Gently reheat on the stovetop over low heat, adding a splash of broth to loosen the sauce.

Frequently Asked Questions

Here are some common questions about Beef Stroganoff:

  • Can I use ground beef? Yes, ground beef works; just adjust the cooking time accordingly.
  • What can I serve with Beef Stroganoff? It’s great with crusty bread, salad, or steamed vegetables.
  • Is it suitable for freezing? Absolutely! Just remember to store it correctly.
  • Can I make it gluten-free? Yes, use gluten-free flour and noodles.
  • How can I make it dairy-free? Substitute sour cream with coconut cream or cashew cream.
  • What’s the best way to reheat leftovers? Gently reheat on the stove with added broth to keep it creamy.
  • Can I add more vegetables? Definitely! Peas, bell peppers, or spinach can enhance the dish.
  • How spicy is this recipe? It’s not spicy, but feel free to add heat to your liking!

Nutritional Tips and Dietary Adaptations

For those watching their nutrition, here are some tips:

  • Reduce calories: Use lean cuts of beef and low-fat sour cream.
  • Boost fiber: Serve with a side of steamed veggies or a mixed green salad.
  • Control portions: Serve smaller portions over a generous bed of veggies for a lighter meal.

Equipment Recommendations

Here’s what you need to whip up this delicious dish:

  • Cast Iron Skillet: Perfect for searing meat and creating a rich sauce.
  • Wooden Spoon: Ideal for stirring without scratching your skillet.
  • Measuring Cups and Spoons: Accurate measurements are key for great flavor.
  • Cutting Board and Knife: Essential for prepping your ingredients.

Serving Suggestions

To make your meal even more inviting, consider these serving ideas:

  • Garnish: Sprinkle fresh herbs over the top for a pop of color.
  • Side Dishes: Pair with a crisp green salad or roasted vegetables to balance the richness.
  • Wine Pairing: A nice red wine, like Merlot or Cabernet Sauvignon, complements the dish beautifully.

Conclusion: Your Beef Stroganoff Awaits!

Now you’re equipped with everything you need to create a mouthwatering Beef Stroganoff that’s sure to impress! This dish is all about comfort, flavor, and creativity in the kitchen. Embrace the joy of cooking and enjoy every rich, creamy bite. So grab your ingredients, channel your inner chef, and let the cooking magic begin!

Authentic Beef Stroganoff Recipe for Comfort Food Lovers

Prep Time 10 minutes
Cook Time 20 minutes
Total Time 30 minutes
Servings 4 servings
Calories 550
A classic and hearty dish perfect for cozy nights, combining tender beef, mushrooms, and a creamy sauce served over noodles.

Ingredients

Meat

  • 1 pound boneless sirloin or tenderloin steak

Vegetables

  • 8 ounces fresh mushrooms (button or cremini)
  • 1 medium onion
  • 2 cloves garlic (minced)

Dairy

  • 1 cup sour cream

Broth

  • 1 cup low-sodium beef broth

Sauces & Condiments

  • 1 tablespoon Worcestershire sauce
  • 1 tablespoon all-purpose flour

Noodles

  • 8 ounces egg noodles

Instructions 

  • Sauté chopped onions in olive oil until translucent. Add minced garlic and cook for another minute.
  • Add sliced mushrooms and cook until softened. Remove vegetables and set aside.
  • Brown sliced beef in the same skillet until seared but not fully cooked.
  • Create a roux with flour, then add beef broth, Worcestershire sauce, and sour cream, stirring until smooth.
  • Return beef and vegetables to the skillet, simmer for a few minutes to combine flavors. Serve over cooked egg noodles.

Notes

For a richer flavor, use full-fat sour cream and sear the beef well.
Calories: 550kcal
Cost: $15
Course: Main Course
Cuisine: Russian
Keyword: Beef, Comfort Food

Elevate Your Grilling Game with Bang Bang Chicken Skewers!

Welcome to the ultimate guide on making mouthwatering Bang Bang Chicken Skewers that are guaranteed to pack a flavor punch! If you’re looking to spice up your next cookout or simply want to indulge in a delicious and healthy meal at home, you’ve come to the right place. These skewers are not just about taste; they are about making healthy cooking exciting and accessible. In this article, we’ll dive deep into the world of Bang Bang Chicken Skewers, exploring everything from ingredients to variations, pro tips, and more. Get ready to unleash your inner chef and make mealtime a delightful experience!

In under 30 minutes, you can transform simple ingredients into a dish that dazzles both the eyes and the palate. Perfect for summer BBQs, picnics, or a quick weeknight dinner, these skewers will become your go-to recipe for any occasion!

Why You’ll Love This Recipe

  • Flavor Explosion: The creamy, spicy bang bang sauce beautifully balances sweet and spicy notes, ensuring a crowd-pleasing dish every time.
  • Quick and Easy: You can whip these skewers up in just about 20 minutes, making them perfect for busy weeknights or last-minute gatherings.
  • Versatile Cooking Options: Whether you prefer grilling, air-frying, or baking, these skewers work wonderfully with any method.
  • Healthy and Nutritious: Packed with protein and made with fresh ingredients, these skewers are a guilt-free option for any meal.
  • Customizable: The recipe is flexible, allowing you to adjust the spices and ingredients to suit your taste or dietary needs.

Ingredients You’ll Need

To create these tasty Bang Bang Chicken Skewers, gather the following ingredients:

  • 1.5 lbs boneless, skinless chicken breasts or thighs: Cut into 1 to 1.5-inch chunks. Thighs offer a juicier bite, while breasts are leaner.
  • 1 tablespoon olive oil: Helps to keep the chicken moist and adds flavor.
  • 1 teaspoon salt: Essential for enhancing the natural flavor of the chicken.
  • ½ teaspoon black pepper: Adds a mild kick.
  • ½ teaspoon garlic powder (optional): For an extra layer of flavor.
  • ½ teaspoon smoked paprika (optional): Infuses a subtle smokiness.
  • 8-10 skewers: Use wooden or metal skewers; soak wooden skewers in water for at least 30 minutes to prevent burning.
  • ½ cup mayonnaise: For the creamy base of the bang bang sauce. You can substitute with ¼ cup mayo + ¼ cup Greek yogurt for a lighter version.
  • 2 tablespoons sriracha: Adjust to taste for desired heat level.
  • 1 tablespoon honey (or sugar): Adds sweetness to balance the spice.
  • 1 tablespoon rice vinegar (or lime juice): Provides acidity and brightness.
  • 1 tablespoon chopped green onions: For garnish and added flavor.
  • 1 teaspoon sesame seeds: Adds a delightful crunch.

Pro Tips for Making Bang Bang Chicken Skewers

Juicy chicken skewers drizzled with sauce, garnished with green onions and sesame seeds.
  • Marinate the Chicken: If you have time, marinating the chicken in olive oil, salt, pepper, and spices for at least 30 minutes will enhance the flavor.
  • Don’t Overcrowd the Skewers: Leave some space between the pieces of chicken to ensure even cooking.
  • Use a Meat Thermometer: Ensure the chicken is cooked through to an internal temperature of 165°F for safe consumption.
  • Adjust the Sauce to Suit Your Taste: Feel free to tweak the ingredients of the bang bang sauce to suit your preferences. Add more sriracha for heat or more honey for sweetness.
  • Focus on Garnishing: A sprinkle of chopped green onions and sesame seeds at the end can elevate the dish visually and in flavor.
  • Experiment with Cooking Methods: Try grilling for a smoky flavor, air-frying for a crispy texture, or baking for an easy, hands-off approach.
  • Make Ahead: You can prep the skewers in advance and store them in the fridge until ready to cook.
  • Save Leftovers: Store any leftover skewers in an airtight container in the fridge for up to three days.

Common Mistakes and Troubleshooting

Even the best chefs make mistakes, so here are some common pitfalls to avoid:

  • Skipping Soaking Wooden Skewers: Always soak wooden skewers to prevent them from burning on the grill.
  • Not Preheating the Grill: Ensure your grill is hot before adding the skewers for the best sear.
  • Overcooking the Chicken: Keep a close eye on cooking time; remove the chicken once it reaches the safe internal temperature.
  • Not Adjusting Sauce Ingredients: Don’t hesitate to modify the sauce to match your taste preferences.

Variations to Try

Here are some fun twists to make this recipe your own:

  • Vegetarian Option: Substitute chicken with tofu or tempeh for a plant-based version.
  • Spicy Bang Bang Shrimp: Use shrimp instead of chicken for a seafood twist.
  • Asian-Inspired Skewers: Add pineapple chunks or bell peppers for extra flavor and nutrition.
  • Herb-Infused: Add fresh herbs like cilantro or basil to the marinade for a fragrant touch.

Storage and Make-Ahead Instructions

If you want to prepare these skewers in advance, follow these tips:

  • Make Ahead: Assemble the skewers and store them in an airtight container in the fridge for up to 24 hours before cooking.
  • Leftovers: Store any leftover cooked skewers in the refrigerator for up to 3 days. Reheat in the microwave or on the grill until warmed through.
  • Freezing: You can freeze uncooked skewers for up to 3 months. Thaw in the fridge before cooking.

FAQs

Here are some common questions regarding Bang Bang Chicken Skewers:

  • Can I use store-bought bang bang sauce? Yes, you can use store-bought sauce for convenience, but homemade offers a fresher taste.
  • How spicy are these skewers? The spice level can be adjusted based on the amount of sriracha used in the sauce.
  • Can I cook these skewers in the oven or air fryer? Absolutely! Bake in a preheated oven at 400°F for 15-20 minutes or air fry for about 10-12 minutes.
  • How long do leftovers last? Store leftovers in an airtight container in the fridge for up to 3 days.
  • What can I serve with Bang Bang Chicken Skewers? Pair them with rice, a fresh salad, or grilled vegetables for a complete meal.
  • Can these skewers be made gluten-free? Yes, simply ensure that any sauce or condiments used are gluten-free.
  • How do I know when the chicken is done? Use a meat thermometer to check that the internal temperature has reached 165°F.
  • Can I make these skewers ahead of time? Yes, you can prepare the skewers a day in advance and store them in the fridge until cooking.

Nutrition Tips and Dietary Adaptations

These skewers are not only delicious but also nutritious! Here are some tips to make them even healthier:

  • Lean Protein: Use chicken thighs for juiciness or chicken breasts for lower fat content.
  • Healthy Fats: Olive oil is a heart-healthy choice for marinating the chicken.
  • Lower Calorie Options: Substitute mayonnaise with Greek yogurt to reduce calories and add protein.
  • Fresh Vegetables: Add bell peppers, onions, or zucchini to the skewers for extra vitamins and fiber.

Equipment Recommendations

To make the process smoother, consider using the following tools:

  • Grill or Grill Pan: For that delicious char and smoky flavor.
  • Meat Thermometer: To ensure perfectly cooked chicken every time.
  • Skewers: Choose between wooden or metal; just soak wooden skewers beforehand.
  • Mixing Bowl: For combining spices and marinating chicken.

Serving Suggestions

Make your meal complete with these serving ideas:

  • Fresh Salad: A light salad with greens and a vinaigrette pairs beautifully with the skewers.
  • Rice or Quinoa: Serve over rice or quinoa to soak up the fantastic bang bang sauce.
  • Grilled Vegetables: Add seasonal grilled vegetables to your plate for a colorful, nutritious side.
  • Wraps: Use the chicken skewers in wraps with lettuce and sauce for a fun handheld meal.

There you have it! An in-depth guide to making the most delicious Bang Bang Chicken Skewers that will impress your friends and family. Remember, cooking should be fun, and this recipe embodies that spirit! So grab your ingredients and get ready to grill up some joy!

Bang Bang Chicken Skewers Recipe

Prep Time 15 minutes
Cook Time 10 minutes
Total Time 25 minutes
Servings 4 servings
Calories 350
Enjoy these flavorful grilled chicken skewers coated in a spicy, creamy sauce, perfect for a quick and delicious meal or appetizer.

Ingredients

Chicken

  • 1.5 lbs boneless, skinless chicken breasts or thighs (cut into 1 to 1.5-inch chunks)
  • 1 tablespoon olive oil
  • 1 teaspoon salt
  • ½ teaspoon black pepper
  • ½ teaspoon garlic powder (optional)
  • ½ teaspoon smoked paprika (optional)
  • 8-10 skewers wooden or metal skewers (soak wooden skewers in water if using)
  • ½ cup mayonnaise (or use ¼ cup mayo + ¼ cup Greek yogurt for a lighter option)
  • 2 tablespoons sriracha (adjust to taste)
  • 1 tablespoon honey (or sugar)
  • 1 tablespoon rice vinegar (or lime juice)
  • 1 tablespoon chopped green onions
  • 1 teaspoon sesame seeds

Instructions 

  • Preheat grill and soak skewers if wooden.
  • Thread chicken chunks onto skewers and season with salt, pepper, garlic powder, and paprika.
  • Grill skewers until cooked through, about 8-10 minutes.
  • Mix mayonnaise, sriracha, honey, rice vinegar, green onions, and sesame seeds to make the sauce.
  • Brush the cooked skewers with the spicy sauce and serve garnished with additional green onions and sesame seeds.

Notes

Soak wooden skewers in water for at least 30 minutes to prevent burning.
Calories: 350kcal
Cost: $15
Course: Main Course
Cuisine: Asian
Keyword: Chicken, Skewers, Spicy