Author

Ryan

Browsing

Elevate Your Salad Game with a Grilled Peach Salad Experience

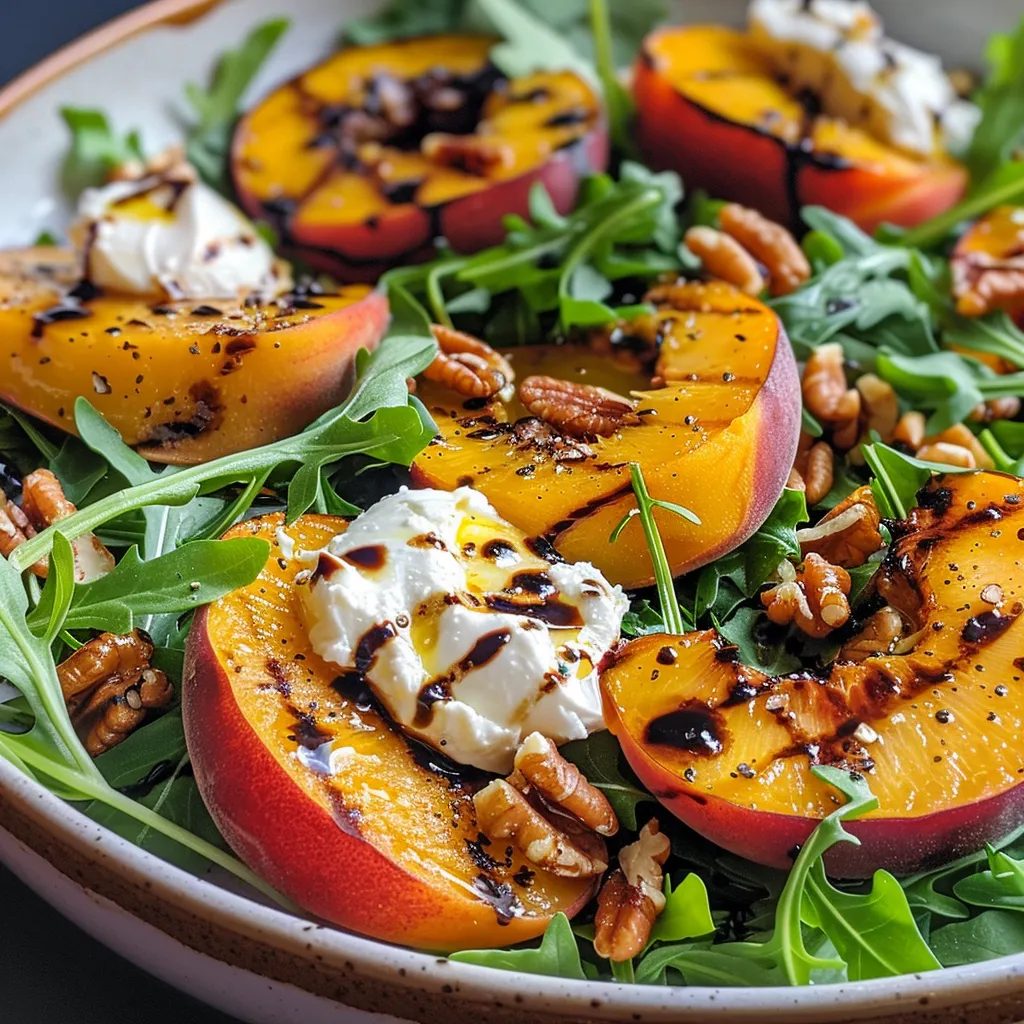
Are you ready to transform your summer meals into vibrant culinary adventures? Say hello to the Grilled Peach Salad with Arugula and Burrata! This dish is not just a salad; it’s a celebration of flavors that brings together the sweetness of grilled peaches, the peppery kick of arugula, and the creamy indulgence of burrata. Perfect for summer get-togethers or a refreshing weeknight dinner, this salad will awaken your taste buds and inspire your kitchen creativity!

Why You’ll Love This Recipe

This recipe is a delightful way to enjoy fresh ingredients while keeping your meals healthy and satisfying. Here are five reasons why this grilled peach salad should be on your menu:

  • Deliciously Balanced Flavors: The sweet, caramelized peaches perfectly complement the peppery arugula and creamy burrata, creating a symphony of tastes that dance on your palate.
  • Quick and Easy Preparation: With just a few simple steps, you can whip up this salad in under 30 minutes, making it an ideal choice for busy weeknights.
  • Nutrition Packed: Featuring fresh fruits and greens, this salad is rich in vitamins, fiber, and healthy fats, making it a guilt-free indulgence.
  • Versatile and Customizable: Feel free to swap out ingredients based on your preferences or what you have on hand—this recipe adapts beautifully!
  • Perfect for Any Occasion: Whether it’s a casual lunch, a fancy dinner party, or a backyard barbecue, this salad fits right in!

Ingredient Breakdown

Let’s dive into what you’ll need to create this masterpiece. Here’s a detailed breakdown of the ingredients:

  • 4 ripe peaches: Choose peaches that are slightly soft to the touch for the best grilling experience.
  • 6 cups arugula: This peppery green adds a delightful zing and is packed with nutrients.
  • 8 ounces burrata cheese: Creamy and rich, burrata elevates the texture of the salad.
  • 1/4 cup walnuts: Toasted for a crunchy contrast, walnuts also provide healthy fats.
  • 1/4 cup balsamic glaze: A drizzle of this adds a sweet-tart flavor that ties everything together.
  • Olive oil: Essential for grilling to prevent sticking and enhance the caramelization of the peaches.
  • Salt and pepper: Simple seasonings that elevate the natural flavors of the ingredients.

Substitutions: If you’re looking for alternatives, try using feta cheese instead of burrata for a tangy twist. Pecans can replace walnuts, and spinach can be a fantastic substitute for arugula.

Pro Tips for Success

A delicious grilled peach salad with fresh arugula, burrata, and toasted walnuts.

To ensure your grilled peach salad turns out perfectly every time, consider these pro tips:

  • Preheat the grill: Make sure your grill is at medium heat to avoid burning the peaches while getting those beautiful grill marks.
  • Oil the grill grates: Prevent sticking by brushing the grates with olive oil before placing the peaches on them.
  • Cool the peaches slightly: After grilling, let the peaches cool for a minute before adding them to the salad to maintain their shape.
  • Mix ingredients gently: When tossing the salad, do it gently to keep the burrata intact and ensure even distribution of flavors.
  • Season to taste: Adjust the seasoning with salt and pepper after adding the balsamic glaze to make sure you get the perfect balance.
  • Experiment with flavors: Add fresh herbs, such as basil or mint, for an extra layer of flavor.
  • Toast the walnuts: A quick toast enhances their flavor and crunch—don’t skip this step!
  • Serve immediately: This salad is best enjoyed fresh, so serve it right after preparation to savor the vibrant flavors.

Avoiding Common Mistakes

Even the best chefs encounter hiccups! Here are some common mistakes to avoid when making your grilled peach salad:

  • Using overripe peaches: Peaches that are too soft might fall apart on the grill. Aim for slightly firm but ripe peaches.
  • Skipping the preheat: Not preheating the grill can lead to uneven cooking. Always preheat for the best results.
  • Overdressing the salad: Too much balsamic glaze can overpower the dish. Drizzle lightly and adjust to taste.
  • Neglecting texture: Including only soft ingredients can make the salad feel flat. Balance with crunchy walnuts and fresh greens.

Flavor Variations to Try

Looking to mix things up? Here are four delicious variations on the grilled peach salad to keep your taste buds excited:

  • Grilled Peach and Goat Cheese Salad: Swap burrata for tangy goat cheese and add a handful of mixed greens for variety.
  • Spicy Grilled Peach Salad: Add sliced jalapeños for a kick and a sprinkle of chili flakes over the finished dish.
  • Quinoa Peach Salad: Incorporate cooked quinoa for added protein and texture, creating a more filling dish.
  • Berry Peach Salad: Mix in fresh berries like strawberries or blueberries for a sweet, colorful twist.

Storage and Make-Ahead Instructions

This grilled peach salad is best enjoyed fresh, but if you need to prepare in advance, follow these guidelines for storing:

  • Store ingredients separately: Keep the grilled peaches, arugula, and dressing stored separately to maintain freshness.
  • Prep ahead: You can grill the peaches and toast the walnuts a day in advance. Just assemble the salad right before serving.
  • Storage duration: If stored correctly, grilled peaches can last in the fridge for up to 3 days, while arugula should be consumed within 1-2 days for optimal freshness.
  • Reheating: Avoid reheating the salad; serve cold or at room temperature for the best experience.

Frequently Asked Questions

Got questions? We’ve got answers! Here are some common inquiries about this grilled peach salad:

  • Can I use frozen peaches?
    While fresh peaches are ideal, you can use frozen peaches. Just ensure they’re thawed completely and drained before grilling.
  • What can I substitute for burrata?
    If burrata isn’t available, try fresh mozzarella or feta cheese for a different flavor profile.
  • Can I make this salad vegan?
    Yes! Omit the cheese or replace it with a plant-based alternative, and ensure your balsamic glaze is vegan-friendly.
  • How do I know when the peaches are done grilling?
    Look for grill marks and a slight softness. They should be warm but not mushy.
  • What can I pair this salad with?
    This salad pairs beautifully with grilled chicken, fish, or even as a side dish for a summer barbecue.
  • Is this salad gluten-free?
    Yes! All the ingredients are naturally gluten-free, making it a safe choice for those with gluten sensitivities.
  • Can I add more protein?
    Absolutely! Grilled chicken, shrimp, or chickpeas would make excellent additions for extra protein.
  • Equipment Recommendations

    To make the perfect grilled peach salad, here are some essential tools you might consider:

    • Grill or Grill Pan: A good quality grill is essential for achieving those perfect grill marks.
    • Basting Brush: Use this to apply olive oil on the peach halves quickly and evenly.
    • Salad Bowl: A large bowl for tossing and serving your salad makes mixing easy and enjoyable.
    • Chef’s Knife: A sharp knife for cutting peaches and tearing burrata will make your prep clean and smooth.

    Serving Suggestions

    This grilled peach salad is visually stunning and flavorful, making it a great centerpiece for any meal. Here are some serving suggestions:

    • Serve it as a delightful starter at dinner parties or family gatherings.
    • Add it as a side dish to grilled meats or fish for a balanced meal.
    • Pack it in a mason jar for a tasty and nutritious lunch on the go.
    • Top it with fresh herbs like basil or mint for added aroma and freshness.

    Embrace the joy of cooking with this Grilled Peach Salad with Arugula and Burrata. It’s not just a meal; it’s an experience that celebrates the flavors of summer! So fire up that grill, gather your ingredients, and create a dish that will leave everyone craving more. Bon appétit!

    Grilled Peach Salad with Arugula and Burrata Recipe

    Prep Time 10 minutes
    Cook Time 10 minutes
    Total Time 20 minutes
    Servings 4 servings
    Calories 350
    A fresh and flavorful salad combining sweet grilled peaches, peppery arugula, creamy burrata, and crunchy walnuts, drizzled with balsamic glaze.

    Ingredients

    Peaches

    • 4 pieces ripe peaches, halved and pitted

    Arugula

    • 6 cups arugula

    Burrata cheese

    • 8 ounces burrata cheese

    Walnuts

    • 1/4 cup toasted walnuts

    Balsamic glaze

    • 1/4 cup balsamic glaze

    Olive oil

    • as needed olive oil for grilling

    Salt and pepper

    • to taste salt and pepper

    Instructions 

    • Preheat grill to medium heat. Brush peach halves with olive oil.
    • Grill peaches cut side down for 4-5 minutes until grill marks form. Cool slightly.
    • In a bowl, toss arugula with grilled peaches, then tear burrata over the top.
    • Sprinkle walnuts, drizzle with balsamic glaze, and season with salt and pepper.
    • Serve immediately for best flavor.

    Notes

    Use ripe peaches for the best flavor and grill just until caramelized.
    Calories: 350kcal
    Cost: $15
    Course: Salad
    Cuisine: American
    Keyword: Arugula, Burrata, Peach

    Ignite Your Taste Buds with Sweet Chili Chicken Rice Bowls!

    If you’re on the hunt for a meal that’s as vibrant as it is nutritious, look no further than these Sweet Chili Chicken Rice Bowls. Bursting with flavor, this colorful dish combines tender chicken thighs, fluffy rice, and a medley of fresh vegetables, all drizzled with a mouthwatering sweet chili sauce. Whether you’re a busy professional or a culinary newbie, this recipe proves that healthy eating can be both fun and delicious!

    Why You’ll Love This Recipe

    • Quick & Easy: Perfect for a weeknight meal, these bowls come together in under 30 minutes.
    • Flavor Explosion: The sweet and spicy combination of the chili sauce elevates the dish, making every bite a delight.
    • Customizable: Feel free to swap in your favorite veggies or proteins for a personalized touch!
    • Meal Prep Friendly: Make a big batch and store them for quick lunches or dinners throughout the week.
    • Healthy & Wholesome: Packed with protein, fiber, and essential nutrients, these bowls are a guilt-free indulgence.

    Ingredient Breakdown

    Here’s what you’ll need to create these delicious chicken rice bowls:

    • 1 lb Chicken thighs: Use boneless and skinless for quicker prep and cooking.
    • 2 cups Rice: Jasmine or basmati rice works best for its fluffy texture.
    • 1/2 cup Sweet chili sauce: This is the star of the show! Feel free to make your own or buy your favorite brand.
    • 1 tbsp Soy sauce: Adds depth; substitute with tamari for a gluten-free option.
    • 2 cloves Garlic: Minced for aromatic flavor.
    • 1 tbsp Ginger: Grated for a zingy kick.
    • 2 cups Vegetables: Bell peppers and broccoli are recommended, but get creative!
    • 2 tbsp Green onions: For garnish and added freshness.
    • 1 tbsp Sesame seeds: Optional, but they add a delightful crunch.

    Expert Tips for Perfect Bowls

    Juicy chicken thighs coated in sweet chili sauce served over rice and vegetables.

    To take your sweet chili chicken rice bowls to the next level, check out these pro tips:

    • Marinate the chicken: Allow your chicken to soak in the sweet chili sauce for at least 30 minutes to enhance flavor.
    • Cook rice perfectly: Rinse the rice before cooking to remove excess starch and achieve fluffy grains.
    • Don’t overcrowd the pan: Cook chicken in batches to ensure even browning.
    • Adjust spice levels: Add red pepper flakes for an extra kick or reduce the sauce for a milder flavor.
    • Use leftovers creatively: Turn leftover chicken into wraps or salads for a quick meal!
    • Garnish generously: Fresh herbs and seeds can elevate presentation and taste.
    • Stir-fry veggies: Cook them until just tender to maintain their vibrant color and crunch.
    • Double the batch: Prepare extra servings for an easy lunch throughout the week!

    Common Mistakes and Troubleshooting

    Even the best chefs make mistakes! Here’s how to avoid common pitfalls:

    • Overcooking chicken: Ensure your chicken is cooked to an internal temperature of 165°F to keep it juicy.
    • Rice sticking together: Use a fork to fluff rice after cooking and prevent clumping.
    • Too much sauce: Start with less sauce and add more as needed to avoid overpowering flavors.
    • Not letting it rest: Allow the chicken to rest for a few minutes after cooking to retain juices.

    Delicious Variations

    Looking to mix things up? Here are some exciting variations to try:

    • Vegetarian Delight: Swap chicken for tofu or tempeh, and use vegetable broth to cook the rice.
    • Spicy Jalapeño Bowls: Add sliced jalapeños to the mix for an extra kick of heat.
    • Thai Peanut Twist: Drizzle your bowls with peanut sauce for a nutty flavor profile.
    • Asian Fusion: Incorporate kimchi or pickled vegetables for a tangy contrast.

    Storage & Make-Ahead Instructions

    Want to save time? Here’s how to store and prepare your bowls ahead of time:

    • Make-ahead option: Prepare chicken and rice in advance, then assemble with fresh veggies when ready to serve.
    • Storage tips: Keep assembled bowls in airtight containers in the refrigerator for up to 4 days.
    • Freezing: You can freeze cooked chicken and rice separately for up to 3 months. Thaw before reheating.

    Frequently Asked Questions

    Got questions? Here are answers to some common queries:

    • Can I use brown rice?: Absolutely! Just note that brown rice takes longer to cook.
    • Is this recipe gluten-free?: Yes, if you use tamari instead of regular soy sauce.
    • How can I make it spicier?: Add chili flakes or sriracha to the sauce for more heat.
    • What vegetables can I use?: Feel free to mix in snap peas, carrots, or zucchini—whatever you have on hand!
    • Can I prepare the sauce ahead of time?: Yes, you can make the sweet chili sauce and store it in the fridge for up to a week.
    • What’s the best way to reheat?: Use a microwave or stovetop, adding a splash of water to maintain moisture.
    • How do I make it dairy-free?: This recipe is naturally dairy-free; just ensure all sauces are dairy-free.
    • Can I add fruits?: Pineapple or mango can add a refreshing sweetness to the bowls!

    Nutritional Tips and Dietary Adaptations

    For a balanced and nutritious meal, consider these tips:

    • Protein boost: Incorporate beans or lentils alongside chicken for added protein.
    • Fiber-rich: Add more vegetables or use whole grain rice for increased fiber content.
    • Low-carb option: Replace rice with cauliflower rice for a low-carb alternative.

    Equipment Recommendations

    Having the right tools can make cooking a breeze. Here’s what I recommend:

    • Non-stick skillet: Perfect for cooking chicken without sticking.
    • Rice cooker: Makes perfectly fluffy rice every time with minimal effort.
    • Measuring cups and spoons: Essential for precise ingredient measurements.
    • Cutting board: A must-have for easy chopping and prep.

    Serving Suggestions

    Ready to plate up your masterpiece? Here are some ideas for serving:

    • Add a side salad: A crisp green salad can complement the warmth of the rice bowls.
    • Serve with fresh herbs: Garnish with cilantro or basil for a fragrant finish.
    • Pair with a drink: Enjoy with sparkling water or a light herbal tea to enhance the meal experience.

    These Sweet Chili Chicken Rice Bowls are not just a recipe; they’re a celebration of flavors and nutrition. With a quick prep time and a customizable approach, you’ll find yourself making this dish over and over again. So grab your ingredients, unleash your inner chef, and let’s get cooking!

    Sweet Chili Chicken Rice Bowls

    Prep Time 10 minutes
    Cook Time 20 minutes
    Total Time 30 minutes
    Servings 4 servings
    Calories 550
    Enjoy a flavorful and easy-to-make bowl featuring tender chicken coated in sweet chili sauce, served over rice with vibrant vegetables.

    Ingredients

    Protein

    • 1 lb Chicken thighs (boneless, skinless) (Use for easier preparation)

    Grains

    • 2 cups Rice (Jasmine or basmati)

    Sauces and Condiments

    • 1/2 cup Sweet chili sauce (For coating the chicken)
    • 1 tbsp Soy sauce (Can substitute with tamari for gluten-free)

    Aromatics

    • 2 cloves Garlic (minced)
    • 1 tbsp Ginger (grated)

    Vegetables

    • 2 cups Vegetables (bell peppers and broccoli)

    Garnishes

    • 2 tbsp Green onions (For garnish)
    • 1 tbsp Sesame seeds (Optional garnish)

    Instructions 

    • Cook rice according to package instructions.
    • Cut chicken into bite-sized pieces and coat with sweet chili sauce.
    • Stir-fry chicken until cooked through, then add garlic, ginger, and vegetables. Cook until vegetables are tender.
    • Assemble bowls with rice, chicken and vegetables. Garnish with green onions and sesame seeds if desired.

    Notes

    For extra flavor, add a squeeze of lime or a drizzle of additional chili sauce.
    Calories: 550kcal
    Cost: $15
    Course: Main Course
    Cuisine: Asian
    Keyword: Chicken, Rice, Sweet Chili

    Unleashing Flavor: The Ultimate Guide to Zesty Asian Chicken Lettuce Wraps

    Dive into the world of vibrant flavors with these Asian Chicken Lettuce Wraps! Quick, nutritious, and oh-so-fun to eat, this recipe will transform healthy meals into delicious adventures. Perfect for busy weeknights or a zesty lunch, this dish is not just a meal; it’s an experience that combines nutrition and taste in a playful way.

    Why You’ll Love This Recipe

    • Quick and Easy: This recipe takes less than 30 minutes to prepare, making it a perfect option for those busy weeknight dinners.
    • Healthy and Nutritious: Packed with lean protein from boneless skinless chicken thighs and loaded with fresh veggies, these lettuce wraps are a guilt-free indulgence.
    • Flavor Explosion: The combination of hoisin sauce, sesame oil, and fresh ginger creates a savory sauce that elevates the dish to new heights.
    • Customizable: You can easily switch up the ingredients to suit your taste or dietary needs, making it versatile for any palate.
    • Fun to Eat: Wrapping your own lettuce leaves creates an interactive dining experience that is perfect for family meals or entertaining friends.

    Ingredients Breakdown

    Here’s what you’ll need to whip up these delightful wraps:

    • 1 lb boneless skinless chicken thighs: This cut of meat is juicy and flavorful. You can substitute with ground chicken or turkey if desired.
    • 1 tablespoon oil: Use any cooking oil you prefer—sesame oil adds an extra hint of flavor.
    • 3 cloves garlic, minced: Fresh garlic enhances the overall taste, but you can use garlic powder in a pinch.
    • 1 tablespoon fresh ginger, grated: Fresh ginger adds warmth and depth; ground ginger can be used sparingly if fresh is unavailable.
    • 1 cup shredded carrots: For a crunchy texture and a pop of color, shredded carrots are a must!
    • 3 tablespoons hoisin sauce: This sweet and savory sauce is the star of the dish. Look for low-sodium versions for a healthier option.
    • 2 tablespoons low sodium soy sauce: Adds umami flavor without excess salt.
    • 1 teaspoon sesame oil: A little goes a long way in flavoring the dish.
    • 1 teaspoon rice vinegar (optional): Adds a tangy kick that complements the other flavors.
    • 1 head butter lettuce leaves: Use butter lettuce for its soft texture or iceberg for a crunchier bite.
    • 2 green onions, sliced: For garnishing and added flavor.
    • 1 tablespoon sesame seeds: Toasted sesame seeds add a nutty flavor and visual appeal.
    • Pinch of red pepper flakes (optional): For a bit of heat, if you like it spicy!

    How to Make Chicken Lettuce Wraps

    Side view of delicious Asian Chicken Lettuce Wraps on a plate.

    Let’s get cooking! Follow these simple steps to create your lettuce wraps:

    1. Heat oil in a large skillet over medium-high heat.
    2. Dice chicken thighs into bite-sized pieces and add to the skillet.
    3. Sear chicken until browned and cooked through, about 6-7 minutes.
    4. Add garlic and ginger, stir constantly for 30 seconds to infuse the flavors.
    5. Add shredded carrots and cook 1-2 minutes until slightly tender.
    6. Stir in hoisin sauce, soy sauce, sesame oil, and rice vinegar.
    7. Let the sauce bubble and thicken for 1-2 minutes.
    8. Spoon mixture into lettuce leaves.
    9. Top with green onions, sesame seeds, and red pepper flakes if using.
    10. Serve immediately while warm with chilled lettuce.

    Pro Tips for Perfect Lettuce Wraps

    • Prep Your Ingredients Ahead: Chop and measure out your ingredients beforehand for a quicker cooking process.
    • Use Fresh Lettuce: Fresh lettuce leaves not only taste better but also hold up better when filled.
    • Don’t Overcrowd the Pan: Cook chicken in batches if necessary to ensure even cooking and browning.
    • Customize the Filling: Feel free to add mushrooms, bell peppers, or water chestnuts for extra crunch!
    • Let the Sauce Cool Slightly: Allowing the sauce to cool a bit before serving keeps the lettuce crisp.
    • Garnish Generously: Don’t skimp on the toppings! They add flavor and texture.
    • Try Different Lettuce Varieties: Experiment with iceberg, romaine, or even collard greens for wraps.
    • Serve with Dipping Sauces: Soy sauce or extra hoisin sauce can enhance the flavor experience.
    • Keep Ingredients Separated: If making ahead, keep the filling and lettuce leaves separate until serving.
    • Enjoy with Friends: Make it a fun evening by having everyone assemble their own wraps!

    Common Mistakes and Troubleshooting

    Even the best chefs have off days. Here’s how to avoid common pitfalls:

    • Too Saucy: If the filling is too wet, add a bit of cornstarch mixed with water to thicken it.
    • Lettuce Falling Apart: Ensure your lettuce leaves are sturdy and dry before filling.
    • Overcooked Chicken: Watch the chicken closely to avoid drying it out; it should be juicy and tender.
    • Flavors Too Mild: Adjust seasoning with additional soy sauce or hoisin as needed.

    Variations to Try

    Get creative with these delicious takes on the classic recipe:

    • Ground Turkey Lettuce Wraps: Substitute ground turkey for a leaner version.
    • Vegetarian Option: Use crumbled tofu or tempeh, sautéed with the same seasonings.
    • Spicy Korean Style: Incorporate gochujang for a spicy kick.
    • Thai Style: Add chopped peanuts and cilantro for a different flavor profile.

    Storage and Make-Ahead Instructions

    If you want to prep ahead, here’s how to store your wraps:

    • Store Filling Separately: Keep the chicken filling in an airtight container in the fridge for up to 3 days.
    • Prepare Lettuce Leaves: Wash and dry the lettuce leaves and store them in a sealed container with a paper towel to keep them crisp.
    • Reheat Carefully: When ready to eat, reheat the filling gently in the skillet.

    Frequently Asked Questions

    • Can I use a different protein? Absolutely! Ground beef, shrimp, or tofu are all great substitutes.
    • Is this recipe gluten-free? Use gluten-free soy sauce and ensure all other ingredients meet your dietary needs.
    • What can I serve with lettuce wraps? Try serving them with rice, quinoa, or a light salad.
    • Can I freeze the filling? Yes, it freezes well! Just thaw and reheat when ready to use.
    • How do I make it spicier? Add more red pepper flakes or a splash of sriracha for an extra kick.
    • Can I prepare this dish ahead of time? Yes, just store the filling and lettuce separately until serving.
    • What lettuce works best? Butter lettuce is ideal, but you can also use romaine or iceberg.
    • How do I make it low-carb? Use lettuce leaves instead of tortillas and skip the rice for a delicious low-carb option.

    Nutrition Tips and Dietary Adaptations

    For those watching their diet, consider these tips:

    • Low-Calorie Option: Use ground turkey or chicken breast for fewer calories.
    • High Protein: Pair with a side of edamame for an extra protein boost.
    • Vegan Adaptation: Replace chicken with lentils or chickpeas and use plant-based sauces.
    • Low-Carb Diet: Enjoy the filling without the lettuce for a delicious, low-carb meal.

    Equipment Recommendations

    Here are some handy tools to make your cooking experience smoother:

    • Skillet: A non-stick skillet works best for easy cooking and cleanup.
    • Knife: A sharp chef’s knife is essential for chopping ingredients quickly.
    • Cutting Board: Protect your counters while prepping ingredients.
    • Measuring Cups and Spoons: Precision is key in cooking to get the flavors just right.

    Serving Suggestions

    Make your meal even more exciting with these serving ideas:

    • Side Dishes: Serve alongside steamed jasmine rice or quinoa for a complete meal.
    • Dipping Sauces: Provide extra hoisin or sesame sauce for added flavor.
    • Fresh Herbs: Garnish with fresh cilantro or mint for a refreshing touch.

    Conclusion

    These Zesty Asian Chicken Lettuce Wraps are a game-changer in the world of healthy eating. They combine vibrant flavors, nutritional benefits, and fun assembly for a meal that’s more than just food—it’s an experience! Enjoy them with family or friends, and watch how this simple recipe becomes a household favorite. So, roll up your sleeves, grab that lettuce, and get ready to unwrap the flavor!

    Asian Chicken Lettuce Wraps

    Prep Time 10 minutes
    Cook Time 15 minutes
    Total Time 25 minutes
    Servings 4 servings
    Calories 350
    Enjoy these flavorful and healthy Asian Chicken Lettuce Wraps, perfect for a quick and satisfying meal.

    Ingredients

    Protein

    • 1 lb boneless skinless chicken thighs
    • 1 tablespoon oil
    • 3 cloves garlic minced
    • 1 tablespoon fresh ginger grated
    • 1 cup shredded carrots
    • 3 tablespoons hoisin sauce
    • 2 tablespoons low sodium soy sauce
    • 1 teaspoon sesame oil
    • 1 teaspoon rice vinegar optional
    • 1 head butter lettuce leaves separated and rinsed
    • 2 green onions sliced
    • 1 tablespoon sesame seeds
    • Pinch optional red pepper flakes

    Instructions 

    • Heat oil in a skillet, cook diced chicken until browned, about 6-7 minutes.
    • Add garlic and ginger, cook for 30 seconds, then stir in carrots and cook 1-2 minutes.
    • Stir in hoisin, soy sauce, sesame oil, and rice vinegar; cook until thickened, 1-2 minutes.
    • Spoon mixture into lettuce leaves, top with green onions, sesame seeds, and red pepper flakes.
    • Serve immediately while warm with chilled lettuce.

    Notes

    For extra flavor, add a splash of lime juice before serving.
    Calories: 350kcal
    Cost: $15
    Course: Main Course
    Cuisine: Asian
    Keyword: Chicken

    Unleash the Flavor with Cold Tahini Noodle Salad!

    Welcome to your next culinary adventure! This Cold Tahini Noodle Salad is not just another dish; it’s a vibrant celebration of flavors that will transform your lunch or dinner into a delightful experience. With fresh veggies, a zesty tahini dressing, and a kick of spice, this salad is quick, nutritious, and oh-so-satisfying! Let’s dive into the world of deliciousness and discover why you’ll fall in love with this recipe.

    Why You’ll Love This Recipe

    • Flavor Explosion: The combination of tahini, soy sauce, and fresh ingredients creates a rich, savory profile that tantalizes your taste buds.
    • Quick and Easy: Perfect for busy weeknights, this salad can be ready in under 30 minutes, making it an ideal choice for those on-the-go.
    • Nutritious: Packed with veggies and healthy fats from tahini, this dish provides a balanced meal that’s both filling and satisfying.
    • Customizable: Feel free to mix and match ingredients based on what you love or have on hand—this salad is a blank canvas for your creativity!
    • Make-Ahead Friendly: Great for meal prep, it can be stored in the fridge for days, allowing the flavors to meld beautifully.

    Ingredients Breakdown

    Here’s what you’ll need to make this Cold Tahini Noodle Salad:

    • 1/2 cup tahini: The creamy base that adds richness and depth.
    • 1/3 cup low sodium soy sauce (or tamari): Brings umami flavor while keeping it healthier.
    • 2 cloves garlic (peeled): For that aromatic kick.
    • 1 inch fresh ginger (peeled): Adds a zesty warmth to the dressing.
    • 1 jalapeño (cut in chunks): For those who love a bit of heat!
    • 2 limes (juiced): Brightens everything up with fresh acidity.
    • 1 tablespoon sriracha: If you like it spicy, this is a must!
    • 2 tablespoons sesame oil: Enhances the nutty flavor profile.
    • 8 ounces noodles (linguine, spaghetti, or rice noodles): The heart of the salad; choose your favorite!
    • 2 bell peppers (sliced): For crunch and sweetness.
    • 1/2 small head green cabbage (shredded): Adds texture and volume.
    • 1/2 small head purple cabbage (shredded): For color and nutrients.
    • 2 carrots (shredded): Sweetness and vibrant orange color.
    • 1 bunch cilantro (chopped): Fresh herbiness that brightens the dish.
    • 5 green onions (chopped): Adds a mild onion flavor.

    Substitutions

    • Gluten-Free: Use gluten-free noodles like rice noodles or zucchini noodles for a fresh twist.
    • Nut-Free: Substitute tahini with sunflower seed butter for a nut-free option.
    • Extra Veggies: Add in cucumbers, snap peas, or edamame for added crunch and nutrition!
    • Protein Boost: Toss in some chickpeas or grilled chicken for a more filling meal.

    How to Make This Salad

    A side view of a refreshing Cold Tahini Noodle Salad with mixed noodles and fresh herbs.

    Step-by-Step Instructions

    1. Cook the noodles according to the package instructions. Drain and rinse with cold water to stop the cooking process.
    2. In a food processor or blender, combine all of the sauce ingredients: tahini, soy sauce, garlic, ginger, jalapeño, lime juice, sriracha, and sesame oil. Blend until smooth and creamy. Taste and adjust the seasonings as needed.
    3. In a large mixing bowl, add the cooked noodles and all the chopped veggies: bell peppers, green cabbage, purple cabbage, carrots, cilantro, and green onions.
    4. Pour the tahini dressing over the noodle and vegetable mixture. Toss thoroughly until everything is well combined and coated in the dressing.
    5. Serve chilled or at room temperature. Enjoy your vibrant Cold Tahini Noodle Salad!

    Pro Tips for Perfecting Your Salad

    • Don’t Overcook Your Noodles: Aim for al dente; they’ll hold up better in the salad and provide perfect texture.
    • Customize Your Dressing: If you prefer a creamier dressing, add a splash of water or more tahini to achieve your desired consistency.
    • Chill for Flavor: Let the salad sit in the fridge for at least 30 minutes before serving to allow the flavors to meld.
    • Use Fresh Ingredients: Fresh veggies not only taste better but also add vibrant color and nutrition!
    • Mix it Up: Try different types of noodles, such as soba or whole wheat, for a unique twist.
    • Seasonal Veggies: Use seasonal vegetables to keep the salad fresh and exciting all year round.
    • Batch It: Make a double batch for easy lunches throughout the week.
    • Garnish: Top with sesame seeds or crushed peanuts for an extra crunch!

    Common Mistakes and Troubleshooting

    • Over-salting: Start with less soy sauce in the dressing; you can always add more later!
    • Too Much Dressing: If the salad looks soggy, add more veggies or noodles to balance it out.
    • Not Rinsing Noodles: Rinsing stops the cooking process and prevents them from sticking together.
    • Skip the Chill: Don’t skip chilling the salad; it enhances the flavor significantly!

    Delicious Variations to Try

    • Spicy Peanut Noodles: Swap tahini for peanut butter and add crushed peanuts on top.
    • Asian-Inspired: Toss in some sesame seeds and serve with a sprinkle of seaweed flakes.
    • Protein-Packed: Add grilled tofu or shrimp for a heartier meal!
    • Herbaceous Twist: Experiment with different herbs like mint or parsley for a fresh twist.

    Storage and Make-Ahead Instructions

    This Cold Tahini Noodle Salad is perfect for meal prep! Store it in an airtight container in the fridge for up to 4 days. The flavors get even better as it sits, making it a fantastic option for lunches or quick dinners. If you’re preparing it ahead of time, consider keeping the dressing separate until you’re ready to serve to maintain the crispness of the veggies.

    Frequently Asked Questions

    • Can I make this salad vegan? Yes! This recipe is already vegan-friendly!
    • What type of noodles work best? Any long noodle works well! Linguine, spaghetti, or even rice noodles are perfect.
    • How long does it last in the fridge? The salad can last up to 4 days when stored properly in the fridge.
    • Can I freeze the salad? It’s best enjoyed fresh, but you can freeze the noodles and sauce separately for later use.
    • Can I add protein to this salad? Absolutely! Grilled chicken, shrimp, or chickpeas are fantastic additions.
    • What can I substitute for tahini? Sunflower seed butter is a great nut-free alternative.
    • Is this salad gluten-free? Yes, if you use gluten-free noodles and tamari!
    • Can I add more vegetables? Definitely! Feel free to add any of your favorite veggies!

    Nutrition Tips and Dietary Adaptations

    This Cold Tahini Noodle Salad is not only delicious but also nutritious! It’s rich in healthy fats from tahini, fiber from veggies, and provides a good source of plant-based protein. If you’re looking to boost the protein content, consider adding edamame or chickpeas. For those watching their carbs, opt for spiralized zucchini or cauliflower rice instead of traditional noodles.

    Essential Equipment Recommendations

    • Food Processor or Blender: Essential for making the smooth tahini dressing.
    • Large Mixing Bowl: A spacious bowl is key for tossing all those delicious ingredients together!
    • Cutting Board and Knife: For chopping and prepping all your fresh veggies.
    • Colander: For draining the noodles after cooking.

    Serving Suggestions

    This Cold Tahini Noodle Salad is a perfect standalone dish but can also be paired beautifully with other items. Serve it alongside grilled chicken, as a side to your favorite protein, or enjoy it as a light lunch with a side of fruit. It’s versatile enough to fit any occasion!

    Conclusion

    There you have it! Your ultimate guide to making a Cold Tahini Noodle Salad that’s bursting with flavor and nutrition. This dish embodies the excitement of healthy cooking, proving that nutritious meals can be both fun and delicious. So grab your ingredients, unleash your creativity, and enjoy this vibrant salad that’s sure to impress your taste buds. Happy cooking!

    Cold Tahini Noodle Salad

    Prep Time 15 minutes
    Cook Time 10 minutes
    Total Time 25 minutes
    Servings 4 servings
    Calories 450
    A refreshing and flavorful noodle salad with a creamy tahini sauce, perfect for a quick, healthy meal.

    Ingredients

    Sauce

    • 1/2 cup tahini
    • 1/3 cup low sodium soy sauce (or tamari)
    • 2 cloves garlic (peeled)
    • 1 inch fresh ginger (peeled)
    • 1 jalapeño cut in chunks
    • 2 limes juiced
    • 1 tablespoon sriracha
    • 2 tablespoons sesame oil

    Noodles

    • 8 ounces noodles (linguine, spaghetti or rice noodles)
    • 2 bell peppers sliced
    • 1/2 small head green cabbage (shredded)
    • 1/2 small head purple cabbage (shredded)
    • 2 carrots shredded
    • 1 bunch cilantro (chopped)
    • 5 green onions chopped

    Instructions 

    • Cook the noodles according to package instructions, then drain and rinse with cold water.
    • Blend all sauce ingredients until smooth, then taste and adjust seasonings.
    • Combine noodles, veggies, and sauce; toss and serve chilled or at room temperature.

    Notes

    Feel free to add more lime juice or sriracha for extra flavor.
    Calories: 450kcal
    Cost: $15
    Course: Salad
    Cuisine: fusion
    Keyword: Noodles

    Welcome to the Zesty World of Shrimp Salad!

    If you’re ready to dive into a dish that’s not just delicious but also bursting with nutrition, then this zesty shrimp salad is the perfect choice! Packed with succulent shrimp, creamy avocados, and a vibrant citrus dressing, this salad is a delightful explosion of flavors that will make your taste buds dance. Whether you’re hosting a summer barbecue or looking for a quick and healthy weeknight dinner, this recipe is sure to impress. Let’s explore why you’ll love this shrimp salad and how to make it shine on your plate!

    Why You’ll Love This Recipe

    • Flavor Explosion: The combination of zesty citrus and fresh ingredients creates a vibrant taste experience that’s refreshing and satisfying.
    • Easy & Quick: This recipe is perfect for busy weekdays. With just a few simple steps, you can have a gourmet salad ready in under 30 minutes!
    • Nutritious Goodness: Loaded with protein from shrimp and healthy fats from avocados, this salad is both filling and nutritious, making it a great choice for any meal.
    • Customizable: Feel free to mix and match ingredients based on what you have on hand. This salad is versatile and can be adapted to suit your taste preferences.
    • Perfect for Meal Prep: Make a big batch and enjoy it for lunch throughout the week. It’s a fantastic way to stay healthy and energized!

    Ingredients Breakdown

    Let’s take a closer look at the stars of this dish! Here’s what you need to whip up this tasty shrimp salad:

    • 3 tablespoons olive oil (divided): This adds healthy fats and a rich flavor.
    • Zest and juice of 1 lime: The lime zest provides aromatic oils, while the juice adds acidity.
    • Juice of 1 orange: Sweet and tangy, orange juice brightens the dressing.
    • ¼ teaspoon red pepper flakes: For a slight kick that balances the sweetness.
    • Kosher salt and freshly ground black pepper: Essential for enhancing the flavor.
    • 1 pound large shrimp (peeled and deveined): The star protein in our salad!
    • 2 avocados: Creamy and nutritious, avocados add richness.
    • 1 pint cherry tomatoes (halved): Sweet and juicy, they provide a pop of color.
    • ½ red onion (thinly sliced): For a sharp bite that complements the other flavors.
    • ½ cup fresh cilantro leaves (divided): A fresh herb that brings everything together.
    • 4 cups arugula (optional): A peppery green that adds an extra layer of flavor.

    How to Make the Zesty Shrimp Salad

    A side view of a colorful shrimp salad featuring avocado slices, red onion, and a citrus dressing.

    Now that we have our ingredients ready, let’s get cooking! Follow these steps to create your delicious shrimp salad:

    1. If you are using wooden skewers, place them in a container with water to cover for 30 minutes. Preheat the grill to medium-high.
    2. For the dressing, in a small bowl or container, combine 2 tablespoons olive oil, the lime zest and juice, orange juice, red pepper flakes, and salt and pepper. Set aside.
    3. In a medium bowl, toss shrimp with the remaining tablespoon of oil and season with salt and pepper. Thread the shrimp onto skewers.
    4. Carefully oil the grill rack. Grill the shrimp over medium heat until they turn pink and are just cooked through, about 4 minutes in all, turning the shrimp halfway during cooking. Let cool to room temperature, and remove the shrimp from the skewers.
    5. In a large, shallow serving bowl, combine the tomatoes, onions, and half the cilantro. Add half of the dressing and toss. Peel and half the avocados, remove the pit, and dice. Add the avocados and cooked shrimp to the bowl and toss gently to combine. Drizzle with the remaining dressing, and sprinkle with the remaining fresh cilantro.
    6. Serve in the bowl or serve over the arugula on individual plates.

    Pro Tips for Perfection

    • Use Fresh Ingredients: The quality of your shrimp and produce makes a significant difference. Look for fresh shrimp and vibrant vegetables.
    • Don’t Overcook the Shrimp: Overcooked shrimp can become rubbery. Grill just until they turn pink.
    • Experiment with Dressings: Feel free to try different dressings like a creamy avocado dressing or a vinaigrette.
    • Chill Before Serving: Letting the salad chill in the fridge for 30 minutes allows the flavors to meld beautifully.
    • Customize Your Greens: If arugula isn’t your vibe, try spinach or mixed greens for a different flavor profile.
    • Make it a Meal: Add quinoa or brown rice for a heartier dish that’s still healthy.

    Common Mistakes and Troubleshooting

    Even the best chefs can run into a few hiccups! Here are some common pitfalls and how to avoid them:

    • Too Much Dressing: Start with a little dressing and add more as needed. You can always add, but you can’t take away!
    • Skipping the Marination: Allow the shrimp to marinate in the oil and spices for at least 10 minutes for maximum flavor.
    • Leaving Out the Citrus: Citrus is key in this recipe. Don’t skip it for that zesty kick!

    Variations to Elevate Your Salad

    Feeling adventurous? Here are some fun variations to try:

    • Grilled Shrimp and Mango Salad: Swap out the avocado for diced mango for a tropical twist.
    • Spicy Shrimp Salad: Add jalapeños or a dash of hot sauce to the dressing for an extra kick.
    • Mediterranean Shrimp Salad: Include olives, feta cheese, and a lemon vinaigrette for a Mediterranean flair.
    • Pasta Shrimp Salad: Toss in cooked pasta for a heartier dish that’s perfect as a main course.

    Storage and Make-Ahead Instructions

    You can easily make this salad ahead of time. Here’s how to store it:

    • Refrigeration: Store leftovers in an airtight container in the fridge for up to 2 days.
    • Make Ahead: Prepare the dressing and chop vegetables the night before. Just grill the shrimp and combine everything before serving.
    • Freezing: It’s not recommended to freeze the salad as it may change the texture of the ingredients.

    Frequently Asked Questions (FAQs)

    • Can I use frozen shrimp? Yes! Just thaw them properly before cooking for the best results.
    • What can I substitute for avocados? Try using diced cucumbers or even creamy tahini for a different taste.
    • Is this salad gluten-free? Absolutely! All the ingredients are naturally gluten-free.
    • How spicy is this salad? The spice level depends on your preference. Adjust the red pepper flakes to your liking!
    • Can I add other seafood? Yes! Feel free to mix in crab or scallops for a seafood medley.
    • How do I make this salad vegan? Substitute shrimp with grilled tofu or chickpeas and use a vegan dressing.
    • What’s the best way to grill shrimp? Ensure your grill is hot and oiled to prevent sticking.
    • How should I serve this salad? It’s delicious on its own or served over a bed of greens.

    Nutritional Tips and Dietary Adaptations

    This shrimp salad is not just tasty; it’s also packed with nutrition! Here are some tips:

    • Protein-Packed: Shrimp is a fantastic source of lean protein, which is essential for muscle repair and growth.
    • Healthy Fats: Avocados provide healthy monounsaturated fats that are great for heart health.
    • Rich in Vitamins: The fresh vegetables add a wealth of vitamins and minerals, contributing to overall health.
    • Low in Carbs: This salad is low in carbohydrates, making it a great option for those watching their carb intake.

    Equipment Recommendations

    To make this salad, you’ll need a few essential kitchen tools:

    • Grill or Grill Pan: For perfectly grilled shrimp.
    • Mixing Bowls: For tossing ingredients and making the dressing.
    • Measuring Cups and Spoons: Accuracy is key when it comes to seasoning!
    • Sharp Knife: For slicing veggies and shrimp with ease.

    Serving Suggestions

    This zesty shrimp salad is highly versatile! Here are some serving ideas:

    • Serve as a Starter: Present it as a refreshing appetizer to kick off a meal.
    • Pair with Grains: Serve over quinoa or brown rice for a hearty main dish.
    • Wrap It Up: Use it as a filling for tacos or wraps for a fun twist!

    Final Thoughts

    Incorporating this zesty shrimp salad into your meal rotation will not only add excitement to your dining experience but also keep it healthy! With its refreshing flavors and vibrant colors, it’s a celebration of good food that anyone can enjoy. So grab your ingredients, fire up the grill, and let’s make this salad a star at your next meal!

    Shrimp Salad with Citrus Dressing

    Prep Time 15 minutes
    Cook Time 10 minutes
    Total Time 25 minutes
    Servings 4 servings
    Calories 350
    A fresh and vibrant shrimp salad featuring a zesty citrus dressing, perfect for a light and flavorful meal.

    Ingredients

    Olive Oil

    • 3 tablespoons olive oil (divided)
    • Zest and juice of 1 lime lime (zest and juice)
    • Juice of 1 orange orange (juice only)
    • ¼ teaspoon red pepper flakes teaspoon red pepper flakes
    • Kosher salt and freshly ground black pepper to taste salt and pepper
    • 1 pound large shrimp pound large shrimp (peeled and deveined)
    • 2 avocados avocados
    • 1 pint cherry tomatoes pint cherry tomatoes (halved)
    • ½ red onion piece red onion (thinly sliced)
    • ½ cup fresh cilantro leaves cup cilantro leaves (divided)
    • 4 cups arugula cup arugula (optional)

    Instructions 

    • If using wooden skewers, soak them in water for 30 minutes. Preheat grill to medium-high.
    • Mix 2 tbsp olive oil, lime zest and juice, orange juice, red pepper flakes, salt, and pepper to make the dressing.
    • Toss shrimp with remaining 1 tbsp olive oil, season with salt and pepper, then skewer.
    • Grill shrimp until pink, about 4 minutes, then cool and remove from skewers.
    • Combine tomatoes, onions, half cilantro, toss with half dressing. Dice avocados and add with shrimp. Toss gently, drizzle remaining dressing, and top with remaining cilantro.

    Notes

    This salad is best served fresh and can be customized with your favorite greens or additional herbs.
    Calories: 350kcal
    Cost: $15
    Course: Salad
    Cuisine: American
    Keyword: Seafood

    Elevate Your Dining Experience with a Roasted Eggplant Salad

    Welcome to a culinary adventure that will invigorate your taste buds and inspire your kitchen creativity! In this vibrant Roasted Eggplant Salad, we’ll marry the smoky, rich flavors of roasted eggplant with a zesty cucumber-yogurt sauce and the juiciness of fresh tomatoes. Not only does this dish burst with flavor, but it also packs a nutritional punch, making healthy eating an exciting experience. So, let’s dive right in!

    Why You’ll Love This Recipe

    This salad is not just a feast for the eyes; it’s a celebration of taste and health! Here are just a few reasons to love this dish:

    • Flavor Explosion: The combination of roasted eggplant, crisp cucumber, and tangy yogurt creates a delightful interplay of tastes that will leave you craving more.
    • Nutritious and Wholesome: Packed with vitamins, fiber, and healthy fats, this salad supports your health without sacrificing flavor.
    • Versatile Dish: Perfect as a side or a main dish, it easily adapts to any meal, whether it’s a casual lunch or a sophisticated dinner party.
    • Quick and Easy: With straightforward steps and minimal prep time, you’ll have a delicious meal ready in no time!
    • Impress Your Guests: The colorful presentation and unique flavor profile make it an impressive addition to any gathering.

    Ingredients Breakdown

    Before you start, let’s take a look at the ingredients and some possible substitutions that can cater to your taste preferences or dietary needs:

    • Eggplants: 2 medium eggplants (about 1½ -2 pounds total). Consider using Japanese eggplants for a sweeter flavor.
    • Oil: 1/4 cup of grapeseed or another neutral oil. Olive oil also works well for added flavor.
    • Spices: 1/2 teaspoon cumin seed, toasted and crushed. Feel free to experiment with smoked paprika for a different twist!
    • Cucumber: 1 cucumber (about 8 oz), or substitute with zucchini if you’re in a pinch.
    • Yogurt: 1 cup of whole milk or 2% plain Greek yogurt. For a dairy-free option, use coconut yogurt.
    • Garlic: 1 clove, crushed. If you love garlic, don’t hesitate to add more!
    • Lemon: Juice of 1 lemon (about 3 tablespoons). Lime juice is a fantastic alternative.
    • Cherry Tomatoes: 2 cups, halved. Any ripe tomatoes work beautifully, adding sweetness to the dish.
    • Greens: A handful of arugula or other leafy greens for that extra crunch.
    • Flaky Sea Salt: For that perfect finishing touch.

    Step-by-Step Instructions

    Side view of a colorful roasted eggplant salad garnished with cherry tomatoes and drizzled with yogurt sauce on a plate.

    Now, let’s get cooking! Follow these simple steps to create your Roasted Eggplant Salad:

    1. Preheat your oven to 450°F (convection roast). On a rimmed baking sheet lined with parchment paper, toss the eggplant pieces with 1/4 cup of oil and season generously with kosher salt (about 1 teaspoon).
    2. Roast the eggplants for about 20 minutes or until they’re beautifully golden on the side touching the pan. Flip each piece gently using a fork or spatula and roast for an additional 10 minutes.
    3. While the eggplant is roasting, grate the cucumber using a box grater. Place the grated cucumber over a sieve to drain excess moisture—save the juice for refreshing beverages!
    4. In a medium bowl, combine the drained cucumber with the yogurt, crushed garlic, and the juice of half the lemon (about 1.5 tablespoons). Mix in the toasted cumin seed and season with salt to taste.
    5. In another bowl, toss the halved cherry tomatoes with a pinch of flaky sea salt, a tablespoon of olive oil, and white balsamic vinegar. Add the arugula and mix gently.
    6. To assemble, spoon the yogurt mixture onto a large serving platter and layer the roasted eggplant on top. Finally, add the tomato-arugula mix and sprinkle with more salt, olive oil, or lemon juice as desired.

    Expert Tips for the Perfect Salad

    Want to take your salad to the next level? Here are some expert insights:

    • Roasting Technique: Roast the eggplant until it’s deeply golden to enhance its natural sweetness.
    • Seasoning Balance: Don’t shy away from seasoning; tasting as you go ensures the flavors are just right.
    • Texture Matters: Aim for a contrast between creamy yogurt, tender roasted eggplant, and crunchy greens.
    • Make-ahead Magic: Prepare the yogurt sauce a day in advance to let the flavors meld beautifully.
    • Flavor Variations: Consider adding feta cheese or olives for a Mediterranean twist!
    • Garnishing: A sprinkle of fresh herbs like parsley or mint can elevate the presentation and flavor.
    • Keep it Fresh: If you’re making this salad ahead of time, store the components separately to maintain freshness.
    • Temperature Play: Serve the salad slightly warm or at room temperature for the best flavor experience.

    Common Mistakes and Troubleshooting

    Even the best chefs make mistakes! Here’s how to avoid common pitfalls:

    • Overcooking Eggplant: Monitor your roasting time closely; overcooked eggplant can turn mushy.
    • Under-seasoning: Taste your components before combining; it’s easier to adjust seasoning in individual parts.
    • Too Much Liquid: Drain the cucumber properly to avoid a watery salad.
    • Skipping the Resting Time: Allowing the yogurt sauce to sit for at least 30 minutes enhances its flavor.

    Delicious Variations to Try

    Don’t hesitate to get creative! Here are some variations on this classic salad:

    • Spicy Kick: Add diced jalapeños or a sprinkle of red pepper flakes for heat.
    • Protein Boost: Toss in grilled chicken, chickpeas, or lentils for added protein.
    • Herbed Delight: Mix in fresh herbs like basil or dill for a fresh twist.
    • Grain Bowl: Serve over quinoa or farro for a hearty meal!

    Storage and Make-Ahead Instructions

    Planning for leftovers? Here’s how to store your creation:

    • Refrigeration: Store leftover salad components separately in airtight containers for up to 3 days.
    • Yogurt Sauce: It can be made up to 3 days in advance, making meal prep a breeze!
    • Freezing: While eggplant is best enjoyed fresh, you can freeze roasted eggplant for up to two months; thaw before use.

    Frequently Asked Questions

    Got questions? We’ve got answers!

    • Can I use different types of eggplant? Yes! Any variety will work, but keep in mind that textures and flavors may differ.
    • Is this salad gluten-free? Absolutely! All ingredients are gluten-free, making it a safe option for those with gluten sensitivities.
    • How do I make this dish vegan? Substitute Greek yogurt with a plant-based alternative, and enjoy a delicious vegan version!
    • Can I prepare this salad in advance? Yes! Prepare the yogurt sauce and roast the eggplant a day ahead; just assemble before serving.
    • What can I pair this salad with? This salad pairs beautifully with grilled meats, pita bread, or as part of a mezze platter.
    • How can I enhance the flavor? Experiment with spices like smoked paprika or fresh herbs to elevate the taste.
    • How do I know when the eggplant is done? It should be golden brown and tender when pierced with a fork.
    • Can I add nuts or seeds? Absolutely! Toasted pine nuts or sunflower seeds add a delightful crunch.

    Nutritional Insights and Dietary Adaptations

    This Roasted Eggplant Salad is a powerhouse of nutrition:

    • Low-Calorie Option: Perfect for those watching their caloric intake while still feeling satisfied.
    • High in Fiber: Eggplants and cucumbers provide dietary fiber, aiding in digestion.
    • Rich in Vitamins: Packed with vitamins C and K, making it a great option for a health boost.

    Essential Equipment Recommendations

    Here’s what you’ll need to successfully create this delightful dish:

    • Baking Sheet: A rimmed baking sheet ensures easy roasting and cleanup.
    • Parchment Paper: For easy release and to prevent sticking.
    • Box Grater: Essential for grating the cucumber effectively.
    • Mixing Bowls: Have a couple on hand for mixing components separately.
    • Sieve: To drain the cucumber juice efficiently.

    Serving Suggestions

    How to serve this salad for maximum impact? Here are some ideas:

    • Plate Presentation: Serve on a large platter for a family-style meal, allowing guests to help themselves.
    • Garnish: Top with crumbled feta cheese or a sprinkle of fresh herbs just before serving.
    • Side Pairings: Complement with warm pita or crusty bread for a complete Mediterranean feast.

    In conclusion, this Roasted Eggplant Salad with Cucumber-Yogurt Sauce is more than just a recipe; it’s an experience that transforms healthy eating into a joyful occasion. So, gather your ingredients, unleash your inner chef, and let the flavors inspire you. Happy cooking!

    Roasted Eggplant Salad with Cucumber-Yogurt Sauce and Tomatoes

    Prep Time 15 minutes
    Cook Time 20 minutes
    Total Time 35 minutes
    Servings 4 servings
    Calories 250
    A vibrant and flavorful salad featuring roasted eggplant, a refreshing cucumber-yogurt sauce, and juicy tomatoes, perfect for a light meal or side dish.

    Ingredients

    Vegetables

    • 2 medium eggplants (about 1½ -2 pounds total, quartered lengthwise, cut into 2-inch pieces)
    • 1/4 cup grapeseed or neutral oil
    • kosher salt kosher salt
    • 1/2 teaspoon cumin seed, toasted and crushed or ground cumin
    • 1 each cucumber (about 8 oz)
    • 1 cup whole milk plain Greek yogurt
    • 1 clove garlic (crushed)
    • 3 tablespoons lemon juice (juice of 1 lemon)
    • 2 cups cherry tomatoes (halved)
    • 1 tablespoon extra-virgin olive oil (plus more for drizzling)
    • 1 tablespoon white balsamic vinegar
    • a handful arugula or other greens
    • flaky sea salt flaky sea salt, such as Maldon (for sprinkling)

    Instructions 

    • Heat oven to 450°F (232°C). Toss eggplants with 1/4 cup oil, season with salt, and roast until golden, about 20 minutes. Flip pieces to ensure even browning.
    • Grate cucumber, drain excess water, and mix into yogurt with crushed garlic and lemon juice. Season with salt and adjust to taste.
    • Mix cherry tomatoes with olive oil, vinegar, and a pinch of sea salt; toss with greens. Layer roasted eggplant and tomato mixture on a platter, then top with yogurt sauce.

    Notes

    Feel free to drizzle extra olive oil or add lemon juice for extra flavor.
    Calories: 250kcal
    Cost: $15
    Course: Salad
    Cuisine: Mediterranean
    Keyword: Eggplant

    Welcome to Your New Favorite Bowl of Goodness!

    Are you ready to dive into a bowl of vibrant flavors and nourishing ingredients? Our Sesame Ginger Noodle Salad is not just a dish; it’s a celebration of health, taste, and a whole lot of fun in the kitchen! Packed with colorful veggies, protein-rich edamame, and an irresistible zesty dressing, this vegan delight is perfect for meal prep or a quick, energizing weeknight dinner. Let’s explore why this noodle salad deserves a prime spot on your table!

    Why You’ll Love This Recipe

    This salad isn’t just visually appealing; it’s a powerhouse of flavor and nutrition. Here are some fantastic reasons to whip up this bowl of deliciousness:

    • Quick and Easy: Ready in 30 minutes or less, making it a perfect option for busy weeknights or last-minute gatherings.
    • Meal Prep Friendly: This salad holds up beautifully in the fridge, making it a great choice for meal prepping for the week.
    • Vegan and Nutritious: Packed with plant-based protein from edamame and a variety of vitamins from fresh veggies.
    • Flavor Explosion: The combination of sesame oil, ginger, and tahini creates a dressing that is so good, you might just want to drink it straight!
    • Customizable: With the flexibility to add your favorite veggies or proteins, it can easily adapt to your taste.

    Ingredient Breakdown and Substitutions

    Let’s take a closer look at the ingredients that make this salad a standout:

    • 16 oz. spaghetti: Any long noodle works well! Feel free to substitute with rice noodles for a gluten-free option.
    • 1 cup red pepper: Sweet bell peppers add crunch and color. You can swap these for yellow or green peppers, or even shredded radishes for a peppery kick.
    • 1 cup purple cabbage: This adds a beautiful color and crunch. Green cabbage or carrots can also be used.
    • 1 cup shredded carrots: Fresh or pre-shredded, these provide natural sweetness. Alternatively, you could use zucchini noodles for a low-carb twist.
    • 1.5 cups shelled edamame: A great source of protein! If you don’t have edamame, feel free to use chickpeas or tofu.
    • 3 stalks green onion: Adds a fresh bite. Chives or shallots can be substituted if needed.
    • 1/4 cup toasted sesame seeds: For garnish, these add crunch and flavor. You can substitute with sunflower seeds or chopped nuts.

    Making the Dressing

    Side angle of a delicious vegan noodle salad featuring spaghetti, red pepper, and purple cabbage.

    Your dressing will tie all the elements together beautifully. Here’s what you need:

    • 1 cup low sodium soy sauce: A base for your dressing. Use tamari for gluten-free or coconut aminos for a soy-free option.
    • 1/3 cup rice vinegar: Adds a zesty punch. Apple cider vinegar can be used for a different flavor profile.
    • 1/4 cup olive oil: This helps to emulsify the dressing. Avocado oil is another great choice.
    • 2 tablespoons tahini (or peanut butter): For creaminess. You can also use sunflower seed butter for a nut-free version.
    • 1 tablespoon sesame oil: This adds that signature nutty flavor that makes your dressing sing!
    • 1 tablespoon brown sugar: Balances the flavors. Honey or maple syrup can be used as alternatives.
    • 1 teaspoon ground ginger: Fresh ginger can be substituted for a bolder flavor.
    • 1/2 teaspoon garlic powder: For a hint of savory; fresh garlic can also work well here.

    Step-by-Step Instructions

    Ready to get cooking? Follow these simple steps:

    1. Cook pasta until al dente. Toss in olive oil and season to taste with salt and pepper. Place in the fridge to cool while you prep the other ingredients.
    2. Add pasta, red pepper, cabbage, carrots, edamame, and green onion to a large bowl.
    3. In a large mason jar, combine all dressing ingredients and shake until smooth and creamy.
    4. Pour dressing over the pasta salad and toss to coat evenly.
    5. Garnish with sesame seeds and enjoy!

    Pro Tips for Perfection

    Elevate your noodle salad game with these expert insights:

    • Don’t Overcook the Noodles: Aim for al dente to ensure your noodles maintain a nice texture.
    • Chill for Flavor: Allow your salad to chill for at least 30 minutes before serving. This helps the flavors meld beautifully.
    • Mix Up the Veggies: Feel free to add seasonal vegetables for added freshness and crunch.
    • Dress Right Before Serving: If meal prepping, keep the dressing separate until you’re ready to eat to prevent sogginess.
    • Try Different Noodle Types: Experiment with soba, udon, or even whole wheat noodles for a different twist.
    • Garnish Creatively: Add sliced avocado, crushed peanuts, or fresh herbs like cilantro or mint for an extra flavor boost.
    • Make It Spicy: Add some red pepper flakes or a drizzle of sriracha for a kick!
    • Stay Mindful of Salt: Since soy sauce can be salty, taste as you go to avoid over-seasoning!

    Common Mistakes and Troubleshooting

    Avoid these pitfalls for the best results:

    • Overcooking the Noodles: This will lead to mushy pasta. Cook just until al dente!
    • Not Chilling Enough: A chilled salad is a happy salad; give it time to cool and let flavors develop.
    • Poorly Mixed Dressing: Ensure all dressing ingredients are well combined for a balanced flavor.
    • Forgetting to Garnish: Skipping the sesame seeds or fresh herbs can take away from the visual appeal!

    Variations to Spice Things Up

    Here are some fun twists you can try in your sesame ginger noodle salad:

    • Add Protein: Toss in grilled chicken, shrimp, or tofu for a heartier meal.
    • Make it a Buddha Bowl: Serve over a bed of quinoa or brown rice for added fiber.
    • Try Different Dressings: Experiment with a peanut sauce or a citrus vinaigrette for a new flavor dimension.
    • Incorporate Fruits: Add diced mango or pineapple for a sweet contrast to the savory flavors.

    Storage and Make-Ahead Instructions

    This salad is fantastic for meal prep! Here’s how to store it:

    • Fridge Storage: Keep in an airtight container for up to 4 days.
    • Dress Separately: If making ahead, store the dressing separately until you’re ready to serve.
    • Freezing Not Recommended: This salad does not freeze well due to the texture of the noodles and veggies.

    Frequently Asked Questions

    Got questions? We’ve got answers! Here’s everything you need to know:

    • Can I use a different type of pasta? Absolutely! Feel free to experiment with your favorite noodles.
    • Is this salad gluten-free? Yes, if you use gluten-free noodles and tamari in the dressing.
    • How long does this salad last in the fridge? It stays fresh for about 4 days when stored properly.
    • Can I add meat to this salad? Yes! Grilled chicken, shrimp, or beef can be delicious additions.
    • What can I substitute for tahini? Peanut butter or sunflower seed butter work well if you’re looking for alternatives.
    • Can I make this salad spicy? Definitely! Add red pepper flakes or sriracha for some heat.
    • What’s the best way to chop the veggies? Aim for uniform sizes to ensure even distribution and a great bite!
    • Can I prepare this salad the night before? Yes! Just dress it right before serving for the best texture.

    Nutrition Tips and Dietary Adaptations

    This salad is naturally vegan and can be tailored to fit different dietary needs:

    • High Protein: Add tempeh or chickpeas for an extra protein boost.
    • Low Carb Option: Swap pasta for spiralized zucchini or shirataki noodles.
    • Nut-Free Version: Use sunflower seed butter instead of tahini or peanut butter.

    Essential Equipment Recommendations

    Here’s what you’ll need to make this salad:

    • Large Pot: For boiling the pasta.
    • Colander: To drain the pasta.
    • Large Mixing Bowl: For combining all ingredients.
    • Mason Jar: Perfect for shaking the dressing.

    Serving Suggestions

    This salad shines on its own, but you can also pair it with:

    • Grilled Veggies: Roasted asparagus or zucchini make great sides.
    • Spring Rolls: Serve with fresh vegetable spring rolls for a delightful meal.
    • Tofu Skewers: Marinated and grilled tofu skewers complement the salad perfectly.

    Final Thoughts

    There you have it! A vibrant, energizing Sesame Ginger Noodle Salad that is as fun to make as it is to eat. Whether you’re meal prepping or hosting friends, this salad will bring excitement and nourishment to your table. So why wait? Grab your ingredients, unleash your inner chef, and let the flavors dance on your palate!

    Sesame Ginger Noodle Salad [Vegan]

    Prep Time 15 minutes
    Cook Time 10 minutes
    Total Time 25 minutes
    Servings 4 servings
    Calories 450
    A vibrant and flavorful vegan noodle salad packed with fresh vegetables and a tangy sesame-ginger dressing.

    Ingredients

    Pasta

    • 16 oz spaghetti

    Vegetables

    • 1 cup red pepper, thinly sliced
    • 1 cup purple cabbage, thinly sliced
    • 1 cup shredded carrots
    • 1.5 cups shelled edamame
    • 3 stalks green onion, thinly sliced

    Garnish

    • 1/4 cup toasted sesame seeds, for garnish

    Dressing

    • 1 cup low sodium soy sauce
    • 1/3 cup rice vinegar
    • 1/4 cup olive oil
    • 2 tablespoons tahini (or peanut butter)
    • 1 tablespoon sesame oil
    • 1 tablespoon brown sugar
    • 1 teaspoon ground ginger
    • 1/2 teaspoon garlic powder

    Salt and pepper

    • Kosher salt
    • fresh cracked pepper

    Instructions 

    • Cook pasta until al dente, then toss with olive oil, salt, and pepper. Cool in fridge.
    • Combine pasta, vegetables, and green onion in a large bowl.
    • Mix dressing ingredients in a jar until smooth, then pour over salad and toss.
    • Garnish with toasted sesame seeds and serve.

    Notes

    Feel free to add more vegetables or adjust the dressing to taste.
    Calories: 450kcal
    Cost: $15
    Course: Salad
    Cuisine: Vegan
    Keyword: Noodles

    Welcome to Your New Favorite Salad Adventure!

    Are you ready to transform your lunch game with a vibrant, delicious, and utterly refreshing dish? Let’s dive into the world of the Fuji Apple Salad, inspired by the beloved Panera classic! With its crunchy romaine, sweet apples, and tangy dressing, this salad is not just a meal; it’s an experience! Perfect for busy weekdays or a delightful weekend brunch, this recipe will inspire you to eat healthily without sacrificing flavor. Join me as we explore why this salad is a must-try!

    Why You’ll Love This Recipe

    • Flavor Explosion: The combination of sweet Fuji and tart Granny Smith apples creates a perfect balance that dances on your taste buds.
    • Quick and Easy: With just a handful of ingredients, you can whip up this salad in under 15 minutes, making it ideal for a busy lifestyle.
    • Meal Prep Friendly: Make-ahead instructions ensure you can enjoy this salad throughout the week with minimal effort.
    • Versatile Variations: This recipe serves as a base for endless creative twists; whether you want to add protein or swap in different nuts, the possibilities are limitless!
    • Nutritious and Satisfying: Packed with vitamins from fresh produce, this salad is not only tasty but also provides a wholesome boost to your diet.

    Ingredient Breakdown

    Before we get cooking, let’s take a closer look at the ingredients you’ll need for this fabulous Fuji Apple Salad and some potential substitutions.

    • 6 cups romaine lettuce (chopped): Crisp and refreshing, romaine provides the perfect base. You can also use spinach or mixed greens for a different flavor.
    • 1 Fuji apple: Sweet and juicy, Fuji apples add a delightful crunch. Feel free to substitute with Honeycrisp or Gala apples if needed.
    • 1 Granny Smith apple: The tartness of Granny Smith apples perfectly balances the sweetness of Fuji apples. You can skip it if you prefer a sweeter salad.
    • 1/4 onion (sweet): A mild onion like Vidalia enhances the flavor without overpowering the salad. For a milder taste, soak in cold water before using.
    • 1/4 cup dried cranberries: These add a chewy sweetness and vibrant color. You can swap them with raisins or omit them for a lower-sugar option.
    • 1 cup walnuts (roughly chopped): Rich in healthy fats, walnuts give this salad a satisfying crunch. Pecans or almonds are excellent alternatives.

    Flavorful Dressing

    Side view of a fresh salad featuring Fuji and Granny Smith apples, walnuts, and cranberries.

    This salad is elevated by a homemade dressing that you can whip up in minutes!

    • 1/2 cup apple juice: Opt for 100% pure apple juice for the best flavor. You can also use fresh apple cider for a richer taste.
    • 1/4 cup white balsamic vinegar: This adds a tangy sweetness that complements the apples beautifully. If you don’t have it, regular balsamic works too, but it will darken the dressing.
    • 4 tablespoons honey: Honey acts as a natural sweetener. Maple syrup is a great vegan substitute!
    • 1/4 cup olive oil (extra virgin): Use high-quality olive oil for a richer flavor. Avocado oil is another fantastic choice.
    • 1/4 teaspoon garlic powder: A hint of garlic enhances the dressing without overwhelming it.
    • 1/4 teaspoon onion powder: This adds depth to the dressing.
    • 1/4 teaspoon ginger powder: A pinch of ginger gives a warm spice that elevates the overall taste.
    • 1/3 teaspoon cinnamon: A surprising yet delightful addition that pairs well with apples.
    • 1/4 teaspoon salt and pepper: Always season your dressing to enhance the flavors!

    How to Make the Fuji Apple Salad

    Now that we have our ingredients ready, let’s put everything together!

    1. Core and chop the apples into thin slices.
    2. Slice the onion into small bite-sized pieces.
    3. In a large bowl, toss together the romaine, apples, onions, cranberries, and walnuts.
    4. In a separate bowl, whisk together the apple juice, white balsamic vinegar, honey, olive oil, and spices until well combined.
    5. Drizzle the dressing over the salad just before serving and toss gently to combine.

    Pro Tips for the Perfect Salad

    • Balance your flavors: Taste as you go! Adjust the sweetness or acidity of your dressing to suit your palate.
    • Chill your ingredients: For an extra refreshing salad, chill your romaine and apples before tossing.
    • Don’t overdress: Start with a small amount of dressing; you can always add more if needed.
    • Include protein: For a heartier meal, add grilled chicken, tofu, or chickpeas for a satisfying boost.
    • Experiment with nuts: Try different nuts like pecans or even seeds for a unique twist.
    • Fresh herbs are your friend: Toss in some fresh mint or basil for an aromatic kick.
    • Make it gluten-free: This salad is naturally gluten-free, making it a great option for everyone!
    • Enjoy it fresh: For the best flavor and texture, enjoy your salad right after preparing it!

    Common Mistakes and Troubleshooting

    Even the best chefs make mistakes, so here are common pitfalls and how to avoid them:

    • Too soggy salad: If your salad is too soggy, you may have added the dressing too early. Dress just before serving to keep everything crisp!
    • Missing flavor: Always taste your dressing before adding it to the salad. Adjust seasoning as necessary to enhance the flavor profile.
    • Overwhelming sweetness: If the salad ends up too sweet, balance it with a bit more vinegar or add a pinch of salt.
    • Chopping too large: Ensure your ingredients are chopped to bite-sized pieces for optimal enjoyment.

    Variations to Try

    Get creative! Here are some scrumptious variations to keep your Fuji Apple Salad exciting:

    • Protein-Packed Version: Add grilled chicken or shrimp for a hearty meal.
    • Vegan Delight: Swap honey for maple syrup and skip any animal products.
    • Cheesy Twist: Crumble feta or goat cheese for a tangy, creamy addition.
    • Spicy Crunch: Toss in some sliced jalapeños for a spicy kick!

    Storage and Make-Ahead Instructions

    This salad is perfect for meal prep!

    • Store ingredients separately: Keep the dressing in a separate container to prevent the salad from getting soggy.
    • Chill for freshness: Store in the refrigerator in an airtight container for up to 3 days.
    • Prep ahead: Chop your veggies and mix the dressing ahead of time for quick assembly right before eating.

    Frequently Asked Questions

    Here are some common questions about the Fuji Apple Salad:

    • Can I use other types of apples? Absolutely! Honeycrisp or Gala apples can be great substitutes.
    • How do I keep my salad fresh? Store components separately and add dressing just before serving.
    • Is this salad gluten-free? Yes, all ingredients are naturally gluten-free!
    • Can I make this salad vegan? Yes! Just replace honey with maple syrup.
    • What can I serve with this salad? It’s perfect alongside grilled meats, sandwiches, or as a light meal on its own.
    • How long will leftovers last? Enjoy within 3 days for the freshest taste!
    • Can I add more vegetables? Definitely! Feel free to toss in your favorite veggies like bell peppers or cucumbers.
    • What dressing can I use instead? A lemon vinaigrette or yogurt-based dressing would also be delicious!

    Nutrition Tips and Dietary Adaptations

    This salad is not only a feast for your taste buds but also for your health! Here are some nutrition tips:

    • Boost your fiber: Add more fruits and veggies to increase fiber content, which is great for digestion.
    • Healthy fats: Walnuts provide heart-healthy fats; feel free to add avocado for an extra dose!
    • Protein power: Incorporate protein sources to keep you full longer—consider beans, nuts, or lean meats.

    Equipment Recommendations

    Here’s what you’ll need to whip up this delightful salad:

    • Cutting board and knife: Essential for chopping your ingredients.
    • Large mixing bowl: For tossing your salad together.
    • Whisk: Perfect for mixing your dressing until smooth.
    • Airtight containers: Great for storing leftovers or prepped ingredients.

    Serving Suggestions

    Here are some ideas for serving your Fuji Apple Salad:

    • Garnish with herbs: Top with fresh herbs like parsley or cilantro for added freshness.
    • Serve with grilled proteins: This salad pairs beautifully with grilled chicken, salmon, or tofu.
    • Light lunch option: Enjoy it on its own for a light, nutritious meal.

    Conclusion: Dive into the Deliciousness!

    And there you have it—a vibrant, nutritious, and utterly delightful Fuji Apple Salad that’s sure to brighten your day! With its burst of flavors and colors, this salad not only nourishes your body but also excites your palate. So grab your ingredients, invite some friends over, and enjoy this healthy celebration together. Remember, healthy eating can be bold, fun, and absolutely delicious. Happy cooking!

    Easy Fuji Apple Panera Salad Copycat

    Prep Time 10 minutes
    Total Time 10 minutes
    Servings 4 servings
    Calories 350
    A fresh and delicious salad inspired by Panera's Fuji Apple Salad, combining crisp greens, sweet apples, and crunchy walnuts with a tangy vinaigrette.

    Ingredients

    Produce

    • 6 cups romaine lettuce (chopped)
    • 1 apple Fuji apple
    • 1 apple Granny Smith apple
    • 1/4 onion sweet onion
    • 1/4 cup dried cranberry
    • 1 cup walnuts (roughly chopped)

    Dressing

    • 1/2 cup apple juice
    • 1/4 cup white balsamic vinegar
    • 4 tablespoons honey
    • 1/4 cup olive oil (extra virgin)
    • 1/4 teaspoon garlic powder
    • 1/4 teaspoon onion powder
    • 1/4 teaspoon ginger powder
    • 1/3 teaspoon cinnamon
    • 1/4 teaspoon salt
    • 1/4 teaspoon pepper

    Instructions 

    • Core and slice apples.
    • Slice onion into small pieces.
    • Toss lettuce, apples, onions, cranberries, and walnuts in a large bowl.

    Notes

    Chill before serving for best flavor.
    Calories: 350kcal
    Cost: $15
    Course: Salad
    Cuisine: American
    Keyword: apple, Salad

    Discover the Vibrant World of Thai Mango Salad

    Welcome to a culinary adventure that takes you straight to the heart of Thailand with our 10-Minute Thai Mango Salad! This refreshing dish is a delightful blend of crunchy vegetables, zesty lime, and a hint of spice that brings a burst of tropical flavors to your plate. Whether you’re looking for a quick lunch, a light dinner, or a stunning side dish for your summer gatherings, this mango salad is here to impress. Let’s dive into the why and how of this exciting recipe!

    Why You’ll Love This Recipe

    • Quick and Easy: Whip this salad up in just 10 minutes, making it perfect for busy weeknights or last-minute gatherings.
    • Fresh and Flavorful: The combination of green mangoes, crunchy vegetables, and a tangy dressing creates a vibrant taste sensation.
    • Nutritious: Packed with vitamins and minerals, this salad offers a healthy boost of Vitamin C and dietary fiber.
    • Customizable: Adjust the spice levels to your liking or swap ingredients to suit your taste—this salad is all about flexibility!
    • Perfect for Any Occasion: Whether it’s a casual lunch, a potluck, or a fancy dinner, this salad shines as a versatile dish.

    Ingredient Breakdown

    Let’s take a closer look at what goes into this Thai mango salad and how you can modify it to suit your tastes.

    • Green Mangoes: 2 firm green mangoes, peeled and julienned. These are the star of the dish, providing a crisp texture and tart flavor.
    • Red Bell Pepper: 1 small red bell pepper, thinly sliced. Adds sweetness and a pop of color.
    • Carrot: 1 medium carrot, julienned. A great source of crunch and nutrients.
    • Red Onion: 1 small red onion, thinly sliced. For a bit of sharpness and color contrast.
    • Cilantro and Mint: A handful of fresh cilantro and mint leaves for that aromatic kick.
    • Chilies: 2-3 Thai bird chilies, finely chopped. Adjust according to your heat preference!
    • Roasted Peanuts: 2 tablespoons, crushed. Adds a delightful crunch.
    • Garlic: 1 clove, minced. For that savory depth.
    • Lime Juice: 3 tablespoons of fresh lime juice. The tangy dressing that brings everything together.
    • Fish Sauce: 2 tablespoons. A traditional ingredient that adds umami.
    • Palm Sugar or Brown Sugar: 1-2 tablespoons. Balances the acidity of the lime.
    • Neutral Oil: 1 tablespoon (optional). Helps to mellow the dressing if desired.

    Pro Tips for the Perfect Thai Mango Salad

    Colorful Thai mango salad featuring julienned mangoes, red bell peppers, and fresh herbs.
    • Choose the Right Mango: Look for firm, unripe mangoes—they should be slightly green and not too soft.
    • Customize Your Heat: If you’re not a fan of spice, start with one chili and add more to taste.
    • Fresh Ingredients Matter: Use fresh herbs and vegetables for the best flavor and texture.
    • Don’t Skip the Dressing: The dressing is where the magic happens—taste and adjust it until it’s just right for you.
    • Prep Ahead: You can prep the ingredients ahead of time and toss them together right before serving.
    • Experiment with Proteins: Add grilled chicken, shrimp, or tofu for a heartier meal!
    • Keep It Crunchy: Toss the salad gently to keep the mangoes and vegetables crisp.
    • Make it Vegan: Substitute fish sauce with soy sauce or coconut aminos.

    Avoiding Common Mistakes

    Here are some common pitfalls to watch out for when making your Thai mango salad:

    • Overripe Mangoes: Make sure your mangoes are firm; overripe ones will make the salad mushy.
    • Too Much Dressing: Start with a small amount of dressing and add more as needed to avoid sogginess.
    • Chopping Sizes: Keep your vegetable cuts uniform for even texture and presentation.
    • Skipping the Herbs: Fresh herbs elevate this dish—don’t leave them out!

    Variations to Try

    Want to mix things up? Here are some delicious variations of this mango salad:

    • Fruit Fiesta: Add diced pineapple or papaya for a tropical twist.
    • Protein-Packed: Toss in grilled shrimp or chicken for a filling meal.
    • Nutty Delight: Substitute roasted cashews for peanuts or use a mix of nuts.
    • Spicy Kick: Add a dash of chili sauce or sriracha for an extra punch.

    Storage and Make-Ahead Instructions

    This salad is best enjoyed fresh, but you can store it in the refrigerator for a few hours:

    • Storage: Keep the salad in an airtight container. It will stay crisp for up to 3 hours.
    • Make-Ahead: Prep the vegetables and dressing separately. Combine just before serving to maintain crunch.

    Frequently Asked Questions

    Here are some common questions about making a Thai mango salad:

    • Can I use ripe mangoes?: You can, but they will be sweeter and softer. Aim for firm green mangoes for the best texture.
    • What if I don’t have fish sauce?: Soy sauce or coconut aminos are great alternatives for a vegan option.
    • How can I make it spicy?: Increase the number of chilies or add some chili flakes to the dressing.
    • Can I add other vegetables?: Absolutely! Cucumbers or radishes can add extra crunch.
    • Is it gluten-free?: Yes, as long as you use a gluten-free fish sauce or substitute.
    • What’s a good serving suggestion?: Serve it as a side to grilled meats or as a light lunch on its own.
    • How can I adjust the sweetness?: Add more or less palm sugar to balance the flavors to your liking.
    • How long does it last in the fridge?: Best eaten fresh, but can be stored for a few hours. The dressing can be made in advance.

    Nutrition Tips and Dietary Adaptations

    This Thai mango salad is not just delicious but also nutritious! Here are some tips:

    • Boost Fiber: Add more veggies like bell peppers or leafy greens for extra fiber.
    • Healthy Fats: Incorporate avocado for a creamy texture and healthy fats.
    • Low-Carb Option: Skip the sugar and use stevia or erythritol for a low-carb version.
    • Vitamin Boost: Add more herbs like parsley or basil for additional vitamins and minerals.

    Equipment Recommendations

    To make your salad-making experience seamless, consider having the following tools:

    • Sharp Knife: For precise cuts of your vegetables.
    • Cutting Board: A stable surface for chopping.
    • Mixing Bowl: A large bowl to combine all your ingredients easily.
    • Whisk: For mixing the dressing thoroughly.
    • Airtight Container: For storing leftovers and keeping them fresh.

    Serving Suggestions

    This mango salad is incredibly versatile! Here are some tasty ways to serve it:

    • As a Side Dish: Pair it with grilled chicken, fish, or tofu for a balanced meal.
    • On a Bed of Greens: Serve it over a bed of spinach or mixed greens for a colorful salad.
    • With Rice or Noodles: Use it as a refreshing topping for rice bowls or noodle dishes.
    • In Lettuce Wraps: Use romaine or butter lettuce leaves to create fun wraps!

    With all these tips, tricks, and variations, you’re ready to create a stunning and delicious Thai mango salad that will impress your friends and family! Let your kitchen be your playground, and have fun experimenting with flavors. Happy cooking!

    Simple Thai Mango Salad (10 Minutes)

    Prep Time 10 minutes
    Total Time 10 minutes
    Servings 4 people
    Calories 150
    A quick and vibrant Thai mango salad combining fresh fruits, herbs, and a tangy dressing for a refreshing appetizer or side dish.

    Ingredients

    Main ingredients

    • 2 pieces firm green mangoes, peeled and julienned
    • 1 small red bell pepper, thinly sliced
    • 1 medium carrot, julienned
    • 1 small red onion, thinly sliced
    • 1 handful fresh cilantro leaves
    • 1 handful fresh mint leaves
    • 2 pieces Thai bird chilies, finely chopped
    • 2 tbsp roasted peanuts, crushed
    • 1 clove garlic, minced
    • 3 tbsp fresh lime juice
    • 2 tbsp fish sauce
    • 2 tbsp palm sugar or brown sugar
    • 1 tbsp neutral oil (optional)

    Instructions 

    • Peel and julienne the mangoes, then place in a large bowl.
    • Add sliced bell pepper, julienned carrot, and sliced onion to the bowl.
    • Mix lime juice, fish sauce, minced garlic, and sugar until dissolved; add oil if desired.
    • Pour dressing over the salad, add chopped chilies, and toss gently.
    • Fold in most herbs, transfer to a plate, sprinkle with peanuts and remaining herbs.
    • Serve immediately or chill briefly for a refreshing start.

    Notes

    Adjust chili level to taste for milder or spicier salad.
    Calories: 150kcal
    Cost: $10
    Course: Appetizer, Side Dish
    Cuisine: Thai
    Keyword: Mango, Salad

    Ignite Your Culinary Adventure with Spicy Sriracha Glazed Shrimp Bowls!

    Are you ready to take your taste buds on a wild ride? Dive into the vibrant flavors of Spicy Sriracha Glazed Shrimp Bowls! This quick, nutritious recipe combines succulent shrimp, zesty veggies, and a creamy kick to create an exciting meal that’s ready in no time. Perfect for busy days and bursting with flavor, this dish will make you rethink what healthy eating truly means!

    Why You’ll Love This Recipe

    • Quick and Easy: Whip this up in just 30 minutes—ideal for busy weeknights! No complicated steps, just delightful flavors.
    • Flavor Explosion: The mix of spicy Sriracha, sweet honey, and zesty lime creates a mouthwatering experience that dances on your palate!
    • Customizable: Whether you prefer more veggies or a twist of protein, this recipe adapts to your taste. Swap shrimp for tofu or chicken if you like!
    • Nutritious and Filling: Packed with protein and fiber, these bowls will keep you energized and satisfied, making it a guilt-free indulgence.
    • Visually Stunning: The vibrant colors of the dish not only make it a feast for the palate but also for the eyes. Perfect for impressing guests or enjoying solo!

    Ingredients Breakdown

    Before we get cooking, let’s gather our ingredients. Here’s what you’ll need to create these flavorful bowls:

    • 1½ lbs wild-caught shrimp: Peeled, deveined, and rinsed to perfection.
    • 2 tbs olive oil: Divided for cooking and enhancing flavors.
    • 2 tbs Sriracha sauce: This is where the magic happens—add more for extra heat!
    • Seasonings: Salt, paprika, dried oregano, cumin, onion powder, garlic powder, and Old Bay seasoning to taste.
    • 12 oz cherry tomatoes: Halved for freshness and flavor.
    • 1/4 red onion: Finely diced to add a sweet crunch.
    • 2 tbs fresh chives: Chopped for a hint of oniony brightness.
    • 1 lime: Juiced for a zesty kick.
    • 2 cups cooked basmati rice: The perfect base for your shrimp bowl!
    • 1 large cucumber: Diced small for a refreshing crunch.
    • 1 large avocado: Sliced to add creaminess.
    • 1/4 cup Kewpie mayo: This Japanese mayo is creamier than regular mayo and elevates the dish!
    • 1 tbs Sriracha: To mix into the mayo for a spicy kick.
    • 1 tsp honey: Balances the heat with a touch of sweetness.

    Pro Tips for Cooking Success

    A detailed view featuring a bowl of Spicy Sriracha Glazed Shrimp with cherry tomatoes, cucumber, and avocado arranged beautifully.
    • Prep Ahead: Chop all your veggies and prepare your ingredients before cooking. This makes the process a breeze!
    • Don’t Overcook the Shrimp: Cook shrimp just until they are pink and opaque—overcooking makes them rubbery.
    • Adjust the Heat: If you’re sensitive to spice, start with less Sriracha, then add more to your taste.
    • Use Fresh Ingredients: Fresh veggies and herbs elevate your dish significantly—choose them wisely!
    • Meal Prep Friendly: This dish holds up well in the fridge, making it perfect for meal preppers.
    • Garnish Generously: Add extra chives or sesame seeds before serving for an added touch of elegance!
    • Mix Your Sauces: Combine Kewpie mayo with Sriracha and honey for a creamy sauce that ties everything together.
    • Don’t Skimp on Lime: The acidity from lime brightens the entire dish and balances the flavors beautifully!

    Common Mistakes to Avoid

    Even the best chefs make mistakes! Here are some common blunders and how to avoid them:

    • Skipping the Marinade: Allow the shrimp to marinate for at least 15 minutes for maximum flavor absorption.
    • Using Overcooked Rice: Use fluffy, well-cooked basmati rice; soggy rice can ruin your bowl.
    • Not Tasting as You Go: Adjust flavors at every step—this ensures a balanced dish!
    • Ignoring Ingredient Quality: Don’t compromise on fresh ingredients—the difference is palpable!

    Variations to Spice Things Up

    Feeling adventurous? Here are some fun variations to try:

    • Protein Swap: Substitute shrimp with chicken, tofu, or even tempeh for a plant-based option.
    • Veggie Power Bowl: Add more colorful veggies like bell peppers, snap peas, or carrots for extra crunch and nutrition.
    • Coconut Rice Base: Instead of basmati, use coconut rice for a tropical twist!
    • Spicy Mango Salsa: Top your bowl with a refreshing mango salsa for a sweet and spicy combo!

    Storage and Make-Ahead Instructions

    This recipe is perfect for meal prep! Here’s how to store it:

    • In the Fridge: Store leftovers in airtight containers for up to 3 days. Reheat gently on the stove or in the microwave.
    • Make Ahead: Prepare the shrimp and rice ahead of time. Assemble your bowls right before serving for the best texture.
    • Freeze for Later: If you want to store it longer, freeze the shrimp (cooked) and rice separately for up to 2 months. Thaw in the fridge overnight before reheating.

    Frequently Asked Questions

    • Can I use frozen shrimp? Yes! Just ensure they’re thawed and patted dry before cooking.
    • Is this dish gluten-free? Yes, as long as you use gluten-free soy sauce or tamari!
    • Can I make this dish spicy? Absolutely! Add more Sriracha or even some red pepper flakes for an extra kick!
    • What can I substitute for Kewpie mayo? Regular mayo works, but for a twist, try Greek yogurt mixed with a bit of Sriracha!
    • How do I make the rice fluffy? Rinse basmati rice before cooking to remove excess starch, ensuring it stays fluffy!
    • Can I skip the avocado? While it adds creaminess, you can replace it with another creamy element like tahini or simply omit it.
    • What’s the best way to cook shrimp? Sautéing or grilling works best! Just watch them carefully to avoid overcooking.
    • Can I use other types of rice? Yes! Brown rice or jasmine rice are great alternatives, but cooking times may vary.

    Equipment Recommendations

    Get the right tools for a seamless cooking experience:

    • Non-stick skillet: For easy shrimp cooking and cleanup.
    • Rice cooker: Perfect for consistently fluffy rice.
    • Sharp knife: Essential for chopping veggies quickly and efficiently.
    • Cutting board: A sturdy surface for all your chopping needs.
    • Measuring spoons: Ensure accuracy in your ingredient amounts!

    Serving Suggestions

    Ready to serve? Here are some ideas to make your meal even more enjoyable:

    • Serve with lime wedges: A squeeze of fresh lime right before eating enhances the flavors.
    • Pair with a refreshing drink: A cool cucumber mint lemonade complements the dish perfectly!
    • Garnish with sesame seeds: Add a sprinkle for an extra touch of gourmet flair!
    • Serve family-style: Set everything out and let everyone build their own bowls—fun and interactive!

    Conclusion

    There you have it—your roadmap to an unforgettable meal with Spicy Sriracha Glazed Shrimp Bowls. This dish not only delivers on flavor but also on health and creativity. So, roll up your sleeves and get cooking. Your taste buds are in for a treat!

    Spicy Sriracha Glazed Shrimp Bowls

    Prep Time 10 minutes
    Cook Time 10 minutes
    Total Time 20 minutes
    Servings 4 servings
    Calories 450
    Enjoy a vibrant and spicy shrimp bowl featuring fresh vegetables, rice, and a flavorful Sriracha glaze for a satisfying meal.

    Ingredients

    Protein

    • 1.5 lbs wild caught shrimp, (peeled, deveined + rinsed)

    Cooking Oils

    • 2 tbs olive oil ((divided))

    Sauces & Condiments

    • 2 tbs Sriracha sauce (hot sauce)
    • 1/4 cup Kewpie mayo
    • 1 tsp honey

    Vegetables

    • 12 oz cherry tomatoes, (halved)
    • 1/4 red onion red onion, (fine dice)
    • 1 large cucumber, (diced small)
    • 1 large avocado, (sliced)

    Herbs & Seasonings

    • 2 tbs fresh chives, (chopped)
    • 1 lime lime, (juiced)
    • to taste salt, paprika, dried oregano, cumin, onion powder, garlic powder, Old Bay Seasoning

    Grains

    • 2 cups cooked basmati rice

    Instructions 

    • Prepare all ingredients and cook the shrimp last.

    Notes

    Adjust seasonings to taste and serve immediately for best flavor.
    Calories: 450kcal
    Cost: $15
    Course: Main Course
    Cuisine: fusion
    Keyword: shrimp