Author

Ryan

Browsing

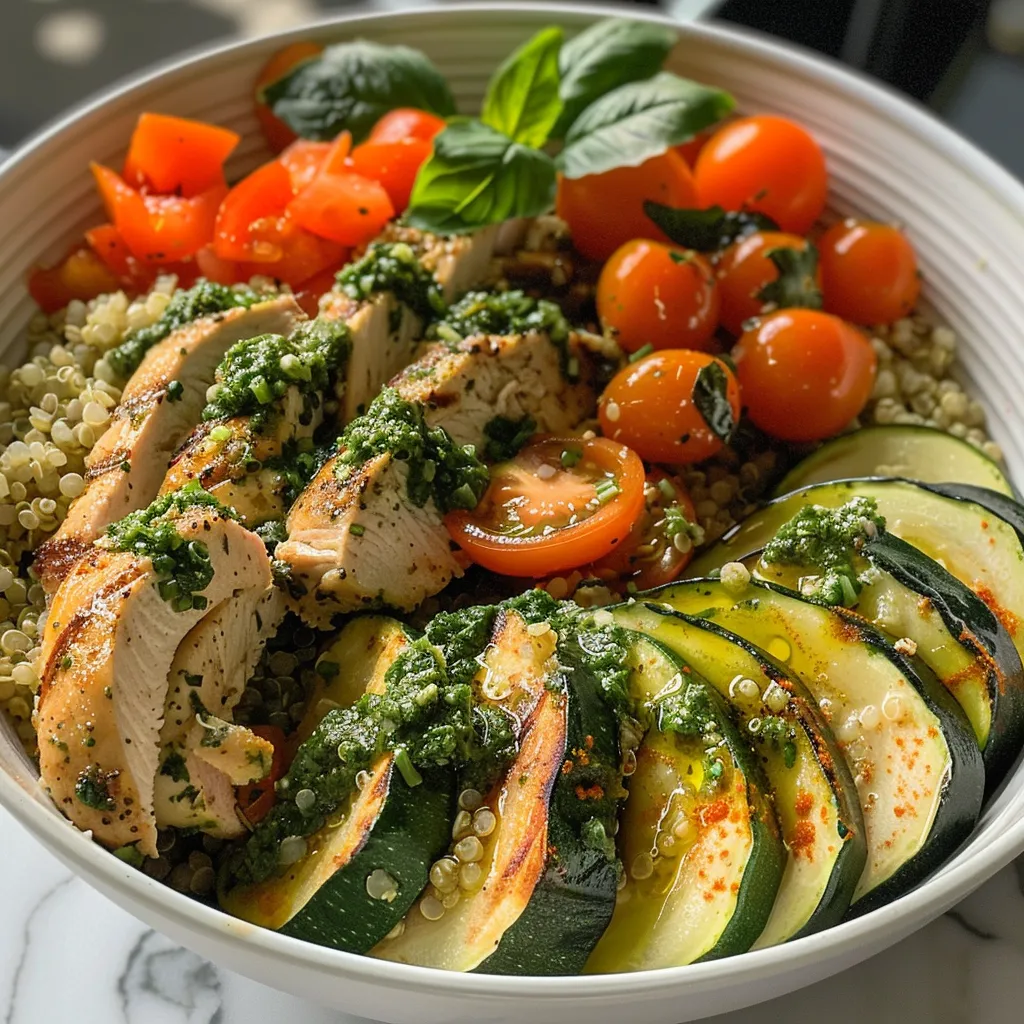
Transform Your Dinner Routine with a Colorful Pesto Chicken Quinoa Bowl

Welcome to your next culinary adventure! If you’re looking to elevate your dinner game, you’ve landed in the right spot. Our Pesto Chicken Quinoa Bowl is not just a meal; it’s a celebration of vibrant flavors and nutritious ingredients that will invigorate your weeknight dinners. Packed with protein from succulent chicken and fiber from wholesome quinoa, this bowl is perfect for busy days or cozy nights. Here, you’ll find everything you need to whip up this delightful dish, so let’s get cooking!

Why You’ll Love This Recipe

  • Nutritious and Balanced: This bowl combines lean protein, whole grains, and fresh vegetables, making it a well-rounded meal.
  • Flavor Explosion: The zesty pesto and roasted veggies create a symphony of flavors that excite your taste buds.
  • Quick and Easy: With minimal prep and cook time, you can have dinner ready in under 30 minutes!
  • Versatile Ingredients: Customize it with your favorite veggies or substitute with plant-based proteins for dietary preferences.
  • Meal Prep Friendly: Make a double batch for easy, healthy lunches throughout the week.

Ingredient Breakdown

Let’s dive into the vibrant ingredients that make this dish shine. Here’s what you’ll need:

  • 1 1/2 cups quinoa: A fantastic source of complete protein and fiber. Substitute with brown rice or farro if desired.
  • Water for boiling: Essential for cooking the quinoa.
  • Salt: A pinch to enhance the flavor of boiling water.
  • 1 pound chicken breasts: Lean protein that you can easily swap for tofu or chickpeas for a plant-based option.
  • 2 tablespoons olive oil: Adds healthy fats and flavor. Avocado oil works well too!
  • 1 tablespoon lemon juice: Brightens the dish and adds a zesty kick.
  • 1 teaspoon Italian seasoning: A blend of herbs that brings a Mediterranean flair.
  • 1/2 teaspoon red pepper flakes: Optional, for those who enjoy a bit of heat!
  • 1 teaspoon garlic powder: Essential for that savory depth of flavor.
  • 1 teaspoon salt: To season the chicken and veggies.
  • 1/4 teaspoon black pepper: Adds a gentle spice.
  • 2 cups cherry tomatoes: Sweet and juicy, they add color and nutrition.
  • 1 medium zucchini: Sliced for a nutritious crunch.
  • 1/4 cup pesto: The star of the show! Use homemade or store-bought for convenience.
  • Fresh basil leaves: For garnishing and an aromatic finish.
  • Parmesan cheese: Optional, for a savory topping.

How to Make Your Pesto Chicken Quinoa Bowl

Side view of a vibrant bowl featuring quinoa, chicken, and cherry tomatoes.

Ready to get cooking? Follow these simple steps to create your bowl of deliciousness:

  1. Cook the Quinoa: Fill a saucepan with water and bring it to a boil. Add a generous pinch of salt and the quinoa. Cook for about 15 minutes or according to package instructions until tender. Drain the quinoa in a fine mesh colander and shake to remove excess water.
  2. Marinate the Chicken: In a large bowl, whisk together olive oil, lemon juice, Italian seasoning, red pepper flakes, garlic powder, and salt. Add the chicken breasts and toss to coat thoroughly in the marinade.
  3. Cook the Chicken: Heat a large pan over medium-high heat with a splash of olive oil. Add the marinated chicken breasts and cook for 5-6 minutes per side, until golden brown and the internal temperature reaches 165°F.
  4. Prep the Veggies: While the chicken cooks, add cherry tomatoes and zucchini to the marinade bowl and toss to absorb extra flavor.
  5. Slice the Chicken: Once cooked, remove the chicken from the pan and let it rest for at least 5 minutes. Then slice into strips.
  6. Sauté the Veggies: Using the same pan, reduce the heat to medium and add the marinated vegetables. Cook for 3-4 minutes until zucchini is tender and cherry tomatoes start to burst.
  7. Mix the Quinoa: Return the cooked quinoa to the pot. Stir in 1/4 cup pesto until evenly incorporated and heated through.
  8. Assemble Your Bowl: Layer the pesto quinoa in bowls, top with sliced chicken and sautéed vegetables. Drizzle with extra pesto, and garnish with fresh basil leaves and grated Parmesan cheese.
  9. Store Leftovers: Cool any leftovers and store in the refrigerator for up to 4 days or freeze for up to 3 months.

Pro Tips for a Perfect Bowl

  • Perfect Cooking: Ensure your quinoa is fluffy by rinsing it before cooking to remove the saponins, which can give a bitter taste.
  • Marinate for Flavor: Let the chicken marinate for at least 30 minutes (or overnight) to deepen the flavor.
  • Don’t Skip the Rest: Let the chicken rest after cooking—it keeps it juicy!
  • Veggie Variations: Feel free to swap in your favorite seasonal veggies like bell peppers or asparagus.
  • Batch Cooking: Prepare a large batch of quinoa on the weekend to make assembly quicker during busy weekdays.
  • Cheese Choices: Experiment with different cheeses like feta or goat cheese for varied flavors.
  • Fresh Herbs: Add a splash of freshness with chopped parsley or cilantro for a different twist.
  • Spice it Up: If you love heat, try adding jalapeños or spicy pesto.
  • Serving Size: Adjust the servings based on your appetite—this recipe is easily scalable!

Common Mistakes to Avoid

Even the best recipes can go awry! Here are common pitfalls to watch out for:

  • Overcooked Quinoa: Keep an eye on the cooking time; overcooked quinoa can become mushy.
  • Undermarinated Chicken: Not allowing enough time for the chicken to marinate can result in bland flavors.
  • Skipping the Resting Time: Cutting into the chicken too soon will let the juices escape, leading to dryness.
  • Not Using Enough Seasoning: Don’t be shy with the seasonings; they bring the dish to life!

Variations to Try

Want to mix things up? Here are some fun variations to keep your Pesto Chicken Quinoa Bowl fresh:

  • Mediterranean Twist: Swap chicken for grilled shrimp and add kalamata olives and feta.
  • Vegan Delight: Use chickpeas instead of chicken and top with tahini sauce.
  • Spicy Kick: Add chipotle sauce or diced jalapeños for a spicy version.
  • Nutty Crunch: Top with toasted pine nuts or almonds for added texture.

Storage and Make-Ahead Instructions

This recipe is great for meal prep! Here’s how to store it:

  • Refrigeration: Store in an airtight container in the fridge for up to 4 days.
  • Freezing: Portion into freezer-safe containers for up to 3 months—just reheat when you’re ready!
  • Make Ahead: Prepare the quinoa and marinated chicken in advance; just cook and assemble when ready to eat.

Frequently Asked Questions

Here are some common questions about this recipe:

  • Can I use brown rice instead of quinoa? Absolutely! Just adjust the cooking time according to the package instructions.
  • What can I substitute for pesto? A homemade herb sauce or even hummus can work as a great alternative.
  • Is this recipe gluten-free? Yes, quinoa is gluten-free, making this dish a great option for those with gluten sensitivities.
  • Can I add more veggies? Definitely! Feel free to add any veggies you love or have on hand.
  • How do I know when the chicken is fully cooked? Use a meat thermometer to ensure it reaches an internal temperature of 165°F.
  • Can I make this dish vegetarian? Yes! Simply replace the chicken with plant-based protein like tofu or tempeh.
  • What’s the best way to reheat leftovers? Microwave or heat on the stove, adding a splash of water to keep it moist.
  • Can I use frozen vegetables? Yes! Just add them to the pan for a few extra minutes to cook through.

Nutritional Tips and Dietary Adaptations

This Pesto Chicken Quinoa Bowl is not just delicious; it’s also packed with nutrients! Here’s how you can adapt it:

  • Calorie-Conscious: Use skinless chicken breasts and reduce the amount of pesto for a lighter option.
  • Protein-Packed: Incorporate beans or lentils for an extra protein boost.
  • Low-Carb Option: Substitute quinoa with cauliflower rice for a low-carb version.

Essential Kitchen Equipment

Here’s what you’ll need to make this recipe:

  • Medium saucepan: For cooking the quinoa.
  • Large bowl: To marinate the chicken.
  • Cast iron skillet or large frying pan: For cooking the chicken and veggies.
  • Fine mesh colander: To drain the cooked quinoa.
  • Meat thermometer: To ensure the chicken is safely cooked.

Serving Suggestions

This dish is perfect on its own or served with:

  • Garlic Bread: A crunchy side to complement your meal.
  • Mixed Green Salad: A refreshing salad to balance the hearty bowl.
  • Fruit Salad: A sweet finish to your dinner.

Now that you’re armed with this comprehensive guide, it’s time to hit the kitchen! Join me in creating a Pesto Chicken Quinoa Bowl that not only satisfies your taste buds but nourishes your body. Dive into this vibrant dish that brings warmth to busy days and a little sweetness to quiet moments. Happy cooking!

Pesto Chicken Quinoa Bowl Recipe

Prep Time 10 minutes
Cook Time 25 minutes
Total Time 35 minutes
Servings 4 servings
Calories 550
A flavorful and healthy bowl combining tender chicken, quinoa, and fresh vegetables, all topped with pesto and garnished with basil and Parmesan.

Ingredients

Grains

  • 1.5 cups quinoa, raw
  • Water for boiling water (for boiling quinoa)
  • a pinch salt (for boiling quinoa)

Protein

  • 1 pound chicken breasts
  • 2 tablespoons olive oil (plus more for cooking)
  • 1 tablespoon lemon juice
  • 1 teaspoon Italian seasoning
  • 1/2 teaspoon red pepper flakes (optional)
  • 1 teaspoon garlic powder
  • 1 teaspoon salt
  • 1/4 teaspoon black pepper

Vegetables

  • 2 cups cherry tomatoes
  • 1 medium zucchini (quartered and sliced)
  • 1/4 cup pesto (plus more to serve)

Garnishes

  • Fresh basil leaves

Instructions 

  • Cook quinoa in boiling water with a pinch of salt for 15 minutes, then drain.
  • Marinate chicken with olive oil, lemon juice, Italian seasoning, red pepper flakes, garlic powder, and salt.
  • Cook chicken in a skillet for 5-6 minutes per side until golden and cooked through. Rest and slice into strips.
  • In the same pan, sauté cherry tomatoes and zucchini for 3-4 minutes until tender and bursting.
  • Mix cooked quinoa with pesto, then assemble bowls topped with chicken, vegetables, basil, and Parmesan.

Notes

Store leftovers in the refrigerator for up to 4 days or freeze for 3 months.
Calories: 550kcal
Cost: $15
Course: Main Course
Cuisine: Italian
Keyword: Chicken, Pesto, Quinoa

Discover the Vibrant World of Apple Walnut Salad

Welcome to a culinary adventure that celebrates the rich flavors and textures of our Apple Walnut Salad. This salad is not just a dish; it’s a delightful experience packed with energizing nutrients. Combining crunchy walnuts, sweet apples, and nutrient-rich quinoa, this salad is a perfect choice for a light lunch or a stunning side dish. Let’s dive into why you’ll absolutely love making this salad and how simple it is to whip up!

Why You’ll Love This Recipe

This salad is more than just a mix of ingredients; it’s a celebration of flavor and nutrition! Here are five reasons why you’ll adore this recipe:

  • Flavor Explosion: The combination of sweet apples and crunchy walnuts creates a symphony of flavors that dance on your palate.
  • Nutrient Powerhouse: Packed with vitamins, antioxidants, and healthy fats, this salad supports overall health and wellness.
  • Quick to Prepare: With minimal prep time, you can enjoy this refreshing salad in under 30 minutes!
  • Customizable: Feel free to mix and match ingredients to suit your taste preferences or dietary needs.
  • Perfect for Meal Prep: This salad stays fresh and delicious, making it an excellent option for meal prep or a quick grab-and-go lunch.

Ingredients Breakdown

Let’s get into the nitty-gritty of what you’ll need to create this delightful Apple Walnut Salad.

For the Salad:

  • 1 cup uncooked quinoa: A fantastic source of protein and fiber that adds a nutty flavor.
  • 2 cups water: For cooking the quinoa.
  • 2 cups spinach, roughly chopped: Adds a fresh, leafy crunch.
  • 1 cup walnuts, roughly chopped: Provides healthy fats and a satisfying crunch.
  • 1 ½ cups apples, diced: Use a mix of sweet and tart varieties for depth of flavor.
  • ¼ cup cranberries: For a hint of sweetness and chewy texture.
  • ¼ cup red onion, finely chopped: Adds a zesty bite.

For the Dressing:

  • 3 tablespoons olive oil: A healthy fat that ties the salad together.
  • 2 tablespoons apple cider vinegar: Offers a tangy flavor that complements the sweetness of the apples.
  • 1 tablespoon maple syrup: Natural sweetness that balances the dressing.
  • 2 teaspoons Dijon mustard: Adds a savory depth to the dressing.
  • ½ teaspoon salt: Enhances flavors.
  • ¼ teaspoon black pepper: A dash of spice to round out the dressing.

Feel free to substitute any of these ingredients based on availability or personal preference. For instance, you can use walnuts or pecans, and swap spinach for kale or mixed greens.

How to Make Apple Walnut Salad

Side view of a vibrant Apple Walnut Salad showcasing walnuts, cranberries, and red onion.

Ready to bring this salad to life? Follow these simple steps:

  1. Start by toasting the quinoa. Place it in a medium saucepan over medium heat, stirring occasionally until the seeds begin to pop and release an aromatic scent.
  2. Add 2 cups of water to the quinoa, bring it to a boil, then reduce the heat to low. Cover the pan and simmer for 15 minutes. Once done, remove the pan from the heat and let it sit, covered, for 10 more minutes. Fluff the quinoa with a fork and season with salt.
  3. While the quinoa cools, prepare the dressing. In a small bowl, whisk together the olive oil, apple cider vinegar, maple syrup, Dijon mustard, salt, and pepper until well combined.
  4. Once the quinoa has cooled to room temperature, transfer it to a large bowl. Add the spinach, walnuts, apples, cranberries, and red onion.
  5. Pour the dressing over the salad and toss gently to combine. Serve immediately at room temperature or chill in the refrigerator before serving.

Expert Tips for Success

To ensure your Apple Walnut Salad is a hit, keep these expert tips in mind:

  • Perfectly Toasted Quinoa: Toasting quinoa enhances its nutty flavor and adds a delightful texture. Don’t skip this step!
  • Apple Variety Matters: Opt for a mix of sweet and tart apples for a more dynamic flavor profile. Think Honeycrisp and Granny Smith.
  • Make Ahead Magic: Prepare the dressing in advance and store it in the fridge to save time.
  • Fresh Ingredients: Use the freshest produce you can find to elevate the taste of your salad.
  • Season to Taste: Adjust the salt and pepper in the dressing according to your preference for a more personalized flavor.
  • Chill for Flavor: Letting the salad chill for 30 minutes allows the flavors to meld beautifully.
  • Keep It Colorful: Add colorful ingredients like bell peppers or shredded carrots for visual appeal.
  • Don’t Overmix: Gently toss the salad to avoid bruising the delicate spinach leaves.

Common Mistakes to Avoid

Even the best of us can make mistakes in the kitchen! Here are a few to watch out for:

  • Overcooking Quinoa: Follow the cooking instructions carefully. Overcooked quinoa turns mushy.
  • Using Old Ingredients: Freshness is key! Always check your produce before using it.
  • Skipping the Dressing: The dressing ties the salad together; don’t skip it!
  • Chopping Apples Too Early: Apples brown quickly. Chop them just before serving to maintain freshness.

Delicious Variations

This Apple Walnut Salad is wonderfully versatile! Here are some creative variations you can try:

  • Protein-Packed: Add grilled chicken or chickpeas for an extra dose of protein.
  • Cheesy Goodness: Crumble feta or goat cheese on top for a creamy contrast to the crunchy salad.
  • Fruit Fusion: Incorporate other fruits like pears or pomegranate seeds for added sweetness and texture.
  • Herb Infusion: Toss in fresh herbs like basil or mint for a refreshing twist.

Storage and Make-Ahead Instructions

Planning ahead? Here’s how to store your salad:

  • Refrigerate Leftovers: Store any leftover salad in an airtight container in the fridge for up to 3 days.
  • Dressing Storage: Keep the dressing separate and store it in a jar in the fridge for up to a week.
  • Make-Head Friendly: You can prepare the salad components a day in advance—just combine before serving!

Frequently Asked Questions

Here are some common questions about our Apple Walnut Salad:

  • Can I use different nuts? Yes, feel free to substitute almonds, pecans, or even sunflower seeds!
  • Is this salad vegan? Yes, all ingredients are plant-based, making it a great vegan option.
  • How can I make this salad gluten-free? Ensure you are using certified gluten-free quinoa.
  • Can I make this salad ahead of time? Absolutely! Just keep the dressing separate until serving to prevent wilting.
  • What type of apples are best? Honeycrisp and Granny Smith are great choices for a balance of sweet and tart.
  • How long does this salad last? Enjoy within 3 days for the best flavor and texture.
  • Can I add more vegetables? Definitely! Carrots, cucumbers, or bell peppers would be fantastic additions.
  • What dressing pairs well with this salad? The apple cider vinaigrette is perfect, but you can also try a lemon vinaigrette for a citrusy twist.

Nutritional Benefits and Dietary Adaptations

This Apple Walnut Salad not only tantalizes your taste buds but also packs a nutritional punch:

  • High in Fiber: The quinoa, apples, and spinach contribute to a high fiber content, promoting digestion.
  • Rich in Antioxidants: Apples and walnuts are loaded with antioxidants that help combat inflammation.
  • Heart-Healthy: Walnuts are known for their omega-3 fatty acids that support heart health.
  • Low in Calories: This salad is a guilt-free option, perfect for those watching their calorie intake.

Essential Equipment for Making this Salad

To prepare this Apple Walnut Salad, you’ll need a few basic tools:

  • Medium Saucepan: For cooking the quinoa.
  • Whisk: To blend your dressing ingredients seamlessly.
  • Large Mixing Bowl: For combining all salad components.
  • Cutting Board and Knife: Essential for chopping fruits and vegetables.

Serving Suggestions

Wondering how to serve this vibrant salad? Here are some ideas:

  • As a Main Dish: Pair it with grilled chicken or fish for a satisfying dinner.
  • As a Side Dish: Serve alongside roasted meats or soups for a well-rounded meal.
  • For Meal Prep: Package it in individual containers for a grab-and-go lunch option.
  • At a Potluck: This salad is sure to impress at gatherings with its colorful presentation and delicious taste.

In conclusion, this Apple Walnut Salad offers a delicious, nutritious, and visually stunning addition to any meal. With its rich flavors and versatile ingredients, it’s perfect for any occasion. So, grab your apron and get ready to enjoy a refreshing culinary creation that’s sure to delight!

Apple Walnut Salad

Prep Time 10 minutes
Cook Time 25 minutes
Total Time 35 minutes
Servings 4 servings
Calories 350
A fresh and nutritious salad combining quinoa, apples, walnuts, and cranberries, drizzled with a tangy dressing.

Ingredients

For the Salad:

  • 1 cup uncooked quinoa
  • 2 cups water
  • 2 cups spinach, roughly chopped
  • 1 cup walnuts, roughly chopped
  • 1.5 cups apples, diced
  • ¼ cup cranberries
  • ¼ cup red onion, finely chopped

For the Dressing:

  • 3 tablespoons olive oil
  • 2 tablespoons apple cider vinegar
  • 1 tablespoon maple syrup
  • 2 teaspoons Dijon mustard
  • ½ teaspoon salt
  • ¼ teaspoon black pepper

Instructions 

  • Toast the quinoa in a dry skillet until aromatic, then cook with water until fluffy.
  • Mix dressing ingredients in a bowl until well combined.
  • Let quinoa cool, then combine with spinach, walnuts, apples, cranberries, and onion.
  • Pour dressing over the salad and toss gently. Serve immediately or chill.

Notes

For extra flavor, toast the walnuts before adding.
Calories: 350kcal
Cost: $12
Course: Salad
Keyword: fruit, Healthy, Quinoa

Whirlwind of Flavor Awaits: Discover the Magic of Thai Peanut Glass Noodle Salad!

Welcome to a vibrant world where every bite is a celebration! If you’re looking for a dish that embodies bold flavors and fresh ingredients, look no further than this Easy Thai Peanut Glass Noodle Salad. Packed with colorful veggies, crunchy peanuts, and a zesty peanut dressing, this salad is not just a meal—it’s an experience! Perfect for busy days, meal prep, or a refreshing treat, this recipe will have your taste buds dancing in delight.

Why You’ll Love This Recipe

This salad is more than just food; it’s a versatile dish that brings joy, energy, and nourishment. Here are five reasons to fall in love with this recipe:

  • Quick and Easy: With a preparation time of under 30 minutes, you can whip this dish up even on the busiest days.
  • Fresh and Nutritious: Bursting with vibrant veggies like crunchy bell peppers and refreshing cucumbers, this salad is a powerhouse of nutrients.
  • Flavor Explosion: The combination of creamy peanut butter, zesty lime juice, and a hint of chili creates a dressing that’s out of this world!
  • Customizable: Make it your own! Substitute ingredients or add proteins like shrimp or tofu to suit your taste.
  • Perfect for Meal Prep: This dish stores beautifully, making it a great option for lunches or snacks throughout the week.

Ingredients You’ll Need

Gather these fresh ingredients to create your delicious Thai peanut glass noodle salad:

  • 150 g glass noodles: Soak until tender and silky for the perfect texture.
  • 1 medium red bell pepper: Adds a sweet crunch and a pop of color.
  • 1 medium cucumber: Provides a refreshing bite that balances the flavors.
  • 2 medium carrots: Shredded for a touch of sweetness and vibrant color.
  • ¼ cup fresh cilantro: Chopped for a burst of freshness.
  • 2 stalks green onions: Thinly sliced for a mild onion flavor.
  • ¼ cup chopped peanuts: For that delightful crunch.
  • 3 tbsp peanut butter: The creamy base of our dressing.
  • 2 tbsp soy sauce: Brings umami flavor to the dish.
  • 1 tbsp lime juice: Adds zesty brightness that elevates the salad.
  • 1 tbsp honey: Enhances the natural sweetness of the veggies.
  • 1 clove garlic: Minced for an aromatic kick.
  • 1 tbsp sesame oil: Adds a toasted aroma that complements the dish.
  • ¼ tsp chili flakes: Optional for a touch of heat.

Substitutions and Variations

Side view of a bowl filled with Thai peanut glass noodles, garnished with peanuts and herbs.

This salad is all about customization! Here are some fantastic substitutions and variations you can try:

  • Protein Boost: Swap in cooked shrimp, chicken, or tofu for a satisfying protein addition.
  • Noodle Alternatives: Use rice noodles, quinoa, or even spiralized zucchini for a gluten-free option.
  • Veggie Variations: Add sliced bell peppers, shredded cabbage, or even snap peas for extra crunch and color.
  • Vegan Friendly: Substitute honey with maple syrup or agave for a vegan-friendly dressing.

Expert Tips for Success

To ensure your salad turns out perfectly, check out these expert tips:

  • Soak the Noodles Properly: Make sure to soak the glass noodles until they’re tender but still slightly firm to the bite.
  • Mix the Dressing Well: Whisk the dressing ingredients in a bowl until well combined for a smooth, creamy texture.
  • Chill Before Serving: Let the salad sit for about 10 minutes after assembling for the flavors to meld together.
  • Adjust the Spice: Feel free to add more or fewer chili flakes based on your spice preference.
  • Flavor Enhancements: Incorporate sesame seeds or crushed peanuts as a garnish for added flavor and crunch.
  • Keep it Fresh: To maintain the salad’s crunch, store the dressing separately until ready to serve.
  • Batch It: Double the recipe for meal prep or serving a crowd; this salad is a hit!
  • Experiment with Herbs: Fresh mint or basil can elevate the flavor profile if you want to mix things up.

Storage and Make-Ahead Instructions

Planning ahead? Here’s how to store and make this delicious salad:

  • Storage: Store the salad in an airtight container in the refrigerator for up to 3 days.
  • Dressing Storage: Keep the peanut dressing in a separate container to maintain the salad’s crunch.
  • Make-Ahead: Prepare the salad components in advance, but assemble them just before serving for optimal freshness.

Frequently Asked Questions (FAQs)

Got questions? We’ve got answers!

  • Can I use other types of noodles? Absolutely! Rice noodles, soba, or even whole wheat spaghetti work well.
  • Is this salad gluten-free? Yes, just ensure you use gluten-free soy sauce.
  • How can I make this salad spicier? Add more chili flakes or a dash of sriracha to the dressing.
  • Can I prepare this salad the night before? Yes, but keep the dressing separate until serving to maintain freshness.
  • What can I serve with this salad? Pair it with grilled chicken, shrimp, or enjoy it on its own for a light meal.
  • How can I make this salad vegan? Simply substitute honey with a vegan sweetener like maple syrup.
  • What are the best toppings for this salad? Try adding avocado, sesame seeds, or additional peanuts for extra flavor and texture.
  • Can I freeze this salad? It’s best enjoyed fresh, but you can freeze the dressing for later use.

Nutrition Tips and Dietary Adaptations

Looking to make this salad even healthier? Here are some nutritional insights:

  • Increase Fiber: Add more veggies or incorporate beans for an extra fiber boost.
  • Reduce Sugar: Adjust the honey to taste or omit it for a lower-sugar option.
  • Boost Healthy Fats: Include avocado slices for healthy monounsaturated fats.
  • Protein Options: Use quinoa or chickpeas for a plant-based protein source.

Essential Equipment

Here’s what you’ll need to create your Thai peanut glass noodle salad:

  • Large Pot: For boiling the glass noodles.
  • Mixing Bowl: To whisk together the peanut dressing.
  • Cutting Board and Knife: For chopping veggies with ease.
  • Measuring Cups and Spoons: For precise ingredient measurements.

Serving Suggestions

Now that your salad is ready, how will you serve it? Here are some delicious ideas:

  • As a Main Dish: Serve it as a hearty main course, perfect for lunch or dinner.
  • Side Dish: Pair it with grilled proteins like chicken, fish, or tofu for a balanced meal.
  • Picnic Option: This salad is great for outdoor gatherings—just pack it in a cooler!
  • Meal Prep: Portion it into containers for a healthy grab-and-go lunch throughout the week.

Get ready to dive into the colorful, nutritious, and downright delicious world of Thai Peanut Glass Noodle Salad! This dish is here to inspire your culinary creativity and make healthy eating a joyful adventure. Enjoy every bite!

Easy Thai Peanut Glass Noodle Salad Bursting with Bold Flavors

Prep Time 15 minutes
Cook Time 5 minutes
Total Time 20 minutes
Servings 4 people
Calories 350
A vibrant and refreshing salad combining silky glass noodles with crunchy vegetables and a flavorful peanut dressing.

Ingredients

Noodles

  • 150 g glass noodles (Soak until tender and silky.)

Vegetables

  • 1 medium red bell pepper (Adds sweet crunch.)
  • 1 medium cucumber (Provides a refreshing bite.)
  • 2 medium carrots (Shredded for sweetness.)

Herbs & Nuts

  • ¼ cup fresh cilantro (Chopped for freshness.)
  • 2 stalks green onions (Thinly sliced.)
  • ¼ cup chopped peanuts (For crunch.)

Dressing

  • 3 tbsp peanut butter (Creamy base.)
  • 2 tbsp soy sauce (Brings umami flavor.)
  • 1 tbsp lime juice (Adds zesty brightness.)
  • 1 tbsp honey (Enhances natural sweetness.)
  • 1 clove garlic (Minced for aroma.)
  • 1 tbsp sesame oil (For a toasted aroma.)
  • ¼ tsp chili flakes (Optional for heat.)

Instructions 

  • Cook and soak the glass noodles until tender, then drain.
  • Chop vegetables and herbs; prepare the peanut dressing.
  • Combine noodles, vegetables, herbs, and peanuts in a large bowl.
  • Whisk together dressing ingredients and toss with the salad.
  • Serve immediately, garnished with extra peanuts and herbs if desired.

Notes

For added flavor, sprinkle with extra chili flakes or lime juice before serving.
Calories: 350kcal
Cost: $12
Course: Salad
Cuisine: Thai
Keyword: Noodles, peanut

Why This Roasted Cauliflower Salad Will Change Your Meal Game

Welcome to the vibrant world of Roasted Cauliflower Salad, where flavor and nutrition collide to create a dish that’s not only delicious but also incredibly satisfying! If you’re searching for a salad that brings excitement to your plate, you’ve come to the right place. This zesty salad is brimming with fresh veggies, a zesty lemon-garlic vinaigrette, and a sprinkle of creamy feta. Let’s dive into why this dish is a must-try!

Why You’ll Love This Recipe

  • Flavor Explosion: The combination of roasted cauliflower, crunchy bell peppers, and zesty dressing creates a dynamic flavor profile that will tantalize your taste buds.
  • Easy to Make: With simple ingredients and straightforward steps, this recipe is perfect for both novice cooks and seasoned chefs!
  • Versatile Dish: Whether as a side or a main course, this salad is adaptable and fits perfectly into various meal plans.
  • Meal Prep Friendly: Make it ahead of time and store it in the fridge—it’s just as delicious cold!
  • Nutrition Powerhouse: Packed with vitamins and antioxidants, this salad not only tastes great but is also beneficial for your health.

Ingredient Breakdown

This Roasted Cauliflower Salad is made with an array of wholesome ingredients that can be easily customized. Here’s what you’ll need:

  • 6 cups cauliflower florets
  • 1 small red bell pepper, sliced (about 1 cup)
  • 5 tablespoons extra-virgin olive oil, divided
  • ½ teaspoon salt, divided
  • ½ teaspoon ground pepper, divided
  • 2 tablespoons lemon juice
  • 1 small clove garlic, grated (¼ teaspoon)
  • 2 teaspoons honey
  • ½ teaspoon Dijon mustard
  • 2 packed cups spring mix salad greens
  • ½ cup sliced red onion
  • ¼ cup chopped fresh herbs (like mint, dill, or parsley)
  • 3 ounces feta cheese, cubed (about ⅔ cup)

Expert Tips for Perfecting Your Salad

Side view of a colorful salad featuring roasted cauliflower and fresh vegetables.

To elevate your cauliflower salad to the next level, consider these pro tips:

  • Roasting Technique: Roast your cauliflower at a high temperature (450°F) for that perfect caramelized flavor.
  • Fresh Herbs: Use a mix of herbs to enhance the freshness of the dish—experiment with your favorites!
  • Dress It Right: Whisk the dressing until it’s fully emulsified for a creamy consistency that clings beautifully to the salad.
  • Chill Before Serving: Letting the salad sit for a few minutes allows the flavors to meld together.
  • Customize Your Crunch: Add nuts or seeds for extra texture—think toasted almonds or sunflower seeds!
  • Season to Taste: Don’t be shy with salt and pepper; they enhance the flavors of your ingredients.
  • Try Different Cheeses: If you’re not a feta fan, goat cheese or mozzarella can add a delightful twist.
  • Meal Prep Magic: Portion out servings for easy grab-and-go lunches throughout the week.

Common Mistakes and Troubleshooting

Avoid these common pitfalls to ensure your salad shines:

  • Overcrowding the Pan: Give your cauliflower room to breathe while roasting—crowded pans steam rather than roast!
  • Underseasoning: Make sure to season both the cauliflower and the dressing well to bring out the flavors.
  • Skipping the Resting Time: Allowing the salad to rest lets the dressing penetrate the veggies, enhancing the overall taste.
  • Not Using Fresh Ingredients: Fresh veggies and herbs make all the difference in flavor and nutrition.

Flavor Variations to Try

Get creative with your roasted cauliflower salad by trying these fun variations:

  • Spicy Kick: Add a sprinkle of crushed red pepper flakes for a spicy twist.
  • Asian Flair: Use sesame oil in the dressing and top with sesame seeds and sliced green onions.
  • Greek Style: Incorporate olives and cherry tomatoes for a Mediterranean vibe.
  • Protein Power: Toss in some grilled chicken or chickpeas for added protein.

How to Store and Make Ahead

This salad is perfect for meal prepping! Here’s how to store it:

  • Refrigeration: Store in an airtight container in the fridge for up to 3 days.
  • Dressing Separately: If making ahead, keep the dressing separate until ready to serve to maintain freshness.

Frequently Asked Questions

Here are some common questions about this Roasted Cauliflower Salad:

  • Can I use frozen cauliflower? Yes, but fresh is recommended for the best texture.
  • What can I substitute for feta? Goat cheese or even avocado can work beautifully.
  • How do I make this salad vegan? Omit the feta and honey, and use maple syrup instead.
  • Can I add other vegetables? Absolutely! Carrots, zucchini, or Brussels sprouts make great additions.
  • How spicy is this salad? It’s not spicy unless you decide to add heat; it’s all up to you!
  • Can I use a different dressing? Yes! A tahini dressing would pair wonderfully with the roasted flavors.
  • How do I keep it fresh for meal prep? Store components separately and mix just before eating.
  • Is this salad gluten-free? Yes, all ingredients in this recipe are gluten-free.

Nutritional Benefits

This salad is not just a feast for your taste buds but also a powerhouse of nutrition:

  • Rich in Vitamins: Cauliflower is high in vitamin C, K, and B vitamins, supporting overall health.
  • High in Fiber: This salad promotes digestive health and keeps you feeling full.
  • Low Calorie: A great option for those looking to maintain or lose weight without sacrificing flavor.
  • Healthy Fats: Olive oil provides good fats that are essential for a healthy diet.

Essential Equipment

To make your cooking experience seamless, consider these tools:

  • Baking Sheet: A sturdy, rimmed baking sheet is essential for roasting your veggies.
  • Mixing Bowls: For tossing ingredients and mixing your dressing.
  • Whisk: A good whisk is necessary for emulsifying your dressing.

Serving Suggestions

This Roasted Cauliflower Salad can stand alone or complement numerous dishes:

  • Pair it with grilled chicken for a protein-packed meal.
  • Serve alongside steak or fish for a vibrant side dish.
  • Enjoy it as a light lunch with crusty bread or pita.

In Conclusion

Embrace the exciting flavors and vibrant colors of this Roasted Cauliflower Salad. It’s not just food; it’s an experience that transforms healthy eating into a joyous adventure! Whether you’re meal prepping for the week or bringing a dish to share, this salad is sure to impress. So grab your ingredients, unleash your inner chef, and enjoy every bite of this delicious, nutritious delight!

Roasted Cauliflower Salad with Lemon-Garlic Vinaigrette

Prep Time 15 minutes
Cook Time 20 minutes
Total Time 35 minutes
Servings 4 servings
Calories 250
A vibrant and healthy salad featuring roasted cauliflower and fresh herbs, dressed with a tangy lemon-garlic vinaigrette.

Ingredients

Vegetables

  • 6 cups cauliflower florets
  • 1 small red bell pepper, sliced (about 1 cup sliced)
  • 5 tablespoons extra-virgin olive oil, divided
  • ½ teaspoon salt, divided
  • ½ teaspoon ground pepper, divided
  • 2 tablespoons lemon juice
  • 1 small clove garlic, grated (¼ teaspoon)
  • 2 teaspoons honey
  • ½ teaspoon Dijon mustard

Salad greens

  • 2 cups spring mix salad greens
  • ½ cup sliced red onion
  • ¼ cup chopped mixed fresh tender herbs (mint, dill, parsley)
  • 3 ounces feta in brine, cubed (about ⅔ cup, divided)

Instructions 

  • Preheat oven to 450°F (230°C). Line a baking sheet with parchment.
  • Toss cauliflower, bell pepper, 1 tablespoon oil, ¼ teaspoon salt, and ¼ teaspoon pepper. Roast for 20 minutes, then cool 5 minutes.
  • Whisk lemon juice, garlic, honey, mustard, remaining oil, salt, and pepper to make vinaigrette.
  • Combine roasted cauliflower, greens, onion, herbs, and ⅓ cup feta. Drizzle with vinaigrette, toss, and top with remaining feta.

Notes

Enjoy fresh and serve immediately for best flavor.
Calories: 250kcal
Cost: $15
Course: Salad
Cuisine: American
Keyword: Cauliflower

Experience the Burst of Flavor in a Cold Peanut Noodle Bowl!

Welcome to your new favorite summer recipe: the Cold Peanut Noodle Bowl! Imagine a dish that dances on your taste buds, combining the creamy richness of peanut butter with the crunch of fresh vegetables and the zing of soy sauce. This dish is not just quick to whip up, but it’s also a vibrant celebration of flavor and texture that you can enjoy any day of the week. In this comprehensive guide, we’ll explore the ins and outs of creating this delightful meal, including tips, tricks, and variations to keep your palate excited!

Whether you’re a busy professional looking for a quick meal prep option or a culinary adventurer ready to explore new tastes, this Cold Peanut Noodle Bowl is your ticket to a culinary adventure. Let’s dive in and make magic in the kitchen!

Why You’ll Love This Recipe

  • Quick and Easy: With just 15 minutes of prep and cooking time, this dish fits perfectly into your busy lifestyle, making it a go-to meal for those hectic evenings.
  • Nutritious and Satisfying: Packed with fresh vegetables and protein-rich peanut sauce, this bowl is both filling and healthy, ensuring you get a balanced meal without sacrificing flavor.
  • Versatile and Customizable: This Cold Peanut Noodle Bowl can easily be tailored to your taste. Swap in your favorite veggies or add protein sources like tofu or chicken to make it your own.
  • Meal Prep Friendly: Prepare components ahead of time for an easy grab-and-go lunch or dinner. The noodles and sauce stay fresh in the fridge, making meal prep a breeze!
  • Perfect for Any Occasion: Whether it’s a summer picnic, a casual weeknight dinner, or a potluck with friends, this dish is sure to impress and satisfy everyone’s cravings.

Ingredients Breakdown

To create this vibrant Cold Peanut Noodle Bowl, gather the following ingredients:

  • 8 oz rice noodles: The star of the dish, rice noodles provide a chewy base that absorbs the delicious peanut sauce.
  • 1/2 cup creamy peanut butter: The heart of the peanut sauce, offering a rich, nutty flavor that brings everything together.
  • 1/4 cup soy sauce: Adds depth and umami to the dish; opt for low-sodium varieties for a healthier option.
  • 2 tablespoons honey: Sweetens the sauce naturally, balancing the savory notes of the soy sauce.
  • 1 tablespoon rice vinegar: Provides a tangy kick that brightens the flavors and cuts through the richness of the peanut butter.
  • 1 cup shredded carrots: Adds a crunchy texture and a splash of color, plus a dose of vitamins!
  • 1 cup bell peppers, sliced: Choose your favorite colors—red, yellow, or green—for added sweetness and crunch.
  • 1/2 cup chopped green onions: Offers a fresh, zesty flavor that complements the peanut sauce beautifully.
  • 1/4 cup chopped cilantro: For those who love it, cilantro adds a refreshing herbaceous note.
  • Sesame seeds (optional): Sprinkle on top for extra crunch and a nutty flavor.

Pro Tips for the Perfect Cold Peanut Noodle Bowl

Side angle photo of a Cold Peanut Noodle Bowl with rice noodles, shredded carrots, and bell peppers.
  • Perfectly Cooked Noodles: Ensure to cook the rice noodles just until tender (about 4-6 minutes as per package instructions) to maintain a delightful chewiness.
  • Rinse with Cold Water: Rinsing the noodles under cold water after cooking stops the cooking process and helps prevent them from becoming sticky.
  • Adjust Peanut Sauce Consistency: If the peanut sauce is too thick, add a splash of warm water to achieve the desired consistency for easy tossing.
  • Chill for Maximum Flavor: Allow the assembled bowl to chill in the fridge for 30 minutes before serving to let the flavors meld together beautifully.
  • Mix and Match Veggies: Feel free to add or substitute vegetables based on your preference; cucumbers, snap peas, or even edamame work well in this recipe.
  • Use Fresh Ingredients: Fresh vegetables enhance the flavor and nutritional value of the dish, so opt for the freshest produce available.
  • Make Ahead: Store the components separately to maintain freshness and prevent sogginess.
  • Garnish Creatively: Elevate your bowl with toasted nuts, sliced avocado, or a drizzle of sriracha for a spicy kick!

Common Mistakes and Troubleshooting

Even the best chefs make mistakes! Here are some common pitfalls and how to avoid them:

  • Overcooking the Noodles: Keep an eye on the cooking time; overcooked noodles can become mushy. Aim for al dente texture.
  • Thick Peanut Sauce: If your peanut sauce is too thick, don’t hesitate to add a little warm water until it reaches your desired consistency.
  • Unbalanced Flavors: Taste as you go! Adjust sweetness, acidity, and saltiness to create a harmonious flavor profile.
  • Vegetable Overload: While it’s tempting to add lots of veggies, ensure you maintain a good balance so the noodles shine through!
  • Not Enough Sauce: Make sure to drizzle enough sauce over the noodles for a well-coated, flavorful bowl!

Delicious Variations to Try

Want to switch things up? Here are some fun variations of the Cold Peanut Noodle Bowl to keep your meals exciting:

  • Protein-Packed Bowl: Add grilled chicken, shrimp, or tofu for a protein boost that makes this dish even more satisfying.
  • Spicy Peanut Sauce: Mix in a teaspoon of chili paste or sriracha to the peanut sauce for a spicy kick!
  • Veggie Delight: Use spiralized zucchini or cucumber instead of rice noodles for a gluten-free, low-carb option.
  • Asian Slaw Version: Add shredded cabbage, edamame, and radishes for a crunchy twist on this classic dish.

Storage and Make-Ahead Instructions

This Cold Peanut Noodle Bowl is perfect for meal prep! Here’s how to store it:

  • In the Refrigerator: Store the components separately in airtight containers for up to 4 days to maintain freshness. Combine when ready to serve.
  • Freezing: While cooked noodles can be frozen, it’s best to freeze the peanut sauce separately to maintain quality. Thaw and reheat before serving.
  • Make-Ahead Tips: You can prepare the sauce and chop the vegetables ahead of time. Just cook the noodles right before serving for the best texture.

Frequently Asked Questions

  • Can I use other types of noodles? Absolutely! While rice noodles are traditional, feel free to use soba noodles, udon, or even whole wheat pasta.
  • Is this dish vegan-friendly? Yes! Just ensure that your soy sauce is vegan and skip any non-vegan toppings.
  • Can I substitute the peanut butter? Yes! Almond butter or sunflower seed butter can be used for a nut-free alternative.
  • How can I make this dish gluten-free? Use gluten-free soy sauce or tamari and check that your noodles are gluten-free.
  • Can I add more veggies? Of course! The more, the merrier! Add your favorite fresh vegetables to enhance the dish.
  • How long can I store leftovers? Leftovers can be stored in the fridge for up to 4 days in an airtight container.
  • Can I serve this dish warm? While it’s best served cold, you can enjoy it warm if you prefer.
  • What should I serve with this dish? Pair it with a light salad or fresh spring rolls for a complete meal!

Nutritional Tips and Dietary Adaptations

This Cold Peanut Noodle Bowl can be easily adapted to fit various dietary needs:

  • Low-Carb Option: Substitute rice noodles with zucchini noodles or cauliflower rice for a low-carb alternative.
  • High-Protein Version: Include grilled chicken, shrimp, or tofu to amp up the protein content.
  • Nut-Free: Replace peanut butter with sunflower seed butter or tahini to make it nut-free.
  • Low-Sodium: Use low-sodium soy sauce and omit added salt to reduce sodium levels.

Essential Equipment

To create this Cold Peanut Noodle Bowl, you’ll need:

  • Large Pot: For boiling the noodles.
  • Mixing Bowls: For combining the sauce and mixing the ingredients.
  • Whisk: To achieve a smooth peanut sauce.
  • Colander: For draining the cooked noodles.
  • Chopping Board and Knives: For prepping fresh vegetables.

Serving Suggestions

This Cold Peanut Noodle Bowl is a fantastic standalone dish. However, here are some fun serving suggestions:

  • Top with Extra Veggies: Garnish with additional chopped cilantro, sliced cucumbers, or shredded cabbage for extra crunch.
  • Pair with a Light Drink: Serve with iced green tea or a refreshing lemonade to complement the flavors.
  • Make it a Feast: Add a side of spring rolls or a light Asian-inspired salad for a complete meal experience.

Conclusion

Creating the perfect Cold Peanut Noodle Bowl is not just about mixing ingredients; it’s about crafting a vibrant experience that delights your senses. With this step-by-step guide, you’re now equipped to make a dish that’s not only quick and easy but bursting with flavor and nutrition. Whether you’re enjoying it as a simple lunch or impressing friends at a casual gathering, this recipe is sure to become a staple in your culinary repertoire. So roll up your sleeves, get creative, and enjoy the whirlwind of flavors in every bite!

Cold Peanut Noodle Bowl

Prep Time 10 minutes
Cook Time 10 minutes
Total Time 20 minutes
Servings 4 servings
Calories 450
A quick and flavorful cold noodle dish with a creamy peanut sauce, perfect for a refreshing meal.

Ingredients

Noodles

  • 8 oz rice noodles
  • 1/2 cup creamy peanut butter
  • 1/4 cup soy sauce
  • 2 tablespoons honey
  • 1 tablespoon rice vinegar
  • 1 cup shredded carrots
  • 1 cup bell peppers, sliced
  • 1/2 cup chopped green onions
  • 1/4 cup chopped cilantro
  • to taste Sesame seeds (optional)

Instructions 

  • Cook rice noodles according to package instructions, then rinse with cold water.
  • Mix peanut butter, soy sauce, honey, and rice vinegar until smooth.
  • Combine noodles, carrots, bell peppers, green onions, and cilantro in a large bowl.
  • Pour sauce over the mixture and toss to coat evenly.
  • Sprinkle sesame seeds on top and serve chilled or at room temperature.

Notes

For extra flavor, add a squeeze of lime or chopped peanuts.
Calories: 450kcal
Cost: $12
Course: Main Course
Cuisine: Asian
Keyword: peanut

Unleash the Flavor: Why You’ll Adore These Thai Sweet Chili Chicken Buddha Bowls!

Welcome to a culinary adventure that celebrates the zest of life! These Thai Sweet Chili Chicken Buddha Bowls are not just meals; they are vibrant, nutritious experiences that bring joy to your table. Perfectly balanced with colorful veggies, succulent chicken, and a zesty sweet chili dressing, this recipe will ignite your taste buds and inspire your kitchen creativity. Whether you’re meal prepping for the week or cooking for family and friends, these bowls are sure to impress. Let’s dive into why you’ll fall in love with this dish!

Why You’ll Love This Recipe

  • Deliciously Versatile: You can customize your Buddha bowls with a variety of veggies and proteins to fit your preferences or dietary needs.
  • Quick and Easy: This recipe is perfect for busy days, taking just about 30 minutes from prep to plate!
  • Nutrient-Packed: Filled with wholesome ingredients like quinoa, kale, and colorful vegetables, you’ll nourish your body while satisfying your cravings.
  • Meal Prep Friendly: Make a big batch and enjoy these bowls throughout the week—perfect for lunch or dinner on the go!
  • Visually Stunning: The vibrant colors of the ingredients make your meal not just delicious but also a feast for the eyes!

Ingredients You’ll Need

Gather these essential ingredients to create your flavorful Thai Sweet Chili Chicken Buddha Bowls. Feel free to mix and match based on what you have at home!

  • 1 cup quinoa: A hearty base rich in protein and fiber.
  • 1 3/4 cups water (or coconut milk): Using coconut milk adds a creamy texture and a hint of sweetness.
  • 3 cups kale, massaged: This nutrient-dense green softens beautifully when massaged!
  • 2 cups bean sprouts: Adds a crunchy texture and fresh flavor.
  • 1 cup carrot, shredded: Sweet and vibrant, carrots bring color and crunch.
  • 2 cups pineapple, sliced: A tropical twist that enhances the sweet chili flavor.
  • 1 cup red pepper, sliced: Adds a pop of color and a sweet, crisp bite.
  • 1 cup red cabbage, sliced: Provides a nutritious boost and a crunchy element.
  • 1 pound cooked chicken, shredded or sliced: Use rotisserie chicken for ease or grill your own for fresh flavor.
  • 1 cup sweet chili dressing: The star of the show that ties all the flavors together!
  • 1 tablespoon sesame seeds, toasted: For a nutty finish and delightful crunch.
  • 1/4 cup green onions, sliced: Freshness and a mild onion flavor elevate the dish.
  • 2 tablespoons cilantro, chopped: Brightens the dish with its fresh-herb flavor.

Steps to Create Your Masterpiece

A vibrant Buddha bowl featuring shredded chicken, kale, and sweet chili dressing, viewed from the side.

Ready to whip up these vibrant bowls? Follow these simple steps:

  1. In a medium saucepan, bring the water and quinoa to a boil. Reduce heat, cover, and let simmer for about 15-20 minutes until quinoa is tender and has absorbed the water.
  2. Remove from heat and let it sit covered for 5 minutes, then fluff with a fork and let cool.
  3. While the quinoa is cooking, prepare your veggies and chicken. Massage the kale with your fingers until it turns a deep green, optionally adding a splash of olive oil, lemon juice, and a pinch of salt for flavor.
  4. Assemble your Buddha bowls by layering the quinoa, kale, and the rest of the veggies and chicken in your preferred order.
  5. Drizzle with sweet chili dressing and sprinkle with toasted sesame seeds, green onions, and cilantro.
  6. Enjoy your vibrant Thai Sweet Chili Chicken Buddha Bowls!

Pro Tips for the Perfect Bowl

  • Prep Ahead: Make the quinoa a day ahead of time for a quick assembly.
  • Flavor Boost: Marinate the chicken in a little sweet chili sauce before cooking for an extra kick!
  • Mix It Up: Feel free to swap out quinoa for brown rice, whole grains, or even noodles.
  • Add Healthy Fats: Top with sliced avocado for a creamy texture and added nutrition.
  • Experiment with Dressings: Try a peanut sauce or tahini dressing for a different flavor profile!
  • Don’t Skip the Massage: Massaging kale significantly improves its flavor and texture, making it tender and delicious.
  • Use Leftovers: Great for using up leftover vegetables or proteins from previous meals!
  • Season to Taste: Don’t hesitate to adjust the seasoning to suit your palate.

Variations to Try

Here are some exciting variations to keep things fresh and fun:

  • Vegetarian Delight: Swap chicken for chickpeas or tofu for a satisfying plant-based option.
  • Spicy Twist: Add sliced jalapeños or a drizzle of sriracha for some heat!
  • Asian-Inspired: Mix in edamame or snap peas for a crunchy, protein-rich addition.
  • Fruit Fusion: Incorporate mango or strawberries for a sweet and tangy twist.

Storage and Make-Ahead Instructions

These Buddha bowls are perfect for meal prepping!

  • Storing Leftovers: Store any leftovers in an airtight container in the fridge for up to 4 days.
  • Freezing: While it’s best fresh, you can freeze the quinoa and chicken separately. Just thaw and assemble when ready to eat.
  • Reheating: Gently reheat quinoa and chicken in the microwave or on the stovetop, adding a splash of water to keep it moist.

Frequently Asked Questions

Got questions? We’ve got answers!

  • Can I use a different grain instead of quinoa? Absolutely! Brown rice, farro, or even noodles work great.
  • Is this dish gluten-free? Yes, as long as you use gluten-free soy sauce for the dressing!
  • Can I make it vegan? Yes, just substitute chicken with tofu or chickpeas and use a vegan dressing.
  • How do I make it spicier? Add more sweet chili sauce or incorporate fresh chili peppers.
  • What can I do with leftovers? Combine them into a wrap or salad for a quick lunch!
  • How do I make my kale less bitter? Massaging it with a bit of oil and salt helps reduce bitterness.
  • Can I add more veggies? Definitely! Feel free to throw in any seasonal or leftover veggies you have.
  • How long does it take to cook? Overall, this recipe takes about 30 minutes from start to finish!

Nutritional Tips and Dietary Adaptations

This recipe is already packed with nutrients, but here are a few tips to boost its health benefits:

  • Protein Power: Incorporate more protein by adding nuts or seeds.
  • Fiber Boost: Include extra vegetables like broccoli or spinach for added fiber.
  • Healthy Fats: Top with avocado or nuts for heart-healthy fats.

Essential Equipment

Before you start cooking, make sure you have these kitchen essentials:

  • Medium saucepan: For cooking quinoa.
  • Cutting board and knife: For chopping veggies.
  • Mixing bowls: For assembling your ingredients.
  • Measuring cups and spoons: For accurate ingredient measurements.

Serving Suggestions

Serve these bowls family-style for a fun and interactive meal! Let everyone customize their bowls with additional toppings like nuts, seeds, or extra dressing. Pair with a light Asian-inspired soup or steamed dumplings for a complete meal that’s sure to impress!

Conclusion

And there you have it—your ultimate guide to crafting these vibrant Thai Sweet Chili Chicken Buddha Bowls! Packed with flavor, nutrition, and endless possibilities for customization, these bowls are your ticket to a fulfilling and exciting meal. Remember, cooking should be a joyous experience, so don’t hesitate to experiment and make this recipe your own. Now grab your ingredients, unleash your creativity, and enjoy every delicious bite!

Thai Sweet Chili Chicken Buddha Bowls

Prep Time 10 minutes
Cook Time 20 minutes
Total Time 30 minutes
Servings 4 servings
Calories 450
A vibrant and healthy bowl combining quinoa, fresh vegetables, and tender chicken, all drizzled with sweet chili dressing for a flavorful meal.

Ingredients

Grains

  • 1 cup quinoa
  • 1.75 cups water (or coconut milk)

Vegetables

  • 3 cups kale, massaged
  • 2 cups bean sprouts
  • 1 cup carrot, shredded

Fruits

  • 2 cups pineapple, sliced
  • 1 cup red pepper, sliced
  • 1 cup red cabbage, sliced

Protein

  • 1 pound cooked chicken, shredded or sliced

Dressing & Garnishes

  • 1 cup sweet chili dressing
  • 1 tablespoon sesame seeds, toasted
  • 1/4 cup green onions, sliced
  • 2 tablespoons cilantro, chopped

Instructions 

  • Bring water and quinoa to a boil, then simmer for 15-20 minutes until tender.
  • Let quinoa sit covered for 5 minutes, then cool.
  • Massage kale with fingers until dark green; assemble bowls with vegetables, chicken, and quinoa. Drizzle with sweet chili dressing.
  • Garnish with toasted sesame seeds, green onions, and cilantro. Serve and enjoy!

Notes

Make the quinoa ahead for easier assembly. Feel free to add sliced avocado or substitute grains.
Calories: 450kcal
Cost: $15
Course: Main Course
Cuisine: Thai
Keyword: Chicken

Discover the Zesty Delight of Lemon Dill Potato Salad

Welcome to the vibrant world of healthy cooking! Today, we’re diving into a dish that’s not just a side, but a celebration of fresh flavors: Lemon Dill Potato Salad. This refreshing twist on the classic potato salad is bursting with zest and free of mayo, making it the perfect accompaniment for summer picnics, backyard BBQs, or a quick weeknight dinner. Let’s get started on creating a dish that will tantalize your taste buds and leave your guests asking for seconds!

Why You’ll Love This Recipe

  • Light and Fresh: This healthy lemon dill potato salad is perfect for warm weather, keeping things light while still being satisfying.
  • Quick and Easy: With minimal prep time and simple ingredients, you can whip this up in no time, making it a go-to recipe for busy weeknights.
  • Versatile Pairing: This salad pairs beautifully with grilled meats, seafood, or can be enjoyed on its own as a hearty vegetarian option.
  • Nutritious Ingredients: Packed with wholesome ingredients, this salad offers a healthy dose of vitamins and minerals without sacrificing flavor.
  • Make-Ahead Friendly: It’s a fantastic dish to prepare ahead of time, allowing the flavors to meld together for an even tastier experience!

Ingredient Breakdown: What You’ll Need

To create this zesty lemon dill potato salad, gather the following ingredients:

  • 500 g Baby Potatoes: Choose small, waxy potatoes for the best texture.
  • 1 teaspoon Salt: Essential for boiling the potatoes to enhance their flavor.
  • 1/4 cup Dill (chopped): Fresh dill adds a vibrant, herbal note that’s key to this dish.
  • 1/4 cup Spring Onion Greens (finely chopped): Provides a mild onion flavor that complements the dill.
  • 1/4 cup Olive Oil (Extra Virgin): A healthy fat that brings richness and helps the dressing adhere to the potatoes.
  • 2 tablespoons Lemon Juice: Freshly squeezed juice brightens up the flavors beautifully.
  • 1 Lemon (zest): Adds an intense citrus flavor that elevates the dish.
  • 1 Garlic Clove (finely minced): For a subtle kick of flavor.
  • 2 tablespoons Dijon Mustard: A tangy addition that enhances the creamy texture without mayo.
  • 1/2 teaspoon Salt: To season the dressing.
  • 1/4 teaspoon Black Pepper (ground): For a touch of warmth.
  • 1/2 teaspoon Sugar: Balances the acidity of the lemon juice.

Step-by-Step Instructions: How to Make Lemon Dill Potato Salad

A colorful, healthy potato salad featuring dill, spring onions, and lemon zest on a white plate.

Ready to create your new favorite salad? Follow these simple steps:

  1. Cook the Potatoes: Cut the baby potatoes in half, leaving the skin on for added nutrients and flavor. Place them in a pot, cover with water, and add 1 teaspoon of salt. Bring to a boil, then cover and simmer for 15-20 minutes until fork-tender. Drain and transfer the potatoes to a large bowl.
  2. Prepare the Dressing: While the potatoes cook, whisk together the olive oil, lemon juice, lemon zest, minced garlic, Dijon mustard, remaining salt, black pepper, and sugar in a bowl until well combined.
  3. Toss and Serve: Add the chopped dill and spring onion greens to the warm potatoes. Pour the dressing over the potatoes and toss gently to coat. Let the salad sit for at least 10 minutes before serving to allow the potatoes to soak up the flavors.

Expert Tips for the Best Lemon Dill Potato Salad

  • Use Waxy Potatoes: They hold their shape better and have a creamy texture, making them perfect for salads.
  • Let It Marinate: For enhanced flavor, prepare the salad a few hours ahead or even the night before.
  • Customize the Herbs: Feel free to experiment with parsley, chives, or even basil for different flavor profiles.
  • Adjust the Dressing: If you prefer a creamier texture, add a dollop of Greek yogurt or a vegan alternative.
  • Add Crunch: Toss in some diced celery or bell peppers for an extra crunch!
  • Season to Taste: Always taste and adjust seasoning before serving; every palate is different!
  • Pair with Protein: This salad complements grilled chicken, fish, or plant-based proteins perfectly.
  • Store Properly: Keep leftovers in an airtight container in the fridge for up to 3 days.

Common Mistakes to Avoid

  • Overcooking the Potatoes: Ensure they’re fork-tender but not mushy—nobody wants a mashed potato salad!
  • Not Letting It Sit: Skipping the resting time means missing out on flavor absorption.
  • Using Dried Dill: Fresh dill makes a world of difference; don’t settle for dried!
  • Skipping the Salt: Salt is crucial at every stage—don’t forget it during boiling and in the dressing!

Delicious Variations to Try

  • Vegan Delight: Substitute the Dijon mustard for a vegan option and enjoy a plant-based version.
  • Add Protein: Mix in chunks of grilled chicken or chickpeas for a heartier meal.
  • Spicy Kick: Add a pinch of red pepper flakes or diced jalapeños for a spicy twist.
  • Herbed Variations: Incorporate fresh parsley, tarragon, or even mint for a unique flavor experience.

Storage and Make-Ahead Instructions

This healthy lemon dill potato salad is perfect for make-ahead meals! Here’s how to store it:

  • Refrigeration: Store in an airtight container for up to 3 days in the fridge.
  • Make Ahead: Prepare the salad a day in advance to allow the flavors to meld.
  • Freezing: Not recommended, as the potatoes may become mushy upon thawing.

Nutrition Tips and Dietary Adaptations

This salad is naturally gluten-free and can easily be made vegan by ensuring all ingredients are plant-based. It’s packed with vitamins from the fresh herbs and potatoes, making it a nutritious choice.

Equipment Recommendations

To make this recipe, you’ll need:

  • Large Pot: For boiling the potatoes.
  • Whisk: To combine the dressing ingredients smoothly.
  • Large Mixing Bowl: For tossing the potatoes and dressing together.

Serving Suggestions: How to Enjoy This Salad

This zesty lemon dill potato salad is incredibly versatile! Serve it alongside:

  • Grilled Chicken: Perfectly complements the smoky flavors.
  • Seafood Dishes: Works wonderfully with grilled shrimp or salmon.
  • Veggie Burgers: A delightful side for plant-based meals.

Frequently Asked Questions

  • Can I use other types of potatoes? Absolutely! Yukon Gold or red potatoes work great too.
  • Is this salad gluten-free? Yes, this recipe is naturally gluten-free!
  • How long can I store leftovers? Up to 3 days in the fridge in an airtight container.
  • Can I make this salad vegan? Yes, just ensure your mustard is vegan and enjoy!
  • What can I add for extra flavor? Consider adding capers or olives for a briny twist.
  • How can I make it creamier? Adding Greek yogurt or a vegan mayo works well!
  • What’s the best way to serve it? Serve it chilled or at room temperature for best results.
  • Can I freeze this salad? It’s not recommended to freeze as potatoes may become mushy.

Now, you are fully equipped to create an incredible Lemon Dill Potato Salad that will impress everyone at your next gathering! Enjoy, and remember, the kitchen is your creative playground—so have fun with it!

Healthy Lemon Dill Potato Salad (No Mayo)

Prep Time 10 minutes
Cook Time 20 minutes
Total Time 30 minutes
Servings 4 servings
Calories 250
A light and flavorful potato salad featuring fresh dill and lemon, perfect for a healthy side dish.

Ingredients

Main

  • 500 g Baby Potatoes (Leave skin on)
  • 1 teaspoon Salt
  • 0.25 cup Dill (chopped)
  • 0.25 cup Spring Onion Greens (finely chopped)
  • 0.25 cup Olive Oil (Extra Virgin)
  • 2 tablespoons Lemon Juice
  • 1 lemon Zest
  • 1 clove Garlic (finely minced)
  • 2 tablespoons Dijon Mustard
  • 0.5 teaspoon Salt
  • 0.25 teaspoon Black Pepper (ground)
  • 0.5 teaspoon Sugar

Instructions 

  • Boil potatoes in salted water until fork-tender, then drain and set aside.
  • Whisk together lemon juice, olive oil, lemon zest, garlic, mustard, salt, pepper, and sugar to make the dressing.
  • Add dill and spring onions to the potatoes, pour dressing over, toss gently, and let sit for 10 minutes before serving.

Notes

Use fresh dill for best flavor and serve at room temperature.
Calories: 250kcal
Cost: $10
Course: Side Dish
Cuisine: Healthy
Keyword: Potatoes

Get ready to embark on a culinary adventure that will tantalize your taste buds and fill your kitchen with mouthwatering aromas. This Spicy Prawn and Thai Basil Stir-Fry blends the vibrant flavors of Thailand with the satisfaction of a quick, healthy meal. In under 30 minutes, you’ll whip up a dish that’s not only packed with protein but also brimming with fresh herbs and spices. Perfect for busy weeknights or impressing guests, this recipe is a must-try for anyone looking to spice things up in the kitchen!

Why You’ll Love This Recipe

This dish is a superstar for a reason! Here are just a few benefits you’ll experience:

  • Quick and Easy: Ready in under 30 minutes, perfect for a weeknight dinner.
  • Flavor Explosion: The combination of spicy chilies and aromatic Thai basil creates a dish that’s bursting with flavor.
  • Healthy Choices: Packed with protein and fresh vegetables, this stir-fry supports your healthy lifestyle.
  • Versatile Ingredients: Customize it with your favorite veggies or proteins for a personalized touch.
  • Impressive Presentation: Serve it over fluffy jasmine rice for a colorful and appetizing meal!

Ingredients Breakdown

To create this delightful dish, gather the following ingredients:

  • 500g large prawns: Peeled and deveined, they are the star of the dish, providing a rich source of protein.
  • 1 tbsp vegetable oil: For frying; choose a high smoke-point oil like canola or grapeseed.
  • 4 garlic cloves: Minced, they add a fragrant depth to the stir-fry.
  • 2 bird’s eye chillies: Finely chopped for a spicy kick; adjust to your heat preference.
  • 2 tbsp oyster sauce: Adds umami and sweetness; feel free to substitute with soy sauce for a vegetarian option.
  • 1 tbsp soy sauce: Enhances the overall flavor; low-sodium options are available.
  • 1 tsp sugar: Balances the heat, but can be omitted for a sugar-free alternative.
  • 50ml water: To help create a sauce that coats the prawns beautifully.
  • 1 cup fresh Thai basil leaves: Essential for that authentic Thai flavor; if unavailable, regular basil works in a pinch.
  • Steamed jasmine rice: To serve; this fluffy rice is the perfect base for the stir-fry.

Cooking Instructions

Follow these simple steps for a flawless stir-fry:

  1. Heat the vegetable oil in a large pan or wok over medium-high heat. Add the minced garlic and chopped chilies, stir-frying until fragrant, about 1-2 minutes.
  2. Next, toss in the prawns and cook for 2-3 minutes until they turn pink and opaque.
  3. In a small bowl, whisk together the oyster sauce, soy sauce, sugar, and water. Pour the sauce over the prawns, stirring to coat evenly. Let the sauce simmer and reduce slightly for 1-2 minutes.
  4. Stir in the Thai basil leaves and cook until just wilted. Remove from heat and garnish with extra basil if desired. Serve immediately with jasmine rice.

Pro Tips for Perfection

Juicy prawns and fresh Thai basil in a stir-fry, presented in a bowl.

To elevate your cooking game, consider these expert insights:

  • Prep Ahead: Have all ingredients prepped and ready to go before you start cooking to ensure a seamless cooking experience.
  • High Heat: Use a high flame for a perfect stir-fry that locks in flavors and maintains crunchy textures.
  • Don’t Overcrowd: Cook in batches if necessary to maintain the heat and achieve that coveted wok hei (breath of the wok) flavor.
  • Fresh Herbs: Always use fresh basil for the best flavor; dried herbs won’t give the same aromatic punch.
  • Adjust Spice: If you prefer less heat, remove the seeds from the chilies or substitute with milder peppers.
  • Colorful Veggies: Add bell peppers, snow peas, or broccoli for extra nutrition and color.
  • Garnish: A sprinkle of sesame seeds or a squeeze of lime can add extra flavor and visual appeal.
  • Resting Time: Allow the dish to sit for a minute after cooking to let the flavors meld.

Common Mistakes and Troubleshooting

Even experienced cooks can hit a snag. Here’s how to avoid common pitfalls:

  • Overcooking Prawns: They should be cooked just until pink and opaque; overcooking makes them rubbery.
  • Sauce Too Thin: If your sauce is watery, allow it to simmer longer to thicken.
  • Not Enough Flavor: Taste and adjust the seasoning before serving; more soy sauce or a splash of lime can enhance the dish.
  • Basil Burning: Add basil at the very end to prevent it from wilting too much.

Possible Variations

Feel free to experiment with these variations for a different twist:

  • Vegetarian Delight: Substitute prawns with tofu or tempeh for a plant-based option.
  • Seafood Medley: Add squid or scallops for a seafood extravaganza!
  • Extra Veggies: Incorporate zucchini, carrots, or snap peas for added nutrition and crunch.
  • Spicy Peanut Sauce: Swap the oyster sauce for a spicy peanut sauce for a rich, nutty flavor.

Storage and Make-Ahead Instructions

Want to prep ahead? Here’s how to store and reheat your dish:

  • Refrigeration: Store leftovers in an airtight container in the fridge for up to 2 days.
  • Freezing: This dish can be frozen, but the texture of the prawns may change upon thawing.
  • Reheating: Gently reheat in a pan over low heat, adding a splash of water to prevent drying out.

Frequently Asked Questions

Got questions? Here are some common inquiries about this dish:

  • Can I use frozen prawns? Absolutely! Just ensure they are thawed completely before cooking.
  • What can I substitute for Thai basil? Regular basil or mint can work, but the flavor will be different.
  • Is this dish gluten-free? Yes, if you use gluten-free soy sauce and oyster sauce.
  • How can I make it spicier? Add more chilies or a splash of chili oil for an extra kick!
  • Can I add more vegetables? Definitely! Just make sure to adjust cooking times for harder vegetables.
  • How many servings does this recipe yield? This recipe serves about 2-3 people, depending on portion sizes.
  • Can I make this dish ahead of time? It’s best enjoyed fresh, but you can prep ingredients ahead.
  • What should I serve with this dish? Serve it over jasmine rice or noodles for a complete meal.

Nutrition Tips and Dietary Adaptations

This stir-fry is not only delicious but also nutritious! Here are some tips:

  • Protein Boost: Add edamame or chickpeas for a plant-based protein kick.
  • Low-Carb Option: Serve over cauliflower rice for a low-carb alternative.
  • Balanced Meal: Pair with a side salad or steamed veggies to increase fiber intake.

Equipment Recommendations

To make cooking this dish a breeze, here’s what you’ll need:

  • Wok or Large Skillet: Essential for even cooking and achieving that perfect stir-fry.
  • Sharp Knife: For easy prep of garlic, chilies, and prawns.
  • Cutting Board: Keep your workspace organized while chopping.

Serving Suggestions

Present your dish beautifully to impress your guests:

  • Garnish: Fresh basil leaves and a sprinkle of sesame seeds add a pop of color.
  • Lime Wedges: Serve with lime wedges for an extra burst of freshness.
  • Rice Bowls: Create rice bowls with layers of jasmine rice, stir-fried prawns, and veggies.

Now that you have the ultimate guide to making a fantastic Spicy Prawn and Thai Basil Stir-Fry, get cooking and enjoy the flavorful journey! Remember, the kitchen is your playground—have fun and make it your own!

Spicy Prawn and Thai Basil Stir-Fry

Prep Time 10 minutes
Cook Time 10 minutes
Total Time 20 minutes
Servings 2 people
Calories 250
A quick and flavorful stir-fry combining succulent prawns with fragrant Thai basil and a spicy sauce.

Ingredients

Prawns

  • 500 g large prawns, peeled and deveined
  • 1 tbsp vegetable oil
  • 4 cloves garlic, minced
  • 2 bird’s eye chillies finely chopped chillies
  • 2 tbsp oyster sauce
  • 1 tbsp soy sauce
  • 1 tsp sugar
  • 50 ml water
  • 1 cup fresh Thai basil leaves

Steamed jasmine rice

Instructions 

  • Heat oil in a wok over medium-high heat. Add garlic and chillies, stir-fry 1-2 minutes.
  • Add prawns and cook 2-3 minutes until pink and opaque.
  • Mix oyster sauce, soy sauce, sugar, and water; pour over prawns and simmer 1-2 minutes.
  • Stir in Thai basil leaves until wilted. Serve with jasmine rice.

Notes

Use fresh basil for the best flavor and adjust chillies to taste for spiciness.
Calories: 250kcal
Cost: $12
Course: Main Course
Cuisine: Thai
Keyword: Prawns

Why This Tropical Mango Avocado Quinoa Bowl is Your New Favorite Recipe

If you’re on the lookout for a dish that bursts with flavor and brings a tropical vibe to your table, then look no further than this Tropical Mango Avocado Quinoa Bowl! Packed with nutrients and a medley of vibrant colors, this salad is not just a meal—it’s an experience. Perfect for a quick lunch or a colorful dinner, it’s time to dive into the harmonious blend of sweet mango, creamy avocado, and zesty lime that makes every bite feel like a mini-vacation.

Why You’ll Love This Recipe

This salad isn’t just about aesthetics; it’s about the delightful combination of taste and health benefits. Here are some compelling reasons to add this dish to your weekly menu:

  • Nutritious and Balanced: Packed with protein from quinoa, healthy fats from avocado, and a rainbow of vitamins from the vegetables, this bowl is a nutritional powerhouse.
  • Quick Prep: Ready in just 30 minutes, this dish is perfect for busy weeknights or spontaneous lunch plans.
  • Meal Prep Friendly: Make it ahead of time! The flavors meld beautifully in the fridge, making it ideal for meal prep.
  • Endless Customization: Easily modify the ingredients based on what’s in your fridge or your dietary preferences, making it versatile.
  • Flavor Explosion: The combination of sweet, tangy, and savory flavors makes each bite a delight, keeping your taste buds dancing!

Ingredient Breakdown

Understanding the components of this Tropical Mango Avocado Quinoa Bowl will help you appreciate its flavor complexity and nutritional value.

  • Quinoa: A complete protein that gives this dish a hearty base. Substitute with brown rice or farro for a different texture.
  • Mango: Adds a natural sweetness. If mangoes aren’t in season, use peaches or pineapple for a similar effect.
  • Avocado: Provides creaminess and healthy fats. You can swap it for silken tofu for a vegan twist.
  • Cherry Tomatoes: Bursting with flavor and color. Feel free to use regular tomatoes, chopped fine.
  • Red Onion: Offers a sharp contrast to the sweetness. If it feels too intense, soak in water for 10 minutes to mellow.
  • Red Bell Pepper: Crunchy and sweet. Yellow or orange bell peppers work just as well!
  • Cilantro: Freshness! If you’re not a fan, swap it with parsley or omit it altogether.
  • Lime Juice: The star of the dressing, giving the salad that zesty kick. Lemon juice is a good alternative.
  • Olive Oil: A healthy fat that helps the dressing blend. Avocado oil can also be used here.
  • Maple Syrup: Balances the acidity. For a sugar-free option, agave nectar works wonderfully.
  • Ground Cumin: Adds a warm spice note. You can leave it out or replace it with chili powder for a kick!

Step-by-Step Instructions

Side view of a bowl filled with quinoa, diced mango, avocado, and cherry tomatoes.

Follow these simple steps to create your Tropical Mango Avocado Quinoa Bowl:

  1. Cook the Quinoa: In a medium saucepan, bring 2 cups of water to a boil. Add 1 cup of rinsed quinoa, reduce heat to low, cover, and simmer for about 15 minutes or until the water is absorbed. Remove from heat and let sit, covered, for 5 minutes. Fluff with a fork and allow to cool completely.
  2. Prepare the Dressing: In a small bowl, whisk together 3 tablespoons of fresh lime juice, 2 tablespoons of olive oil, 1 teaspoon of maple syrup, 1/2 teaspoon of ground cumin, and salt and pepper to taste. Set aside.
  3. Assemble the Salad: In a large bowl, combine the cooled quinoa, diced mango, avocado, halved cherry tomatoes, finely chopped red onion, diced bell pepper, and chopped cilantro.
  4. Add the Dressing: Pour the lime dressing over the salad and gently toss to combine, being careful not to mash the avocado.
  5. Season and Serve: Taste and adjust seasoning if needed. Serve immediately or refrigerate for up to 2 hours to allow flavors to meld.

Pro Tips for Perfect Results

Here are some expert insights to elevate your Tropical Mango Avocado Quinoa Bowl:

  • Cool the Quinoa: Letting the quinoa cool completely before mixing with other ingredients prevents wilting and keeps the salad fresh.
  • Dress at the Right Time: To maintain the integrity of the avocado, add the dressing just before serving.
  • Flavor Boost: For extra depth, consider toasting the quinoa before cooking it—this adds a lovely nutty flavor!
  • Chill the Ingredients: Use cold ingredients for a refreshing salad, especially if you’re serving it on a hot day.
  • Adjust Sweetness: Depending on the sweetness of your mango, you might want to adjust the amount of maple syrup in the dressing.
  • Experiment with Herbs: Fresh herbs like mint or basil can add a unique twist to your salad!
  • Portion Control: This salad is filling, but if you want smaller portions, consider serving it in lettuce wraps!
  • Include More Veggies: Don’t hesitate to add in your favorite veggies like corn or shredded carrots for added texture.

Common Mistakes and Troubleshooting

Even the best chefs encounter hiccups. Here’s how to avoid common pitfalls:

  • Overcooking Quinoa: Follow the cooking time closely. Quinoa should be fluffy, not mushy!
  • Brown Avocado: To prevent browning, add the avocado last and serve promptly or store it in an airtight container with lemon juice.
  • Too Much Dressing: Start with a little dressing and add more as needed to avoid making the salad soggy.
  • Missing Seasoning: Always taste your salad before serving! Adjust salt and pepper as needed for balanced flavor.

Delicious Variations to Try

Feel free to mix things up! Here are a few variations to keep your meals exciting:

  • Protein Boost: Add grilled chicken, shrimp, or chickpeas for an extra protein punch.
  • Spicy Kick: Include diced jalapeños or a sprinkle of red pepper flakes for heat.
  • Asian Flair: Swap lime for rice vinegar and add sesame oil for a different dressing profile.
  • Southwestern Twist: Incorporate black beans, corn, and avocado for a hearty southwestern salad.

Storage and Make-Ahead Instructions

This salad can be a lifesaver for meal prep! Here’s how to store it effectively:

  • In the Fridge: Store in an airtight container for up to 2 days for optimal freshness. The flavors deepen over time, but be cautious of avocado browning.
  • Make Ahead: Prepare the quinoa and chop the vegetables ahead of time. Mix everything together just before serving to keep the avocado fresh.
  • Freezing: While quinoa freezes well, avoid freezing the salad once mixed, as it will affect the texture of the vegetables.

Comprehensive FAQ

Got questions? We’ve got answers! Here’s a roundup of common inquiries:

  • Can I make this salad vegan? Yes, simply omit the honey or maple syrup and use agave instead.
  • How long does this salad last in the fridge? It’s best eaten within 2 days, but can last up to 3 days stored properly.
  • What can I use instead of quinoa? Brown rice, farro, or couscous work as excellent alternatives.
  • Is this salad gluten-free? Absolutely! Quinoa is naturally gluten-free, making this dish suitable for gluten-sensitive diets.
  • How spicy is this salad? It’s not spicy at all unless you add jalapeños or hot sauce.
  • Can I use frozen mango? Yes, but thaw it completely before adding to avoid excess moisture.
  • What’s the best way to serve it? Serve chilled or at room temperature for the best flavor.
  • Can I add nuts or seeds? Definitely! Toasted almonds or pumpkin seeds add great crunch and nutrition.

Nutrition Tips and Dietary Adaptations

This bowl not only satisfies your taste buds but also supports your health goals:

  • High Fiber: The quinoa and veggies provide a good amount of dietary fiber, promoting digestive health.
  • Heart-Healthy Fats: Avocado and olive oil contribute healthy monounsaturated fats, beneficial for heart health.
  • Low Calorie: This dish is low in calories while being high in volume, perfect for a filling meal without the guilt.
  • Customizable for Diets: Easily adaptable for vegan, vegetarian, gluten-free, or paleo diets by adjusting ingredients.

Essential Kitchen Tools You’ll Need

To whip up this Tropical Mango Avocado Quinoa Bowl, here are the tools that will make your cooking experience smooth:

  • Medium Saucepan: For cooking the quinoa.
  • Mixing Bowls: For assembling the salad and mixing the dressing.
  • Whisk: For blending the dressing ingredients seamlessly.
  • Cutting Board and Knife: Essential for chopping your fresh ingredients.
  • Measuring Cups and Spoons: Accurate measurements for perfect flavor balance.

Serving Suggestions

This Tropical Mango Avocado Quinoa Bowl is incredibly versatile! Here are some fun serving ideas:

  • Lettuce Wraps: Serve in large leaves of romaine or butter lettuce for a fun wrap.
  • Side Dish: Pair it with grilled fish or chicken for a complete meal.
  • With a Protein: Top with grilled shrimp or tofu for a hearty lunch or dinner.
  • As a Snack: Enjoy it cold as a mid-afternoon pick-me-up!

In conclusion, this Tropical Mango Avocado Quinoa Bowl is not just a recipe; it’s a celebration of flavor, health, and creativity in the kitchen. Whether you’re cooking for yourself or hosting friends, this dish is sure to impress. So, gear up, grab your ingredients, and get ready to enjoy a meal that’s as vibrant as it is delicious!

Tropical Mango Avocado Quinoa

Prep Time 10 minutes
Cook Time 20 minutes
Total Time 30 minutes
Servings 4 servings
Calories 350
A vibrant and refreshing quinoa salad packed with tropical flavors and healthy ingredients, perfect for a light lunch or side dish.

Ingredients

Grains

  • 1 cup quinoa, rinsed
  • 2 cups water

Fruits and Vegetables

  • 1 large ripe mango, peeled and diced
  • 1 ripe avocado, diced
  • 1 cup cherry tomatoes, halved
  • 0.5 small red onion, finely chopped
  • 0.5 red red bell pepper, diced
  • 0.25 cup fresh cilantro, chopped

Dressing

  • 3 tablespoons fresh lime juice
  • 2 tablespoons olive oil
  • 1 teaspoon maple syrup
  • 0.5 teaspoon ground cumin
  • to taste Salt and freshly ground black pepper

Instructions 

  • Bring water to a boil, add quinoa, reduce heat, cover, and simmer for 15 minutes. Let sit for 5 minutes, then fluff and cool.
  • Whisk lime juice, olive oil, maple syrup, cumin, salt, and pepper to make the dressing.
  • Combine cooled quinoa, mango, avocado, tomatoes, onion, bell pepper, and cilantro in a large bowl.
  • Pour dressing over the salad and toss gently. Serve immediately or refrigerate up to 2 hours.

Notes

For extra flavor, add a pinch of chili flakes or a sprinkle of feta cheese before serving.
Calories: 350kcal
Cost: $12
Course: Salad
Cuisine: Tropical
Keyword: avocado, Mango, Quinoa

Experience the Vibrancy of Our Zesty Black Bean Corn Avocado Salad!

Welcome to a culinary fiesta! This Black Bean Corn Avocado Salad is a vibrant, flavorful dish that not only bursts with color but also packs a punch of nutrition. Perfect for those busy weeknights or a sunny picnic, this salad is your go-to recipe for a quick, healthy meal that satisfies both hunger and taste buds. Dive into the lively flavors of creamy avocado, hearty black beans, and sweet corn, all drizzled with a zesty lime vinaigrette. Get ready to elevate your meal prep with this exciting recipe!

Why You’ll Love This Recipe

  • Quick Preparation: Ready in just 15 minutes, this salad is ideal for busy days when you need a nutritious meal that doesn’t skimp on flavor.
  • Nutritious & Filling: Packed with fiber and protein from black beans and healthy fats from avocado, it’s both satisfying and wholesome.
  • Versatile Dish: Serve it as a side, main course, or even as a dip with tortilla chips—the options are endless!
  • Vibrant Flavors: The combination of fresh ingredients and zesty lime vinaigrette creates a mouthwatering experience that will tantalize your taste buds.
  • Make Ahead Friendly: Perfect for meal prep, this salad can be made ahead of time—just add the avocado before serving to keep it fresh!

Ingredients Breakdown

This colorful salad comes together with a delightful mix of wholesome ingredients. Here’s what you’ll need:

  • 1 (15-ounce) can black beans, rinsed and drained
  • 1 cup frozen corn, thawed
  • 2 ripe avocados, diced
  • 1 red bell pepper, diced
  • ½ red onion, finely chopped
  • ¼ cup fresh cilantro, chopped
  • ¼ cup lime juice, freshly squeezed
  • 2 tablespoons olive oil
  • 1 tablespoon apple cider vinegar
  • 1 teaspoon honey
  • ½ teaspoon ground cumin
  • ¼ teaspoon chili powder
  • Salt and pepper to taste

Feel free to make substitutions based on your taste preferences or what you have on hand:

  • Beans: Substitute black beans with kidney beans or chickpeas for a different flavor profile.
  • Corn: Use fresh corn on the cob in the summer for a sweet crunch.
  • Onion: Red onion can be swapped for green onions for a milder taste.
  • Vinaigrette: Experiment with different vinegars like balsamic or rice vinegar for a unique twist.

Step-by-Step Instructions

A vibrant salad showcasing black beans, corn, and chunks of avocado, garnished with cilantro and lime dressing.

Let’s create this delicious salad in just a few easy steps:

  1. Dice the avocados, red bell pepper, and red onion. Chop the cilantro.
  2. In a large bowl, combine black beans, corn, avocado, bell pepper, red onion, and cilantro.
  3. In a small bowl, whisk together lime juice, olive oil, vinegar, honey, cumin, chili powder, salt, and pepper.
  4. Pour the vinaigrette over the salad and gently toss to combine.
  5. Serve immediately or chill briefly. Garnish with extra cilantro or a lime wedge for an extra kick!

Pro Tips for Success

  • Perfect Avocado: Choose avocados that yield slightly when pressed. This ensures they’re ripe and creamy.
  • Fresh Ingredients: For the best flavor, use fresh herbs and vegetables. They make all the difference!
  • Chill Before Serving: Letting the salad sit in the fridge for 30 minutes allows the flavors to meld together beautifully.
  • Adjust Seasoning: Always taste before serving. Adjust salt, lime, or honey to balance the flavor as desired.
  • Presentation: For a stunning presentation, layer the ingredients in a clear bowl to showcase the vibrant colors.
  • Batch Cooking: This salad is perfect for meal prep! Store in airtight containers for easy grab-and-go lunches.
  • Avocado Preservation: To prevent browning, squeeze a little extra lime juice on the cut avocado before mixing.
  • Spice It Up: Add diced jalapeños or a pinch of cayenne pepper for an extra kick!

Common Mistakes & Troubleshooting

Even the most seasoned chefs make mistakes! Here are some common pitfalls and how to avoid them:

  • Overripe Avocados: Avoid using avocados that are overly soft or brown inside. Check for firmness.
  • Too Much Dressing: Start with a little vinaigrette; you can always add more if needed. Too much dressing can make the salad soggy.
  • Unbalanced Flavors: If the salad tastes bland, add more lime juice or salt to enhance the flavors.
  • Ingredient Swaps: If substituting ingredients, keep in mind that some may alter the overall taste or texture.

Delicious Variations to Try

Feeling adventurous? Here are some exciting variations to keep your salad game fresh:

  • Southwestern Twist: Add diced grilled chicken or shrimp for a protein-packed version.
  • Quinoa Salad: Mix in cooked quinoa for a heartier, grain-filled salad.
  • Tropical Flavor: Incorporate diced mango or pineapple for a sweet twist that’ll brighten your day!
  • Spicy Black Bean: Mix in chopped chipotle peppers for a smoky, spicy kick.

Storage and Make-Ahead Instructions

This salad is perfect for meal prep! Here’s how to store it:

  • Refrigeration: Store in an airtight container in the fridge for up to 3 days. Add avocados just before serving to maintain their freshness.
  • Freezing: It’s best not to freeze this salad as the vegetables and avocado will lose their texture upon thawing.
  • Make-Ahead: Prepare the salad base (beans, corn, veggies, herbs) a day in advance; just add the dressing and avocado before serving.

Frequently Asked Questions

Got questions? We’ve got answers! Here are some common queries about this delightful salad:

  • Can I use canned corn instead of frozen? Yes, canned corn works just as well. Just be sure to drain and rinse it!
  • How can I make this salad vegan? This recipe is already vegan! Just ensure any optional ingredients you add are also plant-based.
  • What can I serve with this salad? It pairs beautifully with grilled chicken, tacos, or as a standalone dish!
  • How do I make it spicier? Add diced jalapeños or a pinch of cayenne pepper to the salad for extra heat.
  • Can I use lemon juice instead of lime? Absolutely! Lemon juice offers a similar tangy flavor.
  • What are some good toppings? Try crumbled feta cheese or toasted pumpkin seeds for added crunch and flavor.
  • How do I store leftovers? Keep leftovers in an airtight container in the fridge for up to 3 days, adding avocado just before serving.
  • Is this salad gluten-free? Yes, this salad is naturally gluten-free!

Nutrition Tips and Dietary Adaptations

This Black Bean Corn Avocado Salad is a powerhouse of nutrition! Here are some tips to make it even healthier:

  • Increase Fiber: Add more beans or include some chia or flax seeds for an additional fiber boost.
  • Low-Fat Option: Swap out the olive oil for a lighter dressing made with yogurt or a simple vinegar-based dressing.
  • Protein Boost: Incorporate diced grilled chicken or a scoop of cottage cheese for an extra protein kick.
  • Low Carb Version: Skip the corn or substitute it with diced cucumbers to lower the carb content.

Essential Equipment Recommendations

To whip up this salad, you’ll need a few essentials:

  • Sharp Knife: A good knife is crucial for chopping your ingredients efficiently.
  • Cutting Board: A sturdy cutting board will make prep work easier and safer.
  • Mixing Bowl: Choose a large mixing bowl to combine all the ingredients comfortably.
  • Whisk or Fork: Use a whisk or fork to mix the vinaigrette and ensure it’s well combined.

Serving Suggestions

This salad is incredibly versatile and can be enjoyed in many ways:

  • As a refreshing side dish for barbecues or summer gatherings.
  • On its own as a light lunch or dinner.
  • As a topping for tacos or burrito bowls for added flavor and texture.
  • As a dip served with tortilla chips for a fun appetizer.

Final Thoughts

With its vibrant colors, hearty ingredients, and zesty dressing, this Black Bean Corn Avocado Salad is more than just a dish; it’s an experience! Whether you’re looking for a quick meal, a side for a gathering, or something fresh to brighten your week, this salad checks all the boxes. So grab your ingredients, get creative, and let the flavors dance on your palate. Happy cooking!

Black Bean Corn Avocado Salad with Lime Vinaigrette

Prep Time 10 minutes
Total Time 10 minutes
Servings 4 servings
Calories 250
A fresh and vibrant salad combining black beans, corn, and creamy avocados, dressed with a zesty lime vinaigrette. Perfect for a quick, healthy meal or side dish.

Ingredients

Canned Goods

  • 1 can black beans, rinsed and drained
  • 1 cup frozen corn, thawed
  • 2 ripe avocados, diced
  • 1 red bell pepper, diced
  • ½ red onion, finely chopped
  • ¼ cup chopped fresh cilantro
  • ¼ cup lime juice, freshly squeezed
  • 2 tablespoons olive oil
  • 1 tablespoon apple cider vinegar
  • 1 teaspoon honey
  • ½ teaspoon ground cumin
  • ¼ teaspoon chili powder
  • to taste Salt and pepper

Instructions 

  • Dice the avocados, bell pepper, and onion. Chop the cilantro.
  • Combine black beans, corn, avocado, bell pepper, onion, and cilantro in a large bowl.
  • Whisk lime juice, olive oil, vinegar, honey, cumin, chili powder, salt, and pepper to make the vinaigrette.
  • Pour vinaigrette over salad and toss gently. Serve immediately or chill briefly.

Notes

For extra flavor, add a sprinkle of feta or a squeeze of additional lime before serving.
Calories: 250kcal
Cost: $10
Course: Salad
Cuisine: Mexican
Keyword: avocado, Black Bean, corn