Author

Ryan

Browsing

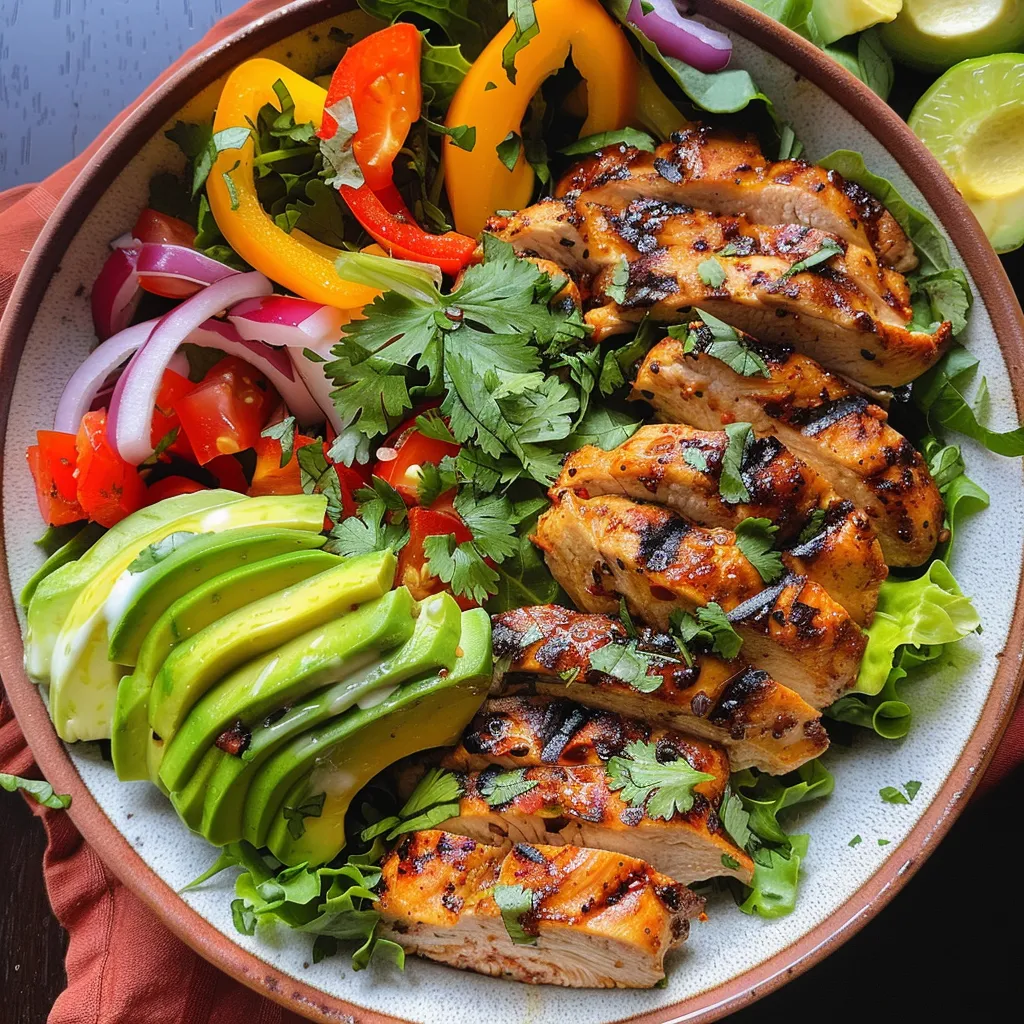
Elevate Your Meal Game with Zesty Southwest Shrimp Salad!

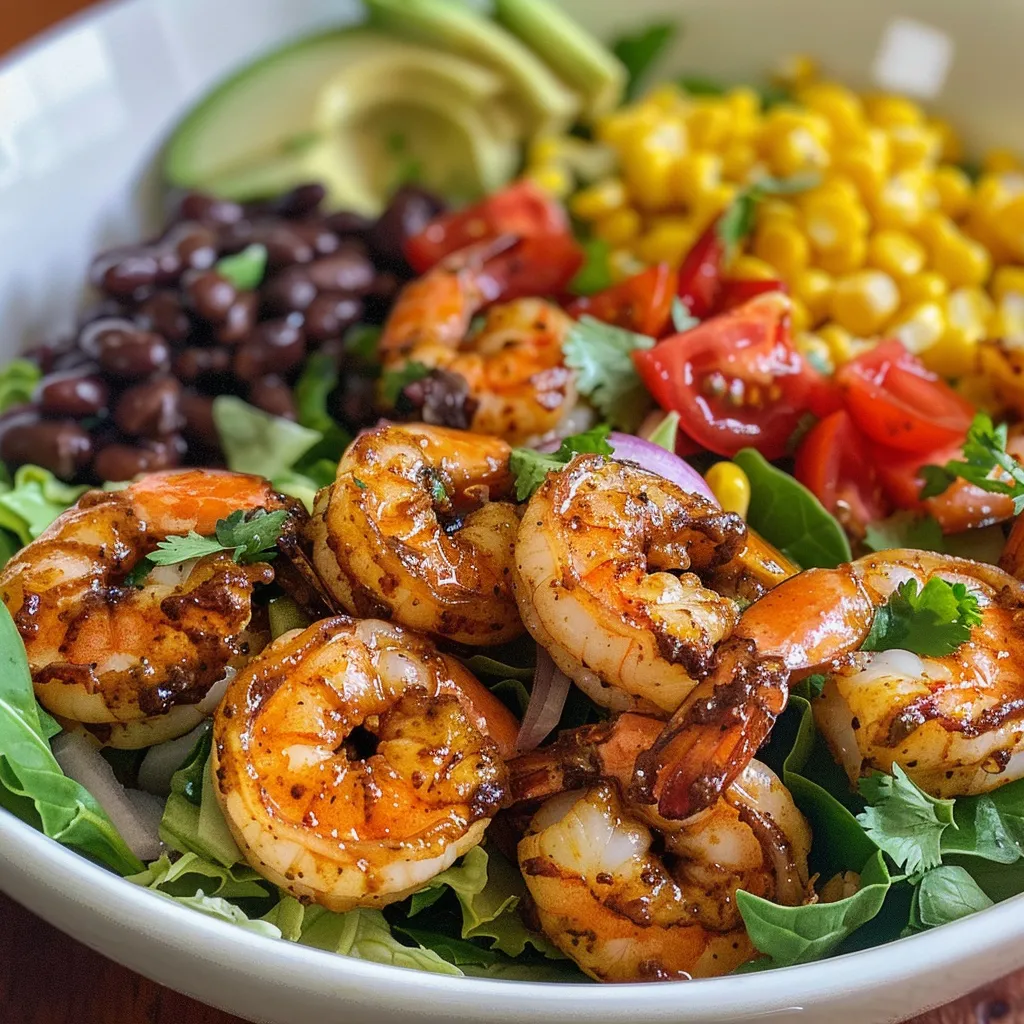
Welcome to the bold and vibrant world of Zesty Southwest Shrimp Salad! This dish is not just your average salad; it’s a colorful, flavor-packed experience that brings together the best of fresh ingredients and zesty flavors. Perfect for busy days or for impressing guests at dinner, this salad is a celebration of nutrition without sacrificing taste. In this comprehensive guide, you’ll find everything you need to whip up a sensational meal that’s as exciting as it is delicious!

Why You’ll Love This Recipe

  • Quick and Easy: This salad is a breeze to prepare, making it perfect for weeknight dinners or meal prep. In just 30 minutes, you can have a nutritious meal on the table!
  • Flavor Explosion: With zesty lime juice, fresh veggies, and perfectly seared shrimp, each bite is bursting with flavor that dances on your palate.
  • Protein-Packed: Loaded with shrimp and black beans, this salad provides a hearty dose of protein, keeping you satisfied and energized.
  • Versatile Ingredients: The ingredients can easily be swapped or added to, making this salad customizable to your taste and dietary needs.
  • Meal Prep Friendly: Prepare this salad ahead of time, and enjoy it throughout the week. Just keep the dressing separate until you’re ready to dive in!

Ingredients Breakdown

Gathering fresh ingredients is key to making this shrimp salad shine. Here’s what you’ll need along with some handy substitutions:

  • Shrimp: Use 1 pound of large, peeled, and deveined shrimp. If you’re looking for a vegan option, consider using chickpeas as a protein substitute.
  • Baking Soda: ½ teaspoon helps to achieve that perfect shrimp texture. It’s a simple trick to enhance the juiciness!
  • Olive Oil: 1 tablespoon for cooking the shrimp and ½ cup for the dressing. Use avocado oil if you prefer a different flavor profile.
  • Garlic Powder: ¼ teaspoon adds depth. Fresh minced garlic works too if you prefer a stronger flavor!
  • Romaine Lettuce: A head of chopped romaine is crisp and refreshing. Swap for spinach or kale for a nutrient boost.
  • Avocado: 1 sliced avocado brings creaminess to the salad. You can also use guacamole if you’re in a hurry.
  • Tomatoes: 2 ripe tomatoes diced add color and sweetness. Cherry tomatoes are a fun alternative!
  • Black Beans: A 15-ounce can, drained and rinsed, adds fiber and protein. You can use any canned beans you enjoy.
  • Frozen Corn: 1½ cups, thawed, for that sweet crunch. Fresh corn on the cob can also be used in season!
  • Red Onion: ½ cup sliced for a bit of bite. Green onions are a milder alternative.
  • Cilantro: ¼ cup chopped gives a fresh herbal note. If you’re not a cilantro fan, parsley is a great substitute.
  • Lemon Juice: 6 tablespoons for that zesty flavor. Lime juice can also be used for a twist!
  • Honey: 2 tablespoons balance the dressing. Agave syrup is a perfect vegan alternative.
  • Chipotle Peppers: 1-2 peppers for some smoky heat. If you prefer less heat, use just a pinch of cayenne instead.
  • Adobo Sauce: ½ – 1 tablespoon for depth. You can skip it if you want to keep it mild.
  • Garlic Cloves: 2 cloves, minced for extra flavor. Use garlic powder if you’re short on fresh cloves.
  • Coarse Salt: ½ teaspoon to enhance flavors.

Pro Tips for Perfection

A colorful Southwest salad with shrimp, featuring chopped romaine, avocado, and tomatoes.
  • Perfectly Sear the Shrimp: Heat your skillet until it’s hot, then add the shrimp. This ensures a beautiful sear and prevents sticking.
  • Chill the Salad: Let the salad sit in the fridge for a few minutes before serving. This allows the flavors to meld together beautifully.
  • Adjust the Spice: If you love heat, add more chipotle or a dash of hot sauce to the dressing for an extra kick!
  • Mix It Up: Try adding quinoa or brown rice to the salad for additional texture and fiber.
  • Fresh Ingredients Matter: Use the freshest produce you can find for the best flavor. Visit your local farmer’s market for seasonal veggies!
  • Dress at the Last Minute: Keep the dressing separate until you’re ready to eat to maintain the salad’s crispness.
  • Storage Tips: Store leftovers in an airtight container in the fridge for up to 3 days. Keep the dressing separate for optimal freshness.
  • Experiment with Dressings: While the lime dressing is fantastic, feel free to swap in your favorite vinaigrette or creamy dressing!

Common Mistakes and Troubleshooting

Even the best chefs make mistakes. Here’s how to troubleshoot common issues:

  • Soggy Salad: If your salad is soggy, ensure you dry your greens thoroughly before mixing in other ingredients.
  • Overcooked Shrimp: Shrimp cook quickly! Remove them from the heat as soon as they turn pink to avoid a rubbery texture.
  • Too Salty Dressing: If your dressing is too salty, balance it out with a splash of additional lime juice or a teaspoon of honey.
  • Lack of Flavor: Always taste and adjust your dressing before adding it to the salad. Don’t be afraid to add more lime or spices!

Delicious Variations

Feeling adventurous? Here are some unique twists on the classic Southwest Shrimp Salad:

  • Southwest Shrimp Quinoa Bowl: Add cooked quinoa as a base for a hearty bowl meal.
  • Spicy Blackened Shrimp Salad: Season the shrimp with Cajun spices for a fiery kick!
  • Vegetarian Version: Replace shrimp with roasted chickpeas or grilled tofu for a plant-based delight.
  • Mexican Shrimp Salad: Incorporate diced mango and jalapeños for a tropical twist!

Storage and Make-Ahead Instructions

This salad is perfect for meal prep! Here’s how to store it:

  • Store in Airtight Containers: Keep the salad and dressing separate in airtight containers. This helps maintain freshness.
  • Refrigerate: Consume within 3 days for the best flavor and texture. The shrimp and veggies will stay fresh and crisp!
  • Make Ahead: Prep the salad ingredients ahead of time and assemble just before serving to keep everything fresh.

Frequently Asked Questions

Got questions? We’ve got answers! Here are some common inquiries about our Zesty Southwest Shrimp Salad:

  • Can I use frozen shrimp? Absolutely! Just make sure to thaw and dry them thoroughly before cooking.
  • What can I substitute for lime juice? Lemon juice works great in a pinch, or even apple cider vinegar for a different tang.
  • Is this salad gluten-free? Yes! All ingredients are naturally gluten-free, making it a great choice for gluten-sensitive diets.
  • How can I make this salad dairy-free? This recipe is already dairy-free! Just ensure any substitutes you use are also dairy-free.
  • Can I add more veggies? Definitely! Feel free to add bell peppers, cucumbers, or any veggies you love!
  • How spicy is this salad? The spice level is adjustable. Start with a small amount of chipotle and add more to taste!
  • Can I make this salad vegan? Yes! Swap the shrimp for chickpeas or grilled tofu and use a vegan sweetener in the dressing.
  • How do I store leftovers? Keep leftovers in an airtight container in the fridge for up to 3 days. Enjoy cold or quickly reheat!

Nutritional Tips and Dietary Adaptations

This Zesty Southwest Shrimp Salad is not only delicious, but it’s also packed with nutritional benefits:

  • High in Protein: The shrimp and black beans provide a significant protein boost, essential for muscle repair and overall health.
  • Rich in Fiber: The vegetables and beans contribute to your daily fiber intake, promoting digestive health.
  • Healthy Fats: The avocado and olive oil offer heart-healthy fats, supporting cardiovascular health and reducing inflammation.
  • Low in Calories: This salad is a nutrient-dense meal, low in calories while keeping you full and satisfied.

Equipment Recommendations

Here are some handy tools to make your cooking experience enjoyable:

  • Non-Stick Skillet: Perfect for searing shrimp without sticking, ensuring they cook evenly.
  • Sharp Knife: A good knife is essential for chopping veggies and prepping ingredients efficiently.
  • Cutting Board: A sturdy cutting board provides a safe space for all your chopping and slicing.
  • Mixing Bowls: Use these for prepping and mixing your salad components and dressing.

Serving Suggestions

Ready to serve? Here are some ideas to elevate your salad presentation:

  • Plate it Up: Serve the salad on a large platter for family-style dining. It’s visually stunning!
  • Garnish: Top with extra cilantro, lime wedges, or sliced jalapeños for a pop of color and flavor.
  • Pair it Right: Serve alongside tortilla chips or warm corn tortillas for a complete meal experience.
  • Drizzle More Dressing: Offer extra dressing on the side for those who love a saucy salad!

Conclusion

Your journey to a vibrant and delicious meal begins with this Zesty Southwest Shrimp Salad! With its bold flavors, fresh ingredients, and easy preparation, it’s bound to become a favorite in your kitchen. Whether you’re meal prepping for the week or hosting a dinner party, this salad is the perfect way to showcase your culinary flair while keeping nutrition in mind. So grab your ingredients, let your creativity shine, and enjoy the magic of healthy cooking!

Southwest Salad with Shrimp

Prep Time 15 minutes
Cook Time 10 minutes
Total Time 25 minutes
Servings 4 servings
Calories 450
A vibrant and flavorful salad combining succulent shrimp with fresh vegetables and a zesty dressing, perfect for a quick and satisfying meal.

Ingredients

Protein

  • 1 pound shrimp (peeled and deveined)
  • 1/2 teaspoon baking soda
  • 1 tablespoon olive oil
  • ¼ teaspoon garlic powder
  • Salt and pepper to taste Salt and pepper

Vegetables

  • 1 head romaine lettuce (chopped)
  • 1 avocado avocado (sliced)
  • 2 ripe tomatoes tomatoes
  • 1 15-ounce can black beans (drained and rinsed)
  • 1.5 cups frozen corn (thawed)
  • 1/2 cup sliced red onion
  • 1/4 cup cilantro (chopped)
  • 6 tablespoons lemon juice
  • 2 tablespoons honey
  • 1/2 cup olive oil
  • 1-2 chipotle peppers chipotle peppers
  • ½ - 1 tablespoon adobo sauce
  • 2 garlic cloves garlic cloves
  • ½ teaspoon coarse salt

Instructions 

  • Marinate shrimp with garlic, salt, pepper, and a tablespoon of olive oil; cook until pink.
  • Prepare dressing by blending lemon juice, honey, olive oil, chipotle peppers, adobo sauce, garlic, and salt.
  • In a large bowl, combine chopped lettuce, tomatoes, black beans, corn, red onion, and cilantro.
  • Add cooked shrimp and sliced avocado to the salad.
  • Drizzle dressing over the salad and toss gently to combine.

Notes

Adjust spice level by varying chipotle peppers and adobo sauce.
Calories: 450kcal
Cost: $15
Course: Salad
Cuisine: Southwest
Keyword: shrimp

Welcome to a culinary journey that celebrates the vibrant flavors of summer! This Heirloom Tomato Burrata Caprese Salad is not just a dish; it’s a sensory experience that brings together fresh ingredients in a delightful harmony. Bursting with the rich taste of heirloom tomatoes and the creamy goodness of burrata cheese, this salad is perfect for impressing guests or enjoying a nutritious meal at home. Let’s dive into why this recipe is a must-try and how to create it effortlessly!

Why You’ll Love This Recipe

This isn’t your average salad! Here are five reasons why you’ll fall in love with this burrata caprese salad:

  • Flavor Explosion: The combination of ripe heirloom tomatoes and creamy burrata creates a delicious contrast that tantalizes your taste buds.
  • Visually Stunning: The vibrant colors of the heirloom tomatoes and fresh basil make this salad a feast for the eyes, perfect for any gathering.
  • Quick and Easy: With just a few simple steps, you can whip up this salad in under 30 minutes!
  • Nutritious and Wholesome: Packed with vitamins and healthy fats, this salad supports your wellness goals without compromising on taste.
  • Versatile Pairing: Whether you’re serving it as an appetizer, side dish, or light main course, it complements a wide range of meals.

Ingredients You’ll Need

To create this vibrant tomato burrata caprese salad, gather the following ingredients:

  • 4 heirloom tomatoes (variety adds flavor and color)
  • 8 ounces burrata cheese (for that creamy texture)
  • 1/4 cup fresh basil leaves (to brighten the dish)
  • 1 teaspoon sea salt flakes (for seasoning)
  • 2 tablespoons extra virgin olive oil (to enhance flavors)
  • 1 teaspoon black pepper (for a little kick)
  • 1 cup balsamic vinegar (to create the glaze)
  • 1 teaspoon truffle salt (optional for gourmet flair)

Ingredient Substitutions: If you can’t find heirloom tomatoes, any ripe tomatoes will do. For a dairy-free version, try using a nut-based cheese alternative in place of burrata.

How to Make Heirloom Tomato Burrata Caprese Salad Recipe

Let’s get cooking! Follow these simple steps to create your heirloom tomato burrata salad:

  • Step 1 — Prepare the Balsamic Glaze: In a small saucepan, combine the balsamic vinegar and truffle salt. Bring to a simmer over medium heat and cook until reduced by half, about 10 minutes. Remove from heat and let it cool completely.
  • Step 2 — Slice and Season the Tomatoes: Cut the heirloom tomatoes into thin slices and arrange them evenly on a serving plate. Drizzle with extra virgin olive oil and season with sea salt flakes and black pepper to taste.
  • Step 3 — Layer in Fresh Basil: Layer the tomato slices neatly on the plate, tucking fresh basil leaves between some of the slices to infuse flavor throughout the salad.
  • Step 4 — Add and Gently Open the Burrata: Place the burrata cheese in the center of the plate. Gently cut it open to allow the creamy interior to slightly ooze out, adding richness to the salad.
  • Step 5 — Drizzle the Balsamic Glaze and Serve: Drizzle the cooled balsamic glaze over the arranged tomatoes and burrata cheese. Garnish with additional fresh basil leaves and serve immediately for best flavor.

Pro Tips for a Perfect Salad

Side angle of a colorful Caprese salad featuring heirloom tomatoes and creamy burrata.

Want to take your salad to the next level? Here are some expert insights:

  • Choose the Best Tomatoes: Opt for heirloom varieties for their unique flavors and colors. Look for tomatoes that feel heavy for their size and have a rich aroma.
  • Don’t Rush the Glaze: Allow the balsamic reduction to cool completely for a thicker consistency that clings beautifully to the salad.
  • Fresh is Best: Use fresh basil leaves and high-quality olive oil to enhance the flavors of the salad.
  • Presentation Matters: Arrange your tomatoes and burrata artfully for a stunning visual appeal.
  • Experiment with Textures: Add toasted nuts or seeds for an extra crunch.
  • Season Generously: Don’t be shy with the salt and pepper; they enhance the natural flavors of the ingredients.
  • Make it Ahead: Prep the salad a few hours in advance. Just drizzle the glaze right before serving to keep things fresh.
  • Pair with Wine: A crisp white wine or a light rosé pairs beautifully with this salad.

Common Mistakes and Troubleshooting

Even the best chefs make mistakes! Here’s how to avoid common pitfalls:

  • Over-seasoning: Start with less salt and pepper; you can always add more to taste.
  • Using Unripe Tomatoes: Ensure your tomatoes are fully ripe for the best flavor. A green or hard tomato will lead to a disappointing salad.
  • Skipping the Glaze: Don’t skip making the balsamic reduction; it adds essential sweetness and depth of flavor.
  • Too Much Moisture: If your tomatoes are particularly juicy, consider draining some of the excess liquid before serving to prevent a soggy salad.

Variations to Try

Feeling adventurous? Here are some exciting variations of the burrata caprese salad to explore:

  • Grilled Vegetable Caprese: Add grilled zucchini or eggplant for a smoky flavor.
  • Fruit Fusion: Include slices of ripe peaches or strawberries for a sweet twist.
  • Spicy Kick: Incorporate sliced jalapeños or a sprinkle of red pepper flakes for heat.
  • Nutty Delight: Top with toasted pine nuts or walnuts for added crunch and healthy fats.

Storage and Make-Ahead Instructions

This salad is best enjoyed fresh, but if you need to prepare it in advance, here’s how:

  • Make-Ahead: You can prepare the balsamic glaze and slice the tomatoes a few hours ahead. Just keep them covered in the refrigerator.
  • Storage: If you have leftovers, store them in an airtight container in the fridge for up to 2 days. However, the burrata may lose some creaminess.
  • Reheating: It’s not recommended to reheat the salad. Enjoy it cold for the best flavor!

Frequently Asked Questions

Got questions? Let’s dive into the answers!

  • Can I use regular mozzarella instead of burrata? Yes, but burrata adds a unique creaminess that enhances the flavor.
  • What type of tomatoes are best? Heirloom tomatoes are ideal for their rich flavor and beautiful colors.
  • How do I make the balsamic glaze thicker? Simmer it longer until it reduces to your desired thickness.
  • Is this salad gluten-free? Absolutely! All the ingredients are naturally gluten-free.
  • Can I add protein to this salad? Yes, grilled chicken or shrimp can be excellent additions.
  • What’s the best way to serve this salad? Serve it cold on a decorative platter for a stunning presentation.
  • How can I make this dish vegan? Substitute the burrata with a plant-based cheese alternative.
  • How long can I keep the leftovers? Leftovers can be stored in the fridge for up to 2 days but are best enjoyed fresh.

Nutrition Tips and Dietary Adaptations

Whether you’re watching your diet or simply want to eat healthier, here are some tips:

  • Low-Calorie Option: Use less olive oil and skip the truffle salt for a lighter version.
  • High-Protein Variation: Add grilled chicken or chickpeas to boost the protein content.
  • Vegan-Friendly: As mentioned, swap the burrata for a dairy-free cheese alternative.
  • Heart-Healthy: Use less balsamic for a lower sugar option and opt for a high-quality extra virgin olive oil.

Equipment Recommendations

Here’s what you’ll need to create this dish:

  • Sharp Chef’s Knife: For cleanly slicing tomatoes and burrata.
  • Cutting Board: A sturdy surface for prep work.
  • Small Saucepan: For making the balsamic glaze.
  • Serving Platter: To beautifully present your salad.

Serving Suggestions

Pair this caprese salad with your favorite dishes for a complete meal:

  • Crusty Bread: Serve with a side of fresh artisanal bread to soak up the balsamic glaze.
  • Grilled Chicken: A perfect protein complement to the creamy salad.
  • Wine Pairing: A chilled glass of Pinot Grigio or Sauvignon Blanc pairs beautifully.
  • Light Pasta Dishes: Enjoy alongside a simple lemon pasta for a refreshing meal.

Final Thoughts

Your Heirloom Tomato Burrata Caprese Salad is ready to shine at your next gathering or weeknight dinner! With its burst of flavors and beautiful presentation, it’s sure to impress. Remember, cooking should be fun and creative, so feel free to experiment with the ingredients and make this salad your own. Enjoy the vibrant summer flavors, and happy cooking!

Heirloom Tomato Burrata Caprese Salad Recipe

Prep Time 10 minutes
Cook Time 10 minutes
Total Time 20 minutes
Servings 4 people
Calories 350
A fresh and vibrant salad featuring heirloom tomatoes, creamy burrata, and a balsamic glaze, perfect for summer gatherings.

Ingredients

Main

  • 4 pieces heirloom tomatoes
  • 8 ounces burrata cheese
  • 0.25 cup fresh basil leaves
  • 1 teaspoon sea salt flakes
  • 2 tablespoons extra virgin olive oil
  • 1 teaspoon black pepper
  • 1 cup balsamic vinegar
  • 1 teaspoon truffle salt

Instructions 

  • Simmer balsamic vinegar with truffle salt until reduced by half, then cool.
  • Slice heirloom tomatoes and arrange on a plate. Drizzle with olive oil, season with salt and pepper.
  • Layer tomato slices with basil leaves between them.
  • Place burrata in the center, gently cut to release creamy interior.
  • Drizzle balsamic glaze over the salad, garnish with basil, and serve immediately.

Notes

Use ripe heirloom tomatoes for best flavor.
Calories: 350kcal
Cost: $15
Course: Salad
Cuisine: Italian
Keyword: Burrata, caprese, tomato

Unleash Your Culinary Creativity with Creamy Sriracha Shrimp Poke Bowls!

Dive into the world of vibrant flavors and nutritious ingredients with our Creamy Sriracha Shrimp Poke Bowls! This recipe is not just a meal; it’s an invitation to explore the exciting intersection of health, taste, and creativity. Bursting with fresh vegetables, juicy shrimp, and a creamy sriracha sauce, it’s perfect for quick dinners or meal prep. Let’s transform your cooking experience into something exhilarating, making healthy eating not just a habit, but a joy!

Why You’ll Love This Recipe

  • Quick and Easy: Ready in just 30 minutes, this poke bowl is perfect for busy weeknights or spontaneous gatherings.
  • Customizable: Tailor each bowl to your taste by adding your favorite ingredients, making it a perfect choice for every palate.
  • Nutritious and Flavor-Packed: Packed with protein from the shrimp and fiber from the vegetables, this dish is a balanced meal that fuels your body.
  • Exciting Textures: Experience a delightful mix of crunchy, creamy, and tender elements that make each bite a culinary adventure.
  • Make Ahead: Perfect for meal prep, the components can be prepared in advance and assembled quickly when you’re ready to eat.

Ingredient Breakdown

To craft these delicious poke bowls, gather the following ingredients:

  • 1 lb shrimp: Peeled and deveined, these are the stars of your dish, offering a juicy, protein-rich base.
  • 2 cups cooked rice or salad greens: Choose sushi rice for a traditional poke bowl or fresh greens for a lower-carb option.
  • 1 tbsp soy sauce or tamari: Adds a savory umami flavor; tamari is great for gluten-free diets.
  • 1 tbsp lime juice: Brightens the dish and enhances the shrimp’s flavor.
  • 1 tbsp oil: Olive oil or sesame oil works well for marinating the shrimp.
  • 1 garlic clove: Minced, this adds a punch of flavor to your marinade.
  • 1/4 cup mayonnaise: Creates the creamy base for your sriracha sauce.
  • 1–2 tbsp sriracha: Adjust to your heat preference; it’s the secret to a zesty kick!
  • 1/2 cucumber: Sliced, it adds a refreshing crunch to the bowl.
  • 1/2 cup shredded carrots: Sweet and crisp, these provide color and texture.
  • 1 avocado: Sliced, for creaminess and healthy fats.
  • 2 green onions: Chopped, they add a fresh, sharp flavor.
  • 1 tbsp sesame seeds: For a nutty finish and added crunch.
  • Optional toppings: Seaweed strips, pickled ginger, or jalapeño slices can enhance flavor and presentation.

Feel free to experiment with substitutions! For example, you can use tofu or chicken instead of shrimp, or quinoa instead of rice for a whole grain option.

Pro Tips for the Perfect Poke Bowl

Side view of a bowl filled with shrimp, rice, avocado, and vibrant vegetables.
  • Perfect Shrimp: Cook shrimp until they are pink and opaque, about 2-3 minutes per side to avoid overcooking.
  • Marinate Wisely: Let the shrimp marinate for at least 5-10 minutes to absorb the flavors.
  • Flavor Adjustments: Don’t hesitate to adjust the sriracha amount based on your heat preference; remember, you can always add more!
  • Freshness Counts: Use the freshest vegetables you can find; their crunch and flavor are essential to a great poke bowl.
  • Presentation Matters: Arrange your ingredients artfully for a beautiful dish that’s as pleasing to the eye as it is to the palate.
  • Experiment with Sauces: Try different sauces like teriyaki or a wasabi mayo for unique flavor profiles.
  • Cook Rice Properly: Rinse sushi rice until the water runs clear; this removes excess starch and gives you the perfect texture.
  • Make Ahead: Prepare components in advance but assemble right before serving to keep everything fresh.

Common Mistakes and Troubleshooting

Even the best chefs make mistakes! Here are some common pitfalls and how to avoid them:

  • Overcooked Shrimp: Keep a close eye on your shrimp while cooking; they should be just pink and curled, not rubbery.
  • Too Much Sauce: Start with a small amount of sriracha mayo and add more to taste—it’s easier to add than to take away!
  • Unbalanced Flavors: If your bowl tastes one-note, consider adding a splash of acid (like lime juice) or a pinch of salt to brighten it up.
  • Not Enough Veggies: Poke bowls thrive on balance; ensure you’re incorporating a variety of fresh vegetables for flavor and nutrition.

Creative Variations

Don’t be afraid to mix things up! Here are some fun variations to keep your poke bowl exciting:

  • Spicy Tuna Bowl: Replace shrimp with sushi-grade tuna, marinated with sesame oil and a hint of wasabi.
  • Veggie Delight: Go plant-based with marinated tofu, a rainbow of vegetables, and quinoa.
  • Teriyaki Chicken Bowl: Use grilled chicken drizzled with teriyaki sauce for a savory alternative.
  • Asian Noodle Bowl: Swap rice for soba noodles and top with peanut sauce for a unique twist.

Storage and Make-Ahead Instructions

Planning for leftovers? Here’s how to store your poke bowl components:

  • Store Components Separately: Keep cooked shrimp, rice, and vegetables in separate airtight containers to maintain freshness.
  • Refrigerate: All components can be stored in the fridge for up to 3 days; the creamy sriracha sauce can last up to a week.
  • Reheat Carefully: If using cooked shrimp, gently reheat in the microwave or in a skillet to avoid rubbery shrimp.

Frequently Asked Questions

  • Can I use frozen shrimp? Yes! Just thaw and pat dry before marinating.
  • Is this recipe gluten-free? Absolutely! Use gluten-free soy sauce or tamari.
  • How spicy is the creamy sriracha sauce? You control the heat! Start with 1 tbsp and adjust according to your taste.
  • Can I use cooked shrimp? Yes, just warm them up with your marinade to infuse flavor.
  • What can I substitute for rice? Quinoa, cauliflower rice, or even zucchini noodles work great!
  • Can I make this ahead of time? Yes! Prepare components separately and assemble just before serving.
  • How do I make it vegan? Substitute shrimp with tofu and use vegan mayo for the sauce.
  • What are some good side dishes? Edamame, seaweed salad, or miso soup pair beautifully with poke bowls!

Nutritional Tips and Dietary Adaptations

Want to enhance the nutritional profile? Here’s how:

  • Add Superfoods: Incorporate ingredients like chia seeds or hemp hearts for a nutrient boost.
  • Go Low-Carb: Use cauliflower rice instead of traditional rice for a lower-carb alternative.
  • Increase Fiber: Include more vegetables like bell peppers or radishes for added fiber and nutrients.
  • Watch Portion Sizes: Keep an eye on your quantities to maintain a balanced meal without overindulging.

Equipment Recommendations

To make your cooking experience smooth and enjoyable, consider having these tools on hand:

  • Sharp Knife: For perfectly sliced vegetables and shrimp.
  • Cutting Board: A sturdy surface for all your chopping needs.
  • Mixing Bowls: To marinate shrimp and mix sauces.
  • Skillet: A non-stick skillet is ideal for cooking shrimp evenly.
  • Measuring Cups and Spoons: Ensure accurate measurements for flavors and textures.

Serving Suggestions

Elevate your poke bowl presentation with these ideas:

  • Layering: Begin with your rice or greens, then artfully arrange shrimp and vegetables on top.
  • Color Coordination: Use a variety of colorful vegetables to create a visually stunning dish.
  • Garnishing: Finish with sesame seeds, seaweed, or a drizzle of extra sriracha for an eye-catching touch.

Conclusion

Creating your own Creamy Sriracha Shrimp Poke Bowls is not just about nourishing your body; it’s about embracing the joy of cooking and the thrill of experimenting with flavors. With this comprehensive guide, you’re equipped to make a meal that excites your taste buds and supports a healthy lifestyle. So grab your ingredients, unleash your creativity, and enjoy every vibrant bite of this delicious dish!

Creamy Sriracha Shrimp Poke Bowls

Prep Time 10 minutes
Cook Time 10 minutes
Total Time 20 minutes
Servings 4 bowls
Calories 450
Enjoy a vibrant and flavorful poke bowl featuring succulent shrimp, fresh vegetables, and a spicy creamy sriracha sauce.

Ingredients

Protein

  • 1 lb shrimp, peeled and deveined

Base

  • 2 cups cooked rice or salad greens

Sauce

  • 1 tbsp soy sauce or tamari
  • 1 tbsp lime juice
  • 1 tbsp olive oil or sesame oil
  • 1 clove garlic, minced
  • 1/4 cup mayonnaise
  • 1–2 tbsp sriracha (adjust to taste)

Vegetables

  • 1/2 cucumber sliced
  • 1/2 cup shredded carrots
  • 1 avocado sliced
  • 2 green onions chopped
  • 1 tbsp sesame seeds

Optional toppings

  • seaweed strips, pickled ginger, jalapeño slices

Instructions 

  • Cook rice or prepare greens as the base.
  • Toss shrimp with oil, soy sauce, lime juice, and garlic; marinate 5–10 minutes.
  • Cook shrimp in a skillet 2–3 minutes per side until pink; set aside.
  • Mix mayonnaise and sriracha for the sauce.
  • Assemble bowls with rice, shrimp, and vegetables; drizzle sauce and sprinkle sesame seeds.

Notes

Adjust sriracha for desired spice level.
Calories: 450kcal
Cost: $15
Course: Main Course
Cuisine: Hawaiian
Keyword: shrimp

Experience the Vibrant Flavors of Roasted Beet Salad

If you’re on a quest for a salad that combines nutrition, flavor, and color in a way that excites your taste buds, look no further than this Roasted Beet Salad with Avocado and Citrus. This dish is not just a feast for the eyes; it’s a culinary adventure that packs a hearty punch of essential nutrients like fiber and vitamins. Plus, it’s incredibly versatile and can be whipped up in no time. Let’s dive into the details of why this salad is a must-try!

Why You’ll Love This Recipe

This roasted beet salad is not only a vibrant addition to your meal rotation but also offers a range of benefits:

  • Flavor Explosion: The combination of earthy roasted beets, creamy avocado, and zesty citrus creates a crescendo of flavors that dance on your palate.
  • Nutritious Ingredients: Packed with antioxidants, healthy fats, and vitamins, this salad provides a nutritional boost in every bite.
  • Quick and Easy: With just a few simple steps, you can have this salad ready to impress at any gathering or as a quick weeknight dinner.
  • Customizable: Whether you prefer it vegan, gluten-free, or with added protein, this recipe can easily adapt to fit your dietary needs.
  • Seasonal Appeal: Perfect for any time of year, especially in the cooler months when beets are at their peak.

Ingredients Breakdown

Let’s explore what makes this salad so special, starting with the ingredients:

  • Beets: The star of the show, providing a sweet, earthy base. Use any variety—red, golden, or even striped beets for a vibrant look.
  • Avocado: Adds a creamy texture and healthy fats, making the salad rich and satisfying.
  • Citrus: Fresh orange and grapefruit slices brighten the dish with a burst of flavor and acidity.
  • Shallot: Minced shallot enhances the salad’s depth of flavor with a mild onion taste.
  • Dressing: A simple vinaigrette made from olive oil, orange juice, honey (or maple syrup), sherry vinegar, and Dijon mustard ties everything together.

For substitutions, consider:

  • Vegan Option: Swap honey for maple syrup.
  • Nut-Free: Omit nuts or seeds that you might want to sprinkle on top.
  • Herb Variations: Try fresh basil or cilantro instead of mint for a different flavor profile.

Step-by-Step Instructions

Close-up view of a colorful salad featuring roasted beets, avocado, and orange slices, garnished with mint and flaky salt.

Ready to make this salad? Here’s how:

  1. Preheat your oven to 400º F (200º C).
  2. Place the trimmed and scrubbed beets in an oven-safe dish and fill it with about an inch of water. Cover the dish tightly with a lid or aluminum foil.
  3. Roast the beets for 45-60 minutes, or until they are fork-tender. Allow them to cool slightly before peeling.
  4. While the beets are roasting, prepare the dressing by combining all dressing ingredients in a jar and shaking until well mixed.
  5. Once the beets are cool enough to handle, peel off the skin using a sharp knife and slice them into rounds or wedges.
  6. To assemble, layer sliced beets, avocado slices, citrus segments, and sprinkle with fresh mint and feta.
  7. Drizzle the dressing over the salad and finish with flaky sea salt to taste.

Expert Pro Tips

To elevate your salad experience, consider these pro tips:

  • Roasting Technique: For even cooking, try wrapping the beets individually in foil before roasting.
  • Chill Before Serving: Allowing the salad to chill for about 30 minutes enhances the flavors as they meld together.
  • Layering: For a more visually appealing presentation, layer your ingredients rather than tossing them all together.
  • Make-Ahead: Prepare the beets and dressing in advance to save time on busy days.
  • Freshness Matters: Use the freshest ingredients possible for the best flavor and texture.
  • Serving Size: This salad serves beautifully as both a side and a main dish—just add protein like grilled chicken or chickpeas!

Common Mistakes and Troubleshooting

Here are a few things to keep in mind to avoid common pitfalls:

  • Overcooking Beets: Ensure the beets are tender but not mushy. Keep an eye on them during roasting.
  • Too Much Dressing: Start with a small amount of dressing and add more to taste. You can always add more, but it’s hard to take it away!
  • Fresh Citrus: Make sure your citrus is fresh. Old citrus can be bland and may not provide the acidity needed to balance the salad.

Delicious Variations

This salad is incredibly versatile! Here are some fun twists:

  • Protein-Packed: Add grilled chicken or quinoa for a heartier meal.
  • Spiced Nuts: Toss in some spiced walnuts or pecans for added crunch and flavor.
  • Cheese Swap: Instead of feta, try crumbled goat cheese or vegan cheese for a different taste.
  • Herb Infusion: Experiment with different herbs like dill or parsley for unique flavor variations.

Storage and Make-Ahead Instructions

This salad is best enjoyed fresh, but here’s how to store leftovers:

  • Refrigerate: Store any leftovers in an airtight container for up to 3 days.
  • Dressing Separately: Keep the dressing separate until ready to serve to prevent the salad from getting soggy.
  • Make-Ahead: Roast the beets and prepare the dressing a day in advance to streamline prep time.

Frequently Asked Questions (FAQ)

Got questions? I’ve got answers!

  • Can I use canned beets? Yes, but fresh roasted beets offer more flavor and texture. If using canned, rinse and drain before adding.
  • What’s the best way to peel roasted beets? Simply let them cool, then use your fingers or a paper towel to rub off the skin.
  • Can I make this salad vegan? Absolutely! Just substitute honey with maple syrup and skip the feta.
  • What if I can’t find sherry vinegar? You can replace it with balsamic or apple cider vinegar for a different flavor profile.
  • Can I add fruits other than citrus? Definitely! Berries or sliced apples would also work well in this salad.
  • How can I make this salad more filling? Add grains like farro or quinoa for additional fiber and protein.
  • Is this salad gluten-free? Yes, all ingredients are naturally gluten-free, making it a great option for those with gluten sensitivities.
  • How long does this salad last? It’s best eaten fresh, but leftovers can be stored in the refrigerator for up to 3 days.

Nutritional Tips and Dietary Adaptations

This salad is as nutritious as it is delicious. Here are some tips to maximize its health benefits:

  • Fiber-Rich: With beets and avocado, this salad offers a great source of dietary fiber which is essential for digestion.
  • Healthy Fats: The avocado provides heart-healthy monounsaturated fats, which are good for your overall health.
  • Low-Calorie Option: If you’re watching your calorie intake, you can reduce the amount of dressing or cheese.

Essential Kitchen Equipment

Before you get cooking, make sure you have the right tools at hand:

  • Sharp Knife: Essential for peeling and slicing beets and avocados.
  • Oven-Safe Dish: For roasting the beets.
  • Jar with Lid: Perfect for shaking up your dressing.
  • Mixing Bowl: For tossing all the salad ingredients together.

Serving Suggestions

This salad shines in many contexts! Here are some serving ideas:

  • As a Side: Pair it with grilled meats or fish for a balanced meal.
  • Picnic-Ready: It’s an excellent choice for potlucks or outdoor gatherings.
  • Lunch Box Friendly: Pack it for lunch with a protein on the side.

In conclusion, the Vibrant Roasted Beet Salad with Avocado and Citrus is a delightful way to bring color and nutrition to your table. It’s not just a salad; it’s a celebration of flavors and textures that everyone will love. Whether you’re enjoying it at a festive gathering or as a simple weeknight meal, this dish promises to deliver joy and satisfaction. You’re just a few ingredients away from stepping into a culinary adventure—so grab your beets and let’s get cooking!

Roasted Beet Salad with Avocado and Citrus

Prep Time 15 minutes
Cook Time 1 hour
Total Time 1 hour 15 minutes
Servings 4 servings
Calories 250
A vibrant and refreshing salad combining roasted beets, citrus slices, creamy avocado, and fresh herbs, drizzled with a tangy dressing.

Ingredients

Vegetables and Fruits

  • 4-5 large beets (trimmed and scrubbed)
  • 1 red grapefruit (sliced)
  • 2 oranges oranges (sliced)
  • 1 ripe avocado (pitted and sliced)

Dressing

  • 1 small shallot (minced)
  • 1/4 cup olive oil
  • 2 tbsp orange juice (freshly squeezed)
  • 1 tsp orange zest
  • 2 tbsp sherry vinegar
  • 2 tbsp honey or maple syrup
  • 1 tsp dijon mustard
  • 1/2 tsp salt

For Serving

Feta, fresh mint and flaky sea salt

Instructions 

  • Preheat oven to 400º F (200º C). Roast beets for 45-60 minutes until fork-tender. Cool, peel, and slice.
  • Combine all dressing ingredients in a jar and shake well.
  • Assemble salad with citrus, avocado, mint, and feta. Drizzle with dressing and season with flaky salt.

Notes

Use fresh herbs for best flavor and serve immediately.
Calories: 250kcal
Cost: $15
Course: Salad
Cuisine: international
Keyword: avocado, Beet, Citrus

Welcome to Your New Favorite Salad: Zesty Grapefruit Avocado Delight!

Are you ready to elevate your salad game? Let’s dive into the vibrant world of flavors with this Grapefruit Avocado Salad. Imagine the delightful combination of tart grapefruit and creamy avocado dancing on your taste buds! This refreshing dish is packed with nutrition and flavor, making it the perfect quick meal for any day of the week. Whether you’re looking for a light lunch, a side dish for dinner, or a standout at your next gathering, this salad has got you covered!

In this article, we’ll explore everything you need to know about creating this zesty explosion of taste. From detailed ingredient breakdowns and tips for perfecting your salad, to clever variations and storage suggestions, we’ll help you master this recipe in no time. So, let’s get started!

Why You’ll Love This Recipe

This salad isn’t just a pretty face; it’s a powerhouse of flavor and nutrition. Here are five reasons why you’ll adore this recipe:

  • Flavor Explosion: The tartness of grapefruit beautifully contrasts with the creamy texture of avocado, creating a delicious balance that will keep you coming back for more.
  • Packed with Nutrients: This salad is loaded with vitamins and minerals. Grapefruit is rich in vitamin C, while avocados provide healthy fats that keep you satiated.
  • Quick and Easy: With just a few simple ingredients, you can whip up this salad in under 15 minutes. Perfect for busy days!
  • Versatile Dish: Enjoy this salad on its own, as a side dish, or topped with grilled chicken for a complete meal.
  • Beautiful Presentation: The vibrant colors of this salad make it a feast for the eyes, perfect for impressing guests at any gathering.

Ingredients Breakdown

Let’s take a closer look at the ingredients that come together to create this delightful salad:

  • 2 medium fresh grapefruits (segmented): Look for grapefruits that are heavy for their size and have a firm skin. This will give you the juiciest segments.
  • 2 ripe avocados (diced): Choose avocados that yield slightly to gentle pressure. This means they’re perfectly ripe for that smooth texture.
  • 1 small red onion (thinly sliced): Red onion adds a lovely bite to the salad. If it’s too strong for your taste, soak the slices in cold water for a few minutes to mellow the flavor.
  • 1/4 cup fresh cilantro (chopped): Fresh herbs provide an aromatic freshness that elevates the dish.
  • 2 tablespoons extra virgin olive oil: A high-quality olive oil enhances the flavors and adds healthy fats.
  • Salt and pepper (to taste): Simple seasonings can make a big difference, so don’t skip these!

Pro Tips for the Perfect Salad

Close-up view of a fresh salad featuring diced avocado and segmented grapefruit with a sprinkle of herbs.

Want to take your grapefruit avocado salad to the next level? Here are some expert insights:

  • Supreme the Grapefruit: To get the best flavor, use a knife to cut away the peel and pith, then slice between the membranes to release the segments.
  • Keep Avocados Fresh: If you’re not serving the salad immediately, toss the avocado with a little lime juice to prevent browning.
  • Dress Just Before Serving: To keep the salad fresh and vibrant, add the olive oil just before you’re ready to eat.
  • Chill Before Serving: For an ultra-refreshing experience, chill the salad in the refrigerator for about 30 minutes before serving.
  • Experiment with Citrus: Try mixing in a little orange or lemon juice for a citrusy vinaigrette twist!
  • Use a Wide Bowl: This allows for easy tossing and presentation, making the salad look even more inviting.
  • Adjust Seasoning: Always taste before serving! Adjust the salt and pepper according to your preference.
  • Garnish Creatively: Top with additional cilantro or edible flowers for a stunning presentation.

Common Mistakes and Troubleshooting

Even the best chefs make mistakes! Here are some common pitfalls and how to avoid them:

  • Overripe Avocados: If your avocados are too soft, they can turn mushy in the salad. Choose avocados that are just ripe for the best texture.
  • Skipping the Seasoning: Don’t forget to season! Salt and pepper enhance the flavors, so be generous.
  • Not Preparing Ingredients Properly: Make sure to segment your grapefruits properly to avoid bitterness from the pith.
  • Forgetting to Toss Gently: Be careful not to mash the avocados while mixing; use a gentle hand!

Creative Variations

Feeling adventurous? Here are some fun variations to try:

  • Mixed Citrus Salad: Combine grapefruit with oranges and add a splash of lemon juice for a refreshing twist.
  • Protein-Packed Addition: Add grilled shrimp or chicken for a heartier meal.
  • Nutty Crunch: Toss in some toasted walnuts or pecans for added texture and healthy fats.
  • Spicy Kick: Add thin slices of jalapeño for a spicy twist that pairs perfectly with the creamy avocado.

Storage and Make-Ahead Instructions

This salad is best enjoyed fresh, but if you need to prepare it ahead of time, follow these tips:

  • Make Ahead: You can prepare the grapefruit segments and avocado separately a few hours in advance. Just combine and dress right before serving.
  • Storing Leftovers: Store any leftover salad in an airtight container in the fridge for up to one day. Note that the avocado may brown slightly.

Comprehensive FAQ

Got questions? We’ve got answers! Here are some frequently asked questions about the grapefruit avocado salad:

  • Can I use oranges instead of grapefruits? Absolutely! Oranges add a sweet twist, but you’ll miss the tartness of the grapefruit.
  • How do I prevent avocados from browning? Toss the diced avocado with a bit of lime or lemon juice before mixing it into the salad.
  • Can I make this salad ahead of time? Yes, prepare the ingredients and toss them just before serving for the best flavor and freshness.
  • What can I pair with this salad? This salad pairs wonderfully with grilled chicken, fish, or served alongside a light soup.
  • Is this salad vegan? Yes, it’s entirely plant-based and fits well in vegan diets!
  • Can I add cheese? Feta or goat cheese can be a delicious addition if you’re not keeping it vegan.
  • How do I cut a grapefruit? Cut the top and bottom off, then slice down the sides to remove the peel, and segment as described earlier.
  • What’s the best way to serve this salad? Serve it chilled in a wide bowl or on individual plates for an elegant presentation.

Nutritional Tips and Dietary Adaptations

This salad is naturally healthy, but here are some tips to cater it to different dietary needs:

  • Gluten-Free: This salad is naturally gluten-free, making it a great option for those with gluten sensitivities.
  • Paleo and Keto-Friendly: The avocados and healthy fats make this salad ideal for paleo or keto diets.
  • Low-Carb Option: This dish is low in carbohydrates, perfect for anyone watching their carb intake.

Equipment Recommendations

To make the preparation easy, here’s some kitchen equipment you might need:

  • Sharp Knife: A good quality knife is essential for segmenting grapefruit and dicing avocados.
  • Cutting Board: A sturdy cutting board will make your prep work smoother.
  • Mixing Bowl: A large bowl is perfect for tossing all the ingredients together.
  • Measuring Spoons: For precise measurements of olive oil and seasonings.

Serving Suggestions

How you serve this salad can elevate the experience:

  • Beautiful Bowls: Serve in colorful bowls for a vibrant table setting.
  • Garnish: Add edible flowers or microgreens for an artistic touch.
  • Accompanying Dishes: Pair with whole grain bread, grilled fish, or a flavorful soup for a complete meal.

Conclusion

There you have it! Your guide to creating a stunning and delicious Grapefruit Avocado Salad that’s sure to impress. With its bright flavors, vibrant colors, and health benefits, this salad is more than just a dish—it’s a celebration of freshness and creativity in your kitchen! So grab those grapefruits and avocados, and let’s make healthy eating exciting!

Grapefruit Avocado Salad

Prep Time 10 minutes
Total Time 10 minutes
Servings 2 people
Calories 250
A fresh and vibrant salad combining sweet grapefruit, creamy avocados, and zesty herbs, perfect for a light meal or appetizer.

Ingredients

Fruits and Vegetables

  • 2 medium fresh grapefruits (segmented)
  • 2 ripe avocados (diced)
  • 1 small red onion (thinly sliced)
  • 1/4 cup fresh cilantro (chopped)
  • 2 tablespoons extra virgin olive oil
  • to taste salt
  • to taste pepper

Instructions 

  • Segment the grapefruits and dice the avocados.
  • Thinly slice the red onion and chop the cilantro.
  • Combine grapefruit, avocado, onion, and cilantro in a bowl.
  • Drizzle with olive oil, season with salt and pepper, and toss gently.
  • Serve immediately on plates or in a bowl.

Notes

Use ripe avocados for best creaminess and fresh grapefruit for vibrant flavor.
Calories: 250kcal
Cost: $12
Course: Salad
Cuisine: fusion
Keyword: avocado, Grapefruit

Are you ready to take your dinner game to the next level? Imagine a vibrant bowl filled with tender salmon, aromatic garlic, and a sweet honey glaze, all resting on a hearty bed of brown rice, complemented by steamed broccoli and crunchy carrots. This dish not only excites your taste buds but also packs a nutritional punch! In this comprehensive guide, we’ll explore why you’ll fall in love with these honey garlic glazed salmon bowls, break down the ingredients, provide expert tips, and share variations to keep your meals exciting and healthy.

Why You’ll Love This Recipe

  • Flavor Explosion: The sweet and savory combination of honey and garlic creates a mouthwatering glaze that elevates the salmon to another level.
  • Quick and Easy: In just 30 minutes, you can whip up this delightful dish, making it perfect for busy weeknights.
  • Nutritious Ingredients: Packed with omega-3 fatty acids from the salmon, fiber from brown rice, and vitamins from fresh veggies, this bowl is a balanced meal.
  • Customizable: With a variety of ingredient substitutions and additions available, you can tailor this dish to fit your dietary needs.
  • Meal Prep Friendly: These bowls can be easily made ahead of time, allowing for quick lunches or dinners throughout the week.

Ingredient Breakdown

Let’s dive into the ingredients that make up these delicious honey garlic glazed salmon bowls. Here’s everything you’ll need:

  • 4 pieces salmon fillets: Skin on or off, based on preference. Choose wild-caught for the best flavor and sustainability.
  • 1/4 cup honey: This natural sweetener makes the glaze irresistible and adds a touch of sweetness.
  • 3 cloves garlic: Minced, for that aromatic punch that infuses the salmon with flavor.
  • 2 tablespoons soy sauce: Opt for a low-sodium version to keep the flavors balanced.
  • 1 tablespoon sesame oil: Adds a toasty, nutty note to the dish.
  • 1 teaspoon ginger: Freshly grated for a hint of warmth and zest.
  • 1/2 teaspoon black pepper: Freshly ground for subtle heat.
  • 2 cups cooked brown rice: A hearty, fiber-rich base that complements the salmon.
  • 1 cup steamed broccoli: Bright green and tender, it adds nutrients and color to the bowl.
  • 1 cup shredded carrots: Provides crunch and a pop of color.
  • 1/4 cup sliced green onions: For freshness and a mild bite.
  • 1 tablespoon sesame seeds: For garnish and extra texture.

Pro Tips for Perfect Salmon Bowls

  • Marinate for Flavor: Allow the salmon to marinate in the honey garlic mixture for at least 15 minutes before cooking to maximize flavor.
  • Watch the Cook Time: Salmon cooks quickly, so keep an eye on it to avoid overcooking. Aim for 4-6 minutes per side, depending on thickness.
  • Steam Your Veggies: Steaming broccoli and carrots preserves their nutrients and vibrant color, making your bowl visually appealing.
  • Use a Non-Stick Skillet: This helps achieve a beautiful sear on the salmon without sticking.
  • Experiment with Grains: If you want to switch things up, quinoa or cauliflower rice can be fantastic alternatives to brown rice.
  • Try Different Proteins: While salmon shines in this recipe, feel free to substitute with chicken or tofu for variety.
  • Don’t Skip the Garnish: A sprinkle of sesame seeds and sliced green onions adds a professional finish to your dish.
  • Make Extra Sauce: If you love the honey garlic glaze, consider doubling the recipe to drizzle over your veggies and rice.

Common Mistakes and Troubleshooting

Side perspective of a delicious bowl filled with honey garlic salmon, vegetables, and sesame seeds.

Even the best chefs make mistakes! Here are some common pitfalls to avoid when preparing your salmon bowls:

  • Overcooking the Salmon: Keep a close watch on the salmon while it cooks. It should flake easily with a fork when done but shouldn’t be dry.
  • Skipping the Marinade: Don’t rush it! Allowing the salmon to marinate enhances the flavor significantly.
  • Using Too Much Soy Sauce: Balance is key. Stick to the recommended amount to avoid overpowering the dish with saltiness.
  • Not Prepping Your Veggies: To save time, chop your vegetables ahead of time and store them in the fridge.

Variations of Honey Garlic Glazed Salmon Bowls

Get creative with these delicious variations to keep your meals fresh and exciting:

  • Spicy Honey Garlic Salmon: Add red pepper flakes or Sriracha to the glaze for a spicy kick!
  • Thai-Inspired Bowl: Incorporate coconut rice and top with crushed peanuts for a tropical twist.
  • Mediterranean Style: Swap out the brown rice for couscous and add olives and feta cheese for a Mediterranean flair.
  • Veggie-Loaded Bowl: Increase the variety of vegetables—add bell peppers, snap peas, or zucchini for extra color and nutrients.

Storage and Make-Ahead Instructions

Meal prepping is a breeze with these honey garlic glazed salmon bowls. Here’s how to store and make them ahead:

  • Refrigerate: Store leftovers in airtight containers for up to 3 days. Reheat gently in the microwave or on the stovetop.
  • Make-Ahead: Prepare the salmon and glaze in advance, and store them separately. Cook the rice and steam the veggies when you’re ready to eat.
  • Freezing Tips: You can freeze cooked salmon for up to 2 months. Thaw in the fridge overnight before reheating.

Comprehensive FAQ

Got questions? We’ve got answers! Here are some frequently asked questions about honey garlic glazed salmon bowls:

  • Can I bake the salmon instead of pan-searing? Absolutely! Preheat your oven to 400°F (200°C) and bake the salmon for 12-15 minutes.
  • What type of salmon works best? Wild-caught salmon is preferred for its flavor and texture, but farmed salmon is also a great choice.
  • How do I know when the salmon is done? The salmon is done when it flakes easily with a fork and is opaque in the center.
  • Can I make the sauce ahead? Yes! The honey garlic glaze can be made ahead and stored in the fridge for up to a week.
  • What can I substitute for honey? Maple syrup or agave nectar can be used as alternatives, though the flavor will differ slightly.
  • Are these bowls gluten-free? Yes, if you use gluten-free soy sauce, this recipe can easily be made gluten-free.
  • Can I use frozen salmon? Yes, just ensure it’s fully thawed before cooking for even results.
  • What’s a good side for these bowls? A light cucumber salad can complement the dish nicely, adding freshness and crunch.

Nutrition Tips and Dietary Adaptations

These honey garlic glazed salmon bowls are not only delicious but also packed with nutrition. Here are some tips to make them fit your dietary needs:

  • Low-Carb Option: Swap brown rice with cauliflower rice to keep carbs low while still enjoying the flavors.
  • High-Protein Version: Add an extra salmon fillet or include chickpeas for added protein.
  • Vegetarian Option: Replace salmon with marinated tofu or tempeh, keeping the glaze for flavor.

Equipment Recommendations

To make the most of your cooking experience, here’s a list of tools that will help you create these delicious bowls:

  • Non-stick skillet: Ideal for cooking salmon without sticking.
  • Rice cooker: Perfect for perfectly cooked brown rice every time.
  • Mixing bowls: For marinating the salmon and mixing the glaze.
  • Measuring cups and spoons: Essential for getting the right amounts of ingredients.

Serving Suggestions

Serve your honey garlic glazed salmon bowls with style! Here are some ideas:

  • Garnish generously: A sprinkle of sesame seeds and fresh green onions elevates presentation.
  • Present in colorful bowls: Use vibrant bowls to make your meal visually appealing.
  • Pair with a refreshing drink: Serve alongside iced green tea or sparkling water with lemon for a refreshing touch.

Final Thoughts

Honey garlic glazed salmon bowls are more than just a meal; they are a celebration of flavors, colors, and nutrition! With the right ingredients and techniques, you can create a dish that impresses family and friends while keeping your health in check. Dive into this culinary adventure and enjoy the process of making nutritious meals that are as delightful to eat as they are to prepare. Happy cooking!

Honey Garlic Glazed Salmon Bowls

Prep Time 10 minutes
Cook Time 15 minutes
Total Time 25 minutes
Servings 4 servings
Calories 520
Delight in these flavorful salmon bowls featuring a sweet and savory honey garlic glaze, served over hearty brown rice with fresh vegetables.

Ingredients

Salmon

  • 4 pieces salmon fillets (skin on or off, based on preference)
  • 0.25 cup honey (the natural sweetener that makes the glaze irresistible)
  • 3 cloves garlic (minced, for that aromatic punch)
  • 2 tablespoons soy sauce (choose a low-sodium version for a balanced flavor)
  • 1 tablespoon sesame oil (adds a toasty, nutty note)
  • 1 teaspoon ginger (freshly grated, for a hint of warmth and zest)
  • 0.5 teaspoon black pepper (freshly ground for subtle heat)
  • 2 cups cooked brown rice (a hearty, fiber-rich base)
  • 1 cup steamed broccoli (bright green and tender)
  • 1 cup shredded carrots (adds crunch and color)
  • 0.25 cup sliced green onions (for freshness and mild bite)
  • 1 tablespoon sesame seeds (for garnish and extra texture)

Instructions 

  • Mix honey, minced garlic, soy sauce, sesame oil, ginger, and black pepper to make the glaze.
  • Brush the salmon fillets with the glaze and cook until flaky, about 8-10 minutes.
  • Prepare bowls by dividing cooked brown rice, steamed broccoli, and shredded carrots.
  • Place cooked salmon on top of the rice and vegetables, then drizzle with remaining glaze.
  • Garnish with sliced green onions and sesame seeds before serving.

Notes

For extra flavor, marinate the salmon in the glaze for 15 minutes before cooking.
Calories: 520kcal
Cost: $15
Course: Main Course
Cuisine: fusion
Keyword: Salmon

Unlock the Flavor: Why You’ll Adore This Grilled Chili Lime Chicken Fajita Salad

Welcome to the ultimate culinary adventure! If you’re searching for a dish that combines vibrant flavors with healthy ingredients, look no further than this Grilled Chili Lime Chicken Fajita Salad. Not only does this dish tantalize your taste buds, but it also nourishes your body. This salad is perfect for busy weeknights or leisurely weekend lunches. Packed with juicy grilled chicken, crisp veggies, and a zesty lime dressing, it’s a meal that brings joy, energy, and satisfaction.

In this article, we’ll dive deep into everything you need to know to create this flavorful dish, from ingredients to pro tips, variations, and storage ideas. So grab your apron, and let’s get cooking!

What Makes This Salad an Absolute Must-Try?

Here are five compelling reasons to make this salad a staple in your kitchen:

  • Flavor Explosion: The combination of grilled chicken, lime, and fresh vegetables creates a flavor bomb that dances on your palate.
  • Quick and Easy: Ready in under 30 minutes, this salad is perfect for busy evenings when you want a nutritious meal fast.
  • Customizable: This dish allows you to personalize toppings and dressing, making it a hit for picky eaters.
  • Healthy and Satisfying: With lean protein and plenty of veggies, it’s a low-carb, high-nutrient option that keeps you full.
  • Meal Prep Friendly: Make this salad ahead of time for a grab-and-go lunch throughout the week!

Ingredient Breakdown: What You’ll Need

Gather these fresh ingredients to whip up your Grilled Chili Lime Chicken Fajita Salad:

  • 3 tablespoons olive oil: A healthy fat that enhances flavor and aids in absorption of nutrients.
  • 100 ml lime juice (freshly squeezed): The star ingredient that adds zest and brightness.
  • 2 tablespoons cilantro (chopped): Fresh herbs that elevate the flavor profile.
  • 2 cloves garlic (crushed): For that delicious aromatic kick.
  • 1 teaspoon brown sugar: Balances the acidity of lime, bringing harmony to the marinade.
  • 3/4 teaspoon red chili flakes: Spice it up to your preference!
  • 1/2 teaspoon ground cumin: Adds warmth and depth.
  • 1 teaspoon salt: Essential for flavor enhancement.
  • 4 boneless chicken thigh fillets (skin removed): Juicy, tender meat that absorbs the marinade beautifully.
  • 1/2 yellow bell pepper (deseeded and sliced): For sweetness and crunch.
  • 1/2 red bell pepper (deseeded and sliced): Adds color and flavor.
  • 1/2 onion (sliced): A savory addition that complements the peppers.
  • 5 cups Romaine lettuce (or cos lettuce leaves, washed and dried): The perfect base for your salad.
  • 2 avocados (sliced): Creamy goodness that adds healthy fats.
  • 1 pinch cilantro (extra to garnish): A finishing touch that boosts freshness.
  • 1 pinch sour cream (optional – to serve): For those who love a creamy finish.

How to Create Your Flavorful Masterpiece

Close-up of a delicious Grilled Chili Lime Chicken Fajita Salad featuring grilled chicken, lettuce, and garnishes.

Let’s get cooking! Follow these straightforward steps for a mouthwatering Grilled Chili Lime Chicken Fajita Salad:

  1. Whisk together all marinade ingredients in a bowl. Pour half into a shallow dish, and marinate the chicken fillets for at least 2 hours (or overnight if possible). Refrigerate the other half for later use as dressing.
  2. Heat a teaspoon of oil in a grill pan or skillet over medium-high heat. Grill chicken fillets until golden and cooked through, about 5-7 minutes per side. Once done, let them rest for a few minutes.
  3. Wipe the pan with a paper towel, drizzle with another teaspoon of oil, and sauté the pepper and onion slices until tender.
  4. Slice the rested chicken into strips. In a large bowl, assemble the salad with lettuce, avocado, peppers, onions, and chicken. Drizzle with the reserved marinade/dressing.
  5. Garnish with extra cilantro and a dollop of sour cream if desired. Serve immediately and enjoy!

Pro Tips for the Best Salad Experience

Want to elevate your salad game? Here are some expert insights:

  • Marinate Longer: For deeper flavor, marinate the chicken overnight.
  • Grill Marks Matter: Achieve those beautiful grill marks for aesthetic appeal and smoky flavor.
  • Fresh Ingredients: Use the freshest veggies you can find for maximum crunch and flavor.
  • Customize with Toppings: Add nuts, seeds, or cheese for extra texture and taste.
  • Spice Level: Adjust the chili flakes according to your heat preference.
  • Resting the Chicken: Let the chicken rest before slicing to retain juices.
  • Make-Ahead Marinade: Prepare the marinade in advance for a quicker prep time.
  • Use of Cast Iron: If you have one, grill the chicken in a cast iron skillet to lock in those juices!

Avoid These Common Mistakes

Even the best chefs make mistakes! Here are some common pitfalls and how to avoid them:

  • Skipping the Marinade: Don’t rush! Marinating enhances flavor significantly.
  • Overcooking the Chicken: Keep an eye on cooking times to avoid dry chicken.
  • Using Old Ingredients: Always check the freshness of your produce and spices.
  • Neglecting to Rest: Give the chicken time to rest after cooking to ensure it stays juicy.

Delicious Variations to Try

Feel free to get creative! Here are some variations on your Grilled Chili Lime Chicken Fajita Salad:

  • Swap the Protein: Try shrimp, steak, or tofu for a different protein option.
  • Add Fruits: Toss in some mango or pineapple for a sweet twist.
  • Spicy Twist: Incorporate jalapeños or a spicy dressing for extra heat.
  • Greens Variety: Experiment with kale or spinach instead of Romaine for different textures.

Storage and Make-Ahead Instructions

Planning ahead? Here’s how to store your salad for freshness:

  • Refrigerate: Store the assembled salad in an airtight container for up to 3 days.
  • Keep Dressing Separate: To maintain freshness, store the dressing separately until serving.
  • Prepped Ingredients: Chop veggies and marinate chicken in advance for easy assembly later.

Frequently Asked Questions

Got questions? We’ve got answers! Here are some common inquiries about this salad:

  • Can I use chicken breast instead of thighs? Yes! Chicken breast is a leaner option and will work well.
  • Is it gluten-free? Absolutely! All ingredients are gluten-free.
  • Can I make this salad vegan? Yes! Substitute grilled tofu for chicken and use a vegan dressing.
  • What can I use instead of lime juice? Lemon juice can be a great substitute, but it will alter the flavor slightly.
  • Can I grill the veggies? Definitely! Grilling adds a wonderful smoky flavor to the peppers and onions.
  • How can I make it spicy? Add more chili flakes or diced jalapeños to your marinade.
  • Can I use frozen chicken? For best results, use fresh chicken, but you can thaw and marinate frozen chicken.
  • What are some good side dishes to serve with it? Consider pairing it with black beans, corn on the cob, or a refreshing fruit salad.

Nutritional Information and Dietary Adaptations

This Grilled Chili Lime Chicken Fajita Salad is not only delicious but also nutritious! Here’s a quick rundown of its health benefits:

  • High Protein: The chicken provides a substantial amount of protein, perfect for muscle repair and growth.
  • Rich in Fiber: Veggies like peppers and lettuce are high in fiber, aiding digestion.
  • Healthy Fats: Avocados contribute heart-healthy monounsaturated fats.
  • Low Carb: This salad is a great option for low-carb diets.

Essential Equipment for Your Kitchen

Ensure you have the right tools to make your cooking experience seamless:

  • Grill Pan: Ideal for achieving those beautiful grill marks.
  • Whisk: For mixing your marinade ingredients thoroughly.
  • Sharp Knife: Ensures you can easily slice chicken and vegetables.
  • Airtight Containers: For storing your salad and dressing.

Serving Suggestions to Elevate Your Meal

Make your salad even more delightful with these serving suggestions:

  • Serve with Tortilla Chips: Add a crunchy element to your meal.
  • Pair with a Margarita: A classic drink choice that complements the flavors.
  • Add a Grain: Quinoa or brown rice can make it more filling.
  • Finish with Fresh Lime Wedges: A squeeze of lime just before eating brightens every bite.

Now that you’re armed with all the tips, tricks, and insights, it’s time to dive into the kitchen and whip up the vibrant, flavorful Grilled Chili Lime Chicken Fajita Salad! Remember, healthy cooking can be a fun, creative adventure that leads to delicious results. Enjoy every bite, and happy cooking!

Discover the Ultimate Flavor Fusion: Avocado Grapefruit Fennel Salad

Welcome to the vibrant world of the Avocado Grapefruit Fennel Salad, where fresh ingredients and zesty flavors collide to create a dish that’s as delightful to the eyes as it is to the palate! This salad is not just a meal; it’s a celebration of health, color, and taste that will brighten your day and energize your body. In this guide, we dive deep into the luscious combination of creamy avocado, tangy grapefruit, and crunchy fennel, ensuring you have everything you need to make this refreshing salad a staple in your kitchen.

With its bold flavors and nutritional benefits, this salad is perfect for any occasion, whether you’re hosting a dinner party, enjoying a picnic, or simply craving a quick and nutritious meal.

Why You’ll Love This Recipe

This salad is not just delicious; it’s packed with benefits that make it a must-try:

  • Vibrant Flavor Profiles: The sweet and tart grapefruit perfectly complements the creamy avocado, while the fennel adds a refreshing crunch.
  • Nutrient-Rich Ingredients: Each component is loaded with vitamins and minerals, making it a powerhouse of nutrition.
  • Quick and Easy Preparation: With simple steps, you can whip this up in under 15 minutes, making it perfect for busy schedules.
  • Versatile Serving Options: Enjoy it as a standalone meal, a side dish, or even as a filling for wraps or sandwiches.
  • Make-Ahead Friendly: Easily prepare this salad in advance for meal prep, storing the dressing separately to keep ingredients fresh.

Ingredient Breakdown: What You Need

Let’s explore the essential ingredients that make this salad a standout dish:

  • Fennel Bulb: Thinly sliced, it offers a crisp texture and a mild licorice flavor that brightens the salad.
  • Avocado: Peeled and cut into chunks, its creamy softness contrasts perfectly with the other ingredients.
  • Pink Grapefruit: Peeled and segmented to add a burst of citrusy sweetness and juiciness.
  • Lightweight Greens: Options like pea shoots, baby spinach, or watercress add a fresh, vibrant base.
  • Shaved Parmigiano-Reggiano Cheese: A luxurious touch that brings a savory depth to the dish.

For the Dressing

This citrus dressing is the perfect finishing touch:

  • 1/4 cup fresh squeezed grapefruit juice
  • 1/4 cup extra virgin olive oil
  • 2 tablespoons white balsamic vinegar
  • 1 tablespoon minced shallot
  • 1 teaspoon grainy brown mustard
  • 1/2 teaspoon kosher salt
  • Freshly ground black pepper to taste

How to Make Avocado Grapefruit Fennel Salad

A detailed side view of a salad featuring avocado, grapefruit segments, and sliced fennel.

Step-by-Step Instructions

Now that you have all your ingredients ready, let’s dive into the preparation:

  1. In a large salad bowl, combine the fennel, avocado, grapefruit, and greens.
  2. Drizzle with 3-4 tablespoons of the citrus dressing and season with salt and pepper.
  3. Adjust seasoning to taste and top with shaved Parmigiano-Reggiano.

Pro Tips for Perfecting This Salad

Here are some expert insights to elevate your salad-making game:

  • Choose Ripe Avocados: Look for avocados that yield slightly to pressure for the best texture.
  • Balance Your Flavors: Adjust the dressing to your taste; add more citrus for tang or a touch of honey for sweetness.
  • Prep Ahead: Slice and prepare your ingredients ahead of time, but keep the dressing separate until serving to maintain freshness.
  • Add Texture: Consider adding nuts or seeds for an extra crunch.
  • Experiment with Greens: Try different leafy greens based on your preference or seasonal availability.
  • Seasonal Variations: Swap grapefruit for oranges or other citrus fruits depending on what’s in season.
  • Fresh Herbs: Incorporate fresh herbs like mint or basil for added flavor.
  • Presentation Matters: Serve in a beautiful bowl or plate to make it visually appealing.

Common Mistakes and Troubleshooting

Even the best chefs make mistakes! Here’s how to avoid common pitfalls:

  • Overdressing the Salad: Start with less dressing and add more as needed to prevent sogginess.
  • Using Unripe Avocados: Unripe avocados can be tough and flavorless; ensure they are ripe for the best experience.
  • Cutting Ingredients Too Early: Prepare ingredients right before serving to keep them fresh and vibrant.

Delicious Variations to Try

Looking to mix things up? Here are some fun variations to consider:

  • Grilled Chicken Add-In: Top with grilled chicken for added protein.
  • Quinoa or Farro Base: Serve over a bed of quinoa or farro for a heartier meal.
  • Spicy Twist: Add sliced jalapeños for a kick of heat!
  • Berry Surprise: Incorporate fresh berries like strawberries or blueberries for added sweetness.

Storage and Make-Ahead Instructions

This salad is perfect for meal prep! Here’s how to store it:

  • Refrigerate Quickly: Store in an airtight container to maintain freshness.
  • Keep Dressing Separate: To prevent sogginess, store the dressing in a separate container until you’re ready to serve.
  • Consume Within 2 Days: For the best flavor and texture, enjoy within two days of preparation.

Comprehensive FAQ

Got questions? We’ve got answers!

  • Can I use other greens? Absolutely! Feel free to substitute with your favorite greens.
  • How do I peel and segment grapefruit? Use a sharp knife to cut off the top and bottom, then slice the skin off and follow the natural segments.
  • Can I make this salad vegan? Yes, simply omit the cheese or substitute with a vegan alternative.
  • What can I use instead of fennel? Celery or cucumber can be a great substitute if you’re not a fan of fennel.
  • How do I make the dressing ahead of time? Mix all dressing ingredients in a jar and store in the fridge for up to a week.
  • Can I add nuts? Yes, nuts like walnuts or almonds add great texture and flavor!
  • What is the best way to serve this salad? It can be served on its own, as a side dish, or alongside grilled meats.
  • Is this salad gluten-free? Yes, all ingredients are naturally gluten-free!

Nutritional Tips and Dietary Adaptations

This salad is already a nutritional powerhouse, but here are some adaptations:

  • Low-Carb Option: Skip the greens and serve as a refreshing side salad.
  • Protein Boost: Add chickpeas or edamame to increase protein content.
  • Healthy Fats: The avocado provides healthy fats, which are excellent for heart health.

Essential Equipment for Success

Having the right tools can make all the difference:

  • Sharp Knife: For easy slicing of the fennel and grapefruit.
  • Cutting Board: A sturdy board is essential for prep.
  • Salad Bowl: A large bowl is best for tossing ingredients together.
  • Jar with Lid: Ideal for shaking up the dressing.

Serving Suggestions

To elevate your dining experience:

  • Pair with Grilled Fish: This salad complements grilled salmon beautifully.
  • Serve with Crusty Bread: A slice of fresh sourdough is perfect for mopping up the dressing.
  • Wine Pairing: Consider a crisp white wine like Sauvignon Blanc to enhance the flavors.

Final Thoughts

There you have it! The Zesty Avocado Grapefruit Fennel Salad is your new go-to dish for a healthy, flavorful meal bursting with freshness. With its quick preparation, vibrant flavors, and endless versatility, this salad is sure to impress your friends and family. So roll up your sleeves, grab your ingredients, and let’s make some culinary magic happen!

Avocado, Grapefruit and Fennel Salad

Prep Time 10 minutes
Cook Time 5 minutes
Total Time 15 minutes
Servings 4 servings
Calories 250
A fresh and vibrant salad combining crisp fennel, creamy avocado, juicy grapefruit, and peppery greens, dressed with a citrus vinaigrette.

Ingredients

Fennel

  • 1 bulb fennel bulb (thinly sliced)

Avocado

  • 1 piece avocado (peeled and cut into chunks)

Grapefruit

  • 2 pieces pink grapefruits (peeled and segmented)

Greens

  • 2 handfuls lightweight greens (such as pea shoots, baby spinach, or watercress)

Parmesan

  • Shaved Parmegiano-Reggiano cheese (shaved)

Citrus Dressing

  • 1/4 cup fresh squeezed grapefruit juice
  • 1/4 cup extra virgin olive oil
  • 2 tablespoons white balsamic vinegar
  • 1 tablespoon minced shallot
  • 1 teaspoon grainy brown mustard
  • 1/2 teaspoon kosher salt
  • Freshly ground black pepper

Instructions 

  • Combine fennel, avocado, grapefruit, and greens in a large bowl. Drizzle with 3-4 tablespoons of citrus dressing, season with salt and pepper, then toss gently. Top with shaved Parmesan.
  • For the dressing, add all ingredients to a jar, seal, and shake well.

Notes

Use fresh ingredients for best flavor and adjust dressing to taste.
Calories: 250kcal
Cost: $15
Course: Salad
Keyword: avocado, Fennel, Grapefruit

Welcome to a flavor adventure that’s about to transform your weeknight dinners! If you’ve ever found yourself wondering how to create an exciting, mouthwatering meal in under 30 minutes, you’re in the right place. This recipe for Spicy Garlic Chicken Rice Bowls with Creamy Chili Sauce is not just a dish; it’s a celebration of taste, texture, and nutrition. Bursting with bold flavors and vibrant ingredients, these bowls are perfect for those busy evenings when you want something nutritious without compromising on taste. Get ready to dive into a culinary playground where cooking becomes fun!

Why You’ll Love This Recipe

  • Flavor Explosion: The combination of garlic, red pepper flakes, and creamy chili sauce offers an irresistible kick that tantalizes your taste buds.
  • Quick & Easy: With minimal prep and cooking time, you can whip this dish up in under 30 minutes, making it ideal for busy weeknights.
  • Customizable: Adjust the spice level and protein choice to suit your preferences—try tofu for a plant-based option or shrimp for a seafood twist!
  • Meal Prep Friendly: This recipe is perfect for meal prep; make a big batch and enjoy throughout the week for a quick, nutritious option.
  • Wholesome Ingredients: Packed with protein, healthy fats, and fiber, this dish provides a balanced meal that fuels your day.

Ingredients You’ll Need

Gather these vibrant ingredients to create your Spicy Garlic Chicken Rice Bowls. Feel free to make substitutions based on your dietary needs!

  • 1 lb Boneless, skinless chicken thighs: Juicy and tender, soaking up all the delicious flavors.
  • 2 tablespoons Olive oil: For cooking the chicken and adding healthy fats.
  • 4 cloves Garlic, minced: The star ingredient that gives this dish its signature flavor.
  • 1 teaspoon Red pepper flakes: Adjust according to your spice tolerance.
  • 1 tablespoon Soy sauce: Adds depth and umami to the dish.
  • 1 cup Jasmine rice: The perfect base for your chicken and veggies.
  • 2 cups Water: For cooking the rice to fluffy perfection.
  • 1 tablespoon Coconut oil: Optional, for added flavor and richness.
  • ½ cup Mayonnaise: For a creamy base in the sauce.
  • 2 tablespoons Chili paste: For that creamy, zesty kick!
  • 1 tablespoon Lime juice: Adds a refreshing zing that brightens the dish.
  • 1 teaspoon Honey (optional): For a touch of sweetness to balance the flavors.
  • Fresh cilantro, chopped: For garnish and flavor, adding a fresh note.
  • Sliced green onions: A crunchy and flavorful topping.
  • Lime wedges: For an extra squeeze of zesty goodness.

How to Make Spicy Garlic Chicken Rice Bowls

Follow these steps to create your delicious chicken rice bowls:

Step 1: Cook the Rice

In a medium pot, combine the jasmine rice and water. Bring to a boil, then reduce to a simmer. Cover and cook for about 15 minutes or until the rice is tender and fluffy. Remove from heat and let it sit covered for 5 minutes before fluffing with a fork.

Step 2: Prepare the Chicken

While the rice is cooking, heat olive oil in a skillet over medium-high heat. Season the chicken thighs with salt, pepper, and red pepper flakes. Sear the chicken for about 5-7 minutes on each side until golden brown and fully cooked. Add minced garlic and soy sauce in the last minute of cooking, stirring to coat the chicken.

Step 3: Make the Creamy Chili Sauce

In a bowl, mix the mayonnaise, chili paste, lime juice, and honey (if using). Adjust the ingredients to your taste—add more chili paste for extra heat or lime for brightness!

Step 4: Assemble Your Bowls

In each bowl, place a generous serving of fluffy jasmine rice, followed by sliced chicken. Drizzle the creamy chili sauce over the top and garnish with chopped cilantro, sliced green onions, and lime wedges.

Pro Tips for Perfect Bowls

Juicy pieces of chicken and rice topped with a rich chili sauce and fresh herbs in a bowl.
  • Use a Meat Thermometer: Ensure your chicken is cooked perfectly to an internal temperature of 165°F.
  • Marinate for Extra Flavor: If you have time, marinate the chicken in soy sauce and garlic for 30 minutes before cooking.
  • Cook Rice in Broth: Use chicken or vegetable broth instead of water for a more flavorful rice base.
  • Try Different Proteins: Substitute chicken with shrimp, beef, or tofu for a variety of flavors.
  • Mix Veggies In: Add stir-fried bell peppers, broccoli, or snap peas for added nutrition and color.
  • Garnish Generously: Don’t skimp on garnishes; they add flavor and make your bowls visually appealing.
  • Adjust Spice Levels: Tailor the heat to your preference; keep chili paste on the side for guests.
  • Serve Immediately: For the best experience, serve your bowls as soon as they are assembled!

Common Mistakes to Avoid

  • Overcooking the Chicken: Keep an eye on your chicken; overcooking can make it dry. Use a meat thermometer for best results!
  • Not Fluffing the Rice: After cooking, let the rice sit and fluff it with a fork to avoid clumping.
  • Ignoring Seasoning: Don’t skip seasoning the chicken; it’s essential for building flavor.
  • Using Too Much Sauce: While the sauce is delicious, too much can overpower the dish. Drizzle to taste!

Delicious Variations

Feel free to mix things up! Here are some scrumptious variations to your Spicy Garlic Chicken Rice Bowls:

  • Vegetarian Delight: Replace chicken with marinated tofu or grilled tempeh for a plant-based option.
  • Seafood Sensation: Use shrimp or scallops instead of chicken for a seafood twist.
  • Asian Fusion: Add a splash of teriyaki sauce and top with sesame seeds for an Asian-inspired flavor.
  • Spicy Veggie Bowls: Include a variety of sautéed vegetables like zucchini, carrots, and bell peppers for more color and nutrients.

Make-Ahead and Storage Instructions

These chicken rice bowls are perfect for meal prep! Here’s how to store and reheat:

  • Storing Leftovers: Keep leftovers in an airtight container in the fridge for up to 3 days. Reheat in the microwave until heated through.
  • Freezing: While the chicken and rice can be frozen, it’s best to store the sauce separately to maintain its creamy texture.
  • Make Ahead: Cook the rice and chicken ahead of time and assemble your bowls just before serving for a quick meal!

Frequently Asked Questions

  • Can I use brown rice instead of jasmine rice? Yes! Just adjust the cooking time according to the package instructions for brown rice.
  • What if I don’t have chili paste? You can substitute with sriracha or a mix of hot sauce and mayonnaise.
  • How can I make this recipe gluten-free? Use tamari instead of soy sauce and ensure your mayonnaise is gluten-free.
  • Can I add other vegetables? Absolutely! Bell peppers, broccoli, and snap peas work great in this recipe.
  • Is this dish kid-friendly? Yes! Adjust the spice level to suit your children’s taste preferences.
  • Can I make this vegan? Yes! Swap chicken for tofu and use vegan mayo for the sauce.
  • What can I serve with this dish? Pair these bowls with a side salad or steamed veggies for a complete meal.
  • How spicy is this dish? The spice level can be adjusted based on your preference; start with less chili paste and add more as needed.

Nutritional Tips and Dietary Adaptations

This recipe is not only delicious but can also be tailored to meet various dietary needs:

  • Protein Options: Explore different proteins like turkey or chickpeas for a vegetarian spin.
  • Low-Carb Option: Serve over cauliflower rice for a lower-carb version without sacrificing flavor.
  • Increase Fiber: Add black beans or chickpeas to the rice for a fiber boost.
  • Healthy Fats: Incorporate avocado slices for added creaminess and healthy fats.

Essential Equipment

Having the right tools can make your cooking experience smoother:

  • Non-stick skillet: Perfect for cooking chicken without sticking.
  • Medium pot: For cooking the rice effortlessly.
  • Meat thermometer: Ensures your chicken is cooked to perfection.
  • Mixing bowls: Ideal for preparing your sauce and seasoning.

Serving Suggestions

These bowls are as beautiful as they are delicious! Here are some serving ideas:

  • Garnish: Top with fresh herbs, lime wedges, and a sprinkle of sesame seeds for an elegant touch.
  • Side Dishes: Serve with a refreshing cucumber salad or steamed edamame for a complete meal.
  • Presentation: Layer the ingredients in clear glass bowls for a visually stunning display.

In conclusion, these Spicy Garlic Chicken Rice Bowls with Creamy Chili Sauce are a fantastic way to ignite your taste buds while enjoying a nutritious meal. With endless possibilities for customization, you can make this dish your own every time. So why wait? Grab your ingredients and embark on this delicious journey today!

Spicy Garlic Chicken Rice Bowls with Creamy Chili Sauce

Prep Time 10 minutes
Cook Time 20 minutes
Total Time 30 minutes
Servings 4 servings
Calories 650
Enjoy a flavorful and spicy chicken rice bowl topped with a creamy chili sauce and fresh herbs for a satisfying meal.

Ingredients

Chicken

  • 1 lb Boneless, skinless chicken thighs
  • 2 tablespoons Olive oil
  • 4 cloves Garlic, minced
  • 1 teaspoon Red pepper flakes (Adjust to taste)
  • 1 tablespoon Soy sauce
  • to taste Salt
  • to taste Pepper

Rice

  • 1 cup Jasmine rice
  • 2 cups Water

Sauce

  • 1 tablespoon Coconut oil (Or any cooking oil)
  • ½ cup Mayonnaise
  • 2 tablespoons Chili paste (Adjust to taste)
  • 1 tablespoon Lime juice
  • 1 teaspoon Honey (Optional)
  • to taste Fresh cilantro, chopped
  • to taste Sliced green onions
  • to taste Lime wedges

Instructions 

  • Cook rice with water until tender, then set aside.
  • Season chicken with garlic, red pepper flakes, soy sauce, salt, and pepper. Cook until browned and cooked through.
  • Prepare creamy chili sauce by mixing mayonnaise, chili paste, lime juice, and honey.
  • Assemble bowls with rice, sliced chicken, and top with cilantro, green onions, and lime wedges. Drizzle with chili sauce.

Notes

Adjust spice levels and toppings to taste for best results.
Calories: 650kcal
Cost: $15
Course: Main Course
Cuisine: fusion
Keyword: Chicken, Rice, Spicy

Kickstart Your Culinary Adventure with This Delectable Salad

Welcome to the vibrant world of flavors where health meets taste! This Asian Sesame Cucumber Salad is not just a dish; it’s a celebration of crunch, zest, and everything fresh! With its invigorating sesame dressing, this salad is the perfect side to elevate any meal or can stand proudly as a light meal on its own. In just a few minutes, you can whip up a salad that’s not only delicious but also packed with nutrients. Let’s dive in!

Why You’ll Love This Recipe

This salad is a gem for several reasons. Here are just a few:

  • Quick and Easy: Ready in under 20 minutes, this salad is a lifesaver for busy weeknights or last-minute gatherings.
  • Fresh and Flavorful: The combination of cucumbers, ginger, and sesame creates a refreshing taste that dances on your palate.
  • Customizable: Add your favorite proteins or veggies to make it your own—perfect for any dietary preference!
  • Low-Calorie Delight: This dish is light yet satisfying, making it an excellent choice for those looking to manage their weight without sacrificing flavor.
  • Perfect for Meal Prep: It keeps well, making it ideal for prepping ahead and enjoying throughout the week.

Ingredients Breakdown

Let’s gather our ingredients. Here’s what you’ll need for this zesty salad:

  • 2 large English cucumbers, thinly sliced
  • 2 spring onions, thinly sliced
  • 1 small carrot, julienned (optional)
  • 2 tablespoons soy sauce (use tamari for gluten-free)
  • 1 tablespoon rice vinegar
  • 1 tablespoon toasted sesame oil
  • 1 teaspoon sugar or maple syrup
  • 1 clove garlic, minced
  • 1 teaspoon fresh ginger, grated
  • 1 teaspoon chili flakes or 1/2 fresh red chili, finely sliced (optional)
  • 2 tablespoons toasted sesame seeds
  • 1 tablespoon fresh cilantro, chopped (optional)

Feel free to mix and match ingredients based on what you have at home. For instance:

  • Cucumbers: Substitute with zucchini or radishes for a different crunch.
  • Onions: Use red onion or shallots for a milder taste.
  • Sweetener: Honey or agave syrup can replace sugar or maple syrup.

How to Make Your Salad

Side view of a fresh, vibrant Asian Sesame Cucumber Salad showcasing sliced cucumbers and garnishes.

Ready to get your hands a little messy? Here’s how to put it all together:

  1. Place sliced cucumbers in a colander and sprinkle with salt. Let sit for 5-10 minutes to remove excess water, then gently pat dry with paper towels.
  2. In a large mixing bowl, combine cucumbers, spring onions, and carrot.
  3. In a small bowl, whisk together soy sauce, rice vinegar, sesame oil, sugar, garlic, ginger, and chili until sugar dissolves completely.
  4. Pour dressing over vegetables and toss thoroughly to ensure even coating.
  5. Transfer to a serving dish and sprinkle with toasted sesame seeds and cilantro before serving.
  6. Serve immediately or refrigerate for 10-15 minutes for enhanced marinated flavor and cooling.

Pro Tips for Success

Level up your salad-making game with these expert insights:

  • Salt the Cucumbers: This step is crucial as it removes excess water, ensuring your salad doesn’t get soggy.
  • Balance the Dressing: Adjust the sweetness or acidity of the dressing to suit your taste; this dish is all about personal preference!
  • Let It Chill: For maximum flavor, let the salad sit in the fridge for 10-15 minutes before serving to allow the flavors to meld.
  • Garnish Wisely: A sprinkle of extra sesame seeds or a few sprigs of cilantro can add a beautiful finishing touch.
  • Protein Power: Add grilled chicken, shrimp, or tofu to transform this salad into a satisfying main dish.
  • Spice It Up: Experiment with different types of chili or add a splash of hot sauce for those who love a kick!
  • Fresh is Best: Use freshly grated ginger for a more robust flavor compared to powdered ginger.
  • Storage: Store any leftovers in an airtight container in the fridge for up to 2 days, but it’s best enjoyed fresh!

Common Mistakes and Troubleshooting

Even the best chefs make mistakes! Here’s how to avoid some common pitfalls:

  • Soggy Salad: If your salad turns out watery, it’s likely due to not salting the cucumbers properly. Always remember to drain and pat them dry!
  • Overpowering Dressing: If your dressing is too salty, balance it out with more sugar or vinegar, depending on your taste.
  • Unbalanced Flavor: Taste as you go! Adjust sweetness, acidity, or spice levels to your liking.

Creative Variations to Try

Make this salad your own with these fun variations:

  • Asian-Inspired Quinoa Salad: Add cooked quinoa for a filling grain boost.
  • Crunchy Nutty Salad: Toss in some chopped peanuts or cashews for added crunch and flavor.
  • Fruit Fusion: Incorporate diced mango or pineapple for a sweet twist that complements the savory elements beautifully.
  • Herb-Infused Delight: Mix in fresh herbs like mint or basil for an aromatic twist.

Storing and Make-Ahead Instructions

This salad is perfect for meal prepping! Here’s how to store it:

  • Refrigeration: Keep it in an airtight container in the fridge for up to 2 days.
  • Make-Ahead: Prepare the dressing ahead of time and store separately; mix just before serving.

Frequently Asked Questions

Here are answers to some common queries:

  • Can I use regular cucumbers instead of English cucumbers? Yes, but be sure to peel them as they may be more bitter.
  • Is this salad gluten-free? Absolutely! Just use tamari instead of soy sauce.
  • How can I make it vegan? This recipe is already vegan; just ensure any added proteins are plant-based.
  • What can I serve this salad with? It pairs beautifully with grilled meats, rice dishes, or as a refreshing standalone meal.
  • Can I freeze this salad? It’s best enjoyed fresh, but you can freeze the dressing separately for later use.
  • Can I add other vegetables? Definitely! Bell peppers or snap peas would be fantastic additions.
  • How do I make it spicier? Increase the amount of chili flakes or add sriracha to the dressing.
  • What is the best way to serve this salad? Serve it chilled for the best flavor experience!

Nutritional Tips and Dietary Adaptations

This salad is naturally low in calories and high in fiber, making it an excellent choice for a healthy diet. Here are ways to adjust it for different dietary needs:

  • Low-Carb: Skip the sugar or use a sugar substitute to keep it keto-friendly.
  • Paleo-Friendly: Use coconut aminos instead of soy sauce for a paleo-compliant dish.
  • High-Protein: Add grilled chicken, shrimp, or chickpeas to enhance protein intake.

Essential Equipment for Success

Here’s what you’ll need to make this salad:

  • Cutting Board: A sturdy surface for chopping your ingredients.
  • Sharp Knife: Essential for slicing the cucumbers and vegetables thinly.
  • Mixing Bowls: Use one for the vegetables and another for the dressing.
  • Whisk: To blend the dressing ingredients smoothly.
  • Colander: For draining the salted cucumbers efficiently.

Serving Suggestions to Elevate Your Meal

Pair this salad with a variety of dishes for a well-rounded meal:

  • Grilled Chicken: The cool salad contrasts beautifully with warm, grilled chicken.
  • Rice Bowls: Serve it atop a bowl of rice for a satisfying combination.
  • Asian Noodles: Pair with cold sesame noodles for a refreshing summer meal.

In conclusion, this Crunchy, Zesty, and Oh-So-Satisfying Asian Sesame Cucumber Salad is not just a dish; it’s a journey into the heart of flavor and nutrition. Whether you’re looking for a quick side, a light meal, or a refreshing dish to impress your guests, this recipe delivers. Get creative, have fun in the kitchen, and remember: cooking healthy can be exciting and delicious! Now, roll up your sleeves and get ready to enjoy a bowl full of sunshine!

Asian Sesame Cucumber Salad

Prep Time 10 minutes
Total Time 10 minutes
Servings 4 servings
Calories 120
A refreshing and tangy cucumber salad with sesame and ginger, perfect as a side dish or light meal.

Ingredients

Vegetables

  • 2 large English cucumbers (thinly sliced)
  • 2 spring onions spring onions (thinly sliced)
  • 1 small carrot (julienned (optional))

Dressing

  • 2 tablespoons soy sauce (use tamari for gluten-free)
  • 1 tablespoon rice vinegar
  • 1 tablespoon toasted sesame oil
  • 1 teaspoon sugar or maple syrup
  • 1 clove garlic (minced)
  • 1 teaspoon fresh ginger (grated)
  • 1 teaspoon chili flakes or red chili (optional, finely sliced)
  • 2 tablespoons toasted sesame seeds
  • 1 tablespoon fresh cilantro (chopped (optional))

Instructions 

  • Sprinkle sliced cucumbers with salt, sit for 5-10 minutes, then pat dry.
  • Combine cucumbers, spring onions, and carrot in a bowl.
  • Whisk together soy sauce, rice vinegar, sesame oil, sugar, garlic, ginger, and chili.
  • Pour dressing over vegetables and toss to coat evenly.
  • Sprinkle with sesame seeds and cilantro, then serve immediately or refrigerate for 10-15 minutes.

Notes

This salad is best enjoyed fresh but can be chilled for a more marinated flavor.
Calories: 120kcal
Cost: $8
Course: Side Dish
Cuisine: Asian
Keyword: cucumber, Sesame