Author

Ryan

Browsing

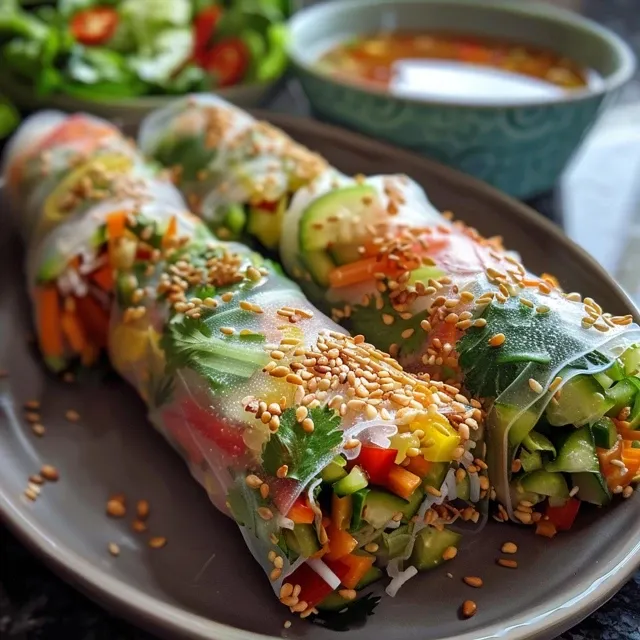
Discover the Joy of Fresh Rice Paper Veg Rolls!

Welcome to the delightful world of rice paper veg rolls! If you’re searching for a snack that’s not only delicious but also visually stunning, you’ve landed in the right place. These rolls are bursting with fresh veggies and aromatic herbs, making them a perfect quick snack or light meal that everyone will love. Whether you’re a busy professional, a health enthusiast, or a food lover, this guide will inspire you to create your own vibrant rolls at home!

In this article, we’ll explore everything you need to know about making rice paper rolls, from a detailed ingredient breakdown to expert tips and common mistakes to avoid. So grab your rice paper wrappers and let’s roll!

Why You’ll Love This Recipe

  • Quick and Easy: Prep and roll these delightful snacks in under 30 minutes, perfect for spontaneous meals or unexpected guests!
  • Customizable: Mix and match your favorite vegetables and proteins to create endless flavor combinations that suit your taste and dietary needs.
  • Healthy and Nutritious: Packed with fresh veggies, these rolls are low in calories and high in vitamins, making them a guilt-free snack.
  • Perfect for Meal Prep: Make a batch in advance and store them in the fridge for quick grab-and-go snacks throughout the week.
  • Fun to Make: Rolling these beauties is a fun kitchen activity that you can enjoy with family and friends!

Ingredients for Rice Paper Veg Rolls

Let’s gather our ingredients! You’ll need:

  • 6 sheets of rice paper: Soak briefly in warm water to soften without tearing.
  • 1 cup julienned carrots: Adds vibrant crunch and natural sweetness.
  • 1 cup cucumber strips: Provides a refreshing texture.
  • 1/2 cup fresh mint leaves: Offers a fragrant lift.
  • 1/2 cup fresh cilantro: Adds a zesty note.
  • 1 cup butter lettuce or leafy greens: Provides a tender base.
  • 1 cup cooked shrimp or sliced tofu: For extra nutrients and protein.
  • 1 cup rice vermicelli noodles: The traditional filler for added texture.
  • 1/4 cup peanut sauce or hoisin-based dip: For a savory, sweet contrast.
  • 2 tablespoons soy sauce or tamari: To add a salty splash.

Expert Tips for Perfect Rice Paper Veg Rolls

Side view of freshly made rice paper rolls with greens and shrimp.
  • Soaking Technique: Soak the rice paper sheets in warm water for just 10-15 seconds until they are pliable. Don’t over-soak to prevent tearing.
  • Rolling Station: Set up a clean surface with all your ingredients prepped and within reach. This makes assembly a breeze!
  • Layering: Start with a base of greens, then add your veggies and protein. Don’t overfill to ensure easy rolling!
  • Rolling Method: Fold the sides in, then roll tightly from the bottom up to secure the filling.
  • Prevent Sticking: Place finished rolls on a plate lined with lettuce to keep them from sticking together.
  • Serve with Dipping Sauce: A delightful dipping sauce enhances the flavor and gives a beautiful presentation.
  • Storage Tips: Keep rolled veg rolls in an airtight container in the fridge for up to 3 days.
  • Flavor Boost: Add a squeeze of lime or a sprinkle of sesame seeds for extra zing!

Common Mistakes and Troubleshooting

Even the best of us can make mistakes in the kitchen. Here’s how to troubleshoot:

  • Rolls tearing: Make sure you don’t over-soak the rice paper. A quick dip is all you need!
  • Filling spilling out: Avoid overfilling your rolls. Less is more when it comes to rolling.
  • Sticking together: Use lettuce or parchment paper between rolls to keep them from sticking.
  • Flavor not popping: Ensure you season your fillings well and don’t skip the dipping sauce!

Delicious Variations to Try

Get creative with your rice paper rolls by trying these variations:

  • Spicy Shrimp Rolls: Add sliced jalapeños and spicy mayo for a kick!
  • Vegan Delight: Substitute shrimp with marinated tempeh and add avocado for creaminess.
  • Rainbow Rolls: Use a variety of colorful veggies like bell peppers, purple cabbage, and radishes for vibrant presentations.
  • Breakfast Rolls: Fill with scrambled eggs, spinach, and cheese for a morning boost!

Make-Ahead and Storage Instructions

Want to prep in advance? Here’s how:

  • Make Ahead: Assemble your rolls and keep them in an airtight container in the fridge for up to 3 days. Place parchment paper between layers to prevent sticking.
  • Freezing: Although it’s best to enjoy them fresh, you can freeze unfilled rice paper sheets. Just soak and fill them as needed!
  • Storage: Store leftover dipping sauce in a separate container in the fridge for up to a week.

Nutrition Tips and Dietary Adaptations

This dish is naturally healthy, but here are some ways to adapt it:

  • Low-Carb Option: Skip the vermicelli noodles and double up on the veggies!
  • Gluten-Free: Use tamari instead of soy sauce for a gluten-free dipping experience.
  • Protein Boost: Incorporate edamame or chickpeas for a plant-based protein punch.
  • Low-Fat Version: Use less peanut sauce or opt for a yogurt-based dip for a lighter alternative.

Essential Equipment for Perfect Rolls

Here’s what you’ll need to create your rice paper veg rolls:

  • Large Shallow Dish: For soaking the rice paper wrappers.
  • Cutting Board: A steady surface for slicing veggies and assembling your rolls.
  • Sharp Knife: To julienne your ingredients with precision.
  • Serving Plate: To showcase your beautiful rolls!

Serving Suggestions

Pair your rice paper rolls with these delicious accompaniments:

  • Dipping Sauces: Peanut sauce, hoisin sauce, or a spicy sriracha mix!
  • Side Salads: A light cucumber salad or a tangy coleslaw complements the rolls perfectly.
  • Fresh Fruit: Serve with slices of watermelon or mango for a refreshing contrast.
  • Herbal Tea: A nice jasmine or mint tea will enhance your meal’s fresh flavors.

Frequently Asked Questions (FAQs)

  • Can I use any kind of rice paper? Yes! Look for round rice paper sheets at your local grocery store or Asian market.
  • How do I prevent the rice paper from sticking together? Keep the rolls separated with lettuce leaves or parchment paper.
  • Can I make these rolls ahead of time? Absolutely! They can be made a day in advance and stored in the fridge.
  • What should I serve with rice paper rolls? Consider dipping sauces, salads, or fresh fruit for a complete meal.
  • Are rice paper rolls gluten-free? Yes, as long as you use gluten-free sauces like tamari.
  • How do I store leftover rolls? Keep them in an airtight container in the fridge for up to 3 days.
  • Can I freeze rice paper rolls? It’s best to eat them fresh, but unfilled rice paper can be frozen.
  • What other fillings can I use? Get creative! Try different proteins, veggies, or even fruits!

Final Thoughts

There you have it, your ultimate guide to making fresh and fun rice paper veg rolls! With these tips and tricks, you’re sure to impress your friends and family with your culinary skills. Remember that the kitchen is your playground, so have fun experimenting with flavors and ingredients. Enjoy your delicious creations and the joy of healthy eating!

Easy Rice Paper Veg Rolls: Fresh, Crunchy Bites You’ll Crave

Prep Time 20 minutes
Cook Time 10 minutes
Total Time 30 minutes
Servings 4 servings
Calories 150
These vibrant rice paper veggie rolls are quick to assemble and packed with fresh flavors and crunchy textures, perfect for a light snack or appetizer.

Ingredients

Rice paper

  • 6 sheets Rice paper (soak briefly in warm water to soften without tearing)

Julienned carrots

  • 1 cup Julienned carrots (adds vibrant crunch and natural sweetness)

Cucumber strips

  • 1 cup Cucumber strips (for refreshing texture)

Fresh mint leaves

  • 1/2 cup Fresh mint leaves (for fragrant lift)

Fresh cilantro

  • 1/2 cup Fresh cilantro (adds zesty note)

Butter lettuce or leafy greens

  • 1 cup Butter lettuce or leafy greens (provides a tender base)

Cooked shrimp or sliced tofu

  • 1 cup Cooked shrimp or sliced tofu (for extra nutrients)

Rice vermicelli noodles

  • 1 cup Rice vermicelli noodles (traditional filler)

Peanut sauce or hoisin-based dip

  • 1/4 cup Peanut sauce or hoisin-based dip (for savory, sweet contrast)

Soy sauce or tamari

  • 2 tablespoons Soy sauce or tamari (for a salty splash)

Instructions 

  • Soak rice paper sheets briefly in warm water until soft.
  • Lay softened rice paper on a flat surface and layer with greens, vegetables, herbs, and protein.
  • Fold the sides and roll tightly to enclose the filling.
  • Repeat with remaining ingredients.
  • Serve with peanut or hoisin sauce and soy sauce for dipping.

Notes

Keep the rice paper moist to prevent tearing during rolling.
Calories: 150kcal
Cost: $15
Course: Appetizer
Cuisine: Asian
Keyword: Vegetables

Unleash the Flavor: A Quick Dive into Egg Fried Rice

Welcome to a culinary adventure that’s as quick as it is delightful! If you’ve ever found yourself staring into the fridge wondering what to whip up for dinner, this 10-minute Egg Fried Rice recipe is your golden ticket. Packed with vibrant veggies, fluffy scrambled eggs, and a tantalizing soy sauce kick, this meal is not just nutritious but also a burst of flavor in every bite. Whether you’re a busy professional, a student, or just someone seeking a fun cooking project, this dish is sure to impress!

Why You’ll Love This Recipe

  • Quick and Easy: Ready in just 10 minutes, making it perfect for busy weeknights when you need something satisfying fast!
  • Versatile Ingredients: Customize with whatever veggies you have on hand—peas, carrots, or even leftover proteins!
  • Nutritious and Filling: A balanced meal that packs proteins, carbs, and essential vitamins, keeping you energized.
  • One-Pan Wonder: Minimal cleanup required as everything cooks in one skillet or wok—less mess, more fun!
  • Kid-Friendly: A surefire hit with the little ones; they’ll love the colorful veggies and the fun flavors!

Ingredient Breakdown

Let’s gather our ingredients! This recipe is simple, but let’s explore each component for maximum flavor and nutrition. Here’s what you’ll need:

  • 2 cups cooked rice: Preferably day-old; this helps achieve the perfect texture!
  • 2 eggs, beaten: Adds protein and fluffiness to the dish.
  • 1 cup mixed vegetables: Think peas, carrots, and corn for a colorful mix; feel free to swap these based on your fridge’s contents!
  • 2 tablespoons soy sauce: The essential flavor booster—choose low-sodium if you’re watching salt intake.
  • 1 tablespoon sesame oil: Adds a nutty flavor that elevates the dish; don’t skip this!
  • 2 green onions, chopped: For a fresh crunch and flavor burst.
  • Salt and pepper to taste: Essential for seasoning and bringing all the flavors together.

Step-by-Step Instructions

Side view of a serving of egg fried rice showcasing grains and veggies.

Ready to cook? Let’s get started! Follow these simple steps to whip up your Egg Fried Rice:

  • Prep the Skillet: In a large skillet or wok, heat a little oil over medium heat. Add the beaten eggs and scramble until fully cooked. Remove the eggs from the skillet and set aside.
  • Sauté the Vegetables: In the same skillet, add a bit more oil if needed and toss in the mixed vegetables. Sauté for about 2-3 minutes until they’re tender.
  • Add the Rice: Incorporate the cooked rice into the skillet along with the soy sauce. Stir everything together until the rice is heated through, breaking apart any clumps.
  • Combine Ingredients: Add the scrambled eggs back into the skillet. Mix everything well, incorporating the green onions and sesame oil, and season with salt and pepper to taste.

Pro Tips for Perfect Egg Fried Rice

Want to elevate your Egg Fried Rice to the next level? Check out these expert tips:

  • Use Day-Old Rice: Freshly cooked rice can be too sticky; day-old rice has the right texture for frying.
  • High Heat is Key: Cooking on medium-high heat helps to achieve that perfect fried texture without steaming the rice.
  • Don’t Overcrowd the Pan: If you’re making a large batch, consider cooking in batches to maintain the quality of each serving.
  • Add Protein: Boost the nutritional value by tossing in cooked chicken, shrimp, or tofu for extra protein.
  • Experiment with Sauces: Try adding oyster sauce or chili sauce for a different flavor profile.
  • Fresh Herbs Enhance Flavor: Garnish with cilantro or basil for an aromatic touch.
  • Eggs Last: Add the eggs at the end to prevent overcooking and keep them fluffy.
  • Don’t Rush the Sauté: Allow vegetables to sauté until tender for optimal flavor.

Common Mistakes and Troubleshooting

Even the best chefs make mistakes! Here are some common pitfalls and how to avoid them:

  • Too Sticky Rice: If your rice is sticky, it’s likely too fresh. Always use day-old rice for the best texture.
  • Overcooked Eggs: Scramble the eggs just until they’re set; they’ll continue to cook when added back into the dish.
  • Insufficient Flavor: Always taste before serving! Adjust soy sauce, salt, or add a splash more sesame oil if needed.
  • Vegetables Too Crunchy: Make sure to sauté them until tender, but not mushy, to retain a bit of crunch.

Flavorful Variations to Try

This recipe is wonderfully adaptable! Here are some tasty variations to keep things exciting:

  • Spicy Egg Fried Rice: Add a teaspoon of chili oil or red pepper flakes for a spicy kick!
  • Vegetable Delight: Load up on extra veggies like bell peppers, broccoli, or zucchini for a health boost.
  • Protein-Packed: Stir in shredded rotisserie chicken or cooked shrimp for a hearty meal.
  • Vegan Version: Replace eggs with tofu scrambled or chickpea flour for a plant-based twist.

Storage and Make-Ahead Instructions

Want to prep ahead? Here’s how to store and reheat your Egg Fried Rice:

  • Storing Leftovers: Store any leftovers in an airtight container in the fridge for up to 3 days.
  • Reheating: Reheat in a skillet over medium heat with a splash of water to prevent drying out.
  • Make-Ahead: You can prepare the rice and chopped veggies a day in advance and store them separately until ready to cook.

FAQ: Your Egg Fried Rice Questions Answered

Got questions? Let’s tackle some common queries!

  • Can I use frozen vegetables? Absolutely! They’re a great time-saver—just make sure to thaw and drain excess moisture.
  • What type of rice is best? Long-grain white rice or jasmine rice works best for fried rice due to their fluffy texture.
  • Can I make this gluten-free? Yes! Use gluten-free soy sauce or tamari.
  • How do I make it less salty? Use low-sodium soy sauce and taste as you go to control the saltiness.
  • Is fried rice healthy? When made with fresh vegetables and lean proteins, it can be a healthy meal option!
  • Can I add sauces? Definitely! Feel free to drizzle on some teriyaki or sweet chili sauce for extra flavor.
  • What’s the best oil for frying? Neutral oils like canola or avocado oil work best as they won’t overpower the taste.
  • How can I make it vegetarian? Skip the eggs and add extra veggies or tofu for a delicious vegetarian option.

Nutrition Tips and Dietary Adaptations

Looking to enhance the nutritional profile? Here are some adaptations:

  • Whole Grain Rice: Substitute white rice with brown rice or quinoa for added fiber.
  • Extra Veggies: The more veggies, the better! Aim for a rainbow of colors for a variety of nutrients.
  • Healthy Fats: Use olive oil instead of sesame oil for a heart-healthy option.

Equipment Recommendations

Here’s what you’ll need to whip up this delicious dish:

  • Skillet or Wok: A non-stick skillet or wok is essential for easy cooking and cleanup.
  • Spatula: A sturdy spatula helps in stirring and flipping ingredients efficiently.
  • Measuring Cups and Spoons: For accurate ingredient measurements, especially with sauces.

Serving Suggestions

How to serve your Egg Fried Rice? Here are some fun ideas:

  • Garnish: Top with sesame seeds and additional green onions for a pop of color.
  • Side Dishes: Pair with a fresh salad or spring rolls for a complete meal.
  • Sauce on the Side: Serve with soy sauce or sweet chili sauce for dipping.

Final Thoughts

And there you have it! A colorful, nutritious, and downright delicious Egg Fried Rice that’s ready in a flash. Perfect for any meal, this dish proves that eating healthy can be fun, vibrant, and utterly satisfying. So grab your skillet, unleash your inner chef, and make this quick meal that’s sure to become a staple in your kitchen. Happy cooking!

Quick 10 Minute Egg Fried Rice

Prep Time 3 minutes
Cook Time 7 minutes
Total Time 10 minutes
Servings 2 servings
Calories 350
A quick and easy fried rice recipe perfect for a satisfying meal in just 10 minutes.

Ingredients

Rice

  • 2 cups cooked rice (preferably day-old)

Eggs

  • 2 pieces beaten eggs

Vegetables

  • 1 cup mixed vegetables (peas, carrots, corn)

Soy Sauce

  • 2 tablespoons soy sauce

Sesame Oil

  • 1 tablespoon sesame oil

Green Onions

  • 2 green onions chopped green onions

Salt and Pepper

  • to taste salt and pepper

Instructions 

  • Heat oil in a skillet, scramble eggs until cooked, then set aside.
  • Cook vegetables in the same skillet for 2-3 minutes until tender.
  • Add rice and soy sauce, stir until heated and clumps break apart.
  • Return eggs to skillet, add sesame oil and green onions, season with salt and pepper, then mix well.

Notes

Use day-old rice for best texture and flavor.
Calories: 350kcal
Cost: $8
Course: Main Course
Cuisine: Asian
Keyword: Fried Rice

Why You’ll Love This Chickpea Flour Cottage Cheese Flatbread!

If you’re looking for a quick, nutritious, and utterly delicious way to enjoy your meals, then you’ve hit the jackpot with this Chickpea Flour Cottage Cheese Flatbread! This recipe is a game changer for anyone who craves a healthy yet satisfying option without sacrificing flavor. Here are five reasons why this flatbread will become your new best friend in the kitchen:

  • High in Protein: With cottage cheese as a primary ingredient, this flatbread packs a protein punch, perfect for fueling your day or post-workout recovery.
  • Quick and Easy: Ready in just a few simple steps, this flatbread is perfect for busy weeknights or spontaneous gatherings with friends.
  • Versatile Base: Whether you’re using it for wraps, pizza, or as a side to your favorite soups and salads, this flatbread adapts to whatever flavor profile you desire.
  • Gluten-Free Option: Made primarily with chickpea flour, this recipe caters to gluten-sensitive eaters without skimping on taste or texture.
  • Exciting Flavor: The nutty taste of chickpea flour combined with the creaminess of cottage cheese creates a flavor explosion that feels indulgent yet healthy.

Ingredients You’ll Need

Creating your Chickpea Flour Cottage Cheese Flatbread is a breeze! Here’s what you need:

  • 1 cup cottage cheese: Choose full-fat for richness, or low-fat if you prefer something lighter.
  • 2 large eggs: These help bind the ingredients and provide moisture.
  • 1/2 cup chickpea flour: The star of the show! This flour gives the flatbread its unique flavor and texture.

Feel free to get creative with substitutions:

  • Flour Alternatives: If you’re looking for a low-carb option, almond flour works well. For a different flavor, try using oat flour.
  • Spice It Up: Add herbs like oregano or spices like cumin to the batter for an extra flavor kick!

How to Make Chickpea Flour Cottage Cheese Flatbread

Follow these straightforward steps to whip up your new favorite flatbread:

  1. Add cottage cheese and eggs to a blender.
  2. Blend until smooth and creamy.
  3. Incorporate chickpea flour and blend again until well combined.
  4. Pour the batter onto a parchment-lined baking sheet or heated skillet.
  5. Spread into a thin, even rectangle or circle.
  6. Bake or cook until set and golden around the edges, approximately 10-12 minutes.
  7. Let cool slightly before slicing for wraps or serving as pizza bases.

Pro Tips for Perfect Flatbread

Side view of a flaky flatbread made from chickpea flour and cottage cheese, showcasing its texture.

To ensure your flatbread turns out perfectly every time, check out these expert tips:

  • Don’t Overmix: Blend just until combined to keep the texture light and airy.
  • Prep Your Pan: Ensure your skillet is well-heated or your baking sheet is lined with parchment for easy release.
  • Control the Thickness: Aim for about 1/4 inch thickness for an ideal balance of crispness and chewiness.
  • Flavor Boost: Add a pinch of salt or your favorite spices to enhance the overall taste.
  • Check for Doneness: The edges should be golden brown, but the center should remain soft.
  • Let It Cool: Allowing the flatbread to sit for a few minutes helps it firm up and makes it easier to handle.

Common Mistakes & Troubleshooting

Don’t let minor hiccups ruin your flatbread experience! Here are some common mistakes and how to fix them:

  • Cracking Flatbread: This can happen if the batter is too thick or if it’s cooked too long. Make sure to spread evenly and keep an eye on the cooking time.
  • Flatbread Is Too Dense: If the flatbread is dense, ensure you’re blending enough air into the batter. The eggs should be fully incorporated into the cottage cheese.
  • Sticking to the Pan: Use parchment paper or a non-stick spray to prevent sticking. If using a skillet, make sure it’s well-greased or heated.

Delicious Variations to Try

Want to switch things up? Here are four fun variations you can try with this flatbread recipe:

  • Herbed Flatbread: Add finely chopped rosemary or thyme to the batter for an aromatic twist.
  • Spicy Flatbread: Mix in a teaspoon of chili powder or cayenne for a kick.
  • Sweet Flatbread: Substitute a tablespoon of honey and a dash of cinnamon for a sweet treat, perfect for breakfast.
  • Cheesy Flatbread: Incorporate shredded cheese into the batter, like mozzarella or cheddar, for a gooey, cheesy delight.

How to Store and Make Ahead

Make your meal prep even easier with these storage tips:

  • Storing Leftovers: Keep your flatbread in an airtight container in the fridge for up to 3 days.
  • Freezing: Slice and freeze flatbread between layers of parchment paper for up to a month. Thaw in the fridge overnight before use.
  • Make Ahead: Prepare the batter in advance and store it in the fridge for up to 24 hours. Just stir before cooking!

Nutritional Benefits & Dietary Adaptations

This Chickpea Flour Cottage Cheese Flatbread isn’t just tasty; it’s also packed with nutritional benefits:

  • Rich in Protein: Perfect for muscle repair and growth, thanks to the cottage cheese.
  • High Fiber: Chickpea flour adds fiber, aiding in digestion and promoting fullness.
  • Low Carb Option: Great for those on a low-carb diet when using chickpea or almond flour.

For dietary adaptations, consider:

  • Vegan Option: Substitute eggs with flaxseed meal mixed with water.
  • Dairy-Free: Use dairy-free cottage cheese or a nut-based alternative.

Essential Equipment Recommendations

To create your flatbread masterpiece, here’s what you’ll need:

  • Blender or Food Processor: For smooth mixing of ingredients.
  • Baking Sheet or Skillet: Choose your cooking method based on preference.
  • Parchment Paper: To prevent sticking and make cleanup a breeze.

Serving Suggestions

Ready to enjoy your Chickpea Flour Cottage Cheese Flatbread? Here are some serving ideas:

  • Wraps: Fill with fresh veggies, hummus, or grilled chicken for a hearty meal.
  • Pizza Base: Top with sauce, cheese, and your favorite toppings for a guilt-free pizza night.
  • Sides: Serve alongside soups or salads for a filling addition to your meal.

Frequently Asked Questions

Got questions? We’ve got answers! Here are some common FAQs:

  • Can I make the batter ahead of time? Yes! Store it in the fridge for up to 24 hours.
  • Why are my flatbreads cracking? This may happen if the batter is too thick or cooked too long. Ensure even spreading and appropriate cooking time.
  • Do I need to strain the cottage cheese? No need! Just use it straight from the container.
  • What can I use instead of chickpea flour? Almond flour or oat flour are great alternatives.
  • How do I know when my flatbread is done? Look for golden edges and a firm center.
  • Can I freeze the flatbread? Yes! Wrap it well and store in the freezer for up to a month.
  • Can I make this recipe vegan? Absolutely! Use flaxseed meal instead of eggs.
  • Is this flatbread gluten-free? Yes, especially when using chickpea flour!

Conclusion: Your New Favorite Flatbread Awaits!

Now that you’ve got the scoop on this Chickpea Flour Cottage Cheese Flatbread, it’s time to roll up your sleeves and get cooking! With its wholesome ingredients and endless possibilities, you’ll find yourself reaching for this recipe time and time again. So go ahead, unleash your inner chef, and enjoy the delicious journey ahead!

Chickpea Flour Cottage Cheese Flatbread

Prep Time 10 minutes
Cook Time 15 minutes
Total Time 25 minutes
Servings 4 pieces
Calories 250
A quick and protein-packed flatbread made with chickpea flour and cottage cheese, perfect for wraps or pizza.

Ingredients

Dairy

  • 1 cup cottage cheese
  • 2 large eggs

Dry Ingredients

  • 1/2 cup chickpea flour

Instructions 

  • Add cottage cheese and eggs to a blender.
  • Blend until smooth, then add chickpea flour and blend again.
  • Pour batter onto a parchment-lined baking sheet or skillet and spread evenly.
  • Bake or cook until set and golden around edges.
  • Let cool slightly before slicing and serving.

Notes

This flatbread is versatile and can be used as a wrap or pizza base.
Calories: 250kcal
Cost: $8
Course: Main Course
Cuisine: international
Keyword: chickpea, cottage cheese, Flatbread

Welcome to Your Culinary Playground: The Ultimate Spring Green Salad

As spring unfolds, there’s nothing quite like a vibrant salad to celebrate the season’s fresh bounty. This Spring Green Salad with Basil Lemon Vinaigrette is not just a feast for the eyes; it’s a delicious and nutritious way to revitalize your plate. Bursting with crisp greens, juicy cherry tomatoes, and a zesty vinaigrette, this salad is your go-to recipe for a refreshing meal that’s simple to prepare and packed with flavor. Let’s dive into why you’ll absolutely love this recipe, and how it can transform your dining experience!

Why You’ll Love This Recipe

  • Quick and Easy: Ready in just 15 minutes, this salad requires no cooking, making it perfect for busy days.
  • Flavor Explosion: The combination of fresh basil and tangy lemon creates a delightful vinaigrette that elevates the salad.
  • Nutrient-Dense: Packed with vitamins and minerals, the mixed spring greens are a powerhouse of nutrition, providing antioxidants and fiber.
  • Customizable: Easily adapt this salad by adding your favorite vegetables or proteins to suit your taste.
  • Seasonal Freshness: This recipe celebrates spring ingredients, ensuring you enjoy the freshest flavors the season has to offer.

Ingredient Breakdown: What You’ll Need

Here’s what you’ll need to create this vibrant salad, along with some substitution ideas to spark your creativity:

  • 4 cups mixed spring greens: Use a blend of arugula, spinach, and baby kale for a variety of textures.
  • 1 cup cherry tomatoes, halved: Substitute with grape tomatoes or diced bell peppers for a different flavor.
  • 1 cucumber, sliced: Any crisp variety works, but feel free to use zucchini for a twist.
  • ½ cup radishes, thinly sliced: If you prefer a milder taste, consider using jicama or sweet bell peppers.
  • ¼ cup red onion, thinly sliced: Swap with scallions for a milder onion flavor.
  • ½ cup fresh basil leaves: Experiment with mint or cilantro for a unique flavor profile.
  • ¼ cup extra-virgin olive oil: You can use avocado oil for a different taste and health benefits.
  • 2 tablespoons fresh lemon juice: Lime juice works well too if you’re looking for a zesty kick.
  • 1 teaspoon lemon zest: This adds a bright flavor; don’t skip it!
  • Salt and pepper, to taste: Adjust based on your preference.

Step-by-Step Instructions: Crafting Your Salad

Juicy spring greens salad featuring sliced cucumbers and red onion, drizzled with vinaigrette.

Creating the Spring Green Salad with Basil Lemon Vinaigrette is a breeze! Follow these easy steps:

  • Rinse and Dry: Start by rinsing the mixed spring greens thoroughly in cold water. Pat them dry with a clean kitchen towel or use a salad spinner to remove any excess moisture.
  • Chop the Vegetables: Slice the cherry tomatoes in half, the cucumber into rounds, and the radishes into thin slices. Also, thinly slice the red onion.
  • Combine Salad Ingredients: In a large salad bowl, toss together the mixed greens, cherry tomatoes, cucumber, radishes, red onion, and fresh basil leaves.
  • Make the Vinaigrette: In a small bowl, whisk together the extra-virgin olive oil, fresh lemon juice, lemon zest, salt, and pepper until well combined and emulsified.
  • Dress the Salad: Drizzle the vinaigrette over the salad ingredients in the bowl. Toss gently to ensure the greens and vegetables are evenly coated with the dressing.
  • Taste and Adjust: Sample the salad and adjust the seasoning with more salt, pepper, or lemon juice as desired.
  • Serve Immediately: Transfer the dressed salad to plates or serve it family-style from the bowl. Enjoy your fresh, flavorful creation!

Pro Tips for the Perfect Salad

Here are some expert insights to elevate your salad-making game:

  • Quality Greens: Always use the freshest, tender greens for optimal flavor and texture.
  • Drying is Key: Ensure your greens are thoroughly dried; excess moisture can dilute the vinaigrette.
  • Chill Your Ingredients: For an extra-refreshing salad, chill your salad bowl and ingredients in the refrigerator before assembling.
  • Brighten Up: Adding a pinch of sugar to the vinaigrette can balance the acidity and enhance the flavors.
  • Mix and Match: Feel free to add nuts, seeds, or your favorite protein, like grilled chicken or chickpeas, for a more filling meal.
  • Dress Just Before Serving: To keep your salad crisp, dress it just before serving.
  • Experiment with Flavors: Add a splash of balsamic vinegar or a teaspoon of Dijon mustard to the vinaigrette for an extra kick.
  • Store Properly: If you have leftovers, store the salad and dressing separately.

Common Mistakes and Troubleshooting

Even the best of us make mistakes in the kitchen! Here are a few common pitfalls and how to avoid them:

  • Overdressing the Salad: Too much dressing can make your salad soggy. Start with a little, then add more as needed.
  • Using Wilted Greens: Always check your greens for freshness; wilted or slimy greens can ruin the dish.
  • Ignoring Seasoning: Don’t forget to season your salad! A little salt and pepper can elevate the flavors immensely.
  • Chopping Ingredients Too Small: Aim for uniform sizes in your vegetables to ensure an even bite and presentation.

Delicious Variations to Try

Feeling adventurous? Here are some exciting variations to put a twist on your Spring Green Salad:

  • Fruit-Infused: Add sliced strawberries or mandarin oranges for a sweet touch.
  • Grain Bowl: Mix in cooked quinoa or farro for a hearty, nutritious twist.
  • Cheesy Delight: Top with crumbled feta or goat cheese for a creamy contrast.
  • Protein-Packed: Include grilled shrimp, chicken, or chickpeas for a satisfying, complete meal.

Storage and Make-Ahead Instructions

Want to prep ahead? Here’s how to store your salad:

  • Make-Ahead: Prepare the salad ingredients in advance (except the dressing) and keep them in an airtight container in the fridge for up to 2 days.
  • Store Dressing Separately: Keep the vinaigrette in a sealed jar in the fridge for up to a week. Shake well before using.
  • Freshness Matters: If storing leftovers, keep the salad and dressing separate to maintain crispness and prevent sogginess.

Frequently Asked Questions About Spring Greens

Got questions? We’ve got answers! Here are some common inquiries about spring greens and this salad:

  • What are spring greens made of? Spring greens typically include tender leaves like arugula, spinach, and baby kale.
  • Can I prep spring greens salad ahead of time? Yes! Just store the salad and dressing separately to keep it fresh.
  • How long will this salad last in the fridge? If stored properly, it should be good for 1-2 days, but it’s best enjoyed fresh.
  • Can I use frozen vegetables? While fresh is best, you can use thawed frozen veggies in a pinch.
  • What’s the best way to slice radishes? Thinly slicing them enhances their flavor and makes them easier to eat.
  • What other greens can I use? Feel free to mix in kale, romaine, or even shredded cabbage for variety.
  • Can I add nuts or seeds? Absolutely! Toasted walnuts, pecans, or sunflower seeds add great texture and flavor.
  • Is this salad vegan? Yes, this salad is entirely plant-based and vegan-friendly!

Nutritional Tips and Dietary Adaptations

Looking to tweak the recipe for dietary needs? Here are some suggestions:

  • Gluten-Free: This recipe is naturally gluten-free; enjoy without any adaptations.
  • Low-Carb: Skip or reduce the amount of radishes and cucumbers if you’re watching your carb intake.
  • Rich in Protein: Add grilled chicken or a scoop of hummus for a protein boost, perfect for post-workout meals.
  • Heart-Healthy: Using extra-virgin olive oil is a great choice for heart health, packed with healthy fats.

Equipment Recommendations

Make your salad-making experience even smoother with these essential tools:

  • Salad Spinner: A must-have for drying greens quickly and effectively.
  • Sharp Knife and Cutting Board: For easy chopping of vegetables and herbs.
  • Whisk: Essential for emulsifying the vinaigrette to achieve that perfect creamy texture.
  • Large Mixing Bowl: A spacious bowl is key for tossing all the ingredients together without spilling.

Serving Suggestions: How to Enjoy Your Salad

Ready to serve? Here are some ideas on how to enjoy your Spring Green Salad:

  • As a Side: Pair it with grilled fish or chicken for a light and healthy dinner.
  • For Lunch: Serve it with a slice of whole grain bread or wrap for a satisfying meal.
  • Picnic Perfect: Pack it up in a container for a refreshing picnic treat!
  • Garnish: Top with edible flowers for a stunning presentation at gatherings.

Conclusion: Celebrate Spring with Every Bite!

This Spring Green Salad with Basil Lemon Vinaigrette is more than just a dish; it’s a celebration of the season’s best produce, designed to invigorate your meals and bring joy to your table. Embrace the fresh flavors, enjoy the vibrant colors, and let every bite remind you that healthy eating can be both exciting and delicious. Gather your ingredients, unleash your culinary creativity, and let’s make this spring unforgettable!

Spring Green Salad with Basil Lemon Vinaigrette: An Incredible Ultimate Recipe

Prep Time 15 minutes
Total Time 15 minutes
Servings 4 servings
Calories 150
A fresh and vibrant salad featuring spring greens and a zesty basil lemon vinaigrette, perfect for a light and healthy meal.

Ingredients

Main

  • 4 cups mixed spring greens (such as arugula, spinach, and baby kale)
  • 1 cup cherry tomatoes, halved
  • 1 cucumber cucumber, sliced
  • 0.5 cup radishes, thinly sliced
  • 0.25 cup red onion, thinly sliced
  • 0.5 cup fresh basil leaves
  • 0.25 cup extra-virgin olive oil
  • 2 tablespoons fresh lemon juice
  • 1 teaspoon lemon zest
  • to taste Salt and pepper

Instructions 

  • Rinse and dry the greens. Slice vegetables and basil.
  • Combine greens, vegetables, and basil in a large bowl.
  • Whisk olive oil, lemon juice, lemon zest, salt, and pepper to make the vinaigrette.
  • Drizzle dressing over the salad and toss gently.
  • Taste and adjust seasoning if needed. Serve immediately.

Notes

Use fresh basil for the best flavor.
Calories: 150kcal
Cost: $15
Course: Salad
Cuisine: American
Keyword: Spring Greens

Are you ready to dive into a culinary adventure that’s both quick and delicious? Look no further! In just 15 minutes, you can whip up a vibrant, flavor-packed plate of veggie egg fried rice that’s perfect for busy food lovers. This dish is not just a meal; it’s a celebration of fresh ingredients and bold flavors that will make your taste buds dance with joy. Whether you’re a seasoned chef or a kitchen newbie, this recipe is your ticket to creating a homemade meal that’s both nutritious and satisfying. Let’s explore why this is the ultimate egg fried rice recipe!

Why You’ll Love This Recipe

  • Quick and Easy: Perfect for weeknight dinners when time is tight, this dish comes together in just 15 minutes!
  • Flavor Explosion: The combination of soy sauce, sesame oil, and fresh vegetables creates a mouthwatering medley of tastes.
  • Nutritious Ingredients: Packed with colorful veggies, this recipe is not only tasty but also a great way to sneak in essential nutrients.
  • Versatile: Customize with your favorite protein like tofu or chicken, or keep it plant-based for a lighter option.
  • Perfect for Meal Prep: Make a big batch and enjoy leftovers for lunch or dinner throughout the week.

Ingredient Breakdown

Here’s what you’ll need to create your delicious 15-minute veggie egg fried rice:

  • 2 cups cooked rice: Use day-old rice for the best texture and to prevent it from becoming mushy.
  • 2 large eggs: Lightly beaten for fluffy egg additions that enhance the dish.
  • 1 cup carrots: Finely diced for sweetness and crunch.
  • 1 cup green peas: Fresh or frozen, they add a pop of color and nutrition.
  • 1 cup bell peppers: Use a mix for vibrant colors and flavors.
  • 2 stalks green onions: Thinly sliced for a fresh, mild onion flavor.
  • 2 cloves garlic: Minced to bring out aromatic flavors.
  • 2 tablespoons soy sauce: Adjust to taste for the perfect umami kick.
  • 1 tablespoon sesame oil: Used for cooking and adds a nutty flavor.
  • Salt and pepper to taste: For seasoning.
  • 1/2 cup frozen corn (optional): For added sweetness and texture.
  • 1 teaspoon chili flakes (optional): For a spicy kick.
  • 1 cup tofu or cooked chicken (optional): For protein boost, making it more filling.

Cooking Instructions

Now, let’s get cooking! Follow these simple steps for a delightful dish:

  1. In a large wok or skillet, heat the sesame oil over medium-high heat.
  2. Add the minced garlic and sauté for about 30 seconds until fragrant.
  3. Stir in the carrots and cook for 2-3 minutes until they start to soften.
  4. Add the bell peppers, green peas, and corn; stir fry for another 2-3 minutes.
  5. Push the vegetables to one side, pour in the beaten eggs on the other side, and scramble until just set.
  6. Mix the eggs with the veggies, then add the cooked rice to the pan.
  7. Drizzle the soy sauce over the rice, season with salt and pepper, and toss everything together until well combined and heated through.
  8. Finally, stir in the green onions and chili flakes if using, and serve hot!

Pro Tips for Perfect Veggie Egg Fried Rice

Side view of a delicious bowl of veggie egg fried rice garnished with green onions and sesame seeds.
  • Use Day-Old Rice: This prevents clumping and ensures a fluffy texture. Fresh rice may become mushy.
  • Don’t Overcook the Eggs: Scramble just until set; they should remain fluffy and soft.
  • Customize Your Veggies: Feel free to use any vegetables you have on hand—zucchini, broccoli, or snap peas work great!
  • Adjust Flavor to Your Liking: Taste and tweak the soy sauce and seasoning as per your preference.
  • Use High Heat: Stir frying on high heat helps to achieve that signature fried rice taste.
  • Garnish for Extra Flavor: Add sesame seeds or a drizzle of sesame oil before serving for an extra flavor boost.
  • Make It Spicy: Increase chili flakes or add sriracha for a fiery kick.
  • Keep It Vegan: Skip the eggs and add more tofu or chickpeas for protein.

Common Mistakes and Troubleshooting

  • Rice Too Sticky: Ensure you use day-old rice, and don’t overcrowd the pan while cooking.
  • Eggs Overcooked: Cook scrambled eggs quickly before mixing them in to keep them tender.
  • Flavor Lacking: Don’t hesitate to adjust soy sauce, salt, and pepper to enhance the flavor.
  • Too Dry: If your fried rice is too dry, add a splash more soy sauce or a little water while cooking.

Delicious Variations

Spice things up with these tasty variations:

  • Thai Basil Fried Rice: Add fresh Thai basil for a fragrant twist.
  • Sweet and Sour Fried Rice: Incorporate pineapple chunks for a sweet and tangy flavor.
  • Spicy Kimchi Fried Rice: Mix in chopped kimchi for an umami-packed, spicy version.
  • Seafood Fried Rice: Toss in shrimp or scallops for a delightful seafood twist.

Storage and Make-Ahead Instructions

This veggie egg fried rice is perfect for meal prep! Here’s how to store and reheat:

  • Refrigerate: Store in an airtight container in the fridge for up to 3 days.
  • Freeze: For longer storage, freeze in portions for up to 2 months. Thaw overnight in the fridge before reheating.
  • Reheat: Use a skillet over medium heat, adding a splash of water or soy sauce to keep it moist.

Frequently Asked Questions

  • Can I use fresh rice instead of day-old rice?
    Yes, but it may become mushy. Be sure to cool it quickly on a baking sheet to reduce moisture.
  • How can I make this dish vegetarian?
    Simply omit any meat and use tofu or additional vegetables for protein.
  • What can I use instead of soy sauce?
    Try tamari for a gluten-free option or coconut aminos for a sweeter alternative.
  • Can I add more vegetables?
    Absolutely! Feel free to add any vegetables you love or have on hand.
  • Is this recipe kid-friendly?
    Yes! Adjust the spice level to suit your kids’ taste, and they’ll enjoy this colorful dish.
  • How can I make it spicier?
    Increase the amount of chili flakes or add sriracha to your serving.
  • What proteins can I add?
    Chicken, shrimp, or even chickpeas work great in this fried rice.
  • Can this be served cold?
    Yes! It can be enjoyed cold as a salad or a snack.

Nutritional Tips and Dietary Adaptations

This recipe is not only delicious but can also cater to various dietary needs:

  • Gluten-Free: Use gluten-free soy sauce or tamari to suit your dietary needs.
  • Low-Carb: Substitute rice with cauliflower rice for a low-carb option.
  • High-Protein: Add more tofu or chicken to boost protein content.
  • Vegan: Skip the eggs and use plant-based proteins to keep it vegan.

Essential Equipment Recommendations

To make your cooking experience smooth and enjoyable, here’s what you’ll need:

  • Wok or Large Skillet: Ideal for stir-frying and achieving that perfect texture.
  • Spatula: For easy mixing and flipping of ingredients.
  • Measuring Cups and Spoons: To ensure precision in your ingredients.
  • Knife and Cutting Board: For quick prep of your fresh veggies.

Serving Suggestions

This veggie egg fried rice is versatile and can be served in various ways:

  • Pair it with a side salad for a refreshing contrast.
  • Serve alongside your favorite protein for a complete meal.
  • Top with additional green onions or sesame seeds for added crunch and flavor.
  • Enjoy it as a standalone dish for a light lunch or dinner option.

In conclusion, creating this zesty 15-minute veggie egg fried rice is not just about cooking; it’s about enjoying the vibrant flavors and the joy of making healthy meals fun and exciting. So grab your ingredients, unleash your inner chef, and let the flavor explosion begin!

Easy 15-Minute Veggie Egg Fried Rice Recipe for Busy Food Lovers

Prep Time 5 minutes
Cook Time 10 minutes
Total Time 15 minutes
Servings 4 servings
Calories 350
A quick and delicious fried rice recipe packed with colorful vegetables and protein, perfect for busy days.

Ingredients

Rice and grains

  • 2 cups cooked rice (Use day-old rice for best texture)

Eggs

  • 2 large large eggs (Lightly beaten)

Vegetables

  • 1 cup carrots (Finely diced)
  • 1 cup green peas (Fresh or frozen)
  • 1 cup bell peppers (Colorful varieties)
  • 2 stalks green onions (Thinly sliced)

Aromatics and sauces

  • 2 cloves garlic (Minced)
  • 2 tablespoons soy sauce (Adjust to taste)
  • 1 tablespoon sesame oil (For cooking)
  • to taste salt
  • to taste pepper

Optional ingredients

  • 1/2 cup frozen corn ((Optional))
  • 1 teaspoon chili flakes (Optional, for heat)
  • 1 cup tofu or cooked chicken (Optional, for protein)

Instructions 

  • Heat sesame oil in a wok or large skillet over medium-high heat.
  • Add garlic and cook for 30 seconds until fragrant.
  • Push ingredients to the side, scramble eggs in the pan, then mix with vegetables and rice.
  • Stir in soy sauce, salt, pepper, and optional chili flakes or corn. Add protein if using.
  • Cook for another 2-3 minutes, then serve hot garnished with sliced green onions.

Notes

Use day-old rice for best texture and flavor. Feel free to customize with your favorite proteins and vegetables.
Calories: 350kcal
Cost: $10
Course: Main Course
Cuisine: Asian
Keyword: Fried Rice

Unleash Your Culinary Creativity with Chickpea Flour Flatbreads!

Welcome to the vibrant world of healthy cooking, where flavor and nutrition unite in delightful harmony! If you’re looking for a quick, easy, and utterly delicious way to elevate your meals, you’ve come to the right place. In this definitive guide, we’ll dive into the magical realm of chickpea flour flatbreads. These versatile, gluten-free creations not only serve as a fantastic base for wraps and dips but also add a protein-packed punch to any meal. Let’s get started!

Why You’ll Love This Recipe

This isn’t just any flatbread recipe; it’s your ticket to culinary adventure! Here are five compelling reasons why you’ll adore making these chickpea flour flatbreads:

  • Quick and Easy: With just a few simple ingredients, you can whip up these flatbreads in under 30 minutes!
  • Gluten-Free Goodness: Made with chickpea flour, these flatbreads are perfect for anyone with gluten sensitivities.
  • Nutritious and Filling: Chickpea flour is loaded with protein and fiber, keeping you satisfied and energized.
  • Versatile Base: Use these flatbreads for wraps, pizzas, or as a side for soups and stews.
  • Customizable Flavors: Add herbs, spices, or toppings to personalize your flatbreads to your liking!

Ingredients You’ll Need

Gather these pantry staples to get started on your chickpea flour flatbread journey:

  • 2/3 cup flour (80g): You can use regular all-purpose flour or gluten-free flour here for a different texture.
  • 1/3 cup chickpea flour (35g): Also known as gram or besan flour, this is the star of the show!
  • 1 tsp olive oil: Adds richness and helps with browning.
  • Scant 1/4 cup warm water: Helps to bind your dough together.
  • Pinch of salt: Enhances the flavors.
  • 1 Tbs Nigella (Kalonji) seeds (Optional): For a unique flavor twist!

Step-by-Step Instructions

Juicy vegan chickpea flour flatbreads displayed enticingly, showing texture and color.

Follow these easy steps to create your delicious chickpea flour flatbreads:

  1. In a mixing bowl, combine the flours and salt.
  2. Make a well in the center, then gradually add the warm water while mixing until a soft dough forms.
  3. Knead the dough lightly, adding half the olive oil, and adjust with more water or flour as needed until pliable.
  4. Let the dough rest for 10-15 minutes to allow the flavors to meld.
  5. Heat a non-stick frying pan over medium heat.
  6. Divide the dough into golf ball-sized portions, then flatten into discs using a rolling pin or your hands.
  7. If using, push the Nigella seeds into the surface of the dough.
  8. Add a tiny bit of olive oil to the pan, then cook each disc until bubbles form, about 2-3 minutes per side.
  9. Keep warm on a plate while you cook the remaining discs.

Pro Tips for Perfect Chickpea Flour Flatbreads

Want to take your flatbread game to the next level? Here are some expert insights:

  • Resting the Dough: Allowing the dough to rest helps it become more pliable and easier to roll.
  • Adjusting Consistency: If your dough feels too sticky, add a bit more flour; if it’s too dry, a splash of water will do the trick!
  • Non-Stick Pan: Using a non-stick pan or a well-seasoned skillet ensures your flatbreads cook evenly without sticking.
  • Experiment with Flavors: Mix in spices like cumin or garlic powder for added depth.
  • Cook on Medium Heat: Cooking on too high heat can burn the flatbreads before they cook through, so keep it moderate!
  • Store Properly: Keep cooked flatbreads in an airtight container to maintain softness.
  • Make Ahead: Prepare the dough in advance and refrigerate it for quick meals later.

Common Mistakes and Troubleshooting

Even the best chefs make mistakes! Here are some common pitfalls and how to avoid them:

  • Dough Too Sticky: If your dough is overly sticky, gradually add more flour during the kneading stage.
  • Flatbreads Too Thick: Roll the dough thinly for a light and airy texture; thick flatbreads can turn out heavy.
  • Not Resting the Dough: Skipping the resting period can lead to tough flatbreads; give them time to relax!
  • Cooking Temperature: If your flatbreads are burning, lower the heat and give them more time to cook through.

Variations to Try

These flatbreads are incredibly versatile! Here are a few variations to mix things up:

  • Herbed Flatbreads: Add dried herbs like oregano or rosemary to the dough for an aromatic twist.
  • Spicy Chickpea Flatbreads: Incorporate red pepper flakes or cayenne for a spicy kick.
  • Cheesy Flatbreads: Mix in nutritional yeast for a cheesy flavor without dairy.
  • Stuffed Flatbreads: Fill the dough with sautéed veggies or cheese before cooking for a delightful surprise!

Storage and Make-Ahead Instructions

Want to enjoy these flatbreads later? Here’s how to store and prepare them in advance:

  • Refrigerate: Store cooked flatbreads in an airtight container in the fridge for up to 3 days.
  • Freeze: Freeze flatbreads between layers of parchment paper for up to a month. Reheat on a skillet before serving.
  • Dough in Advance: Prepare the dough and refrigerate it for up to 2 days. Bring to room temperature before rolling out.

Frequently Asked Questions (FAQs)

Got questions? We’ve got answers! Here are the most commonly asked questions about chickpea flour flatbreads:

  • Can I use other types of flour? Yes! Experiment with all-purpose or gluten-free blends for different textures.
  • Are these flatbreads suitable for meal prep? Absolutely! They store well and can be made ahead of time.
  • What can I serve with these flatbreads? They pair wonderfully with hummus, dips, or as a side for soups.
  • Can I make these flatbreads nut-free? Yes, just ensure any additional ingredients are nut-free.
  • How do I reheat leftover flatbreads? Simply warm them in a skillet or microwave for a few seconds.
  • Can I add toppings before cooking? Yes, feel free to top with seeds or herbs before cooking for extra flavor!
  • Is chickpea flour nutritious? Yes! It’s high in protein, fiber, and essential vitamins.
  • How do I know when my flatbreads are done? They should be lightly browned with bubbles forming on the surface.

Nutrition Tips and Dietary Adaptations

Want to maximize the health benefits of your flatbreads? Consider these tips:

  • Protein Boost: Pair with a protein-rich dip like hummus to create a well-rounded meal.
  • Add Veggies: Serve with a side of roasted or fresh vegetables for extra nutrients.
  • Healthy Fats: Drizzle with olive oil or avocado for healthy fat sources.

Equipment Recommendations

Here’s what you’ll need to whip up your chickpea flour flatbreads:

  • Mixing Bowl: A large bowl for combining your ingredients.
  • Non-Stick Skillet: Essential for evenly cooking the flatbreads without sticking.
  • Rolling Pin: For rolling out your dough to the perfect thickness.
  • Measuring Cups: Accurate measurements ensure consistent results.

Serving Suggestions

Ready to serve your delicious chickpea flour flatbreads? Try these serving ideas:

  • Wraps: Use as a base for wraps filled with your favorite veggies and proteins.
  • Dips: Serve with hummus, tzatziki, or guacamole for a delightful snack.
  • Mini Pizzas: Top with sauce and cheese for quick mini pizzas!
  • As a Side: Pair with soups, salads, or stews for a hearty meal.

And there you have it! A comprehensive guide to making delightful chickpea flour flatbreads that are not just healthy but also a joy to prepare. With this recipe, you’re well on your way to becoming a kitchen superstar! So roll up your sleeves, get creative, and enjoy the process of cooking. Happy baking!

Easy Vegan Chickpea Flour Flatbreads

Prep Time 10 minutes
Cook Time 15 minutes
Total Time 25 minutes
Servings 4 pieces
Calories 180
Delicious and simple vegan flatbreads made with chickpea and regular flour, perfect for a quick snack or meal.

Ingredients

Flours & Salt

  • 2/3 cup flour (or gluten-free flour)
  • 1/3 cup chickpea flour (gram or besan)
  • 1 tsp olive oil
  • scant 1/4 cup warm water
  • pinch salt
  • 1 Tbs tablespoon Nigella (Kalonji) seeds (Optional)

Instructions 

  • Mix the flours and salt together.
  • Make a well, then slowly add water and mix until a soft dough forms.
  • Knead the dough, add half the oil, then knead more, adjusting with water or flour as needed.
  • Let the dough rest for 10-15 minutes.
  • Divide into balls, flatten into discs, push seeds into dough, then cook on a heated pan until bubbling and golden.
  • Flip and cook until golden, then keep warm and repeat with remaining dough.

Notes

You can use gluten-free flour for a vegan, allergen-friendly option.
Calories: 180kcal
Cost: $4
Course: Main, Snack
Cuisine: Vegan
Keyword: chickpea, Flatbread

Welcome to the World of Chickpea Flour Naan!

Are you ready to dive into a delicious culinary adventure? Chickpea Flour Naan is not just your average flatbread; it’s a vibrant, gluten-free option that’s perfect for any occasion. In just 10 minutes, you can whip up this delightful vegan flatbread that not only satisfies your cravings but also packs a nutritional punch. Let’s explore the wonders of chickpea flour naan and why it deserves a spot in your kitchen!

Why You’ll Adore Chickpea Flour Naan

This isn’t just about making naan; it’s about embracing a healthier lifestyle without sacrificing taste. Here are some compelling reasons why you’ll fall in love with this recipe:

  • Quick and Easy: With just 10 minutes of prep time, you can have fresh, warm naan on your table. Perfect for busy weeknights!
  • Gluten-Free Goodness: Made with chickpea flour, this naan is naturally gluten-free, catering to those with dietary restrictions.
  • Nutritious and Wholesome: Chickpea flour is rich in protein and fiber, making this naan a nutritious choice that fuels your body.
  • Versatile Flavor: The addition of garlic powder and lemon juice gives this naan a unique twist, perfect for pairing with a variety of dishes.
  • Effortless Storage: Store leftovers in an airtight container for up to three days, allowing you to enjoy this delightful flatbread later!

Chickpea Flour Naan Ingredients

Let’s break down the key ingredients that make this naan so special. Each component plays a vital role in creating the perfect texture and flavor!

  • 1 cup Chickpea Flour: The star of the show, providing a nutty flavor and essential structure. It’s gluten-free and packed with protein.
  • ¾ cup Nondairy Milk: Almond or cashew milk are great alternatives to add moisture and softness to the naan.
  • 1 tbsp Lemon Juice: Acts as a curdling agent for the milk, creating a tangy flavor that enhances the naan.
  • 2 tbsp Whole Psyllium Husks: Helps bind the dough and retain moisture, ensuring your naan is soft and delightful.
  • 1 tbsp Baking Powder: Ensures lightness in texture without using yeast, making it quick and easy to prepare.
  • ½ tsp Baking Soda: Works alongside baking powder for a fluffy naan that rises beautifully.
  • ½ tsp Salt: Enhances the overall flavor beautifully, bringing all the ingredients together.
  • 1 tsp Garlic Powder: For a flavorful twist, adding depth to each bite.
  • 1 tbsp Vegetable Oil: Any neutral oil works well to keep the naan from sticking to the skillet.
  • 1 tbsp Nonstick Cooking Spray: To keep your skillet non-stick, ensuring perfect cooking every time!

Step-by-Step Instructions for Your Chickpea Flour Naan

Side angle of a fluffy Chickpea Flour Naan, showcasing its texture and color.

Now that we have our ingredients ready, let’s jump into the fun part—making the naan! Follow these simple steps for perfect results:

  1. In a mixing bowl, combine the chickpea flour, baking powder, baking soda, salt, and garlic powder. Stir well.
  2. Add the nondairy milk and lemon juice to the dry ingredients. Mix until a smooth dough forms.
  3. Incorporate the psyllium husks and vegetable oil into the dough, kneading briefly until well mixed.
  4. Divide the dough into equal portions and roll each piece into a ball.
  5. Heat a dry skillet over medium-high heat. Flatten each dough ball into a round shape.
  6. Cook the naan in the skillet for about 2-3 minutes on each side until golden brown and cooked through.
  7. Remove from heat and keep warm under a towel while you cook the remaining naan.
  8. Serve immediately, or store in an airtight container for later!

Storage Tips for Chickpea Flour Naan

Want to enjoy your naan later? Here’s how to keep it fresh:

  • Airtight Container: Store cooled naan in an airtight container at room temperature for up to 3 days.
  • Freezing: For longer storage, wrap naan in plastic wrap and freeze for up to 3 months. Thaw and reheat on a skillet or in the oven.

Chickpea Flour Naan Variations

Feeling adventurous? Here are some fun variations to try with your naan:

  • Herb-Infused Naan: Add chopped fresh herbs like cilantro or parsley for a burst of fresh flavor.
  • Spiced Naan: Incorporate spices like cumin or coriander into the dough for a unique twist.
  • Cheesy Naan: Mix in nutritional yeast or vegan cheese for a cheesy flavor that tantalizes the taste buds.
  • Sweet Naan: Add a touch of maple syrup or cinnamon for a sweet version perfect for breakfast!

Expert Tips for Perfect Chickpea Flour Naan

To help you achieve the best results, here are some expert tips to consider:

  • Check Your Flour: Make sure to use fresh chickpea flour for the best flavor and texture.
  • Adjust Consistency: If the dough is too dry, add a splash of water or more nondairy milk. If too wet, add a bit more chickpea flour.
  • Resting Time: Allowing the dough to rest for a few minutes helps enhance the texture of the naan.
  • Skillet Temperature: Ensure your skillet is hot enough before cooking. This helps achieve those lovely charred spots.
  • Cook One at a Time: To ensure each naan is cooked perfectly, focus on one at a time instead of overcrowding the skillet.
  • Keep Warm: Cover cooked naan with a towel to keep them warm and soft while you finish cooking.
  • Experiment with Oils: Try different oils like coconut or avocado for varied flavors.
  • Pair with Dips: Serve with hummus, salsa, or yogurt dip for a delightful snack or appetizer.

Common Mistakes and Troubleshooting

If things don’t go as planned, don’t worry! Here are some common mistakes to watch out for:

  • Dry Dough: If your dough is crumbly, you may need to add more liquid gradually until it comes together.
  • Sticky Dough: If the dough is too sticky, incorporate a bit more chickpea flour to help with handling.
  • Burnt Naan: If your naan is burning, reduce the heat slightly and cook a bit longer to ensure it’s cooked through.
  • Flat Naan: If your naan isn’t puffing up, ensure your baking powder is fresh and that the skillet is hot enough.

Comprehensive FAQs for Chickpea Flour Naan

Got questions? We’ve got answers! Here are some frequently asked questions about chickpea flour naan:

  • Can I use regular flour instead of chickpea flour? While this recipe is designed for chickpea flour, you can experiment with other flours, keeping in mind that it may alter the texture and flavor.
  • Is it possible to make naan without oil? Yes! You can omit the oil, but it helps with moisture and texture.
  • How do I know when the naan is cooked? Look for golden brown spots and a fluffy texture when you flip them over.
  • Can I make this recipe nut-free? Absolutely! Use oat milk or another nut-free milk alternative.
  • What should I serve with naan? Naan pairs perfectly with curries, soups, or as a base for wraps!
  • Can I make a larger batch? Yes! Just double or triple the ingredients as needed, ensuring even cooking time.
  • How do I reheat leftover naan? Reheat in a dry skillet over medium heat or warm it in the oven wrapped in foil.
  • Is it safe to eat raw chickpea flour? It’s best to cook chickpea flour to avoid any potential digestive issues.

Nutrition Tips and Dietary Adaptations

Here are some tips to make this recipe fit various dietary needs:

  • Protein Boost: Add a scoop of protein powder to the dough for a protein-packed version.
  • Low-Carb Option: Substitute with almond flour for a lower-carb alternative.
  • Fiber Upgrade: Incorporate ground flaxseed for added fiber and omega-3 fatty acids.
  • Allergy Considerations: Ensure all ingredients are free from allergens for those with sensitivities.

Equipment Recommendations

To make your chickpea flour naan experience seamless, here’s what you’ll need:

  • Mixing Bowl: A large bowl for combining ingredients effectively.
  • Skillet: A non-stick or cast-iron skillet works best for cooking naan.
  • Spatula: To flip the naan without damaging its shape.
  • Measuring Cups and Spoons: For precise ingredient measurements, ensuring consistent results.

Serving Suggestions

Your chickpea flour naan is versatile and can be enjoyed in various ways:

  • As a Wrap: Fill with roasted veggies, hummus, or salad for a delicious wrap.
  • With Dips: Serve alongside your favorite dips like baba ganoush or tzatziki.
  • As a Side: Pair with curries, soups, or stews for a hearty meal.
  • Breakfast Treat: Top with avocado and a sprinkle of salt for a nutritious breakfast option!

Conclusion: Your Chickpea Flour Naan Adventure Awaits!

Now that you’re equipped with the knowledge and skills to create delicious chickpea flour naan, it’s time to get cooking! Embrace the joy of healthy eating with this quick, easy, and flavorful recipe. Remember, the kitchen is your playground—experiment, have fun, and enjoy every bite of your flavorful creations. Happy cooking!

Chickpea Flour Naan – Easy Vegan Flatbread in 10 Minutes

Prep Time 5 minutes
Cook Time 5 minutes
Total Time 10 minutes
Servings 4 pieces
Calories 150
Enjoy quick and delicious vegan naan made with chickpea flour, perfect for a healthy snack or meal accompaniment.

Ingredients

Dry ingredients

  • 1 cup Chickpea Flour (The star of the show, providing a nutty flavor and essential structure.)
  • ¾ cup Nondairy Milk (Almond or cashew milk are great alternatives.)
  • 1 tbsp Lemon Juice (Acts as a curdling agent for the milk.)
  • 2 tbsp Whole Psyllium Husks (Helps bind the dough and retain moisture.)
  • 1 tsp Baking Powder (Ensures lightness in texture without yeast.)
  • ½ tsp Baking Soda (Works alongside baking powder for a fluffy naan.)
  • ½ tsp Salt (Enhances the overall flavor beautifully.)
  • 1 tsp Garlic Powder (For a flavorful twist.)
  • 1 tbsp Vegetable Oil (Any neutral oil works well.)
  • 1 tbsp Nonstick Cooking Spray (To keep your skillet non-stick.)

Instructions 

  • Mix chickpea flour, baking powder, baking soda, salt, and garlic powder in a bowl.
  • Add lemon juice to nondairy milk and let sit for a minute, then combine with dry ingredients along with oil and psyllium husks. Mix until a smooth dough forms.
  • Divide dough into 4 balls and flatten into round discs.
  • Heat a skillet with nonstick spray over medium heat. Cook each naan for 2-3 minutes per side until golden brown.
  • Serve warm with your favorite toppings or dips.

Notes

Ensure the dough is well mixed for the best texture, and cook on medium heat to prevent burning.
Calories: 150kcal
Cost: $8
Course: Flatbread
Cuisine: Vegan
Keyword: Chickpea Flour

Discover the Joy of Baking: Grain-Free Banana Zucchini Bread

Welcome to the world of baking where health meets flavor! Today, we’re diving into a recipe that showcases the best of both worlds: our Grain-Free Banana Zucchini Bread. This deliciously moist bread is not just a treat for your taste buds but also a powerhouse of nutrients, perfect for breakfast or a sweet snack. With ripe bananas, fresh zucchini, and a sprinkle of chocolate chips, this bread is a guilt-free indulgence that you won’t want to miss. Let’s get started!

Why You’ll Love This Recipe

This recipe isn’t just another banana bread. Here’s why you’ll absolutely adore it:

  • Nutritious Ingredients: Packed with vitamins and healthy fats, this bread keeps you energized throughout your day.
  • Grain-Free Goodness: Made with almond meal and powdered peanut butter, this recipe is perfect for those following a gluten-free or grain-free diet.
  • Moist & Flavorful: The combination of bananas and zucchini ensures a moist texture without any added sugar.
  • Easy to Make: With simple steps and minimal prep time, you’ll have a delicious loaf ready in no time.
  • Versatile Treat: Whether you enjoy it for breakfast, a snack, or dessert, this bread fits into any part of your day.

Ingredients Breakdown

Let’s take a closer look at what you’ll need to make this delightful banana zucchini bread:

  • 2 extra ripe bananas (~225g, heavily spotted peels): The riper the bananas, the sweeter the bread. Look for bananas that are covered in brown spots.
  • 1 cup shredded zucchini: Squeeze out excess moisture to prevent a soggy loaf. Fresh zucchini adds moisture and nutrients.
  • 1 large egg (room temperature): Acts as a binder and provides structure.
  • 1/4 cup honey or maple syrup: Natural sweetener that enhances flavor without overpowering the bread.
  • 2 tsp vanilla extract: Pure vanilla extract adds depth and sweetness.
  • 1 1/2 cups almond meal (also called almond flour): A grain-free flour that gives the bread a lovely texture and nutty flavor.
  • 1/2 cup powdered peanut butter (PB2 or similar): Adds protein and a subtle peanut flavor without the oil of traditional peanut butter.
  • 1 tsp baking soda: Essential for leavening the bread.
  • 1 tsp ground cinnamon: Spices up the flavor profile with warmth.
  • 1/2 tsp ground nutmeg: Freshly ground nutmeg adds a lovely aromatic touch.
  • 1/4 tsp salt: Balances the sweetness and enhances overall flavor.
  • 1/3 cup chocolate chips: Choose dairy-free if needed for a vegan option. Adds a delightful melty texture.
  • 3 tbsp crushed pecans (optional): For a crunchy topping that adds healthy fats and an extra layer of flavor.
  • 2 tbsp extra chocolate chips (optional): Because who doesn’t love more chocolate?

Step-by-Step Instructions

Sliced Grain-Free Banana Zucchini Bread displaying a soft texture and chocolatey bits, set against a simple background.

Ready to bake? Follow these easy steps for a perfect result:

  1. Prepare the pan: Preheat your oven to 350°F (175°C). Line an 8×4-inch loaf pan with parchment paper, leaving overhang on the sides for easy removal. Lightly spray with cooking spray.
  2. Squeeze the zucchini: After shredding, place the zucchini in a clean kitchen towel and squeeze hard to extract excess liquid. This crucial step prevents soggy bread.
  3. Blend wet ingredients: In a food processor or electric mixer, combine bananas, squeezed zucchini, egg, honey, and vanilla extract. Blend on high for 30-45 seconds until smooth and fluffy.
  4. Mix dry ingredients: In a large bowl, whisk together almond meal, powdered peanut butter, baking soda, cinnamon, nutmeg, and salt. Break up any clumps for even distribution.
  5. Combine wet and dry: Pour the wet mixture into the dry ingredients. Gently stir with a spatula until just combined—small lumps are okay!
  6. Fill the pan: Transfer your batter to the prepared loaf pan and smooth the top. Sprinkle crushed pecans and extra chocolate chips on top, gently pressing them in.
  7. Bake: Place in the oven and bake for 45-55 minutes, or until a toothpick inserted in the center comes out with a few moist crumbs. The top should be golden brown.
  8. Cool: Allow the bread to cool in the pan for 30 minutes before lifting it out using the parchment paper. Let it cool completely on a wire rack before slicing.

Pro Tips for Perfect Banana Zucchini Bread

Want to ensure your banana zucchini bread is a hit? Check out these expert tips:

  • Choose the right bananas: The more brown spots, the better! They provide natural sweetness and flavor.
  • Don’t skip squeezing the zucchini: This step is crucial for avoiding a soggy loaf.
  • Use room temperature egg: It helps the batter mix more evenly, creating a better texture.
  • Mix gently: Overmixing can lead to dense bread. Stir until just combined for the best results.
  • Check for doneness: Ovens vary, so start checking your bread at the 45-minute mark.
  • Let it cool: Patience is key! Let the bread cool completely before slicing for the best texture.
  • Try different add-ins: Experiment with nuts, seeds, or dried fruits to customize your bread.
  • Store properly: Keep the bread in an airtight container to maintain freshness.

Common Mistakes and Troubleshooting

Even the best bakers encounter hiccups. Here are some common mistakes and how to fix them:

  • Soggy bread: Most often caused by excess moisture in the zucchini. Always squeeze the liquid out!
  • Dense texture: Usually due to overmixing. Stir gently until just combined.
  • Not sweet enough: If your bananas aren’t ripe, consider adding a bit more honey or maple syrup.
  • Burnt edges: If your oven runs hot, consider using a lower temperature and covering the top with foil if it browns too quickly.

Delicious Variations to Try

Feeling adventurous? Here are some fun variations to switch things up:

  • Chocolate Chip Peanut Butter Swirl: Add dollops of peanut butter to the batter and swirl it in before baking.
  • Nut-Free Option: Substitute almond meal with oat flour or a nut-free flour blend.
  • Spiced Pumpkin Version: Replace zucchini with pumpkin puree for a fall-inspired twist.
  • Berry Blast: Fold in fresh or frozen berries for a fruity burst of flavor.

Storage and Make-Ahead Instructions

Want to keep your banana zucchini bread fresh? Here’s how:

  • Room Temperature: Store in an airtight container for up to 3 days.
  • Refrigerator: For longer storage, keep in the fridge for up to a week.
  • Freezing: Wrap slices in plastic wrap and freeze for up to 3 months. Thaw overnight in the fridge or at room temperature.

Nutritional Tips and Dietary Adaptations

This banana zucchini bread is not just delicious but also nutritious! Here are some dietary tips:

  • Protein Boost: Add protein powder to the batter for an extra protein punch.
  • Dairy-Free Option: Use dairy-free chocolate chips and nut milk for a completely dairy-free treat.
  • Low-Sugar Alternative: Replace honey with a sugar substitute like erythritol for a lower-calorie version.

Equipment Recommendations

To make your baking experience smooth and enjoyable, here’s what you’ll need:

  • Food Processor or Mixer: For blending the wet ingredients smoothly.
  • Loaf Pan: An 8×4-inch pan is perfect for this recipe.
  • Spatula: For folding and mixing without overworking the batter.
  • Wire Rack: Essential for cooling your bread evenly.

Serving Suggestions

Enjoy your banana zucchini bread in fun ways:

  • Spreadable Goodness: Top slices with almond butter or cream cheese for a delicious treat.
  • Breakfast Toast: Serve it warm with a sprinkle of cinnamon and a drizzle of honey for a delightful breakfast.
  • Snack Time Delight: Pair with a cup of tea or coffee for the perfect afternoon snack.

Frequently Asked Questions

Got questions? We’ve got answers! Here are some commonly asked questions about this recipe:

  • Can I use frozen zucchini?: Yes! Just make sure to thaw and squeeze out excess moisture.
  • What can I substitute for almond meal?: You can use coconut flour or oat flour, but adjustments to liquid may be needed.
  • Can I make this vegan?: Absolutely! Replace the egg with a flax egg (1 tbsp ground flaxseed mixed with 2.5 tbsp water).
  • How do I know when it’s done baking?: A toothpick inserted in the center should come out with a few moist crumbs, not wet batter.
  • What if I don’t have powdered peanut butter?: You can use regular peanut butter, but it will alter the texture slightly.
  • Can I add nuts?: Yes! Chopped walnuts or pecans make a fantastic addition.
  • Is this bread gluten-free?: Yes! As long as all your ingredients are certified gluten-free, it is safe for those with gluten sensitivities.
  • How should I store leftovers?: Keep in an airtight container at room temperature or refrigerate for up to a week.

Final Thoughts

There you have it! This Grain-Free Banana Zucchini Bread is not just a recipe; it’s a celebration of health, flavor, and creativity in the kitchen. With its moist texture and delicious taste, it’s sure to become a staple in your home. So gather your ingredients, preheat that oven, and get ready to enjoy a delightful baking experience that’s as fun as it is flavorful. Happy baking!

Grain-Free Banana Zucchini Bread

Prep Time 15 minutes
Cook Time 50 minutes
Total Time 1 hour 5 minutes
Servings 8 slices
Calories 250
A moist, flavorful banana zucchini bread that's grain-free and perfect for a healthy snack or breakfast.

Ingredients

Wet ingredients

  • 2 pieces extra ripe bananas (~225g, heavily spotted peels)
  • 1 cup shredded zucchini (squeeze out excess moisture)
  • 1 large egg (room temperature)
  • 1/4 cup honey (can substitute maple syrup)
  • 2 tsp vanilla extract (pure extract recommended)

Dry ingredients

  • 1 1/2 cups almond meal (also called almond flour)
  • 1/2 cup powdered peanut butter (PB2 or similar brand)
  • 1 tsp baking soda
  • 1 tsp ground cinnamon
  • 1/2 tsp ground nutmeg (freshly ground if possible)
  • 1/4 tsp salt
  • 1/3 cup chocolate chips (use dairy-free if needed)
  • 3 tbsp crushed pecans (optional, for topping)
  • 2 tbsp extra chocolate chips (optional, for topping)

Instructions 

  • Preheat oven to 350°F (175°C). Line a loaf pan with parchment and spray lightly.
  • Squeeze excess moisture from shredded zucchini.
  • Blend bananas, zucchini, egg, honey, and vanilla until smooth.
  • Mix dry ingredients, then fold wet mixture into dry. Stir in chocolate chips.
  • Pour batter into pan, top with pecans and extra chips, then bake 45-55 mins.
  • Cool in pan 30 mins, then cool completely before slicing.

Notes

Ensure zucchini is well squeezed to prevent sogginess.
Calories: 250kcal
Cost: $15
Course: Breakfast, Snack
Cuisine: American
Keyword: Banana, Grain-Free, Zucchini

Unleashing the Zest: Why Flourless Lemon Yogurt Cake is Your New Favorite Dessert

Welcome to the vibrant world of **Flourless Lemon Yogurt Cake**, where every bite bursts with sunny citrus goodness! If you’ve ever thought that healthy desserts lack flavor or excitement, then hold on tight—this cake is about to change your mind. Imagine a moist, zesty cake that not only satisfies your sweet tooth but also nourishes your body. Made with wholesome ingredients like **Greek yogurt** and **almond flour**, this recipe is perfect for those seeking a gluten-free indulgence without sacrificing taste.

In this article, we’re diving deep into everything you need to know about crafting the ultimate flourless lemon yogurt cake. From ingredient breakdowns and pro tips to common mistakes and serving suggestions, we’ve got you covered. Let’s get started!

Why You’ll Love This Recipe

This cake isn’t just a treat; it’s a celebration of flavor and health. Here are five compelling reasons to fall in love with this **lemon yogurt cake**:

  • Gluten-Free Delight: Made with **almond flour**, this cake is naturally gluten-free, making it a great choice for those with dietary restrictions.
  • Moisture Galore: The use of **Greek yogurt** not only adds protein but also ensures the cake remains incredibly moist and tender.
  • Natural Sweetness: With **granulated sugar** and **honey**, this recipe strikes the perfect balance of sweetness without being overwhelming.
  • Quick and Easy: This cake comes together in just about an hour, perfect for last-minute gatherings or a weekend treat.
  • Versatile and Adaptable: Feel free to experiment with flavors and add-ins like berries or nuts to create your own signature version!

Ingredient Breakdown: What You Need

Before you embark on this baking adventure, let’s look at the essential ingredients that make this cake shine:

  • 2 cups Greek yogurt (plain, full-fat): The star ingredient for creaminess and tang.
  • 4 large eggs: For binding and moisture.
  • 3/4 cup granulated sugar: Adds sweetness while balancing the tartness of the lemons.
  • 1/4 cup honey: Infuses natural sweetness and enhances the cake’s flavor.
  • 1/3 cup cornstarch: Acts as a gluten-free thickener, giving the cake structure.
  • Zest of 2 large lemons: For that punchy lemon flavor that brightens every bite!
  • 1/4 cup fresh lemon juice: Adds acidity and moisture, creating a delightful flavor profile.
  • 1 teaspoon vanilla extract: Enhances the overall flavor.
  • 1 teaspoon baking powder: Gives the cake a little lift.
  • 1/4 teaspoon salt: Balances flavors and enhances sweetness.

Ingredient Substitutions

  • Yogurt Alternatives: You can use **dairy-free yogurt** for a vegan option, but ensure it’s thick to maintain texture.
  • Sweetener Swaps: Replace granulated sugar with coconut sugar for a lower glycemic index option.
  • Flour Alternatives: If you prefer a different flavor, substitute **almond flour** with **coconut flour** (note that you’ll need to adjust the quantity).
  • Egg-Free Option: Use a flaxseed meal (1 tablespoon mixed with 2.5 tablespoons of water = 1 egg) for a vegan version.

Pro Tips for the Perfect Flourless Lemon Yogurt Cake

Side view of a delicious flourless lemon yogurt cake with a glossy finish and lemon zest on top.

Here are some expert tips to elevate your baking game:

  • Room Temperature Ingredients: Ensure your eggs and yogurt are at room temperature for a smooth batter.
  • Don’t Overmix: Gently fold in the ingredients to avoid a dense cake.
  • Test for Doneness: A toothpick inserted into the center should come out clean; if it’s wet, give it a few more minutes.
  • Let It Cool: Allow the cake to cool completely in the pan for easy removal without breaking.
  • Add Zest at the End: To retain the bright flavor, add lemon zest just before pouring the batter into the pan.
  • Experiment with Toppings: Dust with powdered sugar or serve with fresh berries for an elegant touch.
  • Double the Recipe: This cake freezes beautifully, making it a perfect option for meal prep!
  • Use a Springform Pan: For easy removal and a beautiful presentation, opt for a springform cake pan.

Common Mistakes and Troubleshooting

Even the best bakers encounter hiccups. Here are some common mistakes and how to avoid them:

  • Dense Texture: This often happens from overmixing. Remember, less is more!
  • Not Zesty Enough: Use fresh lemons for both zest and juice to maximize flavor.
  • Overbaking: Keep an eye on your cake; it can go from perfect to dry in minutes!
  • Sticking to the Pan: Always line your pan with parchment paper and grease it well.

Delicious Variations to Try

Why not switch things up? Here are some fun variations to give your cake a twist:

  • Berry Burst: Fold in fresh blueberries or raspberries for a fruity explosion.
  • Coconut Delight: Add shredded coconut to the batter for a tropical feel.
  • Chocolate Chip Extravaganza: Stir in dark chocolate chips for a decadent touch.
  • Spiced Up: Add cinnamon or nutmeg for a warm, cozy flavor profile.

Storage and Make-Ahead Instructions

This cake is not only delicious but also easy to store:

  • Room Temperature: Keep it covered at room temperature for 2 days.
  • Refrigeration: For longer freshness, store in an airtight container in the fridge for up to a week.
  • Freezing: Wrap slices tightly with plastic wrap and freeze for up to 3 months. Thaw in the fridge overnight before enjoying.

Frequently Asked Questions (FAQs)

Got questions? Let’s clear up some common queries about this cake:

  • Can I replace the maple syrup with sugar? Absolutely! You can use granulated sugar instead of maple syrup.
  • Can I use regular yogurt instead of Greek yogurt? While you can use regular yogurt, it may result in a softer crumb.
  • Can I substitute almond flour with another flour? Yes, but note that the texture and flavor will change. Coconut flour can be used but requires adjustment in quantity.
  • Can I make this cake dairy-free? Yes! Substitute Greek yogurt with a dairy-free alternative.
  • Can I double the recipe? Certainly! Just ensure your baking pan is large enough to accommodate the extra batter.
  • How can I make this cake more lemony? Add more lemon zest and juice to intensify the flavor.
  • Is this cake suitable for vegans? With egg substitutes and dairy-free yogurt, it can be made vegan!
  • What is the nutritional information per slice? Each slice contains approximately 180 calories, depending on the specific ingredients used.

Serving Suggestions: Pairing Perfectly

To elevate your serving experience, consider these delightful pairings:

  • With Fresh Berries: Serve slices with a side of mixed berries for added freshness.
  • Whipped Cream: A dollop of whipped cream or cool whip adds a luscious touch.
  • Tea or Coffee: Pair with a cup of herbal tea or coffee for a delightful afternoon treat.
  • Ice Cream: A scoop of lemon sorbet or vanilla ice cream makes for a refreshing contrast.

Final Thoughts: Your New Go-To Dessert

Now that you’re armed with all the knowledge to create the most delicious **Flourless Lemon Yogurt Cake**, it’s time to get baking! This cake isn’t just a recipe; it’s an experience filled with flavors that inspire joy and connection. Remember, cooking is about creativity and fun, so don’t hesitate to experiment with flavors and toppings. Enjoy every slice, and share your delicious creations with friends and family. Happy baking!

Flourless Lemon Yogurt Cake Recipe

Prep Time 15 minutes
Cook Time 45 minutes
Total Time 1 hour
Servings 8 slices
Calories 250
A light and tangy flourless cake combining Greek yogurt and fresh lemon for a delightful treat.

Ingredients

Dairy and Eggs

  • 2 cups Greek yogurt (plain, full-fat)
  • 4 large eggs eggs
  • 3/4 cup granulated sugar
  • 1/4 cup honey
  • 1/3 cup cornstarch
  • Zest of 2 large lemons lemon zest
  • 1/4 cup fresh lemon juice
  • 1 teaspoon teaspoon vanilla extract
  • 1 teaspoon teaspoon baking powder
  • 1/4 teaspoon teaspoon salt

Instructions 

  • Preheat oven to 350°F (175°C). Grease and line a cake pan with parchment.
  • Whisk eggs, sugar, and honey until smooth. Mix in yogurt, lemon zest, lemon juice, and vanilla.
  • Stir in cornstarch, baking powder, and salt until well combined. Pour batter into prepared pan.
  • Bake for 40-45 minutes until golden and a toothpick comes out clean. Cool before serving.

Notes

This cake is best enjoyed fresh and can be dusted with powdered sugar for extra flair.
Calories: 250kcal
Cost: $15
Course: Dessert
Cuisine: fusion
Keyword: gluten-free, Lemon, yogurt

Unleash Flavor with Zesty Cherry Tomato Pasta!

Welcome to a vibrant culinary adventure! If you’re looking for a dish that’s as delightful as it is nutritious, you’ve landed in the right place. Cherry Tomato Pasta is the perfect weeknight dinner that combines the freshness of ripe cherry tomatoes, the aromatic punch of garlic, and the delightful fragrance of fresh basil. This recipe not only promises to tantalize your taste buds but also makes the most out of simple ingredients. Let’s dive into the delicious world of Cherry Tomato Pasta, where cooking becomes an exciting playground!

Why You’ll Love This Recipe

  • Quick and Easy: Ready in just 30 minutes, making it ideal for busy weeknights.
  • Fresh Ingredients: Utilizes seasonal cherry tomatoes and aromatic garlic for maximum flavor.
  • Customizable: Easily adaptable with different pasta types or additional veggies.
  • Nutritious: Packed with vitamins from tomatoes and fresh basil, this dish is guilt-free!
  • Perfect for Meal Prep: Great for batch cooking and tastes even better the next day!

Essential Ingredients Breakdown

Let’s take a closer look at the ingredients that make this Cherry Tomato Pasta shine. Each component plays a crucial role in building layers of flavor.

  • 1 lb cherry tomatoes: The star of the dish! Use a mix of colors for a beautiful presentation.
  • 8 oz spaghetti: Feel free to switch it up with whole wheat, gluten-free, or your favorite pasta shape.
  • 4 cloves garlic, minced: Adds a robust flavor that elevates the entire dish.
  • 3 tbsp extra virgin olive oil: A splash of this liquid gold enhances richness and helps sauté the garlic.
  • 1 cup fresh basil leaves, torn: Offers a fragrant aroma and a burst of fresh flavor.
  • ½ cup grated Parmesan cheese: Optional, but it adds creaminess and depth.
  • Salt and pepper to taste: Essential for bringing all the flavors together.

How to Make Cherry Tomato Pasta

Side view of spaghetti mixed with juicy cherry tomatoes and grated Parmesan.

Get ready to whip up a Cherry Tomato Pasta that will impress everyone around your dinner table!

  1. Prepare the cherry tomatoes by washing and halving them.
  2. In a large skillet, heat olive oil over medium heat. Sauté minced garlic until fragrant, about 30 seconds.
  3. Add halved cherry tomatoes to the skillet, season with salt and pepper, and let simmer until softened and juicy.
  4. Meanwhile, cook pasta in salted boiling water according to package instructions until al dente. Reserve 1 cup of pasta water before draining.
  5. Combine cooked pasta with the tomato mixture in the skillet, adding reserved pasta water as needed to create a sauce that coats the pasta.
  6. Fold in torn basil leaves and top with grated Parmesan cheese before serving.

Pro Tips for Perfect Cherry Tomato Pasta

Want to elevate your cooking game? Here are some pro tips to ensure your Cherry Tomato Pasta turns out perfectly every time:

  • Quality over quantity: Use the freshest cherry tomatoes you can find; they make all the difference in taste.
  • Don’t rush the garlic: Sauté it until just fragrant—burnt garlic can ruin the dish.
  • Save pasta water: This starchy water is a secret weapon for creating a silky sauce.
  • Adjust seasoning: Taste your sauce before serving and adjust salt and pepper as necessary.
  • Garnish generously: A little extra basil and Parmesan on top can elevate your dish’s appearance.
  • Make it a meal: Add protein like grilled chicken or shrimp for a heartier dish.
  • Mix it up: Experiment with different herbs like parsley or thyme for a twist.
  • Don’t skip the simmer: Allow the tomatoes to break down and create a rich sauce.

Common Mistakes and Troubleshooting

Even the best chefs make mistakes! Here are some common pitfalls and how to avoid them:

  • Overcooking pasta: Always cook your pasta to al dente for the best texture.
  • Not enough salt: Failing to season your pasta water can lead to bland noodles.
  • Skipping the simmer: If you rush the cooking time for the tomatoes, you miss out on rich flavors.
  • Using dried herbs: Fresh herbs elevate this dish, so opt for fresh whenever possible.

Delicious Variations

Feeling adventurous? Here are some fun variations to try with your Cherry Tomato Pasta:

  • Spicy Kick: Add red pepper flakes while sautéing the garlic for a spicy twist.
  • Vegetable Medley: Toss in zucchini, bell peppers, or spinach for added nutrients and colors.
  • Protein Boost: Incorporate grilled chicken, shrimp, or chickpeas for a heartier meal.
  • Vegan Delight: Skip the cheese and add nutritional yeast for a cheesy flavor without dairy.

Storage and Make-Ahead Instructions

This Cherry Tomato Pasta is perfect for meal prep! Here’s how to store and reheat:

  • Refrigeration: Store any leftovers in an airtight container in the fridge for up to 3 days.
  • Freezing: While fresh pasta is best enjoyed immediately, you can freeze the sauce for up to 2 months.
  • Reheating: Warm on the stovetop over low heat, adding a splash of olive oil or reserved pasta water to loosen the sauce.

Comprehensive FAQ

Got questions? We’ve got answers! Here are some common queries about Cherry Tomato Pasta:

  • Can I use other types of tomatoes? Absolutely! Any ripe tomato will work, but cherry tomatoes provide the sweetest flavor.
  • Is this recipe vegan? You can easily make it vegan by omitting the cheese or using a plant-based alternative.
  • Can I add meat? Yes! Grilled chicken, sausage, or bacon can enhance the dish.
  • How do I make it gluten-free? Substitute spaghetti with gluten-free pasta alternatives.
  • What wine pairs well with this dish? A crisp white wine like Sauvignon Blanc complements the flavors beautifully.
  • Can I add more veggies? Definitely! Feel free to get creative with seasonal vegetables.
  • How can I make this dish spicier? Add red pepper flakes or diced jalapeños for a spicy kick!
  • What sides go well with Cherry Tomato Pasta? A simple green salad or garlic bread make excellent accompaniments.

Nutrition Tips and Dietary Adaptations

Eating healthily doesn’t mean sacrificing flavor. Here are some nutrition tips:

  • Whole grain pasta: Opt for whole grain spaghetti for added fiber and nutrients.
  • Lower fat cheese: Use reduced-fat Parmesan for a lighter option.
  • Fresh herbs: Load up on fresh basil and other herbs for added vitamins.
  • Balanced Meal: Pair with a protein source to create a balanced meal.

Equipment Recommendations

To make your cooking experience seamless, here are some kitchen essentials:

  • Large skillet: Perfect for sautéing and combining your ingredients.
  • Colander: For draining pasta efficiently.
  • Chef’s knife: A good quality knife makes prepping vegetables a breeze.
  • Pasta pot: A large pot for boiling pasta is essential for even cooking.

Serving Suggestions

Now that you’ve mastered the art of Cherry Tomato Pasta, here’s how to serve it:

  • Garnish: Top with extra torn basil and a sprinkle of Parmesan for visual appeal.
  • Pair with a salad: A side of arugula and cherry tomato salad complements the pasta perfectly.
  • Perfect for gatherings: Serve family-style in a large bowl for gatherings or potlucks.

Conclusion

Your journey into the world of Cherry Tomato Pasta is just beginning! With its vibrant flavors and simple preparation, this dish is destined to become a staple in your kitchen. Whether you’re whipping it up for a quick dinner or impressing guests at a gathering, this recipe proves that healthy food can be delicious and exciting. So grab those cherry tomatoes, unleash your creativity, and enjoy every bite of your culinary masterpiece. Happy cooking!

Cherry Tomato Pasta

Prep Time 10 minutes
Cook Time 15 minutes
Total Time 25 minutes
Servings 4 servings
Calories 450
A quick and flavorful pasta dish featuring fresh cherry tomatoes and basil, perfect for a light meal.

Ingredients

Cherry Tomatoes

  • 1 lb cherry tomatoes (washed and halved)
  • 8 oz spaghetti (or pasta of choice)
  • 4 cloves garlic (minced)
  • 3 tbsp extra virgin olive oil
  • 1 cup fresh basil leaves (torn)
  • ½ cup grated Parmesan cheese
  • to taste Salt and pepper

Instructions 

  • Wash and halve the cherry tomatoes.
  • Heat olive oil in a skillet, sauté garlic until fragrant.
  • Add tomatoes, season with salt and pepper, simmer until soft.
  • Cook pasta until al dente, reserve 1 cup pasta water.
  • Combine pasta with tomato sauce, add reserved water as needed.
  • Mix in basil, top with Parmesan, serve.

Notes

Use fresh basil for the best flavor and adjust salt and pepper to taste.
Calories: 450kcal
Cost: $12
Course: Main Course
Cuisine: Italian
Keyword: pasta