Author

Ryan

Browsing

Why You’ll Love This Zesty Creamy Cucumber Salad

Are you ready to take your summer salads to a whole new level? This zesty creamy cucumber salad is not only a feast for your eyes but also a burst of flavors that will have your taste buds dancing! Perfect for picnics, barbecues, or simply as a refreshing side dish at home, this recipe is all about balancing taste and nutrition. Here’s why you’ll absolutely love this dish:

  • Time-saving: With just a few simple ingredients and minimal prep, you can whip this salad up in under 30 minutes!
  • Flavor-packed: The combination of tangy sour cream and fresh dill creates a rich, creamy dressing that elevates the crispness of the cucumbers.
  • Versatile: This salad pairs beautifully with grilled meats, sandwiches, or can even be a light meal on its own. You can customize it with your favorite add-ins!
  • Health-conscious: Packed with fresh vegetables, this salad is low in calories but high in flavor, making it a guilt-free choice.
  • Kid-friendly: Kids love the creamy texture and mild taste, making it an easy way to sneak in some veggies!

What You’ll Need for the Perfect Salad

This creamy cucumber salad is as simple as it gets! Here’s what you will need:

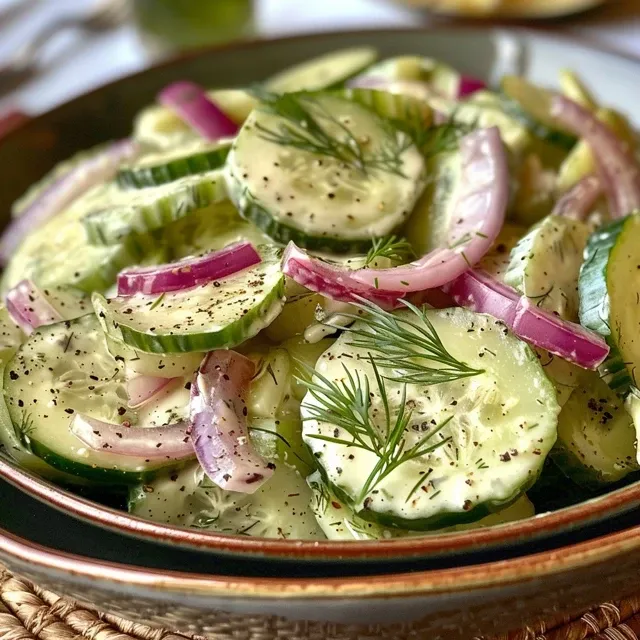
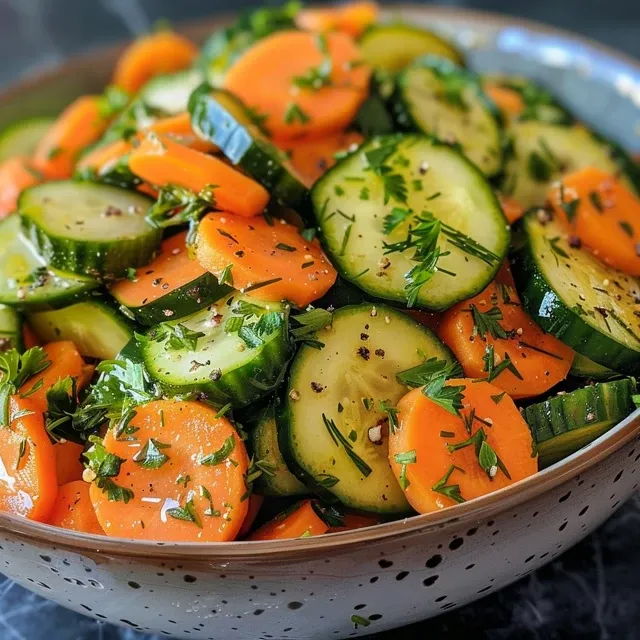
  • 1 English cucumber: Choose one that feels firm and has a vibrant skin. English cucumbers have a sweeter flavor and fewer seeds.
  • 1 teaspoon salt: This helps draw out the water from the cucumbers, ensuring a crisp texture.
  • 1/2 cup sour cream: Full-fat for creaminess, but feel free to substitute with Greek yogurt for a lighter option.
  • 1 teaspoon white vinegar: Adds a touch of acidity to balance the creaminess.
  • 1 teaspoon white sugar: Just a hint to enhance the flavors—adjust to your taste!
  • 1 tablespoon chopped fresh dill: Fresh herbs elevate the dish’s flavor profile.
  • Pepper (to taste): A simple seasoning that rounds out the flavors.
  • 3-4 tablespoons finely chopped red onion: For a slight crunch and a punch of flavor.

How to Make Your Zesty Creamy Cucumber Salad

Ready to bring this dish to life? Follow these simple steps for a delicious cucumber salad:

  1. Slice the cucumber: Use a mandoline or a sharp knife to slice the cucumber thinly (2mm is ideal). Place the slices in a colander.
  2. Salt the cucumber: Sprinkle the cucumber slices with salt and toss gently to ensure they are evenly coated. Let them sit for about 30 minutes to draw out excess water.
  3. Prepare the dressing: In a medium bowl, combine the sour cream, white vinegar, sugar, dill, and pepper. Mix well until smooth. Adjust seasoning to your liking and refrigerate until ready to serve.
  4. Chop and combine: Finely chop the red onion and add it to a large salad bowl. Rinse the cucumber slices under cold water to remove excess salt and pat dry with paper towels.
  5. Toss it all together: Add the cucumber to the bowl, pour the dressing over, and gently toss to combine. Serve immediately for the best texture!

Pro Tips for the Best Creamy Cucumber Salad

Side view of a bowl of creamy cucumber salad showcasing its texture.

Want to ensure your salad is a hit? Check out these expert tips!

  • Choose the right cucumber: English cucumbers are preferred for their thin skin and mild flavor.
  • Mind the salt: If you prefer a less salty taste, you can reduce the amount of salt or rinse the cucumbers after salting.
  • Chill before serving: While it’s best served fresh, letting it chill in the fridge for 15-30 minutes enhances the flavors.
  • Use fresh herbs: Fresh dill is key, but feel free to experiment with mint or parsley for a different twist!
  • Adjust the sweetness: If you like your salad a bit sweeter, add more sugar gradually until it’s just right for you.
  • Mix it up: Consider adding other ingredients like cherry tomatoes, bell peppers, or even feta cheese for added flavor.
  • Leftover salad: If you have leftovers, keep in mind that the salad may become watery after a day. It’s best enjoyed fresh!
  • Meal prep: You can prepare the dressing ahead of time and store it separately until you’re ready to serve.

Common Mistakes and Troubleshooting

Even the best chefs can make mistakes! Here are some common issues and how to avoid them:

  • Watery salad: If your salad turns out watery, ensure you let the cucumbers sit with salt long enough to draw out the moisture.
  • Too salty: If it’s too salty, rinse the cucumbers before tossing them with the dressing.
  • Not enough flavor: Don’t be shy with the seasoning! Adjust the vinegar and sugar to taste.
  • Overdressed: If you find the salad too creamy, add more cucumbers to balance it out.

Delicious Variations to Try

Mix things up with these fun variations!

  • Greek-inspired: Add crumbled feta, kalamata olives, and a splash of lemon juice for a Mediterranean twist.
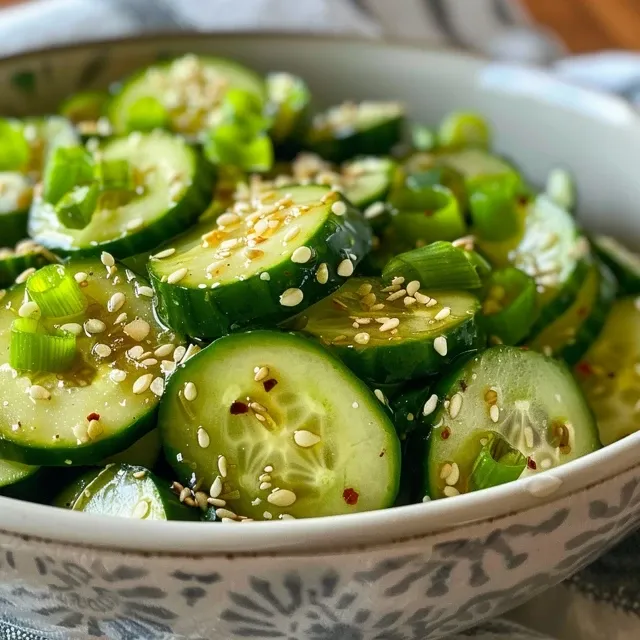
  • Asian flair: Incorporate sesame oil, soy sauce, and chopped green onions for a unique flavor.
  • Spicy kick: For heat, add diced jalapeños or a sprinkle of red pepper flakes.
  • Vegan option: Substitute sour cream with a plant-based yogurt or cashew cream and enjoy a creamy vegan salad!

Storage and Make-Ahead Instructions

This creamy cucumber salad is best enjoyed fresh, but here are some tips for storage:

  • Refrigeration: Store leftover salad in an airtight container in the fridge for up to 2 days.
  • Make ahead: You can prepare the dressing in advance, but add it to the cucumbers just before serving to prevent sogginess.

Frequently Asked Questions

Got questions? We’ve got answers!

  • Can I use regular cucumbers? Yes! However, English cucumbers are less bitter and have thinner skin.
  • How long does this salad last? It’s best enjoyed within a couple of days for optimal freshness.
  • Can I make it spicy? Absolutely! Add diced jalapeños or a dash of hot sauce for a spicy kick.
  • What should I serve this salad with? It pairs wonderfully with grilled chicken, fish, or as part of a picnic spread.
  • Can I use low-fat sour cream? Yes, but keep in mind that the texture and flavor may differ slightly.
  • How can I make it dairy-free? Use a plant-based sour cream alternative or Greek yogurt.
  • Is this salad suitable for meal prep? Yes, but keep the dressing separate until serving for best results.
  • What if I don’t have fresh dill? You can use dried dill, but use about one-third of the amount since dried herbs are more concentrated.

Nutrition Tips and Dietary Adaptations

This zesty creamy cucumber salad is not only delicious but also offers a range of nutritional benefits:

  • Low in calories: With cucumbers as the main ingredient, this salad is refreshing and light.
  • Rich in vitamins: Cucumbers are a great source of vitamins K and C, and they’re hydrating too!
  • Customizable: Feel free to adapt the recipe to fit your dietary needs—gluten-free, vegetarian, and even vegan options are available!

Equipment Recommendations

To make your salad-making experience smooth, here are some handy tools:

  • Mandoline slicer: For perfectly thin cucumber slices in no time!
  • Mixing bowls: A medium bowl for your dressing and a large one for assembly.
  • Colander: Essential for draining excess moisture from the cucumbers.
  • Measuring spoons: Accurate measurements ensure the perfect flavor balance.

Serving Suggestions

Now that your salad is ready, here are some tasty ideas for serving:

  • As a side dish: Serve alongside grilled chicken, steak, or fish for a refreshing accompaniment.
  • On a sandwich: Layer on sandwiches or wraps for added crunch and flavor.
  • As a dip: Pair with pita chips or fresh vegetables for a healthy snack option.

So, there you have it! A vibrant, zesty creamy cucumber salad that’s not just a treat for your taste buds but also a celebration of healthy eating. Dive into this refreshing dish and make it your own with all the variations and tips shared here. Remember, cooking is all about having fun and experimenting. Enjoy the process, and thank you for making healthy eating exciting!

Creamy Cucumber Salad

Prep Time 10 minutes
Total Time 40 minutes
Servings 4 servings
Calories 150
A refreshing and creamy cucumber salad perfect for a light side dish or snack, featuring fresh dill and red onion.

Ingredients

Vegetables

  • 1 piece English cucumber
  • 1 teaspoon salt
  • 0.5 cup sour cream
  • 1 teaspoon white vinegar
  • 1 teaspoon white sugar (see note)
  • 1 tablespoon chopped fresh dill
  • to taste pepper Pepper
  • 3-4 tablespoons finely chopped red onion

Instructions 

  • Slice the cucumber thin and sprinkle with salt. Let sit for 30 minutes, then rinse and dry.
  • Mix sour cream, vinegar, sugar, dill, and pepper to make the dressing. Chill until needed.
  • Chop the red onion and place in a salad bowl.
  • Add the cucumber to the bowl, pour dressing over, and toss. Serve immediately.

Notes

Eat soon to prevent the salad from becoming watery.
Calories: 150kcal
Cost: $8
Course: Side Dish
Cuisine: American
Keyword: cucumber

Revitalize Your Plate with a Flavor-Packed Salad!

Welcome to the vibrant world of healthy eating! Today, we’re diving into a delightful recipe that proves healthy doesn’t have to be boring. This Creamy Dill Cucumber Onion Salad is a refreshing, zesty dish bursting with flavor, perfect for any occasion. Whether you’re looking for a quick side dish for a summer BBQ or a light lunch that dances with freshness, you’ve hit the jackpot. With just a handful of ingredients, you can whip up this salad in no time. Let’s get started!

Why You’ll Love This Recipe

This salad is not just another side dish; it’s a celebration of flavors and textures. Here are five reasons why you’ll be head over heels for this recipe:

  • Quick and Easy: In just 15 minutes, you can prepare this salad, making it perfect for a last-minute addition to any meal.
  • Refreshing Crunch: The chilled cucumbers bring a satisfying crunch, while the zesty red onions add a delightful bite.
  • Versatile Dish: This salad can be served as a side, a topping for grilled meats, or even as a light lunch on its own.
  • Nutritious Goodness: Packed with vitamins and low in calories, this salad supports your healthy lifestyle without sacrificing flavor.
  • Customizable Flavors: With simple substitutions and variations, you can easily tailor this dish to your taste preferences.

Ingredients for Creamy Dill Cucumber Onion Salad

Let’s take a closer look at the ingredients that make this salad a winner:

  • Cucumbers: 4 chilled, half-peeled, thinly sliced. They bring a refreshing crunch.
  • Red Onion: 1 small, sliced. It adds a mild sharpness that beautifully contrasts the creamy dressing.
  • Sour Cream: ½ cup. This is the base of our creamy dressing, adding a rich, tangy flavor.
  • Mayonnaise: 1 tablespoon. It enhances the creaminess of the dressing.
  • Fresh Dill: 2 tablespoons, chopped. A fragrant herb that elevates the flavor profile.
  • White or Black Pepper: ¼ teaspoon. Adds a subtle kick.
  • Flakey Sea Salt: To taste. Enhances the overall flavor of the dish.
  • Freshly-Cracked Pepper: For garnish.

Ingredient Substitution Suggestions

Side perspective of creamy dill cucumber onion salad with thinly sliced cucumbers and red onions, garnished with dill.

If you want to switch things up, here are some fantastic substitutions:

  • Greek Yogurt: Replace sour cream with Greek yogurt for a lighter option.
  • Vegan Mayo: Use a plant-based mayonnaise to make this salad vegan-friendly.
  • Other Herbs: Swap dill for parsley or chives if you prefer a different herb flavor.
  • Different Onions: Try using green onions or shallots for a milder taste.

Step-by-Step Instructions to Make Creamy Dill Cucumber Onion Salad

Ready to get your hands dirty? Follow these simple steps:

  1. Combine Cucumber and Onion: In a large mixing bowl, combine the sliced cucumbers and red onion.
  2. Prepare Dressing: In a separate medium bowl, mix together the sour cream, mayonnaise, chopped dill, and pepper until smooth.
  3. Mix Together Then Refrigerate: Transfer the dressing to the bowl of cucumber and onion. Toss to coat everything evenly. Cover and refrigerate for at least 15 minutes to let the flavors meld.
  4. Garnish and Serve: Before serving, sprinkle on flakey sea salt and garnish with additional fresh dill and freshly cracked pepper if desired.

Pro Tips for a Perfect Creamy Dill Cucumber Onion Salad

To ensure your salad is absolutely delicious, keep these tips in mind:

  • Chill Ingredients: Ensure all ingredients, especially cucumbers, are chilled for maximum freshness.
  • Salt Cucumbers: If you want to avoid a watery salad, sprinkle sliced cucumbers with salt and let them sit for 10 minutes before mixing. Rinse and pat dry to release excess liquid.
  • Fresh Dill: Always use fresh dill for a more vibrant flavor—dried dill doesn’t compare!
  • Adjust Texture: For a creamier salad, add more sour cream or mayo as desired.
  • Mix Well: Toss the salad thoroughly to ensure each piece is coated in the creamy dressing.
  • Serve Immediately: For the best texture, serve the salad right after chilling; it tastes best fresh!
  • Pairing: This salad pairs wonderfully with grilled meats or as a refreshing side dish for any meal.

Common Mistakes and Troubleshooting

A few things to watch out for to ensure perfection:

  • Watery Salad: Avoid using too much salt on cucumbers; rinse thoroughly before mixing.
  • Over-mixing: Gently toss the salad to maintain the crunch of the cucumbers.
  • Skipping the Chill: Don’t skip the chilling step! It allows flavors to meld beautifully.
  • Substitutions Gone Wrong: If substituting ingredients, consider flavor profiles to maintain balance.

Variations to Spice Things Up

Want to make this salad your own? Here are some fun variations:

  • Greek Style: Add crumbled feta cheese and kalamata olives for a Mediterranean twist.
  • Asian Twist: Incorporate sesame oil and soy sauce, and add shredded carrots for a different flavor profile.
  • Spicy Kick: Include diced jalapeños or a pinch of cayenne pepper for some heat.
  • Fruit Fusion: Mix in diced apples or grapes for a sweet contrast with the creamy dressing.

Storage and Make-Ahead Instructions

This salad is great for meal prep! Here’s how to store it:

  • In the Refrigerator: Store in an airtight container for up to 3 days.
  • Make-Ahead: You can prepare the salad a day in advance but add salt just before serving to keep cucumbers crisp.
  • Freezing: Not recommended, as cucumbers will become mushy upon thawing.

FAQs for Creamy Dill Cucumber Onion Salad

Got questions? We’ve got answers!

  • Can this salad be made in advance? Yes, it can be made up to a day ahead. Just don’t add salt until you’re ready to serve.
  • How long can I store leftovers of this salad? Properly stored, it lasts up to 3 days in the fridge.
  • Can I use other vegetables? Absolutely! Try adding bell peppers or radishes for extra crunch.
  • Is this salad gluten-free? Yes, all ingredients are gluten-free.
  • What can I serve with this salad? It’s a great side for grilled chicken, fish, or as part of a picnic spread!
  • Can I make this vegan? Yes, substitute sour cream and mayo with vegan alternatives.
  • Is it okay to use dried dill? While fresh is best, you can use dried dill; just reduce the quantity to avoid overpowering the dish.
  • Will this salad get watery? If prepared ahead, cucumbers may release water. To combat this, salt them before mixing and drain excess liquid.

Nutritional Tips and Dietary Adaptations

Want to keep your salad nutritious? Here are some suggestions:

  • Low-Fat Option: Use low-fat sour cream and mayo for a lighter version.
  • High-Protein Twist: Add cooked chickpeas or shredded chicken for extra protein.
  • Vegan Delight: Opt for plant-based sour cream and mayo to make this salad vegan-friendly.

Equipment Recommendations

Here’s what you’ll need to make this salad:

  • Mixing Bowl: A large bowl for mixing ingredients.
  • Cutting Board: For slicing cucumbers and onions.
  • Sharp Knife: To ensure precise slicing.
  • Measuring Cups: For accurate ingredient measurements.

Serving Suggestions

To elevate your salad experience, consider these serving ideas:

  • Plating: Serve in a colorful bowl to enhance visual appeal.
  • Garnish: Top with extra fresh dill and a sprinkle of sea salt for a finishing touch.
  • Pairing: Complement it with grilled meats, seafood, or as part of a larger salad spread.

Conclusion

This Creamy Dill Cucumber Onion Salad is a delightful addition to any meal, bringing together flavors and textures that are sure to impress. With its quick preparation, refreshing ingredients, and versatility, this salad is one you’ll return to time and time again. So grab your ingredients and let’s get cooking! Enjoy this vibrant dish and remember, healthy can be exciting!

Creamy Dill Cucumber Onion Salad (With Sour Cream and Mayo)

Prep Time 10 minutes
Total Time 10 minutes
Servings 4 servings
Calories 150
A refreshing and creamy cucumber salad with dill, perfect for a light side dish or summer gathering.

Ingredients

Vegetables

  • 4 pieces cucumbers (chilled, half-peeled, thinly sliced) (Chilled for crispness)
  • 1 small small red onion (sliced)
  • 0.5 cup sour cream
  • 1 tablespoon mayonnaise
  • 2 tablespoons chopped fresh dill
  • 0.25 teaspoon ground white pepper or black pepper
  • to taste flakey sea salt Flakey sea salt
  • to taste chopped fresh dill Chopped fresh dill (for garnish)
  • to taste freshly-cracked pepper Freshly-cracked pepper (for garnish)

Instructions 

  • Combine cucumber and red onion in a large bowl.
  • Mix sour cream, mayonnaise, dill, and pepper in a separate bowl.
  • Toss dressing with cucumber and onion; chill for at least 15 minutes.
  • Garnish with sea salt, additional dill, and pepper before serving.

Notes

Use fresh dill for best flavor and chill the salad before serving for maximum crunch.
Calories: 150kcal
Cost: $8
Course: Side Dish
Cuisine: American
Keyword: cucumber, Dill

Summertime is synonymous with vibrant colors, sweet flavors, and refreshing treats. What better way to celebrate the season than with a delightful Rainbow Fruit Salad? This dish is not just a feast for the eyes but also a burst of nutrients, perfect for any occasion. In this article, we’ll dive into the details of crafting the perfect fruit salad, and trust me, it’s going to be easy to make and utterly delicious!

With an array of fruits like strawberries, blueberries, and kiwi, our Rainbow Fruit Salad is the ultimate way to embrace the summer vibes. Plus, adding a drizzle of honey and a squeeze of lime elevates it to a whole new level. Ready to make your taste buds dance? Let’s get started!

Why You’ll Love This Recipe

  • Colorful Presentation: The mix of fruits makes for a stunning, Instagram-worthy dish that’s perfect for gatherings or a simple family meal.
  • Quick and Easy: This recipe is super simple to whip up, taking only about 15-20 minutes from start to finish!
  • Healthy and Nutritious: Packed with vitamins, minerals, and antioxidants, this salad is a refreshing way to boost your health during the hot summer months.
  • Customizable: Feel free to swap in your favorite fruits or whatever you have on hand—this salad is flexible and forgiving!
  • Versatile Serving Options: Serve it as a side dish, dessert, or even a breakfast option to kickstart your day with energy.

Ingredients Breakdown

Let’s gather our ingredients! Here’s what you’ll need for this vibrant Rainbow Fruit Salad:

  • 1 cup strawberries: hulled and sliced for that sweet, juicy flavor.
  • 1 cup blueberries: these little gems add a burst of sweetness and are rich in antioxidants.
  • 1 cup pineapple: diced to give a tropical twist.
  • 1 cup watermelon: diced for hydration and sweetness.
  • 1 cup kiwi: peeled and sliced to bring some tanginess to the mix.
  • 1 cup grapes: halved for that juicy pop!
  • 1 tablespoon honey (optional): for a touch of natural sweetness.
  • Juice of 1 lime: to brighten all the flavors.
  • Fresh mint leaves (optional): for garnish and an extra layer of freshness.

Feel free to substitute any of these fruits with your favorites. Some great alternatives include mango, peaches, or even cherries!

Pro Tips for the Best Fruit Salad

  • Use Fresh Fruits: Always opt for seasonal, ripe fruits for the best flavor and texture.
  • Perfectly Dice: Aim for uniform sizes when cutting your fruits; this not only looks better but ensures even flavor distribution.
  • Chill Before Serving: Refrigerating the salad for about 30 minutes allows the flavors to meld beautifully.
  • Layering Matters: When mixing, start with the heavier fruits at the bottom to prevent squishing lighter ones.
  • Experiment with Dressings: While honey and lime are fantastic, consider trying a yogurt dressing for a creamy twist!
  • Make It Ahead: Prepare your fruit salad a few hours in advance, but add the delicate fruits like bananas or apples right before serving to avoid browning.
  • Go Wild with Herbs: Fresh basil or cilantro can add an unexpected yet delightful flavor profile.
  • Portion Control: If serving at a party, consider using small cups for individual servings, making it easy for guests to grab and go!

Common Mistakes to Avoid

Bright and fresh fruit salad with diced pineapple, watermelon, and halved grapes.

Even the simplest recipes can have a few pitfalls. Here are common mistakes to watch out for:

  • **Overripe or underripe fruits**: Make sure your fruits are at their peak for the best flavor. An overripe banana can ruin the taste!
  • **Cutting too early**: Pre-cut fruits can oxidize and lose freshness. Cut them as close to serving time as possible.
  • **Too much dressing**: A little lime juice goes a long way. Start with a small amount and adjust to taste.
  • **Not using enough variety**: Sticking to just one or two fruits can make your salad bland. Mix it up for a better flavor experience!

Variations on the Rainbow Fruit Salad

Get creative with these exciting variations!

  • Tropical Twist: Add diced mango, shredded coconut, and a splash of coconut water.
  • Berry Bliss: Focus on an all-berry salad with strawberries, blueberries, raspberries, and blackberries.
  • Protein Punch: Mix in some Greek yogurt or cottage cheese for added protein and creaminess.
  • Nutty Delight: Sprinkle with chopped nuts like almonds or walnuts for a crunchy texture and healthy fats.

Storage and Make-Ahead Instructions

This fruit salad is best enjoyed fresh, but you can definitely prepare it in advance:

  • Refrigerate: Store in an airtight container in the fridge for up to 2 days. However, keep in mind some fruits may release juices and soften over time.
  • Make-Ahead: Chop your fruits the night before, and mix them just before serving to maintain the freshest taste.

Frequently Asked Questions

Let’s tackle some common questions about fruit salad:

  • Can I use frozen fruit? Yes! Just make sure to thaw and drain excess liquid before adding.
  • How can I prevent browning? Use lemon or lime juice on fruits like apples and bananas to slow oxidation.
  • What fruits should I avoid? Avoid fruits that spoil quickly, like bananas, unless you plan to eat the salad right away.
  • Can I add dressing? Absolutely! A simple honey-lime dressing or yogurt can enhance flavors.
  • How do I make it vegan-friendly? The recipe is already vegan if you skip the honey or use agave syrup.
  • How can I make it more filling? Add grains like quinoa or oats, or toss in some nuts or seeds.
  • What’s the best way to serve it? Serve chilled in a large bowl, or for individual servings, use mason jars!
  • Can I mix in yogurt? Yes! Adding yogurt can create a creamy texture and extra flavor!

Nutritional Tips and Dietary Adaptations

This Rainbow Fruit Salad is not just colorful but also packed with nutrition:

  • Rich in Vitamins: Fruits are loaded with vitamins A and C, crucial for immune health.
  • High in Fiber: The variety of fruits provides dietary fiber, which is essential for digestion.
  • Low-Calorie Delight: Most fruits are low in calories, making it an ideal guilt-free snack.
  • Gluten-Free: Naturally gluten-free, it’s perfect for those with dietary restrictions.
  • Vegan-Friendly: A delightful option for those following a plant-based diet.

Equipment Recommendations

To make your fruit salad experience even smoother, here are some handy tools:

  • Sharp Knife: A good quality knife is essential for easily slicing fruits.
  • Cutting Board: A sturdy cutting board will make prep a breeze.
  • Mixing Bowl: A large bowl is ideal for tossing everything together without spills.
  • Measuring Cups: For precise measurements when making larger batches.

Serving Suggestions

Here are some fun ways to enjoy your Rainbow Fruit Salad:

  • As a Side Dish: Pair it with grilled chicken or fish for a refreshing contrast.
  • For Breakfast: Serve over yogurt or oatmeal for a nutritious start to your day.
  • At Parties: Create a colorful fruit bar with different toppings like nuts, seeds, and dressings.
  • As a Dessert: Top with whipped cream for a light and fruity dessert option!

With these tips and tricks in hand, you’re all set to create the most delicious and eye-catching Rainbow Fruit Salad! Remember, cooking should be fun, so don’t be afraid to get creative and let your personality shine in the kitchen. Enjoy every bite and make this summer the tastiest one yet!

Perfect Summer Fruit Salad

Prep Time 10 minutes
Total Time 10 minutes
Servings 4 people
Calories 150
A refreshing and colorful fruit salad perfect for hot summer days. Packed with fresh fruits and a hint of lime and honey, it's easy to make and delightful to enjoy.

Ingredients

Fruits

  • 1 cup strawberries, hulled and sliced
  • 1 cup blueberries
  • 1 cup pineapple, diced
  • 1 cup watermelon, diced
  • 1 cup kiwi, peeled and sliced
  • 1 cup grapes, halved
  • 1 tablespoon honey (optional)
  • 1 unit Juice of 1 lime
  • Fresh mint leaves for garnish (optional)

Instructions 

  • Wash and prepare all fruits as specified.
  • Gently mix all fruits in a large bowl.
  • Drizzle honey (if using) and squeeze lime juice over the fruit. Toss gently.
  • Transfer to a serving bowl, garnish with mint leaves, and serve chilled.

Notes

Use fresh, ripe fruits for the best flavor.
Calories: 150kcal
Cost: $15
Course: Dessert, Salad
Cuisine: American
Keyword: fruit, Summer

Unlock the Freshness: Your Guide to the Ultimate Asian Cucumber Salad

Welcome to a culinary adventure that will elevate your summer meals! This refreshing Asian cucumber salad is not just a side dish; it’s a vibrant celebration of flavors that will invigorate your taste buds and brighten your dining table. Packed with crunchy cucumbers, zesty rice vinegar, and a hint of sesame, this salad is perfect for those warm days when you crave something light yet satisfying. Let’s dive into why you’ll love this recipe and how to make it your own!

Why You’ll Love This Recipe

  • Quick and Easy: This salad comes together in less than 30 minutes, making it ideal for busy weeknights or unexpected gatherings.
  • Nutritious and Healthy: It’s packed with essential nutrients, making it a guilt-free addition to any meal.
  • Versatile Side Dish: Pairs beautifully with grilled meats, fish, or can be served as a refreshing snack on its own.
  • Customizable: With various ingredient options, you can tailor this salad to your taste preferences or dietary needs.
  • Flavor Explosion: The combination of fresh cucumbers, tangy dressing, and toasted sesame seeds creates a delightful crunch with every bite.

Essential Ingredients for Your Asian Cucumber Salad

Let’s break down the key ingredients that make this salad a standout:

  • Fresh Cucumbers: Use about 2 medium cucumbers, preferably Persian or English for their crisp texture.
  • Rice Vinegar: 3 tablespoons of unseasoned rice vinegar adds a tangy punch.
  • Sesame Oil: 1 tablespoon of toasted sesame oil enhances the flavor profile beautifully.
  • Soy Sauce: 2 tablespoons of low-sodium soy sauce for a savory depth.
  • Granulated Sugar: 1 teaspoon balances the acidity of the vinegar.
  • Toasted Sesame Seeds: For garnish and a nutty crunch.
  • Green Onions: 2 thinly sliced green onions for freshness and color.
  • Chili Flakes: Optional, but they add a delightful kick if you enjoy a little heat!

Step-by-Step Instructions to Make Your Salad

Fresh Asian cucumber salad featuring sliced cucumbers and a drizzle of sesame oil.

Let’s get cooking! Follow these simple steps to whip up your salad:

  1. Wash and slice the cucumbers thinly into rounds.
  2. In a small bowl, whisk together the rice vinegar, soy sauce, sugar, and sesame oil until well combined.
  3. Add the sliced green onions and optional chili flakes to the dressing mixture; stir gently.
  4. Pour the dressing over the sliced cucumbers in a large bowl and toss until evenly coated.
  5. Cover and chill in the refrigerator for at least 30 minutes to allow the flavors to meld.
  6. Just before serving, sprinkle with toasted sesame seeds for added crunch.

Pro Tips for Perfecting Your Salad

Want to elevate your cucumber salad game? Here are some expert insights:

  • Salt the Cucumbers: To enhance the texture, sprinkle the sliced cucumbers with salt and let them sit for 10 minutes before rinsing. This draws out excess water, resulting in crunchier bites.
  • Chill for Best Flavor: Allow the salad to chill for at least 30 minutes; this helps the cucumbers absorb the dressing, intensifying the flavors.
  • Experiment with Add-ins: Try adding diced avocado, shredded carrots, or even edamame for extra nutrition and flavor.
  • Fresh Herbs: Incorporate fresh herbs like cilantro or mint for an aromatic twist!
  • Adjust Sweetness: Start with 1/2 tablespoon of sugar and adjust according to your taste—some prefer a sweeter dressing!
  • Use Quality Ingredients: Fresh, high-quality ingredients make all the difference in flavor. Look for vibrant cucumbers and premium soy sauce.
  • Serving Temperature: Serve the salad cold for a refreshing experience, especially on hot days.
  • Presentation: For a stunning presentation, serve in a clear bowl to showcase the colorful ingredients.

Common Mistakes and Troubleshooting

Even the best chefs can make mistakes. Here are some common pitfalls and how to avoid them:

  • Too Watery: If your salad turns out watery, you may not have drawn enough moisture from the cucumbers. Salt them beforehand and let them drain.
  • Overly Salty: If the dressing is too salty, balance it with a bit more sugar or vinegar.
  • Not Enough Flavor: If the salad lacks flavor, try adding more soy sauce or a splash of lime juice for acidity.

Delicious Variations to Try

Feeling adventurous? Here are some fun twists on the classic recipe:

  • Spicy Avocado Cucumber Salad: Add diced avocado and a sprinkle of cayenne for a creamy, spicy kick.
  • Mango Cucumber Salad: Incorporate diced mango for a tropical flair and natural sweetness.
  • Thai-Inspired Salad: Add chopped peanuts and fresh mint, then drizzle with a peanut dressing.
  • Sesame Noodle Salad: Combine with cooked soba noodles for a satisfying meal option.

Storage and Make-Ahead Instructions

This salad is perfect for meal prep! Here’s how to store it:

  • Make-Ahead: Prepare the salad and dressing separately up to a day in advance. Combine them just before serving to maintain crispness.
  • Refrigeration: Store in an airtight container in the refrigerator for up to 3 days. The flavors will continue to meld, but the cucumbers may soften slightly over time.
  • Freezing: Not recommended, as cucumbers lose their texture when frozen.

Frequently Asked Questions

Got questions? We’ve got answers! Here are some FAQs about the Asian cucumber salad:

  • What type of cucumbers are best for this salad? Persian or English cucumbers are ideal due to their thin skin and crunch.
  • Can I use regular cucumbers? Yes, but make sure to peel and seed them to reduce bitterness.
  • How long can this salad sit out? It’s best served chilled, but if left out, consume within 2 hours to ensure safety.
  • Can I make this salad vegan? Yes, the recipe is naturally vegan-friendly!
  • What can I serve with this salad? It pairs well with grilled chicken, fish, or as a side for Asian-inspired dishes.
  • How do I make it gluten-free? Use tamari instead of soy sauce for a gluten-free option.
  • Can I add protein to this salad? Absolutely! Grilled shrimp or tofu would complement this salad perfectly.
  • What’s the key to a great dressing? Balancing acidity and sweetness is crucial; taste and adjust as needed!

Nutritional Benefits and Dietary Adaptations

This salad not only delights your taste buds but also packs a nutritional punch:

  • Low in Calories: With minimal ingredients, this salad is a light option for any meal.
  • Rich in Vitamins: Cucumbers are hydrating and provide vitamins K, C, and potassium.
  • Customizable for Diets: Easily adaptable for keto, vegan, or gluten-free diets.

Essential Equipment You’ll Need

Gather these handy tools before you start:

  • Cutting Board: For chopping your cucumbers and green onions.
  • Sharp Knife: To ensure clean, even slices of cucumbers.
  • Mixing Bowl: For whisking the dressing and tossing the salad.
  • Measuring Cups and Spoons: For precise ingredient measurements.
  • Whisk: To mix the dressing thoroughly.

Serving Suggestions

Ready to serve? Here are some delightful ideas:

  • As a Side Dish: Serve alongside grilled chicken or fish for a balanced meal.
  • Party Platter: Present in a beautiful bowl for gatherings or potlucks.
  • As a Light Lunch: Top with grilled shrimp or tofu for a satisfying main dish.

In conclusion, this ultimate refreshing Asian cucumber salad is sure to become a staple in your kitchen. With its vibrant flavors, nutritious ingredients, and endless customization options, it embodies the joy of healthy cooking! So grab your cucumbers, whisk up that dressing, and enjoy a delightful salad that’s as fun to make as it is to eat. Happy cooking!

Refreshing Asian Cucumber Salad

Prep Time 10 minutes
Total Time 10 minutes
Servings 4 servings
Calories 80
A light and tangy cucumber salad with Asian flavors, perfect for a quick refresh.

Ingredients

Vegetables

  • 2 cups sliced fresh cucumbers (approx. 2 medium cucumbers)
  • 3 tbsp rice vinegar (unseasoned)
  • 1 tbsp sesame oil (toasted preferred)
  • 2 tbsp low-sodium soy sauce
  • 1 tsp granulated sugar
  • 1 tbsp toasted sesame seeds
  • 2 green onions green onions (thinly sliced)
  • Optional chili flakes (pinch, optional)

Instructions 

  • Wash and thinly slice the cucumbers.
  • Whisk rice vinegar, soy sauce, sugar, and sesame oil until combined.
  • Add green onions and chili flakes to the dressing; stir gently.
  • Pour dressing over cucumbers and toss to coat.
  • Chill for 30 minutes, then sprinkle with sesame seeds before serving.

Notes

This salad is best enjoyed fresh and chilled for maximum crunch and flavor.
Calories: 80kcal
Cost: $8
Course: Salad
Cuisine: Asian
Keyword: cucumber

Revolutionize Your Dinner with Sizzling Spinach Stuffed Chicken!

Are you ready to take your weeknight dinners from drab to fab? Dive into the world of flavor with this Spinach Stuffed Chicken Breast recipe, where just six simple ingredients come together to create a culinary masterpiece! This dish is not only packed with nutrients but also bursting with flavor, making it an irresistible choice for any night of the week. Whether you’re a seasoned chef or a kitchen novice, this recipe will inspire confidence and creativity in your cooking.

Why You’ll Love This Recipe

Let’s break down why this spinach stuffed chicken will become your go-to meal:

  • Quick and Easy: With just six ingredients, you can whip up this delicious dish in under 45 minutes!
  • Healthy and Nutritious: Packed with spinach and protein-rich chicken, this recipe supports a balanced diet without compromising on flavor.
  • Flavor Explosion: Cream cheese, garlic, and mozzarella create a rich filling that complements the juicy chicken perfectly.
  • Versatile: Customize the filling or serve with your favorite sides to make it your own!
  • Impressive Presentation: Stuffed chicken breasts look stunning on any plate and are sure to wow your family and friends.

Ingredient Breakdown and Substitutions

Here’s what you’ll need to create this mouthwatering dish:

  • 4 boneless, skinless chicken breasts: Ensure they’re thick enough to stuff. If they’re too thin, consider using chicken thighs for extra juiciness.
  • 2 tsp sea salt: Enhances flavor. Adjust based on your taste preferences.
  • 1/2 tsp black pepper: Adds a subtle kick! Feel free to swap with your favorite spices.
  • 6 oz fresh spinach (chopped): Fresh is best for vibrant color and nutrients. If you’re in a pinch, use frozen spinach—just be sure to thaw and drain it well.
  • 2 oz cream cheese (softened): Provides creaminess. You can substitute with Greek yogurt for a lighter option.
  • 2 cloves garlic (minced): Freshly minced garlic packs a punch! Garlic powder works too, but fresh is always better.
  • 1 cup mozzarella cheese (shredded, divided): Melts beautifully. Try other cheeses like feta or gouda for a different flavor profile.
  • 1 tbsp olive oil: For searing the chicken. Avocado oil is a great alternative.
  • 1 medium Roma tomato (sliced thinly into 8 slices): Adds freshness and color. Any tomato variety will work.

How to Make Sizzling Spinach Stuffed Chicken

Side view of spinach stuffed chicken breast garnished with tomato.

Ready to get cooking? Follow these simple steps:

  1. Preheat: Preheat your oven to 450 degrees F (232 degrees C).
  2. Prepare Chicken: Pat the chicken breasts dry and season both sides with salt and pepper. Cut a slit in each chicken breast horizontally, creating a pocket. Set aside.
  3. Steam Spinach: In a large bowl, steam the spinach in the microwave for 2-3 minutes until wilted. Alternatively, sauté on the stove for 3-5 minutes. Set aside to cool.
  4. Mix Filling: In a bowl, mash together the softened cream cheese and garlic. Stir in 1/2 cup of mozzarella cheese.
  5. Combine Spinach: Once cool, squeeze the spinach to remove excess water and mix it into the cream cheese mixture.
  6. Stuff Chicken: Evenly stuff the spinach mixture into the chicken breasts, securing with toothpicks if necessary.
  7. Sear Chicken: Heat olive oil in a large cast iron skillet over medium-high heat. Add the chicken and sear for 4-5 minutes per side until golden brown.
  8. Top with Tomato and Cheese: Quickly add 2 tomato slices and 2 tablespoons of shredded mozzarella cheese on each piece of chicken.
  9. Bake: Transfer the chicken to the oven and bake for about 15 minutes until the internal temperature reaches 165 degrees F (74 degrees C). For a golden finish, broil for 1-3 minutes.

Pro Tips for Perfect Spinach Stuffed Chicken

To ensure your dish turns out flawlessly, consider these expert insights:

  • Use Fresh Ingredients: Fresh spinach and herbs elevate the flavor profile significantly.
  • Don’t Overstuff: Less is more! Overstuffing can lead to mess and uneven cooking.
  • Let it Rest: Allow the chicken to rest for a few minutes before slicing to keep it juicy.
  • Check Internal Temperature: Always use a meat thermometer to ensure proper cooking.
  • Experiment with Spices: Add your favorite herbs or spices to the stuffing mix for a flavor twist!
  • Make Ahead: Prepare the stuffing in advance and assemble the chicken just before cooking for a quick weeknight meal.

Common Mistakes and Troubleshooting

Even the best chefs make mistakes! Here’s how to avoid some common pitfalls:

  • Dry Chicken: Overcooking is the main culprit. Keep an eye on the internal temperature.
  • Watery Filling: Ensure spinach is fully drained before mixing to avoid a soggy filling.
  • Sticking Chicken: Make sure your skillet is hot enough before adding chicken to prevent it from sticking.

Delicious Variations to Try

Feel like switching things up? Here are some fun variations:

  • Italian Herb Spinach Stuffing: Add Italian seasoning and sun-dried tomatoes for a Mediterranean twist.
  • Spicy Spinach Stuffing: Mix in jalapeños or red pepper flakes for some heat!
  • Cheesy Spinach Stuffing: Substitute mozzarella with gouda or cheddar for a different cheesy experience.
  • Stuffed Chicken Thighs: Use chicken thighs instead of breasts for a juicier alternative.

Storage and Make-Ahead Instructions

This dish is perfect for meal prep! Here’s how to store and reheat:

  • Refrigeration: Store cooked chicken in an airtight container for up to 4 days.
  • Freezing: Freeze leftovers for up to 3 months. Thaw in the fridge overnight before reheating.
  • Reheating: To reheat, bake in the oven at 350 degrees F (175 degrees C) until warmed through.

Frequently Asked Questions

Got questions? We’ve got answers! Here’s a handy FAQ:

  • Can I use frozen spinach? Yes! Just ensure it’s fully thawed and drained.
  • How can I tell if the chicken is done? Use a meat thermometer to check for an internal temperature of 165°F (74°C).
  • Can I make this recipe ahead of time? Absolutely! Assemble the chicken and store in the fridge until ready to cook.
  • What can I serve with spinach stuffed chicken? Pair it with a fresh salad, roasted vegetables, or quinoa for a complete meal.
  • Can I use a different cheese? Yes! Feel free to experiment with your favorite cheese varieties.
  • How do I prevent the filling from leaking? Be sure to secure the chicken pockets with toothpicks and avoid overstuffing.
  • Is this recipe gluten-free? Yes! All ingredients used are gluten-free.
  • Can I use chicken thighs instead? Absolutely! Chicken thighs will provide a juicier result.

Nutrition Tips and Dietary Adaptations

This spinach stuffed chicken is naturally low in carbs and high in protein, making it a great option for various dietary needs:

  • Keto-Friendly: Perfect for a low-carb lifestyle, simply skip the breading.
  • Paleo-Friendly: Use dairy alternatives for the filling to fit a paleo diet.
  • Vegetarian Option: Substitute chicken with large portobello mushrooms for a hearty vegetarian meal.

Equipment Recommendations

Here are some kitchen essentials to help you whip up this dish effortlessly:

  • Cast Iron Skillet: Ideal for searing and transferring to the oven.
  • Meat Thermometer: Ensures your chicken is perfectly cooked every time.
  • Mixing Bowls: For preparing your filling and mixing ingredients.

Serving Suggestions

Enhance your meal with these delicious sides:

  • Garlic Mashed Potatoes: Creamy and comforting, they pair perfectly with stuffed chicken.
  • Quinoa Salad: A light and refreshing option loaded with veggies.
  • Steamed Broccoli: Adds a nutritious crunch to your plate.

Revolutionize your dinner table with this Spinach Stuffed Chicken Breast recipe! With its vibrant flavors, stunning presentation, and numerous health benefits, it’s bound to become a favorite in your household. Remember, cooking should be fun and exciting—so roll up your sleeves and get ready to impress!

Spinach Stuffed Chicken Breast (6 Ingredients)

Prep Time 15 minutes
Cook Time 20 minutes
Total Time 35 minutes
Servings 4 pieces
Calories 350
A delicious and healthy stuffed chicken breast recipe featuring spinach, cheese, and tomatoes, perfect for a quick dinner.

Ingredients

Protein

  • 4 oz Boneless skinless chicken breasts
  • 2 tsp Sea salt
  • 0.5 tsp Black pepper
  • 6 oz Fresh spinach (chopped)
  • 2 oz Cream cheese (softened)
  • 2 cloves Garlic (minced)
  • 1 cup Mozzarella cheese (shredded, divided)
  • 1 tbsp Olive oil
  • 1 medium Roma tomato (sliced thinly into 8 slices)

Instructions 

  • Preheat oven to 450°F (232°C).
  • Season chicken breasts with salt and pepper, cut a slit to create a pocket.
  • Steam spinach until wilted, then squeeze out excess water. Mix with cream cheese, garlic, and 1/2 cup mozzarella.
  • Stuff the spinach mixture into chicken pockets, secure with toothpicks, sear in oil for 4-5 minutes per side.
  • Top with tomato slices and remaining mozzarella, then bake for 15 minutes until cooked through.

Notes

Use a meat thermometer to ensure chicken reaches 165°F (74°C).
Calories: 350kcal
Cost: $15
Course: Main Course
Cuisine: American
Keyword: Cheese, Chicken, spinach

Welcome to the Flavor Fiesta: Discover Frito Cowboy Cabbage!

Dive into the vibrant world of Frito Cowboy Cabbage, where crunchy veggies and zesty spices come together in a colorful explosion of flavor! This dish is not only a feast for the eyes but also a delight for your taste buds. Imagine a bowl filled with fresh, crispy ingredients, drizzled with a creamy chipotle dressing, and topped with the delightful crunch of Chili Cheese Fritos. It’s quick, nutritious, and perfect for busy weeknights or parties! Let’s explore why this recipe should be your next kitchen adventure!

Why You’ll Love This Recipe

  • Quick and Easy: Whip up this delicious salad in just 15 minutes, making it a perfect choice for busy days.
  • Nutritious Ingredients: Packed with black beans, corn, and fresh veggies, this dish is loaded with vitamins and minerals.
  • Customizable: Feel free to tweak the ingredients based on your preferences or what you have on hand.
  • Perfect for Parties: This vibrant salad is a crowd-pleaser, sure to impress your guests at gatherings.
  • Flavor Explosion: The combination of chipotle dressing and Chili Cheese Fritos creates a taste sensation you won’t forget!

Ingredients Breakdown

Here’s what you’ll need to create this colorful dish, along with some handy substitutions.

  • Coleslaw Mix: 1 bag (16 ounces) provides a crunchy base. You can substitute with finely shredded green cabbage for a fresher flavor.
  • Black Beans: 1 can (15 ounces), rinsed and drained. If you prefer, pinto beans or chickpeas can also work well.
  • Canned Corn: 1 ½ cups (drained). Fresh corn off the cob adds a sweeter taste, but canned is quick and easy.
  • Jalapeño Pepper: 1 medium, seeded and finely diced for a spicy kick. If you want less heat, omit or replace with a bell pepper.
  • Red Bell Pepper: 1 small, also seeded and diced, for sweetness and color.
  • Green Onions: 3, finely sliced for a fresh, oniony crunch.
  • Cilantro: ¼ cup, finely chopped for a burst of fresh flavor. If cilantro isn’t your thing, parsley is a great substitute!
  • Taco Seasoning: 1 tablespoon for that Southwestern flair. Homemade taco seasoning works too!
  • Ground Cumin: ½ teaspoon for warmth and depth of flavor.
  • Chili Cheese Fritos: 1 bag (9.75 ounces), reserving a handful for topping. You can use regular Fritos if you prefer.
  • Sour Cream: ½ cup, adds creaminess. Greek yogurt is a healthy alternative.
  • Mayonnaise: ½ cup, for richness; you can swap with avocado or a vegan alternative.
  • Lime Juice: ¼ cup (about 2 limes) for brightness.
  • Chipotle Sauce: 2 tablespoons from a can of chipotles in adobo for that smoky flavor.

How to Make Frito Cowboy Cabbage

Side view of a hearty dish featuring Frito Cowboy Cabbage with various toppings.

Follow these simple steps to create your delicious Frito Cowboy Cabbage.

  • Step 1: In a large bowl, combine the coleslaw mix, black beans, corn, jalapeño, red bell pepper, green onions, cilantro, taco seasoning, and cumin. Toss until everything is evenly mixed.
  • Step 2: In a separate medium bowl, whisk together the sour cream, mayonnaise, lime juice, and chipotle sauce until smooth. This creamy chipotle dressing makes about 1 ¼ cups.
  • Step 3: When you’re ready to serve, pour the dressing over the salad mixture and stir gently to coat all the ingredients.
  • Step 4: Add all but a handful of the Chili Cheese Fritos to the salad and toss again.
  • Step 5: Just before serving, top with the reserved Fritos for an extra crunch. This is where the magic happens!
  • Step 6: Serve immediately and enjoy the fiesta of flavors!

Pro Tips for Perfection

  • Chill before serving: For best flavor, chill the coleslaw mix and dressing ingredients before combining.
  • Freshness is key: Use fresh ingredients whenever possible for the best taste and nutrition.
  • Customize to your liking: Feel free to add or swap in your favorite veggies like avocado or cherry tomatoes.
  • Topping time: Always add the Fritos just before serving to keep them crunchy!
  • Meal prep: You can prepare the salad and dressing ahead of time, just mix before serving.
  • Spice it up: Adjust the amount of jalapeño or add hot sauce if you like it spicy!
  • Storage tips: Store leftovers in an airtight container in the fridge for up to 2 days.
  • Layering flavors: Let the salad sit for 10-15 minutes after mixing to allow the flavors to meld.

Common Mistakes and Troubleshooting

Even the best of us make mistakes in the kitchen! Here’s how to avoid the most common pitfalls.

  • Too watery: Make sure to drain the canned corn and black beans thoroughly to prevent a soggy salad.
  • Overdressed: Start with half the dressing and add more as needed to avoid a dressing overload.
  • Flavorless: Don’t skip the seasonings! They elevate the dish, so be generous with the taco seasoning and cumin.
  • Not enough crunch: Add extra Fritos or consider including nuts for added texture.

Variations to Try

Get creative with these fun twists on the classic Frito Cowboy Cabbage!

  • Southwestern Chicken: Add shredded rotisserie chicken for extra protein and heartiness.
  • Vegan Delight: Swap out sour cream and mayonnaise for cashew cream or avocado dressing.
  • Cheesy Version: Sprinkle shredded cheese (cheddar or pepper jack) on top for an extra creamy layer.
  • Spicy Kick: Incorporate diced chipotle peppers in adobo for a bolder flavor.

Storage and Make-Ahead Instructions

Planning ahead? Here’s how to store your Frito Cowboy Cabbage:

  • Refrigeration: Store leftovers in an airtight container in the fridge for up to 2 days.
  • Make-Ahead: Prepare the salad ingredients and dressing separately, then combine just before serving for optimal freshness.
  • Freezing: This salad is best enjoyed fresh, but you can freeze the dressing separately for future use.

Frequently Asked Questions (FAQs)

  • Can I make this salad ahead of time? Yes, prepare the ingredients and dressing separately, then mix just before serving.
  • What can I substitute for the Fritos? You can use any crunchy tortilla chips or even crispy fried onions for a different twist!
  • Is Frito Cowboy Cabbage gluten-free? Yes, if you use gluten-free Fritos or tortilla chips, this recipe can be gluten-free.
  • How can I make it spicier? Add more jalapeño, a dash of hot sauce, or diced chipotle peppers in adobo.
  • What’s the best way to serve this salad? Serve it chilled or at room temperature for the best flavor.
  • Can I add other vegetables? Absolutely! Feel free to add diced tomatoes, corn, or cucumbers for added crunch.
  • How long does it last in the fridge? It stays fresh for about 2 days, but it’s best enjoyed within the first day.
  • Can I use fresh corn instead of canned? Yes! Fresh corn adds a delightful sweetness and crunch.

Nutritional Tips and Dietary Adaptations

This recipe is not only delicious but can also be adapted to suit various dietary preferences:

  • Low-carb: Skip the Fritos and serve on a bed of greens for a lighter meal.
  • High-protein: Add cooked quinoa or grilled chicken for an extra protein boost.
  • Vegetarian: The recipe is naturally vegetarian; just ensure the toppings align with your dietary choices.
  • Low-calorie: Use Greek yogurt instead of sour cream and light mayo to cut calories.

Equipment Recommendations

Ensure you have the right tools to make your cooking experience smooth and enjoyable:

  • Large Mixing Bowl: Essential for combining all the salad ingredients easily.
  • Whisk: Perfect for mixing the chipotle dressing to a smooth consistency.
  • Chopping Board: A sturdy board is crucial for prepping your fresh veggies.
  • Sharp Knife: A good knife will make slicing and dicing quick and effortless.

Serving Suggestions

Pair your vibrant Frito Cowboy Cabbage with these delicious options:

  • Grilled Chicken: A perfect protein pairing for a hearty meal.
  • Tacos: Serve alongside your favorite tacos for a delightful Tex-Mex feast.
  • BBQ Ribs: The freshness of the salad complements smoky BBQ flavors beautifully.
  • As a Side Dish: Great for potlucks or family gatherings as a refreshing side.

Conclusion: Let the Fiesta Begin!

Frito Cowboy Cabbage is more than just a salad; it’s a celebration of flavor, color, and nutrition. With its quick prep time and endless customization options, it’s the perfect dish for any occasion. Whether you keep it traditional or mix it up with your own flair, this recipe is sure to become a staple in your kitchen. So, gather your ingredients, invite some friends, and let the fiesta begin—your taste buds will thank you!

Frito Cowboy Cabbage

Prep Time 15 minutes
Total Time 15 minutes
Servings 4 servings
Calories 350
A vibrant and crunchy cabbage salad topped with chili cheese Fritos and a smoky chipotle dressing, perfect for a quick, flavorful meal or side dish.

Ingredients

Vegetables and Beans

  • 16 ounces coleslaw mix
  • 15 ounces black beans (rinsed and drained)
  • 1.5 cups canned corn kernels (drained)
  • 1 medium jalapeño pepper (seeded and finely diced)
  • 1 small red bell pepper (seeded and finely diced)
  • 3 green onions green onions (finely sliced)
  • 0.25 cup fresh cilantro (finely chopped)
  • 1 tablespoon taco seasoning
  • 0.5 teaspoon ground cumin
  • 9.75 ounces Chili Cheese Fritos (reserving a handful for topping)
  • 0.5 cup sour cream
  • 0.5 cup mayonnaise
  • 0.25 cup fresh lime juice (about 2 limes)
  • 2 tablespoons chipotle sauce (from a can of chipotles in adobo, just the sauce)

Instructions 

  • Combine coleslaw mix, black beans, corn, jalapeño, red bell pepper, green onions, cilantro, taco seasoning, and cumin in a large bowl. Toss to combine.
  • Whisk together sour cream, mayonnaise, lime juice, and chipotle sauce in a medium bowl to make the dressing.
  • Pour the dressing over the cabbage mixture and gently stir to coat.
  • Add most of the Fritos, gently mixing to combine.
  • Top with the reserved handful of Fritos just before serving for crunch.
  • Serve immediately for best texture.

Notes

For extra flavor, chill the salad for 30 minutes before serving.
Calories: 350kcal
Cost: $12
Course: Salad
Cuisine: American
Keyword: cabbage, Fritos, Spicy

Discover the Zesty Cucumber and Carrot Salad: Your New Favorite Crunchy Delight!

Welcome to a colorful journey of flavor and nutrition! This cucumber and carrot salad is not just a recipe; it’s a celebration of fresh, vibrant ingredients that come together in a delightful crunch. Perfectly zesty and incredibly refreshing, this salad is your go-to solution for quick meals that don’t skimp on taste. With just a handful of ingredients and minimal prep time, you can whip up a salad that’s not only beautiful but also a powerhouse of nutrients!

Why You’ll Love This Recipe

Here are five compelling reasons to make this salad your next kitchen adventure:

  • Quick and Easy: Ready in just 15 minutes, this salad is perfect for busy days when you need a nutritious boost without the hassle.
  • Flavor Explosion: The combination of zesty lemon, aromatic herbs, and crunchy vegetables creates a harmony of flavors that will make your taste buds dance.
  • Versatile and Customizable: Feel free to adapt this recipe! Add your favorite nuts, seeds, or other veggies to make it your own.
  • Healthy and Nutritious: Packed with vitamins and minerals, this salad supports your wellness goals without sacrificing flavor.
  • Great for Meal Prep: Make it ahead of time for a refreshing side dish that pairs beautifully with any main course!

Ingredients Breakdown

Here’s what you’ll need to create your scrumptious salad:

  • 2 medium cucumbers: Choose firm and fresh ones for the best crunch. You can also use pickling cucumbers for a unique twist.
  • 2 large carrots: Opt for vibrant, unblemished carrots. You can grate them for a finer texture or julienne them for a more rustic feel.
  • ¼ cup fresh parsley or dill: These herbs add a burst of freshness. If you’re not a fan, try basil or cilantro for different flavor profiles.
  • 3 tablespoons extra virgin olive oil: A high-quality olive oil elevates the dressing. Consider avocado oil for a different taste.
  • Juice from 1 medium lemon: Fresh lemon juice brightens the salad. Lime juice works well if you’re looking for a twist.
  • Salt and pepper to taste: Essential for enhancing the flavors!

How to Make This Salad

Side perspective of a colorful salad featuring sliced cucumbers and carrots.

Ready to dive into the preparation? Follow these simple steps:

  1. Wash and Slice: Rinse your cucumbers and carrots thoroughly. Slice the cucumbers into thin rounds or half-moons. Peel and grate the carrots using a box grater or food processor.
  2. Chop Herbs: Finely chop your fresh parsley or dill to release their aromatic oils.
  3. Make the Dressing: In a small bowl, whisk together the olive oil, lemon juice, salt, and pepper until well combined.
  4. Combine Ingredients: In a large bowl, toss the sliced cucumbers, grated carrots, and chopped herbs. Drizzle with the dressing and gently toss until everything is evenly coated.
  5. Chill and Serve: For enhanced flavors, chill the salad in the refrigerator for at least 30 minutes before enjoying!

Pro Tips for Making the Best Salad

Here are some expert insights to elevate your salad game:

  • Choose Fresh Ingredients: Fresh, seasonal vegetables yield the best flavor and texture.
  • Adjust the Dressing: Feel free to add a dash of honey or maple syrup for a hint of sweetness if you prefer.
  • Mix It Up: Add diced bell peppers, cherry tomatoes, or even avocado for an extra layer of flavor.
  • Crunch Factor: For added texture, toss in some toasted sunflower seeds or slivered almonds.
  • Make Ahead: This salad keeps well in the fridge for up to 2 days, making it ideal for meal prep.
  • Perfect Pairings: Serve this salad alongside grilled chicken or fish for a complete meal.
  • Adjust the Lemon: Experiment with the amount of lemon juice to find your perfect tang balance.
  • Season Wisely: Taste and adjust your salt and pepper after tossing to ensure the flavors pop.

Common Mistakes and Troubleshooting

Even the best can make mistakes! Here’s what to avoid:

  • Overdressing: Start with less dressing and add more if needed. You want the salad to be coated, not swimming!
  • Using Old Vegetables: Wilty cucumbers or soft carrots can ruin the texture. Always use fresh produce.
  • Skipping the Chill: Chilling enhances the flavors. Don’t skip this step for the best taste!

Variations to Try

Get creative! Here are some fun variations to keep things exciting:

  • Thai-Inspired: Add a splash of fish sauce and a sprinkle of crushed peanuts for a Thai twist.
  • Asian Flair: Incorporate sesame oil and rice vinegar, and sprinkle with sesame seeds.
  • Fruity Delight: Toss in some diced apples or mandarin oranges for a sweet contrast.
  • Spicy Kick: Add some diced jalapeños or a pinch of red pepper flakes for heat.

Storage and Make-Ahead Instructions

Want to prepare this salad in advance? Here’s how:

  • Refrigeration: Store the salad in an airtight container in the fridge for up to 2 days. The flavors will deepen over time!
  • Make Ahead: Prepare the components separately and mix just before serving to maintain freshness.

Frequently Asked Questions

Got questions? We’ve got answers!

  • Can I use different herbs? Absolutely! Feel free to swap in your favorite herbs based on your taste preferences.
  • What can I serve with this salad? This salad pairs beautifully with grilled meats, fish, or as a side for a sandwich.
  • Is this salad good for meal prep? Yes! It stores well and is perfect for lunchboxes or quick dinners.
  • Can I add protein? Definitely! Grilled chicken, chickpeas, or tofu make excellent additions.
  • What’s the best way to cut the cucumbers? Thin rounds or half-moons work best for a nice crunch!
  • Can I make this salad vegan? Yes, it’s naturally vegan as is! Just ensure no animal products in your dressing.
  • How do I make it gluten-free? This recipe is gluten-free; just double-check your ingredient labels.
  • What’s the nutritional value of this salad? It’s low in calories and rich in vitamins A and C, making it a nutritious choice!

Nutrition Tips and Dietary Adaptations

Eating healthy doesn’t have to be boring! Here are some tips to enhance the nutritional profile:

  • Increase Fiber: Add legumes like chickpeas or lentils for a fiber boost.
  • Healthy Fats: Incorporate avocado for healthy fats and creaminess.
  • Low-Calorie Option: Enjoy this salad as a low-calorie meal by keeping the dressing light.

Recommended Equipment

Here’s what you’ll need to create this salad:

  • Cutting Board: A sturdy cutting board is essential for chopping your veggies.
  • Sharp Knife: A good knife makes slicing and grating much easier.
  • Mixing Bowl: A large bowl for tossing all the ingredients together.
  • Whisk: For efficiently blending your dressing ingredients.

Serving Suggestions

Make your meal complete with these serving ideas:

  • As a Side Dish: Serve it alongside grilled meats or fish for a refreshing contrast.
  • As a Topping: Use it as a topping for tacos or wraps for added crunch and flavor.
  • In a Bowl: Pair it with quinoa or brown rice for a hearty, healthy bowl.

Conclusion

There you have it! A vibrant, refreshing, and oh-so-delicious cucumber and carrot salad that’s sure to become a staple in your kitchen. With its bright flavors and crunchy texture, this salad is a testament to how healthy eating can be fun and exciting. So grab your ingredients, gather your loved ones, and dive into this crunchy delight that’s ready to elevate your meals. Happy cooking!

Cucumber and Carrot Salad Recipe

Prep Time 10 minutes
Total Time 10 minutes
Servings 4 people
Calories 120
A fresh and vibrant salad combining crisp cucumbers, sweet carrots, and herbs, perfect for a light meal or side dish.

Ingredients

Vegetables

  • 2 medium cucumbers
  • 2 large carrots
  • 0.25 cup fresh parsley or dill
  • 3 tablespoons extra virgin olive oil
  • 1 medium lemon (juice from)
  • to taste salt and pepper

Instructions 

  • Wash and slice cucumbers; peel and grate carrots.
  • Chop herbs finely.
  • Whisk olive oil, lemon juice, salt, and pepper to make dressing.
  • Combine vegetables and herbs; toss with dressing.
  • Chill for 30 minutes before serving.

Notes

For extra flavor, add a pinch of chili flakes or a drizzle of honey.
Calories: 120kcal
Cost: $8
Course: Salad
Cuisine: international
Keyword: Carrot, cucumber, Fresh Herbs

Hey there, food adventurers! Ryan here, ready to take you on a vibrant culinary journey with my Mediterranean Chickpea Cucumber Salad. Imagine a sun-drenched afternoon, the air filled with laughter, and the table set with colorful, inviting dishes. This salad is more than just a recipe; it’s a joyful celebration of fresh, bold flavors that transport me back to those carefree college days when I first discovered the magic of combining simple ingredients into something extraordinary. Every bite is a reminder that healthy eating is not just nourishing but also a whole lot of fun!

Why You’ll Absolutely Love This Recipe

  • It’s a breeze to make—like a mini kitchen victory every time!
  • Packed with vibrant colors and textures that make every bite exciting.
  • Perfect for any meal, whether it’s a quick lunch or a light dinner.
  • Full of Mediterranean Diet goodness, keeping you energized and satisfied.
  • It’s a refreshing, flavor-packed way to enjoy your veggies and protein.

Simple Ingredients for a Delicious Treat

Let’s talk about the stars of this dish. Chickpeas are not just a protein powerhouse; they’re also incredibly versatile and have this amazing ability to soak up flavors. Then, we have cucumbers, which add that refreshing crunch we all love. Cherry tomatoes bring in a burst of sweetness, while the red onion adds a sharp, zesty kick. And of course, we can’t forget the creamy, tangy feta cheese that ties everything together. Fresh parsley and mint? They’re the aromatic herbs that elevate this salad to a whole new level of deliciousness. Trust me, these ingredients are not just components—they’re the building blocks of a delightful culinary experience.

You’ll find the full ingredient list with exact measurements in the recipe card below!

Let’s Make Some Magic: Step-by-Step

Alright, let’s dive into the fun part—making this vibrant salad! Start by dicing your cucumber, halving those juicy cherry tomatoes, and slicing the red onion as thin as you like. Chop up the parsley and mint; their fresh aroma is going to make your kitchen smell amazing! In a large bowl, toss together the chickpeas, cucumber, tomatoes, red onion, feta, parsley, and mint. Now, let’s whisk up a simple yet zesty dressing. In a small bowl, combine olive oil, lemon juice, minced garlic, oregano, salt, and pepper. Pour this magic over your salad and toss gently to coat everything evenly. Serve it right away or chill it for later—either way, it’s going to be delightful!

A Few of My Favorite Tips

Here are a couple of tips from my kitchen to yours: For an extra kick, add a pinch of red pepper flakes to the dressing—trust me, it’s a game-changer! If you’re prepping this salad in advance, keep the dressing separate until you’re ready to serve, so everything stays crisp and fresh. And if you’re a fan of olives, a handful of Kalamata olives can add a lovely depth of flavor.

How I Like to Serve This

I love serving this salad as a side with grilled chicken or fish for a complete meal. It’s also fantastic on its own as a light lunch. Sometimes, I’ll even stuff it into a whole wheat pita for a quick, satisfying sandwich. However you choose to enjoy it, this salad is guaranteed to brighten your day!

Storing & Reheating (If There’s Any Left!)

If you happen to have any leftovers, store them in an airtight container in the fridge for up to 3 days. The flavors meld beautifully over time, making it even more delicious the next day. Just give it a good toss before serving. Remember, the key to keeping it fresh is to store the dressing separately if you can!

Looking for more salad inspiration? Dive into my Crisp Asian Cucumber Salad Adventure or refresh your senses with This Asian Cucumber Salad. And if you need another burst of crunch, check out This Crunchy Asian Cucumber Salad. Here’s to making healthy eating exciting and delicious!

Mediterranean Chickpea Cucumber Salad

Prep Time 15 minutes
Total Time 15 minutes
Servings 4 servings
Calories 300
A refreshing and healthy salad packed with protein and vibrant flavors, perfect for a light meal or side dish.

Ingredients

Canned Goods

  • 1 can chickpeas, drained and rinsed ((425g))

Vegetables

  • 1 cucumber diced ((about 200g))
  • 1 pint cherry tomatoes, halved ((about 300g))
  • 1/2 red onion thinly sliced ((about 75g))

Dairy

  • 4 ounces feta cheese, crumbled ((115g))

Herbs

  • 1/4 cup fresh parsley, chopped ((15g))
  • 1/4 cup fresh mint, chopped ((15g))

Condiments

  • 3 tablespoons olive oil ((45ml))
  • 2 tablespoons lemon juice ((30ml))
  • 1 clove garlic, minced
  • 1/2 teaspoon dried oregano

Seasoning

  • salt and pepper to taste

Instructions 

  • Dice cucumber, halve tomatoes, and slice red onion. Chop parsley and mint.
  • In a bowl, combine chickpeas, cucumber, tomatoes, red onion, feta, parsley, and mint.
  • In a small bowl, whisk olive oil, lemon juice, garlic, oregano, salt, and pepper.
  • Pour dressing over salad and toss gently to coat.
  • Serve immediately or chill for later.

Notes

For added flavor, let the salad sit for 30 minutes before serving.
Calories: 300kcal
Cost: $10.00
Course: Salad
Cuisine: Mediterranean
Keyword: chickpea

Hey there, fellow food adventurers! It’s Ryan here, your go-to guide for all things vibrant and delicious. Today, I’m beyond thrilled to share a recipe that brings a burst of Mediterranean sunshine right onto your plate. Picture this: a bowl brimming with colors, textures, and flavors that dance together like a joyful symphony. This Mediterranean Chickpea Salad is not just a meal; it’s an experience. Every bite takes me back to lazy afternoons on sun-drenched patios, where life feels as simple and beautiful as a sunset over the Austin skyline. So, let’s dive in and make something truly special together!

Why You’ll Absolutely Love This Recipe

  • It’s a breeze to make, perfect for those “what’s for lunch?” moments.
  • Packed with protein and fiber, it’s a powerhouse of nutrition wrapped in pure deliciousness.
  • The vibrant colors and fresh flavors will brighten your day, guaranteed!
  • Perfect for meal prep, so you can enjoy it throughout the week.
  • This salad is versatile, fitting seamlessly into any Mediterranean Diet Recipes Dinners plan.

Simple Ingredients for a Delicious Treat

Let’s talk ingredients, my friends. Each one is a star in its own right. Chickpeas, those little protein-packed gems, are the heart of this dish. They’re not just filling; they’re fabulous! Mini cucumbers add a refreshing crunch, while red onion provides a zesty kick. Fresh herbs like oregano and parsley bring that fragrant, garden-fresh goodness we all love. And let’s not forget the kalamata olives and feta, adding that irresistible Mediterranean flair. It’s all about balance, and these ingredients hit the mark every time.

You’ll find the full ingredient list with exact measurements in the recipe card below!

Let’s Make Some Magic: Step-by-Step

Alright, let’s roll up our sleeves and get to the fun part! First, drain and rinse those chickpeas, then toss them into a salad bowl like the culinary rockstar you are. Next up, prep your veggies and herbs. As you chop, imagine each piece adding a little burst of flavor to our masterpiece. Now, for the dressing—add olive oil, lemon juice, and minced garlic directly into the bowl. Give it all a gentle toss, taste, and adjust as needed. A sprinkle of salt and pepper, and voila! You’ve got yourself a Mediterranean Chickpea Salad that’s as beautiful as it is tasty.

A Few of My Favorite Tips

Here are a few insider tips to elevate your salad game: For an extra zing, add a pinch of red pepper flakes. If you’re feeling fancy, a drizzle of balsamic glaze can take this salad to new heights. And remember, fresh herbs are your best friend—don’t skimp on them!

How I Like to Serve This

This salad is a star on its own, but I love pairing it with some warm pita bread or serving it alongside grilled chicken for a heartier meal. It’s also fantastic as a side dish for any Mediterranean-inspired feast. Honestly, it’s so versatile, the possibilities are endless!

Storing & Reheating (If There’s Any Left!)

If you have leftovers (lucky you!), store them in an airtight container in the fridge. This salad keeps well for up to three days. The flavors meld beautifully over time, making it a perfect make-ahead option. Just give it a gentle stir before serving, and you’re good to go!

Looking for more salad inspiration? Check out these delightful options: Dive into this refreshing watermelon basil feta salad, Brighten your day with this feta watermelon salad, or this crunchy Asian cucumber salad will brighten your day. Happy cooking, and remember, healthy eating is all about joy and creativity!

Mediterranean Chickpea Salad

Prep Time 15 minutes
Total Time 15 minutes
Servings 4 servings
Calories 350
A refreshing and nutritious salad packed with Mediterranean flavors, perfect for a light meal or side dish.

Ingredients

Salad Ingredients

  • 1 can chickpeas (rinsed and drained)
  • 2 mini cucumbers (chopped)
  • 1 tablespoon red onion (chopped)
  • 1 tablespoon fresh oregano (chopped)
  • 1 tablespoon fresh parsley (chopped)
  • 1/2 red bell pepper (chopped)
  • 1 cup little tomatoes (cut into halves)
  • 1/2 cup kalamata olives
  • 3.5 ounces feta (packed in oil & herbs if possible)
  • 2 tablespoons olive oil
  • 1/2 tablespoon lemon juice
  • 1 clove garlic (minced)
  • salt & pepper (to taste)

Instructions 

  • Drain & rinse your chickpeas and add them to a salad bowl.
  • Prep your veggies and herbs, and add them to the salad bowl as you go along.
  • Add the dressing ingredients (olive oil, lemon juice, garlic) right into the salad bowl and toss gently.
  • Taste and adjust as needed (e.g. add more olive oil), and season with salt & pepper.

Notes

For added flavor, use feta packed in oil and herbs.
Calories: 350kcal
Cost: $10.00
Course: Salad
Cuisine: Mediterranean
Keyword: Chickpeas

Hey there, fellow food lovers! I’m Ryan Johnson, your go-to guy for all things healthy, delicious, and downright exciting in the kitchen. Today, I’m bringing you something that’s not only a feast for your taste buds but also a burst of vibrant colors and nutrition—my 10-Minute Mediterranean Chickpea Salad. This dish takes me back to my college days, where my culinary journey began with experimenting in my tiny dorm room kitchen. It’s a recipe that reminds me of sunny afternoons and the joy of creating something beautiful and nourishing from simple ingredients. So, let’s dive into this culinary adventure together!

Why You’ll Absolutely Love This Recipe

  • Quick and Easy: It’s so easy, it feels like a little kitchen victory every time you make it!
  • Flavor Explosion: Each bite is packed with bold Mediterranean flavors.
  • Healthy and Nutritious: Packed with protein-rich chickpeas and fresh veggies.
  • Versatile: Perfect as a main dish, side, or meal prep superstar.
  • Colorful and Inviting: Brighten up your plate and your day!

Simple Ingredients for a Delicious Treat

Let’s talk ingredients! This Homemade Chickpea Salad Dish is all about fresh, vibrant components that come together in harmony. Chickpeas are the star here—protein-packed and satisfying. I love adding crisp cucumber and juicy cherry tomatoes for that refreshing crunch. Kalamata olives bring a briny depth, while red bell pepper adds a sweet note. And who can resist the creamy, tangy goodness of feta cheese? Don’t forget the fresh parsley—it brightens everything up!

You’ll find the full ingredient list with exact measurements in the recipe card below!

Let’s Make Some Magic: Step-by-Step

Alright, friends, let’s whip up this Easy Chickpea Salad Dish together. Imagine me right there in your kitchen, cheering you on!

  1. Gather your ingredients: Assemble all of the salad ingredients in a large bowl. Feel the excitement? That’s the magic starting!
  2. Shake it up: Add all of the dressing ingredients to a mason jar fitted with a lid and shake well to emulsify. It’s like a little dance party for your salad!
  3. Bring it together: Pour the dressing over the salad and toss. Watch as all those flavors come together in a beautiful harmony.
  4. Enjoy: Serve cold or at room temperature. Your taste buds are in for a treat!

A Few of My Favorite Tips

Here are some insider tips, just between us:

  • Make Ahead: This salad is a fantastic Chickpea Salad Meal Prep option. It actually tastes even better the next day!
  • Mix It Up: Feel free to add other veggies like avocado or roasted red peppers for a twist.
  • Spice It Up: Add a pinch of chili flakes if you like a little heat.

How I Like to Serve This

I love serving this salad as a main dish with some warm pita bread on the side. It’s also a wonderful side dish for grilled meats or fish. And if you’re hosting a summer picnic, it’s a star addition to your spread. Check out my other salad creations like The Refreshing Watermelon Feta Salad You’ll Crave This Summer for more inspiration!

Storing & Reheating (If There’s Any Left!)

Store any leftovers in an airtight container in the fridge for up to 3 days. The flavors meld together beautifully over time. Just give it a good toss before serving to redistribute the dressing. No reheating needed—this salad is best enjoyed cold or at room temperature!

10-Minute Mediterranean Chickpea Salad

Prep Time 10 minutes
Total Time 10 minutes
Servings 4 servings
Calories 350
This quick and refreshing Mediterranean chickpea salad is packed with flavor and nutrients, perfect for a healthy meal or side dish.

Ingredients

Salad Ingredients

  • 2 cans chickpeas – drained and rinsed well
  • 3/4 cup chopped cucumber
  • 2/3 cup sliced cherry tomatoes
  • 1/2 cup chopped red bell pepper
  • 1/3 cup sliced kalamata olives
  • 1/4 cup chopped red onion
  • 1/4 cup crumbled feta cheese
  • 1/4 cup chopped fresh parsley
  • 1/4 cup extra virgin olive oil
  • 1/4 cup red wine vinegar
  • 1 tablespoon dijon mustard
  • 1 teaspoon oregano
  • 1/2 teaspoon garlic powder
  • 1/4 teaspoon kosher salt
  • 1/4 teaspoon ground black pepper

Instructions 

  • Assemble all of the salad ingredients in a large bowl.
  • Add all of the dressing ingredients to a mason jar fitted with a lid and shake well to emulsify.
  • Pour the dressing over the salad and toss.
  • Serve cold or at room temperature.

Notes

For added flavor, let the salad sit for 10 minutes before serving.
Calories: 350kcal
Cost: $10.00
Course: Salad
Cuisine: Mediterranean
Keyword: Chickpeas