Author

Ryan

Browsing

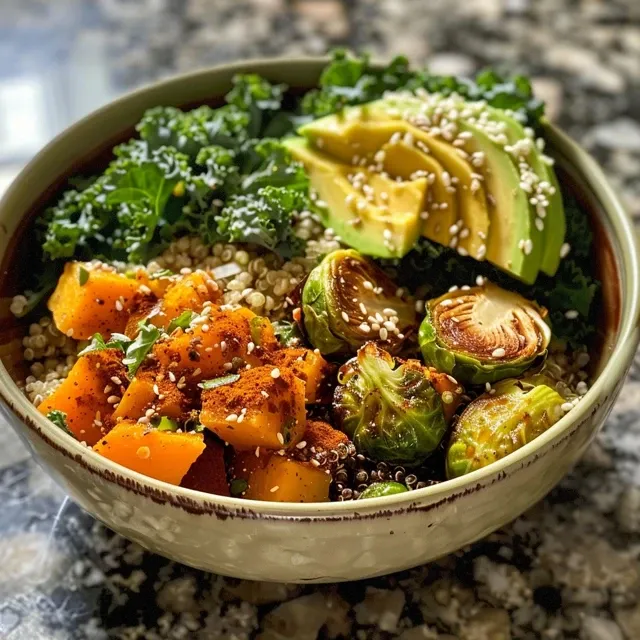
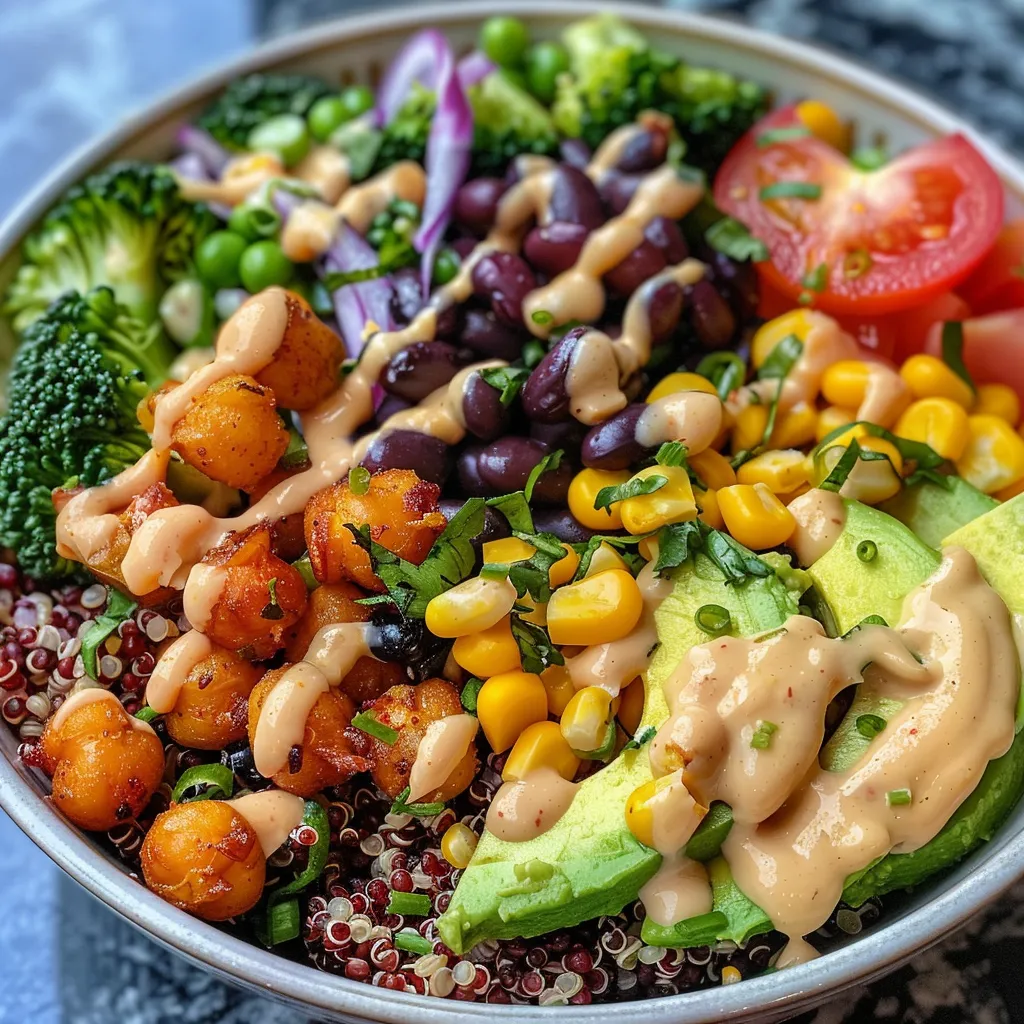
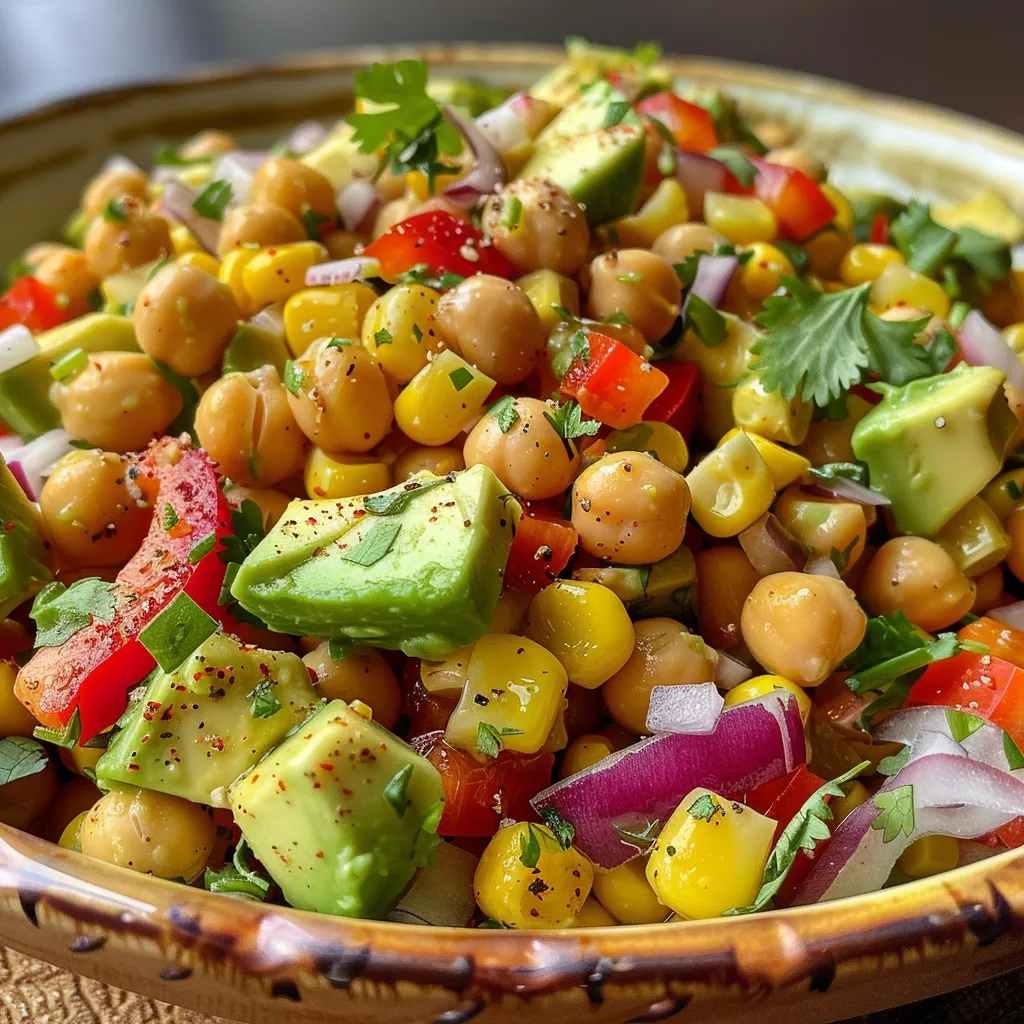
Brighten Up Your Plate with This Zesty Sweet Corn & Chickpea Salad

Are you ready to dive into a vibrant bowl of goodness? This Sweet Corn Chickpea & Avocado Salad is not just a feast for the eyes; it’s a powerhouse of flavor and nutrition! Bursting with fresh ingredients, this salad makes healthy eating feel exciting and satisfying. Perfect as a refreshing side dish or a light main course, it’s here to prove that nutritious meals can be fun and full of zest. Let’s uncover why this salad will become your new go-to recipe!

Why You’ll Love This Salad

Here are just a few reasons why this Sweet Corn Chickpea Salad will steal your heart:

  • Quick and Easy Prep: Whip it up in just 30 minutes, making it ideal for busy weeknights!
  • Nutritious Powerhouse: Packed with protein from chickpeas and healthy fats from avocados, this dish fuels your body right.
  • Vibrant Flavors: The combination of sweet corn, creamy avocado, and zesty lime creates a delightful flavor explosion.
  • Customizable: Easily adapt the ingredients to suit your preferences or what you have on hand.
  • Perfect for Meal Prep: Make a batch ahead of time for quick lunches or dinners during the week.

Ingredients Breakdown

Getting started with this Chickpea Avocado Salad is a breeze! Here’s everything you’ll need:

  • 2 ears sweet corn (kernels removed, about 250g / 1 cup): Fresh corn is best, but frozen works too!
  • 1 can chickpeas (15 oz / 425g): Drain and rinse for a clean taste.
  • 2 ripe avocados: Choose firm but slightly soft avocados for the best texture.
  • 1/4 cup red onion (finely chopped, about 30g): Adds a nice crunch and flavor.
  • 1/2 bell pepper (diced, about 75g): Use any color you like for a pop of color!
  • 1/4 cup fresh cilantro (chopped, about 15g): This herb lifts the salad with freshness.
  • 2 tablespoons lime juice (30ml): Freshly squeezed is best for bright flavor.
  • 3 tablespoons olive oil (45ml): A drizzle of healthy fat for richness.
  • 1/2 teaspoon cumin (2.5ml): A warm spice that complements the other flavors.
  • 1/4 teaspoon chili powder (1.25ml): Adjust according to your spice preference!
  • Salt and pepper to taste: Essential for bringing out all the flavors.

Step-by-Step Instructions

Colorful salad featuring diced avocados, sweet corn kernels, and chickpeas arranged attractively.

Ready to create this delicious salad? Follow these simple steps:

  1. If using fresh corn, remove kernels from the cob.
  2. In a large mixing bowl, combine corn, chickpeas, avocado, red onion, bell pepper, and cilantro.
  3. In a small bowl, whisk together lime juice, olive oil, cumin, chili powder, salt, and pepper.
  4. Pour dressing over the salad and gently toss to coat.
  5. Taste and adjust seasonings. Serve immediately or chill for later.

Pro Tips for Perfect Results

Want to elevate your salad game? Here are some expert tips:

  • Use fresh ingredients: The fresher your produce, the better your salad will taste!
  • Don’t overmix: Gently toss to keep the avocado intact and creamy.
  • Adjust spice levels: If you like it spicy, add more chili powder or even a dash of hot sauce!
  • Make it colorful: Mix in additional veggies like cherry tomatoes or cucumbers for extra crunch.
  • Go vegan: This salad is already plant-based, but omit any non-vegan additions to keep it pure!
  • Refresh with herbs: Experiment with fresh basil or mint for a twist!
  • Serve chilled: Let it sit in the fridge for 30 minutes before serving for flavors to meld.
  • Store properly: Keep leftovers in an airtight container to maintain freshness.

Common Mistakes and Troubleshooting

Even the best chefs can hit a snag! Here are some common issues and how to avoid them:

  • Brown avocado: Add avocado just before serving to prevent browning.
  • Soggy salad: Dress only when ready to serve to keep everything crisp.
  • Bland flavor: Always taste and adjust seasonings as needed!
  • Overripe ingredients: Choose ripe but firm produce for the best texture in your salad.

Delicious Variations

Feeling adventurous? Try these fun twists on the classic recipe:

  • Add protein: Toss in grilled chicken, shrimp, or quinoa for a heartier meal.
  • Switch up the beans: Use black beans or kidney beans instead of chickpeas.
  • Switch the dressing: Try a balsamic vinaigrette or a tahini dressing for different flavors.
  • Make it a wrap: Serve the salad in a whole wheat wrap for a portable lunch option.

Storage and Make-Ahead Instructions

This salad is great for meal prep! Here’s how to store it:

  • Refrigerate: Store in an airtight container for up to 3 days.
  • Make-ahead: Prep the ingredients in advance but wait to add the avocado and dressing until just before serving.

Frequently Asked Questions

Here are some commonly asked questions to help you master this recipe:

  • Can I use frozen corn? Yes! Just thaw and drain before using.
  • How can I make this salad spicier? Add more chili powder or a dash of hot sauce.
  • Is this salad gluten-free? Absolutely! All ingredients are naturally gluten-free.
  • Can I add other vegetables? Yes! Feel free to mix in your favorites like cucumbers or radishes.
  • How long does this salad last? It stays fresh for about 3 days in the fridge.
  • Can I make this salad in advance? Yes, but wait to add the avocado until serving to keep it fresh.
  • Is this salad vegan? Yes! All ingredients are plant-based.
  • What can I serve this salad with? It pairs well with grilled meats, tacos, or as a standalone dish!

Nutrition Tips and Dietary Adaptations

This Sweet Corn Chickpea & Avocado Salad is not only delicious but also nutritious. Here are some tips to adapt it to your dietary needs:

  • Low-carb option: Replace chickpeas with diced zucchini or cauliflower.
  • High-protein: Add grilled chicken or tofu to boost protein content.
  • Heart-healthy: Use less olive oil or substitute with a light vinaigrette.

Equipment Recommendations

To make your salad prep a breeze, here are some essential kitchen tools:

  • Sharp knife: For easy chopping of all fresh ingredients.
  • Cutting board: A spacious board for safe and efficient prep.
  • Mixing bowls: A large bowl for mixing the salad and a small one for dressing.
  • Measuring cups and spoons: Ensure accurate ingredient measurements for perfect results.

Serving Suggestions

This salad is versatile! Here are some serving ideas:

  • As a side dish: Perfect alongside grilled chicken or fish.
  • On its own: Serve it as a light lunch or quick dinner.
  • In wraps: Use it as a filling for whole grain wraps.
  • With chips: Serve it with tortilla chips for a crunchy snack!

Final Thoughts

There you have it! A thorough guide to creating the ultimate Sweet Corn Chickpea & Avocado Salad. With its delightful flavors, vibrant colors, and nourishing ingredients, this salad is guaranteed to make your taste buds dance. Whether you whip it up for a family gathering or a simple lunch, it’s sure to impress. Enjoy your culinary adventure, and remember, cooking should always be fun!

Sweet Corn, Chickpea & Avocado Salad

Prep Time 10 minutes
Total Time 10 minutes
Servings 4 servings
Calories 350
A fresh and vibrant salad combining sweet corn, chickpeas, and creamy avocados, perfect for a quick, healthy meal.

Ingredients

Main

  • 250 g sweet corn kernels (removed from cob)
  • 425 g canned chickpeas (drained and rinsed)
  • 2 pcs ripe avocados (diced)
  • 30 g red onion (finely chopped)
  • 75 g bell pepper (diced)
  • 15 g fresh cilantro (chopped)
  • 30 ml lime juice
  • 45 ml olive oil
  • 2.5 ml cumin
  • 1.25 ml chili powder
  • to taste salt and pepper

Instructions 

  • If using fresh corn, remove kernels from the cob.
  • Combine corn, chickpeas, avocado, red onion, bell pepper, and cilantro in a large bowl.
  • Whisk lime juice, olive oil, cumin, chili powder, salt, and pepper in a small bowl.
  • Pour dressing over the salad and toss gently.
  • Adjust seasonings, serve immediately or chill.

Notes

This salad is best enjoyed fresh but can be refrigerated for later.
Calories: 350kcal
Cost: $15
Course: Salad
Cuisine: international
Keyword: vegetarian

Welcome to the world of healthy eating that doesn’t sacrifice flavor or fun! If you’re craving that iconic Big Mac experience but want a meal that fits your healthy lifestyle, then you’re in for a treat with this Big Mac Salad. This vibrant, deconstructed salad incorporates all the delicious elements of a classic Big Mac, from the zesty special sauce to the savory ground beef, while packing in plenty of fresh veggies. In this article, we’ll dive deep into the recipe, share tips for making it your own, and ensure you’re set up for salad success!

Why You’ll Love This Recipe

There are so many reasons to fall in love with this Big Mac Salad. Here are just a few:

  • Quick and Easy: This salad comes together in under 30 minutes, making it perfect for weeknight dinners.
  • Healthier Option: Enjoy all the flavor of a Big Mac without the extra calories and carbs from the bun.
  • Customizable: Use whatever ingredients you have on hand to make it your own—there are endless variations!
  • Meal Prep Friendly: Make it ahead of time for easy lunches or dinners throughout the week.
  • Kid-Approved: A fun and colorful twist that even picky eaters will love, making it a great family meal!

Ingredients Breakdown

Let’s explore the ingredients that make this salad shine! Below, I’ve broken down each component, along with some tasty substitutions to fit your dietary needs.

  • Iceberg Lettuce: The crisp base of your salad. Feel free to swap with romaine or mixed greens for added nutrients.
  • Lean Ground Beef: I recommend 85/15 for a balance of flavor and health. For a leaner option, go for ground turkey or even plant-based crumbles!
  • American Cheese: Torn into pieces for that iconic cheeseburger vibe. You can use cheddar or a dairy-free cheese alternative as a substitute.
  • Dill Pickles: Chopped for that tangy crunch. If you’re not a pickle fan, try chopped olives for a different twist!
  • White Onion: Finely diced for a sharp flavor punch. Red onion or green onions work just as well.
  • Sesame Seeds: Toasted for extra flavor and crunch. You can skip these for a nut-free version.
  • For the Special Sauce: A combination of mayonnaise, sweet pickle relish, yellow mustard, white vinegar, tomato paste, paprika, and onion powder. Adjust the balance to your taste!

Step-by-Step Instructions

Ready to assemble your masterpiece? Follow these easy steps for a salad that’s bursting with flavor!

  1. Make the Special Sauce: Whisk together mayonnaise, sweet pickle relish, yellow mustard, white vinegar, tomato paste, paprika, and onion powder in a bowl until smooth. Set aside.
  2. Cook the Ground Beef: In a skillet over medium-high heat, brown the ground beef, breaking it into smaller pieces as it cooks. Season with salt and pepper. Drain any excess fat.
  3. Assemble Your Salad: Create a base of chopped lettuce in bowls or on plates. Top with the warm cooked ground beef.
  4. Drizzle the Sauce: Generously drizzle the prepared special sauce over the salad.
  5. Finish with Toppings: Scatter the torn cheese, chopped pickles, and diced onion over the top, and finish with a sprinkle of toasted sesame seeds.
  6. Serve and Enjoy: Toss everything together before digging in for the best flavor experience!

Pro Tips for the Best Big Mac Salad

Juicy Big Mac salad featuring chopped lettuce and toppings.

Here are some expert insights to elevate your Big Mac Salad game:

  • Warm Ingredients: Use warm ground beef to slightly melt the cheese for a deliciously creamy texture.
  • Chill the Sauce: For even more flavor, chill the special sauce for at least 30 minutes before serving.
  • Layering is Key: Layer ingredients thoughtfully to ensure every bite has a balance of flavors!
  • Prep Ahead: Make the sauce and cook the beef in advance to save time on busy nights.
  • Experiment with Greens: Don’t hesitate to mix in some spinach or kale for added nutrients!
  • Garnish with Fresh Herbs: Fresh parsley or cilantro adds a pop of freshness.
  • Think Outside the Bowl: Try serving this salad in a wrap or on a whole grain bun for a fun twist!

Common Mistakes and Troubleshooting

Here are a few common pitfalls and how to avoid them:

  • Overcooked Beef: Avoid drying out your beef by cooking it just until browned and no longer.
  • Too Much Dressing: Drizzle lightly at first; you can always add more, but it’s tough to take it away!
  • Stale Lettuce: Use fresh, crisp lettuce for the best texture; wilted greens will ruin your salad experience.

Variations to Mix It Up

Feeling adventurous? Here are some delicious variations to try with your Big Mac Salad:

  • Veggie Delight: Substitute ground beef with black beans or lentils for a plant-based twist!
  • Spicy Kick: Add jalapeños or hot sauce to the special sauce for some extra heat.
  • Greek Style: Swap pickles for sliced kalamata olives and add feta cheese for a Mediterranean flair.
  • Asian-Inspired: Use a sesame ginger dressing instead of the special sauce and top with shredded carrots and sliced scallions.

Storage and Make-Ahead Instructions

This salad is perfect for meal prep! Here’s how to store it:

  • Refrigeration: Store ingredients separately in airtight containers. Assemble just before serving to keep the lettuce crisp.
  • Make-Ahead: Prepare the sauce and cook the beef up to 2 days in advance. Just assemble the salad when you’re ready to eat!

Comprehensive FAQ

Got questions? I’ve got answers! Here are some frequently asked questions about the Big Mac Salad:

  • Can I use ground turkey instead of beef? Absolutely! Ground turkey is a leaner option that works wonderfully in this salad.
  • Is this salad gluten-free? Yes, as long as you use gluten-free mayonnaise and double-check any other ingredients.
  • Can I add more vegetables? Yes! Feel free to add bell peppers, cucumbers, or any other veggies you love.
  • How long will leftovers last? The assembled salad is best eaten fresh, but the components can last in the fridge for up to 3 days.
  • Can I freeze this salad? It’s not recommended to freeze the salad once assembled, but the cooked beef can be frozen for later use.
  • What’s the best way to serve this salad? Serve it chilled or at room temperature for the best flavor.
  • Can I use a different dressing? Definitely! Feel free to experiment with your favorite dressings.
  • Is this salad kid-friendly? For sure! The flavors are familiar, making it appealing to kids.

Nutritional Tips and Dietary Adaptations

This Big Mac Salad is naturally low in carbs and high in protein, making it a great option for various diets. Here are some nutritional tips:

  • Low-Carb: Skip the cheese and use a vinegar-based dressing for a lighter option.
  • Keto-Friendly: Stick to lean ground beef, and add more leafy greens to keep carbs low.
  • Vegan Option: Use plant-based ground meat and a vegan mayo for the special sauce.

Equipment Recommendations

Here are some kitchen tools that will make preparing your Big Mac Salad a breeze:

  • Non-stick Skillet: Perfect for cooking the ground beef without sticking.
  • Mixing Bowl: A large bowl for whisking the special sauce together.
  • Sharp Knife: Essential for chopping veggies and slicing pickles.
  • Cutting Board: A stable surface for all your chopping needs.

Serving Suggestions

This salad is versatile and can be served in many fun ways:

  • In a Wrap: Use a whole grain wrap to hold all the salad ingredients for a portable meal.
  • On a Plate: Serve it in individual bowls for a casual family dinner.
  • With a Side: Pair it with sweet potato fries or roasted veggies for a complete meal.

In conclusion, the Big Mac Salad is not just a meal; it’s a celebration of flavors and creativity in the kitchen! Dive into this nutritious, satisfying dish that brings the joy of a classic favorite into your healthy eating routine. So grab your ingredients, and let’s get cooking! Enjoy your culinary adventure!

Big Mac salad recipe

Prep Time 10 minutes
Cook Time 15 minutes
Total Time 25 minutes
Servings 4 servings
Calories 650
A delicious salad inspired by the classic Big Mac, featuring seasoned beef, special sauce, and fresh toppings.

Ingredients

Vegetables

  • 1 large head iceberg lettuce (chopped)
  • 1 lb lean ground beef (85/15)
  • 4 slices American cheese (torn)
  • 0.5 cup dill pickles (chopped)
  • 0.5 cup white onion (finely diced)
  • 1 tbsp sesame seeds (toasted)
  • 0.5 cup mayonnaise
  • 3 tbsp sweet pickle relish
  • 1 tbsp yellow mustard
  • 2 tsp white vinegar
  • 1 tsp tomato paste
  • 0.5 tsp paprika
  • 0.5 tsp onion powder

Salt and black pepper

Instructions 

  • Whisk all sauce ingredients until smooth to make the Special Sauce.
  • Cook ground beef until browned; season with salt and pepper. Drain excess fat.
  • Assemble salads with chopped lettuce, cooked beef, and drizzle with sauce.
  • Top with torn cheese, chopped pickles, diced onion, and sesame seeds.
  • Serve immediately and toss before eating.

Notes

For best flavor, prepare the sauce ahead of time and let it chill.
Calories: 650kcal
Cost: $15
Course: Salad
Cuisine: American
Keyword: Beef, Sandwich

Welcome to a colorful culinary adventure that transforms your lunch into a vibrant feast! Get ready to dive into the world of quinoa and veggie power bowls—a dish that’s not just about nutrition but also about excitement and flavor! These bowls are the perfect blend of hearty grains, fresh veggies, and zesty dressings that will energize your day. In this guide, you’ll discover how to create these delicious meals that are perfect for meal prep or a quick lunch. Let’s get cooking!

Why You’ll Love This Recipe

  • Nutritious powerhouse: Packed with fiber, protein, and essential vitamins, these bowls are a nutritious choice for any meal.
  • Flavor explosion: The combination of smoky butternut squash and crispy Brussels sprouts, drizzled with a sweet and spicy honey-Dijon dressing, creates an irresistible flavor profile.
  • Versatile ingredients: Feel free to mix and match your favorite veggies or grains to suit your taste and dietary needs.
  • Meal prep friendly: These bowls store well in the fridge and can be made ahead, making them an ideal solution for busy schedules.
  • Great for any occasion: Whether it’s a cozy dinner, a lunch at the office, or a picnic in the park, these power bowls are perfect for any setting!

Ingredient Breakdown with Substitutions

Let’s dive into the essentials that make these quinoa power bowls sing! Here’s what you’ll need:

  • Brussels sprouts: 14 to 16 oz., trimmed and halved. If you’re not a fan, try broccoli or green beans instead.
  • Olive oil: 2 Tbsp., divided. Avocado oil is a great substitute if you prefer.
  • Adobo sauce: 1 Tbsp. (from a can of chipotle peppers). For a milder flavor, use barbecue sauce or sriracha.
  • Maple syrup: 1 Tbsp. Adds sweetness; honey works too!
  • Kosher salt: 1 tsp., divided. You can use sea salt or regular table salt in its place.
  • Butternut squash: 3 cups, peeled and cubed (about 1 small squash). Sweet potatoes or carrots can work as substitutes.
  • Smoked paprika: 1 tsp. Try cumin or cayenne pepper for a different flavor kick.
  • Garlic powder: 1 tsp. Fresh garlic works well if you prefer!
  • Quinoa: 1 cup dry, rinsed. You can swap it with brown rice or farro.
  • Broth: 2 cups of lower-sodium vegetable or chicken broth. Water is a fine substitute!
  • Kale: 2 to 3 handfuls, chopped. Spinach or arugula are great alternatives.
  • Avocado: For topping, optional but highly recommended!
  • Apple cider vinegar: 1 Tbsp. White wine vinegar is also a good option.
  • Dijon mustard: 1 Tbsp. For a spicier kick, try brown mustard.

How to Make Quinoa and Veggie Power Bowls

Follow these simple steps to whip up your delicious bowls:

Step 1: Roast the Brussels Sprouts and Butternut Squash

Preheat your oven to 425°F. On a baking sheet, toss the halved Brussels sprouts with 1 Tbsp of olive oil, adobo sauce, maple syrup, and ½ tsp of salt. On a separate baking sheet, toss the cubed butternut squash with the remaining olive oil, smoked paprika, garlic powder, and ½ tsp of salt. Roast both sheets in the oven for about 25 minutes, stirring halfway through, until tender.

Step 2: Cook the Quinoa

In a small saucepan, combine the rinsed quinoa and broth. Bring it to a boil, then reduce the heat to low, cover, and let it simmer until the quinoa is fluffy and the liquid is absorbed (about 15 minutes). Once cooked, stir in the chopped kale, allowing the residual heat to wilt the leaves.

Step 3: Prepare the Dressing

In a small bowl, whisk together the olive oil, apple cider vinegar, Dijon mustard, honey, and remaining salt until smooth.

Step 4: Assemble Your Bowls

Divide the quinoa and kale mixture evenly among four bowls. Top with the roasted Brussels sprouts and butternut squash. Drizzle with the dressing, and garnish with sliced avocado and any other toppings you desire!

Pro Tips for Perfect Power Bowls

Close-up view of a vibrant quinoa bowl topped with avocado and drizzled dressing.
  • Rinse your quinoa: This helps remove the natural coating (saponin) that can make quinoa taste bitter.
  • Vary your veggies: Use seasonal vegetables to keep the dish fresh and exciting! Try adding zucchini, bell peppers, or carrots.
  • Customize your dressing: Experiment with different vinegars or add herbs like basil or cilantro for a fresh twist!
  • Make it filling: Add a protein source such as chickpeas, tofu, or grilled chicken to turn this into a complete meal.
  • Use the right temperature: Ensure your oven is hot enough for roasting; this helps achieve crispy veggies.
  • Prep ahead: Cook a big batch of quinoa and roast extra veggies for quick meals throughout the week!
  • Garnish creatively: Top with nuts, seeds, or fresh herbs to add texture and flavor.
  • Get colorful: The more colors on your plate, the more nutrients you’re likely getting!

Common Mistakes and Troubleshooting

Here are some common issues and how to avoid them:

  • Overcooked quinoa: If your quinoa turns mushy, reduce the cooking time slightly next time.
  • Underseasoned veggies: Don’t be shy with your spices and seasonings; they elevate the flavors!
  • Watery dressing: If your dressing is too thin, add more Dijon mustard or honey to thicken it.
  • Burnt Brussels sprouts: Keep an eye on them while roasting; they can quickly go from perfectly crispy to charred.

Variations: Mix It Up!

Here are some fun variations to keep your power bowls exciting:

  • Mexican Fiesta Bowl: Add black beans, corn, diced tomatoes, and avocado, topped with a lime-cilantro dressing.
  • Asian-Inspired Bowl: Toss in edamame, shredded carrots, and sesame seeds, drizzled with a soy sauce-based dressing.
  • Mediterranean Delight: Incorporate chickpeas, cucumbers, cherry tomatoes, and feta cheese with a lemon-tahini dressing.
  • Breakfast Bowl: Top with a poached egg, diced tomatoes, and avocado for a hearty breakfast twist!

Storage and Make-Ahead Instructions

These bowls are great for meal prep! Here’s how to store them:

  • Store individual components (quinoa, veggies, dressing) separately in airtight containers in the fridge for up to 4 days.
  • Assemble bowls just before serving to keep the veggies fresh and crunchy.
  • Reheat quinoa and veggies in the microwave or on the stovetop; drizzle with fresh dressing before serving.

Frequently Asked Questions (FAQ)

  • Can I use frozen vegetables? Yes, frozen veggies work well too; just adjust cooking times accordingly.
  • Is this recipe gluten-free? Yes, quinoa is gluten-free, making this a perfect choice for gluten-free diets!
  • How can I add more protein? Add chickpeas, tofu, or grilled chicken for an extra protein boost.
  • Can I eat these bowls cold? Absolutely! They make for a refreshing cold meal, especially in summer.
  • How long does quinoa last in the fridge? Cooked quinoa can last up to 5-7 days in the fridge when stored properly.
  • What dressing pairs well with these bowls? A simple vinaigrette or tahini dressing complements the flavors beautifully!
  • Are these bowls vegan? Yes! All the ingredients are plant-based, making it a vegan-friendly recipe.
  • Can I use other grains? Yes, feel free to substitute quinoa with brown rice, farro, or even couscous!

Nutrition Tips and Dietary Adaptations

These quinoa power bowls can be easily adapted to fit various dietary needs:

  • Vegan: This recipe is already vegan-friendly. Just ensure your dressing is plant-based.
  • Low-carb: You can replace quinoa with cauliflower rice for a lower-carb version.
  • High-protein: Add legumes like lentils or beans to boost protein content.
  • Low-sodium: Use homemade broth or water instead of store-bought broth to control sodium levels.

Equipment Recommendations

Here’s what you’ll need to whip up these delicious bowls:

  • Oven: For roasting the veggies to perfection.
  • Baking sheets: Use them for roasting your Brussels sprouts and butternut squash.
  • Small saucepan: Ideal for cooking your quinoa.
  • Mixing bowls: For preparing your dressing and assembling ingredients.
  • Whisk: Perfect for blending your dressing ingredients smoothly.

Serving Suggestions

These bowls are visually stunning and can be served in a variety of ways:

  • Serve in colorful bowls to enhance the presentation.
  • Pair with a side of whole-grain bread or pita for added texture.
  • Top with fresh herbs like cilantro or parsley for an extra burst of flavor.

So there you have it! Your guide to creating fabulous quinoa and veggie power bowls that are not only healthy but also bursting with flavor. Embrace the joy of cooking and let your creativity shine as you mix and match ingredients to create your own signature bowl. Happy cooking!

Quinoa and Veggie Power Bowls

Prep Time 10 minutes
Cook Time 25 minutes
Total Time 35 minutes
Servings 4 servings
Calories 450
A nutritious and vibrant bowl combining roasted vegetables, fluffy quinoa, and a tangy dressing for a wholesome meal.

Ingredients

Vegetables

  • 14 to 16 oz Brussels sprouts, trimmed and halved
  • 2 Tbsp extra-virgin olive oil, divided (sub avocado oil)
  • 1 Tbsp adobo sauce (from a can of chipotle peppers in adobo sauce)
  • 1 Tbsp maple syrup
  • 1 tsp kosher salt, divided
  • 3 cups peeled and cubed butternut squash (from 1 small squash)
  • 1 tsp smoked paprika
  • 1 tsp garlic powder
  • 1 cup dry quinoa
  • 2 cups lower-sodium vegetable or chicken broth
  • 2 to 3 handfuls chopped kale
  • 1/4 cup extra-virgin olive oil
  • 1 Tbsp apple cider vinegar
  • 1 Tbsp honey (sub maple syrup)
  • 2 tsp Dijon mustard
  • 1/4 tsp kosher salt

Instructions 

  • Preheat oven to 425°F (220°C).
  • Toss Brussels sprouts with 1 Tbsp. oil, adobo sauce, maple syrup, and 1/2 tsp. salt; roast for 25 minutes.
  • Cook quinoa in broth until fluffy, then stir in kale to wilt.
  • Mix olive oil, vinegar, mustard, honey, and salt to make dressing.
  • Assemble bowls with quinoa, roasted vegetables, drizzle with dressing, and garnish with sliced avocado.

Notes

You can add sliced avocado or your favorite toppings for extra flavor.
Calories: 450kcal
Cost: $15
Course: Main Course
Cuisine: Healthy
Keyword: Quinoa, Vegetables

Welcome to a world where healthy eating meets vibrant flavors! Today, we’re diving into the colorful and nutritious realm of the Broccoli Crunch Salad, a recipe that’s as fun to make as it is to eat. This delightful dish combines the crispiness of fresh broccoli with the sweetness of apples and the juicy burst of pomegranate arils, creating a salad that’s sure to be a hit at any table. Whether you’re prepping for a potluck, looking for a quick lunch, or simply wanting to jazz up your dinner plate, this salad is your go-to option. Let’s explore why this recipe will become a staple in your kitchen!

Why You’ll Love This Recipe

  • Deliciously Crunchy: The combination of broccoli, apples, and almonds creates a symphony of textures that makes every bite exciting!
  • Nutritious Powerhouse: Packed with vitamins, fiber, and antioxidants, this salad is not just tasty but also supports your overall health.
  • Quick and Easy: With minimal ingredients and simple steps, you can whip up this salad in just 15 minutes—perfect for busy days!
  • Customizable: This recipe allows for numerous variations, so you can tweak it to suit your taste or dietary preferences.
  • Great for Any Occasion: Whether it’s a casual lunch or a festive gathering, this salad fits right in, impressing your guests with its vibrant colors and flavors.

Ingredients Breakdown

Let’s get into the nitty-gritty of what makes this salad so delicious! Here’s what you’ll need:

  • 3 tablespoons mayonnaise: For creaminess; feel free to substitute with Greek yogurt for a lighter option.
  • 1 tablespoon olive oil: Adds healthy fats; avocado oil works well too!
  • 1 tablespoon lime juice: Brightens the flavors; lemon juice can be a great alternative.
  • 1 teaspoon Dijon mustard: Gives a tangy kick; honey mustard can be used for a sweeter touch.
  • ¼ teaspoon fine sea salt: Enhances all flavors; adjust to your taste.
  • 1 shallot, sliced thinly: Adds a mild onion flavor; green onions can also be a nice substitute.
  • 1 pound broccoli florets, cut into 1-inch pieces: The star of the show, providing crunch and nutrition!
  • 1 apple (any eating variety), chopped: Adds sweetness; Honeycrisp or Granny Smith are excellent choices.
  • ¼ cup slivered almonds, toasted: For extra crunch; walnuts or sunflower seeds work too!
  • ½ cup pomegranate arils: These jewels of flavor bring a juicy burst; dried cranberries can be a great substitute.

Step-by-Step Instructions

Ready to bring this salad to life? Follow these simple steps:

  1. In a large mixing bowl, whisk together the mayonnaise, olive oil, lime juice, Dijon mustard, salt, and shallot until smooth.
  2. Add the broccoli florets and apple chunks, tossing gently to coat everything well.
  3. Transfer the mixed salad to a serving bowl.
  4. Sprinkle the toasted almonds and pomegranate arils on top for a beautiful presentation.
  5. Serve immediately and enjoy the crunchy goodness!

Pro Tips for the Perfect Broccoli Crunch Salad

Side view of a fresh Broccoli Crunch Salad with vibrant ingredients including fruits and nuts.
  • Chop the broccoli small: Aim for bite-sized pieces to ensure easy eating and even dressing distribution.
  • Toast the almonds: This enhances their flavor and adds an irresistible crunch—just keep an eye on them to avoid burning!
  • Make it ahead: You can prepare the salad a few hours in advance; just add the pomegranate and almonds right before serving to keep them crunchy.
  • Experiment with flavors: Add ingredients like feta cheese, dried cranberries, or even grilled chicken to elevate this salad!
  • Store leftovers properly: Keep any leftover salad in an airtight container in the fridge for up to 2 days.

Common Mistakes and Troubleshooting

Even the best of us make mistakes in the kitchen! Here’s how to avoid common pitfalls:

  • Overdressing: Start with less dressing and add more as needed to avoid sogginess.
  • Using old broccoli: Freshness is key! Ensure your broccoli is bright green and firm for the best taste.
  • Ignoring personal taste: Don’t hesitate to adjust the ingredients to match your preferences—cooking should be fun!

Variations to Try

Feeling adventurous? Here are some tasty variations to switch things up:

  • Asian-Inspired: Add sesame oil, soy sauce, and toasted sesame seeds for an Asian twist.
  • Fruit Medley: Incorporate seasonal fruits like berries or citrus for a refreshing change.
  • Protein-Packed: Toss in some grilled chicken or chickpeas to turn this salad into a full meal.
  • Spicy Kick: Add a pinch of cayenne pepper or diced jalapeños for a spicy version!

Storage and Make-Ahead Instructions

This salad is best enjoyed fresh, but you can easily prep components in advance:

  • Chop the broccoli and store it in an airtight container in the fridge for up to 3 days.
  • Mix the dressing separately and keep it refrigerated for up to a week.
  • Combine all ingredients just before serving to maintain optimal freshness.

Frequently Asked Questions

Got questions? We’ve got answers!

  • Can I make this salad ahead of time? Absolutely! Just add the nuts and pomegranate arils right before serving to keep them crunchy.
  • Can I use something other than mayonnaise for the dressing? Yes! Greek yogurt or a tahini-based dressing works wonderfully too.
  • What other mix-ins can I add? Feel free to throw in some shredded carrots, bell peppers, or even quinoa for added texture and nutrition.
  • How do I store leftovers of this Broccoli Crunch Salad? Keep it in an airtight container in the fridge for up to 2 days.
  • Is this salad suitable for special diets? Yes! It can easily be made vegan and gluten-free by adjusting the ingredients accordingly.
  • Can I use frozen broccoli? Fresh is best, but if you have frozen, just make sure to thaw and drain it thoroughly before using.
  • What can I serve with this salad? It pairs well with grilled chicken, fish, or as a side to any main dish!
  • How can I make this salad more filling? Add protein like grilled chicken, chickpeas, or roasted tofu for a satisfying meal.

Nutrition Tips and Dietary Adaptations

This salad is naturally low in calories and high in nutrients, making it a great choice for any meal plan. Here are some tips to enhance its nutritional profile:

  • Incorporate Whole Foods: Use whole, unprocessed ingredients to maximize the health benefits.
  • Consider Portion Sizes: Be mindful of the amount of dressing; a little goes a long way!
  • Protein Power: Adding lean proteins can help you stay full longer and balance your meal.

Equipment Recommendations

Here’s what you’ll need to whip up this salad:

  • Mixing Bowl: A large bowl for mixing the ingredients is essential.
  • Whisk: For blending the dressing ingredients smoothly.
  • Knife and Cutting Board: Sharp knives make chopping easy and safe.
  • Measuring Cups and Spoons: Accurate measurements ensure the right balance of flavors.

Serving Suggestions

Once your Broccoli Crunch Salad is ready, consider these serving ideas:

  • As a Side Dish: Serve alongside grilled meats or seafood for a colorful plate.
  • In a Wrap: Use it as a filling in wraps for a crunchy lunch option.
  • On a Bed of Greens: Serve over mixed greens for added volume and nutrients.

There you have it—everything you need to create the ultimate Broccoli Crunch Salad with Apples and Pomegranate! Not only is this recipe a feast for the eyes, but it’s also packed with flavor and nutrition. So grab your ingredients, unleash your inner chef, and get ready to crunch into vibrant goodness! Happy cooking and enjoy every bite!

Broccoli Crunch Salad with Apples, Almonds and Pomegranate

Prep Time 10 minutes
Total Time 10 minutes
Servings 4 servings
Calories 250
A fresh and crunchy salad combining crisp broccoli, sweet apples, toasted almonds, and juicy pomegranate seeds, all coated in a creamy dressing.

Ingredients

Dressing

  • 3 tablespoons mayonnaise
  • 1 tablespoon olive oil
  • 1 tablespoon lime juice
  • 1 teaspoon Dijon mustard
  • ¼ teaspoon fine sea salt
  • 1 shallot shallot, sliced thinly
  • 1 pound broccoli florets (cut into 1-inch pieces)
  • 1 apple apple (any eating variety), chopped
  • ¼ cup slivered almonds, toasted
  • ½ cup pomegranate arils

Instructions 

  • Whisk together mayonnaise, olive oil, lime juice, mustard, salt, and shallot in a large bowl.
  • Add broccoli and apple, then toss to coat.
  • Transfer to a serving bowl.
  • Sprinkle with toasted almonds and pomegranate arils.
  • Serve immediately.

Notes

For extra crunch, toast the almonds until golden.
Calories: 250kcal
Cost: $15
Course: Salad
Keyword: broccoli

Discover the Magic of Quinoa Power Bowls

Welcome to the vibrant world of the Yard House Quinoa Power Bowl, where flavor meets nutrition in a delightful explosion of colors and textures! This bowl is not just a meal; it’s a celebration of healthy eating that packs a punch for your taste buds. In this comprehensive guide, we will explore every delightful layer of this dish—from its brilliant ingredients to its numerous health benefits. Whether you’re a busy professional seeking quick meal prep ideas or a health-conscious foodie eager to indulge in something delicious, this quinoa power bowl is your answer. Let’s dive into the fun and nourishing aspects of this recipe!

Why You’ll Love This Recipe

This quinoa power bowl isn’t just about good looks; it’s a powerhouse of nutrition and flavor. Here are five specific reasons why this recipe will become a staple in your kitchen:

  • Balanced Nutrition: This bowl combines protein-rich quinoa, fiber-filled veggies, and healthy fats from avocado and tahini, making it a complete meal.
  • Quick & Easy: With minimal prep and cook time, you can whip this up in under 30 minutes, perfect for busy weeknights.
  • Meal Prep Friendly: Make larger batches to enjoy throughout the week. Each component stores well separately!
  • Customizable: Adjust the ingredients to suit your taste or dietary needs, whether you’re vegan, gluten-free, or simply looking to switch things up.
  • Flavor Explosion: The combination of fresh ingredients and a zesty tahini dressing creates a bowl that is as delightful to eat as it is to look at.

Breaking Down the Ingredients

To create the perfect Yard House Quinoa Power Bowl, we need to gather some vibrant ingredients. Here’s what you’ll need:

  • Tri-color Quinoa: This nutty grain is not only beautiful but also a complete protein, perfect for keeping you full.
  • Diced Tomatoes: Fresh and juicy, they add a burst of flavor and moisture.
  • Sweet Corn Kernels: For a touch of sweetness and crunch—feel free to use fresh or frozen!
  • Sliced Avocado: Creamy and rich in healthy fats, avocado is a must for any power bowl.
  • Black Beans: These protein-packed legumes contribute to the bowl’s heartiness.
  • Roasted Chickpeas: Crunchy and satisfying, they add texture and additional protein.
  • Broccoli Florets: Lightly roasted, they enhance the bowl with nutrients and flavor.
  • Red Onions: Their sharpness balances the creaminess of the avocado.
  • Tahini Dressing: A simple blend of tahini, lemon juice, garlic, and a hint of maple syrup ties all the flavors together.

Ingredient Substitutions

Don’t have all the ingredients on hand? No problem! Here are some substitutions you can try:

  • Use brown rice or farro instead of quinoa for a different grain base.
  • Replace black beans with kidney beans or lentils for a protein boost.
  • If you prefer a different dressing, try a balsamic vinaigrette or a yogurt-based dressing.
  • Swap broccoli for zucchini or bell peppers for a fresh twist.

How to Make Your Quinoa Power Bowl

Side angle of a vibrant quinoa bowl featuring assorted veggies and toppings.

Ready to unleash your inner chef? Follow these simple steps to create your Yard House Quinoa Power Bowl at home:

  • Cook quinoa according to package instructions, rinsing it first to remove any bitterness.
  • Preheat your oven to 400°F (200°C). Toss chickpeas and broccoli with olive oil, salt, and pepper, then roast for about 20 minutes until crispy.
  • While the veggies roast, chop the fresh tomatoes, corn, avocado, and red onions.
  • Heat black beans in a small pot until warm.
  • Prepare your tahini dressing: Mix tahini, lemon juice, minced garlic, water, salt, and a touch of maple syrup to taste.
  • Assemble your bowl: Start with a generous base of quinoa, layer on the toppings, and finish with a drizzle of the dressing.

Pro Tips for the Perfect Power Bowl

Elevate your quinoa power bowl with these expert insights:

  • Texture Matters: Ensure a mix of textures—crunchy roasted veggies, creamy avocado, and fluffy quinoa create a satisfying bite.
  • Flavor Balance: Adjust the dressing to your taste. Add more lemon juice for brightness or maple syrup for sweetness as needed.
  • Chill Out: For a refreshing twist, chill the bowl in the refrigerator for about 30 minutes before serving.
  • Batch Cook Quinoa: Prepare a larger batch of quinoa at the beginning of the week for quick assembly on busy days.
  • Spice It Up: Experiment with spices! Cumin, chili powder, or smoked paprika can add an exciting layer of flavor.
  • Fresh Herbs: Garnish with fresh herbs like cilantro or parsley for an extra burst of freshness.
  • Make Ahead: Store components separately to keep ingredients fresh and vibrant.
  • Serving Size: This recipe serves 2, but feel free to double or triple it for meal prep!

Common Mistakes and Troubleshooting

Even the best chefs make mistakes! Here are some common pitfalls and how to avoid them:

  • Overcooked Quinoa: Follow package instructions carefully and check for a fluffy texture. Rinse well before cooking!
  • Undercooked Veggies: Ensure your veggies are tender and slightly crispy by roasting long enough.
  • Too Much Dressing: Start with a small amount of dressing and add more as needed to avoid overpowering the dish.

Variations to Try

Keep things exciting by trying these variations of the quinoa power bowl:

  • Mediterranean Twist: Add olives, feta cheese, and a drizzle of olive oil.
  • Spicy Kick: Incorporate jalapeños or a sprinkle of red pepper flakes for heat.
  • Asian-Inspired Bowl: Use edamame, sesame seeds, and a soy-ginger dressing.
  • Breakfast Bowl: Top with a poached egg for a protein-packed start to your day!

Storage and Make-Ahead Instructions

Perfect for meal prep, here’s how to store your quinoa power bowl components:

  • Refrigerate: Store cooked quinoa, roasted veggies, and toppings separately in airtight containers for up to 4 days.
  • Freezing: Quinoa can be frozen for up to 2 months. Thaw in the refrigerator before using.
  • Assemble Fresh: For the best taste, assemble the bowl just before eating, especially for the avocado and dressing.

Frequently Asked Questions

Got questions? We’ve got answers! Here are some common queries about the Yard House Quinoa Power Bowl:

  • Can I make this bowl vegan? Yes! All ingredients are plant-based, making it a perfect vegan meal.
  • Is this recipe gluten-free? Absolutely! Quinoa is naturally gluten-free, making this dish safe for those with gluten sensitivities.
  • How do I make it spicier? Add chili flakes, jalapeños, or your favorite hot sauce to turn up the heat!
  • Can I use canned beans? Yes! Canned beans are quick and convenient; just rinse and heat before adding.
  • What if I’m allergic to nuts? Tahini can be substituted with sunflower seed butter or omitted entirely.
  • How can I make it more filling? Add more protein sources like grilled chicken, tofu, or more beans.
  • Can I use different vegetables? Absolutely! Use whatever veggies you love or have on hand.
  • How do I add more flavor? Marinate your veggies before roasting or toss them in spices for added depth.

Nutritional Tips and Dietary Adaptations

Make your quinoa power bowl even healthier with these tips:

  • Increase Fiber: Add more vegetables or legumes to enhance fiber content.
  • Healthy Fats: Incorporate seeds like chia or pumpkin seeds for extra nutrients.
  • Protein Boost: Consider adding grilled chicken, shrimp, or a scoop of hummus.

Equipment Recommendations

To make your cooking experience seamless, here are some recommended tools:

  • Medium Pot: For cooking quinoa perfectly.
  • Baking Sheet: Ideal for roasting veggies and chickpeas evenly.
  • Mixing Bowl: For preparing your tahini dressing.
  • Measuring Cups and Spoons: Essential for accurate ingredient measurements.

Serving Suggestions

Presentation is key! Serve your quinoa power bowl in a vibrant bowl and enjoy it fresh. Pair it with:

  • Fresh Lemon Wedges: A squeeze of lemon brightens the entire dish.
  • Crusty Bread: Perfect for dipping into the tahini dressing.
  • Herbal Tea: A light herbal tea can complement the meal beautifully.

Final Thoughts

Your journey into the world of healthy eating is about to get a whole lot tastier with the Yard House Quinoa Power Bowl! Packed with vibrant ingredients, this dish is designed to nourish your body while tantalizing your taste buds. Remember, cooking should be an adventure—don’t hesitate to experiment and make this bowl your own! Enjoy your culinary journey, and share the joy of healthy eating with others. Happy cooking!

Yard House Quinoa Power Bowl

Prep Time 15 minutes
Cook Time 20 minutes
Total Time 35 minutes
Servings 4 servings
Calories 450
A vibrant and nutritious bowl packed with colorful vegetables, protein-rich beans, and a creamy tahini dressing, perfect for a healthy meal.

Ingredients

Grains

  • 1 cup tri-color quinoa (rinsed before cooking)

Vegetables

  • 1 cup diced tomatoes
  • 0.5 cup sweet corn kernels
  • 1 avocado sliced avocado
  • 0.5 cup black beans (warm)
  • 0.5 cup roasted chickpeas
  • 1 cup broccoli florets (roasted)
  • 0.25 cup red onions (sliced)

Dressing

  • 2 tablespoons tahini
  • 1 tablespoon lemon juice
  • 1 clove garlic (minced)
  • 2 tablespoons water
  • 1/4 teaspoon salt
  • 1 teaspoon maple syrup (optional for sweetness)

Instructions 

  • Cook quinoa according to package instructions, rinsing first.
  • Roast chickpeas and broccoli with olive oil, salt, and pepper until crispy.
  • Chop tomatoes, corn, avocado, and red onions.
  • Warm black beans.
  • Mix tahini, lemon juice, garlic, water, salt, and maple syrup to make dressing.
  • Assemble bowls with quinoa, toppings, and drizzle with dressing.

Notes

Feel free to customize toppings and adjust seasonings to taste.
Calories: 450kcal
Cost: $15
Course: Main Course
Cuisine: Healthy
Keyword: Quinoa

Elevate Your Mealtime: Discover the Keto Taco Salad Sensation!

If you’re on the lookout for a quick, delicious, and healthy meal, look no further than this keto taco salad with ground beef! In just 5 minutes, you can whip up a vibrant, flavor-packed dish that will satisfy your cravings and fuel your body. This recipe is not just a meal; it’s a celebration of fresh ingredients, zesty flavors, and a fun way to enjoy healthy eating without compromising on taste. So, let’s dive into the culinary adventure of making your own keto taco salad!

Why You’ll Love This Recipe

This keto taco salad is not just your average salad; it’s a whole experience! Here are five compelling reasons why this dish will become a staple in your kitchen:

  • Quick and Easy: With only a handful of ingredients and minimal cooking time, this recipe is perfect for busy weeknights or last-minute meals.
  • Flavor Explosion: The combination of seasoned ground beef, fresh veggies, and creamy toppings creates a delightful burst of flavors in every bite.
  • Customizable: You can easily adjust ingredients and toppings to suit your taste preferences or dietary needs, making it a versatile choice for everyone.
  • Low Carb and Keto-Friendly: This salad fits perfectly into a low-carb or keto diet, helping you stay on track while enjoying a delicious meal.
  • Family-Friendly: The whole family will love this dish! It’s a fun and interactive meal that everyone can customize to their liking.

Ingredients Breakdown

Let’s talk about the ingredients that bring this keto taco salad to life! Here’s what you need:

  • 1 lb ground beef: Choose lean ground beef for a healthier option, or switch it up with ground turkey or chicken for a lighter twist.
  • 1 cup shredded lettuce: This will be your crisp base. Opt for romaine or iceberg for that satisfying crunch.
  • 1/2 cup diced tomatoes: Fresh tomatoes add color and juicy sweetness. You can also use cherry tomatoes for extra flavor.
  • 1/4 cup diced red onion: Red onion gives a nice bite. If you prefer milder flavors, consider using green onions instead.
  • 1/2 cup shredded cheese: Use your favorite cheese—cheddar, pepper jack, or a dairy-free alternative work beautifully!
  • 1/4 cup sour cream: Creamy and tangy, sour cream adds richness to the salad. Greek yogurt is a great low-fat substitute!
  • 1/4 cup salsa: Choose your preferred salsa for added flavor. Mild, medium, or spicy—your choice!
  • 1 tablespoon taco seasoning: For ultimate flavor, use homemade taco seasoning or your favorite store-bought blend.

Pro Tips for Perfecting Your Keto Taco Salad

Side angle shot of a vibrant Keto Taco Salad loaded with ground beef and colorful toppings.

To ensure your keto taco salad is a hit every time, check out these expert tips:

  • Cook the beef thoroughly: Ensure your ground beef is fully cooked and nicely browned for the best flavor.
  • Don’t skimp on seasoning: The taco seasoning is key! Adjust the amount based on your spice preference.
  • Layer ingredients: For an aesthetically pleasing salad, layer your ingredients in a bowl rather than mixing them all together.
  • Chill your toppings: Keeping your toppings like sour cream and salsa chilled will enhance the overall flavor experience.
  • Experiment with toppings: Try adding avocado, jalapeños, or black olives for extra flavor and nutrition.
  • Make it a meal prep: This salad can be prepped in advance. Just keep the ingredients separate until you’re ready to serve.
  • Garnish creatively: Fresh cilantro, lime wedges, or crushed low-carb tortilla chips make great garnishes!
  • Store leftovers correctly: If you have leftovers, store them in an airtight container in the fridge for up to 3 days.

Common Mistakes and Troubleshooting

Even the best chefs encounter challenges! Here are some common pitfalls to avoid when making your keto taco salad:

  • Overcooking the beef: Keep an eye on your beef to prevent it from becoming dry. Aim for a juicy texture!
  • Forgetting to drain fat: Always drain excess fat after cooking the ground beef to keep your salad light and fresh.
  • Skipping the seasoning: Taco seasoning is essential for flavor; don’t skip it!
  • Using wilted veggies: Fresh ingredients make all the difference—ensure your lettuce and toppings are crisp and vibrant.
  • Overloading on toppings: While toppings are fun, too many can make the salad soggy. Be mindful of balance!

Delicious Variations to Try

Want to mix things up? Here are four exciting variations of the keto taco salad:

  • Tex-Mex Style: Add black beans, corn, and diced bell peppers for a more traditional taco experience.
  • Southwest Chicken Salad: Swap out ground beef for shredded chicken and add avocado and corn for a twist.
  • Vegetarian Delight: Use crumbled tofu or tempeh seasoned with taco spices for a plant-based option.
  • Spicy Beef and Cheese: Mix in diced jalapeños and pepper jack cheese for a spicy kick!

Storage and Make-Ahead Instructions

This keto taco salad is perfect for meal prep! Here’s how to store and make it ahead of time:

  • Storing leftovers: Keep leftover salad components in separate airtight containers in the fridge for up to 3 days.
  • Meal prep: Prepare the ground beef and chop your veggies ahead of time. Assemble the salad just before serving.
  • Freezing options: While the salad itself doesn’t freeze well, you can freeze cooked ground beef and thaw it for quick meals later.

Frequently Asked Questions

You might have some questions about your keto taco salad. Here are answers to some common inquiries:

  • Can I use ground turkey instead of beef? Absolutely! Ground turkey is a leaner alternative that works great.
  • What can I use instead of taco seasoning? You can make your own by mixing chili powder, cumin, garlic powder, and paprika!
  • Is this recipe suitable for meal prep? Yes! Just keep the components separate until ready to eat.
  • Can I add beans to this salad? While beans are higher in carbs, you can add a small amount if it fits your dietary needs.
  • How can I make this salad spicier? Add more spices to the beef or include jalapeños and hot salsa as toppings.
  • What if I don’t have sour cream? Greek yogurt is a great substitute that provides a similar texture and tang.
  • Can I make this salad vegan? Yes! Use plant-based ground meat and skip the cheese and sour cream.
  • How many servings does this recipe make? This recipe typically serves 2-4 people, depending on portion sizes.

Nutritional Tips and Dietary Adaptations

Your keto taco salad can be adjusted to meet various dietary needs:

  • Low Carb: This recipe is inherently low in carbs, making it perfect for keto dieters.
  • Gluten-Free: Ensure any added sauces or toppings are gluten-free to keep the dish compliant.
  • Dairy-Free: Substitute cheese and sour cream with dairy-free alternatives for a lactose-free meal.
  • Paleo-Friendly: Use grass-fed beef, fresh veggies, and homemade seasoning to make it paleo-compliant.

Essential Equipment for Your Kitchen

To whip up your keto taco salad, you’ll need some basic kitchen equipment:

  • Skillet: A non-stick skillet is perfect for cooking the ground beef.
  • Cutting board: A good cutting board will make chopping your veggies quick and easy.
  • Chef’s knife: A sharp knife is essential for precise chopping of ingredients.
  • Mixing bowls: Use these for layering your salad and mixing ingredients.
  • Measuring cups and spoons: For accurate ingredient measurements to ensure flavor!

Serving Suggestions

Now that your keto taco salad is ready, here are some fun ways to serve it:

  • On a platter: Serve the salad on a large platter for a family-style meal that encourages sharing.
  • With tortilla chips: Pair your salad with low-carb tortilla chips for a crunchy, satisfying addition.
  • As a taco bowl: Serve it in a taco bowl made from baked cheese for a fun twist!
  • With lime wedges: Fresh lime juice drizzled over the top enhances the flavor and adds brightness!

In conclusion, this keto taco salad is a deliciously simple way to enjoy a healthy meal. It’s quick, customizable, and packed with flavor, making it a go-to recipe for anyone looking to spice up their mealtime without the fuss. So grab your ingredients, unleash your inner chef, and enjoy this vibrant salad that’s sure to tantalize your taste buds!

Keto Taco Salad with Ground Beef: 5 Minutes to Delight

Prep Time 5 minutes
Cook Time 10 minutes
Total Time 15 minutes
Servings 4 servings
Calories 550
A quick and flavorful keto-friendly taco salad perfect for a satisfying meal in minutes.

Ingredients

Meat

  • 1 lb ground beef

Vegetables

  • 1 cup shredded lettuce
  • 1/2 cup diced tomatoes
  • 1/4 cup diced red onion

Dairy & Condiments

  • 1/2 cup shredded cheese
  • 1/4 cup sour cream
  • 1/4 cup salsa
  • 1 tablespoon taco seasoning

Instructions 

  • Cook the ground beef in a skillet until browned, then stir in taco seasoning.
  • Layer shredded lettuce in a bowl as the base.
  • Add cooked beef on top of the lettuce.
  • Top with diced tomatoes, red onion, and shredded cheese.
  • Serve with sour cream and salsa on the side.

Notes

For extra flavor, add fresh cilantro or a squeeze of lime.
Calories: 550kcal
Cost: $15
Course: Main Course
Cuisine: Mexican
Keyword: Beef

Discover the Joy of Cooking with Our Delicious Honey Chicken Salad

Welcome to the vibrant world of healthy cooking! Today, we’re diving into a delightful recipe that’s not just easy to prepare but also bursting with flavor: **Honey Chicken Salad**. This dish combines tender chicken, crisp greens, and a sweet honey dressing, making it perfect for busy days or any occasion when you want to impress without stress. With its nutritional benefits and explosion of tastes, this salad is sure to become a staple in your kitchen. Let’s explore how to whip up this amazing meal that proves eating well can be both simple and satisfying!

Why You’ll Love This Recipe

This Honey Chicken Salad isn’t just another dish; it’s a celebration of fresh ingredients and delicious flavors. Here’s why you’ll adore it:

  • Quick and Easy: Ready in under 30 minutes, this salad is ideal for those busy weekdays when time is of the essence.
  • Nutritious and Balanced: Packed with protein from the chicken and vitamins from the mixed greens, it’s a wholesome choice for lunch or dinner.
  • Flavor Explosion: The sweet honey dressing complements savory chicken and fresh vegetables, creating a mouthwatering experience.
  • Versatile: Customize it with your favorite ingredients, whether it’s nuts, seeds, or extra veggies—this recipe can adapt to your taste!
  • Meal Prep Friendly: Perfect for making ahead of time, this salad can be stored in the refrigerator for up to a week, maintaining its deliciousness.

Ingredients You’ll Need

Let’s gather our ingredients! Here’s what you’ll need to create this vibrant dish, along with some suggestions for substitutions:

  • 2 cups cooked chicken, shredded or diced: Use rotisserie chicken for convenience or leftover grilled chicken for added flavor.
  • 1 cup mixed greens: Spinach, arugula, or romaine work wonderfully, providing a fresh base for the salad.
  • 1 cup diced vegetables: Bell peppers, cucumbers, or carrots add crunch and color, making the salad visually appealing.
  • 1/2 cup cherry tomatoes, halved: Juicy and sweet, these tomatoes enhance the salad’s flavor profile.
  • 1/4 cup red onion, thinly sliced: For a mild bite, red onion adds a delightful crunch and texture.
  • 1/2 cup honey: The star of the show, this will create a sweet and sticky dressing.
  • 1/4 cup olive oil: A healthy fat that helps to emulsify the dressing.
  • 2 tablespoons Dijon mustard: For a zesty kick that balances the sweetness of the honey.
  • Salt and pepper to taste: Essential for enhancing the flavors.
  • 1/4 cup chopped nuts (optional): Walnuts or almonds add a satisfying crunch.
  • 1/4 cup feta or goat cheese (optional): Creamy cheese elevates the salad with its rich flavor.

How to Make Honey Chicken Salad

Side view of a vibrant Honey Chicken Salad featuring juicy chicken and cherry tomatoes.

Ready to start cooking? Follow these simple steps to create your Honey Chicken Salad:

  1. Cook the chicken if not already done, then let cool and shred or dice.
  2. In a small bowl, whisk honey, olive oil, and Dijon mustard until smooth. Season with salt and pepper.
  3. In a large bowl, combine mixed greens, diced vegetables, cherry tomatoes, and red onion.
  4. Gently fold the cooked chicken into the vegetable mixture.
  5. Drizzle the honey dressing over the salad and toss gently to coat evenly.
  6. If using, sprinkle chopped nuts and cheese over the salad and fold in gently.
  7. Taste and adjust seasoning with salt and pepper if needed.
  8. Optional: Chill salad in the refrigerator for 5 minutes to meld flavors.
  9. Serve immediately, optionally drizzling with extra dressing.

Pro Tips for the Perfect Salad

Here are some expert insights to elevate your Honey Chicken Salad:

  • Use Leftover Chicken: For convenience, leftover rotisserie or grilled chicken works remarkably well.
  • Adjust the Sweetness: Feel free to add more or less honey to suit your taste preference.
  • Mix Up Your Greens: Experiment with different greens like kale or mixed spring greens for varied flavors.
  • Make It Vegan: Substitute chicken with chickpeas or tofu and use maple syrup instead of honey for a vegan twist.
  • Texture Matters: Aim for a mix of crunchy and soft ingredients to create an enjoyable eating experience.
  • Chill Before Serving: Allowing the salad to sit in the refrigerator for a few minutes enhances the flavors.
  • Try Different Dressings: While honey dressing is delicious, a balsamic vinaigrette or lemon olive oil can add a refreshing twist.
  • Chop Evenly: Dice your vegetables uniformly for a beautiful presentation and consistent flavor in every bite.
  • Presentation is Key: Layer the salad in a glass bowl for a stunning display, especially if serving to guests.
  • Don’t Overdress: Start with a little dressing and add more as needed to avoid sogginess.

Common Mistakes and Troubleshooting

Even the best cooks can make mistakes. Here are some common pitfalls and how to avoid them:

  • Overcooking the Chicken: Ensure chicken is cooked just until done to maintain tenderness.
  • Too Much Dressing: Start light on the dressing; you can always add more, but you can’t take it away!
  • Skipping the Chill: Allowing the salad to chill enhances the melding of flavors—don’t skip this step!
  • Ignoring Seasoning: Always taste your salad before serving to adjust the seasoning appropriately.

Delicious Variations to Try

Feeling adventurous? Here are some tasty variations for your Honey Chicken Salad:

  • Spicy Honey Chicken Salad: Add diced jalapeños or a dash of hot sauce to the dressing for a kick.
  • Fruit-Infused Salad: Mix in diced apples or berries for a sweet and fruity twist.
  • Asian-Inspired Salad: Swap the dressing for a sesame ginger dressing and add mandarin oranges and almonds.
  • Grilled Peach Chicken Salad: Top with grilled peaches for a sweet, smoky flavor that pairs beautifully with chicken.

Storage and Make-Ahead Instructions

This Honey Chicken Salad is perfect for meal prep! Here’s how to store it:

  • Refrigeration: Keep the salad in an airtight container in the refrigerator for up to 5 days.
  • Make-Ahead: You can prepare the ingredients ahead of time and assemble the salad just before serving to maintain freshness.
  • Freezing: For best quality, avoid freezing mixed greens. Instead, freeze only the chicken and dressing, then combine fresh ingredients when ready to eat.

Frequently Asked Questions

Got questions? We’ve got answers! Here are some common queries about this recipe:

  • Can I use canned chicken? Absolutely! Canned chicken works well for convenience; just drain and shred before adding.
  • Is this salad good for meal prep? Yes! It holds up well in the refrigerator for several days, making it a great choice for meal prep.
  • Can I make this salad vegan? Yes! Substitute chicken with chickpeas or tofu, and use maple syrup instead of honey.
  • How long does the salad last? In an airtight container, it can last up to 5 days in the fridge.
  • Can I prepare the dressing ahead of time? Yes! The dressing can be made ahead and stored in the refrigerator for up to a week.
  • What can I serve with this salad? It pairs beautifully with whole grain bread, quinoa, or even a light soup for a complete meal.
  • How can I enhance the flavor? Try adding different herbs or spices like cilantro or chili powder for a flavor boost!
  • Can I use other types of mustard? Certainly! Yellow mustard or whole grain mustard can also work well in the dressing.

Nutritional Tips and Dietary Adaptations

This Honey Chicken Salad can fit into various dietary needs:

  • Low-Carb Option: Skip the honey or use a low-carb sweetener to reduce sugars.
  • Gluten-Free: Ensure all ingredients, particularly the mustard, are gluten-free.
  • Paleo-Friendly: Replace honey with a compliant sweetener like coconut nectar.
  • High-Protein: Increase chicken quantity or add beans for an extra protein boost.

Essential Equipment for Success

To create this delicious salad, you’ll need:

  • Mixing Bowls: A large bowl for combining salad ingredients and a smaller bowl for the dressing.
  • Whisk: Essential for blending the dressing ingredients smoothly.
  • Sharp Knife: For chopping vegetables and chicken evenly.
  • Cutting Board: A sturdy surface to prep your ingredients safely.
  • Storage Containers: Airtight containers for keeping leftovers fresh.

Serving Suggestions

Want to make your meal even more delightful? Here are some serving suggestions:

  • Pair with Whole Grains: Serve alongside quinoa, brown rice, or whole grain crackers for added fiber.
  • Top with Avocado: Creamy avocado slices provide healthy fats and a delicious flavor contrast.
  • Garnish with Fresh Herbs: A sprinkle of fresh cilantro or parsley can brighten the dish beautifully.
  • Serve in Lettuce Wraps: For a fun twist, scoop the salad into lettuce leaves for a light, crunchy wrap.

Conclusion: Get Cooking!

There you have it—your ultimate guide to creating a flavorful, nutritious Honey Chicken Salad! This recipe is more than just a meal; it’s an adventure in the kitchen that embraces creativity and flavor. Whether you’re cooking for yourself, your family, or entertaining friends, this dish is sure to impress. So grab your ingredients, unleash your inner chef, and enjoy the deliciousness that awaits. Remember, healthy eating is not just about restrictions; it’s about enjoying vibrant, bold flavors that energize and excite. Happy cooking!

Honey Chicken Salad: An Amazing Ultimate Recipe

Prep Time 10 minutes
Cook Time 15 minutes
Total Time 25 minutes
Servings 4 servings
Calories 450
A delicious and healthy honey chicken salad combining fresh greens, vegetables, and a sweet honey dressing for a satisfying meal.

Ingredients

Protein

  • 2 cups cooked chicken, shredded or diced

Vegetables

  • 1 cup mixed greens (spinach, arugula, romaine)
  • 1 cup diced vegetables (bell peppers, cucumbers, carrots)
  • 1/2 cup cherry tomatoes, halved
  • 1/4 cup red onion, thinly sliced

Dressing

  • 1/2 cup honey
  • 1/4 cup olive oil
  • 2 tablespoons Dijon mustard

Optional Toppings

  • 1/4 cup chopped nuts (walnuts, almonds) (optional)
  • 1/4 cup feta cheese or goat cheese (optional)

Instructions 

  • Cook and cool the chicken, then shred or dice.
  • Whisk honey, olive oil, and Dijon mustard until smooth; season with salt and pepper.
  • Combine greens, diced vegetables, cherry tomatoes, and red onion in a large bowl.
  • Add cooked chicken to the bowl and toss with dressing.
  • Sprinkle nuts and cheese if using, then toss gently. Chill briefly if desired, then serve.

Notes

For extra flavor, let the salad sit in the refrigerator for 5 minutes before serving.
Calories: 450kcal
Cost: $15
Course: Salad
Cuisine: American
Keyword: Chicken, Healthy, Honey

Get Ready to Savor the Ultimate Keto Big Mac Salad!

If you’re craving the bold flavors of a Big Mac but want to keep it healthy and low-carb, then you’ve landed in the right place! The Keto Big Mac Salad is a delicious twist on a classic favorite that packs all the flavors you love without the guilt. This vibrant salad combines juicy ground beef, fresh veggies, and a creamy homemade dressing that will make your taste buds sing. Plus, it’s quick to prepare, making it perfect for busy weeknights or meal prep for the week ahead.

Why You’ll Love This Recipe

  • Flavor Explosion: This salad captures all the iconic flavors of a Big Mac, including the tangy dressing and savory beef, making healthy eating feel indulgent.
  • Low-Carb Goodness: With minimal carbs, this dish is perfect for those following a keto diet, allowing you to enjoy a satisfying meal without compromising on your goals.
  • Meal Prep Friendly: Make this salad in advance for quick lunches or dinners throughout the week, keeping your meals exciting and nutritious.
  • Customizable: You can easily tweak the ingredients to suit your taste or dietary restrictions, making it a versatile option for everyone.
  • Easy to Prepare: With straightforward steps and minimal cooking time, you can whip up this dish even on your busiest days!

Ingredient Breakdown

To create your Keto Big Mac Salad, gather the following ingredients:

  • 1/2 cup mayonnaise: Use a quality mayonnaise for the best flavor. You can also opt for avocado mayo for a healthier twist.
  • 2 tablespoons ketchup: Choose a sugar-free ketchup to keep the carbs low.
  • 2 tablespoons pickles, diced: Adds the signature crunch and flavor.
  • 2 tablespoons white onion, finely diced: For that classic Big Mac bite.
  • 2 teaspoons yellow mustard: A must for that tangy kick.
  • 2 teaspoons white vinegar: Enhances the dressing’s flavor.
  • 1/2 teaspoon garlic powder: For a subtle warmth.
  • 1/2 teaspoon onion powder: Adds depth to the dressing.
  • 1 pound ground beef, lean: The star protein of this dish, use 80/20 for optimal flavor.
  • 2 medium-sized romaine lettuce (about 6 cups chopped): Provides a crispy base.
  • 2 Roma tomatoes (about 1 cup diced): Freshness and sweetness.
  • 3/4 cup shredded cheddar cheese: Adds creaminess and flavor.
  • 1 teaspoon salt: Enhances all the flavors.
  • 1/4 teaspoon coarse black pepper: For seasoning the beef.
  • Sesame seeds (optional for garnish): A fun, crunchy topping.

Pro Tips for the Perfect Salad

A side slice of a colorful Keto Big Mac Salad featuring diced vegetables and cheese.
  • Meat Quality: Use high-quality ground beef for the best flavor. Lean beef (80/20) strikes the ideal balance of fat and flavor.
  • Let the Dressing Sit: For enhanced flavor, allow your dressing to chill in the refrigerator for at least 30 minutes before serving.
  • Chop Fresh: Always chop your veggies fresh for the best texture and taste—don’t skimp on the romaine!
  • Layer It Up: For a fun presentation, serve the salad in layers or create a DIY salad bar for family and friends.
  • Storage Tips: Keep the dressing separate from the salad ingredients until ready to serve to prevent sogginess.
  • Extra Crunch: Add in some crispy bacon bits or crushed pork rinds for an extra crunch!
  • Herb Infusion: Add fresh herbs like parsley or cilantro for a burst of freshness.
  • Make It Spicy: If you like heat, consider adding jalapeños or a dash of hot sauce to the dressing.

Common Mistakes and Troubleshooting

Here are some common pitfalls to avoid when making your Keto Big Mac Salad:

  • Overcooking the Beef: Make sure to cook the beef just until browned to keep it juicy.
  • Too Much Dressing: Start with less dressing and add more as needed; you want to enhance, not drown, the salad.
  • Incorrect Seasoning: Taste as you go! Adjust the salt and pepper according to your preference.
  • Pre-Chopped Veggies: While convenient, pre-chopped veggies may lack freshness—opt for fresh produce whenever possible.

Variations to Try

Get creative with your Keto Big Mac Salad! Here are some fun twists:

  • Turkey Big Mac Salad: Swap ground beef for ground turkey for a leaner option.
  • Veggie Delight: Make it vegetarian by using roasted chickpeas or tempeh in place of meat.
  • Spicy Big Mac Salad: Add diced jalapeños or a spicy dressing for a kick!
  • Greek-Inspired Version: Use feta cheese and olives for a Mediterranean twist.

Storage and Make-Ahead Instructions

This salad is perfect for meal prep! Here’s how to store it:

  • Refrigeration: Store the salad components in separate airtight containers in the fridge for up to 5 days.
  • Dressing Storage: Keep the dressing in a separate container, and it will stay fresh for about a week.
  • Assembling the Salad: Combine the salad ingredients just before serving to ensure the lettuce stays crisp.

FAQs About Keto Big Mac Salad

  • Can I use ground turkey instead of beef? Absolutely! Ground turkey works well and is a leaner option.
  • Is this salad gluten-free? Yes, all ingredients are gluten-free, making it a safe choice for those with gluten sensitivities.
  • How can I make this dairy-free? Replace cheddar cheese with a dairy-free alternative or omit it altogether.
  • Can I add more vegetables? Yes! Feel free to add any of your favorite veggies, such as bell peppers or cucumbers.
  • How long does the dressing last? Homemade dressing typically lasts about a week in the fridge.
  • Can I use a store-bought dressing? Yes, but check for low-carb options to keep it keto-friendly!
  • What can I serve with this salad? It pairs beautifully with avocado slices, crispy bacon, or keto-friendly garlic bread.
  • Is this recipe suitable for meal prep? Yes! It’s perfect for preparing ahead of time and enjoying throughout the week.

Nutritional Tips and Dietary Adaptations

To make the most out of your Keto Big Mac Salad, consider these nutritional tips:

  • Protein Power: Add additional protein, like shredded chicken or hard-boiled eggs, to boost satiety.
  • Low Carb Additions: Incorporate more low-carb vegetables like spinach or kale for added nutrients without extra carbs.
  • Healthy Fats: Include avocado or nuts for healthy fats that will keep you full longer.

Equipment Recommendations

Here’s what you’ll need:

  • Sharp Knife: For chopping veggies and cutting your ingredients precisely.
  • Cutting Board: A sturdy surface for all your chopping needs.
  • Mixing Bowl: For preparing your dressing and combining ingredients.
  • Skillet: For cooking your ground beef to perfection.
  • Measuring Cups and Spoons: Essential for accuracy in ingredients.

Serving Suggestions

Make your meal even more enjoyable:

  • Create a Salad Bar: Set up a DIY salad bar with toppings and dressings for family or friends to personalize their salads.
  • Pair with a Low-Carb Drink: Enjoy this salad with a refreshing unsweetened iced tea or sparkling water.
  • Garnish Creatively: Use sesame seeds or fresh herbs to enhance the visual appeal of your dish.

In conclusion, the Keto Big Mac Salad is not only a flavor-packed meal but also a health-conscious choice that makes eating well exciting. This salad is a game changer, proving that you can enjoy fast food flavors in a nutritious way. So grab your ingredients, roll up your sleeves, and let’s make healthy eating a joy!

Keto Big Mac Salad

Prep Time 15 minutes
Cook Time 10 minutes
Total Time 25 minutes
Servings 4 servings
Calories 650
A low-carb, flavorful salad inspired by the classic Big Mac, perfect for a quick and satisfying meal.

Ingredients

Dressing

  • 1/2 cup mayonnaise
  • 2 tablespoons ketchup
  • 2 tablespoons pickles, diced
  • 2 tablespoons white onion, finely diced
  • 2 teaspoons yellow mustard
  • 2 teaspoons white vinegar

Additional Ingredients

  • 1 pound lean ground beef
  • 2 medium romaine lettuce (about 6 cups chopped)
  • 1 large white onion, finely diced
  • 2 Roma tomatoes (about 1 cup diced) Roma tomatoes
  • 3/4 cup shredded cheddar cheese
  • 1/2 cup pickles
  • 1 teaspoon salt
  • 1/4 teaspoon black pepper

Instructions 

  • Mix mayonnaise, ketchup, pickles, onion, mustard, and vinegar until smooth to make the dressing.
  • Dice onion and tomatoes, then prepare the lettuce and cook ground beef until browned. Season with salt and pepper.
  • Assemble the salad by combining lettuce, tomatoes, beef, cheese, and pickles. Drizzle with the dressing and serve.

Notes

This salad is perfect for a quick keto-friendly meal with bold flavors.
Calories: 650kcal
Cost: $15
Course: Salad
Cuisine: American
Keyword: Big Mac, Keto, Salad

Discover the Magic of Chickpea & Avocado Salad!

Welcome to a flavor-packed adventure with our vibrant Chickpea & Avocado Salad! This delightful dish is more than just a salad; it’s a celebration of textures and tastes that will make your taste buds dance with joy. Packed with healthy fats, plant-based protein, and a zesty dressing, this salad is perfect for a quick lunch or as a side that will steal the show at any gathering. Let’s dive into the delicious details of what makes this salad not just good, but truly exceptional!

Why You’ll Love This Recipe

This Chickpea & Avocado Salad isn’t just another recipe; it’s your new go-to for numerous reasons:

  • Quick and Easy: With minimal prep and straightforward steps, this recipe is perfect for busy weeknights or last-minute gatherings.
  • Nutrient-Packed: Ripe avocados provide healthy fats while chickpeas offer plant-based protein, making this salad filling and nourishing.
  • Customizable: Mix in your favorite veggies or herbs to tailor the flavor profile to your taste.
  • Visually Stunning: The vibrant colors and textures make this salad a feast for the eyes as much as for the palate.
  • Meal Prep Friendly: This salad stores well and can be made ahead, making it a convenient choice for meal prep.

Ingredients for Chickpea & Avocado Salad

Here’s what you’ll need to whip up this delightful dish:

  • 1 can (15 oz) chickpeas, rinsed and drained
  • 2 ripe avocados, diced
  • 1 cup cherry tomatoes, halved
  • 1 cup cucumber, diced
  • 1/4 cup red onion, finely chopped
  • 2 tbsp lemon juice (freshly squeezed)
  • 2 tbsp extra virgin olive oil
  • Salt and pepper to taste

Feel free to substitute ingredients based on your preferences. For example, you can use lime juice for a different zesty flavor or add bell peppers for extra crunch!

How to Make Chickpea & Avocado Salad

Close-up view of an avocado and chickpea salad, showcasing fresh ingredients and bright colors.

Let’s get cooking! Follow these simple steps for a delicious salad:

  1. Gather all ingredients on the countertop.
  2. Rinse and drain the chickpeas well.
  3. Finely chop the cherry tomatoes, cucumber, and red onion; dice the avocados.
  4. In a large mixing bowl, combine chickpeas, avocados, tomatoes, cucumber, and red onion. Toss gently to mix.
  5. In a small bowl, whisk together lemon juice and olive oil; season with salt and pepper to taste.
  6. Pour the dressing over the salad and toss gently until everything is coated.
  7. Serve immediately or let the salad sit for 10 minutes to meld the flavors.

Pro Tips for the Best Chickpea & Avocado Salad

To elevate your salad game, consider these expert insights:

  • Choosing Ripe Avocados: Look for avocados that yield slightly to gentle pressure for the best creaminess.
  • Texture Matters: For a varied texture, mash some chickpeas and leave others whole.
  • Add a Kick: Try adding a pinch of cayenne or a dash of hot sauce for a spicy twist.
  • Fresh Herbs: Incorporate fresh herbs like cilantro or parsley for added freshness.
  • Don’t Skip the Dressing: The right dressing is key; make sure to season it well for maximum flavor.
  • Balance Flavors: Taste as you go! Adjust lemon juice or olive oil to suit your preference.
  • Customize to Your Taste: Feel free to add ingredients like feta cheese or nuts for additional flavor and crunch.
  • Serve it Right: Chill your salad before serving for a refreshing experience.

Common Mistakes and Troubleshooting

Even seasoned chefs can make mistakes. Here are some common pitfalls and how to avoid them:

  • Overripe Avocados: Ensure your avocados are ripe but not overripe; mushy avocados can ruin the texture.
  • Skipping Seasoning: Don’t forget to season your salad; a pinch of salt can enhance the flavors significantly.
  • Ignoring Texture Variations: Mixing everything too vigorously can result in a mushy mess; toss gently.
  • Overloading Ingredients: Stick to the recommended ingredients to maintain the salad’s balance.

Delicious Variations of Chickpea & Avocado Salad

Get creative! Here are four tasty variations you can try:

  • Mexican Fiesta: Add corn, black beans, and a sprinkle of taco seasoning for a fiesta-inspired salad.
  • Greek Twist: Toss in feta cheese, kalamata olives, and oregano for a Mediterranean flair.
  • Asian-Inspired: Include edamame, sesame seeds, and a soy sauce-based dressing for a unique twist.
  • Spicy Chickpea Salad: Mix in diced jalapeños or crushed red pepper flakes for a spicy kick.

Storage and Make-Ahead Instructions

This salad is perfect for meal prep! Here’s how to store it:

  • In the Fridge: Store in an airtight container for up to 2 days. The flavors will meld beautifully!
  • Make-Ahead: Prepare everything except the dressing and avocado ahead of time; add them just before serving.

Frequently Asked Questions (FAQs)

Got questions? We’ve got answers! Here are some FAQs about Chickpea & Avocado Salad:

  • What are the health benefits of this salad? This salad is rich in fiber, healthy fats, and plant-based protein, making it a nutritious choice.
  • Can I use canned chickpeas? Absolutely! Canned chickpeas are convenient and quick—just rinse and drain!
  • How can I customize my salad? Feel free to add or replace ingredients based on your preferences—there are no rules in salad-making!
  • How do I prevent avocados from browning? Add lemon juice immediately after cutting them and store in an airtight container.
  • Is this salad vegan? Yes, it’s 100% plant-based and vegan-friendly!
  • Can I freeze this salad? It’s best enjoyed fresh, but you can freeze the chickpeas and veggies separately.
  • What can I serve this salad with? Pair it with grilled chicken, fish, or serve it as a standalone dish!
  • How long does it take to prepare? From start to finish, this salad takes about 15-20 minutes!

Nutritional Tips and Dietary Adaptations

This salad is not only delicious but also adaptable to various dietary needs:

  • Gluten-Free: Enjoy this salad worry-free, as all ingredients are naturally gluten-free.
  • Low-Carb: Substitute chickpeas with cauliflower rice for a low-carb option.
  • High-Protein: Add grilled chicken or tofu for an extra protein boost.

Essential Equipment Recommendations

Make your cooking experience smoother with these essentials:

  • Cutting Board: A sturdy cutting board for chopping your veggies.
  • Chef’s Knife: A sharp knife will make slicing and dicing a breeze.
  • Mixing Bowls: Use large mixing bowls for easy tossing of ingredients.
  • Measuring Cups and Spoons: Ensure accurate measurements for your ingredients.

Serving Suggestions

Serve this salad as a standalone meal or as a side dish at your next gathering. Here are a few ideas:

  • As a Light Lunch: Pair it with whole-grain pita or a side of soup.
  • At a BBQ: Bring it to your next barbecue as a refreshing side dish.
  • For Meal Prep: Pack it in individual containers for a healthy week’s worth of lunches.

In conclusion, this Chickpea & Avocado Salad is not just a recipe; it’s a canvas for creativity and a powerhouse of nutrition. With its vibrant flavors and versatile ingredients, you can’t go wrong. The kitchen is your playground—so get in there, make this salad, and let your culinary spirit shine!

Avocado & Chickpea Salad

Prep Time 10 minutes
Total Time 10 minutes
Servings 4 servings
Calories 350
A fresh and healthy salad combining creamy avocados with protein-rich chickpeas and crisp vegetables, perfect for a quick lunch or light dinner.

Ingredients

Main

  • 1 can (15 oz) chickpeas, rinsed and drained
  • 2 ripe avocados avocados, diced
  • 1 cup cherry tomatoes, halved
  • 1 cup cucumber, diced
  • 1/4 cup red onion, finely chopped
  • 2 tbsp lemon juice (freshly squeezed)
  • 2 tbsp extra virgin olive oil
  • to taste Salt and pepper

Instructions 

  • Rinse and drain the chickpeas.
  • Chop cherry tomatoes, cucumber, and red onion; dice avocados.
  • Combine chickpeas, avocados, tomatoes, cucumber, and onion in a bowl.
  • Whisk lemon juice and olive oil; season with salt and pepper.
  • Pour dressing over salad; toss gently and serve.

Notes

For extra flavor, add fresh herbs like cilantro or parsley.
Calories: 350kcal
Cost: $12
Course: Salad
Cuisine: international
Keyword: avocado, chickpea

Welcome to a flavorful adventure that’s as vibrant as it is nutritious! If you’re looking to elevate your salad game, you’ve landed in the right spot. This Asian Sesame Cucumber Salad packs a punch with its crisp cucumbers, sweet carrots, and a zesty dressing that’s not only quick to whip up but also a delight for your taste buds. Let’s dive into the deliciousness!

Why You’ll Love This Recipe

This isn’t just any salad; it’s a celebration of freshness and flavor! Here’s why you’re going to adore it:

  • Quick & Easy: Perfect for busy days, this salad can be prepped in under 30 minutes!
  • Nutritious & Wholesome: Packed with vitamins from cucumbers and carrots, it’s a guilt-free delight.
  • Versatile Dish: Enjoy it as a side, a snack, or a light main course – the options are endless!
  • Flavor Explosion: The combination of tangy dressing and crunchy veggies creates a symphony of taste.
  • Customizable: Easily swap ingredients to suit your dietary needs or personal preferences.

Ingredients Breakdown

Let’s get down to the nitty-gritty of what you’ll need to create this scrumptious salad:

  • 2 English or hothouse cucumbers: Chilled for that refreshing crunch.
  • 2 large carrots: Adds sweetness and color; feel free to spiralize or julienne them!
  • 1 tsp. Kosher salt: Essential for drawing out moisture from cucumbers.
  • 2 TBSP rice vinegar: Provides a tangy kick that lightens the dish.
  • 1 TBSP fresh lime juice: Brightens the flavors (around half a lime).
  • 2-3 TBSP honey: Sweetness balances the tangy dressing; substitute with maple syrup for a vegan option.
  • 1 tsp. toasted sesame oil: The star ingredient that gives the salad its signature nutty flavor.
  • Pinch of red pepper flakes: For a hint of heat; adjust to your taste!
  • ½-1 TBSP toasted sesame seeds: A crunchy garnish that also looks gorgeous!
  • 1 scallion, sliced: Fresh and mild, it adds a nice bite.
  • 2 TBSP fresh cilantro (optional): For a burst of herbal freshness!

How to Make Asian Sesame Cucumber Salad

Ready to create this dish? Follow these simple steps for a salad that’s sure to impress:

  1. If you have a spiralizer, use it to cut the cucumbers and carrots into long noodles. If not, thinly slice them with a knife.
  2. Place the spiralized cucumber into a strainer and toss with 1 tsp. kosher salt. Let it drain for 15-20 minutes to remove excess moisture.
  3. In a small bowl or glass measuring cup, whisk together the rice vinegar, lime juice, honey, sesame oil, red pepper flakes, and sesame seeds.
  4. Once the cucumber has drained, spread it onto a layer of paper towels or a clean dish towel, and gently pat out as much moisture as you can.
  5. Place the ‘noodles’ into a large bowl and add 2-3 TBSP of the dressing to coat. Toss to combine, then garnish with additional sesame seeds, sliced scallions, and cilantro.
  6. Serve immediately. Leftover salad can be stored in an airtight container in the fridge for up to a day, but note that the cucumber will continue to release water.

Pro Tips for the Perfect Salad

Freshly prepared Asian Sesame Cucumber Salad featuring cucumbers and carrots.

To ensure your salad is nothing short of perfection, check out these expert insights:

  • Texture Matters: For the crunchiest salad, use fresh, firm cucumbers and carrots.
  • Don’t Rush the Salting: Allow the cucumbers to sit with salt long enough to draw out moisture; it makes a big difference!
  • Chill Ingredients: Start with chilled cucumbers and carrots to enhance the refreshing taste.
  • Experiment with Dressings: Try adding a splash of soy sauce or a dash of sesame seeds for extra flavor.
  • Fresh Herbs: Mix in fresh mint or basil for an aromatic twist!
  • Serving Temperature: This salad is best served cold; consider refrigerating it for an hour before serving.
  • Meal Prep: Make it ahead of time for a quick grab-and-go lunch option!
  • Presentation: Serve in a clear bowl to highlight the vibrant colors of the ingredients.

Common Mistakes and Troubleshooting

Even the best chefs can make mistakes! Here’s how to avoid common pitfalls:

  • Too Watery: If your salad is watery, it’s likely from not salting the cucumbers long enough. Be patient!
  • Overly Sweet Dressing: Adjust the honey to taste. Start with less and add more if needed.
  • Bland Flavor: If your salad lacks zing, add more lime juice or a splash of soy sauce.
  • Soft Veggies: Ensure your cucumbers and carrots are fresh to maintain a satisfying crunch.

Delicious Variations

Mix things up with these exciting variations:

  • Spicy Kick: Add thinly sliced jalapeños or a drizzle of sriracha for a fiery twist.
  • Protein Party: Toss in shredded cooked chicken, shrimp, or tofu for a hearty meal.
  • Fruity Fusion: Include diced mango or pineapple for a sweet, tropical flair.
  • Nuts for Crunch: Throw in some chopped peanuts or cashews for added texture and flavor.

Storage & Make-Ahead Instructions

Want to prepare this salad in advance? Here’s how to store it and keep it fresh:

  • Make Ahead: You can prepare the dressing and chop the vegetables a day in advance. Just combine them right before serving.
  • Storage: Keep the salad in an airtight container in the fridge. It’s best enjoyed within 24 hours for optimal freshness.
  • Moisture Control: If storing leftovers, place a paper towel in the container to absorb excess moisture.

Asian Sesame Cucumber Salad Recipe FAQs

Got questions about this delightful salad? We’ve got answers!

  • Can I use regular cucumbers instead of English? Yes, but be sure to peel them as they can be waxy!
  • How long will leftovers last? It’s best eaten within a day, as cucumbers release water over time.
  • Can I make this salad vegan? Absolutely! Just substitute honey with maple syrup.
  • Is this salad gluten-free? Yes, as long as you use gluten-free soy sauce if added.
  • What can I serve with this salad? It pairs perfectly with grilled meats, rice dishes, or as a light lunch on its own!
  • Can I add other vegetables? Feel free to experiment with bell peppers, radishes, or snap peas for added crunch.
  • Can I freeze this salad? Not recommended, as the texture of cucumbers will suffer when thawed.
  • What is the nutritional value of this salad? It’s low in calories and high in vitamins! Perfect for a light, healthy meal.

Nutritional Tips and Dietary Adaptations

Let’s keep it healthy! Here are some nutritional insights:

  • Low Calorie: This salad is a fantastic low-calorie option that’s rich in fiber and nutrients.
  • High in Vitamins: Cucumbers are hydrating and packed with vitamins K and C.
  • Balanced Meal: Pair with a protein source for a well-rounded meal.
  • Low Sugar: By substituting honey with a low-calorie sweetener, you can reduce sugar content.

Equipment Recommendations

Here’s what you’ll need to whip up this delicious salad:

  • Spiralizer: For creating those fun veggie noodles.
  • Sharp Knife: Essential for slicing ingredients thinly.
  • Cutting Board: A sturdy surface to prep your veggies.
  • Mixing Bowl: A large bowl for tossing everything together.
  • Measuring Cups: To ensure accurate ingredient proportions.

Serving Suggestions

Wondering how to present this colorful salad? Here are some ideas:

  • Vibrant Platter: Serve it on a large, colorful platter for a stunning centerpiece.
  • Individual Bowls: Portion into small bowls for a cute and personal touch.
  • Accompanied by Proteins: Pair with grilled salmon or chicken for a complete meal.
  • Alongside Rice Dishes: It complements fried rice or sushi perfectly!

Now that you’re armed with everything you need to create your own Asian Sesame Cucumber Salad, go forth and crunch into freshness! This salad is not just a meal; it’s a celebration of flavors that will energize your day. Happy cooking!

Asian Sesame Cucumber Salad

Prep Time 15 minutes
Total Time 15 minutes
Servings 4 servings
Calories 120
A fresh and crunchy salad combining crisp cucumbers and carrots with a tangy sesame dressing, perfect for a light side dish.

Ingredients

Vegetables

  • 2 pieces English or hothouse cucumbers, chilled
  • 2 pieces large carrots

Seasonings & Liquids

  • 1 tsp Kosher salt
  • 2 TBSP rice vinegar
  • 1 TBSP fresh lime juice ((about half a lime))
  • 2-3 TBSP honey, to taste
  • 1 tsp Toasted sesame oil
  • pinch red pepper flakes (to taste)
  • ½-1 TBSP toasted sesame seeds (white and black, or either on their own)
  • 1 piece scallion, sliced
  • 2 TBSP fresh cilantro, chopped (optional)

Instructions 

  • Use a spiralizer or thinly slice cucumbers and carrots.
  • Salt the cucumber noodles and drain for 15-20 minutes.
  • Whisk together vinegar, lime juice, honey, sesame oil, red pepper flakes, and sesame seeds.
  • Pat cucumber dry, then toss with dressing and garnish with scallions, cilantro, and sesame seeds.
  • Serve immediately; store leftovers in fridge for up to a day.

Notes

This salad is best enjoyed fresh but can be stored for a short time in the fridge.
Calories: 120kcal
Cost: $10
Course: Side Dish
Cuisine: Asian
Keyword: Carrot, cucumber, Sesame