Author

Ryan

Browsing

Welcome to Your Flavorful Adventure!

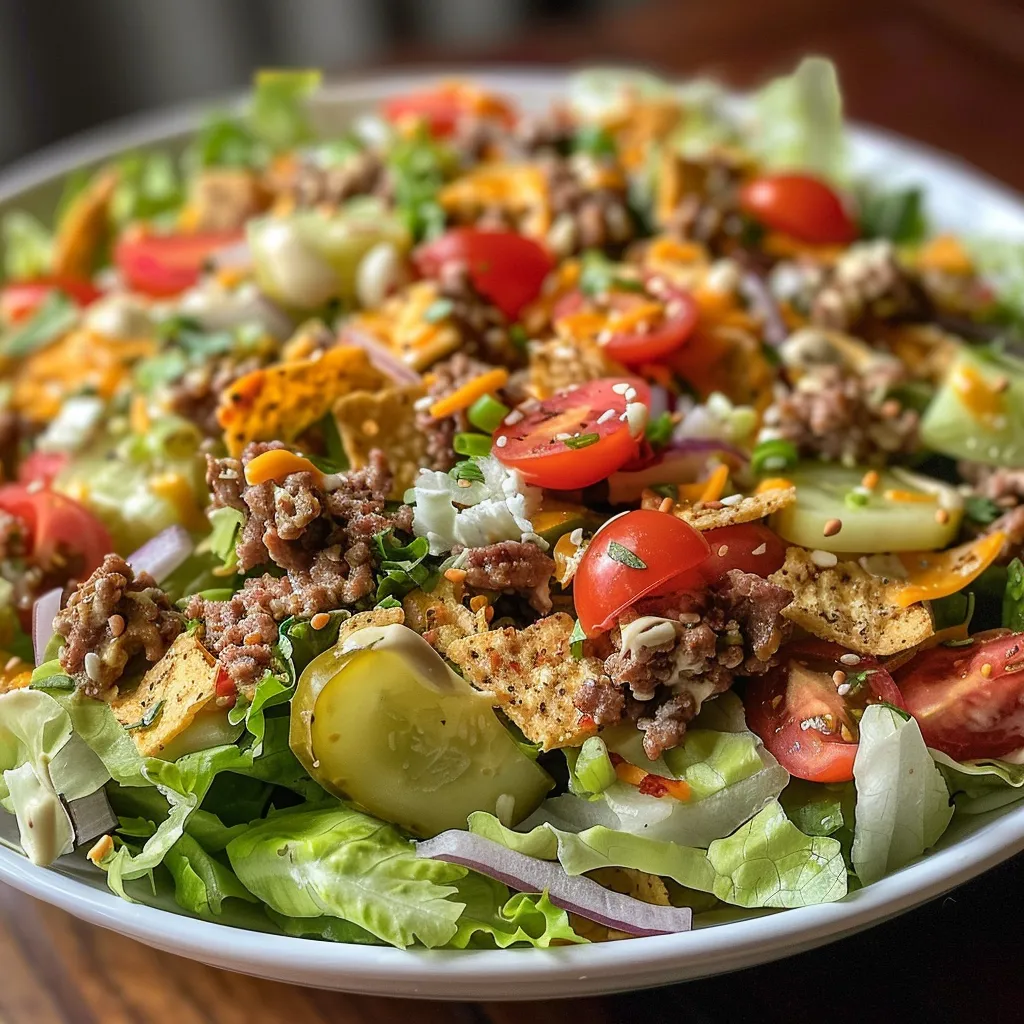
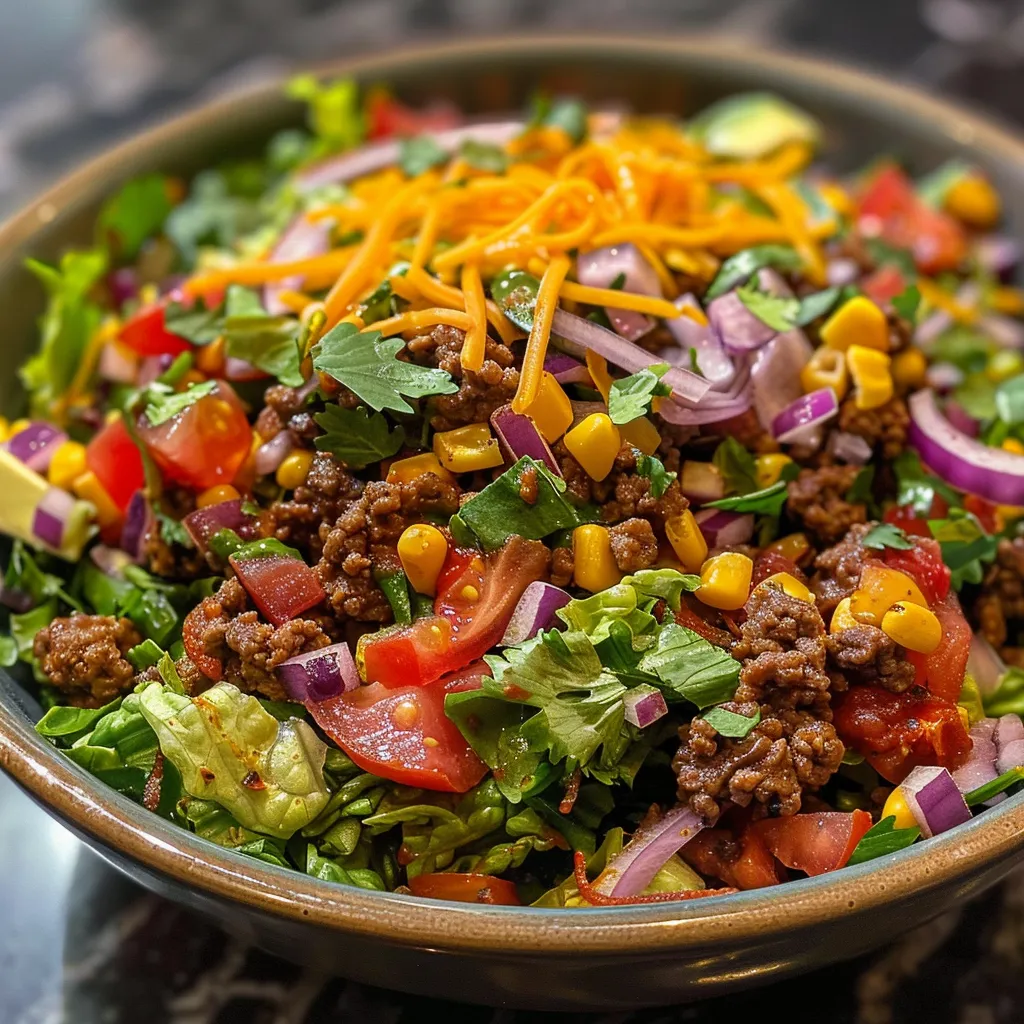
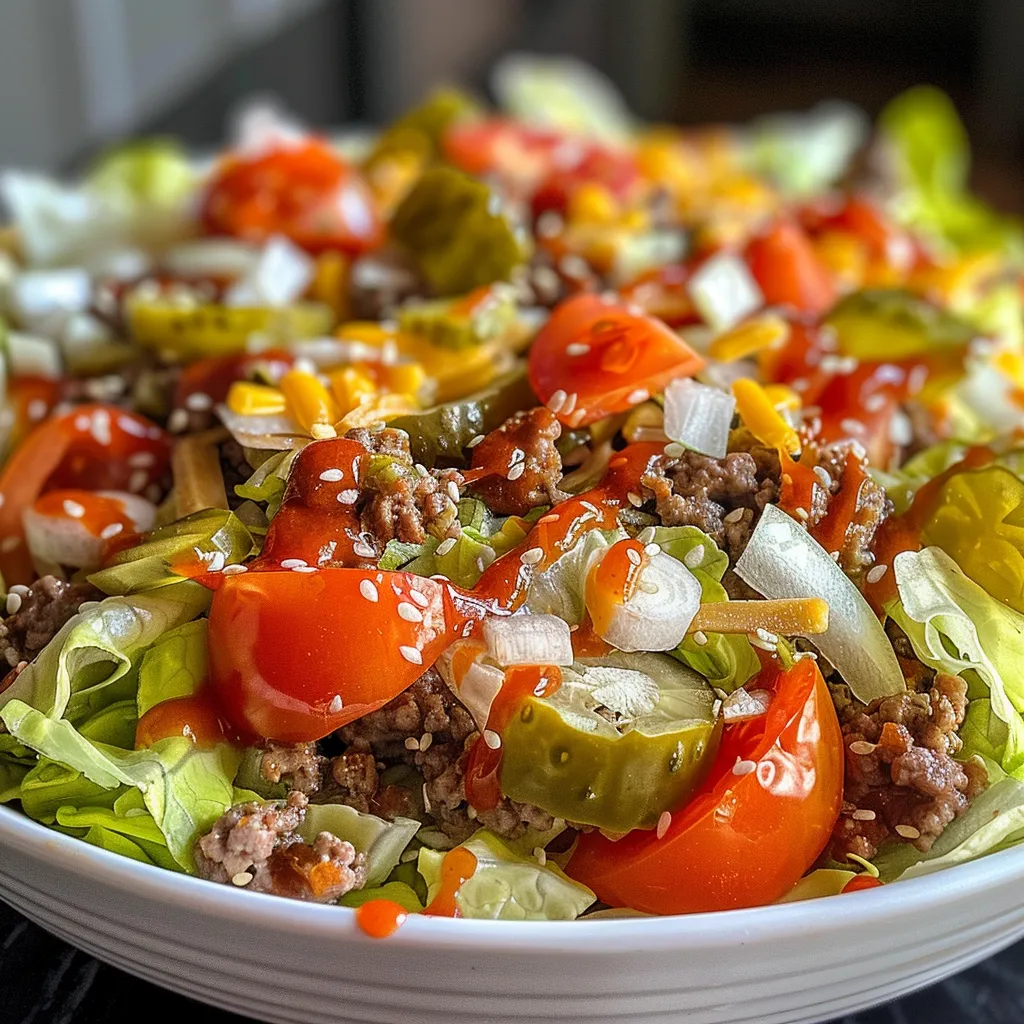
Get ready to crunch your way into a world of flavor with our Keto Big Mac Salad! This quick and easy recipe combines savory ground beef, zesty sauce, and fresh veggies for a satisfying meal that keeps you on track without sacrificing taste. It’s time to transform how you view healthy eating—let’s make it exciting!

Why You’ll Love This Recipe

This keto big mac salad isn’t just delicious; it’s packed with benefits that will keep you coming back for more. Here’s why this salad is a must-try:

  • Quick and Easy: With minimal prep and cook time, you can whip up this dish in under 30 minutes, making it perfect for busy weeknights.
  • Low Carb Delight: Perfect for keto enthusiasts, this salad is low in carbohydrates while still delivering on flavor and satisfaction.
  • Nutrient-Rich Ingredients: Fresh veggies and quality protein come together for a meal that’s as nutritious as it is tasty.
  • Customizable: Feel free to add or swap ingredients to suit your taste or dietary needs—this recipe is versatile!
  • Meal Prep Friendly: Make a big batch and store it for quick lunches throughout the week—healthy eating made easy!

Ingredients You’ll Need

To make the ultimate keto big mac salad, gather these ingredients:

  • ½ cup mayonnaise: This will serve as the creamy base for your dressing.
  • 1 ½ tablespoons yellow mustard: Adds a tangy kick that complements the flavors brilliantly.
  • 1 tablespoon dill pickle relish: A must-have for that classic Big Mac flavor.
  • 1 teaspoon vinegar: White or apple cider vinegar can enhance the dressing’s zing.
  • 1 teaspoon garlic powder: Infuses the dressing with a subtle savory note.
  • 1 teaspoon onion powder: Adds depth and flavor without the crunch of raw onions.
  • ½ teaspoon paprika: For a hint of smokiness and color.
  • 1 pound ground beef: The star protein; choose a quality cut for the best flavor.
  • Lettuce: Use romaine or iceberg for that perfect crunch.
  • Shredded cheddar cheese: A rich, cheesy layer that brings everything together.
  • Chopped onions: Fresh or pickled, they add a lovely bite to the mix.
  • Pickle chips: For garnish and extra crunch!

Step-by-Step Instructions

Side angle of a delicious Keto Big Mac Salad featuring layers of meat and fresh vegetables.

Ready to dive in? Here’s how to create your keto big mac salad:

  1. Mix the Dressing: In a small bowl, combine the mayonnaise, yellow mustard, dill pickle relish, vinegar, garlic powder, onion powder, and paprika. Stir until smooth and well blended.
  2. Prepare the Beef: In a skillet over medium heat, brown the ground beef, breaking it apart as it cooks. Drain any excess grease for a leaner dish.
  3. Assemble the Salad: In a large mixing bowl, toss together the lettuce, shredded cheddar, chopped onions, and pickle chips. Top with the cooked ground beef.
  4. Dress It Up! Drizzle the dressing over the salad just before serving to keep everything fresh and crunchy. Toss gently to combine.

Tips for the Perfect Keto Big Mac Salad

Before you dig in, consider these expert tips to enhance your salad experience:

  • Quality Beef: Opt for 80/20 ground beef for the best balance of flavor and juiciness.
  • Fresh Ingredients: Use crisp, fresh lettuce and high-quality cheese for optimal taste.
  • Custom Dressings: Experiment with adding spices like cayenne for heat or fresh herbs for a twist.
  • Layering Technique: Layer ingredients in a jar for a make-ahead meal that looks as good as it tastes.
  • Spice It Up: Add jalapeños or hot sauce if you enjoy a kick!

Common Mistakes and Troubleshooting

Even the best chefs make mistakes! Here are some common pitfalls and how to avoid them:

  • Overcooked Beef: Watch the cooking time to keep the beef tender and juicy.
  • Wilty Lettuce: Add dressing just before serving to maintain crispness.
  • Too Much Dressing: Start with a little and add more to taste; you can always add but can’t take away!

Variations to Try

If you’re feeling adventurous, here are some fun variations you can try:

  • Turkey Version: Swap ground beef for ground turkey for a lighter option.
  • Veggie Delight: Add diced bell peppers, cucumbers, or avocados for extra flavor and nutrition.
  • Cheesy Twist: Mix in crumbled feta or blue cheese for a different flavor profile.
  • Spicy Kick: Incorporate sriracha or spicy ranch dressing for a hot twist!

Storage and Make-Ahead Instructions

This keto big mac salad is perfect for meal prep! Here’s how to store it:

  • Refrigerate: Store in an airtight container for up to 3 days.
  • Make Ahead: Prepare the dressing and beef in advance, then assemble just before serving to maintain freshness.
  • Freeze Caution: Avoid freezing as lettuce doesn’t thaw well; instead, keep components separate until ready to eat.

Frequently Asked Questions

Got questions about the recipe? I’ve got answers!

  • Can I make this vegan? Absolutely! Substitute ground beef with plant-based crumbles and use vegan mayo.
  • How can I lower the calories? Use leaner beef and skip the cheese if you want a lighter version.
  • What can I use instead of mayonnaise? Greek yogurt or avocado can be great alternatives for creaminess.
  • Is this salad good for meal prep? Yes, it’s fantastic for meal prep! Just keep the dressing separate until serving.
  • How long does it last in the fridge? It will stay fresh for about 3 days in the fridge.
  • Can I add more veggies? Totally! Feel free to mix in your favorites.
  • What dressing pairs well? A light vinaigrette or ranch dressing can also complement this salad nicely.
  • Can I use other proteins? Yes! Grilled chicken, shrimp, or even tofu can work beautifully.

Nutritional Tips and Dietary Adaptations

As you enjoy your keto big mac salad, keep these nutrition tips in mind:

  • Low Carb Focus: This salad is perfect for those following a low-carb or keto diet, helping you stay within your carb limits.
  • Protein-Packed: The beef provides a great source of protein, essential for muscle maintenance and energy.
  • Healthy Fats: The mayonnaise contributes healthy fats, which are vital for satiety and overall health.
  • Fiber Boost: Add more veggies for fiber, which aids digestion and keeps you feeling full.

Essential Equipment for Success

To make your cooking process seamless, here’s what you’ll need:

  • Skillet: A non-stick skillet is ideal for cooking the ground beef.
  • Mixing Bowls: Use different sizes for mixing ingredients and assembling the salad.
  • Measuring Cups: Ensure accurate measurements for a perfectly balanced dressing.

Serving Suggestions

Serve your keto big mac salad with these delicious sides:

  • Low Carb Bread: Pair it with keto-friendly bread or rolls for a complete meal.
  • Chips: Serve with low-carb tortilla chips or veggie chips for crunch.
  • Wine Pairing: A light white wine can complement the flavors without overpowering them.

Wrap Up Your Flavor Adventure!

And there you have it—the ultimate Keto Big Mac Salad experience! With its vibrant flavors, nutritious ingredients, and easy prep, this salad is sure to become a staple in your kitchen. So grab your ingredients and give this fun, tasty recipe a try. Remember, healthy eating is all about joy, energy, and balance. Happy cooking!

Keto Big Mac Salad Recipe

Prep Time 10 minutes
Cook Time 10 minutes
Total Time 20 minutes
Servings 4 servings
Calories 450
A delicious low-carb salad inspired by the classic Big Mac, perfect for a quick and satisfying meal.

Ingredients

Dressing

  • 0.5 cup mayonnaise
  • 1.5 tablespoons yellow mustard
  • 1 tablespoon dill pickle relish
  • 1 teaspoon vinegar
  • 1 teaspoon garlic powder
  • 1 teaspoon onion powder
  • 0.5 teaspoon paprika
  • 1 pound ground beef (Cooked and drained)
  • Lettuce (Chopped)
  • Shredded cheddar cheese
  • Chopped onions
  • Pickle chips

Instructions 

  • Mix all the dressing ingredients in a small bowl and set aside.
  • Cook ground beef until browned, then drain excess grease.
  • In a large bowl, toss lettuce, cheese, onions, pickles, and ground beef. Add dressing and toss to combine. Serve immediately.

Notes

This salad is perfect for a quick keto-friendly meal with bold flavors.
Calories: 450kcal
Cost: $12
Course: Salad
Cuisine: American
Keyword: Big Mac, Keto

Welcome to a vibrant culinary adventure where we celebrate the magic of fresh spinach and creamy ricotta in a dish that promises flavor and satisfaction! Spinach and Ricotta Stuffed Shells are not just a meal; they are an experience that combines nutrition with indulgence. This recipe is designed for everyone—from busy meal preppers to those who enjoy a cozy family dinner. Ready to dive in? Let’s explore how this dish brings together the best of flavor and health!

Why You’ll Love This Recipe

Spinach and Ricotta Stuffed Shells are the epitome of comfort food, but with a nutritious twist! Here are five reasons to get excited about this dish:

  • Flavor Explosion: Each bite is a delightful combination of creamy ricotta, fresh spinach, and zesty marinara that tantalizes the taste buds.
  • Nutritious Ingredients: Spinach is packed with vitamins A, C, and K, while ricotta offers a dose of protein, making this dish both satisfying and nourishing.
  • Easy to Prepare: With simple ingredients and straightforward steps, this recipe can be ready in under an hour, perfect for a weeknight dinner!
  • Make-Ahead Friendly: These stuffed shells can be prepared in advance, stored, and baked right before serving—ideal for busy schedules.
  • Kid-Approved: The fun shape and delicious flavors make this dish a hit with children and adults alike, encouraging healthy eating habits!

Ingredient Breakdown

Let’s gather what you need to whip up this delightful dish! Here’s a detailed look at the ingredients:

  • Large Pasta Shells: These are the perfect vehicle for our filling! You can substitute with gluten-free shells or even zucchini boats for a low-carb option.
  • Fresh Spinach: Look for vibrant green leaves. If fresh spinach isn’t available, frozen spinach can work too—just make sure to thaw and drain it well!
  • Ricotta Cheese: This creamy cheese adds richness. For a lighter version, use part-skim ricotta or cottage cheese.
  • Grated Parmesan Cheese: A sprinkle of Parm enhances the flavor. Nutritional yeast is a great dairy-free substitute!
  • Salt and Pepper: Essential for seasoning! Feel free to experiment with herbs like oregano or basil for an extra flavor boost.
  • Marinara Sauce: A store-bought or homemade sauce works perfectly. For a twist, try pesto or a spicy arrabbiata sauce.

Pro Tips for Perfect Stuffed Shells

To elevate your cooking game, keep these expert insights in mind:

  • Cook Pasta Al Dente: Ensure the pasta shells are slightly firm to the bite; they’ll hold up better when baked.
  • Don’t Overfill: Stuff the shells generously, but avoid overfilling to prevent spills during baking.
  • Let the Filling Cool: Allow the spinach and ricotta mixture to cool slightly before stuffing; it makes handling easier.
  • Layered Sauce: Spread a bit of marinara sauce on the bottom of the baking dish to prevent sticking and enhance flavor.
  • Cover While Baking: Cover the dish with foil for the initial baking to keep the shells moist, then uncover for a bubbly finish.
  • Top with Fresh Herbs: Garnish with fresh basil or parsley after baking for a pop of color and freshness.
  • Experiment with Cheese: Mix in mozzarella or fontina with the ricotta for a gooey, cheesy filling!
  • Adjust Seasoning: Always taste your filling before stuffing the shells to make sure it’s flavorful!

Common Mistakes and Troubleshooting

Side view of large pasta shells filled with spinach and ricotta, resting in a plate of red sauce.

Even the best chefs make mistakes! Here’s how to avoid common pitfalls:

  • Too Much Water: If using frozen spinach, ensure it’s well-drained to avoid a watery filling.
  • Overcooked Pasta: If the shells are too soft, they may tear when handling. Stick to the package instructions!
  • Dry Filling: If your mixture seems dry, add a splash of marinara or a drizzle of olive oil for moisture.
  • Burnt Cheese: If you notice the cheese browning too quickly, cover the dish with foil until the end of baking.

Delicious Variations

Get creative with these fun twists on the classic recipe:

  • Mexican Style: Add black beans, corn, and taco seasoning to the filling, and top with salsa instead of marinara.
  • Pesto Spinach: Replace marinara with pesto and mix some sun-dried tomatoes into the filling for a Mediterranean flair.
  • Cheesy Spinach and Mushroom: Sauté mushrooms with garlic and mix them with spinach and ricotta for an earthy taste.
  • Vegan Version: Use cashew cheese or tofu instead of ricotta and a vegan cheese alternative on top.

Storage and Make-Ahead Instructions

Planning ahead? Here’s how to store or make these shells in advance:

  • Refrigeration: Assemble the dish, cover with foil, and refrigerate for up to 24 hours before baking.
  • Freezing: Freeze assembled shells in an airtight container for up to 3 months. Thaw overnight in the fridge before baking.
  • Reheating: To reheat leftovers, warm in the oven at 350°F (175°C) covered with foil until heated through.

Comprehensive FAQ

Here are some frequently asked questions to help you out:

  • Can I use whole wheat pasta shells? Absolutely! Whole wheat shells are a great way to add more fiber to your meal.
  • How long does this dish last in the fridge? Cooked stuffed shells can last for 3-5 days in the refrigerator.
  • Can I make this dish gluten-free? Yes, just use gluten-free pasta shells and ensure your marinara is gluten-free.
  • What can I serve with stuffed shells? Pair them with a fresh salad, garlic bread, or steamed vegetables for a complete meal.
  • Can I use other greens? Yes! Kale or Swiss chard can be used instead of spinach for a different flavor profile.
  • Is it okay to use canned spinach? Yes, but fresh or frozen spinach is recommended for the best texture and flavor.
  • How can I spice it up? Add crushed red pepper flakes or a dash of hot sauce to the ricotta mixture for a spicy kick!
  • What’s the best way to make this dish vegan? Use a plant-based ricotta substitute and a vegan cheese alternative for topping.

Nutritional Tips and Dietary Adaptations

Considering dietary needs? Here are some tips to make this dish fit your lifestyle:

  • Low-Calorie Option: Use low-fat ricotta and reduce cheese on top.
  • High-Protein Boost: Add cooked chicken or turkey to the filling for extra protein.
  • Low-Carb Version: Replace pasta shells with zucchini or eggplant slices for a delicious veggie-packed alternative.

Equipment Recommendations

Here’s what you’ll need to create this masterpiece:

  • Baking Dish: A 9×13 inch glass or ceramic baking dish works perfectly.
  • Mixing Bowls: Have a couple of medium-sized bowls for mixing the filling and combining ingredients.
  • Pasta Pot: For cooking the shells, a large pot with ample water is essential.

Serving Suggestions

Ready to serve? Here’s how to present your stuffed shells:

  • Garnish: Top with fresh basil or parsley for a pop of color.
  • Side Salad: Serve alongside a bright spinach and strawberry salad to complement the dish.
  • Wine Pairing: A light white wine, like Pinot Grigio, pairs beautifully with the creamy flavors of the dish.

In conclusion, Spinach and Ricotta Stuffed Shells are more than just a meal—they’re a celebration of flavor, nutrition, and the joy of cooking. Embrace the creativity of your kitchen, and remember, healthy eating can be deliciously fun! Whether you’re sharing this dish with loved ones or enjoying it solo, you’re in for a delightful experience. So, grab your ingredients and get cooking—adventure awaits!

Spinach and Ricotta Stuffed Shells

Prep Time 10 minutes
Cook Time 25 minutes
Total Time 35 minutes
Servings 4 servings
Calories 350
A delicious baked pasta dish featuring tender shells filled with a creamy spinach and ricotta mixture, topped with marinara sauce.

Ingredients

pasta

  • 12 large shells large pasta shells
  • 2 cups fresh spinach
  • 1 cup ricotta cheese
  • 0.5 cup grated Parmesan cheese
  • to taste salt
  • to taste pepper
  • 2 cups marinara sauce

Instructions 

  • Cook pasta shells in boiling water for 8-10 minutes, then drain and cool slightly.
  • Mix spinach, ricotta, Parmesan, salt, and pepper in a bowl.
  • Preheat oven to 350°F (175°C).
  • Stuff each shell with the spinach mixture and place in a baking dish.
  • Pour marinara sauce over shells and bake for 25 minutes until bubbly.

Notes

You can add extra cheese on top before baking for a richer flavor.
Calories: 350kcal
Cost: $15
Course: Main Course
Cuisine: Italian
Keyword: pasta

Welcome to the Flavorful World of Harvest Salad

Welcome to a culinary adventure that celebrates the vibrant colors and flavors of the fall season! Our Harvest Salad with Apples, Cranberries, and Candied Pecans is more than just a dish; it’s a delightful experience that marries nutrition with taste. This salad is perfect for anyone looking to elevate their meal with fresh ingredients that are as exciting as they are healthy. In this guide, we’ll explore everything you need to know about creating this delicious salad, from ingredient breakdown to serving suggestions and storage tips. So, let’s dive in and discover why you’ll absolutely love this recipe!

Why You’ll Love This Recipe

This salad is a celebration of flavors and textures that will leave your taste buds dancing. Here are just a few reasons why this dish should be on your table:

  • Flavor Explosion: The combination of crisp apples, tart cranberries, and crunchy pecans creates a delightful medley that excites the palate.
  • Quick & Easy: Ready in just 20 minutes, this salad is perfect for busy weeknights or last-minute gatherings.
  • Nutrient-Packed: Loaded with vitamins, minerals, and healthy fats, this dish supports your well-being without sacrificing taste.
  • Versatile: Perfect as a side dish or a main meal, you can customize it to fit any occasion, from holiday feasts to summer picnics.
  • Visually Stunning: The vibrant colors make this salad a showstopper that will impress your guests and family alike.

Ingredients for Harvest Salad

Let’s break down the ingredients needed to create this delicious harvest salad. Each component plays a vital role in achieving the perfect flavor profile.

Essential Ingredients

  • 5 ounces Arugula: Provides a fresh, peppery bite and nutrient boost to this harvest salad.
  • 1 large Apple (Fuji or Gala): Cored and diced to add sweetness and crunch; remember to dip in lemon juice to prevent browning!
  • 0.5 cup Dried Cranberries: These add a chewy tartness that complements both the apples and arugula.
  • 0.5 cup Pecans: Lightly toasted to enhance their buttery flavor; reserve half chopped for a crunchy garnish.
  • 0.25 cup Balsamic Vinegar: This provides tangy depth and slight sweetness to brighten all the fresh ingredients.
  • 2 tablespoons Olive Oil: Use high-quality extra virgin olive oil for a smooth mouthfeel and balanced acidity.

Ingredient Substitutions

  • Greens: Swap arugula for baby spinach or mixed greens for a milder flavor.
  • Nuts: If you’re nut-free, sunflower seeds or pumpkin seeds make excellent alternatives.
  • Vinegar: Apple cider vinegar can replace balsamic vinegar for a different flavor profile.
  • Fruits: Experiment with pears or pomegranate seeds for a seasonal twist!

How to Make Harvest Salad

A fresh salad garnished with diced apples, dried cranberries, and crunchy pecans on a wooden table.

Creating this harvest salad is a straightforward process that results in a beautiful and delicious dish. Follow these steps for a flawless outcome:

1. Prepare the Ingredients

Start by washing and drying your arugula and then core and dice your apples. Remember to toss the apple pieces in lemon juice to keep them vibrant and prevent browning.

2. Toast the Pecans

In a dry skillet over medium heat, toast the pecans for about 5 minutes, stirring frequently until they are fragrant and golden. This step enhances their flavor!

3. Make the Dressing

In a small bowl, whisk together balsamic vinegar and olive oil until well combined. Season with salt and pepper to taste.

4. Assemble the Salad

In a large bowl, combine the arugula, diced apples, dried cranberries, and toasted pecans. Drizzle the dressing over the salad and toss gently to coat.

5. Dress and Serve

Once everything is beautifully mixed, serve your salad immediately. If you’re preparing it ahead of time, wait to dress it until just before serving to keep the greens crisp.

Pro Tips for the Best Harvest Salad

To elevate your salad game, consider these expert insights:

  • Use Seasonal Ingredients: Whenever possible, opt for locally sourced, seasonal produce to enhance flavor and freshness.
  • Experiment with Textures: Add crispy bacon bits or crispy chickpeas for an extra crunch!
  • Mind the Dressing: Make your dressing in advance and store it in the fridge for up to a week for maximum flavor.
  • Balance the Sweetness: If you prefer a less sweet salad, reduce the amount of cranberries or opt for unsweetened dried fruit.
  • Chill the Salad: For a refreshing touch, chill the salad in the fridge for 10-15 minutes before serving.
  • Garnish Wisely: A sprinkle of feta cheese or goat cheese can add a creamy contrast to the crunchy salad.
  • Color is Key: Mix different varieties of apples for a more visually appealing dish!

Common Mistakes and Troubleshooting

Even the best cooks can make a mistake. Here’s how to avoid common pitfalls:

  • Overdressing: It’s better to start with less dressing and add more to taste. You can always add more, but you can’t take it away!
  • Brown Apples: To keep your apples looking fresh, always toss them in lemon juice as soon as you cut them.
  • Soggy Greens: If you dress the salad too early, the greens may wilt. Always dress just before serving!
  • Too Sweet: If the salad turns out sweeter than desired, balance it with a pinch of salt or a splash of vinegar.

Variations to Try

Don’t be afraid to mix things up! Here are some fun variations of this harvest salad:

  • Grilled Chicken Harvest Salad: Add grilled chicken breast for a protein boost and a heartier meal.
  • Quinoa Harvest Salad: Toss in cooked quinoa for a gluten-free option that adds fiber and protein.
  • Vegan Harvest Salad: Replace honey with maple syrup in the dressing and skip the cheese for a fully plant-based dish.
  • Spicy Variation: Add sliced jalapeños or a sprinkle of cayenne pepper to the dressing for a spicy kick!

Storage and Make-Ahead Instructions

This salad is best enjoyed fresh, but here’s how to store and prepare it for later:

  • Make-Ahead: You can prepare the salad ingredients in advance (excluding the dressing) and store them in an airtight container in the fridge for up to 2 days.
  • Storing Leftovers: Store any leftover salad in a sealed container in the fridge for up to 2 days; however, the greens may lose their crispness.
  • Dressing Storage: The dressing can be made ahead of time and stored in the fridge for up to one week. Just give it a good shake before using!

FAQ: Your Harvest Salad Questions Answered

Got questions? We’ve got answers! Here are some common inquiries about this harvest salad:

  • What type of apples should I use? Fuji or Gala apples work best for their sweetness and crunch.
  • Can I use fresh cranberries? Yes, but fresh cranberries are tart; consider adding a bit of sugar or honey to balance their flavor.
  • How can I make this salad more filling? Add roasted chickpeas, quinoa, or grilled chicken for added protein and substance.
  • Is this salad gluten-free? Yes, all ingredients are naturally gluten-free, making it perfect for those with dietary restrictions.
  • Can I prepare this salad the night before? It’s best to prepare the ingredients but wait to dress the salad until just before serving to maintain freshness.
  • What can I serve with this salad? It pairs beautifully with grilled meats, sandwiches, or as part of a buffet spread.
  • Can I freeze this salad? Freezing is not recommended as the texture of the greens will be affected.
  • How do I keep the salad fresh longer? Store the salad components separately and combine them only when ready to serve.

Nutritional Tips and Dietary Adaptations

Eating healthy is all about balance. Here are some tips to ensure your harvest salad is nutritious:

  • Choose Whole Ingredients: Always opt for whole, unprocessed ingredients to maximize nutrients.
  • Portion Control: Be mindful of portions, especially with nuts and dressings, to keep your meal balanced.
  • Incorporate Protein: For a more balanced meal, add a source of protein, such as beans, chicken, or tofu.
  • Mind the Sugar: If you’re watching your sugar intake, reduce or replace dried fruits with fresh fruits.

Equipment Recommendations

To make preparing your harvest salad a breeze, here’s some handy equipment you may need:

  • Sharp Knife: A good knife will make chopping fruits and vegetables easy and safe.
  • Cutting Board: A sturdy cutting board is essential for prep work.
  • Mixing Bowl: A large bowl for tossing all your salad ingredients together.
  • Whisk: A whisk for emulsifying the dressing quickly.

Serving Suggestions

Now that your salad is ready, here are some delicious serving suggestions:

  • As a Side Dish: This salad is a perfect complement to roasted meats or grilled fish.
  • On Its Own: Enjoy it as a light lunch or dinner for a refreshing meal.
  • For Special Occasions: Serve it at holiday gatherings, potlucks, or brunch parties for a festive touch.

In conclusion, our Harvest Salad with Apples, Cranberries, and Candied Pecans is not just a meal; it’s a celebration of flavor, nutrition, and creativity. By following this comprehensive guide, you’ll be well-equipped to create a dish that will impress your taste buds and nourish your body. So grab your ingredients, unleash your inner chef, and enjoy every vibrant bite of this delightful salad. Happy cooking!

Easy Harvest Salad with Apples, Cranberries & Candied Pecans Bliss

Prep Time 10 minutes
Cook Time 5 minutes
Total Time 15 minutes
Servings 4 servings
Calories 250
A vibrant and refreshing salad combining crisp apples, tart cranberries, and crunchy pecans, perfect for a light, nutritious meal or side dish.

Ingredients

Main

  • 5 ounces Arugula (Brings a fresh, peppery bite and nutrient boost to this harvest salad with apples.)
  • 1 large Apple (Cored and diced; use Fuji or Gala for sweet crunch; dip in lemon juice to prevent browning.)
  • 0.5 cup Dried Cranberries (Adds chewy tartness that perfectly complements both apple and arugula flavors.)
  • 0.5 cup Pecans (Lightly toasted to enhance their buttery flavor; reserve half chopped for a crunchy garnish.)
  • 0.25 cup Balsamic Vinegar (Provides tangy depth and slight sweetness to brighten all the fresh ingredients.)
  • 2 tablespoons Olive Oil (Use good quality extra virgin olive oil for a smooth mouthfeel and balanced acidity.)

Instructions 

  • In a large bowl, combine arugula, diced apple, dried cranberries, and toasted pecans.
  • In a small bowl, whisk together balsamic vinegar and olive oil to make the dressing.
  • Pour the dressing over the salad and toss gently to combine.
  • Chop and sprinkle the reserved pecans on top for added crunch.
  • Serve immediately and enjoy!

Notes

For extra flavor, add a sprinkle of feta cheese or a handful of toasted seeds.
Calories: 250kcal
Cost: $15
Course: Salad
Keyword: apple, Cranberry, Pecan

Dive into the deliciousness of a Big Mac Salad that’s bursting with flavor and is keto-friendly! This simple recipe transforms your favorite fast-food taste into a healthy, homemade delight that’s packed with nutrients and excitement. Perfect for busy days or a fun dinner at home!

Why You’ll Love This Big Mac Salad Recipe

This Big Mac Salad is not just another salad; it’s a culinary adventure! Here are some reasons why you’ll absolutely love this recipe:

  • Flavor Explosion: It captures the iconic taste of a Big Mac without the extra carbs, making it a satisfying meal that doesn’t skimp on flavor.
  • Quick to Prepare: In just 30 minutes, you can whip up a meal that’s perfect for busy weeknights or a relaxed weekend.
  • Customizable Ingredients: Whether you prefer extra veggies or a different protein, this salad is all about your personal touch.
  • Keto-Friendly: With low-carb ingredients, this dish fits perfectly into a ketogenic lifestyle without sacrificing taste.
  • Meal Prep Friendly: Make it ahead for lunch or dinner, and enjoy the convenience of a nutritious meal ready to go!

Ingredients Breakdown

Here’s what you’ll need to create your own Big Mac Salad, along with some substitutions for a personalized touch:

  • 1 lb Ground Beef: Lean ground beef is a healthier option. You can substitute with ground turkey or plant-based meat for a lighter version.
  • 1 tsp Garlic Powder: This adds a savory depth. If you’re a garlic lover, feel free to use fresh minced garlic instead!
  • 1 tsp Onion Powder: Omit for a lighter touch, or swap with fresh diced onion for a crunchier texture.
  • 1 tbsp Worcestershire Sauce: For a gluten-free alternative, use soy sauce or coconut aminos.
  • 1 tsp Salt and 1 tsp Pepper: Basic seasonings to elevate the flavor of your beef.
  • 4 cups Iceberg Lettuce: Iceberg gives a nice crunch, but feel free to substitute with romaine or mixed greens.
  • 1 cup Shredded Cheddar Cheese: Mozzarella can work too if you prefer a milder flavor.
  • 1 cup Chopped Cherry Tomatoes: Adds a burst of freshness; bell peppers can be a colorful alternative.
  • 1 cup Sliced Pickles: Opt for dill pickles to capture that classic Big Mac essence.
  • 2 tbsp Toasted Sesame Seeds: For an added crunch and nutty flavor.
  • 1/2 cup Mayonnaise: Greek yogurt serves as a lighter alternative without sacrificing creaminess.
  • 2 tbsp Dill Relish: Chopped pickles can replace this for a simple twist.
  • 1 tbsp Yellow Mustard: For a zesty kick, feel free to use Dijon mustard instead.
  • 1 tbsp Ketchup: Optional for a hint of sweetness, especially if you’re missing that classic burger taste.
  • 1 tbsp White Vinegar: Use lemon juice for a bright, tangy substitute.
  • 1 tsp Smoked Paprika: Adds a unique depth; regular paprika works well too.
  • 1 tsp Sugar: Omit for strict keto compliance or use a keto-friendly sweetener.

Step-by-Step Instructions for Making Your Big Mac Salad

Ready to dive into the cooking? Let’s get started with these easy steps!

  • Step 1: Cook the Ground Beef – In a skillet over medium heat, add the ground beef, garlic powder, onion powder, Worcestershire sauce, salt, and pepper. Cook until browned and fully cooked, about 5-7 minutes. Drain excess fat.
  • Step 2: Prepare the Dressing – In a separate bowl, mix the mayonnaise, dill relish, yellow mustard, ketchup, white vinegar, smoked paprika, and sugar until smooth. Adjust seasoning to taste.
  • Step 3: Assemble the Salad – In a large bowl, layer the iceberg lettuce, cooked ground beef, shredded cheese, cherry tomatoes, and sliced pickles.
  • Step 4: Drizzle the Dressing – Pour the dressing over the salad, tossing gently to combine all ingredients.
  • Step 5: Garnish and Serve – Top with toasted sesame seeds for extra texture and serve immediately!

Expert Tips for the Best Big Mac Salad

Side view of a hearty Big Mac Salad, featuring ground beef, cheddar cheese, and fresh vegetables in a bowl.

Here are some pro tips to ensure your Big Mac Salad turns out absolutely delicious:

  • Use Lean Meat: Opt for 80/20 ground beef for a nice balance of flavor and health, or go for ground turkey for a lighter option.
  • Customize the Veggies: Feel free to add other vegetables like cucumbers, radishes, or avocado to boost nutrition and flavor.
  • Fresh Ingredients: The fresher the ingredients, the better the salad will taste. Use in-season veggies for the best flavor.
  • Make the Dressing Ahead: Prepare the dressing in advance and store it in the fridge to save time during meal prep.
  • Adjust Spice Levels: If you like a bit of heat, add some cayenne pepper or hot sauce to the dressing.
  • Toasted Seeds: Toast sesame seeds in a dry skillet over medium heat for a few minutes to enhance their flavor.
  • Chill Before Serving: Letting the salad chill for about 15 minutes before serving allows the flavors to meld beautifully.
  • Extra Protein: Add grilled chicken, shrimp, or tofu for a protein boost!

Common Mistakes and Troubleshooting

Even the best chefs can make mistakes! Here are some common pitfalls and how to avoid them:

  • Soggy Salad: To prevent sogginess, make sure to dry your lettuce thoroughly before adding the dressing.
  • Overcooked Beef: Don’t overcook the ground beef; aim for a nice brown color without drying it out.
  • Too Much Dressing: Start with a little dressing and add more as needed to avoid overwhelming the flavors.
  • Skipping Seasoning: Don’t skip the seasoning in the beef; it’s essential for flavor!

Variations to Spice Up Your Big Mac Salad

Here are some fun variations to keep your Big Mac Salad exciting:

  • Southwestern Twist: Add black beans, corn, and avocado with a cilantro-lime dressing.
  • Asian-Inspired: Swap the beef for grilled chicken, add edamame, and use a sesame-ginger dressing.
  • Italian Flair: Incorporate Italian sausage, diced mozzarella, and a balsamic vinaigrette.
  • Vegan Delight: Replace ground beef with lentils or chickpeas and use a vegan mayo for the dressing.

Storage and Make-Ahead Instructions

This salad is perfect for meal prep! Here’s how to store it:

  • Refrigeration: Store leftovers in an airtight container in the fridge for up to 3 days. Keep the dressing separate to avoid sogginess.
  • Make-Ahead: You can prepare the beef and dressing a day ahead. Just assemble the salad before serving.
  • Freezing: While the salad itself doesn’t freeze well, you can freeze the cooked ground beef for up to 3 months. Thaw and reheat before assembling your salad.

Comprehensive Frequently Asked Questions (FAQs)

Got questions? We’ve got answers! Here’s what people often ask about the Big Mac Salad:

  • 1. Can I make this salad vegetarian? Yes! Substitute the ground beef with black beans or lentils for a hearty plant-based option.
  • 2. How can I make the dressing healthier? Use Greek yogurt instead of mayonnaise for a lighter dressing.
  • 3. Is this salad suitable for meal prepping? Absolutely! Just store the dressing separately until you’re ready to eat.
  • 4. Can I use different types of cheese? Yes! Feel free to use your favorite cheese or omit it for a dairy-free option.
  • 5. How do I make it spicier? Add some jalapeños or a dash of hot sauce to the dressing.
  • 6. What other toppings can I use? Try avocado, bacon bits, or sunflower seeds for added crunch!
  • 7. Can I serve this salad warm? Yes! The warm beef gives a nice contrast to the cold veggies.
  • 8. How do I ensure my salad stays fresh? Keep the dressing separate until serving and store any leftovers in an airtight container.

Nutrition Tips and Dietary Adaptations

This Big Mac Salad is not only delicious but can also be tailored to fit various dietary needs:

  • Keto-Friendly: With low-carb ingredients, it fits perfectly into a keto lifestyle.
  • Gluten-Free: Simply use gluten-free Worcestershire sauce and soy sauce.
  • Low-Calorie: Opt for leaner meat and reduce the dressing for a lighter option.
  • High-Protein: Add more protein-rich toppings or use a protein-rich dressing to boost your intake.

Equipment Recommendations

Here are some essential tools to make your cooking experience smooth:

  • Skillet: A non-stick skillet is ideal for cooking the ground beef.
  • Mixing Bowl: Use a large bowl for assembling your salad and mixing the dressing.
  • Measuring Cups and Spoons: Accurate measurements ensure the best flavor.
  • Serving Utensils: A large spoon or spatula helps to toss and serve the salad easily.

Serving Suggestions

This Big Mac Salad is a complete meal on its own, but here are some ideas on what to pair it with:

  • Garlic Bread: A slice of warm garlic bread on the side complements the flavors perfectly.
  • Fruit Salad: A refreshing fruit salad can provide a sweet contrast to the savory salad.
  • Chips: Serve with your favorite low-carb chips for a satisfying crunch!
  • Drinks: Pair with a refreshing iced tea or lemon-infused water for a delightful meal experience.

Wrap-Up

Now you’re ready to create a Big Mac Salad that’s not just a meal but a celebration of flavors! With the perfect balance of textures and tastes, this recipe is bound to impress your family and friends. Remember, cooking should be fun, so don’t hesitate to experiment and make it your own. Enjoy your culinary adventure, and here’s to healthy eating that feels indulgent!

Big Mac Salad: Keto-Friendly Flavor Explosion at Home

Prep Time 10 minutes
Total Time 10 minutes
Servings 4 servings
Calories 650
Enjoy a delicious, keto-friendly twist on the classic Big Mac with this flavorful homemade salad.

Ingredients

Meat

  • 1 lb Ground Beef (Lean ground beef for healthier option)
  • 1 tsp Garlic Powder
  • 1 tsp Onion Powder (Omit for a lighter touch)
  • 1 tbsp Worcestershire Sauce (Use soy sauce for gluten-free)
  • 1 tsp Salt
  • 1 tsp Pepper

Vegetables

  • 4 cups Iceberg Lettuce (Can substitute with romaine)
  • 1 cup Shredded Cheddar Cheese (Mozzarella can work too)
  • 1 cup Chopped Cherry Tomatoes (Bell peppers can be an alternative)
  • 1 cup Sliced Pickles (Opt for dill pickles for classic taste)
  • 2 tbsp Toasted Sesame Seeds (For added texture)

Dressing

  • 1/2 cup Mayonnaise (Greek yogurt is a lighter alternative)
  • 2 tbsp Dill Relish (Chopped pickles can replace)
  • 1 tbsp Yellow Mustard (Dijon for a spicier kick)
  • 1 tbsp Ketchup (Optional for sweetness)
  • 1 tbsp White Vinegar (Lemon juice is a bright substitute)
  • 1 tsp Smoked Paprika (Regular paprika can also work)
  • 1 tsp Sugar (Omit for strict keto compliance)

Instructions 

  • Cook the ground beef with garlic powder, onion powder, salt, and pepper until browned.
  • Chop and prepare vegetables; combine lettuce, tomatoes, pickles, and cheese in a large bowl.
  • Mix mayonnaise, relish, mustard, ketchup, vinegar, paprika, and sugar to make the dressing.
  • Add cooked beef and dressing to the vegetables; toss to combine.
  • Sprinkle toasted sesame seeds on top and serve immediately.

Notes

For a lower sodium version, reduce added salt and soy sauce.
Calories: 650kcal
Cost: $15
Course: Salad
Cuisine: American
Keyword: Beef, Keto, Salad

Welcome to a culinary adventure that will transform your meal prep with the vibrant and delicious flavors of a keto ground beef taco salad! This recipe is not just about satisfying your taste buds; it’s also a celebration of healthy eating. Packed with fresh ingredients and zesty spices, it’s the perfect way to indulge in a low-carb feast. Whether you’re a keto veteran or just looking to spice up your meals, this keto taco salad is sure to become a staple in your kitchen!

Why You’ll Love This Recipe

  • Flavor Explosion: Each bite is bursting with zesty flavors from the spices and fresh ingredients, making healthy eating a joy!
  • Quick and Easy: Whip this salad up in under 30 minutes, perfect for busy weeknights or meal prep!
  • Customizable: Easily adjust ingredients to suit your taste or dietary needs, making it a go-to for everyone.
  • Low-Carb Goodness: This salad is keto-friendly, allowing you to enjoy a satisfying meal without the carbs.
  • Meal Prep Hero: Ideal for prepping ahead of time; just store the dressing separately to keep it fresh!

Ingredients You’ll Need

To make this mouthwatering keto taco salad, gather the following ingredients:

  • 1 1/2 pounds of lean ground beef: For a rich protein base, choose grass-fed for added flavor and nutrition.
  • 2 tablespoons of cooking oil: Avocado oil is my favorite choice for its health benefits and high smoke point.
  • 1 medium green bell pepper: Finely chopped to add crunch and sweetness.
  • 1 medium onion: Finely chopped for a savory depth of flavor.
  • 1 teaspoon of onion powder: Enhance the onion flavor without additional chopping!
  • 3/4 teaspoon of garlic powder: Adds a punch of flavor effortlessly.
  • 1 teaspoon of chili powder: For that classic taco taste.
  • 3/4 teaspoon of cumin powder: A must-have spice for a warm, earthy flavor.
  • 1/2 teaspoon of chipotle pepper: For a smoky heat that elevates the dish.
  • 1/2 teaspoon of black pepper: Freshly ground for the best flavor.
  • 1 1/4 teaspoon of salt: Essential for balancing all the flavors.
  • 3 hearts of Romaine lettuce: Torn into bite-sized pieces for a crisp base.
  • 2 cups of grape tomatoes: Halved for freshness and sweetness.
  • 1 cup of shredded cheddar cheese: A delicious, melty topping that adds richness.
  • 2 medium Hass avocados: Diced for creaminess and healthy fats.
  • 1/2 cup of red onions: Sliced for a sharp contrast in flavor.
  • 1/2 cup of green onions: Sliced for freshness.
  • 2 tablespoons of chopped cilantro: For a burst of herbal brightness.
  • 1/4 cup of sliced black olives: Adds a briny punch.
  • 1 cup salsa: Choose your favorite brand or homemade for the best flavor.
  • 1 cup sour cream: Thinned with two tablespoons of heavy cream or Mexican crema for a creamy dressing.
  • Additional spices for the dressing: 1/4 teaspoon of onion powder, garlic powder, cumin powder, chili powder, black pepper, chipotle pepper, and salt for extra flavor.

How to Make Your Keto Taco Salad

  1. In a large skillet over medium-high heat, add the cooking oil and sauté the chopped bell peppers and onions until they become translucent. Set them aside.
  2. Increase the heat to high and add the ground beef to the skillet. Sprinkle all the dry seasonings over the meat and cook until browned, breaking it into pieces with a spatula as it cooks.
  3. Stir in the sautéed bell peppers and onions into the cooked ground beef, mixing well.
  4. To create the creamy salsa dressing, combine the salsa, thinned sour cream or Mexican crema, and additional spices in a small bowl. Mix well and set aside.
  5. Assemble your salad by layering the torn Romaine lettuce in a large bowl or serving platter. Top it with the halved tomatoes, cheese, black olives, diced avocados, red onions, and green onions.
  6. Finally, add the cooked taco meat on top and garnish with chopped cilantro. Serve the creamy salsa dressing on the side for maximum deliciousness!

Pro Tips for Perfection

Juicy ground beef taco salad in a bowl, garnished with lettuce and cheese.
  • Use Fresh Ingredients: Fresh veggies and quality meat will elevate your salad to the next level.
  • Spice it Up: Adjust the spice levels according to your taste. You can add more chipotle for heat!
  • Make Ahead: Prepare the meat and chop the veggies ahead of time. Assemble when ready to eat.
  • Customize Your Toppings: Feel free to add your favorite toppings like jalapeños, salsa verde, or even a sprinkle of lime juice!
  • Keep It Crunchy: Serve the dressing on the side to keep the lettuce fresh and crispy.
  • Try Different Proteins: Ground turkey, chicken, or even plant-based crumbles work well in this recipe.
  • Garnish Wisely: Fresh herbs like cilantro or parsley can make a big difference in flavor.
  • Mix It Up: Add black beans or corn for those who aren’t strictly keto and want more texture!

Common Mistakes and Troubleshooting

In your quest for the perfect keto taco salad, here are a few common pitfalls and how to avoid them:

  • Soggy Lettuce: Avoid this by keeping the dressing separate until serving.
  • Overcooked Meat: Keep an eye on your ground beef; it should be cooked just until browned, not dry!
  • Too Much Salt: Adjust seasoning gradually; you can always add more, but it’s hard to take it out!

Delicious Variations

Want to switch things up? Here are some fantastic variations for your keto taco salad:

  • Chicken Taco Salad: Substitute ground beef with shredded rotisserie chicken for a quick, protein-packed twist.
  • Vegetarian Option: Use black beans or lentils instead of meat for a hearty salad.
  • Spicy Taco Salad: Add diced jalapeños or a drizzle of hot sauce for those who like it fiery!
  • Southwestern Style: Incorporate corn, black beans, and a cilantro-lime dressing for a different flavor profile.

Storage and Make-Ahead Instructions

This salad is perfect for meal prep! Here’s how to store it:

  • Refrigeration: Store the salad ingredients and dressing separately in airtight containers for up to 4 days.
  • Freezing: While the salad itself isn’t suitable for freezing, you can freeze the cooked taco meat. Just thaw and reheat when ready to enjoy!
  • Make-Ahead: Prepare all components ahead of time, but add the dressing right before serving to keep everything fresh and crisp.

FAQ

Here are some common questions about making keto taco salad:

  • Is this salad keto-friendly? Yes! With low-carb ingredients, this salad fits perfectly into a keto diet.
  • Can I use a homemade taco seasoning? Absolutely! Homemade seasoning allows you to control the flavors and ingredients.
  • What if I don’t like spicy food? You can reduce or eliminate the spices, or use milder options to suit your taste.
  • Can I make this ahead of time? Yes, just keep the dressing separate until you’re ready to serve.
  • What other toppings can I add? Get creative! Try adding different cheeses, nuts, or seeds for a unique twist.
  • How can I make this salad more filling? Add quinoa or brown rice for additional carbs and fiber if you’re not strictly keto.
  • Can I use other meats? Yes! Ground turkey, chicken, or even pulled pork work wonderfully!
  • How do I prevent leftovers from going soggy? Keep the dressing separate and store the components in airtight containers.

Nutritional Tips and Dietary Adaptations

This keto taco salad is not only delicious but also nutritious. Here are some tips:

  • Protein-Packed: With lean ground beef and cheese, this salad provides ample protein to fuel your day.
  • Healthy Fats: Avocados and olive oil contribute to healthy fat intake, essential for a balanced keto diet.
  • Fiber-Rich: The fresh vegetables add fiber, helping to keep you full and satisfied.

Equipment Recommendations

To make your cooking experience even smoother, here’s what you’ll need:

  • Large Skillet: For cooking the meat and veggies.
  • Cutting Board and Knives: For preparing your fresh ingredients.
  • Mixing Bowls: To mix the dressing and assemble your salad.
  • Serving Tray or Bowls: For presenting your beautiful salad.

Serving Suggestions

Ready to dig in? Here are some fun ways to serve your keto taco salad:

  • Individual Bowls: Serve in individual bowls for a personal touch.
  • Family Style: Present it on a large serving platter to let everyone build their own salad.
  • Wrap It Up: Use lettuce wraps for a fun, handheld version of the salad!

Now you’re ready to create a dish that’s not only healthy but also bursting with flavor! Enjoy your cooking adventure, and remember—eating healthy can be a joyous experience filled with delicious discoveries! So grab your ingredients and let’s make this keto ground beef taco salad that will make your taste buds dance!

Keto Ground Beef Taco Salad (Gluten-Free)

Prep Time 15 minutes
Cook Time 20 minutes
Total Time 35 minutes
Servings 4 servings
Calories 650
A flavorful and healthy keto-friendly taco salad packed with fresh vegetables, seasoned ground beef, and creamy salsa dressing.

Ingredients

Meat and Vegetables

  • 1.5 pounds lean ground beef, grass-fed
  • 2 tablespoons cooking oil
  • 1 medium green bell pepper, chopped finely
  • 1 medium onion, finely chopped
  • 1 teaspoon onion powder
  • 0.75 teaspoon garlic powder
  • 1 teaspoon chili powder
  • 0.75 teaspoon cumin powder
  • 0.5 teaspoon chipotle pepper
  • 0.5 teaspoon black pepper
  • 1.25 teaspoons salt

Salad Toppings

  • 3 hearts Romaine lettuce, torn into bite sizes
  • 2 cups grape tomatoes, sliced in half
  • 1 cup Mexican blend shredded cheddar cheese
  • 2 medium Hass avocados, diced
  • 0.5 cup red onions, sliced
  • 0.5 cup green onions, sliced
  • 2 tablespoons chopped cilantro (garnish)
  • 0.25 cup sliced black olives
  • 1 cup salsa
  • 1 cup sour cream, thinned with heavy cream
  • 0.25 teaspoon onion powder
  • 0.25 teaspoon garlic powder
  • 0.25 teaspoon cumin powder
  • 0.25 teaspoon chili powder
  • 0.25 teaspoon black pepper
  • 0.25 teaspoon chipotle pepper
  • 0.25 teaspoon salt

Instructions 

  • Sauté bell peppers and onions in oil until translucent, then set aside.
  • Cook ground beef with dry seasonings until browned, breaking into pieces.
  • Mix cooked vegetables into beef; prepare salsa dressing by combining salsa, sour cream, and spices.
  • Assemble salad with lettuce, tomatoes, cheese, olives, avocados, and onions; top with cooked beef and cilantro.
  • Toss salad, serve with salsa dressing on the side.

Notes

For extra flavor, add a squeeze of lime before serving.
Calories: 650kcal
Cost: $15
Course: Main Course
Cuisine: Mexican
Keyword: Beef, Keto, Salad

Discover the Vibrant World of Asian Cucumber Salad

If you’re looking for a **refreshing**, **crunchy**, and **flavor-packed** side dish that’s ready in minutes, you’re in the right place! This **Asian Cucumber Salad** is not just a salad; it’s a celebration of texture and taste that can brighten up any meal. With every bite, you’ll experience the crispness of cucumbers combined with a zesty dressing that dances on your taste buds. Whether you’re prepping for a dinner party, a picnic, or simply want to elevate your weeknight dinner, this **easy Asian cucumber salad** is the perfect solution. Let’s dive into why you’ll love this recipe and how to whip it up in no time!

Why You’ll Love This Recipe

  • Quick and Easy: This salad takes only 15 minutes to prepare, making it a fantastic choice for busy weeknights or last-minute gatherings.
  • Light yet Satisfying: Crisp cucumbers combined with a tangy dressing create a refreshing dish that complements any meal without weighing you down.
  • Versatile Pairing: Goes beautifully with grilled meats, sushi, or even as a topping for rice bowls, adding a burst of flavor and crunch.
  • Customizable: You can easily adjust the ingredients and flavors to suit your taste preferences—add more spice, sweetness, or even some extra veggies!
  • Nutrient-Rich: Packed with vitamins and minerals, this salad is a guilt-free way to add more veggies to your diet.

Ingredients You’ll Need

To create this **Asian cucumber salad**, gather the following ingredients:

  • 3 Persian or English cucumbers (thinly sliced)
  • 1 tsp salt (for drawing out moisture)
  • 2 tbsp rice vinegar (for that tangy kick)
  • 1 tbsp soy sauce (adds depth of flavor)
  • 1 tsp sesame oil (for a nutty aroma)
  • 1 tsp sugar (to balance the acidity)
  • 1 tsp chili oil (or red pepper flakes, for heat)
  • 1 tsp sesame seeds (for garnish)
  • 1 clove garlic (minced, optional for extra flavor)

How to Make Easy Asian Cucumber Salad

Side photo of a refreshing Asian cucumber salad featuring sliced cucumbers and a glossy dressing.

Step 1: Prepare the Cucumbers

Start by thinly slicing your cucumbers on the diagonal. This not only looks appealing but also increases the surface area for the dressing to cling to. Toss the sliced cucumbers with salt and let them sit for about 10–15 minutes. This step is crucial as it draws out excess moisture, ensuring your salad remains crunchy.

Step 2: Make the Dressing

In a separate bowl, whisk together the rice vinegar, soy sauce, sesame oil, sugar, and chili oil. Feel free to adjust the dressing ingredients according to your taste—this is your chance to make it personal!

Step 3: Combine and Chill

Once the cucumbers have released their moisture, drain, rinse, and pat them dry. Toss them with the dressing in a large mixing bowl. For an extra flavor boost, sprinkle in the minced garlic. Chill in the refrigerator for about 10 minutes before serving to let the flavors meld together.

Step 4: Serve and Enjoy!

Transfer the salad to a serving bowl and sprinkle with sesame seeds for that final touch. Enjoy your **Asian cucumber salad** as a side dish or snack!

Pro Tips for Success

  • Choose Quality Cucumbers: Use fresh Persian or English cucumbers for the best crunch; avoid soft or blemished ones.
  • Don’t Skip the Salt: Salting the cucumbers is essential for drawing out moisture and enhancing their natural flavors. Let them sit for at least 10-15 minutes!
  • Experiment with Dressings: Feel free to adjust sweetness and spice levels according to your preference; a little extra chili oil can go a long way!
  • Let It Chill: Allowing the salad to chill for a bit before serving enhances the flavors and makes it even more refreshing.
  • Garnish Creatively: Try adding chopped green onions or fresh herbs like cilantro for an added pop of flavor.
  • Try Different Oils: If you’re out of sesame oil, a little olive oil can also work in a pinch—just keep that nutty taste in mind!
  • Keep It Crisp: If making ahead, store the cucumbers and dressing separately until just before serving to maintain that delightful crunch.
  • Go for Color: Add colorful ingredients like bell peppers or carrots to enhance the visual appeal and nutrition!

Common Mistakes and Troubleshooting

Even the best chefs can run into hiccups! Here are some common mistakes and tips to troubleshoot:

  • Too Watery: If your salad ends up watery, make sure to salt your cucumbers adequately and drain them well before adding the dressing.
  • Too Salty: If it tastes overly salty, try adding a bit more sugar or vinegar to balance the flavors.
  • Missing Flavor: If the salad lacks flavor, consider adding more soy sauce or a splash of lime juice for brightness.
  • Too Spicy: If you prefer a milder taste, reduce the amount of chili oil or omit it altogether.

Flavor Variations

Want to switch things up? Try these exciting variations!

  • Thai-Inspired: Add chopped peanuts and fresh mint for a Thai twist.
  • Mango Delight: Diced mango can add a sweet and tropical flavor that pairs beautifully with the cucumbers.
  • Spicy Kimchi: Toss in some chopped kimchi for an extra kick and probiotics.
  • Avocado Addition: Add cubed avocado for creaminess and richness in texture.

Make-Ahead & Storage Instructions

This salad is perfect for meal prep! Here’s how to store it:

  • **Make Ahead:** You can prepare the cucumbers and dressing separately up to a day in advance. Just combine them right before serving.
  • **Storage:** Keep leftovers in an airtight container in the refrigerator. It’s best enjoyed within 2-3 days for optimal freshness.
  • **Freezing:** While not recommended for this salad, you can freeze the cucumbers before preparation for use in smoothies or other dishes later.

Comprehensive FAQ

Got questions? Here are some frequently asked ones:

  • Can I use regular cucumbers? Yes, but Persian or English cucumbers are preferred for their crunch and mild flavor.
  • What can I substitute for rice vinegar? Apple cider vinegar or white vinegar can work in a pinch.
  • Is this salad gluten-free? Yes, just ensure the soy sauce is gluten-free or use tamari as an alternative.
  • Can I add protein? Absolutely! Grilled chicken, shrimp, or tofu can turn this salad into a complete meal.
  • How spicy is this salad? The spice level depends on how much chili oil you add; start with a small amount if you’re sensitive to spice!
  • Can I make this vegan? Yes, this recipe is inherently vegan, just ensure the soy sauce is vegan-friendly!
  • How long does it last in the fridge? Enjoy your salad within 2-3 days for the best flavor and texture.
  • What to serve it with? This salad pairs wonderfully with grilled meats, rice dishes, or even as a refreshing snack on its own!

Nutritional Tips and Dietary Adaptations

This salad not only tastes great but is also packed with nutrients. Here are some tips:

  • Low-Calorie Option: This salad is naturally low in calories, making it a perfect addition to any weight loss plan.
  • High-Fiber Boost: Add additional vegetables like bell peppers or carrots for an extra fiber boost.
  • Heart-Healthy Fats: Incorporating avocado adds healthy fats to promote heart health.

Essential Equipment Recommendations

Here’s what you’ll need to whip up this delicious salad:

  • Cutting Board: A sturdy surface for slicing your cucumbers.
  • Sharp Knife: A good knife ensures even, thin slices of cucumbers.
  • Mixing Bowl: To combine your ingredients and toss the salad.
  • Measuring Spoons: For accurate measurements of your dressing components.

Serving Suggestions

Now that your **Asian cucumber salad** is ready, here are some serving suggestions:

  • As a side dish alongside grilled chicken or fish for a balanced meal.
  • Top your rice bowls or grain salads with this zesty cucumber salad for added crunch.
  • Serve as a refreshing appetizer before a hearty meal to stimulate the appetite.
  • Pair with sushi or Asian-inspired dishes for a cohesive dining experience.

In Conclusion

With its vibrant flavors and refreshing crunch, this **Crunchy, Zesty, and Totally Addictive Asian Cucumber Salad** proves that eating healthy can be an exciting experience! Whether you’re looking for a quick side dish, a meal prep solution, or a new favorite salad, this recipe has got you covered. So grab your ingredients, head to the kitchen, and let your culinary creativity shine! Enjoy every bite, and don’t forget to share this recipe with friends and family. Happy cooking!

Asian Cucumber Salad

Prep Time 15 minutes
Total Time 15 minutes
Servings 4 servings
Calories 80
A refreshing and tangy cucumber salad with a hint of spice, perfect as a side dish or light appetizer.

Ingredients

Cucumbers

  • 3 pieces Persian or English cucumbers (thinly sliced)
  • 1 tsp salt
  • 2 tbsp rice vinegar
  • 1 tbsp soy sauce
  • 1 tsp sesame oil
  • 1 tsp sugar
  • 1 tsp chili oil (or red pepper flakes, to taste)
  • 1 tsp sesame seeds
  • 1 clove garlic (minced, optional)

Instructions 

  • Thinly slice cucumbers on the diagonal, toss with salt, and let sit 10 minutes. Drain and rinse.
  • Whisk together rice vinegar, soy sauce, sesame oil, sugar, and chili oil.
  • Toss cucumbers with dressing, sprinkle with sesame seeds and garlic. Chill for 10 minutes before serving.

Notes

Adjust chili oil to taste for spiciness.
Calories: 80kcal
Cost: $8
Course: Side Dish
Cuisine: Asian
Keyword: cucumber

Elevate Your Meal Game with a Vibrant Apple Blueberry Salad

Welcome to the delightful world of our Apple Blueberry Salad, where crisp apple slices, juicy blueberries, and creamy goat cheese unite for a fresh, energizing experience! This salad isn’t just a feast for the eyes; it’s a flavor explosion that’s perfect for quick lunches or elegant dinners. Packed with nutrients and vibrant colors, this salad is a celebration of health and taste that you won’t want to miss. Let’s dive into the delicious details!

Why You’ll Love This Recipe

Here are five compelling reasons why this Apple Blueberry Salad will become your new go-to dish:

  • Fresh and Flavorful: The combination of sweet apples and tangy blueberries creates a refreshing taste that dances on your palate.
  • Nutritious Ingredients: Each component is loaded with vitamins and minerals, making this salad a powerhouse of nutrition.
  • Quick and Easy: With minimal prep time, you can whip this salad up in under 15 minutes, perfect for busy weeknights.
  • Customizable: This salad is versatile! Add your favorite nuts or proteins to make it your own.
  • Impressive Presentation: Its vibrant colors and textures make it a stunning addition to any table, guaranteed to impress your guests.

Ingredient Breakdown

Let’s take a closer look at the ingredients that make this salad shine, along with some fantastic substitutes to tailor it to your taste:

  • Spring mix: A blend of baby greens that offers a mild flavor. You can substitute with arugula or spinach for a peppery kick.
  • Apple slices: We recommend Honeycrisp or Fuji apples for their sweetness and crunch. Feel free to swap in your favorite variety!
  • Goat cheese or gorgonzola: Adds creaminess and tang. For a dairy-free option, try a vegan cheese or omit it entirely.
  • Walnuts: Provide a satisfying crunch. Use pecans or almonds for a different flavor profile.
  • Blueberries: Bursting with antioxidants, these can be swapped with strawberries or raspberries if desired.
  • Fresh parsley: Adds a touch of freshness. Consider substituting with mint for a unique twist.
  • Honey balsamic vinaigrette: A sweet and tangy dressing that ties the salad together. You can make it at home or use a store-bought version.

Steps to Create Your Salad

A delicious salad featuring apple slices, blueberries, and crumbled cheese on a plate.

Ready to make this delicious salad? Here’s how:

  1. Add spring mix to a large bowl or platter.
  2. Gently layer on the apple slices, blueberries, goat cheese, chopped walnuts, and parsley.
  3. Drizzle with honey balsamic vinaigrette.
  4. Toss lightly or serve dressing on the side. Serve immediately.

Pro Tips for Perfecting Your Salad

Here are some expert insights to elevate your salad game:

  • Chill Ingredients: For an extra refreshing bite, chill your fruit and greens before assembling.
  • Layer for Aesthetic: Layering ingredients not only looks great but also enhances flavor in every bite.
  • Adjust to Taste: Feel free to tweak the dressing and quantities to suit your personal preference.
  • Use Fresh Ingredients: Opt for fresh produce whenever possible for the best flavor and nutrients.
  • Meal Prep Friendly: Prep ingredients ahead of time and store separately to maintain freshness.
  • Mix and Match: Experiment with different fruits and nuts; the possibilities are endless!
  • Health Benefits: This salad is rich in fiber and antioxidants, supporting digestion and overall health.
  • Crave the Contrast: Adding a sprinkle of sea salt can enhance the sweetness of the fruit.
  • Dress Smart: If making ahead, keep the dressing separate until right before serving to prevent sogginess.

Common Mistakes and Troubleshooting

Let’s avoid some common pitfalls!

  • Overdressing: Too much dressing can drown the salad. Start with a little, and add more as needed.
  • Brown Apples: To prevent browning, toss apple slices in a bit of lemon juice before adding them to the salad.
  • Wet Greens: Make sure your greens are dry before dressing to prevent a soggy salad.
  • Too Much Cheese: While cheese is delicious, too much can overpower the other flavors. Use it judiciously!

Variations to Try

Feel free to switch things up with these exciting variations:

  • Protein-Packed: Add grilled chicken or chickpeas for a heartier salad.
  • Spicy Kick: Toss in some sliced jalapeños or a dash of chili flakes for heat.
  • Grain Boost: Mix in cooked quinoa or farro for added texture and nutrition.
  • Herb-Infused: Experiment with different herbs like basil or cilantro for a unique twist.

Storage and Make-Ahead Instructions

Want to make this salad ahead of time? Here’s how to store it:

  • Refrigerate: Store any leftovers in an airtight container in the refrigerator for up to 2 days.
  • Keep Components Separate: For meal prep, store dressing and salad components in separate containers to maintain freshness.
  • Revive Leftovers: If the salad has wilted, freshen it up with a splash of lemon juice or extra dressing.

Frequently Asked Questions

Here’s a handy FAQ to address your burning questions:

  • Can I use frozen blueberries? Yes, but fresh blueberries are recommended for the best texture.
  • How can I make this salad vegan? Replace goat cheese with a dairy-free cheese option and omit any animal protein.
  • What dressing can I substitute? A lemon vinaigrette or a simple olive oil and vinegar mix works well.
  • Can I add other fruits? Absolutely! Strawberries, peaches, or citrus fruits can add a delightful twist.
  • Is this salad gluten-free? Yes, all the ingredients are naturally gluten-free.
  • How long does this salad last? Best eaten fresh but can last 1-2 days in the fridge if stored properly.
  • Can I add nuts? Yes! Nuts like almonds or pecans can add great crunch.
  • What’s the best way to serve this salad? It pairs beautifully with grilled meats or as a light lunch on its own.

Nutritional Benefits and Dietary Adaptations

This salad is not only delicious but also nutritious! Here are some key benefits:

  • Rich in Antioxidants: Blueberries are known for their high antioxidant levels, which help combat oxidative stress.
  • Fiber-Rich: Apples and walnuts contribute to your daily fiber intake, promoting digestive health.
  • Healthy Fats: Walnuts provide healthy omega-3 fatty acids essential for heart health.
  • Low-Calorie Option: This salad is a low-calorie meal option that is satisfying without the guilt.

Equipment Recommendations

Here’s what you’ll need to make this salad:

  • Large Mixing Bowl: For combining all the ingredients.
  • Knife: A sharp knife for slicing the apples and cheese.
  • Cutting Board: To protect your countertop while prepping.
  • Whisk: For mixing the dressing if you choose to make it from scratch.

Serving Suggestions

This salad is versatile and can be served in various ways:

  • As a Side: Perfect alongside grilled chicken or fish for a balanced meal.
  • Light Lunch: Serve it alone for a nutritious, quick lunch option.
  • Brunch Buffet: A fantastic addition to any brunch spread, pairing well with pastries and coffee.
  • Picnic-Friendly: Pack it for a picnic; it travels well and is refreshing on a hot day.

Conclusion

Now that you’ve got the scoop on this vibrant Apple Blueberry Salad, it’s time to get creative in the kitchen! Whether you’re meal prepping for the week or planning a dinner party, this salad is sure to impress and satisfy. Remember, the key to a great salad lies in the freshness of the ingredients and a sprinkle of love. So, roll up your sleeves, have fun, and enjoy every colorful bite!

Apple Blueberry Salad

Prep Time 10 minutes
Total Time 10 minutes
Servings 4 servings
Calories 250
A fresh and vibrant salad combining crisp apples, juicy blueberries, and tangy cheese, perfect for a light lunch or side dish.

Ingredients

Spring mix

  • 2 cups Spring mix

Fruits and cheese

  • 1 apple Apple slices (Honeycrisp or Fuji recommended)
  • 0.5 cup Blueberries
  • 1/4 cup Goat cheese or gorgonzola
  • 1/4 cup Walnuts (Chopped)

Herbs and dressing

  • 2 tablespoons Fresh parsley (Chopped)
  • 3 tablespoons Honey balsamic vinaigrette

Instructions 

  • Add spring mix to a large bowl or platter.
  • Layer on apple slices, blueberries, cheese, walnuts, and parsley.
  • Drizzle with honey balsamic vinaigrette.
  • Toss lightly or serve dressing on the side. Serve immediately.

Notes

Use fresh ingredients for the best flavor and texture.
Calories: 250kcal
Cost: $15
Course: Salad
Keyword: apple, blueberry

Elevate Your Meal Prep with This Zesty Keto Taco Salad!

Are you ready to kick up your lunch game? Dive into this vibrant Keto Taco Salad that’s bursting with flavor and packed with nutrition! Whether you’re a seasoned chef or a kitchen newbie, this recipe is designed to make healthy eating exciting and effortless. In just a few minutes, whip up a satisfying, low-carb meal that will keep you energized and excited all day long. Perfect for meal prep or a quick dinner, this taco salad is a crowd-pleaser for the whole family!

Why You’ll Love This Recipe

This Keto Taco Salad isn’t just delicious; it’s also packed with benefits that make it a must-try for anyone looking to enjoy healthy meals without sacrificing flavor. Here are five reasons you’ll love this recipe:

  • Quick & Easy: With just a handful of ingredients and minimal cooking time, this salad comes together in less than 30 minutes!
  • Low-Carb Delight: Perfect for those following a keto diet, this salad is low in carbs but high in flavor.
  • Customization Galore: Make it your own! Choose your favorite proteins, toppings, and dressings for endless combinations.
  • Meal Prep Friendly: This salad stores beautifully, making it an ideal choice for meal prep throughout the week.
  • Family-Friendly: With its vibrant colors and satisfying flavors, even picky eaters will love this healthy twist on a classic!

Ingredients Breakdown

Let’s dive into what makes this Keto Taco Salad a flavorful masterpiece! Here’s what you’ll need:

  • ¼ cup diced onion: Adds sweetness and depth. Feel free to substitute with green onions for a milder flavor.
  • 1 pound ground beef: A classic choice that’s rich in protein. Try ground turkey or plant-based alternatives for a lighter option.
  • 2 tablespoons taco seasoning (sugar-free): Spice it up with homemade or store-bought seasoning. Check for sugar content!
  • 2 tablespoons beef broth or water: Keeps the beef moist and flavorful. You can skip this if you prefer a drier mixture.
  • 8 ounces romaine lettuce, chopped: Provides a crunchy base. Swap for spinach or mixed greens for a different flavor profile.
  • 1 avocado, diced: Creamy and nutritious, adding healthy fats to your meal.
  • 4 ounces cheddar cheese, shredded: A classic topping that enhances flavor. Go for lactose-free cheese for a dairy-friendly option!
  • ¼ cup grape tomatoes, quartered: Adds sweetness and color. Substitute with cherry tomatoes if you prefer.
  • ¼ cup fresh cilantro, chopped: A burst of freshness! Omit if you’re not a fan.
  • Tex-Mex style dressing (sugar-free) for serving: Completes the salad with zesty flavor. Look for low-carb options or make your own at home!

Pro Tips for the Perfect Taco Salad

Juicy ground beef and colorful vegetables in a Keto Taco Salad.

Want to elevate your cooking game? Here are some expert insights to ensure your Keto Taco Salad turns out perfectly every time:

  • Seasoning Matters: Don’t skimp on the taco seasoning! It’s the heart of the dish. Adjust spice levels to your preference.
  • Cook the Beef Right: Brown the ground beef thoroughly for optimal flavor. Drain any excess fat to keep it healthy.
  • Layering is Key: For maximum flavor, layer your ingredients instead of mixing. Start with lettuce, then add beef, toppings, and finally drizzle with dressing.
  • Fresh Ingredients: Use fresh, high-quality ingredients for the best taste. This makes a world of difference!
  • Chill Before Serving: If you have time, let the assembled salad chill in the fridge for 30 minutes. It enhances the flavors!
  • Dress Just Before Serving: To keep the lettuce crisp, add the dressing just before serving.
  • Experiment with Toppings: Try adding jalapeños, olives, or a dollop of sour cream for extra flavor and creaminess!
  • Meal Prep Wisely: Store ingredients separately in airtight containers for meal prep. Combine just before eating to maintain freshness.

Avoid Common Mistakes

Even the best recipes can go awry! Here’s how to troubleshoot common pitfalls:

  • Too Watery: If your salad is too watery, drain the beef well and avoid overusing dressings.
  • Meat Overcooked: Keep an eye on your cooking time for ground beef. Overcooking can make it tough.
  • Flavorless: If the salad tastes flat, consider adding more seasoning or a squeeze of lime juice for brightness.
  • Too Many Carbs: Ensure your taco seasoning is sugar-free and check all ingredient labels for hidden sugars!

Variations to Try

Feeling adventurous? Here are some fun variations to switch up your Keto Taco Salad:

  • Spicy Southwest: Add diced jalapeños and pepper jack cheese for a spicy kick.
  • Chicken Taco Salad: Swap ground beef for shredded grilled chicken for a lighter option.
  • Vegetarian Delight: Use black beans or lentils in place of meat for a hearty vegetarian version.
  • Tex-Mex Bowl: Serve over cauliflower rice for a filling, low-carb twist!

Storage and Make-Ahead Instructions

This Keto Taco Salad is perfect for meal prep! Here’s how to store it:

  • In the Fridge: Store assembled salads in airtight containers in the fridge for up to 3 days. Keep the dressing separate until serving.
  • Freezing: While the salad itself doesn’t freeze well, you can freeze cooked ground beef for later use!
  • Make-Ahead: Prepare the beef and chop the veggies ahead of time. Assemble when ready to eat!

Frequently Asked Questions

Got questions? We’ve got answers! Here are some common queries about this Keto Taco Salad:

  • Can I make this salad ahead of time? Yes! Just store the dressing separately to keep the lettuce fresh.
  • Is this salad gluten-free? Absolutely! All ingredients can be gluten-free as long as you check labels.
  • How many carbs are in this salad? This Keto Taco Salad is low in net carbs, making it perfect for your keto diet!
  • Can I use ground turkey instead of beef? Definitely! Ground turkey is a great lean alternative.
  • What can I substitute for avocado? You can omit it or use guacamole for a creamy texture.
  • Is there a dairy-free version? Yes! Use dairy-free cheese or skip the cheese entirely.
  • How do I make my own taco seasoning? Combine chili powder, cumin, garlic powder, and paprika for a delicious homemade mix!
  • What’s the best way to serve this salad? Serve it chilled or at room temperature, topped with your favorite dressing!

Nutritional Tips and Dietary Adaptations

Customize this Keto Taco Salad to fit your dietary needs:

  • Protein Sources: Use plant-based proteins like beans or tofu for a vegetarian option.
  • Low-Sodium: Use low-sodium beef broth and seasoning to keep it heart-healthy.
  • Low-Fat: Opt for lean ground meat or use more veggies to reduce fat content.

Equipment Recommendations

Here’s what you’ll need to make this delicious salad:

  • Skillet: A non-stick skillet works best for browning the ground beef.
  • Cutting Board & Knife: Essential for chopping veggies and prepping ingredients.
  • Measuring Cups & Spoons: For accurate ingredient measurements.
  • Mixing Bowls: Useful for mixing dressings and storing chopped ingredients.

Serving Suggestions

Pair your Keto Taco Salad with these delicious options:

  • Low-Carb Tortilla Chips: Crunchy and perfect for scooping up every last bite!
  • Guacamole: A creamy dip that complements the salad beautifully.
  • Fresh Salsa: Add a zesty punch with homemade or store-bought salsa.

Now that you have the ultimate guide to making a stunning Keto Taco Salad, it’s time to get cooking! Enjoy the vibrant flavors and nutritious ingredients that will keep your energy levels high and your taste buds dancing. Remember, healthy eating can be fun and exciting—so let’s make it a culinary adventure!

Keto Taco Salad—A Quick & Satisfying Low-Carb Classic

Prep Time 10 minutes
Cook Time 15 minutes
Total Time 25 minutes
Servings 4 servings
Calories 550
This keto-friendly taco salad combines seasoned ground beef with fresh vegetables and cheese for a quick, satisfying low-carb meal.

Ingredients

Vegetables

  • 0.25 cup diced onion
  • 8 ounces romaine lettuce, chopped
  • 1 avocado diced avocado
  • 0.25 cup grape tomatoes, quartered

Meat & Seasonings

  • 1 pound ground beef
  • 2 tablespoons taco seasoning (sugar-free)
  • 2 tablespoons beef broth or water

Cheese & Herbs

  • 4 ounces cheddar cheese, shredded
  • 0.25 cup fresh cilantro, chopped

Dressing

  • Tex-Mex style dressing (sugar-free) for serving

Instructions 

  • Cook diced onion in a skillet over medium-high heat for 5 minutes.
  • Add ground beef and cook until browned, then stir in taco seasoning and beef broth; cook 2 minutes.
  • Divide chopped lettuce onto plates, top with beef mixture, avocado, cheese, tomatoes, and cilantro.
  • Drizzle with dressing before serving.

Notes

Use fresh ingredients for best flavor and texture.
Calories: 550kcal
Cost: $15
Course: Main Course
Cuisine: Mexican
Keyword: Keto, Low Carb, Salad

Transform Your Meals with the Dazzling Avocado Chickpea Salad!

Are you ready to elevate your mealtime game? This vibrant Avocado Chickpea Salad is a deliciously nutritious option that combines the creamy goodness of avocados with the hearty protein of chickpeas. Packed with fresh ingredients and flavor, this salad is perfect for a quick lunch or a light dinner. In just a matter of minutes, you can whip up a dish that not only delights your taste buds but also nourishes your body. Let’s dive into this culinary adventure!

Why You’ll Love This Recipe

  • Quick and Easy: With minimal prep and no cooking required, this salad can be on your table in under 15 minutes!
  • Plant-Based Power: Chickpeas are an excellent source of plant-based protein, making this salad a fantastic choice for vegetarians and vegans.
  • Nutrient-Rich Ingredients: The combination of avocados, tomatoes, and greens provides essential vitamins and minerals, promoting overall health.
  • Customizable Flavor: You can easily adjust the ingredients and dressing to suit your taste preferences, making it a versatile dish.
  • Meal Prep Friendly: This salad stays fresh in the fridge, making it perfect for meal prep throughout the week.

Ingredient Breakdown

To create this colorful chickpea salad, you’ll need the following ingredients:

  • 1 can (15 oz) chickpeas: Rinsed and drained—these little powerhouses are packed with protein and fiber.
  • 2 large ripe avocados: Diced for creaminess—choose avocados that yield slightly to gentle pressure for the best texture.
  • 1 cup cherry tomatoes: Halved for a burst of sweetness and color.
  • ½ red onion: Finely chopped for a sharp, zesty kick.
  • 1 cucumber: Diced for a refreshing crunch.
  • 2 cups mixed greens or spinach (optional): Adds extra vitamins and nutrients.
  • 3 tablespoons extra-virgin olive oil: For healthy fats and richness.
  • 2 tablespoons fresh lemon juice: Brightens the flavors and adds acidity.
  • 1 teaspoon Dijon mustard: For a tangy twist.
  • ½ teaspoon garlic powder: Enhances the savory flavor.
  • Salt and freshly ground black pepper: To taste, for seasoning perfection.
  • 1 tablespoon fresh parsley or cilantro, chopped (optional): For a fresh herbal note.

Pro Tips for a Flawless Salad

Close-up view of a colorful salad with chickpeas and fresh ingredients like cucumbers and red onion.
  • Use ripe avocados: They should be slightly soft but not mushy for the best texture.
  • Dress just before serving: To prevent browning and keep the salad fresh, add the dressing right before you dig in.
  • Experiment with spices: Feel free to add cumin, paprika, or chili flakes for an extra flavor kick.
  • Chill for flavor: Let the salad sit in the fridge for 30 minutes to allow the flavors to meld.
  • Include nuts or seeds: For added crunch, sprinkle in some toasted sunflower seeds or pumpkin seeds.
  • Make it a meal: Add grilled chicken or shrimp for a protein boost, making it heartier.
  • Store leftovers properly: Keep any leftover salad in an airtight container in the fridge for up to 2 days.
  • Check your seasonings: Always taste and adjust the salt and pepper before serving to ensure perfect balance.

Common Mistakes & Troubleshooting

Even the best of us can make mistakes in the kitchen. Here are some common pitfalls to avoid when making your avocado chickpea salad:

  • Overripe avocados: If your avocados are too mushy, they can make the salad watery. Aim for perfectly ripe ones.
  • Skimping on seasoning: Don’t be shy with the salt and pepper! They enhance the flavors of the other ingredients.
  • Waiting too long to dress: Dressing the salad too early can lead to sogginess, so add the dressing just before serving.
  • Ignoring texture: Make sure to chop everything uniformly to ensure a balanced bite every time.

Delicious Variations

Feel free to get creative with your chickpea salad! Here are some variations to try:

  • Mexican Twist: Add diced jalapeños, corn, and a splash of lime juice for a zesty flair.
  • Greek Style: Incorporate feta cheese, olives, and oregano for a Mediterranean twist.
  • Asian Influence: Mix in edamame, shredded carrots, and sesame oil for an Asian-inspired flavor.
  • Fruit Fusion: Toss in diced mango or pineapple for a sweet and tropical touch.

Storage and Make-Ahead Instructions

This avocado chickpea salad is perfect for meal prep! Here’s how to store it:

  • Refrigerator: Keep the salad in an airtight container for up to 2 days. Be mindful that the avocado will brown over time.
  • Make-Ahead: Prepare the ingredients a day in advance, but wait to combine them until just before serving to maintain freshness.

Frequently Asked Questions

  • Can I use frozen chickpeas? Yes! Just thaw and rinse them before using.
  • How can I make this recipe gluten-free? This recipe is already gluten-free, so you’re good to go!
  • Can I add other vegetables? Absolutely! Feel free to mix in your favorite veggies like bell peppers or carrots.
  • Is this salad suitable for meal prep? Yes! It’s an excellent meal prep option as it keeps well in the fridge.
  • What can I substitute for lemon juice? You can use lime juice or vinegar as an alternative.
  • How do I make it spicier? Add diced jalapeño or a pinch of cayenne pepper for some heat!
  • Can I use canned avocados? Fresh avocados are recommended for the best flavor and texture.
  • How do I make this salad vegan? This recipe is already vegan-friendly, so enjoy it guilt-free!

Nutritional Tips and Dietary Adaptations

This chickpea salad is not only delicious but also packed with nutrients:

  • High in Fiber: Chickpeas and vegetables provide a great source of dietary fiber, promoting digestive health.
  • Rich in Healthy Fats: Avocados contribute heart-healthy monounsaturated fats, which are great for your cholesterol levels.
  • Customizable for Diets: This dish can easily fit into various dietary lifestyles—be it vegan, vegetarian, or gluten-free.

Essential Equipment

For this recipe, you don’t need much equipment, but here are a few essentials:

  • Cutting Board: To chop your fresh ingredients.
  • Sharp Knife: For easy cutting of vegetables and avocados.
  • Mixing Bowl: A large bowl will help you combine all your ingredients without spilling.
  • Measuring Cups and Spoons: For precise measurements of your ingredients.

Serving Suggestions

Serve this avocado chickpea salad as a standalone dish or pair it with:

  • Whole Grain Bread: Toasted or fresh, it complements the salad perfectly.
  • Grilled Chicken or Fish: Add protein for a heartier meal.
  • Quinoa or Brown Rice: Serve it over a bed of grains for extra staying power.

In conclusion, the Dazzling Avocado Chickpea Salad is not just a dish; it’s an experience! With its burst of flavors and health benefits, it’s a meal that leaves you feeling energized and satisfied. So grab your ingredients, and let’s make mealtime fun again!

Avocado Chickpea Salad

Prep Time 10 minutes
Total Time 10 minutes
Servings 4 servings
Calories 350
A fresh and nutritious salad combining creamy avocados, hearty chickpeas, and vibrant vegetables, perfect for a quick lunch or light dinner.

Ingredients

Canned Goods

  • 1 can chickpeas, drained and rinsed

Produce

  • 2 large ripe avocados, diced
  • 1 cup cherry tomatoes, halved
  • ½ red onion, finely chopped red onion
  • 1 cucumber, diced cucumber

Dressing

  • 3 tablespoons extra-virgin olive oil
  • 2 tablespoons fresh lemon juice
  • 1 teaspoon Dijon mustard
  • ½ teaspoon garlic powder
  • to taste Salt and black pepper Salt and freshly ground black pepper
  • 1 tablespoon fresh parsley or cilantro, chopped (optional)

Instructions 

  • In a large bowl, combine chickpeas, diced avocados, cherry tomatoes, red onion, and cucumber.
  • In a small bowl, whisk together olive oil, lemon juice, Dijon mustard, garlic powder, salt, and pepper.
  • Pour the dressing over the salad and toss gently to combine.
  • Garnish with chopped parsley or cilantro if desired and serve immediately.

Notes

For extra flavor, let the salad sit for 10 minutes before serving to allow the flavors to meld.
Calories: 350kcal
Cost: $12
Course: Salad
Cuisine: international
Keyword: avocado

Unleash a Burst of Flavor with Spicy Thai Peanut Noodle Salad!

Are you ready to elevate your lunch or dinner game? This Spicy Thai Peanut Noodle Salad is a whirlwind of flavor that’s not just easy to make but also a feast for your eyes and taste buds! Packed with vibrant veggies, a creamy peanut sauce, and a delightful kick of spice, this dish is perfect for anyone looking to enjoy a satisfying meal without the fuss. Let’s dive into why this noodle salad is a must-try and how you can whip it up in no time!

Why You’ll Love This Recipe

  • Quick and Easy: This recipe is a breeze to prepare, taking less than 30 minutes from start to finish. Perfect for busy weeknights!
  • Flavor Explosion: The combination of creamy peanut butter, zesty sriracha, and fresh veggies creates a mouthwatering experience that’s hard to resist.
  • Customizable: Feel free to add your favorite proteins, swap out veggies, or adjust the spice level to suit your taste.
  • Meal Prep Friendly: This salad keeps well, making it an excellent choice for meal prep. It tastes even better the next day as the flavors meld!
  • Healthy and Nourishing: Packed with nutrients from fresh vegetables and wholesome ingredients, this salad is as good for your body as it is for your palate!

Gather Your Ingredients

Here’s what you’ll need to create this delicious Spicy Thai Peanut Noodle Salad:

  • 8 ounces dried noodles: Choose spaghetti, linguine, or rice noodles for a gluten-free option.
  • 1/2 cup creamy peanut butter: Smooth peanut butter works best, but crunchy adds a fun texture!
  • 1/4 cup soy sauce: Use low-sodium soy sauce or tamari for gluten-free.
  • 2 tablespoons rice vinegar: This adds a lovely tang to the dish.
  • 1 tablespoon honey: For a touch of sweetness. Maple syrup is a great vegan alternative.
  • 1 tablespoon sriracha: Adjust this to your spice preference!
  • 1 clove garlic, minced: Fresh garlic elevates the flavor profile.
  • 1/4 cup hot water: To adjust the sauce consistency.
  • 1 cup shredded carrots: Adds crunch and color.
  • 1 cup shredded red cabbage: For a pop of color and nutrients.
  • 1/2 cup chopped green onions: Fresh and zesty!
  • 1/4 cup chopped cilantro: A burst of freshness.
  • 1/4 cup chopped peanuts: For garnish and extra crunch.

How to Make This Delicious Spicy Thai Peanut Noodle Salad

Side view image of a delicious Spicy Thai Peanut Noodle Salad with a creamy peanut sauce.

Follow these simple steps to create a bowl of pure deliciousness:

  • Step 1: Cook the Noodles
    Boil the noodles according to package directions. Once cooked, drain and rinse with cold water to stop the cooking process.
  • Step 2: Make the Peanut Sauce
    In a bowl, whisk together the peanut butter, soy sauce, rice vinegar, honey, sriracha, and minced garlic until smooth and creamy.
  • Step 3: Adjust the Sauce
    Gradually whisk in hot water until the sauce reaches your desired consistency. It should be pourable but still thick enough to cling to the noodles.
  • Step 4: Prep the Veggies
    In a large mixing bowl, combine the cooked noodles, shredded carrots, red cabbage, green onions, and cilantro.
  • Step 5: Toss It All Together
    Pour the peanut sauce over the noodle mixture and toss everything together until well combined.
  • Step 6: Garnish and Serve
    Top with chopped peanuts for added crunch before serving. Enjoy your vibrant and flavorful salad!

Pro Tips for Making Thai Noodle Salad with Peanut Sauce

  • Use Fresh Ingredients: Fresh vegetables enhance the flavor and texture of your salad. Always opt for the freshest produce available.
  • Adjust the Spice: If you love heat, feel free to add more sriracha or even some red pepper flakes to the sauce.
  • Experiment with Noodles: Different types of noodles bring unique textures—try soba or even zucchini noodles for a twist!
  • Chill Before Serving: Letting the salad chill in the refrigerator for about 30 minutes allows the flavors to meld beautifully.
  • Make It a Meal: Add grilled chicken, tofu, or shrimp for a protein-packed version that’s even more filling.
  • Store Properly: Keep leftovers in an airtight container in the fridge for up to 3 days.
  • Garnish Creatively: Add sesame seeds, lime wedges, or sliced chili peppers for an extra kick!
  • Vegan Option: Use maple syrup instead of honey and ensure your peanut butter is vegan-friendly.

Common Mistakes and Troubleshooting

Even the best chefs make mistakes! Here’s how to avoid common pitfalls:

  • Too Thick Sauce: If your peanut sauce is too thick, simply whisk in additional hot water until the desired consistency is reached.
  • Overcooked Noodles: Make sure to check the noodles a minute or two before the package instructions say they should be done; you want them al dente!
  • Flavor Disparity: If the salad tastes bland, add a splash more soy sauce or a squeeze of lime juice to brighten it up!
  • Too Spicy: If you accidentally overdo the spice, add a little more peanut butter or honey to balance it out.

Variations to Try

Get creative and make this recipe your own! Here are some variations you can try:

  • Asian-Inspired: Add edamame, snap peas, or bell peppers for a more veggie-packed version.
  • Protein-Packed: Toss in grilled chicken, shrimp, or marinated tofu for a heartier meal.
  • Cold Salad Style: Chill the salad and enjoy it as a refreshing cold dish on hot days.
  • Nut-Free: Replace peanut butter with sunflower seed butter for a nut-free alternative.

Storage and Make-Ahead Instructions

This Spicy Thai Peanut Noodle Salad is perfect for meal prepping! Here’s how to store:

  • Store leftovers in an airtight container in the refrigerator for up to 3 days.
  • To keep the salad fresh, store the peanut sauce separately and add it just before serving.
  • Feel free to make this salad a day ahead of time. The flavors will develop even more deliciousness overnight!

Frequently Asked Questions (FAQ)

  • Can I use whole wheat noodles? Absolutely! Whole wheat noodles add extra fiber and nutrients to the salad.
  • What can I substitute for peanut butter? Almond butter or sunflower seed butter are great alternatives if you have nut allergies.
  • Can I make this salad vegan? Yes, just substitute honey with maple syrup and ensure your ingredients are vegan-friendly.
  • How can I make this dish gluten-free? Use gluten-free noodles and tamari instead of soy sauce.
  • Can I add fruits to the salad? Yes! Slices of mango or pineapple add a delightful sweetness to the dish.
  • How long does this salad last in the fridge? It stays fresh for up to 3 days when stored properly in an airtight container.
  • Can I use frozen vegetables? Yes, but fresh vegetables provide the best texture and flavor.
  • What’s the best way to serve this salad? Serve it chilled or at room temperature for the best flavor!

Nutrition Tips and Dietary Adaptations

This salad is not only delicious but also nutritious! Here are some tips:

  • Add Protein: Incorporating protein sources like grilled chicken or tofu can make this salad more filling.
  • Boost Nutrients: Add a variety of colorful vegetables for maximum vitamins and minerals.
  • Adjust Carbs: For a lower-carb version, consider spiralizing zucchini or using shirataki noodles instead.
  • Watch the Sauce: Be mindful of the amount of soy sauce and peanut butter if you’re watching your sodium or calorie intake.

Equipment Recommendations

Here’s what you’ll need to whip up this scrumptious salad:

  • Large Pot: For boiling noodles.
  • Mixing Bowl: To combine all your ingredients.
  • Whisk: For blending your peanut sauce smoothly.
  • Knife and Cutting Board: For chopping veggies.
  • Measuring Cups and Spoons: For accurate ingredient measurements.

Serving Suggestions

This Spicy Thai Peanut Noodle Salad is incredibly versatile! Here are some serving ideas:

  • Serve it as a standalone lunch or dinner option.
  • Pair it with grilled proteins for a complete meal.
  • Offer it as a side dish for barbecues or gatherings.
  • Add it to your potluck spread for a fresh, vibrant option!

With this Spicy Thai Peanut Noodle Salad, you’re not just serving a meal; you’re offering a delightful culinary experience that’s easy to prepare and packed with flavor. So grab your ingredients and let’s get cooking! Your taste buds will thank you!

Spicy Thai Peanut Noodle Salad: 1 Awesome Meal

Prep Time 10 minutes
Cook Time 10 minutes
Total Time 20 minutes
Servings 4 servings
Calories 450
A vibrant and flavorful noodle salad with a spicy peanut sauce, perfect for a quick and satisfying meal.

Ingredients

Noodles

  • 8 ounces dried noodles (like spaghetti or linguine)
  • 0.5 cup creamy peanut butter
  • 0.25 cup soy sauce
  • 2 tablespoons rice vinegar
  • 1 tablespoon honey
  • 1 tablespoon sriracha (or more, to taste)
  • 1 clove garlic, minced
  • 0.25 cup hot water
  • 1 cup shredded carrots
  • 1 cup shredded red cabbage
  • 0.5 cup chopped green onions
  • 0.25 cup chopped cilantro
  • 0.25 cup chopped peanuts (for garnish)

Instructions 

  • Cook noodles according to package directions. Drain and rinse with cold water.
  • Whisk together peanut butter, soy sauce, rice vinegar, honey, sriracha, and garlic until smooth. Gradually add hot water to reach desired consistency.
  • Combine cooked noodles, carrots, cabbage, green onions, and cilantro in a large bowl. Toss with the peanut sauce.
  • Garnish with chopped peanuts before serving.

Notes

Adjust sriracha for desired spice level.
Calories: 450kcal
Cost: $15
Course: Main Course
Cuisine: Thai
Keyword: Noodles, peanut