Author

Ryan

Browsing

Welcome to Your New Favorite Sandwich Adventure!

If you’re looking for a quick, healthy meal that packs a punch of flavor, then you’ve just stumbled upon the perfect recipe! Our Smashed Chickpea Avocado Dill Pickle Sandwiches are not only a delightful fusion of ingredients, but they also offer a nutritious boost that will keep your taste buds dancing and your energy levels high. With vibrant colors and hearty textures, this sandwich is the ultimate solution for busy lunches or light dinners. Let’s dive into this exciting culinary journey!

Why You’ll Love This Recipe

These sandwiches are more than just tasty; they come with a plethora of benefits:

  • Quick Preparation: Ready in just 10 minutes, this recipe is perfect for those hectic days when you need something fast.
  • Nutritious Ingredients: Packed with protein from chickpeas and healthy fats from avocado, this meal will keep you satisfied and energized.
  • Vegan and Gluten-Free Options: Easily adaptable for various dietary needs, making it accessible to everyone!
  • Flavor Explosion: The combination of chickpeas, creamy avocado, and zesty dill pickles creates a mouthwatering experience.
  • Meal Prep Friendly: Make a batch ahead of time for easy lunches throughout the week.

Ingredients You’ll Need

Gather these simple ingredients for a delightful sandwich:

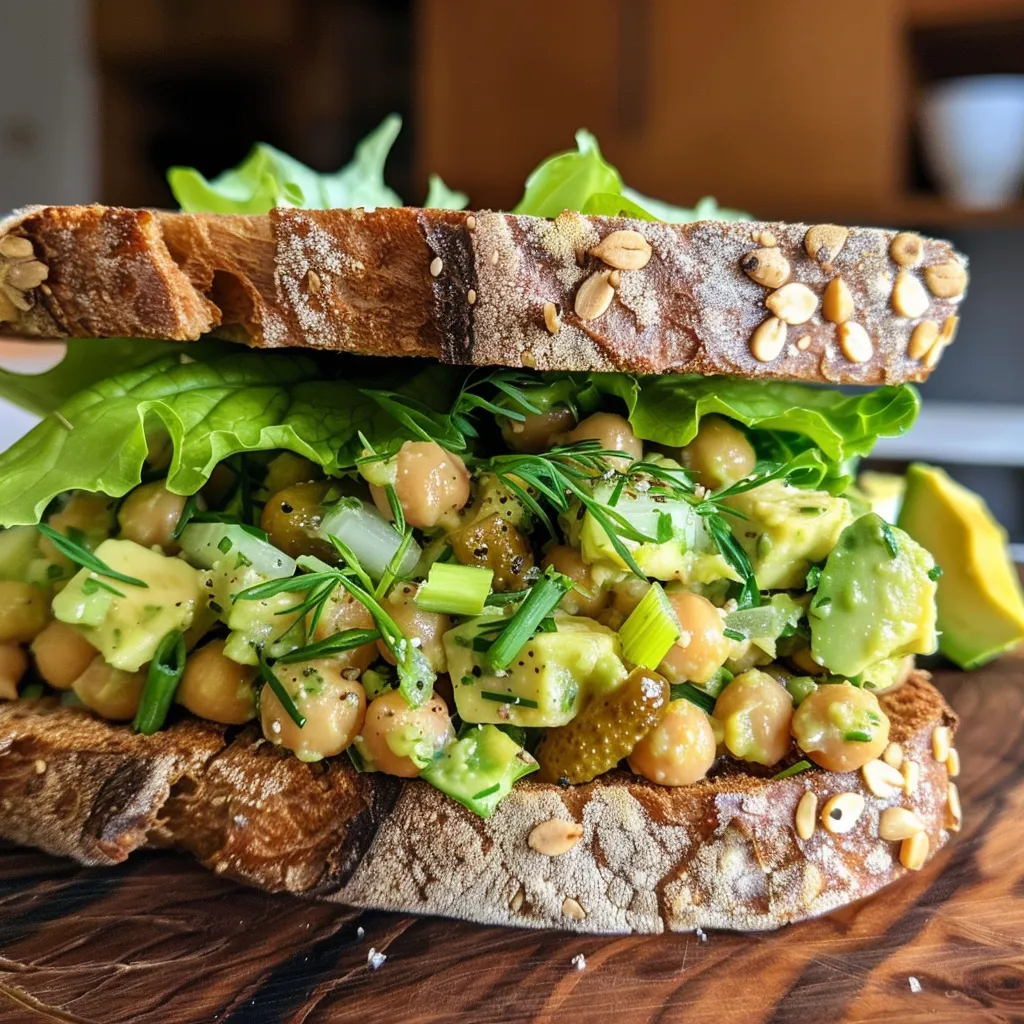
  • 1 ½ cups cooked chickpeas (or 1 14-oz can, drained and rinsed)
  • 1 ripe avocado, pitted
  • 3 tablespoons freshly squeezed lemon juice
  • 1 large garlic clove, minced
  • 1 celery rib, diced
  • ¼ cup finely chopped pickles
  • ¼ cup finely chopped dill (adjust to taste)
  • 2 green onions, finely chopped
  • A pinch each of fine sea salt and freshly ground black pepper
  • Whole grain bread, pitas, bagels, or tortillas
  • Lettuce or arugula for crunch
  • Mustard for an extra zing

Ingredient Substitutions

If you’re missing some ingredients, don’t worry! Here are some substitutions you can consider:

  • Chickpeas: Use black beans or lentils for a different protein punch.
  • Avocado: Swap with mashed silken tofu for a lighter option.
  • Pickles: Dill relish or chopped jalapeños can add a spicy twist.
  • Whole Grain Bread: Try gluten-free bread or lettuce wraps for a low-carb alternative.

Let’s Make This Happen

Side view of a delicious sandwich filled with smashed chickpeas, avocado, and dill pickles, garnished with leafy greens.

Step-by-Step Instructions

Ready to whip up your new favorite sandwich? Follow these simple steps:

  1. Mash the Chickpeas: In a bowl, mash the chickpeas using a potato masher or a fork until they are broken up, but still chunky.
  2. Add the Avocado: Mix in the ripe avocado and mash until creamy.
  3. Mix in Flavor: Stir in the lemon juice, minced garlic, diced celery, chopped dill, pickles, green onions, salt, and pepper. Adjust seasonings to taste.
  4. Assemble the Sandwich: Spread the chickpea avocado mixture onto slices of your chosen bread, top with lettuce, and close with another slice of bread.
  5. Serve: Cut in half and enjoy! Pair with a side salad for a complete meal.

Pro Tips for Ultimate Success

Elevate your sandwich-making game with these expert insights:

  • Perfect Texture: Leave some chickpeas whole for added texture in each bite.
  • Seasonal Freshness: Use fresh herbs in season for enhanced flavor.
  • Chill Time: Let the mixture sit for 15-30 minutes in the fridge for flavors to meld.
  • Experiment with Mustard: Try different types of mustard (honey, dijon, etc.) for unique flavors.
  • Bulk Prep: Make a large batch and store in an airtight container for easy lunches.

Common Mistakes and Troubleshooting

Here are some pitfalls to avoid while making your sandwiches:

  • Over-mashing: Avoid turning the chickpeas and avocado into a complete puree; keep it chunky for the best texture.
  • Too Much Salt: Always start with less salt; you can add more, but it’s hard to fix if you overdo it.
  • Ignoring Freshness: Use fresh ingredients, especially herbs and vegetables, for the best flavor.

Variations to Mix It Up

Feel adventurous? Here are some fun twists to try:

  • Spicy Chickpea Avocado: Add diced jalapeños or a dash of hot sauce for a kick.
  • Curried Chickpeas: Incorporate curry powder for an exotic flavor profile.
  • Herbed Delight: Use basil or cilantro instead of dill for a different herbaceous note.
  • Nutty Crunch: Mix in some toasted sunflower seeds or walnuts for added crunch.

Storage and Make-Ahead Instructions

Want to meal prep? Here’s how to store your sandwiches:

  • Refrigerate: Store the chickpea avocado mixture in an airtight container in the fridge for up to 3 days.
  • Freezing: For best taste, avoid freezing the assembled sandwiches. Instead, freeze the chickpea mixture and thaw before serving.

Frequently Asked Questions

Here are some common questions to help you master this recipe:

  • Can I make this ahead of time? Yes! The chickpea mixture can be made a day in advance.
  • What can I substitute for the avocado? You can use mashed silken tofu or Greek yogurt for creaminess.
  • Can I use a different type of bread? Absolutely! Any bread, pita, or wrap will work.
  • What’s the best way to serve these sandwiches? They are great fresh, but you can also serve them with a side of soup or salad.
  • How long do leftovers last? The chickpea mixture can last up to 3 days in the fridge.
  • Can I use canned chickpeas? Yes, canned chickpeas work perfectly! Rinse and drain them well.
  • Is this recipe gluten-free? Yes, if you use gluten-free bread or wraps.
  • Can I add more vegetables? Definitely! Feel free to include diced bell peppers or shredded carrots for extra nutrition.

Nutritional Benefits and Dietary Adaptations

Let’s talk about why this sandwich is a smart choice:

  • High in Protein: Chickpeas provide a substantial amount of protein, making this sandwich filling and satisfying.
  • Rich in Healthy Fats: Avocados are a great source of monounsaturated fats, promoting heart health.
  • Fiber-Rich: This recipe is loaded with fiber, which is essential for digestive health.
  • Low in Calories: A great option for those watching their calorie intake without compromising taste.

Equipment Recommendations

To make your sandwich-making experience seamless, consider the following:

  • Potato Masher: Perfect for mashing chickpeas and avocados.
  • Mixing Bowl: A good-sized bowl will help you combine all ingredients easily.
  • Knife and Cutting Board: Essential for chopping veggies and spreading the mixture.

Serving Suggestions

Now that you’ve made these delicious sandwiches, here are some ideas to elevate your meal:

  • Pair with a salad: A fresh side salad with a citrus dressing complements the flavors beautifully.
  • Chips on the side: Serve with baked tortilla chips or veggie chips for a satisfying crunch.
  • Enjoy with a smoothie: Combine with a green smoothie for a nutrient-packed meal.

Wrap Up Your Culinary Adventure!

And there you have it! A comprehensive guide to making the most scrumptious Smashed Chickpea Avocado Dill Pickle Sandwiches. This recipe is not just about nourishment; it’s a celebration of flavors and creativity. Don’t be afraid to experiment and make it your own. Share your creations with friends and family, and watch as they fall in love with healthy eating all over again. Thank you for joining me on this delicious journey—happy cooking!

Smashed Chickpea Avocado Dill Pickle Sandwiches

Prep Time 10 minutes
Total Time 10 minutes
Servings 4 servings
Calories 350
A delicious and nutritious vegetarian sandwich featuring smashed chickpeas, creamy avocado, and tangy pickles, perfect for a quick lunch or snack.

Ingredients

Main

  • 1.5 cups cooked chickpeas (or 1 14-oz can, drained and rinsed)
  • 1 ripe avocado avocado (pitted)
  • 3 tablespoons freshly squeezed lemon juice
  • 1 large garlic clove garlic (minced)
  • 1 celery rib celery (diced)
  • 0.25 cup finely chopped pickles
  • 0.25 cup finely chopped dill (or to taste)
  • 2 green onions green onions (finely chopped)
  • Pinch each fine sea salt and freshly ground black pepper
  • to taste Whole grain bread, pitas, bagels, or tortillas
  • to taste Lettuce or arugula
  • to taste Mustard

Instructions 

  • Mash chickpeas until broken up, then mix in avocado, lemon juice, garlic, green onions, celery, pickles, dill, salt, and pepper.
  • Spread the mixture onto bread slices, add lettuce or arugula, top with mustard if desired, and assemble the sandwich.

Notes

Feel free to customize with your favorite greens or additional seasonings.
Calories: 350kcal
Cost: $15
Course: Lunch, Snack
Cuisine: American
Keyword: Sandwich, vegetarian

Unlock the Magic of Crunchy Ramen Noodle Salad

Welcome to a culinary adventure where flavor meets fun! This Crunchy Ramen Noodle Salad is not just a salad; it’s a vibrant explosion of color and taste that elevates your healthy eating game. In less than 30 minutes, you can whip up a dish that’s perfect for picnics, potlucks, or a quick weeknight dinner. Let’s dive into why you’re going to love this recipe and how to make it shine!

Why You’ll Love This Recipe

  • Quick and Easy: Ready in under 30 minutes, this salad is perfect for busy days when you want something nutritious and delicious without the fuss.
  • Flavor-Packed: The combination of toasted ramen noodles, crunchy veggies, and a tangy dressing creates a symphony of flavors in every bite.
  • Customizable: Feel free to mix and match ingredients based on what you have on hand, making this recipe adaptable to your taste preferences.
  • Meal Prep Friendly: Make a big batch at the beginning of the week for easy lunches or dinners that stay fresh and tasty.
  • Healthy Yet Satisfying: This salad is full of nutrients while still being hearty enough to keep you full and satisfied!

Ingredients Breakdown

The beauty of this ramen noodle salad lies in its versatility. Here’s what you’ll need:

  • 2 packs instant ramen noodles: Any flavor works, but discard the seasoning packets!
  • 4 cups shredded green cabbage: For a crunchy base; feel free to substitute with coleslaw mix.
  • 1 cup shredded purple cabbage: Adds color and additional crunch.
  • 1 cup shredded carrots: For sweetness and vibrant color.
  • ½ cup sliced green onions: A fresh, mild onion flavor.
  • ½ cup sliced almonds: Toasted for that perfect crunch.
  • 1 tablespoon sesame seeds: Optional, but they add a nutty flavor and texture.
  • ¼ cup olive oil or vegetable oil: For dressing and toasting the noodles.
  • 3 tablespoons rice vinegar: For a tangy kick.
  • 2 tablespoons soy sauce: Adds depth and umami flavor.
  • 1 tablespoon honey or sugar: To balance the acidity.
  • 1 teaspoon sesame oil: For richness.
  • ½ teaspoon ground ginger: Adds warmth and spice.
  • ½ teaspoon garlic powder: For flavor punch.

Step-by-Step Instructions

A delicious bowl of Ramen Noodle Salad with cabbage, carrots, and almonds.

Let’s get cooking! Follow these simple steps to create your ramen noodle salad:

  1. Break the Noodles: Start by breaking the ramen noodles into small, bite-sized pieces.
  2. Toast the Noodles and Almonds: Heat a dry skillet over medium heat. Add the broken noodles and sliced almonds. Toast them for about 4–5 minutes, stirring often, until golden brown.
  3. Prepare the Vegetables: In a large bowl, combine the shredded green cabbage, purple cabbage, carrots, and green onions.
  4. Make the Dressing: In a small jar or bowl, whisk together the olive oil, rice vinegar, soy sauce, honey, sesame oil, ginger, and garlic powder until smooth and emulsified.
  5. Combine Everything: Add the toasted noodles and almonds to the bowl with the veggies. Pour the dressing over the top and toss everything well until evenly coated.
  6. Let It Chill: For the best texture, let the salad sit for 15–20 minutes before serving. This allows the flavors to mingle while keeping the noodles crunchy.

Pro Tips for the Best Ramen Noodle Salad

  • Toast the Noodles: Never skip toasting the noodles! This step enhances their flavor and keeps them from becoming soggy.
  • Customize Your Veggies: Feel free to add any veggies you love, such as bell peppers, snap peas, or shredded broccoli.
  • Make It Spicy: Add a splash of sriracha or a sprinkle of red pepper flakes to the dressing for a spicy kick!
  • Use Fresh Herbs: Fresh cilantro or mint can elevate the flavor profile even more.
  • Experiment with Proteins: Add grilled chicken, tofu, or shrimp for a protein boost.
  • Balance the Dressing: Adjust the sweetness or tanginess of the dressing according to your taste preferences.
  • Pack for Lunch: This salad makes a great meal prep option that you can take for lunch throughout the week.
  • Serve Cold or Room Temperature: This salad is delicious served cold, but is also great at room temperature!

Common Mistakes and Troubleshooting

Here are a few common pitfalls to avoid when making your ramen noodle salad:

  • Soggy Noodles: Ensure you toast the noodles properly and let the salad sit for just the right amount of time before serving.
  • Too Much Dressing: Start with less dressing and add more as needed. You want to coat the salad without drowning it!
  • Overcooked Veggies: Mix the veggies gently to avoid bruising them; they should stay crisp and fresh.

Delicious Variations

Get creative with your noodle salad by trying these variations:

  • Asian Chicken Ramen Salad: Add shredded rotisserie chicken and top with sesame dressing.
  • Spicy Peanut Ramen Salad: Mix in some peanut butter in the dressing and sprinkle with crushed peanuts.
  • Vegan Delight: Swap honey for agave nectar and add tofu or chickpeas for protein.
  • Crunchy Mediterranean Ramen: Incorporate olives, feta cheese, and sun-dried tomatoes for a Mediterranean twist.

Storage and Make-Ahead Instructions

This salad is perfect for meal prep! Here’s how to store it:

  • Refrigerate: Store in an airtight container for up to 3 days. The noodles will stay crunchy if stored separately from the dressing.
  • Make Ahead: You can prepare all the components in advance and combine them right before serving for maximum freshness.

FAQs: Your Questions Answered!

  • Can I use different noodles? Absolutely! Rice noodles or soba noodles work great!
  • Is this salad gluten-free? Use gluten-free ramen noodles and soy sauce to make it gluten-free.
  • How can I make it lower in calories? Reduce the oil and use a sugar substitute in the dressing.
  • Can I add fruits? Yes! Sliced apples or mandarin oranges can add a refreshing twist.
  • What can I serve with this salad? It pairs well with grilled meats, sandwiches, or as a stand-alone dish.
  • Can I freeze this salad? It’s not recommended to freeze as the noodles will become mushy.
  • What’s the best way to chop cabbage? A sharp knife or mandoline will give you the best results!
  • How do I make it vegan? Simply replace honey with maple syrup and ensure all ingredients are vegan-friendly.

Nutritional Tips and Dietary Adaptations

This ramen noodle salad is not only delicious but also packed with nutrients. Here are some tips to enhance its nutritional value:

  • Add More Greens: Incorporate spinach or kale for added vitamins and minerals.
  • Protein Boost: Include edamame or chickpeas for a plant-based protein option.
  • Healthy Fats: Avocado can be a creamy addition that also provides healthy fats.

Essential Equipment Recommendations

To make your cooking experience seamless, here’s what you’ll need:

  • Sharp Knife: For chopping vegetables quickly and efficiently.
  • Cutting Board: A stable surface to prepare your ingredients.
  • Large Mixing Bowl: To combine all the salad ingredients easily.
  • Skillet: For toasting the noodles and almonds to perfection.
  • Whisk or Jar: For mixing the dressing smoothly.

Serving Suggestions

Serving your Crunchy Ramen Noodle Salad can be just as fun as making it! Here are some ideas:

  • Garnish with Fresh Herbs: Top with cilantro or mint for an aromatic finish.
  • Serve with Lime Wedges: A squeeze of fresh lime juice elevates the flavor!
  • Pair with Grilled Proteins: Consider grilled chicken, shrimp, or tofu for a complete meal.

Final Thoughts

Creating a Crunchy Ramen Noodle Salad is a delightful way to embrace healthy eating without sacrificing flavor or fun. With its vibrant colors, crunchy textures, and bold flavors, this salad is sure to become a staple in your kitchen. So grab your ingredients, unleash your creativity, and enjoy every bite of this exciting dish!

Ramen Noodle Salad Recipe

Prep Time 10 minutes
Cook Time 5 minutes
Total Time 15 minutes
Servings 4 servings
Calories 350
A quick and flavorful cold salad combining crunchy vegetables, toasted ramen noodles, and a tangy dressing.

Ingredients

group

  • 2 packs instant ramen noodle
  • 4 cups shredded green cabbage
  • 1 cup shredded purple cabbage
  • 1 cup shredded carrots
  • ½ cup sliced green onions
  • ½ cup sliced almonds
  • 1 tablespoon sesame seeds
  • ¼ cup olive oil or vegetable oil
  • 3 tablespoons rice vinegar
  • 2 tablespoons soy sauce
  • 1 tablespoon honey or sugar
  • 1 teaspoon sesame oil
  • ½ teaspoon ground ginger
  • ½ teaspoon garlic powder

Instructions 

  • Break ramen noodles into small pieces and toast with almonds for 4-5 minutes.
  • Combine shredded vegetables in a large bowl.
  • Whisk together oil, vinegar, soy, honey, sesame oil, ginger, and garlic until smooth.
  • Add toasted noodles and almonds to vegetables, pour dressing, and toss.
  • Let sit for 15-20 minutes before serving to enhance flavor and crunch.

Notes

For extra flavor, refrigerate for 15 minutes before serving.
Calories: 350kcal
Cost: $10
Course: Salad
Cuisine: Asian
Keyword: Noodle, Vegetables

Unleash the Flavor: Your Ultimate Guide to Thai Peanut Glass Noodle Salad!

Welcome to a whirlwind of flavors that will take your taste buds on an exciting ride! If you’ve been searching for the perfect noodle salad that’s not only delicious but also quick and easy to prepare, then you’ve hit the jackpot with this Thai Peanut Glass Noodle Salad. Bursting with vibrant colors, crunchy veggies, and a creamy peanut dressing, this salad is a celebration of freshness and taste. Let’s dive into what makes this dish a must-try!

Why You’ll Love This Recipe

This salad is more than just a meal; it’s a delightful experience. Here are five reasons why you’ll love whipping up this Thai Peanut Glass Noodle Salad:

  • Quick and Easy: Ready in just 20 minutes, it’s perfect for busy weeknights or last-minute gatherings.
  • Nutritious Ingredients: Packed with fresh veggies and wholesome ingredients, it’s a guilt-free indulgence.
  • Versatile and Customizable: Easily adapt the recipe to suit your taste or dietary needs—swap ingredients or add proteins.
  • Vibrant and Flavorful: The combination of textures and flavors makes each bite an adventure.
  • Great for Meal Prep: Make it ahead of time for a delicious grab-and-go lunch that stays fresh!

Ingredient Breakdown

Let’s explore the delicious ingredients that make this salad sing!

  • 150 g glass noodles: Soak until tender and silky. These noodles are the star of the show, absorbing the peanut dressing perfectly.
  • 1 medium red bell pepper: Adds a sweet crunch and vibrant color.
  • 1 medium cucumber: Provides a refreshing bite and juiciness.
  • 2 medium carrots: Shredded for sweetness and texture.
  • ¼ cup fresh cilantro: Chopped for a burst of freshness.
  • 2 stalks green onions: Thinly sliced for a mild onion flavor.
  • ¼ cup chopped peanuts: For that irresistible crunch.
  • 3 tbsp peanut butter: The creamy base of our dressing that brings everything together.
  • 2 tbsp soy sauce: Adds depth and umami flavor.
  • 1 tbsp lime juice: A zesty brightness that elevates the dish.
  • 1 tbsp honey: Enhances the natural sweetness.
  • 1 clove garlic: Minced for aromatic goodness.
  • 1 tbsp sesame oil: For a toasted aroma and flavor.
  • ¼ tsp chili flakes: Optional for a touch of heat.

Substitutions and Variations

Delicious Thai Peanut Glass Noodle Salad featuring glass noodles, bell peppers, and peanuts.

Don’t hesitate to get creative! Here are some substitutions and variations to suit your taste:

  • Protein Boost: Add grilled chicken, shrimp, tofu, or chickpeas for extra protein.
  • Vegetable Swaps: Try bell peppers, snap peas, or even broccoli for added crunch and color.
  • Gluten-Free Options: Use gluten-free soy sauce or tamari for a gluten-free dish.
  • Nut-Free Version: Replace peanut butter with sunflower seed butter or tahini if you have nut allergies.

Pro Tips for Perfecting Your Salad

Ready to wow your guests or family? Here are some expert insights:

  • Soak the noodles: Ensure the glass noodles are soaked properly until they are tender but still have a slight bite.
  • Make the dressing in advance: Allow the flavors to meld by preparing the peanut dressing ahead of time.
  • Chill the salad: Serve it cold for a refreshing experience, especially during hot days.
  • Garnish generously: Top with extra chopped peanuts and cilantro for a beautiful presentation.
  • Adjust seasoning: Taste and adjust the soy sauce, lime juice, or honey to suit your flavor preferences.
  • Store properly: Use an airtight container to keep leftovers fresh.
  • Use fresh ingredients: Fresh veggies make a world of difference in taste and texture.
  • Experiment with spices: Add more chili flakes or a dash of sriracha for extra spice!

Common Mistakes and Troubleshooting

Here are some pitfalls to avoid while making your salad:

  • Overcooking the noodles: Keep an eye on the soaking time to avoid mushy noodles.
  • Too much dressing: Start with less dressing and add more as needed to prevent sogginess.
  • Skipping flavors: Don’t skip the garlic or lime juice; they elevate the dish immensely.
  • Not letting it chill: Chilling enhances the flavors, so give it some time in the fridge.

Storage and Make-Ahead Instructions

This salad is perfect for meal prep! Here’s how to store it:

  • Refrigerate: Store in an airtight container for up to 3 days.
  • Make-ahead: Prepare the components in advance and mix just before serving to keep veggies crisp.
  • Freezing: Not recommended due to the texture of noodles and fresh veggies.

Serving Suggestions

This salad pairs wonderfully with various dishes or can stand alone as a meal:

  • Serve as a side dish: Complement it with grilled meats or seafood.
  • Top with proteins: Serve it alongside grilled chicken, tofu, or shrimp for a complete meal.
  • Perfect picnic fare: Pack it up for a healthy, portable lunch option.

FAQ: Your Burning Questions Answered!

Let’s tackle some common questions about this delightful Thai Peanut Glass Noodle Salad:

  • Can I use other types of noodles? Yes! You can substitute with rice noodles, soba noodles, or even whole wheat spaghetti.
  • How can I make this salad spicier? Add extra chili flakes or a splash of sriracha to the peanut dressing.
  • Can I make this salad vegan? Absolutely! Just use maple syrup instead of honey and tofu for protein.
  • What’s the best way to store leftovers? Keep in an airtight container in the fridge for up to 3 days.
  • How do I make it gluten-free? Use gluten-free soy sauce or tamari and ensure your noodles are gluten-free.
  • Can I prepare this salad in advance? Yes! Just keep the dressing separate until you’re ready to serve.
  • Is this salad suitable for meal prep? Definitely! It holds up well and makes for a nutritious lunch option.
  • What can I serve with this salad? It goes well with grilled proteins, spring rolls, or as part of a larger Asian-inspired spread.

Nutritional Tips and Dietary Adaptations

This salad is not only delicious but also nutritious! Here are some dietary adaptations and tips:

  • Low-Calorie Option: Skip the honey and use a sugar substitute to reduce calories.
  • Protein-packed: Add edamame or chickpeas for a vegetarian protein boost.
  • High Fiber: The veggies in this salad provide a great source of dietary fiber.

Recommended Equipment

To get the best results while preparing your salad, here are some essential kitchen tools:

  • Cutting Board: For chopping your veggies safely.
  • Sharp Knife: A good knife makes all the difference in precision.
  • Mixing Bowls: Use for combining ingredients and dressing.
  • Measuring Cups and Spoons: For accurate ingredient measurements.
  • Airtight Containers: Perfect for storing leftovers and meal prep.

Conclusion: Dive into Deliciousness!

Now that you have the ultimate guide to creating a vibrant and scrumptious Thai Peanut Glass Noodle Salad, it’s time to get cooking! This dish is all about embracing flavors, textures, and the joy of healthy eating. So, gather your ingredients, put on your favorite playlist, and let your kitchen become a playground of deliciousness. Happy cooking!

Easy Thai Peanut Glass Noodle Salad Bursting with Bold Flavors

Prep Time 15 minutes
Cook Time 5 minutes
Total Time 20 minutes
Servings 4 servings
Calories 350
A vibrant and refreshing salad combining silky glass noodles with crunchy vegetables and a flavorful peanut dressing.

Ingredients

Noodles

  • 150 g glass noodles (Soak until tender and silky.)
  • 1 medium red bell pepper (Adds sweet crunch.)
  • 1 medium cucumber (Provides a refreshing bite.)
  • 2 medium carrots (Shredded for sweetness.)
  • ¼ cup fresh cilantro (Chopped for freshness.)
  • 2 stalks green onions (Thinly sliced.)
  • ¼ cup chopped peanuts (For crunch.)
  • 3 tbsp peanut butter (Creamy base.)
  • 2 tbsp soy sauce (Brings umami flavor.)
  • 1 tbsp lime juice (Adds zesty brightness.)
  • 1 tbsp honey (Enhances natural sweetness.)
  • 1 clove garlic (Minced for aroma.)
  • 1 tbsp sesame oil (For a toasted aroma.)
  • ¼ tsp chili flakes (Optional for heat.)

Instructions 

  • Cook and soak the glass noodles until tender, then drain.
  • Prepare the dressing by mixing peanut butter, soy sauce, lime juice, honey, garlic, sesame oil, and chili flakes.
  • Combine noodles with chopped vegetables and herbs, then toss with the dressing.
  • Top with chopped peanuts and serve immediately.

Notes

Adjust chili flakes to taste for more or less heat.
Calories: 350kcal
Cost: $12
Course: Salad
Cuisine: Thai
Keyword: Noodles, peanut

Discover the Crisp & Zesty World of Asian Sesame Cucumber Salad!

Welcome to the vibrant and refreshing world of Asian Sesame Cucumber Salad! This dish is a delightful fusion of crunch, flavor, and nutrition that will elevate your meals. With just a handful of ingredients, you can whip up this salad in no time, making it the perfect choice for busy weeknights or as a stunning side at your next gathering. Packed with the goodness of cucumbers and a savory sesame dressing, this salad is not only tasty but also incredibly versatile.

In this comprehensive guide, we’ll delve into everything you need to know about making the best Asian Sesame Cucumber Salad. From ingredient insights to expert tips, variations, and FAQs, let’s make healthy eating fun and accessible!

Why You’ll Love This Recipe

  • Quick and Easy: With just a few simple steps, this salad comes together in under 30 minutes, making it an ideal option for busy days.
  • Refreshing Flavor: The combination of crisp cucumbers with a tangy sesame dressing creates a burst of flavor that dances on your palate.
  • Nutrient-Packed: Cucumbers are low in calories but high in water content, making this salad a hydrating and healthy choice.
  • Versatile Dish: This salad can be served as a side dish, a light lunch, or even topped with proteins to create a satisfying main course.
  • Customizable: Easily adapt the ingredients to suit your taste or dietary preferences, allowing for endless variations!

Ingredients for Asian Sesame Cucumber Salad

To create this refreshing salad, gather the following ingredients:

  • 4 cups sliced English cucumbers (about 2 medium cucumbers): These cucumbers are perfect for their crisp texture and mild flavor.
  • 2 tbsp toasted sesame oil: This oil adds a rich, nutty flavor that elevates the dish.
  • 2 tbsp low-sodium soy sauce: Provides a savory depth without overwhelming saltiness.
  • 2 tbsp rice vinegar: Adds a tangy kick that balances the flavors beautifully.
  • 1 tbsp honey (or maple syrup): For a touch of sweetness; feel free to adjust based on your preference.
  • 1 clove garlic, minced: Infuses the dressing with aromatic goodness.
  • 1 tbsp toasted sesame seeds: For garnish and a delightful crunch.
  • Optional: Chopped green onions for garnish, adding a mild onion flavor.

How to Make Asian Sesame Cucumber Salad

Side view of a colorful Asian Sesame Cucumber Salad with glistening cucumber slices and sesame oil drizzle.

Follow these easy steps to whip up your salad:

  1. Wash and slice the cucumbers thinly (about 1/4 inch thick).
  2. In a small bowl, whisk together the sesame oil, soy sauce, rice vinegar, honey, and minced garlic until well combined.
  3. In a large mixing bowl, combine the sliced cucumbers and pour over the dressing. Toss gently to coat.
  4. Allow the salad to chill in the refrigerator for at least 15–20 minutes to enhance flavors.
  5. Before serving, sprinkle with toasted sesame seeds and toss lightly.

Pro Tips for Perfecting Your Salad

Here are some expert insights to take your Asian Sesame Cucumber Salad to the next level:

  • Use fresh ingredients: Fresh cucumbers and high-quality sesame oil will make a noticeable difference in flavor.
  • Chill before serving: Letting the salad sit in the refrigerator allows the flavors to meld beautifully.
  • Balance flavors: Taste the dressing before adding it to the cucumbers; adjust sweetness and acidity as needed.
  • Experiment with textures: Consider adding nuts or seeds for extra crunch.
  • Make it a meal: Toss in grilled chicken, shrimp, or tofu for a protein-packed version.
  • Store properly: Keep leftovers in an airtight container for up to 2 days, but note that cucumbers can become watery over time.
  • Garnish creatively: Add fresh herbs like cilantro or mint for an aromatic twist.
  • Watch the salt: Because soy sauce can be salty, adjust accordingly if you’re also using salted nuts or seeds.

Common Mistakes and Troubleshooting

To ensure your salad turns out perfectly, keep an eye out for these common pitfalls:

  • Over-dressing the salad: Too much dressing can make the cucumbers soggy. Start with less and add more to taste.
  • Using the wrong cucumber: Avoid using regular cucumbers; English cucumbers have a better texture for this salad.
  • Skipping the chilling step: Don’t rush—allowing the salad to chill enhances the overall flavor!
  • Not slicing evenly: Aim for uniform slices to ensure even coating and texture.

Variations to Try

Feel free to mix things up with these tasty variations:

  • Spicy Sesame Salad: Add sliced jalapeños or a drizzle of sriracha for a spicy kick!
  • Herb-Infused Delight: Incorporate fresh herbs like cilantro or mint for a fragrant twist.
  • Protein-Packed Bowl: Stir in shredded chicken, cooked shrimp, or cubed tofu for a heartier meal.
  • Crunchy Add-Ins: Toss in chopped peanuts or cashews for added texture and flavor.

Storage and Make-Ahead Instructions

Want to prep ahead of time? Here’s how to store and make this salad for later:

  • Make Ahead: You can prepare the dressing in advance and store it separately in the refrigerator for up to a week.
  • Storage: If you have leftovers, store them in an airtight container for up to 2 days. Note that cucumbers may release water, which can dilute the dressing.
  • Freezing: It’s not recommended to freeze this salad, as cucumbers will lose their crispness upon thawing.

Asian Sesame Cucumber Salad Recipe FAQs

Got questions? We’ve got answers!

  • Can I use other types of cucumbers? While you can use other cucumbers, English cucumbers are preferred for their crunch and flavor.
  • What can I substitute for honey? Maple syrup makes a great vegan alternative.
  • How can I make it gluten-free? Use tamari instead of soy sauce for a gluten-free option.
  • What other vegetables can I add? Carrots, bell peppers, or radishes can add color and crunch.
  • Is this salad good for meal prep? Yes! Just keep the dressing separate until you’re ready to serve.
  • Can I serve this salad warm? It’s best served cold, but you can enjoy it at room temperature.
  • How spicy is this recipe? The base recipe is not spicy, but you can add jalapeños or sriracha to adjust the heat!
  • What goes well with this salad? It pairs beautifully with grilled meats, sushi, or as part of a refreshing summer meal!

Nutritional Benefits and Dietary Adaptations

This Asian Sesame Cucumber Salad is not only delicious but also packed with health benefits:

  • Low-Calorie: Cucumbers are great for hydration and low in calories.
  • High in Vitamins: They provide essential vitamins and minerals, including vitamin K and potassium.
  • Heart-Healthy: Sesame oil is rich in unsaturated fats, which can support heart health.

Essential Equipment for Your Salad

To make your salad, you’ll need just a few basic kitchen tools:

  • Sharp knife: For slicing cucumbers evenly.
  • Cutting board: To prepare your ingredients safely.
  • Mixing bowls: One for mixing the dressing and another for tossing the salad.
  • Whisk or fork: For combining the dressing ingredients.

Serving Suggestions

Here’s how to make your meal complete:

  • As a Side Dish: Serve alongside grilled chicken or fish for a refreshing complement.
  • In a Wrap: Use it as a filling in a wrap with grilled veggies and protein.
  • At a Potluck: Bring this salad to share; it’s sure to be a hit!

Enjoy the freshness and crunch of this Asian Sesame Cucumber Salad! It’s a simple yet flavorful dish that brings joy and nutrition to your table. Remember, cooking can be a delightful adventure, and with this recipe, you have everything you need to create something special. Happy cooking!

Asian Sesame Cucumber Salad

Prep Time 10 minutes
Total Time 10 minutes
Servings 4 servings
Calories 120
A refreshing and easy-to-make cucumber salad with a savory sesame dressing, perfect for a light appetizer or side dish.

Ingredients

Cucumbers

  • 4 cups sliced English cucumbers (about 2 medium cucumbers)
  • 2 tbsp toasted sesame oil
  • 2 tbsp low-sodium soy sauce
  • 2 tbsp rice vinegar
  • 1 tbsp honey (or maple syrup)
  • 1 clove garlic, minced
  • 1 tbsp toasted sesame seeds
  • Optional chopped green onions for garnish

Instructions 

  • Wash and thinly slice the cucumbers.
  • Whisk together sesame oil, soy sauce, rice vinegar, honey, and minced garlic.
  • Combine cucumbers with dressing and toss gently.
  • Chill in refrigerator for 15–20 minutes.
  • Sprinkle with toasted sesame seeds before serving.

Notes

For extra flavor, add chopped green onions as garnish.
Calories: 120kcal
Cost: $8
Course: Side Dish
Cuisine: Asian
Keyword: cucumber, Sesame

Welcome to the Flavorful World of Big Mac Salad!

Are you ready to dive into a deliciously creative twist on a fast-food favorite? The Big Mac Salad packs all the savory flavors you adore from a classic Big Mac, but in a fresh, healthy salad format! This vibrant dish is not just about taste; it’s about embracing a lifestyle where eating well is an exciting adventure. With crunchy veggies, juicy ground beef, and a creamy special sauce, this salad is perfect for meal prep, busy weeknights, or when you want to impress your friends at a gathering. Let’s get cooking!

Why You’ll Love This Big Mac Salad Recipe

Here are five compelling reasons why this recipe will become a staple in your kitchen:

  • Flavor Explosion: Each bite delivers the iconic taste of a Big Mac, minus the heavy bun. Say hello to a guilt-free indulgence!
  • Quick & Easy: Whip this up in under 30 minutes, making it perfect for busy weeknights or spontaneous get-togethers.
  • Customizable: Feel free to swap ingredients based on your preferences or what you have on hand. This salad is flexible and forgiving!
  • Meal Prep Friendly: This salad holds up well in the fridge, making it an ideal choice for meal prep enthusiasts.
  • Healthier Alternative: Enjoy all the Big Mac vibes without the heavy calories or carbs, allowing you to savor without the guilt!

Ingredients You’ll Need

To create this mouthwatering Big Mac salad, gather the following ingredients:

  • 1 cup mayonnaise: The creamy base for your special sauce.
  • 2 tablespoons diced dill pickles: Adds a zesty crunch that’s essential to the flavor profile.
  • 2 teaspoons mustard: For that tangy kick!
  • 1 teaspoon white vinegar: Balances the richness of the mayonnaise.
  • 1/2 teaspoon smoked paprika: Adds depth and warmth to the dressing.
  • 1 1/2 tablespoons sugar or Stevia: A hint of sweetness to round out the flavors.
  • 1 pound ground beef: The star protein of our salad!
  • Salt and pepper to taste: Essential for seasoning.
  • 1 head Romaine lettuce (roughly chopped): The crunchy base.
  • 1 cup diced tomatoes: Freshness and color.
  • 1 1/2 cups shredded cheddar cheese: For a cheesy finish.
  • 1/2 cup diced dill pickles: More crunch and flavor!

Step-by-Step Instructions

Side view of a Big Mac Salad with layers of fresh ingredients including pickles and a creamy dressing.

Follow these simple steps to make your Big Mac Salad come to life:

  1. Prepare the Dressing: In a mixing bowl, blend the mayonnaise, diced pickles, mustard, white vinegar, smoked paprika, and sugar until smooth. If desired, thin the dressing with a splash of milk for a lighter consistency. Refrigerate to allow the flavors to meld.
  2. Cook the Ground Beef: Heat a skillet over medium-high heat. Add the ground beef, cooking until browned and crumbly—about 5-7 minutes. Season with salt and pepper, then drain any excess fat.
  3. Combine the Salad Ingredients: In a large bowl, mix the chopped Romaine, diced tomatoes, shredded cheddar cheese, and additional diced pickles.
  4. Assemble the Salad: Add the cooked ground beef to the salad mixture. Drizzle with the prepared dressing and toss gently to combine.
  5. Serve & Enjoy!: Divide into bowls and dig in! Enjoy the flavors of your favorite Big Mac in a fresh and exciting way.

Pro Tips for the Best Big Mac Salad

Maximize your Big Mac Salad experience with these expert insights:

  • Let the Dressing Chill: Allowing the dressing to chill enhances its flavor. Prepare it in advance for better taste!
  • Fresh Ingredients: Use fresh, crisp veggies for the best texture and flavor. Don’t skimp on those diced tomatoes!
  • Beef Alternatives: For a leaner option, consider using ground turkey or chicken. You can also go plant-based by using lentils or chickpeas!
  • Season to Taste: Always taste and adjust the seasoning of your salad. Everyone’s palate is different!
  • Storage Tips: Store the components separately to keep the salad fresh. Mix just before serving to maintain crunch.
  • Customize Your Toppings: Consider adding avocado, bacon bits, or even crispy onions for a delightful twist!
  • Make it Spicy: Add sliced jalapeños or a dash of hot sauce to the dressing for a spicy kick!
  • Pair with Sides: Serve with whole grain pita chips or a side of veggie sticks for a complete meal!

Common Mistakes and Troubleshooting

Avoid these pitfalls to ensure your salad is a success:

  • Overcooking the Beef: Cook until just browned. Overcooking can make it dry and tough.
  • Too Much Dressing: Start with a little dressing; you can always add more. Too much can make the salad soggy.
  • Skipping Seasoning: Don’t forget to season your beef! It’s crucial for flavor.
  • Using Wilted Greens: Always use fresh, crisp Romaine for the best crunch and taste.
  • Not Allowing the Dressing to Chill: Rushed dressing won’t have the same depth of flavor. Patience pays off!

Delicious Variations to Try

Mix it up with these exciting variations to keep things fresh:

  • Veggie Delight: For a vegetarian version, replace the beef with black beans or quinoa. Add more veggies like bell peppers or corn!
  • Spicy Big Mac Salad: Incorporate spicy ground beef or add sliced jalapeños for a kick.
  • BBQ Big Mac Salad: Drizzle with BBQ sauce instead of the special sauce for a smoky flavor.
  • Cheesy Big Mac Salad: Add extra cheese varieties like crumbled feta or blue cheese for a flavor boost!

Storage and Make-Ahead Instructions

This Big Mac Salad is perfect for meal prep!

  • Refrigeration: Store in a sealed container in the fridge for up to two days. Keep the dressing separate to maintain freshness.
  • Make-Ahead: Prepare the ingredients ahead of time and store them separately. Combine just before serving for the best texture.
  • Freezing: While the salad itself doesn’t freeze well, you can freeze cooked ground beef for future use.

Frequently Asked Questions

Got questions? We’ve got answers!

  • Can I use different types of lettuce? Absolutely! Feel free to use iceberg or mixed greens for a different texture.
  • How can I make this salad gluten-free? Ensure all sauces and dressings are gluten-free and you’re all set!
  • Can I use turkey instead of beef? Yes! Ground turkey is a great lean alternative.
  • What can I add for extra crunch? Try adding crispy bacon bits or crushed tortilla chips for a fun texture!
  • Is this recipe kid-friendly? Definitely! The familiar flavors of a Big Mac are appealing to kids.
  • How long does the dressing last? The dressing can be stored in the fridge for up to a week in an airtight container.
  • Can I add fruits? Yes! Diced apples or grapes could add a sweet twist!
  • What’s the best way to reheat the beef? Reheat in a skillet over medium heat until warmed through, adding a splash of water if needed to keep it moist.

Nutritional Tips and Dietary Adaptations

Make this salad fit your dietary needs:

  • Low-Carb Option: Use fewer high-carb ingredients like cheese and stick with veggies.
  • Vegan Alternative: Substitute ground beef with lentils or chickpeas, and use vegan mayo for the dressing.
  • Protein-Packed: Add chickpeas, beans, or even a boiled egg for added protein.
  • Low-Fat Version: Use low-fat mayo or Greek yogurt in the dressing for a healthier option.

Essential Kitchen Equipment

Make sure you have these tools handy for a smooth cooking experience:

  • Skillet: For browning the ground beef.
  • Mixing Bowl: For preparing the dressing and combining the salad ingredients.
  • Measuring Cups and Spoons: Essential for accuracy in ingredient amounts.
  • Knife and Cutting Board: For chopping veggies and preparing ingredients.

Serving Suggestions

Elevate your meal with these serving ideas:

  • Pair with Whole Grain Bread: Serve with warm, toasted whole grain bread for a complete meal.
  • Accompany with Chips: A side of veggie chips or whole grain pita chips adds a satisfying crunch.
  • Fresh Juice or Smoothies: Complement with a refreshing drink, like a green smoothie or homemade lemonade.
  • Dessert Option: For a sweet finish, enjoy a light fruit salad or yogurt parfait.

In conclusion, the Big Mac Salad is not just a meal; it’s an experience! With its vibrant flavors and healthful ingredients, you can enjoy all the deliciousness of a traditional Big Mac while still feeling great about what you eat. So grab your ingredients, channel your inner chef, and let’s make healthy eating a fun and flavorful adventure!

Big Mac Salad

Prep Time 10 minutes
Cook Time 15 minutes
Total Time 25 minutes
Servings 4 servings
Calories 650
A flavorful salad inspired by the classic Big Mac, combining fresh vegetables, seasoned ground beef, and a creamy dressing.

Ingredients

Dressing

  • 1 cup mayonnaise
  • 2 tablespoons diced dill pickles
  • 2 teaspoons mustard
  • 1 teaspoon white vinegar
  • 1/2 teaspoon smoked paprika
  • 1 1/2 tablespoons sugar or Stevia

Main ingredients

  • 1 pound ground beef
  • Salt and pepper to taste Salt and pepper
  • 1 head Romaine lettuce (roughly chopped)
  • 1 cup diced tomatoes
  • 1 1/2 cups shredded cheddar cheese
  • 1/2 cup diced dill pickles

Instructions 

  • Mix mayonnaise, pickles, mustard, vinegar, paprika, and sugar until smooth. Refrigerate.
  • Cook ground beef until browned; season with salt and pepper. Drain excess fat.
  • Combine chopped lettuce, tomatoes, cheddar, and pickles in a large bowl.
  • Add beef to salad and drizzle with dressing. Toss and serve.

Notes

Adjust seasoning and dressing consistency to taste.
Calories: 650kcal
Cost: $15
Course: Salad
Cuisine: American
Keyword: Beef, Cheddar, Dressing

Welcome to Your New Favorite Salad Adventure!

Are you ready to embark on a flavor journey that transforms the classic Big Mac into a vibrant, nutritious salad? Say hello to the Deconstructed Big Mac Salad! This recipe takes all the mouthwatering components of a Big Mac and presents them in a fresh, exciting way. Packed with lean beef, crisp lettuce, and a creamy dressing, this salad is not just a meal; it’s an experience that proves healthy eating can be delicious and satisfying!

In this article, you’ll discover everything you need to know to make the perfect Big Mac Salad, including ingredient substitutions, pro tips, and even variations to keep your meals exciting. Let’s dive in and make healthy eating fun!

Why You’ll Love This Recipe

  • Flavor Explosion: All the classic Big Mac flavors you adore—savory beef, creamy dressing, and crunchy toppings—come together in a delightful salad that is sure to satisfy your cravings.
  • Quick and Easy: Ready in about 30 minutes, this recipe is perfect for busy weeknights. Just throw everything together, and you’re good to go!
  • Customizable: Whether you’re vegetarian, gluten-free, or just looking to mix things up, this salad can be tailored to fit your dietary needs without sacrificing flavor.
  • Meal Prep Friendly: Make a big batch on Sunday, and you’ll have delicious lunches ready to go throughout the week. It’s a great way to stay on track with your healthy eating goals!
  • Kid-Approved: This salad is a fun twist on a classic that kids will love. It’s a sneaky way to get them to eat more veggies!

Ingredients & Substitutions

Here’s what you’ll need to create this scrumptious salad:

  • 1 lb Ground Beef: For a leaner option, use ground turkey or chicken.
  • 1 tsp Sea Salt: Essential for enhancing the flavors of the beef.
  • 1/4 tsp Black Pepper: Adds a hint of spice.
  • 8 oz Romaine Lettuce: Crisp iceberg lettuce works well too!
  • 1 cup Tomatoes (chopped): Grape or cherry tomatoes add a sweet touch.
  • 3/4 cup Cheddar Cheese (shredded): Try pepper jack for a spicy kick!
  • 1/2 cup Pickles (diced): Dill pickles give that classic Big Mac taste.
  • 1/2 cup Mayonnaise: Greek yogurt can be a healthier alternative.
  • 2 tbsp Pickles (diced): For the dressing—adds extra tang!
  • 2 tsp Mustard: Yellow or Dijon works perfectly.
  • 1 tsp White Vinegar: Balances the dressing’s creaminess.
  • 1/2 tsp Smoked Paprika: Adds depth and smokiness.
  • 1 1/2 tbsp Besti Powdered Monk Fruit Allulose Blend: For sweetness without the calories.

How To Make Big Mac Salad

Side view of a colorful Big Mac Salad, showcasing layers of ingredients.

Let’s get cooking! Follow these simple steps to whip up your Big Mac Salad:

  1. Add the ground beef to a large skillet over medium-high heat. (You can add a little oil if needed.) Break apart with a spatula and season with salt and pepper. Cook for 8-10 minutes, stirring occasionally, until the beef is browned and moisture has evaporated.
  2. Meanwhile, puree all the dressing ingredients in a blender. If the dressing is thicker than you like, thin out with water or oil and puree again. Adjust sweetener to taste. Refrigerate until ready to serve.
  3. In a large bowl, combine the lettuce, tomatoes, shredded cheese, and pickles.
  4. Add the ground beef. Drizzle the dressing over the salad. Toss to coat.
  5. Garnish with sesame seeds if desired.

Pro Tips for Making the Perfect Big Mac Salad

Want to elevate your salad game? Check out these expert tips:

  • Use Fresh Ingredients: Fresh veggies and quality meat make all the difference. Choose organic where possible!
  • Customize Your Dressing: Experiment with different spices in the dressing to find your perfect flavor.
  • Chill Your Dressing: A cold dressing enhances the freshness of the salad and makes it more refreshing, especially in warm weather.
  • Don’t Overcook the Beef: Keep an eye on your beef to avoid it drying out. Perfectly cooked beef adds juiciness to your salad.
  • Mix & Match Toppings: Add avocado, bacon bits, or different cheeses for extra flavor and texture!
  • Let It Rest: Allow the salad to sit for a few minutes before serving to let all the flavors meld together.
  • Prep Ahead: Cook the beef and prepare the dressing in advance to cut down on meal prep time during the week.
  • Presentation Matters: Layer your salad in a big bowl for a beautiful presentation at gatherings!

Common Mistakes and Troubleshooting

Even the best chefs make mistakes! Here are some common pitfalls and how to avoid them:

  • Too Much Dressing: Start with a little dressing, and add more as needed. You can always add, but you can’t take away!
  • Overcooked Beef: Cook ground beef just until it’s no longer pink. It should be juicy, not dry!
  • Wilting Lettuce: If your salad sits too long, the lettuce can wilt. Serve immediately or keep components separate until serving.
  • Missing Flavor: If your salad lacks flavor, consider adding more seasoning or a splash of vinegar to brighten it up.

Variations to Keep It Exciting

Want to mix things up? Here are some creative twists on the classic Big Mac Salad:

  • Vegetarian Delight: Substitute crumbled tofu or black beans for the beef for a plant-based twist.
  • Spicy Big Mac Salad: Add jalapeños or sriracha to the dressing for a kick!
  • Greek Big Mac Salad: Use feta cheese, olives, and a tzatziki dressing instead of the traditional dressing.
  • Taco-Inspired Big Mac Salad: Swap the beef for seasoned ground turkey or taco meat and top with salsa and avocado.

Storage and Make-Ahead Instructions

Make your life easier with these storage tips:

  • Store Components Separately: Keep the beef, dressing, and salad mix separate until you’re ready to eat to maintain freshness.
  • Refrigerate for Up to 3 Days: The beef can be stored in an airtight container in the fridge for a quick meal option.
  • Make Dressing Ahead: The dressing can be made in advance and stored in the refrigerator for up to a week.

Comprehensive FAQ

Got questions? We’ve got answers!

  • Can I make this salad ahead of time? Yes! You can prepare the beef and dressing in advance.
  • What can I use instead of ground beef? Ground turkey, chicken, or even plant-based options work well.
  • What’s the best way to store leftovers? Keep components separate in airtight containers in the fridge.
  • Can I freeze this salad? It’s best enjoyed fresh, but cooked beef can be frozen if separated.
  • How can I make it low-carb? Skip the cheese and dressing or opt for low-carb versions!
  • What kind of lettuce should I use? Romaine or iceberg are both excellent choices for crunch!
  • Can I use a different dressing? Absolutely! Any creamy dressing works beautifully.
  • What’s the nutritional value of this salad? It varies based on ingredients, but it’s generally rich in protein and fiber.

Nutrition Tips and Dietary Adaptations

Eating healthy doesn’t mean sacrificing flavor. Here are some tips:

  • Increase Fiber: Add beans or quinoa to enhance nutritional value.
  • Go Low-Fat: Use low-fat cheese or yogurt-based dressing for fewer calories.
  • Boost Vitamins: Incorporate more colorful veggies like bell peppers and carrots.

Equipment Recommendations

These tools will make your cooking experience smoother:

  • Skillet: A non-stick skillet is perfect for cooking the beef.
  • Blender: Essential for whipping up the dressing quickly.
  • Large Mixing Bowl: For combining all your ingredients seamlessly.

Serving Suggestions

Want to make your meal even more delightful? Here are some serving ideas:

  • Pair with Whole Grain Bread: Serve with toasted whole grain bread or pita for added texture.
  • Serve with a Side of Fruit: A fresh fruit salad complements the savory flavors perfectly!
  • Garnish for Visual Appeal: Use fresh herbs like parsley or cilantro for a pop of color.

Conclusion

There you have it! The ultimate guide to crafting a Deconstructed Big Mac Salad that’s not only delicious but also packed with nutrition. Whether you’re meal prepping for the week or whipping up a quick dinner, this salad is sure to impress. Remember, eating healthy should be fun and flavorful, so don’t hesitate to get creative in the kitchen! Enjoy your culinary adventure!

Big Mac Salad (Cheeseburger Salad)

Prep Time 10 minutes
Cook Time 10 minutes
Total Time 20 minutes
Servings 4 servings
Calories 650
A flavorful and easy-to-make salad inspired by the classic cheeseburger, perfect for a quick lunch or dinner.

Ingredients

Meat

  • 1 lb Ground beef
  • 1 tsp Sea salt
  • 1/4 tsp Black pepper

Vegetables

  • 8 oz Romaine lettuce (chopped)
  • 1 cup Tomatoes (chopped)

Cheese

  • 3/4 cup Cheddar cheese (shredded)

Pickles

  • 1/2 cup Diced pickles
  • 2 tbsp Pickles (diced)

Dressing

  • 1/2 cup Mayonnaise
  • 2 tsp Mustard
  • 1 tsp White vinegar
  • 1/2 tsp Smoked paprika
  • 1 1/2 tbsp Besti Powdered Monk Fruit Allulose Blend (sweetener)

Instructions 

  • Cook the ground beef with salt and pepper until browned, about 8-10 minutes.
  • Blend dressing ingredients until smooth; refrigerate.
  • Combine lettuce, tomatoes, cheese, and pickles in a large bowl.
  • Add cooked beef and drizzle with dressing; toss to coat.
  • Garnish with sesame seeds if desired.

Notes

Adjust dressing thickness with water or oil as needed.
Calories: 650kcal
Cost: $15
Course: Salad
Cuisine: American
Keyword: Cheeseburger

Discover the Magic of the Green Goddess Salad!

Welcome to a culinary adventure that’s as vibrant as it is delicious! The Green Goddess Salad is not just any salad; it’s a symphony of fresh greens, creamy dressing, and a burst of zesty flavors that will make your taste buds dance. Packed with nutrients and designed to elevate your meal game, this salad is the perfect addition to any lunch or dinner table. Whether you’re looking for a healthy side dish, a light lunch, or a colorful centerpiece for your next gathering, this salad is here to impress.

Why You’ll Love This Recipe

This Green Goddess Salad is more than just a pretty plate. Here are five reasons why you’ll adore it:

  • Nutritious powerhouse: With a blend of leafy greens, fresh herbs, and creamy yogurt, this salad is packed with vitamins, minerals, and healthy fats that nourish your body.
  • Effortless preparation: Ready in just 15 minutes, this salad is perfect for busy weeknights or last-minute gatherings.
  • Customizable flavors: Feel free to mix and match ingredients based on your preferences or what’s in your fridge—no two salads need to be the same!
  • Perfect for meal prep: This salad keeps well in the fridge, making it a fantastic option for creating healthy meals in advance.
  • Vibrant presentation: The colorful greens and creamy dressing not only taste great but look fabulous on your plate—perfect for impressing guests!

Ingredients You’ll Need

Let’s dive into the ingredients that make this salad a must-try. Here’s what you’ll need:

  • Romaine Lettuce: Acts as the crunchy base, providing a refreshing crunch.
  • Spinach: Adds a nutrient boost and vibrant color.
  • Kale: A hearty green that complements the other ingredients with its slightly bitter flavor.
  • Fresh Herbs (Basil, Parsley, Chives): These aromatic herbs bring a burst of freshness to the dressing.
  • Lemon Juice: Provides a zesty kick that brightens the flavor.
  • Greek Yogurt: The secret ingredient for a creamy texture without excess calories.
  • Olive Oil: Adds richness and helps emulsify the dressing.
  • Garlic: For that aromatic punch that enhances the overall taste.
  • Salt and Pepper: Essential for seasoning and elevating flavors.

How to Make This Green Goddess Salad

Side view of a Fresh Green Goddess Salad with colorful greens and creamy dressing.

Ready to whip up this delicious salad? Follow these simple steps:

  1. Start by washing and thoroughly drying the romaine lettuce, spinach, and kale. Chop the greens into bite-sized pieces.
  2. In a blender, combine the fresh herbs (basil, parsley, chives), Greek yogurt, olive oil, lemon juice, and garlic. Blend until smooth and creamy.
  3. Taste the dressing and add salt and pepper according to your preference.
  4. In a large mixing bowl, add the chopped greens. Drizzle some of the dressing over the top and toss gently to coat.
  5. Transfer the salad to a serving dish or individual plates. Serve with the remaining dressing on the side.

Pro Tips for the Perfect Salad

Want to take your Green Goddess Salad to the next level? Here are some expert insights:

  • Use fresh herbs: Fresh herbs elevate the flavor significantly compared to dried herbs.
  • Experiment with greens: Feel free to add arugula, mixed greens, or even microgreens for variety.
  • Make it hearty: Add protein like grilled chicken, chickpeas, or feta cheese to transform this salad into a filling meal.
  • Store the dressing separately: To keep the salad fresh, store the dressing in a separate container and add it just before serving.
  • Prep in advance: Chop your greens and make the dressing ahead of time to save time on busy days.

Common Mistakes to Avoid

Here are some pitfalls to watch out for:

  • Not washing greens: Always wash and dry your greens thoroughly to remove any dirt or pesticides.
  • Overdressing: Start with a small amount of dressing and add more as needed to avoid a soggy salad.
  • Using wilted greens: Freshness is key; avoid using any greens that are wilted or discolored.
  • Blending too long: Blend the dressing just until smooth to maintain a creamy texture without turning it runny.

Variations to Try

Get creative with these variations:

  • Protein-Packed Salad: Add grilled chicken or shrimp for a satisfying meal.
  • Vegan Version: Substitute Greek yogurt with avocado or tahini for a creamy texture that’s plant-based.
  • Grain Bowl: Toss in some quinoa or farro for a hearty and filling option.
  • Spicy Kick: Add sliced jalapeños or a dash of hot sauce to the dressing for some heat!

Storage and Make-Ahead Instructions

This salad is perfect for meal prep! Here’s how to store it:

  • Refrigeration: Store the salad in an airtight container in the fridge for up to 3 days. Keep the dressing separate until ready to eat.
  • Make-Ahead: Prepare the salad and dressing a day in advance for easy assembly on busy days.

Frequently Asked Questions

Got questions? We’ve got answers!

  • Can I make this salad gluten-free? Yes! All the ingredients are naturally gluten-free.
  • How long does the dressing last in the fridge? The dressing can be stored in an airtight container for up to 1 week.
  • Can I freeze the salad? It’s not recommended to freeze the salad as the greens may become mushy when thawed.
  • What can I substitute for Greek yogurt? Use silken tofu or a dairy-free yogurt for a vegan option.
  • Is this salad kid-friendly? Yes! The creamy dressing is appealing to kids, making it a great way to introduce greens.
  • How can I make this salad more filling? Add nuts, seeds, or grains for added texture and protein.
  • Can I use dried herbs? While fresh herbs are best, you can use dried herbs in a pinch—just use less!
  • How do I adjust the creaminess of the dressing? Add more Greek yogurt for a thicker dressing or more olive oil for a thinner consistency.

Nutrition Tips and Dietary Adaptations

This Green Goddess Salad is not only delicious but also packed with health benefits:

  • Rich in Vitamins: The greens provide essential vitamins A, C, and K, supporting overall health.
  • High in Fiber: The combination of greens and herbs contributes to daily fiber intake, promoting digestive health.
  • Low Calorie: This salad is a great way to enjoy a filling meal without an overload of calories.
  • Customizable for Dietary Needs: Easily adapt this recipe to fit gluten-free, vegan, or low-carb diets.

Equipment Recommendations

Here’s what you’ll need to whip up this fabulous salad:

  • Blender or Food Processor: Essential for making that creamy dressing.
  • Salad Spinner: To wash and dry your greens efficiently.
  • Sharp Knife and Cutting Board: For chopping your vegetables with ease.
  • Large Mixing Bowl: For tossing your salad together.

Serving Suggestions

Pair your Green Goddess Salad with these delicious options:

  • Grilled Salmon: The flavors complement each other beautifully.
  • Quinoa Pilaf: A great way to add some whole grains to your meal.
  • Fresh Breads: Serve with whole grain or sourdough bread for a complete meal.

In conclusion, the Green Goddess Salad with its creamy dip is more than just a salad; it’s a celebration of fresh flavors and vibrant colors. With its ease of preparation and endless customization options, it’s the perfect dish to make your meals exciting. So grab your greens and let’s create a plate that not only nourishes your body but also delights your senses!

Fresh Green Goddess Salad with Creamy Viral Dip

Prep Time 15 minutes
Total Time 15 minutes
Servings 4 servings
Calories 250
A vibrant and healthy salad featuring fresh greens and a creamy herb dressing, perfect for a light meal or side dish.

Ingredients

Vegetables

  • 1 head Romaine Lettuce
  • 1 cup Spinach
  • 1 cup Kale

Herbs & Flavorings

  • 0.5 cup Fresh Herbs (Basil, Parsley, Chives)
  • 2 tablespoons Lemon Juice
  • 0.5 cup Greek Yogurt
  • 2 tablespoons Olive Oil
  • 2 cloves Garlic
  • to taste Salt
  • to taste Pepper

Instructions 

  • Wash and dry the greens; chop into bite-sized pieces.
  • Blend herbs, Greek yogurt, olive oil, lemon juice, and garlic until smooth.
  • Season the dressing with salt and pepper to taste.
  • Toss greens with dressing and serve.

Notes

Use fresh herbs for the best flavor and adjust seasoning as needed.
Calories: 250kcal
Cost: $15
Course: Salad
Cuisine: Healthy
Keyword: Green, Herb, yogurt

Welcome to a culinary adventure that proves healthy eating can be as exciting as it is nutritious! This Quinoa Power Salad is not just a meal; it’s a vibrant celebration of flavors and textures that will invigorate your body and tantalize your taste buds. Packed with colorful veggies and protein-rich quinoa, this gluten-free superfood bowl is perfect for a quick lunch or a wholesome dinner. Ready to dive into deliciousness? Let’s get started!

Why You’ll Love This Quinoa Power Salad

This salad is more than just a pretty dish; it’s a powerhouse of nutrition and flavor! Here are five reasons you’ll adore this recipe:

  • Gluten-Free Goodness: Perfect for those with celiac disease or gluten sensitivities, this salad is naturally gluten-free, making it a safe choice for everyone.
  • Quick and Easy: With a prep time of just 15 minutes and a cook time of 15 minutes, you can whip this up in no time!
  • Meal Prep Hero: This salad keeps well in the fridge for 3-4 days, making it an excellent option for meal prep or quick lunches throughout the week.
  • Customizable: The ingredients are flexible, allowing you to mix and match based on your preferences and what you have on hand.
  • Packed with Nutrients: Filled with fresh vegetables and wholesome ingredients, this salad is rich in vitamins, minerals, and antioxidants.

Ingredients Breakdown

Here’s what you need for this colorful salad, along with some tasty substitutions:

  • 1 cup uncooked quinoa (or 3 cups cooked): A fantastic base rich in protein and fiber.
  • 1 ¾ cups water or vegetable broth: For cooking the quinoa, enhancing its flavor.
  • 1 cup cherry tomatoes, halved: For sweetness and juiciness.
  • 1 cup cucumber, diced: Adds crunch and freshness.
  • 1 bell pepper, chopped: Choose your favorite color for vibrant appeal!
  • ½ cup shredded carrots: Sweetness and a pop of orange.
  • ¼ cup red onion, finely diced: For a little zing.
  • ¼ cup parsley or cilantro, chopped: Fresh herbs elevate the flavors!
  • ¼ cup feta cheese (optional): Creaminess and a tangy bite.
  • ¼ cup toasted sunflower seeds or pumpkin seeds: For extra crunch and healthy fats.
  • Lemon Dressing: Combination of ¼ cup olive oil, 2 tbsp fresh lemon juice, 1 tsp Dijon mustard, 1 tsp maple syrup or honey, and salt and pepper to taste.

Step-by-Step Instructions

Let’s get cooking! Follow these simple steps to create your quinoa power salad:

  1. Rinse the quinoa under cold water. Combine with water or broth in a pot, bring to a boil, then reduce to a simmer. Cover and cook for 15 minutes. Let it cool.
  2. In a large bowl, combine the cooked quinoa with cherry tomatoes, cucumber, bell pepper, carrots, red onion, and herbs.
  3. In a small jar or bowl, whisk together all dressing ingredients until well mixed.
  4. Pour the dressing over the salad and toss to combine.
  5. Top with feta and seeds if using, for extra flavor and texture.
  6. Serve immediately or chill for 30 minutes to let the flavors meld.

Pro Tips for Perfecting Your Quinoa Power Salad

Close-up of a vibrant Quinoa Power Salad featuring fresh vegetables and lemon dressing.

To ensure your salad is nothing short of spectacular, here are some expert insights:

  • Rinse Your Quinoa: Always rinse quinoa before cooking to remove its natural coating, called saponin, which can taste bitter.
  • Flavorful Cooking Liquid: For more depth, cook your quinoa in vegetable broth instead of water.
  • Chill for Flavor: Letting your salad chill for at least 30 minutes allows the flavors to meld beautifully.
  • Mix Up Your Greens: Feel free to add spinach, kale, or arugula for extra nutrients and flavor.
  • Protein-Packed Add-Ins: Consider adding chickpeas, grilled chicken, or tofu for an extra protein boost.
  • Don’t Skip the Dressing: The dressing is key to tying all the flavors together—make it fresh!
  • Adjust the Seasoning: Always taste and adjust seasoning before serving—don’t be shy with the salt and pepper!
  • Use Fresh Ingredients: Fresh vegetables will make a noticeable difference in flavor and texture.

Common Mistakes and Troubleshooting

Even the best chefs make mistakes! Here’s how to avoid common issues:

  • Overcooking Quinoa: If your quinoa turns mushy, it’s likely overcooked. Stick to the recommended cooking time.
  • Underdressed Salad: If the salad tastes bland, it may need more dressing or seasoning—always taste as you go!
  • Too Many Veggies: While it’s tempting to add all the veggies, stick to the recommended amounts for the best balance.
  • Skipping the Chill Time: Don’t underestimate the power of chilling—the flavors truly come alive when given time to meld.

Creative Variations to Try

Feeling adventurous? Here are some fun twists on the classic quinoa power salad:

  • Mediterranean Style: Add olives, artichokes, and swap feta for goat cheese for a Mediterranean flair.
  • Southwestern Twist: Incorporate black beans, corn, and avocado, and use a lime-cilantro dressing.
  • Asian-Inspired: Add edamame, shredded cabbage, and use a sesame-ginger dressing for an Asian twist.
  • Fruit-Infused: Toss in diced apples or mandarin oranges for a sweet contrast to the savory ingredients.

Storage and Make-Ahead Instructions

This salad is perfect for meal prep and can be stored in the fridge for up to 4 days. Here’s how to ensure it stays fresh:

  • Store in Airtight Containers: Keep your salad in airtight containers to maintain freshness.
  • Keep Dressing Separate: If possible, store the dressing separately to prevent the salad from becoming soggy.
  • Portion It Out: Consider portioning out servings for easy grab-and-go lunches.

Frequently Asked Questions

Got questions? Here are some common queries about this vibrant quinoa power salad:

  • Can I use other grains instead of quinoa? Yes! Brown rice, farro, or barley can be great substitutes.
  • Is this salad suitable for meal prep? Absolutely! It holds well in the fridge for several days.
  • Can I make this salad vegan? Yes! Omit the feta cheese and use maple syrup for the dressing.
  • How do I know when the quinoa is cooked? It’s done when it’s fluffy and the germ separates from the seed.
  • What can I add for extra protein? Chickpeas, grilled chicken, or tofu are excellent options!
  • How can I make it more filling? Add nuts, seeds, or a protein source like beans or chicken.
  • Can I freeze this salad? It’s best fresh, but you can freeze the quinoa separately and mix later.
  • What’s the best way to serve this salad? It’s delicious served cold or at room temperature!

Nutrition Tips and Dietary Adaptations

This quinoa power salad is not only delicious but also nutritious! Here’s how to adapt it for various dietary needs:

  • Low-Carb Option: Swap quinoa for cauliflower rice for a low-carb version.
  • High-Protein Variation: Add grilled chicken or chickpeas to boost protein content.
  • Nut-Free Version: Omit seeds and replace with crunchy veggies like bell peppers.

Equipment Recommendations

To create this salad, you’ll need a few basic kitchen tools:

  • Medium Pot: For cooking the quinoa.
  • Large Mixing Bowl: To toss all the ingredients together.
  • Whisk or Jar: For mixing the dressing easily.
  • Knife and Cutting Board: Essential for chopping your fresh veggies.

Serving Suggestions

Wondering how to enjoy your quinoa power salad? Here are some ideas:

  • As a Main Dish: Serve it as a hearty main dish topped with protein for a fulfilling meal.
  • Perfect Side Dish: Pair it with grilled meats or fish for a nutritious side.
  • Wrap It Up: Use it as a filling for wraps or pita pockets for a fun twist!

Conclusion

And there you have it—your ultimate guide to creating a vibrant and nutritious Quinoa Power Salad! With its endless variations and delightful flavors, this salad proves that healthy eating doesn’t have to be boring. So, roll up your sleeves and get ready to experience the joy of cooking with fresh ingredients. Whether you’re meal prepping or hosting a gathering, this salad is sure to impress. Enjoy every colorful bite!

Quinoa Power Salad Recipe – Healthy Gluten-Free Superfood Bowl

Prep Time 10 minutes
Cook Time 15 minutes
Total Time 25 minutes
Servings 4 servings
Calories 350
A vibrant and nutritious salad combining protein-rich quinoa with fresh vegetables and a zesty lemon dressing, perfect for a healthy meal.

Ingredients

Grains

  • 1 cup uncooked quinoa
  • 1 ¾ cups water or vegetable broth

Vegetables

  • 1 cup cherry tomatoes, halved
  • 1 cup cucumber, diced
  • 1 piece bell pepper, chopped
  • 1/2 cup shredded carrots
  • 1/4 cup red onion, finely diced
  • 1/4 cup chopped parsley or cilantro

Dairy & Seeds

  • 1/4 cup feta cheese (optional)
  • 1/4 cup toasted sunflower seeds or pumpkin seeds

Lemon Dressing

  • 1/4 cup olive oil
  • 2 tbsp fresh lemon juice
  • 1 tsp Dijon mustard
  • 1 tsp maple syrup or honey

Salt and pepper to taste

Instructions 

  • Rinse quinoa and cook with water or broth for 15 minutes, then let cool.
  • Combine cooked quinoa with vegetables and herbs in a large bowl.
  • Whisk together dressing ingredients in a small jar or bowl.
  • Pour dressing over salad and toss to combine. Top with feta and seeds if desired.
  • Serve immediately or chill for 30 minutes to meld flavors.

Notes

This salad is versatile and can be customized with your favorite vegetables and toppings.
Calories: 350kcal
Cost: $15
Course: Salad
Cuisine: Healthy
Keyword: Quinoa

Are you ready to dive into a bowl of vibrant flavors and textures? Our Crunchy Asian Ramen Noodle Salad is the ultimate dish that combines fresh veggies, crunchy nuts, and a zesty dressing. Perfect for busy days or lively gatherings, this salad is sure to impress! In this article, we’ll explore everything you need to know to make this dish a smashing success, from ingredient breakdowns to expert tips. Let’s get cooking!

Why You’ll Love This Recipe

This Crunchy Asian Ramen Noodle Salad isn’t just a meal; it’s an experience! Here are five reasons why you’ll absolutely love it:

  • Quick & Easy: Ready in just 20 minutes, this salad is perfect for busy weeknights or spontaneous gatherings.
  • Flavor Explosion: The combination of fresh veggies, crunchy nuts, and tangy dressing creates a symphony of flavors that will tantalize your taste buds.
  • Customizable: Whether you’re vegetarian, gluten-free, or simply looking to clean out your fridge, this salad is versatile enough to fit any dietary need.
  • Nutritious: Packed with fresh vegetables and healthy fats, this dish is not only delicious but also nourishing!
  • Make-Ahead Friendly: Perfect for meal prep, this salad stays fresh and tasty, making it a great option for lunches throughout the week.

Ingredients Breakdown

Here’s what you’ll need to create this Crunchy Asian Ramen Noodle Salad:

  • 3 packets instant ramen noodles: Discard the seasoning packets; we’re making our own flavor magic!
  • 2 cups shredded cabbage: You can use green or napa cabbage for a crunchy texture.
  • 1 cup shredded carrots: Freshly shredded for that sweet crunch.
  • 1/2 cup red bell pepper: Thinly sliced for vibrant color and sweetness.
  • 1/2 cup green onions: Chopped for a fresh, oniony flavor.
  • 1/2 cup chopped cilantro: Adds a refreshing herbal note.
  • 1/4 cup sunflower seeds: For that extra crunch!
  • 1/4 cup sliced almonds: Toasted for flavor and texture.

For the dressing:

  • 1/4 cup soy sauce: The base of our delicious dressing.
  • 2 tablespoons rice vinegar: Adds a tangy kick.
  • 2 tablespoons sesame oil: For that nutty flavor.
  • 1 tablespoon honey or maple syrup: A touch of sweetness to balance the flavors.
  • 1 teaspoon minced garlic: Because garlic makes everything better!
  • 1 teaspoon grated fresh ginger: Adds warmth and depth.
  • 1 tablespoon sesame seeds: Optional, but they elevate the dish visually and texturally.

Step-by-Step Instructions

Now that we have our ingredients ready, let’s dive into the steps!

  1. Begin by cooking the ramen noodles according to the package instructions, which usually takes about 3 minutes. Once cooked, drain the noodles in a colander and rinse them under cold water to stop the cooking process. Set aside to cool.
  2. In a large mixing bowl, combine the shredded cabbage, shredded carrots, sliced red bell pepper, chopped green onions, chopped cilantro, sunflower seeds, and sliced almonds.
  3. In a separate small bowl, whisk together the soy sauce, rice vinegar, sesame oil, honey (or maple syrup), minced garlic, and grated ginger. Mix until well combined.
  4. Add the cooled ramen noodles to the mixing bowl with the vegetables. Pour the dressing over the salad and toss everything together until well coated.
  5. Let the salad sit for about 5-10 minutes to allow the flavors to meld, then give it another quick toss before serving.

Pro Tips for the Best Crunchy Asian Ramen Noodle Salad

A side view of a refreshing ramen noodle salad featuring shredded cabbage and carrots.

Want to elevate your salad game? Here are some expert tips:

  • Toast the Nuts: Toasting the almonds and sunflower seeds in a dry skillet enhances their flavor and crunch. Just a few minutes on medium heat can make a world of difference!
  • Use Fresh Ingredients: Freshly chopped herbs and vegetables provide the best flavor and texture. Avoid pre-packaged ingredients when possible.
  • Customize Your Veggies: Feel free to add or substitute with your favorite vegetables—cucumbers, snap peas, or even edamame work beautifully!
  • Adjust the Dressing: Taste and tweak the dressing ingredients to fit your preference. If you love more zing, add extra vinegar or lime juice!
  • Don’t Skimp on Time: Letting the salad sit allows all the flavors to meld beautifully. Patience is key!
  • Mix It Up: Consider adding protein such as grilled chicken, tofu, or shrimp for a heartier meal.
  • Store Separately: If making ahead, store the salad and dressing separately to maintain the crunch until serving.
  • Use a Large Bowl: A larger bowl helps in tossing everything without spilling—trust me, it’s a game-changer!

Common Mistakes and Troubleshooting

Even the best chefs make mistakes! Here’s how to avoid them:

  • Overcooking Noodles: Ramen noodles cook quickly. Keep an eye on them to avoid mushiness!
  • Too Much Dressing: Start with a little and add more if needed. You can always add, but you can’t take away!
  • Skipping the Chill Time: Letting the salad sit for a few minutes is crucial for flavor development.

Variations to Try

Mix things up with these tasty variations:

  • Spicy Kick: Add a dash of sriracha or chili sauce to the dressing for a spicy twist!
  • Asian Fusion: Incorporate mandarin oranges or sesame ginger dressing for a fusion twist.
  • Protein Packed: Toss in grilled chicken, shrimp, or chickpeas for added protein.
  • Crunchy Veggies: Add sliced radishes or bell peppers for extra crunch and color.

Storage and Make-Ahead Instructions

This salad is perfect for meal prep! Here’s how to store it:

  • Refrigerate: Store in an airtight container in the fridge for up to 3 days. Keep the dressing separate until ready to serve to maintain crunch.
  • Make-Ahead: Prep all ingredients in advance and assemble just before serving for maximum freshness.

Frequently Asked Questions (FAQs)

Got questions? I’ve got answers!

  • Can I make this salad vegan? Absolutely! Just use maple syrup instead of honey, and you’re good to go!
  • How do I make it gluten-free? Use gluten-free ramen noodles or rice noodles for a delicious alternative.
  • Can I use a different type of nut? Yes! Cashews or walnuts can be great substitutes.
  • What can I use if I don’t have sesame oil? Olive oil or avocado oil can be used, but the flavor will differ slightly.
  • How can I add more protein? Grilled chicken, tofu, or chickpeas are excellent additions!
  • Can I freeze this salad? It’s best enjoyed fresh, so freezing isn’t recommended.
  • How long does it take to make? Approximately 20 minutes from start to finish!
  • What pairs well with this salad? It makes a great side for grilled meats, Asian-inspired dishes, or as a light lunch on its own!

Nutrition Tips and Dietary Adaptations

This Crunchy Asian Ramen Noodle Salad is naturally packed with nutrients:

  • Fiber Boost: The vegetables provide plenty of fiber to keep you full and satisfied.
  • Healthy Fats: Nuts and seeds offer healthy fats, which are essential for overall health.
  • Low-Calorie Option: Keep the dressing light and use less oil to reduce calories.

Equipment Recommendations

To whip up this delicious salad, you’ll need:

  • A Large Mixing Bowl: Perfect for tossing all your ingredients together.
  • A Whisk: Ideal for combining the dressing smoothly.
  • A Sharp Knife: For chopping vegetables with ease.
  • A Colander: To drain and cool the noodles efficiently.

Serving Suggestions

This salad is incredibly versatile! Here are a few serving ideas:

  • As a side dish for grilled chicken or fish.
  • As a light lunch topped with your choice of protein.
  • At gatherings, served alongside other Asian-inspired dishes.

Conclusion

There you have it! A comprehensive guide to making the most delightful Crunchy Asian Ramen Noodle Salad. With its blend of flavors, textures, and nutritional benefits, this dish is sure to become a favorite in your kitchen. So grab your ingredients, roll up your sleeves, and let’s create something delicious together. Happy cooking!

Crunchy Asian Ramen Noodle Salad

Prep Time 10 minutes
Cook Time 3 minutes
Total Time 13 minutes
Servings 4 servings
Calories 350
A vibrant and crunchy salad combining ramen noodles, fresh vegetables, and a flavorful Asian-inspired dressing.

Ingredients

Noodles

  • 3 packets instant ramen noodles (Discard seasoning packets)

Vegetables

  • 2 cups shredded cabbage (Green or napa)
  • 1 cup shredded carrots
  • 1/2 cup red bell pepper (Thinly sliced)
  • 1/2 cup green onions (Chopped)
  • 1/2 cup chopped cilantro

Seeds & Nuts

  • 1/4 cup sunflower seeds
  • 1/4 cup sliced almonds

Sauces & Oils

  • 1/4 cup soy sauce
  • 2 tablespoons rice vinegar
  • 2 tablespoons sesame oil
  • 1 tablespoon honey or maple syrup
  • 1 teaspoon minced garlic
  • 1 teaspoon grated fresh ginger
  • 1 tablespoon sesame seeds (Optional)

Instructions 

  • Cook ramen noodles for 3 minutes, drain, rinse with cold water, and set aside.
  • Combine shredded vegetables, seeds, and almonds in a large bowl.
  • Whisk together soy sauce, rice vinegar, sesame oil, honey, garlic, and ginger to make the dressing.
  • Add noodles to the vegetables, pour dressing, and toss to coat.
  • Let sit for 5-10 minutes, toss again, then serve.

Notes

For extra crunch, sprinkle additional sesame seeds before serving.
Calories: 350kcal
Cost: $12
Course: Salad
Cuisine: Asian
Keyword: ramen, Vegetables

Embrace Autumn with a Flavorful Apple Pecan Fall Salad

As the leaves turn golden and the air grows crisp, there’s nothing quite like a vibrant dish that captures the essence of fall. This Apple Pecan Fall Salad is a delightful blend of sweet and savory, bringing together fresh ingredients that excite your taste buds while nourishing your body. Ready to elevate your mealtime? Let’s dive into how to whip up this seasonal masterpiece!

Why You’ll Love This Recipe

  • Seasonal Freshness: This salad is a celebration of fall produce, featuring juicy apples and crunchy pecans, making it the perfect dish for autumn gatherings.
  • Health Benefits: Packed with vitamins from mixed greens, healthy fats from pecans, and fiber from fruits, this salad is as nutritious as it is delicious.
  • Quick Preparation: With just a few simple steps, you can have this salad ready in under 20 minutes, perfect for busy weeknights or last-minute guests.
  • Customizable Ingredients: Whether you’re vegan, gluten-free, or just looking to switch things up, this salad offers ample opportunities for substitutions.
  • Stunning Presentation: The colorful composition of greens, reds, and blues not only pleases the palate but also looks fantastic on any table!

Ingredient Breakdown: What You’ll Need

Let’s take a closer look at the ingredients that make this salad shine:

  • Mixed Greens: 6 cups of your favorite greens provide a fresh base. Consider using a mix of spinach, arugula, and kale for a nutrient boost.
  • Apples: 1 diced apple (Jonathan, Fuji, or Gala) adds sweetness and crunch. If you’re feeling adventurous, try a tart apple like Granny Smith!
  • Pear: 1 diced pear complements the apples with its juicy texture. Feel free to swap in other fruits like persimmons or citrus segments.
  • Craisins: 1/3 cup adds a chewy sweetness that balances the flavors beautifully.
  • Blue Cheese: 1/2 cup crumbled blue cheese offers a creamy, tangy contrast. For a dairy-free option, try crumbled tofu or nut-based cheese.
  • Salted Pecans: 1/2 cup of pecans provides a satisfying crunch and rich flavor. If you prefer, walnuts or sunflower seeds can be great alternatives.
  • Olive Oil: 1/2 cup for the dressing, bringing healthy fats into the mix.
  • Lime Juice: 1/4 cup for a zesty brightness in your dressing.
  • Honey: 2 tablespoons for natural sweetness. Maple syrup is a fantastic vegan substitute!
  • Dijon Mustard: 1 teaspoon adds a delightful tang to the dressing.
  • Salt and Pepper: 1 teaspoon of salt and 1/2 teaspoon of pepper to season the dressing.

Step-by-Step Instructions

Side view of a fresh salad featuring diced apples, pecans, and greens.

Ready to create your masterpiece? Follow these simple steps:

  1. In a mason jar, combine all the ingredients for the dressing: olive oil, lime juice, honey, dijon mustard, salt, and pepper. Seal and shake well until combined.
  2. In a large bowl, toss together the mixed greens, diced apple, pear, craisins, blue cheese, and pecans. It’s all about getting those flavors to mingle!
  3. Serve the salad with the honey mustard dressing on the side, allowing everyone to dress their salads to taste.

Pro Tips for Perfecting Your Salad

  • Make-Ahead Dressing: Prepare the dressing a few days in advance to save time. It keeps well in the fridge!
  • Storage: Store leftovers in an airtight container for up to 3 days. Keep the dressing separate to maintain freshness.
  • Chill Your Ingredients: For a refreshing crunch, chill your greens and fruits before assembling the salad.
  • Toast Pecans: Lightly toasting the pecans enhances their flavor and adds an extra crunch.
  • Add Protein: For a heartier meal, toss in grilled chicken, chickpeas, or quinoa. They’ll complement the salad beautifully.
  • Experiment with Herbs: Fresh herbs like mint or basil can elevate the flavor profile. Try adding a handful for a fresh twist!
  • Variety in Greens: Mixing different greens not only enhances the flavor but also increases the nutritional value of your salad.
  • Check Ripeness: Make sure your apples and pears are ripe but firm for the best texture.

Common Mistakes and Troubleshooting

Even the best chefs make mistakes! Here’s how to avoid common pitfalls:

  • Over-dressing: Start with less dressing; you can always add more. Over-dressed salads can become soggy quickly.
  • Using Wilting Greens: Always use fresh, crisp greens for the best texture and taste. Wilted greens can ruin your salad.
  • Too Many Strong Flavors: Balance is key. If adding ingredients like red onion or strong cheeses, use them sparingly to avoid overpowering the salad.

Flavor Variations to Try

Mix things up with these fun variations:

  • Spicy Kick: Add jalapeños or a dash of cayenne pepper to the dressing for a spicy twist.
  • Sweet and Savory: Incorporate roasted sweet potatoes or butternut squash for added warmth and sweetness.
  • Fruit Medley: Swap out apples and pears for seasonal fruits like pomegranate seeds or sliced peaches.
  • Nutty Alternative: Try different nuts like almonds or pistachios for a unique crunch.

Storage and Make-Ahead Instructions

Want to prep ahead? Here’s how:

  • Prepare the Salad Components: Wash and chop your vegetables and fruits a day in advance. Store them separately in airtight containers.
  • Make the Dressing Ahead: Whisk together the dressing ingredients and store it in a sealed jar in the refrigerator for up to one week.
  • Assemble When Ready: Toss the salad together just before serving to keep everything fresh and crunchy!

FAQs About Apple Pecan Fall Salad

  • Can I make this Apple Pecan Fall Salad ahead of time? Absolutely! Prepare components separately and assemble just before serving.
  • Can I substitute the honey mustard dressing with something else? Yes, a balsamic vinaigrette or a simple lemon olive oil dressing works wonderfully!
  • What other nuts can I use in this salad? Walnuts, almonds, or even sunflower seeds can create a delightful crunch.
  • Is this salad gluten-free? Yes, as long as you ensure your mustard and other ingredients are gluten-free.
  • Can I use other types of cheese? Definitely! Goat cheese or feta would also be delicious alternatives.
  • How can I make this salad vegan? Omit the cheese or use a plant-based alternative, and switch honey for maple syrup.
  • What should I serve with this salad? This salad pairs beautifully with grilled chicken, roasted turkey, or a hearty grain dish.
  • How long will leftovers last? Leftovers can be stored in the refrigerator for up to three days, but it’s best to keep the dressing separate.

Nutrition Tips and Dietary Adaptations

This salad isn’t just tasty; it’s packed with nutrition:

  • Boost Fiber: The combination of fruits and greens ensures a high fiber content, aiding digestion.
  • Healthy Fats: Pecans provide omega-3 fatty acids, which are great for heart health.
  • Low Calorie: With a base of greens and fruits, this salad is low in calories but high in nutrients.

Essential Equipment Recommendations

Here’s what you’ll need to make this salad:

  • Mason Jar: Perfect for shaking up your dressing.
  • Large Bowl: For mixing and tossing your salad ingredients.
  • Knife and Cutting Board: Essential for chopping your fruits and vegetables.

Serving Suggestions

Make your meal complete by pairing this salad with:

  • Grilled Chicken: The protein adds heartiness to your meal.
  • Quinoa: A great side dish that complements the salad.
  • Whole Grain Bread: Perfect for a light lunch or dinner.

Conclusion

This Apple Pecan Fall Salad is not just a dish; it’s an experience that brings the flavors of autumn to your table in a delightful way. With its vibrant colors and rich tastes, it’s sure to impress at any gathering. So grab your ingredients, unleash your inner chef, and enjoy a bowl of fall goodness!

Apple Pecan Fall Salad

Prep Time 10 minutes
Total Time 10 minutes
Servings 4 servings
Calories 250
A fresh and crunchy salad perfect for autumn, combining sweet apples, tangy cranberries, and toasted pecans with a flavorful lime honey dressing.

Ingredients

Mixed Greens

  • 6 cups mixed greens

Fruits

  • 1 apple apple (diced) (Jonathan, Fuji, or Gala)
  • 1 pear pear (diced)

Dried Fruit

  • 1/3 cup craisins

Cheese and Nuts

  • 1/2 cup blue cheese (read about substitutions here)
  • 1/2 cup salted pecans

Dressing

  • 1/2 cup olive oil
  • 1/4 cup fresh lime juice
  • 2 tablespoons honey
  • 1 teaspoon dijon mustard
  • 1 teaspoon salt
  • 1/2 teaspoon pepper

Instructions 

  • Combine dressing ingredients in a jar and shake well.
  • Mix all salad ingredients in a large bowl, toss gently.

Notes

For added crunch, toast the pecans before adding.
Calories: 250kcal
Cost: $15
Course: Salad
Cuisine: American
Keyword: apple, Fall, Pecan