Author

Ryan

Browsing

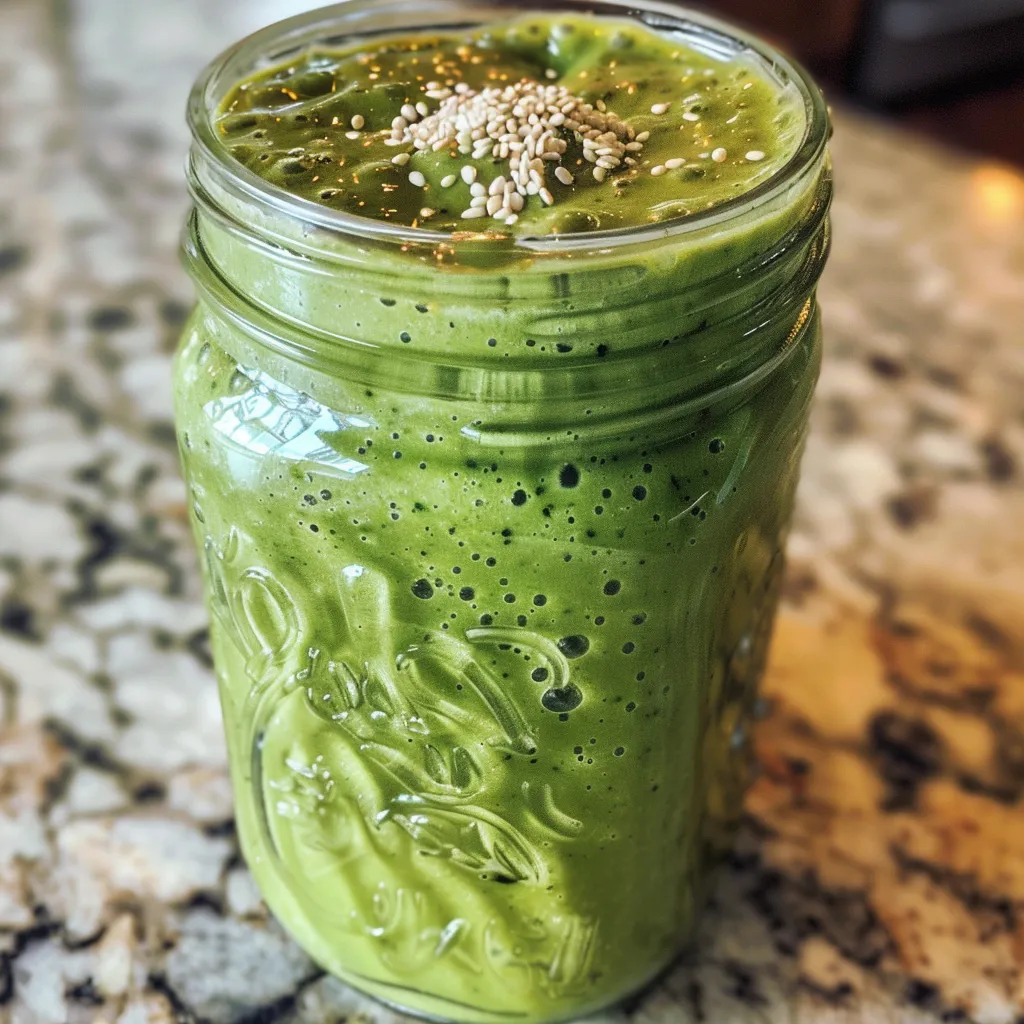
If you think green smoothies are all about drinking your veggies, think again! This protein-packed smoothie is the perfect blend of flavor and nutrition, making it your new go-to for a delicious and energizing start to your day. With just a handful of simple ingredients, you’ll discover how easy it is to create a creamy, dreamy green protein smoothie that tastes indulgent while being incredibly healthy. Let’s dive into why this recipe will become a staple in your kitchen!

Why You’ll Love This Recipe

Here are some compelling reasons to blend up this smoothie:

  • Quick and Easy: Whip this up in under 5 minutes—perfect for busy mornings or post-workout refueling.
  • Nutritious and Delicious: Packed with vitamins, minerals, and protein, this smoothie will keep you feeling full and energized.
  • Customizable: With a few simple substitutions, you can make it your own based on dietary preferences or what you have on hand.
  • Kid-Friendly: Even picky eaters will love this smoothie—it’s sweet, creamy, and hides those greens perfectly!
  • Perfect for Meal Prep: Make a batch ahead of time and store it for a quick grab-and-go option.

Ingredient Breakdown

Let’s explore the star ingredients in this dreamy green protein smoothie and their awesome benefits:

  • Frozen Bananas: They add natural sweetness and a creamy texture. You can swap them with fresh bananas, but add ice for that frosty goodness.
  • Spinach: A powerhouse of vitamins A, C, and K, spinach is low in calories but high in nutrients. Use baby spinach for a milder flavor, or mix in kale for a bolder taste.
  • Pitted Dates: These natural sweeteners add caramel-like richness. You can substitute with honey or maple syrup, but adjust the quantity according to your taste.
  • Vanilla Hemp Protein Powder: This adds not only protein but also a lovely vanilla flavor. Feel free to use any protein powder you prefer—whey, pea, or even collagen!
  • Non-Dairy Milk: Almond, oat, or coconut milk all work beautifully here. Choose unsweetened varieties to control the sugar content.
  • Hemp Seeds: These tiny seeds are nutritional powerhouses, rich in omega-3 and omega-6 fatty acids. Swap with chia seeds if you prefer.
  • Chia Seeds: A great source of fiber and protein, these seeds help thicken the smoothie. You can skip them if you’re short on time, but they add great texture!

Pro Tips for the Best Green Protein Smoothie

To ensure your smoothie turns out perfect every time, keep these expert tips in mind:

  • Layer Ingredients Properly: Always add liquids first to help your blender work more efficiently. This prevents clumping of the greens.
  • Experiment with Greens: Mix different greens like kale, arugula, or Swiss chard to find your favorite combination.
  • Adjust Sweetness: Depending on your taste buds, feel free to add more or fewer dates to reach your desired sweetness level.
  • Chill Ingredients: Use frozen bananas and cold non-dairy milk for a frosty, refreshing drink.
  • Blend Thoroughly: Blend until completely smooth to avoid any leafy chunks—nobody wants a lumpy smoothie!
  • Make It a Meal: Add oats or nut butter for a more filling meal replacement option.
  • Opt for Natural Sweeteners: If you’re looking for lower sugar, use less fruit and add spices like cinnamon for flavor.
  • Always Taste Before Serving: Adjust ingredients based on your preference before pouring it into your glass!

Common Mistakes and Troubleshooting

Side view of a vibrant green smoothie, showcasing its creamy texture and fresh ingredients.

Even the best recipes can go awry, so here’s how to avoid common pitfalls:

  • Too Thick: If your smoothie is too thick, add more non-dairy milk a little at a time until you reach your desired consistency.
  • Bitter Flavor: If your smoothie tastes bitter, you might have used too many kale leaves or not enough sweeteners. Adjust accordingly!
  • Unpleasant Texture: Ensure you blend long enough to break down the greens completely. A high-powered blender works best.
  • Too Sweet: If you’ve added too much fruit, balance it out with more spinach or a squeeze of lemon juice.

Variations to Try

Feeling adventurous? Here are some fun ways to switch up your smoothie:

  • Chocolate Delight: Add 1 tablespoon of cocoa powder for a chocolatey version. This pairs beautifully with banana!
  • Berry Blast: Toss in a handful of frozen mixed berries for a fruity twist that adds antioxidants.
  • Nutty Banana: Add a tablespoon of almond or peanut butter for that nutty flavor and an extra protein boost.
  • Spicy Green: Include a small piece of fresh ginger or a dash of cayenne pepper for a kick of flavor.

Storage and Make-Ahead Instructions

This smoothie is best enjoyed fresh, but you can make it ahead of time and store it:

  • Refrigerate: Store in an airtight container for up to 24 hours. Shake well before drinking.
  • Freeze: Pour into ice cube trays and freeze. Blend cubes with a splash of non-dairy milk for a quick smoothie later!

Frequently Asked Questions (FAQ)

Here are some common questions about green protein smoothies:

  • Can I use regular milk instead of non-dairy milk? Absolutely! Use whatever milk you prefer, but keep in mind it may change the flavor.
  • Is it okay to use frozen spinach? Yes! Frozen spinach is a great option and often just as nutritious as fresh.
  • How can I make this smoothie vegan? This recipe is already vegan as long as you use plant-based protein powder!
  • Can I add supplements to this smoothie? Definitely! Feel free to add your favorite supplements like spirulina or protein powder.
  • What’s the best time to drink a protein smoothie? Morning, post-workout, or as a midday snack. It’s a great fuel source at any time!
  • How many servings does this recipe make? This recipe serves two, so you can share or save one for later!
  • Can I use other fruits besides bananas? Yes! You can substitute other fruits like mango or peaches, but they may alter the flavor.
  • Does this smoothie help with weight loss? Yes! It’s low in calories and high in nutrients, making it a perfect option for weight management.

Nutrition Tips and Dietary Adaptations

To enhance the nutritional value of your smoothie:

  • Protein Boost: Add a scoop of protein powder or Greek yogurt for an extra protein kick.
  • Fiber Fix: Incorporate oats or flaxseeds for added fiber, helping you stay full longer.
  • Healthy Fats: Include a tablespoon of nut butter or avocado for healthy fats that keep you satisfied.
  • Vitamins Galore: Mix in a handful of superfood powders like spirulina or maca for an extra health boost!

Equipment Recommendations

To create the best smoothie, you’ll need:

  • High-Speed Blender: A powerful blender ensures a smooth and creamy texture.
  • Measuring Cups: Accurate measurements for consistent results every time.
  • Glass or Jar: For serving your smoothie—opt for a fun glass to make it feel special!

Serving Suggestions

Make your smoothie experience even better with these serving ideas:

  • Toppings: Add granola, coconut flakes, or fresh fruit on top for added texture and flavor.
  • Pair with Snacks: Enjoy alongside a handful of nuts or a slice of whole-grain toast for a balanced meal.
  • Garnish with Fresh Mint: A sprig of mint on top adds a refreshing touch.

Conclusion

Now that you’ve unlocked the secret to a delicious green protein smoothie, you’re ready to bring some vibrant energy into your day! It’s not just about health; it’s about enjoying every sip. So grab your blender, throw in those colorful ingredients, and let your taste buds dance! Remember, eating healthy can be fun, exciting, and delicious—just like this smoothie! Cheers to a healthier, happier you!

The BEST Tasting Green Protein Smoothie EVER

Prep Time 5 minutes
Total Time 5 minutes
Servings 1 cup
Calories 250
Enjoy a delicious and nutritious green smoothie packed with plant-based protein and fresh ingredients.

Ingredients

Fruits

  • 2 frozen bananas frozen bananas
  • 1 cup spinach (about 2 handfuls)
  • 2-4 pitted dates pitted dates

Protein Powder

  • 1 scoop vanilla hemp protein powder (may substitute other protein)

Liquid

  • 1 cup non-dairy milk
  • 1 tablespoon hemp seeds
  • 1 tablespoon chia seeds

Instructions 

  • Place all ingredients into a blender.
  • Blend until smooth, adding more milk if needed.

Notes

Use ripe bananas for extra sweetness and creaminess.
Calories: 250kcal
Cost: $8
Course: Breakfast, Smoothie
Cuisine: Healthy
Keyword: Green, Protein, Vegan

Unleash the Flavor: Your Ultimate Guide to Epic Beef Burritos!

Welcome to the tantalizing world of beef burritos! If you’re looking for a delicious and satisfying meal that packs a punch of flavor, you’ve landed in the right place. This recipe is not just about filling a tortilla; it’s about crafting a culinary experience that fuels your day and delights your taste buds. With bold spices, zesty salsa, and creamy guacamole, these burritos are the perfect solution for busy nights or a fun weekend feast. Let’s dive into this flavor explosion and discover why these beef burritos are a must-try!

Why You’ll Love This Recipe

  • Simplicity: With straightforward ingredients and easy-to-follow steps, you can whip up these burritos in no time.
  • Meal Prep Friendly: Perfect for meal prep, these burritos can be made ahead and frozen, allowing you to enjoy a homemade meal anytime.
  • Customizable: Tailor these burritos to your taste! Switch up the fillings, sauces, or toppings to create your ultimate burrito.
  • Flavor Packed: Every bite is bursting with savory goodness, thanks to our carefully selected spices and fresh ingredients.
  • Budget-Friendly: This recipe is not only delicious but also light on your wallet, making it perfect for families and busy individuals alike.

Ingredient Breakdown

Let’s take a closer look at the ingredients that make these beef burritos so scrumptious. Here’s what you’ll need:

  • 1/2 TBS olive oil: For sautéing and adding flavor.
  • 1/2 onion, chopped: Offers a sweet and savory base to your burrito filling.
  • 1 pound lean ground beef: The star of the show, providing protein and richness.
  • 1 tablespoon chili powder: Adds heat and depth to the dish.
  • 1 tsp EACH ground cumin, smoked paprika, onion powder, dried oregano, salt: A blend of spices that bring the flavor to life.
  • 1/4 teaspoon pepper: For a subtle kick.
  • 1/4 teaspoon cayenne pepper: Adjust to taste for extra heat!
  • 4-6 garlic cloves, minced (or 1 tsp powder): Because garlic makes everything better!
  • 1/4 cup salsa: For a zesty twist.
  • 1 (4 oz.) can mild diced green chilies: Adds a hint of freshness and spice.
  • 6-8 burrito size flour tortillas (10-12 inch): The perfect wrap for your delicious filling.
  • 2 cups Cilantro Lime Rice: A refreshing addition that elevates your burrito game.
  • 2 cups black beans or pinto beans (rinsed, drained): For protein and texture.
  • 1 recipe chipotle sauce: Adds creaminess and a smoky flavor.
  • Guacamole (homemade or store-bought): Because what’s a burrito without guac?
  • 1 ½ cups shredded sharp or Monterey Jack cheese: To melt into gooey goodness!

Pro Tips for Perfect Beef Burritos

Side view of beautifully garnished beef burritos with fresh toppings.

Want to take your burrito-making skills to the next level? Check out these expert tips:

  • Don’t rush the sauté: Take your time when cooking the onions and garlic. This builds a flavorful base.
  • Season well: Taste as you go! Adjust spices to fit your flavor preferences.
  • Warm your tortillas: Heat them briefly in a pan or microwave to make them more pliable.
  • Layer wisely: Start with rice, then beans, followed by beef, and top with cheese and sauces to prevent sogginess.
  • Secure your burrito: Use the burrito-folding technique to keep everything intact—tuck in the sides and roll tightly.
  • Experiment with fillings: Try adding sautéed veggies, different beans, or even grilled chicken for variety.
  • Use quality tortillas: The right tortilla will make all the difference in taste and texture.
  • Perfect for freezing: Wrap tightly in foil or plastic wrap for easy meal prep!

Avoiding Common Mistakes

Even seasoned cooks can make mistakes! Here are some common pitfalls to avoid:

  • Overfilling: Resist the urge to pile on too much filling! This can make wrapping difficult.
  • Skipping the seasoning: Don’t forget to season each layer for maximum flavor.
  • Not letting fillings cool: Allow the beef mixture to cool slightly before assembling to prevent soggy tortillas.
  • Ignoring the resting time: Let the wrapped burritos rest for a few minutes before cutting to help them hold their shape.

Delicious Variations

Feeling adventurous? Here are some fun variations to try!

  • Vegetarian Burrito: Swap the ground beef for sautéed mushrooms or lentils for a hearty plant-based option.
  • Breakfast Burrito: Add scrambled eggs, cheese, and avocado for a morning twist.
  • Spicy Chipotle Burrito: Mix in chipotle sauce and jalapeños for an extra kick.
  • BBQ Beef Burrito: Use shredded BBQ beef instead of ground beef for a smokey flavor.

Storage and Make-Ahead Instructions

Want to enjoy these beef burritos later? Here’s how to store and reheat them:

  • Refrigerate: Store assembled burritos in an airtight container for up to 3 days.
  • Freeze: Wrap individual burritos tightly in foil or plastic wrap and freeze for up to 3 months.
  • Reheat: Microwave frozen burritos for 2-3 minutes or bake at 400°F for 20-25 minutes until heated through.

Frequently Asked Questions

Got questions? We’ve got answers! Here are some common FAQs about beef burritos:

  • Can I make these burritos gluten-free? Yes! Use gluten-free tortillas and check your other ingredients for gluten.
  • What if I don’t have all the spices? No problem! Get creative with what you have. Just ensure you include chili powder for that essential flavor.
  • Can I use ground turkey instead of beef? Absolutely! Ground turkey works beautifully and is a great lean alternative.
  • How do I keep my burritos from getting soggy? Make sure your fillings are not too wet, and avoid overloading them.
  • What toppings do you recommend? Fresh cilantro, diced tomatoes, and a squeeze of lime juice are fantastic!
  • Can I add cheese inside the burrito? Yes! Cheese is a great addition for extra flavor.
  • How long can I keep leftovers? Enjoy refrigerated leftovers within 3 days or freeze them for future meals.
  • Can I use other types of beans? Yes! Feel free to substitute with kidney beans or refried beans for a different flavor.

Nutrition Tips and Dietary Adaptations

Looking to make this recipe even healthier? Here are some nutrition tips:

  • Lean protein: Choose lean ground beef or even ground chicken for a lighter option.
  • Add veggies: Incorporate bell peppers, zucchini, or spinach into the beef mixture for added nutrients.
  • Whole grain tortillas: Opt for whole wheat tortillas for more fiber.
  • Skip the sour cream: Use Greek yogurt instead for a healthier creamy topping.

Equipment Recommendations

For the best burrito-making experience, here’s what you’ll need:

  • Skillet: A large skillet for sautéing your beef and veggies.
  • Spatula: To make stirring and mixing a breeze.
  • Measuring spoons and cups: For accurate ingredient measurement.
  • Aluminum foil: Great for wrapping burritos for freezing.

Serving Suggestions

Ready to enjoy your beef burritos? Here are some fun serving suggestions:

  • Serve with a side of chips: Crunchy tortilla chips with salsa or guacamole make a great pairing.
  • Top with fresh ingredients: Add diced avocado, fresh cilantro, or pickled onions for a burst of flavor.
  • Pair with a refreshing drink: A classic margarita or a fruity mocktail complements the flavors perfectly!

Now that you’ve got the lowdown on making epic beef burritos, it’s time to roll up those sleeves and get cooking! Remember, the kitchen is your playground—experiment, have fun, and enjoy every bite of your delicious creations. Happy cooking!

Beef Burritos

Prep Time 15 minutes
Cook Time 10 minutes
Total Time 25 minutes
Servings 4 servings
Calories 650
Delicious homemade beef burritos packed with flavorful ingredients and easy to prepare.

Ingredients

Main Ingredients

  • 0.5 TBS olive oil
  • 0.5 onion onion, chopped
  • 1 pound lean ground beef
  • 1 tablespoon chili powder
  • 1 tsp ground cumin
  • 1 tsp smoked paprika
  • 1 tsp onion powder
  • 1 tsp dried oregano
  • 1 tsp salt
  • 0.25 teaspoon pepper
  • 0.25 teaspoon cayenne pepper ((more or less to taste))
  • 4 cloves garlic, minced
  • 0.25 cup salsa
  • 1 can mild diced green chilies (4 oz.)
  • 6-8 tortillas burrito-sized flour tortillas (10-12 inch)
  • 2 cups Cilantro Lime Rice (or plain rice seasoned with lime, salt, and pepper)
  • 2 cups black beans or pinto beans (rinsed, drained)
  • 1 recipe chipotle sauce ((or sour cream or Greek yogurt))
  • to taste guacamole ((homemade or store-bought))
  • 1.5 cups shredded sharp or Monterrey Jack cheese

Instructions 

  • If baking: Preheat oven to 400°F. Add a baking rack on top of a baking sheet and spray with cooking spray; set aside.

Notes

For best results, prepare ingredients ahead of time and assemble just before baking or serving.
Calories: 650kcal
Cost: $15
Course: Main Course
Cuisine: Mexican
Keyword: Beef, Burritos

Welcome to Your Ultimate Epic Loaded Nacho Platter Experience!

If you’re searching for a crowd-pleasing dish that combines the comforting familiarity of tortilla chips with the zesty punch of chili con carne, you’ve landed in the right place! Our Epic Loaded Nacho Platter is not just a recipe; it’s an invitation to flavor town, where gooey cheese, vibrant toppings, and bold flavors unite to create a feast that’s perfect for game days, movie nights, or any gathering where you want to impress your friends and family.

Let’s dive into how to create these mouthwatering nachos that will steal the show and keep everyone coming back for more!

Why You’ll Love This Recipe

Here are five compelling reasons why this Loaded Nacho Platter is destined to become your go-to dish:

  • Crowd-Pleasing Delight: With layers of flavors and textures, this dish is a surefire hit at any gathering, keeping guests happy and engaged.
  • Quick and Easy: From prep to plate in just 20 minutes, this nacho platter is perfect for those who want deliciousness on a tight schedule.
  • Customizable to Perfection: Tailor your nachos with your favorite toppings—think jalapeños, olives, or avocado—to make them uniquely yours.
  • Perfect for Leftovers: Transform leftover chili into a sumptuous dish that feels fresh and exciting, reducing waste and maximizing flavor.
  • Fun and Interactive: Nachos are the ultimate sharing dish, encouraging guests to dig in and enjoy the flavors together.

Ingredient Breakdown

Ready to get cooking? Here’s what you need for your Loaded Nacho Platter:

  • 1 (10-12 oz.) bag of tortilla chips: Choose sturdy chips that can hold up under the weight of toppings.
  • 1 cup leftover Chili Con Carne: A flavorful base that adds a hearty touch to your nachos.
  • 1 cup shredded cheddar cheese: Melts beautifully for that gooey perfection.
  • 1/2 cup nacho cheese sauce: Use store-bought or homemade for an extra cheesy kick.
  • 1/2 cup sour cream: Adds creaminess and balances the spice.
  • 1/4 cup red and green onions, finely chopped: For a pop of color and crunch.

**Substitutions:** Feel free to get creative! You can swap out the cheddar cheese for Monterey Jack or Pepper Jack for a spicier twist. If you want to make it vegetarian, replace the chili with black beans or refried beans.

Pro Tips for Epic Nachos

A side view of a vibrant nacho dish with tortilla chips, melted cheese, and sour cream.

Before you get cooking, check out these expert insights to ensure your nacho game is on point:

  • Layer it Right: For the ultimate nacho experience, layer your ingredients. Start with tortilla chips, then add chili, cheese, and repeat!
  • Don’t Overload: While it’s tempting to pile on toppings, too much can lead to soggy nachos. Find a balance!
  • Use Fresh Ingredients: Fresh toppings like diced tomatoes, jalapeños, and avocado make a noticeable difference in flavor.
  • Warm It Up: Ensure your chili is heated through before adding it to the nachos to keep everything nice and crispy.
  • Experiment with Cheese: Mixing different cheeses can add depth to your flavor profile.
  • Go Bold with Spices: Add a pinch of cumin or chili powder to your chili for an extra flavor boost!
  • Serving Platter Matters: Use a large, shallow dish for even distribution of chips and toppings.
  • Keep it Hot: Serve immediately after baking for the best texture and flavor experience.

Common Mistakes and Troubleshooting

Even the best chefs make mistakes! Here’s how to avoid common pitfalls:

  • Overbaking: Keep an eye on your nachos to prevent burning. Just a few minutes in the oven is all you need to melt the cheese.
  • Soggy Chips: If your nachos are soggy, try using thicker chips or layering them better.
  • Too Much Heat: If you or your guests aren’t fans of spicy food, go easy on the jalapeños and hot sauces.
  • Skipping Fresh Toppings: Don’t forget to add fresh toppings after baking for that vibrant crunch!

Variations on Your Loaded Nacho Platter

Let’s keep things exciting! Here are some tasty variations to keep your nacho platter fresh:

  • BBQ Chicken Nachos: Substitute chili with shredded BBQ chicken for a smoky flavor.
  • Veggie Nachos: Load up on grilled veggies like bell peppers, mushrooms, and zucchini for a colorful twist.
  • Buffalo Nachos: Use buffalo chicken and top with blue cheese crumbles for a spicy kick.
  • Breakfast Nachos: Add scrambled eggs, bacon, and avocado for a brunch-worthy treat.

Storage and Make-Ahead Instructions

Want to prepare ahead of time? Here’s how to do it:

  • Make-Ahead Chili: Prepare your chili a day in advance and store it in the refrigerator. Reheat before assembling your nachos.
  • Store Leftover Nachos: If you have leftovers, store them in an airtight container. They’re best enjoyed within a day, but you can reheat them in the oven.
  • Freezing Options: You can freeze leftover chili for up to three months. Just reheat and assemble when you’re ready to eat!

Frequently Asked Questions

Got questions? We’ve got answers!

  • Can I use corn chips instead of tortilla chips? Yes! Any sturdy chip will work, but tortilla chips are traditional.
  • How can I make these nachos vegetarian? Replace the chili with beans or grilled veggies for a delicious vegetarian option.
  • What if I don’t have nacho cheese sauce? You can make a simple cheese sauce by melting cheddar with a bit of milk or cream.
  • Can you make these nachos in advance? While it’s best to serve them fresh, you can prepare the chili and toppings ahead of time.
  • What’s the best way to reheat nachos? The oven is best! Just pop them in at 350°F until they’re heated through.
  • How do I store leftover nachos? Keep them in an airtight container in the refrigerator. They’re best enjoyed within a day.
  • Can I add fruit to my nachos? Absolutely! Fresh diced mango or pineapple can add an exciting twist.
  • What drinks pair well with nachos? A cold beer, sparkling water, or a fruity cocktail are perfect companions!

Nutrition Tips and Dietary Adaptations

Want to keep it healthy? Here are some tips:

  • Lighten Up: Use reduced-fat cheese and sour cream for a lighter version without sacrificing flavor.
  • Increase Fiber: Add black beans or pinto beans for extra protein and fiber.
  • Go Gluten-Free: Ensure your tortilla chips are labeled gluten-free for a safe option.
  • Control the Spice: Customize the heat level by adjusting the amount of jalapeños or hot sauce.

Equipment Recommendations

Here’s what you’ll need for nacho success:

  • Baking Sheet: A large, rimmed baking sheet is ideal for spreading out the nachos.
  • Parchment Paper: Makes cleanup a breeze and prevents sticking.
  • Microwave-Safe Bowl: For heating your nacho cheese sauce smoothly.

Serving Suggestions

When it’s time to serve, consider these fun ideas:

  • Shared Platter: Serve on a large platter for everyone to dig in together.
  • Individual Bowls: For a twist, create mini nacho bowls for each guest!
  • Garnish with Fresh Herbs: A sprinkle of cilantro or parsley can add a fresh finish.

Conclusion: Dive into Deliciousness!

Now that you’re equipped with all the knowledge to create your very own Epic Loaded Nacho Platter, it’s time to get cooking! Remember, the kitchen is your playground, so have fun with it! Experiment, customize, and enjoy every bite of this vibrant and delicious dish. Whether it’s a casual weeknight or a festive gathering, these nachos are sure to bring joy and flavor to your table. Happy cooking!

Loaded Nacho Platter with Chili Con Carne

Prep Time 10 minutes
Cook Time 10 minutes
Total Time 20 minutes
Servings 4 people
Calories 650
A delicious and easy-to-make nacho platter topped with flavorful chili con carne, melted cheese, and fresh toppings. Perfect for sharing at parties or casual gatherings.

Ingredients

Main

  • 1 bag tortilla chips (10-12 oz.)
  • 1 cup leftover Chili Con Carne
  • 1 cup shredded cheddar cheese
  • 1/2 cup nacho cheese sauce (store-bought or homemade)
  • 1/2 cup sour cream
  • 1/4 cup red and green onions, finely chopped

Instructions 

  • Preheat oven to 350°F (175°C). Line a baking sheet with parchment paper.
  • Spread chips on the baking sheet, top with chili, then sprinkle cheese.
  • Bake for 4-5 minutes until cheese melts and chili warms.
  • Heat nacho cheese sauce until smooth.
  • Remove nachos, drizzle with cheese sauce and sour cream, then top with onions. Serve immediately.

Notes

For extra flavor, add jalapeños or cilantro as desired.
Calories: 650kcal
Cost: $15
Course: Appetizer
Cuisine: American
Keyword: Nachos

Welcome to Flavor Town: A Journey Through Dirty Rice with Ground Beef

Are you ready to embark on a culinary adventure that tantalizes your taste buds and fills your kitchen with irresistible aromas? Dive into this vibrant and satisfying Dirty Rice with Ground Beef recipe, where every spoonful is a delightful dance of flavors! This dish is not just about eating; it’s about enjoying the experience of cooking and savoring every bite. With fresh ingredients, zesty seasonings, and the perfect blend of textures, this recipe will transform your dinner table into a fiesta of excitement. Let’s get started!

Why You’ll Love This Recipe

There are countless reasons to fall in love with this dirty rice creation. Here are just a few:

  • Quick and Easy: You can whip this dish up in under 30 minutes, making it perfect for busy weeknights or spontaneous gatherings.
  • Nutritious and Satisfying: Packed with protein from the ground beef and fiber from the vegetables, you’ll walk away feeling energized and content.
  • Endless Customization: Feel free to add your favorite veggies or proteins! This recipe is versatile enough to adapt to your pantry ingredients.
  • Cajun Flavor Explosion: Enjoy the rich, bold flavors that come from Cajun seasoning, thyme, and paprika, giving you that authentic southern flair!
  • One-Pot Wonder: Less cleanup is always a win! Cook everything in one skillet for simplicity and ease.

The Ingredients Breakdown

Let’s get to the heart of this dish! Here’s what you’ll need:

  • 1 tablespoon olive oil: For sautéing the beef and vegetables, offering a rich flavor.
  • 1 pound ground beef: Choose lean ground beef for a healthier option. You can also swap it for ground turkey or chicken.
  • 1 small onion, finely diced: Adds sweetness and depth to the flavor profile.
  • 1 green or red bell pepper, diced: For crunch and color! Feel free to mix it up with yellow or orange peppers.
  • 2 cloves garlic, minced: Because every great dish starts with garlic!
  • 1 1/2 cups long-grain white rice: The base of the dish, you can use brown rice for a healthier twist.
  • 3 cups chicken broth: Provides moisture and flavor. Vegetable broth works well too for a vegetarian option.
  • 1 teaspoon Cajun seasoning: The star of the show! Adjust the amount if you prefer a milder flavor.
  • 1/2 teaspoon thyme: For a hint of earthiness.
  • 1/2 teaspoon paprika: Adds a touch of smokiness.
  • 1/2 teaspoon salt: To enhance all the flavors.
  • 1/4 teaspoon black pepper: For a little kick!
  • 1/4 cup chopped green onions, for garnish: A fresh touch to finish the dish!

Now that we have everything ready, let’s dive into the cooking process!

Step-by-Step Instructions

Side angle of a bowl filled with savory Dirty Rice mixed with ground beef and colorful peppers.

Follow these simple steps to create your delicious Dirty Rice with Ground Beef:

  1. Heat the Oil: In a large skillet, heat the olive oil over medium heat.
  2. Cook the Beef: Add the ground beef and cook, breaking it apart, until browned and cooked through. Drain any excess fat if necessary.
  3. Add the Veggies: Toss in the diced onion, bell pepper, and minced garlic. Cook for 3-5 minutes until softened and fragrant.
  4. Season It Up: Stir in the Cajun seasoning, thyme, paprika, salt, and pepper. Cook for another minute to let those flavors meld.
  5. Incorporate the Rice: Add the rice to the skillet and stir to coat it in the seasoning mix.
  6. Add the Broth: Pour in the chicken broth and bring the mixture to a boil. Once boiling, reduce the heat to low, cover, and simmer for 20-25 minutes, or until the rice is cooked and the liquid has been absorbed.
  7. Fluff and Garnish: Remove from heat and let sit for 5 minutes. Fluff the rice with a fork and garnish with chopped green onions.

Pro Tips for Perfect Dirty Rice

Want to elevate your cooking game? Check out these expert insights:

  • Choose Quality Meat: Opt for high-quality ground beef to enhance the flavor and texture of your dish.
  • Don’t Rush the Vegetables: Allow enough time for the onion and bell pepper to soften to deepen their flavors.
  • Season at Every Step: Layering seasoning throughout the cooking process will result in a more flavorful dish.
  • Experiment with Heat: If you enjoy a little spice, consider adding diced jalapeños or a dash of hot sauce.
  • Let It Rest: Allowing the rice to sit for a few minutes after cooking helps with texture and flavor absorption.
  • Use Leftovers Creatively: Transform leftovers into burritos, stuffed peppers, or a hearty salad!
  • Test for Doneness: Ensure the rice is tender and the liquid is absorbed before serving.
  • Pair with Fresh Sides: Serve with a fresh salad or cornbread for a complete meal!

Common Mistakes and Troubleshooting

Even pro chefs make mistakes! Here are some common pitfalls and how to avoid them:

  • Too Much Liquid: If the rice is too mushy, reduce the amount of broth next time.
  • Undercooked Rice: Ensure the heat is low enough and the skillet is covered to allow steam to cook the rice thoroughly.
  • Overcooked Beef: Cook the beef just until browned to maintain a juicy texture.
  • Lack of Flavor: Adjust seasonings to taste, and don’t be afraid to add a bit more Cajun seasoning if needed!

Delicious Variations to Try

Why not shake things up? Here are some fun twists on this classic recipe:

  • Spicy Andouille Sausage: Replace half the ground beef with sliced andouille sausage for a bolder taste.
  • Vegetarian Delight: Swap ground beef for lentils or mushrooms and use vegetable broth for a delightful plant-based option.
  • Seafood Fusion: Incorporate shrimp or crawfish for a Louisiana twist!
  • Mexican Dirty Rice: Add taco seasoning instead of Cajun spices and top with avocado and salsa for a Mexican flair.

Storage and Make-Ahead Instructions

Want to enjoy this dish later? Here’s how to store and prepare ahead of time:

  • Refrigeration: Store leftovers in an airtight container in the fridge for up to 4 days.
  • Freezing: Freeze for up to 3 months. Thaw overnight in the fridge before reheating.
  • Make-Ahead: Prepare the beef and vegetable mixture a day in advance and cook the rice just before serving.

Frequently Asked Questions

Got questions? We’ve got answers! Here are some FAQs about this delicious dish:

  • Can I use brown rice? Yes, but note that brown rice will require a longer cooking time and more liquid.
  • What can I serve with dirty rice? It pairs wonderfully with cornbread, a green salad, or grilled vegetables.
  • Can I make this dish gluten-free? Yes, just ensure your broth is gluten-free and swap any ingredients as needed.
  • How spicy is this recipe? It’s mild! Adjust the Cajun seasoning to your preferred spice level for extra heat.
  • Can I make this vegetarian? Absolutely! Use lentils or a meat substitute and vegetable broth.
  • What if I don’t have Cajun seasoning? Mix paprika, garlic powder, and black pepper as a substitute.
  • How do I know when the rice is done? The rice should be tender, and the liquid should be absorbed. Fluff with a fork to check.
  • Can I add more vegetables? Yes! Feel free to throw in carrots, peas, or any other veggies you enjoy.

Nutritional Tips and Dietary Adaptations

Eating healthy doesn’t mean sacrificing flavor! Here are some tips to boost the nutritional value of your dirty rice:

  • Use Lean Proteins: Opt for lean ground beef or turkey to reduce saturated fat.
  • Incorporate More Veggies: Add in extra veggies like spinach, kale, or zucchini for added nutrients.
  • Whole Grain Rice: Choosing brown rice increases fiber and keeps you full longer.
  • Reduce Sodium: Use low-sodium broth and adjust added salt to maintain flavor without excess sodium.

Equipment Recommendations

Here’s what you’ll need to bring this dish to life:

  • Large Skillet: A heavy-bottom skillet or cast iron pan is ideal for even cooking.
  • Wooden Spoon: Perfect for stirring and breaking up the beef.
  • Measuring Cups and Spoons: Essential for accurate ingredient measurements.
  • Sharp Knife: A good knife makes chopping veggies quick and easy!

Serving Suggestions

Want to elevate your dining experience? Consider these serving ideas:

  • Top with Fresh Herbs: A sprinkle of parsley or cilantro brightens up the dish!
  • Add Hot Sauce: For those who like a kick, hot sauce is a fantastic addition.
  • Side of Slaw: A crunchy slaw pairs well with the savory flavors of the rice.
  • Serve with Cornbread: Sweet cornbread balances the spice of the dish beautifully!

Now that you have the ultimate guide to making Dirty Rice with Ground Beef, it’s your turn to shine in the kitchen! Gather those ingredients, turn up the heat, and enjoy a dish that’s bursting with flavor and good vibes. Bon appétit!

Dirty Rice with Ground Beef

Prep Time 10 minutes
Cook Time 25 minutes
Total Time 35 minutes
Servings 4 servings
Calories 650
A flavorful Cajun-inspired dish combining seasoned ground beef with rice and vegetables for a hearty, satisfying meal.

Ingredients

olive oil

  • 1 tablespoon olive oil

ground beef

  • 1 pound ground beef

vegetables

  • 1 small onion, finely diced
  • 1 diced bell pepper, diced

garlic

  • 2 cloves garlic, minced

rice

  • 1 1/2 cups long-grain white rice

broth

  • 3 cups chicken broth

seasonings

  • 1 teaspoon Cajun seasoning
  • 1/2 teaspoon thyme
  • 1/2 teaspoon paprika
  • 1/2 teaspoon salt
  • 1/4 teaspoon black pepper

green onions

  • 1/4 cup chopped green onions, for garnish

Instructions 

  • Heat olive oil in a skillet, cook ground beef until browned. Remove excess fat.
  • Add diced onion, bell pepper, and garlic; cook until softened.
  • Stir in seasonings, cook for 1 minute.
  • Add rice, stir to coat, then pour in broth. Simmer covered for 20-25 minutes.
  • Let sit 5 minutes, fluff with a fork, garnish with green onions, and serve.

Notes

For extra flavor, add a dash of hot sauce or cayenne pepper.
Calories: 650kcal
Cost: $12
Course: Main Course
Cuisine: Cajun
Keyword: Beef, Rice

Welcome to the Creamy Chicken Alfredo Adventure!

Are you ready to transform your dinner table into a vibrant feast? Today, we’re diving into the world of creamy chicken alfredo pasta! This dish is not just a meal; it’s an experience of flavor that dances on your palate. Imagine perfectly cooked fettuccine enveloped in a rich, velvety sauce, topped with tender chicken and a sprinkle of parsley. Yes, please! Perfect for busy weeknights or a special occasion, this recipe will impress everyone at your table. Let’s get cooking and discover why this creamy chicken alfredo pasta is destined to become your new favorite!

Why You’ll Love This Recipe

  • Quick and Easy: With just a few simple steps, you can whip up a comforting meal in under 30 minutes. Perfect for those busy evenings!
  • Rich Flavor Profile: The combination of garlic, cream, and Parmesan creates a sauce that’s bursting with deliciousness. It’s comfort food at its finest!
  • Customizable: Want to add veggies or swap proteins? This recipe is versatile and can adapt to what you have on hand.
  • Meal Prep Friendly: Leftovers taste even better the next day! Make a big batch and enjoy it throughout the week.
  • Kid-Approved: Creamy, cheesy, and oh-so-delicious, kids love this dish, making it a great choice for family dinners.

Ingredient Breakdown

To create this dreamy chicken alfredo, you’ll need the following ingredients:

  • 12 ounces fettuccine pasta: The star of the show! Feel free to use any pasta shape that you prefer.
  • 2 tablespoons olive oil: This helps to cook the chicken to perfection while adding flavor.
  • 2 boneless, skinless chicken breasts: Tender and juicy, ensuring a satisfying protein component.
  • Salt and black pepper, to taste: Essential for enhancing the flavors of your dish.
  • 3 cloves garlic, minced: Adds a punch of flavor that elevates the sauce.
  • 2 cups heavy cream: This is the magic ingredient that makes the sauce rich and creamy.
  • 1 cup grated Parmesan cheese: Provides a nutty, cheesy flavor that brings the sauce together.
  • 2 tablespoons unsalted butter: Adds richness and depth to the sauce.
  • ¼ teaspoon nutmeg (optional): A hint of nutmeg can enhance the creaminess of the alfredo.
  • Fresh parsley, chopped: For garnish and a pop of color.

Expert Tips for The Best Chicken Alfredo

Juicy chicken pieces atop fettuccine pasta, coated in a rich Alfredo sauce, garnished with herbs.
  • Cook your pasta to al dente: This ensures the pasta holds its shape and texture when combined with the sauce.
  • Let the chicken rest: After cooking, allow the chicken to rest for a few minutes before slicing to keep it juicy.
  • Don’t rush the sauce: Allow the cream to simmer gently for a smooth and creamy consistency.
  • Use fresh Parmesan: Opt for freshly grated Parmesan cheese for the best flavor and texture.
  • Save some pasta water: If your sauce is too thick, add a splash of reserved pasta water to adjust the consistency.
  • Experiment with spices: Feel free to add a pinch of red pepper flakes for a spicy kick!
  • Mix in vegetables: Try adding steamed broccoli or spinach to include some greens in your meal.
  • Adjust seasoning: Always taste and adjust the seasoning before serving for the best flavor.

Avoid These Common Mistakes

Even the best of us can make mistakes in the kitchen! Here are a few common pitfalls to avoid:

  • Overcooking the chicken: Keep an eye on your chicken to prevent it from becoming dry. Cook until just done!
  • Using low-quality ingredients: Since this recipe is simple, high-quality ingredients make a huge difference in flavor.
  • Skipping the garlic: Garlic adds essential flavor; don’t skip it!
  • Not reserving pasta water: This can help achieve the perfect sauce consistency, so don’t forget!
  • Rushing the sauce: Allowing the cream to simmer gently is crucial for a silky texture.

Delicious Variations to Try

Looking to mix things up? Here are some tasty variations of the classic chicken alfredo:

  • Spinach and Artichoke Alfredo: Add sautéed spinach and artichoke hearts for a twist.
  • Broccoli Alfredo: Toss in steamed broccoli florets for some added crunch and nutrition.
  • Shrimp Alfredo: Swap the chicken for shrimp for a seafood twist that’s just as delicious.
  • Vegan Alfredo: Use cashew cream and nutritional yeast for a dairy-free version that’s still creamy and flavorful.

Storage and Make-Ahead Instructions

This creamy chicken alfredo is great for meal prep! Here’s how to store it:

  • Refrigerator: Store leftovers in an airtight container for up to 3 days.
  • Freezer: While it’s best fresh, you can freeze the sauce separately for up to 2 months. Just thaw and reheat when ready to serve.
  • Reheating: Reheat in a skillet over low heat, adding a splash of cream or pasta water to loosen the sauce.

Frequently Asked Questions

  • Can I use milk instead of heavy cream? While you can substitute milk, the sauce won’t be as rich and creamy.
  • What pasta is best for chicken alfredo? Fettuccine is traditional, but you can use any pasta you have on hand!
  • How do I make it gluten-free? Use gluten-free pasta and ensure your other ingredients are gluten-free.
  • Can I add more cheese? Absolutely! Adding more Parmesan will enhance the cheesy flavor.
  • Is this recipe kid-friendly? Yes! The creamy texture and mild flavors are usually a hit with kids.
  • Can I make this dish ahead of time? Yes! Prepare the sauce in advance and cook the pasta just before serving.
  • What can I serve with chicken alfredo? Garlic bread, a fresh salad, or steamed veggies make excellent side dishes.
  • How do I prevent the sauce from separating? Keep the heat low and avoid boiling after adding the cheese.

Nutrition Tips and Dietary Adaptations

Eating healthy doesn’t mean sacrificing flavor! Here are some tips to make this recipe more nutritious:

  • Use whole-grain pasta: This adds fiber and nutrients to your meal.
  • Opt for lean chicken: Chicken breast is a great source of protein without excess fat.
  • Add vegetables: Incorporate steamed veggies like broccoli or peas for added vitamins and minerals.
  • Limit cheese: You can reduce the amount of cheese to decrease calories while still enjoying a creamy texture.

Essential Equipment

To make this creamy chicken alfredo, you’ll need:

  • Large pot: For boiling the pasta.
  • Skillet: A large skillet is essential for cooking the chicken and making the sauce.
  • Wooden spoon: For stirring the sauce and combining all ingredients.
  • Measuring cups and spoons: Accurate measurements ensure the best results!

Serving Suggestions

Ready to serve? Here are some creative ideas to elevate your chicken alfredo experience:

  • Garnish with fresh parsley: A sprinkle of chopped parsley adds color and freshness.
  • Serve with garlic bread: Perfect for soaking up any leftover sauce!
  • Pair with a light salad: A simple green salad balances the richness of the pasta.
  • Offer grated cheese on the side: Let guests add as much cheese as they like!

Indulging in this creamy chicken alfredo pasta adventure is just a recipe away! With its simplicity and rich flavors, it’s destined to become a staple in your kitchen. So grab your ingredients, gather your loved ones, and let’s make mealtime something to celebrate!

Creamy Chicken Alfredo Pasta

Prep Time 10 minutes
Cook Time 20 minutes
Total Time 30 minutes
Servings 4 servings
Calories 650
A rich and creamy pasta dish featuring tender chicken and a luscious Alfredo sauce, perfect for a comforting meal.

Ingredients

Pasta

  • 12 ounces fettuccine pasta

Sauce

  • 2 tablespoons olive oil
  • 2 pieces boneless, skinless chicken breasts (thinly sliced)
  • Salt and black pepper Salt and black pepper (to taste)
  • 3 cloves garlic, minced
  • 2 cups heavy cream
  • 1 cup grated Parmesan cheese
  • 2 tablespoons unsalted butter
  • ¼ teaspoon nutmeg (optional)

Garnish

  • Fresh parsley fresh parsley, chopped (for garnish)

Instructions 

  • Cook the pasta until al dente, then drain and set aside.
  • Cook sliced chicken in olive oil until golden, then remove from skillet.
  • Sauté garlic in the same skillet, then add cream, butter, Parmesan, and nutmeg. Stir until smooth.
  • Return chicken to sauce, add pasta, and toss to combine. Garnish with parsley before serving.

Notes

For a lighter version, use half-and-half instead of heavy cream.
Calories: 650kcal
Cost: $15
Course: Main Course
Cuisine: Italian
Keyword: Chicken, Cream, pasta

Welcome to the World of Whimsical Easter Fruit Salad!

Spring has finally sprung, and what better way to celebrate than with a vibrant, colorful fruit salad that dances on your taste buds? This whimsical Easter fruit salad is not just a dish; it’s a celebration of flavors, textures, and nutrients that come together in perfect harmony. Packed with juicy peach pie filling, tropical pineapple, zesty mandarin oranges, and a medley of fresh strawberries, kiwis, and bananas, this salad is a delightful addition to any festive table. Get ready to impress your family and friends with a dish that’s as beautiful as it is delicious!

In this guide, we’ll dive deep into everything you need to know about creating this easy and delicious fruit salad that will make your Easter brunch unforgettable. From ingredient breakdowns and pro tips to common mistakes to avoid, let’s get started on this fruity adventure!

Why You’ll Love This Recipe

This fruit salad is not only delicious but also incredibly versatile and easy to make. Here are five reasons why you’ll fall head over heels for it:

  • Quick and Easy Preparation: With minimal chopping and prep work, this fruit salad comes together in just 15 minutes. It’s perfect for those last-minute gatherings!
  • Kid-Friendly: The sweet peach pie filling, combined with colorful fruits, makes this salad a hit with children. It’s a fun way to encourage them to eat more fruit!
  • Versatile Ingredients: Feel free to mix and match your favorite fruits. This salad can be customized to suit any palate or dietary preference.
  • Make-Ahead Friendly: You can prepare this salad in advance, allowing the flavors to meld beautifully. Just add the bananas and kiwis just before serving for maximum freshness!
  • Vibrant Presentation: The colorful array of fruits makes for an eye-catching centerpiece on any table, instantly elevating your Easter celebration.

Ingredient Breakdown

Let’s take a closer look at the ingredients that make this fruit salad so special:

  • 1 can (21 ounces) peach pie filling: This sweet, flavorful filling serves as the base and adds a delightful sweetness to the salad.
  • 1 can (20 ounces) pineapple chunks, drained: Pineapple brings a tropical flair and a juicy texture to the mix.
  • 1 can (15 ounces) mandarin oranges, drained: These zesty bites add a burst of citrus flavor.
  • 1 package (16 ounces) strawberries, hulled: Fresh strawberries add a beautiful red hue and a sweet, juicy bite.
  • 3 kiwis: Kiwis add a unique tanginess and vibrant green color, enhancing the salad’s visual appeal.
  • 2 bananas: Sliced bananas offer creaminess and natural sweetness. Remember to add these just before serving to avoid browning.

Substitutions and Variations

Close-up view of a vibrant Easter fruit salad topped with peach pie filling and surrounded by fresh fruit pieces.

Don’t hesitate to get creative with your fruit salad! Here are some substitutions and variations you can try:

  • Fruit Swap: Substitute peaches with diced apples or pears for a different flavor profile.
  • Tropical Twist: Add shredded coconut or mango for an extra tropical vibe.
  • Berry Bliss: Incorporate mixed berries like blueberries or raspberries for a berry-packed version.
  • Nutty Crunch: Sprinkle in some chopped nuts (like almonds or walnuts) for added texture and nutrition.

Pro Tips for the Perfect Salad

To ensure your whimsical Easter fruit salad turns out perfectly, keep these expert tips in mind:

  • Use Fresh Ingredients: Fresh fruits not only enhance flavor but also boost nutritional value.
  • Chill Before Serving: Allow the salad to chill in the fridge for at least an hour. This helps the flavors meld and makes it extra refreshing!
  • Adjust Sweetness: Taste the salad before serving. If it’s not sweet enough, you can drizzle a little honey or agave syrup over it.
  • Layering Matters: Layer fruits in the serving bowl for a visually appealing presentation.
  • Mix Gently: When combining ingredients, do so gently to avoid mashing the fruits.
  • Store Properly: If you have leftovers, store them in an airtight container in the fridge for up to two days.
  • Bananas Last: Remember to add bananas just before serving to keep them fresh and avoid browning.
  • Experiment with Dressings: Try adding a splash of lime juice or a drizzle of yogurt for a creamy dressing twist!

Avoid These Common Mistakes

To ensure your Easter fruit salad turns out beautifully, avoid these common pitfalls:

  • Using Overripe Fruit: Always choose ripe but firm fruit to maintain texture.
  • Skipping the Chill: Don’t skip chilling the salad; it enhances the flavor and makes it more enjoyable.
  • Cutting Fruits Too Early: Prepare fruits too early can lead to oxidation. Keep bananas and kiwis aside until just before serving.
  • Not Draining Canned Fruit: Be sure to drain canned fruits thoroughly to avoid excess liquid.

Storage and Make-Ahead Instructions

This fruit salad is perfect for making ahead of time! Here’s how to store it:

  • Make Ahead: You can prepare the salad a day in advance, just adding bananas and kiwis before serving.
  • Refrigerate: Store in an airtight container in the fridge to keep it fresh.
  • Leftovers: Enjoy leftovers within two days for the best quality.

Frequently Asked Questions (FAQs)

Got questions? We’ve got answers! Here are some common queries about this whimsical Easter fruit salad:

  • Can I use frozen fruit? Yes! Frozen fruit can be used, but be sure to thaw and drain it first to avoid excess moisture.
  • How can I make it vegan? This recipe is naturally vegan as long as you use plant-based peach pie filling.
  • Can I add yogurt to this salad? Absolutely! A dollop of yogurt can add creaminess and a tangy flavor.
  • Is it gluten-free? Yes, this fruit salad is gluten-free! Always check canned products for potential gluten.
  • How do I keep bananas from browning? You can toss them in a little lemon juice to slow down oxidation.
  • What’s the best way to serve it? Serve chilled in a large bowl, or create individual servings in cups for a fun presentation!
  • Can I use other fruits? Definitely! Feel free to experiment with your favorite fruits based on seasonal availability.
  • How do I make it more filling? Add a scoop of granola or nuts for extra texture and nutrition.

Nutrition Tips and Dietary Adaptations

This Easter fruit salad is not only delicious but also packed with nutrients! Here are some nutrition tips to enhance its health benefits:

  • Fiber Boost: Fruits are rich in dietary fiber, aiding digestion and keeping you full longer.
  • Vitamin Rich: The diverse fruits provide essential vitamins and minerals, especially vitamin C and antioxidants.
  • Low-Calorie Option: This salad is a low-calorie dessert option compared to traditional sweets.
  • Adjust Sweetness: If you’re watching sugar intake, reduce the amount of pie filling or use a sugar-free version.

Recommended Equipment

To make this whimsical Easter fruit salad, you’ll need a few simple tools:

  • Mixing Bowl: A large bowl for combining all the ingredients.
  • Cutting Board: For chopping fresh fruits like strawberries, kiwis, and bananas.
  • Knife: A sharp knife is essential for precise cutting.
  • Measuring Cups: To accurately measure canned fruits and other ingredients.
  • Serving Spoon: For serving the salad and ensuring everyone gets a delightful mix of flavors!

Serving Suggestions

This Easter fruit salad is versatile and pairs well with a variety of dishes. Here are some serving suggestions:

  • Brunch Buffets: Serve alongside quiches, pastries, and other brunch favorites.
  • Picnics: Pack it in a cooler for a refreshing treat on a sunny day.
  • BBQs: A great side dish to balance out savory grilled meats.
  • Holiday Dinners: Perfect as a light dessert option after a hearty meal.

Conclusion: Dive into the Fruity Fun!

Eating healthy doesn’t have to be boring, and this whimsical Easter fruit salad proves just that! With its vibrant colors and delightful flavors, it’s a dish that offers joy and celebration. Whether you’re hosting a festive gathering or simply treating yourself, this salad is sure to be a hit. So grab your fruits, channel your inner chef, and let the fruity fun begin! Happy cooking!

Delicious Easter Fruit Salad with Peach Pie Filling

Prep Time 15 minutes
Total Time 15 minutes
Servings 8 servings
Calories 250
A vibrant and refreshing fruit salad perfect for Easter celebrations, combining sweet canned fruits with fresh strawberries, kiwis, and bananas.

Ingredients

Canned Fruits

  • 1 can peach pie filling
  • 1 can pineapple chunks (drained)
  • 1 can mandarin oranges (drained)

Fresh Fruits

  • 16 ounces strawberries (hulled, either frozen or fresh)
  • 3 pieces kiwis
  • 2 pieces bananas

Instructions 

  • Drain and combine all canned fruits in a large bowl.
  • Peel and slice kiwis and bananas, then add to the bowl.
  • Gently toss all fruits to mix evenly.
  • Chill in the refrigerator for at least 30 minutes before serving.

Notes

For added flavor, top with a dollop of whipped cream or a sprinkle of chopped nuts.
Calories: 250kcal
Cost: $12
Course: Dessert, Salad
Cuisine: American
Keyword: Easter, fruit

Unleash Flavor with Creamy Chicken & Mushroom Pasta

Welcome to a culinary adventure where comfort meets elegance! This creamy chicken & mushroom pasta recipe is not just a meal; it’s a delightful experience that will elevate your dinner game. Packed with tender chicken, savory mushrooms, and a decadent cream sauce, it’s the perfect solution for busy nights or special occasions. Let’s dive into why this dish is an absolute must-try!

Why You’ll Love This Recipe

Here’s why this chicken and mushroom pasta will become a staple in your kitchen:

  • Quick & Easy: This dish can be whipped up in just 30 minutes, making it ideal for those hectic weeknights.
  • Comfort Food Elevated: The rich cream sauce transforms traditional pasta into a restaurant-quality dish right at home.
  • Versatile Ingredients: Customize with your favorite pasta shapes or add extra vegetables for a nutrient boost.
  • Flavor Explosion: The combination of garlic, thyme, and mushrooms creates a symphony of flavors that will tantalize your taste buds.
  • Perfect for Meal Prep: This recipe keeps well in the fridge, making it a fantastic option for make-ahead meals.

Ingredient Breakdown

Let’s take a closer look at what goes into this delicious chicken mushroom pasta and how you can modify ingredients to suit your tastes:

  • Pasta: 8 oz of penne pasta is the base. You can substitute with fusilli, rigatoni, or farfalle based on your preference.
  • Chicken: 2 pieces of chicken breasts, trimmed and sliced into 1/2-inch strips, provide a protein-packed punch.
  • Butter: Use 2 tbsp of butter (salted or unsalted) to sauté the ingredients and add flavor.
  • Mushrooms: 8 oz of cremini or button mushrooms are sautéed to perfection, giving your dish that earthy depth.
  • Garlic: 4 cloves of freshly minced garlic elevate the flavor profile significantly.
  • Heavy Cream: 1 cup of heavy cream creates that luscious sauce we all crave. Ensure it’s cold or at room temperature.
  • Parmesan Cheese: 1/2 cup of freshly grated parmesan adds creaminess and a salty bite that pairs beautifully.
  • Thyme: 1 tsp of thyme (fresh or dried) for that aromatic touch.
  • Seasoning: Salt and freshly cracked pepper to taste.

How to Make Creamy Chicken & Mushroom Pasta

Creamy chicken and mushroom penne pasta served in a stylish dish, showcasing a rich sauce.

Follow these steps to create your masterpiece:

  1. Cook the pasta according to package instructions until al dente. Reserve some pasta water, then drain and set aside.
  2. In a large skillet, melt the butter over medium heat. Add the sliced chicken and cook until browned and cooked through, about 5-7 minutes.
  3. Add the minced garlic and sliced mushrooms, sautéing until the mushrooms are tender and the garlic is fragrant, about 3 minutes.
  4. Pour in the heavy cream, stirring to combine. Allow the sauce to simmer for 3-5 minutes until it thickens slightly.
  5. Stir in the parmesan cheese, thyme, salt, and pepper, adjusting seasoning as needed.
  6. Toss in the cooked pasta, adding a splash of reserved pasta water to achieve your desired sauce consistency.
  7. Serve immediately, garnished with extra parmesan and fresh herbs if desired.

Pro Tips for Perfecting Your Pasta Dish

Want to take your chicken mushroom pasta to the next level? Check out these expert tips:

  • Don’t Overcook the Chicken: Aim for juicy, tender chicken by cooking just until no longer pink.
  • Use Fresh Ingredients: Fresh garlic and herbs enhance the flavor and aroma of your dish.
  • Adjust the Sauce Thickness: If the sauce is too thick, add a splash of pasta water. If too thin, let it simmer longer.
  • Experiment with Cheese: Swap out parmesan for other cheeses like mozzarella or gouda for a different flavor.
  • Add Greens: Stir in baby spinach or kale just before serving for a nutritional boost.
  • Make it Spicy: Add red pepper flakes to the sauce for a kick of heat!
  • Plan for Leftovers: This dish stores well in the fridge, making it perfect for meal prep.
  • Use the Right Pasta: Different shapes hold sauce differently; choose based on your preference!

Common Mistakes & Troubleshooting

Here are a few common pitfalls and how to avoid them:

  • Overcooked Pasta: Ensure to cook your pasta al dente. It will continue cooking in the sauce.
  • Too Greasy: If your sauce is too oily, try using less butter or draining excess fat after cooking the chicken.
  • Flavorless Sauce: Always taste and adjust seasoning towards the end of cooking.
  • Clumpy Cheese: Gradually add cheese to the sauce while stirring to ensure a smooth consistency.

Delicious Variations

Feeling adventurous? Here are some tasty variations to try:

  • Pesto Chicken & Mushroom Pasta: Swap half of the cream for basil pesto for a fresh twist.
  • Garlic Butter Shrimp & Mushrooms: Substitute shrimp for chicken for a seafood delight!
  • Vegetable Mushroom Pasta: Add seasonal veggies like zucchini or bell peppers for extra color and nutrients.
  • Spicy Chipotle Chicken: Add chipotle sauce for a smoky, spicy flavor profile.

Storage & Make-Ahead Instructions

This dish is perfect for meal prep! Here’s how to store it:

  • Fridge: Store in an airtight container in the refrigerator for up to 3 days.
  • Freezer: Freeze for up to 2 months. Thaw and reheat on the stove, adding a splash of cream or pasta water to restore the sauce’s consistency.
  • Reheating: Reheat gently on the stove over low heat, stirring frequently.

Comprehensive FAQ

1. Can I use other types of pasta?

Absolutely! Feel free to swap in your favorite pasta shape.

2. Is this recipe gluten-free?

Use gluten-free pasta to make this dish suitable for gluten-sensitive diets.

3. Can I make this dish dairy-free?

Yes! Substitute heavy cream with coconut cream and cheese with nutritional yeast.

4. How can I increase the protein content?

Add more chicken or toss in some beans or lentils for a hearty boost.

5. What can I serve with this pasta?

A simple side salad, garlic bread, or steamed vegetables complement this dish well.

6. How do I make it vegetarian?

Just omit the chicken and add more mushrooms or other vegetables!

7. Can I make this dish spicy?

Absolutely! Add red pepper flakes while cooking for heat.

8. How long does this pasta stay fresh?

It will last for about 3 days in the fridge. Just reheat on the stovetop!

Nutritional Tips & Dietary Adaptations

This creamy chicken mushroom pasta can be adapted to fit various dietary needs:

  • Low-Carb: Use spiralized veggies like zucchini or spaghetti squash instead of pasta.
  • Protein-Packed: Add chickpeas or edamame for an extra protein boost.
  • Vegan-Friendly: Use plant-based cream and omit chicken for a delicious vegan meal.

Essential Equipment Recommendations

Here’s what you’ll need for this recipe:

  • Large Skillet: For cooking the chicken and sauce.
  • Pot: To boil the pasta.
  • Wooden Spoon: For stirring ingredients together.
  • Measuring Cups & Spoons: For accurate ingredient measurements.

Serving Suggestions

Complete your meal with these delightful serving options:

  • Fresh Herbs: Garnish with chopped parsley or basil for added freshness.
  • Lemon Zest: A sprinkle of lemon zest brightens the dish beautifully.
  • Salad: Pair with a crisp green salad dressed in vinaigrette.

So there you have it! A comprehensive guide to crafting the perfect creamy chicken & mushroom pasta. With its comforting flavors and versatile nature, this dish is bound to impress your family and friends. Remember, the kitchen is your playground—experiment, have fun, and enjoy every bite!

Indulge in Chicken & Mushroom Pasta in Decadent Cream Sauce

Prep Time 10 minutes
Cook Time 20 minutes
Total Time 30 minutes
Servings 4 servings
Calories 650
Enjoy a rich and creamy pasta dish featuring tender chicken and savory mushrooms, perfect for a comforting meal.

Ingredients

Pasta

  • 8 oz Penne Pasta (Can substitute with fusilli, rigatoni, or farfalle)

Chicken

  • 2 pieces Chicken Breasts (Trim and slice into 1/2-inch strips)

Dairy

  • 2 tbsp Butter (Salted or unsalted based on preference)
  • 8 oz Mushrooms (Opt for cremini or button)
  • 4 cloves Garlic (Freshly minced)
  • 1 cup Heavy Cream (Use cold or at room temperature)
  • 1/2 cup Parmesan Cheese (Freshly grated recommended)
  • 1 tsp Thyme (Fresh or dried)
  • to taste Salt Salt
  • to taste Pepper Pepper (Freshly cracked)

Instructions 

  • Cook the pasta according to package instructions until al dente. Drain and set aside.
  • In a large skillet, melt butter over medium heat. Add sliced chicken and cook until browned and cooked through, about 5-7 minutes.
  • Add minced garlic and sliced mushrooms to the skillet. Sauté until fragrant and mushrooms are tender, about 5 minutes.
  • Pour in heavy cream, add thyme, salt, and pepper. Simmer for 3-5 minutes until slightly thickened.
  • Stir in grated Parmesan cheese and cooked pasta. Toss to combine and heat through for 2 minutes.

Notes

For a lighter version, use half-and-half instead of heavy cream.
Calories: 650kcal
Cost: $15
Course: Main Course
Cuisine: Italian
Keyword: Chicken, Cream, Mushroom, pasta

Unlock the Flavors of Texas with This Mouthwatering Chili Recipe!

If you’re ready to dive into a bowl of pure comfort, look no further than my Melt-in-Your-Mouth Texas Style Beef Chili. This recipe is not just your average bowl of chili—it’s a flavor explosion that will have your taste buds dancing! Packed with tender beef, vibrant vegetables, and a harmonious blend of spices, this chili is perfect for cozy family dinners or lively gatherings with friends. Plus, the best part? It’s easy to make and downright delicious!

Why You’ll Love This Recipe

Let’s talk about why this Texas chili is a must-try:

  • Flavor Harmony: The combination of smoky chipotle, zesty lime, and hearty beef creates a rich, robust flavor that you’ll crave again and again.
  • Hearty & Filling: This chili isn’t just a side dish; it’s a complete meal that’s satisfying enough to stand on its own.
  • Quick Prep Time: While it simmers for hours, the hands-on prep is quick, making it perfect for busy weeknights.
  • Perfect for Meal Prep: This chili tastes even better the next day, making it ideal for meal prep or leftovers!
  • Customizable: Adjust the spice levels or add your favorite beans and veggies to make it your own!

Ingredients for Texas Style Beef Chili

Here’s what you’ll need to create this delicious chili:

  • 2 lb beef chuck roast, cut into 1 inch cubes
  • Salt and pepper to taste
  • 2 tbsp avocado oil
  • 1 white onion, diced
  • 2 bell peppers, diced
  • 1 poblano pepper, diced
  • 1 jalapeno, minced
  • 6 garlic cloves, minced
  • 2 cans chopped tomatoes
  • 1 can kidney beans, drained
  • 1 can hatch chilis
  • 4 cups chicken stock or beef stock
  • 1 tbsp fish sauce
  • 3 tbsp chili powder
  • 1 tbsp smoked paprika
  • 1 tsp chipotle powder
  • 2 tsp oregano
  • 1 tbsp cumin
  • 1 bay leaf
  • 1 lime, juiced
  • ¼ cup cilantro, chopped for garnish
  • Optional toppings: chopped red onion, avocado, cilantro, cheese, sour cream

How to Make Texas Style Beef Chili

Ready to whip up your chili masterpiece? Follow these simple steps:

  1. Prepare the Beef: Season the beef with salt and pepper and pat dry with a paper towel. Heat avocado oil in a large Dutch oven over medium heat. Sear the beef in batches until golden brown, about 2 minutes per side. Remove and set aside.
  2. Build the Flavor Base: In the same pot, sauté onions, bell peppers, and poblano pepper until translucent, about 5-10 minutes. Add jalapeno and garlic, sauté for 2 more minutes.
  3. Combine Ingredients: Stir in chopped tomatoes, kidney beans, hatch chilis, chicken stock, fish sauce, chili powder, smoked paprika, chipotle powder, oregano, cumin, and bay leaf. Season with salt. Add the beef back to the pot.
  4. Simmer to Perfection: Cover and simmer for 2 hours until the beef is tender. Stir occasionally to prevent sticking.
  5. Finish Strong: Remove the bay leaf, stir in lime juice and cilantro, and adjust seasoning if needed. Serve with your favorite toppings!

Pro Tips for the Best Texas Chili

Want to take your chili to the next level? Check out these expert insights:

  • Use Quality Beef: Opt for a chuck roast with good marbling for maximum flavor and tenderness.
  • Don’t Rush the Searing: Searing the beef properly helps to lock in flavors. Aim for a nice golden crust.
  • Customize Your Heat: If you like it spicy, feel free to add more jalapenos or some cayenne pepper!
  • Let It Rest: Allowing your chili to sit for a bit before serving enhances the flavors.
  • Garnish Creatively: Don’t skimp on the toppings! They add a fresh contrast to the rich chili.
  • Freeze for Later: This chili freezes beautifully. Just store it in airtight containers for up to three months!
  • Use Fresh Herbs: Fresh cilantro adds a bright flavor that cuts through the richness of the beef.
  • Chili Powder Choice Matters: The type of chili powder you use can drastically change the flavor. Choose one you love!

Common Mistakes and Troubleshooting

Mistakes happen in the kitchen! Here’s how to avoid them:

  • Overcooking the Beef: Ensure you check the beef for tenderness after 2 hours. You want it melt-in-your-mouth tender but not mushy.
  • Too Much Salt: If your chili ends up too salty, add a dollop of sour cream or a bit of sugar to balance the flavors.
  • Not Enough Liquid: If your chili is too thick, add a splash more stock or water to reach your desired consistency.
  • Skip the Fish Sauce: Don’t underestimate the umami boost from fish sauce—it enhances the overall flavor!

Delicious Variations

Here are some fun twists on the classic Texas chili:

  • Vegetarian Chili: Replace the beef with lentils or mushrooms for a hearty vegetarian option.
  • White Chicken Chili: Swap beef for shredded chicken and use white beans for a lighter version.
  • Chili Verde: Use pork shoulder and tomatillos for a tangy green chili experience.
  • Spicy Chili: Add more jalapenos or a few dashes of hot sauce to crank up the heat!

Storage and Make-Ahead Instructions

Want to enjoy your chili later? Here’s how to store it:

  • Refrigerate: Store cooled chili in an airtight container in the fridge for up to 4 days.
  • Freeze: Freeze in portion-sized containers for up to 3 months. Thaw overnight in the refrigerator before reheating.
  • Reheat: Warm on the stovetop over medium heat, stirring occasionally, until heated through.

Frequently Asked Questions

Got questions? I’ve got answers!

  • Does Texas chili have beans? Traditional Texas chili doesn’t include beans, but feel free to add them for texture!
  • Can I use ground beef instead? Yes, but for the best flavor and texture, I recommend using chuck roast.
  • How can I make it spicier? Add more jalapenos, cayenne, or even a few dashes of your favorite hot sauce.
  • What’s the best way to serve chili? Serve hot with toppings like cheese, sour cream, and fresh cilantro.
  • Can I make it in a slow cooker? Absolutely! Just sear the beef first, then add all ingredients to the slow cooker and cook on low for 6-8 hours.
  • Is it suitable for freezing? Yes, it freezes well! Just make sure to cool it completely before storing.
  • What can I serve with chili? Cornbread, rice, or tortilla chips make fantastic sides.
  • What type of chili powder should I use? Choose a high-quality chili powder that suits your taste—smoky and rich is often best!

Nourishing Nutrition Tips

This Texas chili provides more than just flavor:

  • Beef is a great source of protein, helping to keep you full and energized.
  • Adding beans increases fiber content, beneficial for digestion.
  • Fresh veggies like peppers and onions bring vitamins and minerals to the dish.

Essential Equipment You’ll Need

Before you get cooking, make sure you have:

  • Large Dutch Oven: Ideal for searing and simmering all in one pot.
  • Wooden Spoon: Perfect for stirring without scratching your pot.
  • Measuring Cups and Spoons: Accurate measurements ensure consistent flavors.
  • Sharp Knife: For chopping vegetables and cutting beef.

Serving Suggestions

Elevate your chili experience with these tasty accompaniments:

  • Chopped Green Onions: Adds a fresh, crunchy element.
  • Cheddar Cheese: A classic topping for a creamy finish.
  • Avocado Slices: Adds creaminess and richness.
  • Crushed Tortilla Chips: For added crunch and texture.

Conclusion

There you have it—my Melt-in-Your-Mouth Texas Style Beef Chili is not only delicious but also versatile and easy to make. It’s sure to become a family favorite that you’ll want to make again and again. So grab your ingredients, gather your loved ones, and let’s get cooking! Remember, cooking should be fun, and this chili is here to prove that healthy eating can be a vibrant and exciting adventure. Enjoy!

Texas Style Beef Chili Recipe That Melts in Your Mouth

Prep Time 20 minutes
Cook Time 2 hours
Total Time 2 hours 20 minutes
Servings 6 servings
Calories 650
Enjoy a hearty, flavorful Texas-style beef chili that's tender and packed with smoky spices, perfect for a comforting meal.

Ingredients

Meat

  • 2 lb beef chuck roast, cut into 1 inch cubes
  • Salt and pepper to taste Salt and pepper
  • 2 tbsp avocado oil
  • 1 white onion diced white onion
  • 2 diced bell peppers
  • 1 diced poblano pepper
  • 1 minced jalapeno
  • 6 cloves garlic, minced
  • 2 cans chopped tomatoes
  • 1 can kidney beans, drained
  • 1 can hatch chilis
  • 4 cups chicken stock or beef stock
  • 1 tbsp fish sauce
  • 3 tbsp chili powder
  • 1 tbsp smoked paprika
  • 1 tsp chipotle powder
  • 2 tsp oregano
  • 1 tbsp cumin
  • 1 bay leaf bay leaf
  • 1 lime juiced
  • ¼ cup cilantro, chopped for garnish

Optional toppings

  • chopped red onion, avocado, cilantro, cheese, sour cream Optional toppings

Instructions 

  • Season beef with salt and pepper, then sear in hot oil until golden. Remove and set aside.
  • Sauté onions, peppers, and garlic until translucent. Add tomatoes, beans, chilis, stock, and spices; return beef to the pot.
  • Simmer covered for 2 hours until beef is tender. Remove bay leaf, stir in lime juice and cilantro, then serve with toppings.

Notes

For extra flavor, let the chili rest for 30 minutes before serving to allow flavors to meld.
Calories: 650kcal
Cost: $15
Course: Main Course
Cuisine: Texan
Keyword: Beef

Welcome to the World of Banana Oatmeal Bliss!

Are you ready to elevate your breakfast game with a dish that’s not only delicious but also incredibly nutritious? Look no further than this Banana Oatmeal recipe! In just a few simple steps, you can whip up a warm, comforting bowl of creamy oats that will energize your mornings and delight your taste buds. Packed with ripe bananas, wholesome oats, and a hint of spice, this recipe is your ticket to a breakfast you’ll look forward to. Let’s dive in!

Why You’ll Love This Recipe

Here are just a few reasons why this banana oatmeal will become your new breakfast staple:

  • Quick & Easy: In just 15 minutes, you can have a hearty breakfast ready to go!
  • Nutritious Fuel: With fiber-rich oats and potassium-packed bananas, this meal will keep you energized throughout the morning.
  • Customizable: Dress it up with your favorite toppings or variations to keep it exciting every day.
  • Budget-Friendly: All ingredients are affordable and typically found in your pantry.
  • Perfect for Meal Prep: Make a big batch and enjoy it throughout the week!

Ingredient Breakdown

Let’s take a closer look at what you’ll need for this scrumptious banana oatmeal:

  • 4 large ripe bananas: Look for bananas that have brown spots for natural sweetness.
  • 3 cups low-fat milk: This gives your oatmeal a creamy texture. You can substitute with almond milk or oat milk for a dairy-free option!
  • 2 cups old-fashioned rolled oats: These oats provide a hearty base. Steel-cut oats can also be used for a chewier texture; just adjust cooking time.
  • 3 tablespoons pure maple syrup: Adds a delightful sweetness that pairs perfectly with bananas.
  • 1 teaspoon vanilla extract: For an aromatic touch that enhances the flavor.
  • 0.75 teaspoon ground cinnamon: This spice adds warmth and a hint of sweetness.
  • 0.25 teaspoon ground ginger: A subtle kick that complements the other flavors.
  • 0.125 teaspoon salt: Balances the sweetness.

Step-by-Step Instructions

Side view of a bowl of banana oatmeal showing the texture and ingredients, featuring fresh banana slices on top.

Ready to make your banana oatmeal? Follow these easy steps:

  1. Peel and slice 1 banana; set aside for serving.
  2. In a large saucepan, mash the remaining 3 bananas using a fork.
  3. Add the milk to the mashed bananas and bring the mixture to a simmer over medium-high heat, stirring occasionally.
  4. Once simmering, stir in the oats, maple syrup, vanilla, cinnamon, ginger, and salt.
  5. Reduce heat to medium-low and cook, stirring frequently, until the mixture thickens and becomes creamy, about 5 minutes.
  6. Divide the oatmeal into 4 bowls, topping each with the reserved banana slices. Sprinkle with additional cinnamon if desired and serve immediately.

Pro Tips for Perfect Banana Oatmeal

Want to elevate your oatmeal game even further? Check out these expert insights:

  • Choose the Right Bananas: The riper the banana, the sweeter your oatmeal will be. Look for bananas with plenty of brown spots.
  • Adjust Consistency: If you prefer a thinner oatmeal, simply add more milk until you reach your desired texture.
  • Experiment with Sweetness: Feel free to adjust the maple syrup based on your sweetness preference.
  • Enhance with Toppings: Try adding nuts, seeds, or fresh berries for extra texture and flavor!
  • Make it Creamy: For an extra creamy oatmeal, stir in a tablespoon of nut butter before serving.
  • Incorporate Superfoods: Toss in chia seeds or flaxseeds for added nutrition.
  • Use a Non-Stick Pan: This helps prevent the oats from sticking and burning at the bottom.
  • Batch Cooking: Make a double batch and store leftovers in the fridge for a quick breakfast option!

Common Mistakes and Troubleshooting

Don’t let a few hiccups ruin your oatmeal experience! Here are common mistakes and how to avoid them:

  • Overcooking: Keep an eye on your oatmeal to prevent it from becoming too thick or mushy. Stir frequently!
  • Not Enough Liquid: If your oatmeal seems too dry, add a splash of milk or water to achieve the perfect consistency.
  • Using Unripe Bananas: Ripe bananas provide the best flavor and sweetness. Avoid underripe bananas for this recipe.
  • Skipping the Salt: A pinch of salt enhances the overall flavor—don’t skip it!

Delicious Variations to Try

This banana oatmeal is incredibly versatile! Here are some fun variations to keep your breakfast exciting:

  • Peanut Butter Banana Oatmeal: Stir in a spoonful of peanut butter before serving for a protein boost!
  • Chocolate Chip Banana Oatmeal: Add a handful of dark chocolate chips for a sweet treat.
  • Berry Bliss Oatmeal: Top with fresh berries for a burst of flavor and color.
  • Nutty Banana Oatmeal: Sprinkle with chopped walnuts or almonds for crunch and healthy fats.

Storage and Make-Ahead Instructions

Planning ahead? Here’s how to store your banana oatmeal:

  • Refrigeration: Store any leftovers in an airtight container in the fridge for up to 3 days.
  • Reheating: To reheat, add a splash of milk and warm in the microwave or on the stovetop.
  • Make-Ahead: You can prepare the oatmeal in advance and store it in the fridge. Just reheat and add toppings before serving!

Frequently Asked Questions

Got questions? We’ve got answers! Here are some of the most common inquiries about banana oatmeal:

  • Can I make banana oatmeal vegan? Yes! Simply use plant-based milk and omit any dairy toppings.
  • Can I use instant oats instead of rolled oats? Yes, but the cooking time will be shorter. Keep an eye on the consistency!
  • Can I freeze banana oatmeal? Yes, freeze in individual portions. Thaw in the fridge overnight before reheating.
  • How do I keep bananas from turning brown in oatmeal? Serve bananas fresh on top just before eating to maintain their color.
  • Can I make this oatmeal gluten-free? Absolutely! Just ensure your oats are certified gluten-free.
  • What can I use instead of maple syrup? Honey or agave syrup works well as alternatives.
  • How can I add more protein to my oatmeal? Stir in protein powder or add Greek yogurt as a topping!
  • Is banana oatmeal good for weight loss? Yes, it’s filling and nutritious, making it a great choice for a balanced diet.

Nutritional Tips and Dietary Adaptations

This banana oatmeal isn’t just tasty; it’s also packed with health benefits. Here’s a breakdown:

  • High in Fiber: Oats are a great source of dietary fiber, which helps keep you full and supports digestive health.
  • Rich in Potassium: Bananas provide potassium, essential for heart health and muscle function.
  • Low in Saturated Fat: This recipe is heart-healthy, making it suitable for various diets.
  • Adaptable for Diets: Easily modify this recipe for vegan, gluten-free, or high-protein diets!

Essential Equipment You’ll Need

To make this banana oatmeal, you’ll need a few basic kitchen tools:

  • Large saucepan: Essential for cooking your oatmeal evenly.
  • Wooden spoon: Perfect for stirring without scratching your cookware.
  • Measuring cups and spoons: Accurate measurements are key to a perfect recipe.
  • Fork: For mashing bananas and mixing ingredients smoothly.

Serving Suggestions

Now that your banana oatmeal is ready, how can you serve it up for maximum enjoyment? Here are some ideas:

  • Top it off: Add sliced nuts, seeds, or a dollop of yogurt for added texture.
  • Garnish: Sprinkle with chia seeds or coconut flakes for a tropical twist.
  • Pair it: Enjoy with a side of fresh fruit or a smoothie for a complete breakfast!

Conclusion

There you have it! A foolproof recipe for Banana Oatmeal that’s not only delightful but also nutritious and easy to make. Breakfast doesn’t have to be boring—embrace the joy of cooking and enjoy the deliciousness of this wholesome bowl of oatmeal. Whether you’re fueling up for a busy day or indulging in a cozy weekend breakfast, this recipe is sure to satisfy. So grab your ingredients and get cooking! Your taste buds will thank you.

Banana Oatmeal

Prep Time 5 minutes
Cook Time 10 minutes
Total Time 15 minutes
Servings 4 bowls
Calories 250
A creamy and comforting oatmeal infused with ripe bananas and warm spices, perfect for a nutritious breakfast.

Ingredients

Fruits

  • 4 large ripe bananas (divided)

Dairy

  • 3 cups low-fat milk

Grains

  • 2 cups old-fashioned rolled oats

Sweeteners & Spices

  • 3 tablespoons pure maple syrup
  • 1 teaspoon vanilla extract
  • 0.75 teaspoon ground cinnamon (plus more for sprinkling)
  • 0.25 teaspoon ground ginger
  • 0.125 teaspoon salt

Instructions 

  • Peel and slice 1 banana for topping.
  • Mash remaining bananas in a saucepan, add milk, and simmer.
  • Stir in oats, maple syrup, vanilla, cinnamon, ginger, and salt; cook until thickened.
  • Divide oatmeal into bowls and top with reserved banana slices.
  • Sprinkle with cinnamon if desired and serve immediately.

Notes

Using ripe bananas enhances sweetness naturally.
Calories: 250kcal
Cost: $8
Course: Breakfast
Cuisine: American
Keyword: Banana

Welcome to Your New Favorite Smoothie Adventure!

Get ready to dive into the vibrant world of smoothies with our Kale Pineapple Smoothie! This energizing drink not only tantalizes your taste buds but also packs a nutritious punch, making it the perfect addition to your busy lifestyle. If you’ve ever thought healthy eating is boring, think again! This smoothie is a delicious way to incorporate greens into your diet without sacrificing flavor. In just a few minutes, you can whip up a drink that’s as refreshing as a tropical vacation.

Why You’ll Love This Recipe

This Kale Pineapple Smoothie isn’t just delicious; it’s loaded with benefits that will keep you coming back for more. Here’s why you’ll love it:

  • Tropical Flavor Explosion: The sweetness of pineapple combined with the earthiness of kale creates a delightful balance that dances on your palate.
  • Energizing Ingredients: Packed with essential vitamins and minerals, this smoothie offers a natural energy boost to kickstart your day.
  • Quick and Easy: Ready in under 5 minutes, this smoothie is perfect for busy mornings or a refreshing afternoon snack.
  • Customizable Base: Swap out ingredients easily to suit your taste or dietary needs without compromising flavor.
  • Nutrient-Rich: With ingredients like kale and Greek yogurt, you’re fueling your body with protein, fiber, and probiotics!

Ingredient Breakdown

Let’s dive into the ingredients that make this smoothie a star:

  • 1 heaping cup frozen pineapple chunks: Provides sweetness and a tropical flair. Substitutions: Use mango or peaches if pineapple is unavailable!
  • 1 tightly packed cup kale, ribs removed: Adds a nutritious green boost. Substitutions: Spinach or Swiss chard work well!
  • 1 small ripe banana (frozen for creaminess): Enhances creaminess and natural sweetness. Substitutions: Avocado can add creaminess without the sweetness.
  • 1/2 cup Greek yogurt or coconut yogurt: Adds protein and a creamy texture. Substitutions: Silken tofu for a vegan option.
  • 3/4 cup cold water or coconut water: For blending and hydration. Substitutions: Almond milk for a nutty flavor!
  • 1–2 teaspoons fresh lemon juice: Brightens the flavor profile. Substitutions: Lime juice for a zesty twist!
  • Optional: 1 tablespoon almond butter or chia seeds: Boosts protein and healthy fats. Substitutions: Peanut butter or flaxseeds.
  • Optional sweet boost: 1–2 teaspoons honey or maple syrup: Adjust sweetness to your liking.

Steps to Smoothie Perfection

Side photo of a frosty Kale Pineapple Smoothie, showcasing its creamy texture and fresh ingredients.

Ready to blend? Follow these simple steps:

  • **Blend liquids first**: Start with your water or coconut water in the blender.
  • **Add kale**: Toss in the kale and blend until finely chopped.
  • **Incorporate fruits and add-ins**: Add the pineapple, banana, yogurt, and any optional ingredients.
  • **Blend on high**: Process for 45–60 seconds until you achieve a silky smooth texture.

Pro Tips for the Perfect Smoothie

Want to elevate your smoothie game? Check out these expert tips:

  • Pre-blend the greens: For a smoother texture, blend the kale with the liquid first to break it down before adding fruits.
  • Use frozen fruits: They create a creamier texture and keep your smoothie cold.
  • Adjust thickness: If your smoothie is too thick, add more liquid; if it’s too thin, add more fruit or yogurt.
  • Experiment with flavors: Add spices like ginger or turmeric for health benefits and unique flavors.
  • Batch prep: Prepare smoothie packs by pre-measuring and freezing ingredients for quick morning blends.
  • Invest in a high-speed blender: It makes a significant difference in achieving the perfect consistency.
  • Don’t forget to taste!: Adjust sweetness or acidity based on your preference before serving.
  • Use a straw or spoon: Enjoying your smoothie with a fun straw or spoon can enhance the experience!

Avoid Common Mistakes

Even smoothie pros can make mistakes! Here are some common pitfalls and how to avoid them:

  • Overloading flavors: Stick to 3-5 main ingredients to keep flavors balanced and not overwhelming.
  • Skipping the greens: Don’t underestimate the nutritional benefits of greens; they can be subtle in taste but powerful in nutrients!
  • Not blending long enough: Ensure your smoothie is blended to a silky consistency to avoid any chunky bits.
  • Adding too much liquid: Start with less and add more as needed to avoid a watery smoothie.

Delicious Variations to Try

Bored of the same old recipe? Switch it up with these fun variations:

  • Berry Kale Smoothie: Swap pineapple for mixed berries for a different flavor profile.
  • Mango Coconut Bliss: Replace pineapple with mango and use coconut milk for a tropical twist.
  • Green Protein Power: Add a scoop of your favorite protein powder for an extra protein boost!
  • Chocolate Kale Smoothie: Add a tablespoon of cocoa powder or chocolate protein for a dessert-like smoothie.

Storage and Make-Ahead Instructions

Want to prepare in advance? Here’s how:

  • Make-ahead smoothie packs: Combine all solid ingredients in a freezer bag and freeze. Just add liquid and blend in the morning!
  • Store leftovers: If you have leftover smoothie, store it in an airtight container in the fridge for up to 24 hours. Give it a good shake before drinking!

Comprehensive FAQ

Got questions? We’ve got answers! Here are some frequently asked questions about our Kale Pineapple Smoothie:

  • Can I use fresh pineapple instead of frozen? Yes! Just add a few ice cubes to maintain the cold temperature.
  • Is this smoothie vegan? Yes, use coconut yogurt and skip the honey for a completely vegan option.
  • How can I make it less sweet? Reduce the amount of banana or pineapple, or add more greens.
  • Can I add more vegetables? Absolutely! Try adding spinach, cucumber, or even avocado for creaminess.
  • Is it okay to add protein powder? Yes, protein powder can be a great addition for a post-workout boost!
  • How can I make this smoothie more filling? Add oats or nut butter for extra fiber and healthy fats to keep you satisfied.
  • What’s the best time to drink this smoothie? It’s perfect for breakfast, a midday snack, or after a workout!
  • How do I clean my blender easily? Blend a little warm water with a drop of dish soap and rinse; it’s a breeze!

Nutritional Tips and Dietary Adaptations

Want to maximize your smoothie’s nutritional profile? Consider these tips:

  • Fiber boost: Add chia seeds or flaxseeds for additional fiber and omega-3 fatty acids.
  • Protein power: Incorporate Greek yogurt or protein powder for muscle recovery post-workout.
  • Low-sugar option: Use avocado instead of banana for creaminess without the sugar.
  • Dairy-free adaptation: Use plant-based yogurts and milk alternatives for a delicious vegan option.

Equipment Recommendations

To make your smoothie-making experience smoother, here are my top recommendations:

  • High-Speed Blender: Invest in a good quality blender like a Vitamix or Ninja for the best texture.
  • Measuring Cups and Spoons: Accurate measurements ensure your smoothie turns out perfect every time.
  • Reusable Straws: Eco-friendly and fun, they enhance your smoothie-drinking experience!

Serving Suggestions

Want to take your smoothie to the next level? Here are some fun serving suggestions:

  • Garnish with fruit: Top your smoothie with fresh pineapple chunks or a sprinkle of chia seeds.
  • Serve in a fun glass: Use a mason jar or a fancy glass for Instagram-worthy presentations!
  • Pair with a healthy snack: Enjoy with whole-grain toast or a handful of nuts for a balanced meal.

Closing Thoughts

The Kale Pineapple Smoothie is not just a drink; it’s a celebration of health, flavor, and creativity in your kitchen. Remember, healthy eating doesn’t mean sacrificing taste or adventure. So, grab your blender, experiment with the ingredients, and discover your own twist on this energizing smoothie. Cheers to vibrant health and deliciousness!

Kale Pineapple Smoothie

Prep Time 5 minutes
Total Time 5 minutes
Servings 2 cups
Calories 180
A refreshing and nutritious smoothie combining the sweetness of pineapple with the greens of kale, perfect for a quick energizing boost.

Ingredients

Fruits and Vegetables

  • 1 cup frozen pineapple chunks
  • 1 cup kale, ribs removed (tightly packed)
  • 1 small ripe banana (frozen if you want extra creaminess)

Dairy and liquids

  • 1/2 cup Greek yogurt or coconut yogurt
  • 3/4 cup cold water or coconut water
  • 1–2 teaspoons fresh lemon juice

Optional add-ins

  • 1 tablespoon almond butter or chia seeds (optional)
  • 1–2 teaspoons honey or maple syrup (if needed for sweetness)

Instructions 

  • Blend liquids first, then kale, then fruit and add-ins.
  • Blend on high for 45–60 seconds until silky.

Notes

Adjust sweetness with honey or maple syrup as needed.
Calories: 180kcal
Cost: $8
Course: Breakfast, Snack
Cuisine: Healthy
Keyword: Kale, Pineapple, Smoothie