Author

Ryan

Browsing

Welcome to a culinary adventure that will make your taste buds dance! If you’re ready to transform everyday ingredients into a mouthwatering feast, this Spicy Korean Chicken recipe is your ticket to flavor town. Packed with the perfect blend of heat and sweetness, this dish is not just a meal—it’s an experience. Let’s dive into the deliciousness!

Why You’ll Love This Recipe

  • Flavor Explosion: This recipe combines gochujang, soy sauce, and honey for a rich, savory-sweet flavor that will keep you coming back for more.
  • Quick and Easy: In less than 30 minutes, you can whip up a delicious meal, making it perfect for busy weeknights.
  • Versatile: Serve it over rice, in lettuce wraps, or alongside stir-fried veggies for a complete meal that fits any occasion.
  • Health-Conscious: Using chicken thighs or breasts, this dish is protein-packed and can be easily adapted for various dietary needs.
  • Fun Cooking Experience: Cooking this spicy Korean chicken is not just about the food; it’s about embracing the joy of cooking and sharing a flavorful meal with loved ones.

Ingredients You’ll Need

Here’s what you need to create this mouthwatering dish:

  • 4 boneless, skinless chicken thighs (or chicken breasts): Tender cuts that soak up the marinade wonderfully.
  • 1 tablespoon vegetable oil: Used for pan-frying to get that delicious crispy exterior.
  • 2 tablespoons gochujang: This Korean chili paste adds the heat and depth of flavor.
  • 1 tablespoon soy sauce: Enhances the umami profile of the dish.
  • 1 tablespoon honey: Balances the heat with a touch of sweetness.
  • 1 teaspoon sesame oil: Adds a nutty flavor that complements the other ingredients.
  • 1 teaspoon rice vinegar: Provides acidity to brighten the dish.
  • 2 cloves garlic, minced: Infuses the chicken with aromatic flavor.
  • 1 teaspoon grated ginger: Adds a zingy warmth.
  • ½ teaspoon red pepper flakes (adjust to taste): For those who crave extra heat!
  • 1 teaspoon sesame seeds: For garnish and a delightful crunch.
  • 2 green onions, sliced: Adds freshness and color to the dish.

How to Make Spicy Korean Chicken

Ready to cook? Follow these simple steps:

Step 1: Prepare the Marinade

In a large bowl, mix together the gochujang, soy sauce, honey, sesame oil, rice vinegar, garlic, ginger, and red pepper flakes. This marinade is where the magic happens—let it sit for a few minutes to allow the flavors to meld.

Step 2: Marinate the Chicken

Add the chicken thighs to the marinade, ensuring they’re well coated. Cover the bowl and let it marinate for at least 15 minutes. For a more intense flavor, you can marinate for up to 2 hours in the refrigerator.

Step 3: Cook the Chicken

Heat the vegetable oil in a large skillet over medium-high heat. Once hot, add the marinated chicken, cooking for about 6-8 minutes on each side, or until fully cooked and golden brown. You can also grill the chicken for an added smoky flavor!

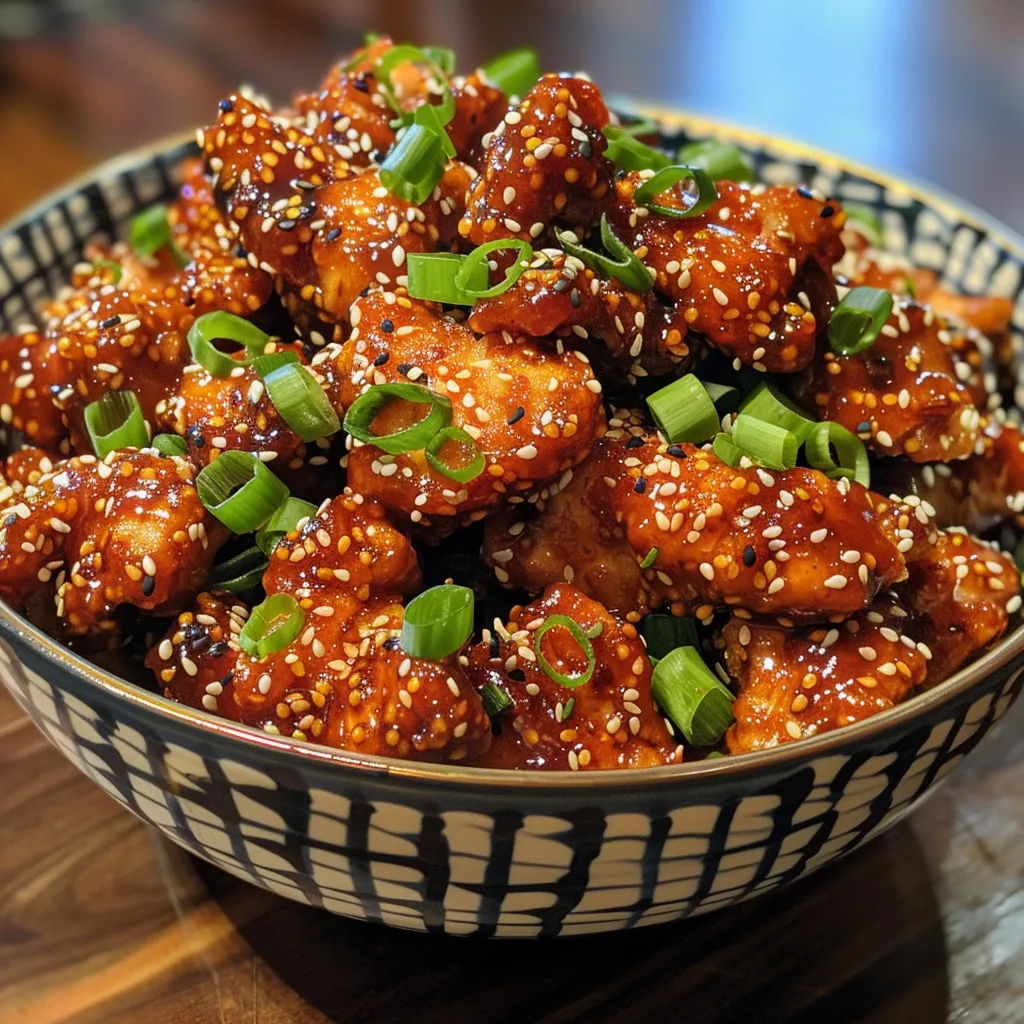
Step 4: Garnish and Serve

Once cooked, remove the chicken from the skillet and let it rest for a few minutes. Slice the chicken and garnish with sesame seeds and sliced green onions. Serve it over a bed of rice or with your choice of sides.

Pro Tips for Perfect Spicy Korean Chicken

Side view of tender chicken thighs coated in a glossy red chili sauce.
  • Don’t Rush the Marinade: Letting the chicken soak in the marinade enhances the flavors. Aim for at least 30 minutes if possible.
  • Use a Meat Thermometer: Ensure your chicken reaches an internal temperature of 165°F for safe eating.
  • Adjust the Heat: If you’re sensitive to spice, start with less gochujang and red pepper flakes, and adjust to your preference.
  • Experiment with Cooking Methods: This recipe works great in the oven or on the grill—feel free to try different methods!
  • Keep Leftovers Fresh: Store any leftovers in an airtight container and consume within 3 days for the best flavor.
  • Pair with Simple Sides: Quick pickled veggies or a simple salad complements the flavors wonderfully.
  • Make it a Meal Prep Star: This chicken is perfect for meal prep—cook it in batches and use it throughout the week!
  • Customize Your Garnishes: Add sliced cucumbers, cilantro, or even avocado for a fresh twist.

Common Mistakes and Troubleshooting

Even the best chefs make mistakes! Here’s how to avoid common pitfalls:

  • Overcooking the Chicken: Keep an eye on your chicken to prevent it from drying out. Use a meat thermometer!
  • Skipping the Marinade: Don’t skip marinating—this is crucial for flavor!
  • Not Letting it Rest: Resting the chicken after cooking helps retain moisture.

Variations to Try

Feeling adventurous? Here are some fun twists on this recipe:

  • Spicy Korean Chicken Tacos: Serve the chicken in corn tortillas with fresh slaw and avocado.
  • Korean Chicken Rice Bowls: Layer the chicken over brown rice with veggies and a drizzle of sesame dressing.
  • Gochujang Chicken Stir-Fry: Toss the chicken with your favorite stir-fry vegetables for a quick meal.
  • Grilled Gochujang Chicken Skewers: Marinate and thread the chicken onto skewers for a fun grilling option.

Storage and Make-Ahead Instructions

Want to prepare ahead? Here’s how:

Storing Leftovers

Place leftover chicken in an airtight container in the fridge for up to 3 days. Reheat in the microwave or on the stovetop until warmed through.

Freezing

For longer storage, freeze the marinated chicken before cooking. Simply thaw in the fridge overnight before cooking as directed.

Frequently Asked Questions

  • Can I use chicken breasts instead of thighs? Yes! Chicken breasts will work, but they may require less cooking time.
  • What if I can’t find gochujang? You can substitute with sriracha, but the flavor will differ.
  • How can I make this dish gluten-free? Use tamari or coconut aminos instead of soy sauce.
  • Can I prepare the marinade in advance? Absolutely! You can prepare it a day ahead and store it in the fridge.
  • What sides pair well with this chicken? Steamed rice, pickled vegetables, or a fresh salad work great!
  • Is it possible to cook this in the oven? Yes! Bake at 400°F for about 20-25 minutes, flipping halfway through.
  • Can I make this vegan? Substitute chicken with tofu or tempeh, and adjust the cooking time accordingly.
  • What is the best way to serve this dish? Serve it hot, garnished with sesame seeds and green onions, with rice or noodles on the side.

Nutrition Tips and Dietary Adaptations

This Korean chicken recipe can be tailored to fit various dietary needs:

  • Low-Carb Option: Serve with cauliflower rice instead of regular rice for a low-carb meal.
  • High-Protein Boost: Pair with quinoa for an added protein kick.
  • Vegetarian Version: Use tempeh or seitan in place of chicken for a plant-based alternative.

Equipment Recommendations

Here’s what you’ll need to make this recipe:

  • Large Mixing Bowl: For marinating the chicken.
  • Skillet or Grill: To cook the chicken to perfection.
  • Meat Thermometer: To ensure the chicken is cooked safely.
  • Knife and Cutting Board: For prepping your ingredients.

Serving Suggestions

To round out your meal, consider these serving ideas:

  • Serve with Rice: A bed of jasmine or brown rice pairs perfectly with the chicken.
  • Add Fresh Veggies: Include steamed broccoli or sautéed bok choy for a nutritious boost.
  • Top with Fresh Herbs: Cilantro or basil can add a fresh twist to your dish.

There you have it—your ultimate guide to making the most delicious Spicy Korean Chicken. Get ready to impress your friends and family with this bold dish that proves healthy eating can be fun, exciting, and oh-so-satisfying! Now, roll up your sleeves and let’s get cooking!

Spicy Korean Chicken

Prep Time 10 minutes
Cook Time 15 minutes
Total Time 25 minutes
Servings 4 servings
Calories 350
Enjoy this flavorful and spicy Korean-inspired chicken dish that's quick to prepare and packed with bold flavors.

Ingredients

Protein

  • 4 pieces boneless, skinless chicken thighs (or chicken breasts)
  • 1 tablespoon vegetable oil
  • 2 tablespoons gochujang (Korean chili paste)
  • 1 tablespoon soy sauce
  • 1 tablespoon honey
  • 1 teaspoon sesame oil
  • 1 teaspoon rice vinegar
  • 2 cloves garlic, minced
  • 1 teaspoon grated ginger
  • ½ teaspoon red pepper flakes (adjust to taste)
  • 1 teaspoon sesame seeds
  • 2 green onions sliced

Instructions 

  • Mix gochujang, soy sauce, honey, sesame oil, rice vinegar, garlic, ginger, and red pepper flakes to create the marinade.
  • Marinate the chicken in the sauce for at least 15 minutes.
  • Heat vegetable oil in a skillet over medium heat and cook the chicken until browned and cooked through, about 8-10 minutes per side.
  • Sprinkle with sesame seeds and sliced green onions before serving.

Notes

Adjust red pepper flakes to control spiciness.
Calories: 350kcal
Cost: $12
Course: Main Course
Cuisine: Korean
Keyword: Chicken

Kickstart Your Day with a Refreshing Kiwi Spinach Smoothie!

Are you ready to revitalize your mornings? Introducing the Kiwi Spinach Green Smoothie—your new go-to drink for an energizing boost! Packed with fresh ingredients and vibrant flavors, this smoothie is perfect for those who want to kickstart their day in a healthy, delicious way. Not only is it easy to make, but it’s also brimming with nutrients that will keep you feeling great. Let’s dive into why this smoothie will become your new favorite!

Why You’ll Love This Kiwi Spinach Smoothie

This smoothie isn’t just a treat for your taste buds; it’s a powerhouse of nutrition. Here are five compelling reasons to whip it up:

  • Energy Boost: The combination of kiwi and spinach provides a natural energy lift, perfect for busy mornings or post-workout recovery.
  • Nutrient-Rich: Packed with vitamins A, C, and K, this smoothie supports your immune system and overall health.
  • Fiber-Packed: Chia seeds and spinach offer a good dose of fiber, aiding digestion and keeping you full longer.
  • Customizable: Easily adjust the ingredients to suit your taste preferences or dietary needs, making it versatile for everyone!
  • Quick and Easy: With minimal prep time, this smoothie can be made in under 10 minutes—perfect for those on the go!

Ingredients Breakdown

Here’s what you’ll need to create your delicious Kiwi Spinach Green Smoothie:

  • 2 fresh kiwis: Peel and slice for a tangy sweetness. Opt for ripe kiwis for the best flavor.
  • 1 cup baby spinach: Use fresh for a mild, nutrient-rich green that blends beautifully.
  • 1 banana: Cut into pieces for a creamy texture and natural sweetness.
  • 1/2 cup unsweetened almond milk: Or any milk of choice. This creates a smooth, drinkable consistency.
  • 1/4 cup Greek yogurt: Optional, but adds protein and creaminess to your smoothie.
  • 1 teaspoon honey or maple syrup: For added sweetness—adjust to your liking!
  • 1 tablespoon chia seeds: These little powerhouses add extra fiber and omega-3s.
  • 5 fresh mint leaves: Adds a refreshing twist—feel free to adjust to taste!
  • 1 cup ice cubes: For chilling your smoothie and making it extra refreshing.

How to Make Your Kiwi Spinach Smoothie

Close-up view of a vibrant kiwi spinach smoothie with ice, in a side profile shot.

Ready to blend? Follow these simple steps:

  • Step 1: Prepare your ingredients by peeling and slicing the kiwis and banana.
  • Step 2: In a blender, combine the kiwis, spinach, banana, almond milk, Greek yogurt (if using), honey or maple syrup, chia seeds, mint leaves, and ice cubes.
  • Step 3: Blend everything together until smooth. If needed, add more almond milk for a thinner consistency.
  • Step 4: Taste and adjust sweetness or mint flavor as desired.
  • Step 5: Serve immediately in a glass, garnished with a slice of kiwi or a sprig of mint!

Expert Tips for Smoothie Success

Want to take your smoothie game to the next level? Here are some expert insights:

  • Use frozen fruits: For a thicker smoothie, try using frozen bananas or kiwis.
  • Boost the protein: Add a scoop of your favorite protein powder for an extra kick!
  • Mix in other greens: Experiment with kale or Swiss chard for added nutrients.
  • Plan ahead: Pre-portion your ingredients in zip-top bags for quick morning smoothies.
  • Keep it fresh: Always use fresh ingredients for the best flavor and nutrition.
  • Make it a meal: Add oats or nut butter to turn it into a more filling meal replacement.
  • Test different milks: Almond milk, coconut milk, or oat milk can all change the flavor profile.
  • Don’t skip the mint: Fresh mint adds a lively freshness that complements the fruity flavors!

Common Mistakes and Troubleshooting

Even the best of us make mistakes! Here are some common pitfalls and how to avoid them:

  • Over-blending: This can lead to a watery consistency. Blend just until smooth!
  • Not tasting: Always taste your smoothie before serving to adjust flavors.
  • Using too little liquid: If your smoothie is too thick, add a splash more milk to reach your desired consistency.
  • Skipping the greens: Don’t underestimate the power of greens—always include spinach or another leafy green for maximum health benefits.

Delicious Variations

Feeling adventurous? Here are some fun variations to try:

  • Tropical Twist: Add pineapple and coconut milk for a tropical vibe!
  • Berry Blast: Swap out the kiwi for mixed berries for a different flavor profile.
  • Chocolate Delight: Add a tablespoon of cocoa powder for a chocolatey treat!
  • Nutty Banana: Toss in a spoonful of almond butter for an added nutty flavor and creaminess.

Storage and Make-Ahead Instructions

Want to prepare ahead of time? Here’s how:

  • Store in an airtight container: Your smoothie will last up to 24 hours in the fridge. Give it a good shake before serving.
  • Freeze for later: Pour your smoothie into ice cube trays and freeze. Blend with a splash of milk for a quick treat!

Nutrition Tips and Dietary Adaptations

This smoothie is naturally vegan if you skip the Greek yogurt and honey. Here are some more tips:

  • Gluten-free: This recipe is gluten-free as is, making it safe for those with gluten intolerances.
  • Dairy-free: Use dairy-free yogurt or skip it altogether to keep it vegan.
  • Low-sugar option: Omit the honey or maple syrup and rely on the natural sweetness of the fruits.

Equipment Recommendations

To make your smoothie-making process easier, here’s what you’ll need:

  • High-speed blender: Invest in a good blender to ensure a smooth consistency.
  • Measuring cups and spoons: For precise measurements of your ingredients.
  • Cutting board and knife: To prep your fruits and veggies efficiently.

Serving Suggestions

Wondering how to enjoy your smoothie? Here are some ideas:

  • As a breakfast replacement: Serve it alongside whole grain toast for a complete meal.
  • Post-workout refuel: Enjoy it after exercising to replenish your energy.
  • Healthy snack: Pair it with a handful of nuts or a piece of fruit for a balanced snack.

Kiwi Spinach Smoothie Recipe FAQs

Got questions? We’ve got answers!

  • Can I use frozen fruits? Absolutely! Frozen fruits can make your smoothie even creamier.
  • Is this smoothie suitable for kids? Yes! It’s a fun way to sneak in greens and nutrients.
  • Can I make this smoothie in advance? Yes, just store it in an airtight container and give it a shake before serving.
  • How can I make it sweeter? Adjust sweetness with honey, maple syrup, or dates.
  • Can I add protein powder? Definitely! It’s a great way to boost protein content.
  • What if I don’t like kiwi? You can substitute with any fruit you prefer!
  • Is it okay to use baby spinach? Yes! Baby spinach blends well and has a milder flavor.
  • Can I use regular yogurt instead of Greek? Yes, but Greek yogurt adds more protein and creaminess.

In conclusion, the Kiwi Spinach Green Smoothie is not just a drink; it’s a celebration of flavors and nutrients that will brighten your day. With its vibrant green color and refreshing taste, it’s a feast for the senses and a boost for your health. So grab your ingredients and get blending—your taste buds and body will thank you!

Easy Kiwi Spinach Green Smoothie for a Refreshing Energy Boost

Prep Time 5 minutes
Total Time 5 minutes
Servings 1 cup
Calories 180
This vibrant green smoothie combines fresh kiwi and spinach for a nutritious and energizing start to your day.

Ingredients

Fruits

  • 2 pieces fresh kiwi (peel and slice)
  • 1 cup baby spinach (use fresh)
  • 1 piece banana (cut into pieces for blending)
  • 0.5 cup unsweetened almond milk (or any milk of choice)
  • 0.25 cup Greek yogurt (optional for protein)
  • 1 teaspoon honey or maple syrup (for added sweetness)
  • 1 tablespoon chia seeds (for extra fiber)
  • 5 leaves fresh mint leaves (to taste)
  • 1 cup ice cubes (for chilling)

Instructions 

  • Add all ingredients to a blender.
  • Blend until smooth and creamy.
  • Pour into a glass and enjoy immediately.

Notes

For a sweeter taste, add more honey or maple syrup as desired.
Calories: 180kcal
Cost: $8
Course: Breakfast, Smoothie
Cuisine: Healthy
Keyword: Green, kiwi, spinach

Discover Your New Comfort Food: Easy Creamy Beef Stroganoff!

Welcome to the world of flavor with this easy creamy beef stroganoff recipe! Imagine perfectly tender beef swimming in a rich, creamy sauce, surrounded by savory mushrooms and served over your favorite comfort food base. This classic dish is not just a meal; it’s a culinary experience that transforms any weeknight into a special occasion. Whether you’re serving family or impressing guests, this beef stroganoff will leave them craving more!

Ready to dive in? Let’s explore why this recipe will quickly become your go-to comfort food!

Why You’ll Love This Recipe

  • Quick and Easy: With just 30 minutes from start to finish, you’ll have a mouthwatering meal that fits perfectly into your busy lifestyle!
  • Flavor-Packed: The combination of tender beef, earthy mushrooms, and a creamy sauce creates a symphony of flavors that dance on your palate.
  • Versatile Serving Options: Serve it over egg noodles, rice, or mashed potatoes, making it adaptable to whatever you have on hand.
  • Kid-Friendly: The creamy texture and savory flavors make it a hit with little ones and adults alike, ensuring everyone cleans their plate.
  • Freezer-Friendly: Cook in bulk and freeze portions for those nights when you need an effortless meal solution!

Ingredients You’ll Need

Here’s what you’ll need to create this delicious dish. Feel free to mix and match with these substitutions!

  • 1 lb beef sirloin or tenderloin, sliced into thin strips
  • 1 tablespoon olive oil
  • 2 tablespoons unsalted butter
  • 1 small onion, finely chopped
  • 2 cloves garlic, minced
  • 8 oz cremini or white mushrooms, sliced
  • 1 teaspoon smoked paprika
  • 1 teaspoon Dijon mustard
  • 1 cup beef broth
  • 1 cup heavy cream
  • 1 teaspoon Worcestershire sauce
  • Salt and black pepper to taste
  • Fresh parsley, chopped (for garnish)
  • Cooked egg noodles, rice, or mashed potatoes (for serving)

How to Make Beef Stroganoff

Juicy beef strips in a rich sauce, garnished with parsley and served over noodles.

Let’s get cooking! Follow these simple steps to whip up your creamy beef stroganoff.

Step 1: Prepare the Beef

Start by slicing the beef into thin strips, about ¼-inch thick. This helps it cook quickly and stay tender. Season with a pinch of salt and black pepper.

Step 2: Sauté the Aromatics

In a large skillet over medium-high heat, add the olive oil. Once hot, add the beef strips in a single layer, working in batches if necessary to avoid overcrowding. Sear for about 1-2 minutes per side until browned but not fully cooked through. Remove the beef and set aside.

Step 3: Cook the Mushrooms

In the same skillet, reduce the heat to medium and melt the butter. Add the chopped onion and cook for about 2-3 minutes until soft and translucent. Stir in the minced garlic and cook for another 30 seconds until fragrant. Then, add the sliced mushrooms and cook for about 5 minutes, stirring occasionally until golden brown.

Step 4: Build the Sauce

Sprinkle the smoked paprika over the mushrooms and stir in the Dijon mustard. Pour in the beef broth, scraping the bottom of the skillet to lift any browned bits (these add amazing flavor). Let the broth simmer for about 5 minutes to reduce slightly.

Step 5: Add the Cream and Worcestershire Sauce

Reduce the heat to low and stir in the heavy cream and Worcestershire sauce. Simmer gently for another 5 minutes, allowing the flavors to meld together. Taste and adjust the seasoning with salt and pepper as needed.

Step 6: Return the Beef to the Pan

Add the seared beef back to the skillet, stirring to coat it in the sauce. Let it simmer for another 2-3 minutes until the beef is heated through and cooked to your desired doneness.

Step 7: Serve and Enjoy

Remove from heat and garnish with freshly chopped parsley. Serve over egg noodles, rice, or mashed potatoes for a truly comforting meal.

Pro Tips for the Best Beef Stroganoff

  • Use High-Quality Beef: Opt for tender cuts like sirloin or tenderloin for the best flavor and texture.
  • Don’t Overcook the Beef: Searing the beef quickly keeps it tender; remember it will continue to cook in the sauce.
  • Fresh Herbs Matter: Adding fresh parsley as a garnish brightens the dish and adds a pop of color!
  • Customize the Creaminess: Adjust the amount of heavy cream based on your preference for richness.
  • Make it Extra Flavorful: Consider adding a splash of red wine to the broth for a deeper flavor.
  • Experiment with Mushrooms: Mix different types of mushrooms for varied textures and tastes.
  • Try Different Bases: Switch it up by serving over polenta or cauliflower rice for a new twist.
  • Let It Rest: Allowing the stroganoff to sit for a few minutes before serving lets the flavors meld even further.

Common Mistakes and Troubleshooting

Even the best chefs make mistakes! Here are some common pitfalls and how to avoid them:

  • Beef is Tough: Ensure you’re slicing against the grain and not overcooking it during the searing process.
  • Too Much Liquid: If your sauce is too watery, let it simmer longer to reduce and thicken.
  • Flavor is Lacking: Always taste and adjust seasoning throughout the cooking process.

Variations to Try

Feeling adventurous? Here are some creative twists on the classic beef stroganoff:

  • Vegetarian Stroganoff: Substitute beef with hearty mushrooms or plant-based proteins for a meatless option.
  • Spicy Stroganoff: Add a pinch of cayenne pepper or a splash of hot sauce for a spicy kick!
  • Herbed Stroganoff: Mix in fresh thyme or rosemary for an aromatic twist.
  • Gourmet Stroganoff: Use filet mignon and add a splash of sherry for a gourmet touch.

Storage and Make-Ahead Instructions

This dish is perfect for meal prep! Here’s how to store it:

  • Refrigerator: Store in an airtight container for up to 3 days. Reheat on the stove or microwave.
  • Freezer: Freeze for up to 3 months. Thaw overnight in the fridge before reheating.

Frequently Asked Questions

  • Can I use a different type of meat? Absolutely! Chicken or turkey can be substituted for beef.
  • What if I don’t have beef broth? You can use chicken broth or vegetable broth instead.
  • Can I make this dish dairy-free? Use coconut cream and dairy-free butter as alternatives.
  • Is this recipe gluten-free? Use gluten-free noodles and ensure your broth is also gluten-free.
  • How can I spice it up? Add some sautéed jalapeños or a dash of hot sauce for heat!
  • What’s the best way to reheat? Gently reheat on the stovetop to avoid overcooking the beef.
  • Can I double this recipe? Yes, just ensure your pan is large enough or cook in batches.
  • What sides pair well with beef stroganoff? Green beans, a fresh salad, or crusty bread make great accompaniments.

Nutrition Tips and Dietary Adaptations

This recipe can easily fit into various dietary needs:

  • Protein-Packed: This dish is a great source of protein from the beef and can be adapted with legumes for vegetarian versions.
  • Low-Carb Option: Serve over zucchini noodles or cauliflower rice for a low-carb alternative.
  • Heart-Healthy: Opt for lean cuts of beef and reduce the amount of heavy cream for a lighter version.

Equipment Recommendations

To make your beef stroganoff experience even better, here are some essential tools:

  • Heavy-Duty Skillet: A non-stick or cast-iron skillet ensures even cooking and easy clean-up.
  • Sharp Chef’s Knife: A good knife is crucial for slicing the beef thinly.
  • Measuring Cups: Accurate measurements ensure perfect results every time!

Serving Suggestions

For the ultimate beef stroganoff experience, consider these serving ideas:

  • Garnish with Fresh Herbs: A sprinkle of parsley or chives elevates the dish visually and flavor-wise.
  • Add Crunch: Serve with crispy breadsticks or garlic bread for a delightful texture contrast.
  • Pair with Wine: A glass of red wine enhances the meal’s richness.

Now that you have the ultimate guide to making a delicious beef stroganoff, why not get started? This dish is not just about feeding your body; it’s about nourishing your soul! Happy cooking!

Comforting and Creamy Beef Stroganoff – A Classic Dish Made Easy

Prep Time 10 minutes
Cook Time 20 minutes
Total Time 30 minutes
Servings 4 servings
Calories 550
A rich and creamy beef stroganoff that's easy to prepare and perfect for a cozy meal. Tender beef is simmered in a flavorful mushroom and cream sauce, served over your favorite carbs.

Ingredients

Meat

  • 1 lb beef sirloin or tenderloin, sliced into thin strips
  • 1 tablespoon olive oil
  • 2 tablespoons unsalted butter
  • 1 small onion, finely chopped
  • 2 cloves garlic, minced
  • 8 oz cremini or white mushrooms, sliced
  • 1 teaspoon smoked paprika
  • 1 teaspoon Dijon mustard
  • 1 cup beef broth
  • 1 cup heavy cream
  • 1 teaspoon Worcestershire sauce
  • to taste Salt and black pepper
  • for garnish Fresh parsley, chopped
  • for serving Cooked egg noodles, rice, or mashed potatoes

Instructions 

  • Slice beef into thin strips, season with salt and pepper.
  • Heat oil in a skillet, sear beef 1-2 minutes per side, then set aside.
  • Melt butter, cook onion 2-3 minutes, add garlic 30 seconds.
  • Add mushrooms, cook 5 minutes until golden. Stir in paprika and mustard, pour broth, simmer 5 minutes.
  • Reduce heat, stir in cream and Worcestershire, simmer 5 minutes. Return beef, cook 2-3 minutes.
  • Garnish with parsley, serve over noodles, rice, or mashed potatoes.

Notes

Use high-quality beef for best flavor. Adjust seasoning to taste.
Calories: 550kcal
Cost: $15
Course: Main Course
Cuisine: Russian
Keyword: Beef, Comfort Food, Creamy

Unlock the Flavor: Your Guide to the Ultimate Beef and Pepper Rice Bowl

Welcome to the vibrant world of the Beef and Pepper Rice Bowl! This dish is not just a meal; it’s an experience filled with flavor, color, and nutrition. In less than 30 minutes, you can whip up a dish that combines perfectly seasoned ground beef with colorful bell peppers, all brought together with a savory sauce over a fluffy bed of rice. Perfect for busy weeknights, this recipe is designed to satisfy your cravings without compromising on health.

Why You’ll Love This Recipe

  • Quick and Easy: Ready in just 25 minutes, this dish is ideal for those hectic evenings when time is of the essence.
  • Nutritious and Balanced: With protein-packed ground beef and fiber-rich bell peppers, this bowl is a complete meal that fuels your body.
  • Customizable: Whether you prefer different proteins or additional veggies, this recipe allows for endless variations to suit your taste.
  • Family-Friendly: Mild yet flavorful, this dish is sure to please everyone at the dinner table, from kids to adults.
  • Budget-Savvy: Utilizing affordable ingredients like vegetables and rice, this meal is easy on the wallet without sacrificing flavor.

Ingredients Breakdown

Here’s what you’ll need to create your Beef and Pepper Rice Bowl, along with some substitution options to help you customize!

  • 1 tablespoon vegetable oil: For sautéing the beef and veggies. You can substitute olive oil or coconut oil for a different flavor profile.
  • 1 pound ground beef: The star of the dish. For a leaner option, try ground turkey or chicken, or even plant-based crumbles for a vegetarian twist.
  • 1 red bell pepper (sliced): Adds sweetness and color. Feel free to mix with other peppers like yellow or orange for extra vibrancy.
  • 1 green bell pepper (sliced): Provides a slight bitterness that balances the sweetness of the red pepper.
  • 1 small yellow onion (sliced): Brings depth of flavor. Substitute with shallots for a milder taste.
  • 2 cloves garlic (minced): Essential for a savory base. Add more if you’re a garlic lover!
  • 3 tablespoons soy sauce: For that umami punch. Use low-sodium soy sauce to reduce the sodium content.
  • 1 tablespoon oyster sauce: Adds richness. For a vegetarian option, try mushroom sauce.
  • 1 tablespoon hoisin sauce: Sweet and savory. You can skip this if you prefer a less sweet profile.
  • 1 teaspoon sesame oil: A drizzle of this at the end enhances the flavor. You can omit it if you’re avoiding oils.
  • 1/2 teaspoon ground black pepper: For seasoning. Adjust according to your spice preference.
  • 3 cups cooked white or brown rice: The base for your bowl. Use quinoa or cauliflower rice for a low-carb option.
  • Optional toppings: Sliced green onions, sesame seeds, sriracha for that extra flair!

Step-by-Step Cooking Instructions

Side view of a colorful Beef and Pepper Rice Bowl topped with green onions and sesame seeds.

Let’s get cooking! Follow these simple steps to create your delicious Beef and Pepper Rice Bowl.

  • Step 1: Heat the vegetable oil in a large skillet over medium-high heat.
  • Step 2: Add the ground beef, cooking until browned. Drain any excess fat if necessary.
  • Step 3: Toss in the sliced bell peppers, onion, and minced garlic. Cook until the veggies are tender yet still crisp, about 3-4 minutes.
  • Step 4: Stir in the soy sauce, oyster sauce, hoisin sauce, sesame oil, and black pepper. Cook for an additional 2-3 minutes, ensuring the beef and vegetables are well coated with the sauce.
  • Step 5: Spoon the beef mixture over the cooked rice. Top with your choice of green onions, sesame seeds, or a drizzle of sriracha. Enjoy immediately!

Pro Tips for the Best Beef and Pepper Rice Bowl

  • Prep Ahead: Chop your vegetables and cook the rice in advance to save time during the week.
  • Use Day-Old Rice: For the best texture, day-old rice is less sticky and holds up better in stir-fry dishes.
  • Adjust Spice Levels: If you like a kick, add red pepper flakes or sriracha to the sauce.
  • Mix Up the Protein: Experiment with different proteins like chicken, shrimp, or tofu for variety.
  • Flavor Boost: Add a splash of lime juice before serving for a refreshing zing.
  • Extra Veggies: Sneak in more veggies like zucchini, carrots, or snap peas for added nutrition.
  • Garnish for Greatness: Fresh herbs like cilantro or basil can elevate the dish visually and taste-wise.
  • Storing Leftovers: Store any leftovers in an airtight container in the fridge for up to 3 days.

Common Mistakes to Avoid

Let’s ensure your Beef and Pepper Rice Bowl turns out perfectly every time!

  • Overcooking the Vegetables: Keep them tender-crisp for the best texture. Don’t let them get mushy!
  • Skipping the Marinade: Allowing the beef to marinate briefly enhances flavor penetration.
  • Using Too Much Sauce: Balance is key; too much sauce can make the dish soggy.
  • Not Using Hot Oil: Make sure the oil is hot enough to sear the beef for that delicious browning.

Variations to Explore

Get creative! Here are some fun variations you can try:

  • Spicy Beef and Pepper Bowl: Incorporate jalapeños or a spicy sauce for a fiery kick.
  • Vegetable-Only Bowl: Replace beef with a medley of your favorite vegetables and tofu for a plant-based delight.
  • Asian Fusion: Add pineapple chunks for sweetness or cashews for crunch and flavor.
  • Mexican Twist: Use taco seasoning instead of the sauces and serve with avocado and sour cream.

Storage and Make-Ahead Instructions

This Beef and Pepper Rice Bowl is perfect for meal prep! Here’s how to store and reheat:

  • Refrigeration: Store leftovers in an airtight container in the fridge for up to 3 days.
  • Freezing: You can freeze the beef mixture in a freezer-safe container for up to 2 months. Just reheat and serve over fresh rice.
  • Reheating: To reheat, microwave for 1-2 minutes or stir-fry over medium heat until heated through.

Comprehensive FAQ

Got questions? We’ve got answers!

  • Can I use a different type of meat for this recipe? Absolutely! Ground turkey, chicken, or even plant-based alternatives work well.
  • Is this Beef and Pepper Rice Bowl gluten-free? To make it gluten-free, use tamari instead of soy sauce and ensure all sauces are gluten-free.
  • Can I make this dish in advance? Yes! Prepare the beef and veggies ahead of time and store them separately from the rice until you’re ready to eat.
  • What other vegetables can I add? Feel free to add broccoli, snap peas, carrots, or any of your favorites!
  • How spicy is this dish? It’s mild, but you can easily increase the heat by adding chili flakes or sriracha.
  • Can I use brown rice instead of white rice? Yes! Brown rice is a nutritious option and works perfectly in this recipe.
  • What’s the best way to serve this dish? Serve it hot, garnished with green onions and sesame seeds for added flavor and presentation.
  • Can I double the recipe? Definitely! Just make sure your skillet is large enough to accommodate all the ingredients.

Nutritional Tips and Dietary Adaptations

This Beef and Pepper Rice Bowl is as healthy as it is delicious. Here are some tips:

  • Increase Fiber: Add more vegetables to boost fiber content and increase satiety.
  • Lower Carbs: Substitute rice with cauliflower rice or quinoa for a low-carb option.
  • Healthy Fats: Incorporate avocado or nuts for healthy fats without adding too many calories.
  • Protein Boost: Consider adding edamame or chickpeas for an extra protein punch.

Equipment Recommendations

Here’s what you’ll need to create this dish:

  • Large Skillet: A heavy-bottomed skillet or wok is ideal for even cooking.
  • Cutting Board and Knife: For chopping vegetables and preparing ingredients.
  • Measuring Cups and Spoons: Essential for precise ingredient measurements.
  • Spatula: A sturdy spatula helps in mixing and serving the dish.

Serving Suggestions

Looking for the perfect pairing? Here are some ideas:

  • Fresh Salad: A crisp garden salad complements the dish beautifully.
  • Spring Rolls: Serve with fresh spring rolls for a light and refreshing side.
  • Fruit Salad: A sweet fruit salad can provide a delightful contrast to the savory flavors.
  • Homemade Pickles: Add some tangy homemade pickles for an exciting twist!

In conclusion, the Beef and Pepper Rice Bowl is a wonderfully versatile dish that brings energy, flavor, and joy to your table. With endless variations and easy preparation, it’s perfect for anyone looking to enjoy delicious, healthy food. So grab your ingredients, get into that kitchen, and let’s make magic happen!

Beef and Pepper Rice Bowl Recipe

Prep Time 10 minutes
Cook Time 15 minutes
Total Time 25 minutes
Servings 4 servings
Calories 650
A quick and flavorful rice bowl featuring seasoned ground beef, colorful bell peppers, and savory sauces, perfect for a satisfying meal.

Ingredients

Vegetables and Meat

  • 1 tablespoon vegetable oil
  • 1 pound ground beef
  • 1 red bell pepper red bell pepper (sliced)
  • 1 green bell pepper green bell pepper (sliced)
  • 1 small yellow onion (sliced)
  • 2 cloves garlic (minced)
  • 3 tablespoons soy sauce
  • 1 tablespoon oyster sauce
  • 1 tablespoon hoisin sauce
  • 1 teaspoon sesame oil
  • 1/2 teaspoon ground black pepper
  • 3 cups cooked white or brown rice
  • Optional toppings sliced green onions, sesame seeds, sriracha (Optional toppings)

Instructions 

  • Heat vegetable oil in a skillet, cook ground beef until browned.
  • Add bell peppers, onion, and garlic; cook until tender-crisp.
  • Stir in soy sauce, oyster sauce, hoisin sauce, sesame oil, and black pepper; cook evenly coated.
  • Serve beef mixture over rice; top with green onions, sesame seeds, or sriracha if desired.

Notes

Use fresh vegetables for best flavor and texture.
Calories: 650kcal
Cost: $15
Course: Main Course
Cuisine: Asian
Keyword: Beef, bell peppers, Rice

Why You’ll Fall in Love with Creamy Veggie Pasta

Imagine a dish that encapsulates the vibrant essence of fresh vegetables and the comforting warmth of a creamy sauce. That’s exactly what this Creamy Veggie Pasta delivers! Bursting with flavor and nutrition, this meal not only satisfies your taste buds but also aligns perfectly with a healthy lifestyle. Whether you’re a busy professional, a parent juggling schedules, or simply someone who loves to eat well, this recipe is your go-to solution.

In just under 30 minutes, you can whip up a bowl of this deliciousness that caters to various dietary preferences—gluten-free, vegan, or simply packed with your favorite seasonal veggies. Let’s dive into why this creamy veggie pasta is a must-try!

  • Quick and Easy: Perfect for busy weeknights, this meal can be made in under 30 minutes, making it an ideal option for those who need something fast yet satisfying.
  • Nutritious Powerhouse: Loaded with vitamins and minerals from fresh vegetables like zucchini, broccoli, and spinach, it’s a delightful way to boost your veggie intake.
  • Customizable: Use whatever veggies you have on hand! This recipe is as flexible as your creativity—mix and match to suit your taste.
  • Vegan-Friendly: Made with rich vegan sour cream and nutritional yeast for flavor, it’s a hit for both plant-based eaters and omnivores alike.
  • Kid-Approved: With its creamy texture and fun pasta shapes, kids love this dish as much as adults do. Plus, it’s a sneaky way to get them to eat their veggies!

Essential Ingredients for Creamy Veggie Pasta

For this delightful dish, you’ll need a medley of ingredients that come together to create a creamy, satisfying meal. Here’s a breakdown of what you’ll need, along with some suggested substitutions!

  • Pasta: 1 (16 oz.) package of your favorite pasta shape (think penne, fusilli, or spaghetti). For a gluten-free option, use gluten-free pasta.
  • Olive Oil: 3 tablespoons light olive oil or any neutral-flavored oil for sautéing. If you prefer an oil-free version, try sautéing in vegetable broth.
  • Garlic: 3 cloves, minced. This adds an aromatic depth to your dish. Adjust the amount according to your preference!
  • Vegetables: A delicious combination of 2 cups zucchini, 2 cups broccoli, 1 cup mushrooms, 1 cup bell peppers, and 1 cup cherry tomatoes. Feel free to get creative with whatever veggies you enjoy!
  • Spinach: 3 cups of baby spinach; it wilts beautifully and adds a vibrant green color.
  • Seasonings: 1 teaspoon salt, 1 teaspoon Italian herbs, and 1/4 teaspoon pepper (or red pepper flakes for a kick).
  • Vegan Sour Cream: 1 1/2 cups to give that luscious creaminess. You can substitute with cashew cream for a homemade touch.
  • Nutritional Yeast: 1 tablespoon (optional), for adding a cheesy flavor without dairy.
  • Pasta Water: 1 cup, reserved from cooking the pasta, or use veggie broth to adjust the sauce consistency.

How to Make Creamy Veggie Pasta

Ready to get cooking? Follow these simple steps to create your creamy veggie pasta!

  1. Boil the pasta: Start by boiling a 16-oz package of pasta in salted water according to package directions until al dente. Reserve 1 cup of pasta water before draining.
  2. Prepare the veggies: In a large frying pan or wok, warm the minced garlic in 3 tablespoons of oil over the lowest heat setting.
  3. Sauté the vegetables: Toss in the chopped veggies (except the cherry tomatoes and spinach). Sprinkle with 1 teaspoon of salt and 1 teaspoon of Italian herbs. Turn the heat up to medium and sauté for about 6-8 minutes until the vegetables start to become tender.
  4. Add the greens: Incorporate the cherry tomatoes and spinach, cooking for another 1-2 minutes until the spinach wilts.
  5. Create the creamy sauce: Add 1/2 cup of reserved pasta water, 1 1/2 cups of vegan sour cream, and 1 tablespoon of nutritional yeast (if using). Stir well, slowly adding more pasta water until your desired consistency is reached.
  6. Combine: Let it come to a gentle boil, then turn off the heat. Add the drained pasta and toss everything together until well combined.
  7. Season to taste: Adjust with additional salt, pepper, and a dash of red pepper flakes for an extra kick. Serve hot and enjoy!

Expert Pro Tips for the Best Creamy Veggie Pasta

Ready to elevate your creamy veggie pasta game? Here are some expert insights to ensure your dish is a total success!

  • Veggie Variety: You can use any vegetables you like! Asparagus, peas, or even kale can be fantastic additions. Just adjust cooking times accordingly to ensure everything is tender.
  • Texture Matters: For the best texture, make sure to not overcook your pasta. Al dente pasta holds up better when tossed with the sauce.
  • Flavor Boost: Don’t shy away from adding herbs or spices. Fresh basil, parsley, or a sprinkle of lemon zest can brighten the dish beautifully.
  • Make Ahead: This pasta can be made ahead of time and stored in the fridge for up to 3 days. Just reheat gently, adding a splash of water or broth to loosen the sauce.
  • Freezing Tips: If you want to freeze leftovers, keep the sauce separate from the pasta. This helps maintain the creamy texture. Thaw in the fridge before reheating.
  • Cheesy Flavor: For a cheesy taste without dairy, add a bit of vegan parmesan or nutritional yeast directly to the sauce.
  • Serving Style: Serve with a sprinkle of fresh herbs or a drizzle of olive oil for an extra touch of flair.
  • Personalize It: Tailor this dish to your personal taste by adjusting ingredient proportions or spice levels. Make it your own!

Common Mistakes and Troubleshooting

Even experienced cooks can face challenges. Here’s how to avoid common pitfalls when making creamy veggie pasta!

  • Overcooking the Pasta: This can lead to mushy noodles. Always check the pasta a minute or two before the package suggests.
  • Too Thick of a Sauce: If your sauce is too thick, gradually add more reserved pasta water or veggie broth until you reach the desired consistency.
  • Underseasoning: Taste as you go! Adjust seasoning to ensure that the flavors are well-balanced.
  • Inadequate Cooking of Vegetables: Ensure your veggies are cooked to a tender state but not mushy. Keep an eye on them while sautéing!

Delicious Variations to Try

Want to switch things up? Here are some exciting variations of creamy veggie pasta that you can experiment with!

  • Pesto Veggie Pasta: Stir in some store-bought or homemade pesto for a fresh, herby flavor.
  • Spicy Arrabbiata: Add red pepper flakes directly into the sauce for a spicy kick!
  • Cheesy Broccoli Casserole: Top with breadcrumbs and bake for a delicious twist.
  • Asian-Inspired: Swap the Italian herbs for soy sauce, ginger, and sesame oil for an Asian flair.

Proper Storage and Make-Ahead Instructions

Want to make your creamy veggie pasta ahead of time or store leftovers? Here’s how!

  • Refrigerate: Store in an airtight container for up to 3 days. Reheat gently on the stove or in the microwave, adding a splash of water to loosen the sauce.
  • Freeze: For best results, freeze the sauce separately from the pasta. It can last in the freezer for up to a month. Thaw overnight in the fridge before reheating.
  • Meal Prepping: Cook your pasta and veggies ahead of time and store them separately. When ready to eat, combine and toss with the creamy sauce.

Frequently Asked Questions

Got questions? We’ve got answers! Here are some common queries about creamy veggie pasta and their solutions.

  • Can I use different pasta shapes? Absolutely! Feel free to use any pasta shape you prefer—just adjust cooking times according to package directions.
  • Is this dish gluten-free? Yes, simply use gluten-free pasta and ensure that your vegan sour cream and other ingredients are also gluten-free.
  • What can I substitute for vegan sour cream? You can use cashew cream, coconut cream, or even a blend of silken tofu and lemon juice for a similar creamy texture.
  • Can I make this dish ahead of time? Yes! You can prepare the entire dish and store it in the fridge for a quick reheat later.
  • How do I make this recipe spicier? Add more red pepper flakes or a splash of hot sauce to the sauce for an added kick!
  • Can I add protein to this pasta? Definitely! Grilled chicken, shrimp, or chickpeas can enhance the dish and keep you feeling fuller.
  • What if my sauce is too thick? Gradually add more reserved pasta water or veggie broth until you reach your desired consistency.
  • Can I use frozen vegetables? Yes, frozen veggies work well too! Just add them in during the last few minutes of cooking.

Nutritional Benefits and Dietary Adaptations

This creamy veggie pasta isn’t just delicious; it’s also packed with nutrients!

  • High in Fiber: The variety of vegetables provides a significant fiber boost, which is excellent for digestive health.
  • Rich in Vitamins: Loaded with vitamins A, C, and K from the fresh veggies, it supports overall wellness.
  • Low in Saturated Fat: Using vegan sour cream and healthy oils keeps the dish light yet creamy.
  • Customizable for Diets: Easily adapt this recipe to fit vegan, vegetarian, and gluten-free diets.

Equipment You’ll Need

Here’s a quick list of essential tools to make your cooking experience smooth and enjoyable:

  • Large Pot: For boiling the pasta.
  • Frying Pan or Wok: Ideal for sautéing vegetables and mixing everything together.
  • Measuring Cups and Spoons: For precise ingredient measurements.
  • Wooden Spoon or Spatula: Perfect for tossing and stirring without scratching your cookware.

Serving Suggestions for Creamy Veggie Pasta

To make your meal even more delightful, consider these serving ideas:

  • Garnish with Fresh Herbs: A sprinkle of fresh basil or parsley brightens the dish and adds color.
  • Serve with a Side Salad: A crisp green salad complements the creamy pasta beautifully.
  • Pair with Garlic Bread: Crunchy garlic bread is the perfect accompaniment for scooping up that creamy goodness!
  • Add a Protein: Top with grilled chicken, shrimp, or chickpeas to make it a heartier meal.

Conclusion: Your Flavor Adventure Awaits!

In the world of cooking, Creamy Veggie Pasta stands out as a champion of flavor and nutrition. Its adaptability, ease of preparation, and vibrant taste make it a winner for any occasion. So gather your ingredients, unleash your creativity, and dive into this whirlwind of flavor. Remember, cooking should be fun, and with this recipe, you’ll not only nourish your body but also your spirit!

Creamy Veggie Pasta

Prep Time 10 minutes
Cook Time 15 minutes
Total Time 25 minutes
Servings 4 servings
Calories 520
A delicious and creamy vegetable pasta that combines fresh produce with a flavorful vegan sauce, perfect for a quick and satisfying meal.

Ingredients

Pasta

  • 16 oz pasta (any shape)
  • 3 tablespoons light olive oil (or neutral-flavored oil)
  • 3 cloves garlic (minced (use more or less to taste))
  • 2 cups zucchini
  • 2 cups broccoli
  • 1 cup mushrooms (washed and sliced)
  • 1 cup bell peppers
  • 1 cup cherry tomatoes
  • 3 cups baby spinach
  • 1 teaspoon salt
  • 1 teaspoon Italian herbs
  • 1.5 cups vegan sour cream
  • 1 tablespoon nutritional yeast (optional)
  • 1.5 cups pasta water (or veggie broth)
  • 0.25 teaspoon pepper (or red pepper flakes)

Instructions 

  • Cook pasta in salted water according to package instructions.
  • Warm garlic in oil over low heat; chop vegetables into bite-sized pieces.
  • Sauté vegetables (except cherry tomatoes and spinach) with salt and herbs for 6-8 minutes, then add cherry tomatoes and spinach, cooking until wilted.
  • Mix in pasta water, vegan sour cream, and nutritional yeast; stir until smooth. Add more pasta water to reach desired consistency.
  • Combine cooked pasta with sauce, toss well, season with salt, pepper, and red pepper flakes if desired. Serve hot.

Notes

For extra flavor, sprinkle with fresh herbs or nutritional yeast before serving.
Calories: 520kcal
Cost: $15
Course: Main Course
Cuisine: Italian
Keyword: Vegetables

Error: model did not return valid JSON.

Beef Pasta in Tomato Sauce

Prep Time 10 minutes
Cook Time 20 minutes
Total Time 30 minutes
Servings 4 servings
Calories 650
A hearty and flavorful dish combining pasta, savory beef, and a rich tomato sauce, perfect for a comforting meal.

Ingredients

Pasta

  • 400 grams pasta (penne, rigatoni, fusilli, spaghetti, or linguine) (Choose your favorite shape)

Cooking oil

  • 2 tablespoons olive oil (For sautéing)

Meat

  • 500 grams lean ground beef (Can substitute with ground turkey or chicken)

Vegetables

  • 1 medium onion (Aromatic and slightly sweet)
  • 3 cloves garlic (Enhances savory depth)

Herbs and spices

  • 1 teaspoon dried oregano (Part of classic herb blend)
  • 1 teaspoon dried basil (Part of classic herb blend)
  • 0.5 teaspoon dried thyme (Part of classic herb blend)

Umami enhancer

  • 2 tablespoons soy sauce (Adds umami flavor)

Sauce

  • 1 cup marinara sauce (Use high-quality canned or homemade)

Seasoning

  • to taste salt and pepper (Adjust to preference)

Dairy

  • 0.5 cup heavy cream (Adds creaminess and umami kick)

Fresh herbs

  • 2 tablespoons parsley (Bright finishing touch)

Instructions 

  • Cook the pasta according to package instructions until al dente. Drain and set aside.
  • Heat olive oil in a large skillet over medium heat. Sauté chopped onion and minced garlic until fragrant.
  • Add ground beef and cook until browned. Stir in dried herbs and soy sauce, cook for another 2 minutes.
  • Pour in marinara sauce and simmer for 10 minutes. Stir in heavy cream and cook for an additional 2 minutes.
  • Combine cooked pasta with the sauce. Garnish with chopped parsley before serving.

Notes

For a lighter version, substitute ground turkey and reduce cream.
Calories: 650kcal
Cost: $15
Course: Main Course
Cuisine: Italian
Keyword: Beef, pasta, Tomato Sauce
Close-up image of Beef Pasta in Tomato Sauce, highlighting the tender beef pieces and vibrant red sauce.

Welcome to Your New Favorite Comfort Dish!

If you’re on the hunt for a lasagna recipe that combines rich flavors, creamy textures, and the joy of cooking, you’ve landed in the right place! This Million Dollar Lasagna with Cottage Cheese is not just another pasta dish; it’s a culinary experience that brings a smile to your face and warmth to your soul. With each layer of savory meat sauce, creamy cheese, and melty mozzarella, this dish is destined to become a family favorite. Plus, it’s surprisingly easy to make! Let’s dive into what makes this lasagna so special and how you can whip it up in your own kitchen.

Why You’ll Love This Million Dollar Lasagna

This recipe isn’t just about food; it’s about making memories and enjoying the process of cooking. Here are five reasons why this lasagna will become your go-to:

  • Flavor Harmony: The combination of savory meat, rich marinara, and creamy cottage cheese creates an explosion of flavors that dance on your palate.
  • Easy to Assemble: With simple ingredients and straightforward steps, you’ll have this dish in the oven in no time, making it perfect for busy weeknights or special gatherings.
  • Feeds a Crowd: This lasagna is generously sized, making it ideal for potlucks, family dinners, or meal prepping for the week ahead.
  • Customizable: Whether you want to make it vegetarian, swap out the meat, or add more veggies, this recipe easily adapts to your dietary preferences.
  • Comfort Food at Its Best: There’s nothing like a warm, cheesy lasagna to evoke feelings of comfort and nostalgia, making it a perfect dish for family bonding.

Ingredients for Million Dollar Lasagna with Cottage Cheese

Here’s what you’ll need to create this culinary masterpiece:

  • 1 lb ground beef (or Italian sausage for extra flavor)
  • 1 jar (24 oz) marinara sauce (or 3 cups homemade)
  • 12 no-boil lasagna noodles (regular noodles work too; just parboil them first)
  • 2 cups cottage cheese (small-curd works best)
  • 1 egg (helps bind the cheese layer)
  • 2 cups shredded mozzarella (plus extra for the top)
  • ½ cup grated Parmesan (the real stuff, not the green can)
  • 1 tsp garlic powder (or 2 cloves fresh minced garlic)
  • 1 tsp dried basil (or 1 tbsp fresh)
  • Salt & pepper (to taste)

Pro Tips for the Perfect Lasagna

Juicy Million Dollar Lasagna with visible layers of ground meat, marinara sauce, and melted cheese.

Want to take your lasagna from good to unforgettable? Here are some expert insights:

  • Layering Technique: Alternate layers of meat sauce and cheese for a balanced flavor in every bite.
  • Rest Before Slicing: Let the lasagna sit for at least 10 minutes after baking. This helps it set and makes slicing easier.
  • Cheese Variations: Experiment with different cheeses like ricotta or fontina for a unique twist on the classic.
  • Make Ahead: Assemble the lasagna a day before and refrigerate. Just pop it in the oven when you’re ready!
  • Spice it Up: Add a pinch of red pepper flakes to the meat sauce for a delightful kick.
  • Herb Infusion: Fresh herbs can elevate the flavor—try adding fresh basil or parsley between the layers.
  • Quality Ingredients: Use the best quality marinara sauce and cheese you can find; it makes a huge difference!
  • Freezing Tips: Lasagna freezes beautifully, so consider making two and freezing one for later!

Common Mistakes and Troubleshooting

Even expert chefs can face challenges in the kitchen. Here are some common pitfalls and how to avoid them:

  • Too Much Moisture: If your lasagna is watery, make sure to drain excess fat from the meat and avoid using too much sauce.
  • Overcooked Noodles: If using regular noodles, be careful not to overcook them before layering; they should be slightly underdone.
  • Uneven Layering: Ensure equal distribution of meat sauce and cheese to avoid one layer overpowering the others.
  • Not Enough Cheese: Don’t skimp on the cheese! It’s what gives the lasagna that creamy, indulgent texture.
  • Skipping the Resting Time: This is crucial! If you slice too soon, the layers will collapse.

Delicious Variations to Try

Feel adventurous? Here are some variations to keep things exciting:

  • Vegetarian Delight: Swap the meat for layers of sautéed spinach, mushrooms, and zucchini for a hearty veggie version.
  • Spicy Italian: Use spicy Italian sausage and add roasted red peppers for a flavor punch.
  • Mexican Twist: Add black beans, corn, and taco seasoning to the meat sauce and top with jalapeños and cheddar.
  • Pesto Perfection: Layer in some basil pesto for a fresh, herby twist that complements the cheese.

Storage and Make-Ahead Instructions

This lasagna is not only delicious but also practical! Here’s how to store and prep:

  • Refrigerating: Store leftovers in an airtight container in the fridge for up to 4 days.
  • Freezing: Wrap tightly with plastic wrap and aluminum foil; it can be frozen for up to 3 months. Thaw overnight in the refrigerator before baking.
  • Reheating: Reheat in the oven at 350°F for about 20-30 minutes or until heated through, adding a sprinkle of cheese on top for that melty goodness.

Frequently Asked Questions

Got questions? We’ve got answers! Here are some of the most frequently asked questions about this lasagna recipe:

  • Can I use regular lasagna noodles? Yes! Just make sure to parboil them first to ensure they cook evenly.
  • Is cottage cheese necessary? While it adds creaminess, you can substitute ricotta or a blend of cream cheese and Greek yogurt.
  • How can I make it gluten-free? Use gluten-free lasagna noodles and check your marinara sauce for gluten-containing ingredients.
  • Can I make it vegan? Absolutely! Replace the meat with lentils or mushrooms and use vegan cheese and egg substitutes.
  • How do I know when it’s done? The lasagna should be bubbly and golden on top. Let it rest for 10 minutes before slicing.
  • Can I add vegetables? Yes! Spinach, mushrooms, and bell peppers work wonderfully in this recipe.
  • What should I serve with it? A fresh green salad and garlic bread complement the flavors perfectly.
  • Can I reheat leftovers? Yes, simply reheat in the oven or microwave until warmed through.

Nutritional Tips and Dietary Adaptations

Making healthy choices while enjoying this delicious lasagna is possible! Here are some tips:

  • Protein Boost: Add extra lean ground turkey or chicken for a lighter version.
  • Low-Fat Options: Use low-fat cottage cheese and reduced-fat cheeses to cut down on calories.
  • Vegetable Power: Increase nutrition by adding layers of veggies like zucchini, spinach, or carrots.
  • Whole Grain Noodles: Opt for whole grain or legume-based pasta for added fiber.

Essential Equipment for Success

Before you start cooking, make sure you have these kitchen essentials:

  • 9×13-inch Baking Dish: Perfect for layering your lasagna.
  • Skillet: For cooking your meat and sauce.
  • Mixing Bowl: To combine your cheese filling.
  • Measuring Cups and Spoons: Ensure accurate ingredient amounts.
  • Spatula or Spoon: For layering and serving your delicious creation.

Serving Suggestions

Now that your lasagna is ready, here are some ideas for serving it:

  • Classic Pairing: Serve with a simple Caesar or garden salad topped with vinaigrette.
  • Breadside Buddy: Garlic bread or cheesy breadsticks make for a perfect companion.
  • Wine Pairing: A nice Chianti or a light Pinot Noir complements the flavors beautifully.
  • Garnish: Fresh basil or parsley on top adds a vibrant touch and freshness.

Conclusion

This Million Dollar Lasagna with Cottage Cheese is more than just a meal; it’s a celebration of flavors, memories, and the joy of cooking! Whether you’re whipping it up for a cozy family dinner or impressing friends at a gathering, this dish is sure to be a hit. So roll up your sleeves, gather your ingredients, and let’s make some magic happen in the kitchen! Enjoy every bite, and remember: healthy eating can be fun, delicious, and absolutely satisfying!

Million Dollar Lasagna with Cottage Cheese

Prep Time 15 minutes
Cook Time 45 minutes
Total Time 1 hour
Servings 8 servings
Calories 650
A rich and cheesy lasagna layered with flavorful meat sauce and creamy cottage cheese, perfect for a hearty family dinner.

Ingredients

Meat and Sauce

  • 1 lb ground beef (or Italian sausage) (for extra flavor)
  • 24 oz marinara sauce (or 3 cups homemade)

Noodles

  • 12 no-boil lasagna noodles lasagna noodles (regular noodles work too; just parboil first)

Cheese Mixture

  • 2 cups cottage cheese (small-curd works best)
  • 1 egg egg (helps bind the cheese layer)
  • 2 cups shredded mozzarella (plus extra for the top)
  • ½ cup grated Parmesan (the real stuff, not the green can)
  • 1 tsp garlic powder (or 2 cloves fresh minced garlic)
  • 1 tsp dried basil (or 1 tbsp fresh)
  • to taste Salt & pepper

Instructions 

  • Cook ground beef until no pink, then stir in marinara sauce and simmer for 5 minutes.
  • Mix cottage cheese, egg, mozzarella, Parmesan, garlic, basil, salt, and pepper until smooth.
  • Spread ½ cup meat sauce in a 9×13-inch dish, layer 4 noodles, half the cheese mixture, then ⅓ of remaining sauce.
  • Repeat layers with remaining noodles, cheese, and sauce. Top with mozzarella.
  • Cover with foil and bake at 375°F (190°C) for 30 minutes, then uncover and bake 15 more minutes until bubbly. Rest 10 minutes before slicing.

Notes

For a richer flavor, add a splash of red wine to the meat sauce.
Calories: 650kcal
Cost: $15
Course: Main Course
Cuisine: Italian
Keyword: lasagna

Elevate Your Dinner with Irresistible Coconut Curry Chicken

Looking to spice up your weeknight dinners? This Coconut Curry Chicken is your answer! Packed with vibrant flavors and wholesome ingredients, it’s not just another meal; it’s a culinary adventure. With just a few simple steps, you can create a dish that’s sure to impress family and friends alike. Let’s dive into this exciting recipe, where nutrition meets deliciousness!

Why You’ll Love This Recipe

This Coconut Curry Chicken isn’t just tasty—it’s a powerhouse of benefits that will have you coming back for seconds. Here’s why you’ll adore this dish:

  • Quick & Easy: Ready in just 30 minutes, it’s perfect for busy weeknights. No need for elaborate meal prep!
  • Flavor Explosion: Infused with aromatic spices and creamy coconut milk, every bite offers a burst of flavor that outshines takeout.
  • One-Pan Wonder: Minimal cleanup with this one-skillet recipe makes it a breeze to whip up.
  • Customizable: Adjust the heat level with curry paste to suit your taste buds. Love it spicy? Go for extra paste!
  • Healthy Comfort Food: Full of wholesome ingredients, this dish is not just filling but nourishing, providing a delicious way to meet your dietary needs.

Essential Ingredients for Coconut Curry Chicken

Before we get cooking, let’s gather our ingredients. Each one plays a crucial role in creating this delicious dish!

  • Ground Spices: 2 teaspoons ground coriander, 1 ½ teaspoons yellow curry powder, and 2 teaspoons cumin for a robust flavor base.
  • Chicken: 1 ½ pounds of boneless, skinless chicken breast, cut into 1-inch cubes—this is the heart of our dish!
  • Coconut Oil: 3 tablespoons of coconut oil for sautéing and adding that rich coconut flavor.
  • Aromatics: 1 small yellow onion, 3 cloves garlic, and 1 tablespoon fresh grated ginger for a fragrant start.
  • Red Curry Paste: 2-3 tablespoons to bring the heat and depth of flavor.
  • Vegetables: 1 red bell pepper, sliced thin for color and crunch.
  • Coconut Milk: 1 (14.5-ounce) can of full-fat coconut milk for that creamy texture we crave.
  • Lime Juice: 1 tablespoon, about ½ lime, for a bright finish.
  • Maple Syrup: 1 tablespoon to balance the flavors perfectly.
  • Thickener: 1 tablespoon corn starch or tapioca flour for a luscious sauce.
  • To Serve: Fresh chopped cilantro, brown rice, basmati rice, cauliflower rice, or naan bread to round out your meal.

How to Prepare the Perfect Coconut Curry Chicken: Step-by-Step Guide

Delicious Coconut Curry Chicken with vibrant colors and fresh ingredients, seen from the side.

Ready to create this mouth-watering Coconut Curry Chicken? Follow these easy steps:

  1. Prep the Chicken: In a medium bowl, combine the ground coriander, yellow curry powder, cumin, kosher salt, and black pepper. Add the cubed chicken and toss to coat evenly with the spices.
  2. Sauté Aromatics: Melt coconut oil in a large skillet over medium-high heat. Add diced onion and cook until soft and translucent (3-4 minutes). Stir in minced garlic, grated ginger, and red curry paste, cooking for another 1-2 minutes until fragrant.
  3. Cook the Vegetables: Add the sliced red bell pepper to the pan and cook for 1-2 minutes until it starts to soften.
  4. Brown the Chicken: Add the seasoned chicken to the pan, cooking for 4-5 minutes, stirring frequently, until browned on all sides (it doesn’t need to be cooked through).
  5. Add Coconut Milk: Pour in the full-fat coconut milk, lime juice, and maple syrup. Stir until the sauce thickens slightly and the chicken is cooked through (3-5 minutes). Ensure the chicken reaches an internal temperature of 165°F.
  6. Thicken the Curry: For a thicker consistency, combine corn starch with 1 tablespoon of water and stir into the sauce. Cook over medium heat until thickened (2-3 minutes).
  7. Garnish and Serve: Remove from heat, garnish with fresh cilantro, and serve warm over rice or with naan bread.

Pro Tips for the Best Coconut Curry Chicken

Want to take your Coconut Curry Chicken to the next level? Here are some expert tips:

  • Choose Your Coconut Milk Wisely: Opt for full-fat coconut milk for the creamiest texture. Lite versions won’t thicken well and can result in a watery curry.
  • Adjust the Spice Level: Start with less red curry paste and add more according to your heat preference. You can always add more, but it’s hard to take it away!
  • Fresh Ingredients Matter: Use fresh ginger and garlic for the best flavor. Dried versions won’t have the same aromatic punch.
  • Prep Ahead: You can marinate the chicken with spices a few hours in advance to infuse more flavor.
  • Freeze for Later: This curry freezes beautifully, making it a great meal prep option. Just store in an airtight container.
  • Experiment with Veggies: Feel free to toss in your favorite vegetables like spinach, zucchini, or snap peas for added nutrition.
  • Garnish Creatively: Top with toasted coconut flakes or a swirl of yogurt for a gourmet touch.
  • Check Consistency: If the curry is too thick, add a splash of chicken broth or water to reach your desired consistency.

Common Mistakes and Troubleshooting

Even the best chefs make mistakes! Here are some common pitfalls and how to avoid them:

  • Overcooking the Chicken: Keep an eye on the chicken to prevent it from becoming dry. Cook just until it reaches the right temperature.
  • Too Watery: If your curry is too thin, make sure to add corn starch mixed with water to thicken it.
  • Not Enough Flavor: Always taste as you go! If it needs more flavor, consider adding more spices or salt.
  • Burnt Garlic: Garlic can burn quickly; stir it in towards the end of sautéing the onions.

Variations of Coconut Curry Chicken

Feel like switching things up? Here are some variations you can try:

  • Vegetarian Version: Substitute chicken with chickpeas or tofu for a plant-based delight.
  • Different Proteins: Try shrimp or fish instead of chicken for a seafood twist.
  • Spicy Coconut Curry: Add fresh chili peppers or a dash of cayenne for an extra kick.
  • Sweet and Savory: Stir in diced mango or pineapple for a sweet flavor contrast.

Storage and Make-Ahead Instructions

This Coconut Curry Chicken is great for meal prep! Here’s how to store it:

  • Refrigerate: Store in an airtight container for up to 4 days in the fridge.
  • Freeze: This dish freezes well for up to 3 months. Just thaw and reheat when ready to enjoy!
  • Reheat: Warm in a skillet over medium heat, adding a splash of water or broth to prevent sticking.

Frequently Asked Questions

Got questions? We’ve got answers! Check out these FAQs:

  • Can I use light coconut milk? While you can use it, full-fat coconut milk is recommended for a creamier texture.
  • How can I make this curry vegetarian? Substitute chicken with chickpeas or tofu, and use vegetable broth instead of chicken broth.
  • Can I use frozen chicken? Yes, but thaw it completely before cooking for even results.
  • What to serve with Coconut Curry Chicken? It pairs beautifully with brown rice, basmati rice, or naan bread.
  • How do I know when the chicken is done? The chicken should reach an internal temperature of 165°F.
  • Can I add more vegetables? Absolutely! Feel free to add any veggies you like.
  • Is this recipe gluten-free? Yes, all ingredients listed are gluten-free, ensuring it’s safe for gluten-sensitive individuals.
  • How long does it take to make? The total time is around 30 minutes, making it a quick and enjoyable dinner option!

Nutritional Tips and Dietary Adaptations

Keeping it healthy? Here are some tips to consider:

  • Lean Protein: Use chicken breast or even turkey for a lower-fat option.
  • Low-Carb Option: Serve over cauliflower rice instead of traditional rice for a keto-friendly meal.
  • Vegan Adaptation: Replace chicken with plant-based proteins and use coconut cream instead of coconut milk for a richer texture.
  • Reduce Sodium: Use low-sodium broth and fresh herbs to keep the flavor without extra salt.

Equipment Recommendations

To make your cooking experience as smooth as possible, here are some essential tools:

  • Skillet: A large skillet or sauté pan is ideal for this recipe.
  • Measuring Cups and Spoons: Accurate measurements ensure the perfect balance of flavors.
  • Cutting Board: A sturdy cutting board is essential for chopping your ingredients efficiently.
  • Chef’s Knife: A sharp knife makes prep work quick and easy.
  • Spatula: A good spatula helps in stirring and serving the curry without sticking.

Serving Suggestions

Now that your Coconut Curry Chicken is ready, let’s talk about how to serve it:

  • Rice Base: Serve over a bed of fluffy brown or basmati rice for a hearty meal.
  • With Naan: Pair with warm naan bread for scooping up every last bit of curry.
  • Fresh Garnish: Top with chopped cilantro and a squeeze of fresh lime for a burst of flavor.
  • Side Dishes: Consider a simple side salad or roasted vegetables to round out the meal.

In conclusion, this Coconut Curry Chicken is not just a recipe; it’s a celebration of flavor, health, and ease. Whether you’re cooking for yourself or for a group, this dish brings joy to the table. So roll up your sleeves, grab your ingredients, and let’s make dinner a delicious adventure!

Coconut Curry Chicken

Prep Time 10 minutes
Cook Time 20 minutes
Total Time 30 minutes
Servings 4 servings
Calories 450
A flavorful and creamy coconut curry chicken dish with aromatic spices, perfect served over rice or naan.

Ingredients

Spice Mix

  • 2 teaspoons ground coriander
  • 1.5 teaspoons yellow curry powder
  • 2 teaspoons cumin
  • 1 teaspoon kosher salt
  • 0.25 teaspoon black pepper

Main Ingredients

  • 1.5 pounds boneless skinless chicken breast (cut into 1 inch cubes)
  • 3 Tablespoons coconut oil
  • 1 small yellow onion (diced)
  • 3 cloves garlic (minced)
  • 1 Tablespoon fresh grated ginger
  • 2-3 Tablespoons red curry paste
  • 1 red bell pepper thinly sliced
  • 1 14.5 ounce can full-fat canned coconut milk
  • 1 Tablespoon lime juice (about 1/2 lime)
  • 1 Tablespoon maple syrup
  • 1 Tablespoon corn starch (or tapioca flour)

To serve

  • fresh chopped cilantro, brown rice, basmati rice, cauliflower rice, or naan bread

Instructions 

  • Combine spices and toss chicken in the mixture.
  • Melt coconut oil and cook onion until soft, then add garlic, ginger, and curry paste; cook until fragrant.
  • Add bell pepper and cook briefly, then add chicken and brown on all sides.
  • Stir in coconut milk, lime juice, and maple syrup; cook until chicken is cooked through and sauce thickens.
  • If desired, thicken curry with cornstarch slurry and garnish with cilantro before serving.

Notes

Adjust curry paste for desired heat level.
Calories: 450kcal
Cost: $15
Course: Main Course
Cuisine: Thai
Keyword: Chicken, Coconut, Curry

Unleash Your Inner Chef with Teriyaki Beef Lettuce Wraps

Welcome to the vibrant and exciting world of Teriyaki Beef Lettuce Wraps! If you’re looking for a quick, healthy meal that packs a flavor punch, you’ve landed in the right spot. This recipe not only showcases the deliciousness of ground beef but also wraps it all in crisp lettuce leaves, creating a delightful crunchy experience. Get ready to dive into a culinary adventure where nutrition meets taste!

Why You’ll Love This Recipe

Let’s talk about why Teriyaki Beef Lettuce Wraps are a must-try in your kitchen!

  • Quick and Easy: With just a handful of ingredients and under 30 minutes, you can whip up a delicious meal that’s perfect for busy weeknights.
  • Nutritious and Healthy: This recipe uses lean ground beef and fresh vegetables, making it a wholesome choice for you and your family.
  • Customizable: Whether you’re vegan, gluten-free, or simply want to mix things up, this recipe can easily adapt to fit your dietary needs.
  • Flavor Explosion: The teriyaki sauce brings a sweet and savory flavor that will have your taste buds dancing.
  • Fun to Eat: Wrapping your beef mixture in crisp lettuce leaves makes for a playful and interactive dining experience!

Ingredients Breakdown

Here’s what you’ll need to create these *mouth-watering* Teriyaki Beef Lettuce Wraps. Let’s break it down!

  • 1 pound ground beef: You can substitute with ground turkey or chicken for a leaner option.
  • 1 cup low-sodium soy sauce: Tamari is a great gluten-free alternative.
  • 2 tablespoons honey or maple syrup: For a vegan version, use agave syrup.
  • 1 tablespoon rice vinegar: This adds a tangy kick; feel free to use apple cider vinegar if that’s what you have on hand.
  • 1 tablespoon sesame oil: This ingredient enhances the flavor; you can use olive oil in a pinch.
  • 2 cloves garlic, minced: Fresh garlic is best, but powdered garlic can work too.
  • 1 inch fresh ginger, grated: Adds warmth; powdered ginger can substitute, but use less.
  • 1 medium carrot, shredded: You can swap in bell peppers or cucumbers for different textures.
  • 0.5 cup green onions, finely chopped: Chives can be a tasty alternative.
  • 8 large lettuce leaves: Butter lettuce or romaine works beautifully!
  • Sesame seeds, for garnish: A sprinkle adds crunch; omit if you prefer.
  • Fresh cilantro, for garnish: This adds freshness; parsley can work too.

Step-by-Step Instructions

Ready to cook? Here’s how to bring your Teriyaki Beef Lettuce Wraps to life!

  1. In a skillet over medium heat, add the ground beef. Cook, stirring frequently, until the meat is well browned and no longer pink, about 5-7 minutes. If there’s excess fat, drain it from the skillet.
  2. In a separate bowl, whisk together the soy sauce, honey (or maple syrup), rice vinegar, sesame oil, minced garlic, and freshly grated ginger until well combined.
  3. Pour the prepared sauce over the cooked ground beef in the skillet. Stir well to ensure the beef is evenly coated with the sauce. Allow the mixture to simmer for an additional 3-5 minutes.
  4. Stir in the shredded carrot and chopped green onions, mixing until they are evenly distributed throughout the beef mixture. Remove the skillet from the heat.
  5. Take a lettuce leaf and spoon a generous amount of the teriyaki beef mixture into the center of each leaf.
  6. Sprinkle sesame seeds over the top of each filled wrap and add a few sprigs of fresh cilantro for garnish.

Pro Tips for Perfect Wraps

Here are some expert insights to elevate your cooking game:

  • Quality Beef: Choose grass-fed ground beef for better flavor and nutrition.
  • Let It Marinate: Allow the beef to sit in the sauce for at least 15 minutes before cooking for deeper flavor.
  • Don’t Overcook: Keep the beef juicy by cooking just until browned.
  • Fresh Ingredients: Use the freshest veggies for the best crunch and nutrition.
  • Assembly Line: Set up a wrap assembly line for a fun dinner party experience!
  • Extra Crunch: Add chopped nuts or crispy fried onions for an extra layer of texture.
  • Serve Immediately: Enjoy your wraps right away for the best crunch!
  • Experiment with Flavors: Try adding chili paste or sriracha for some heat.

Common Mistakes and Troubleshooting

Don’t let small mishaps ruin your delicious dinner! Here are common mistakes and how to avoid them:

  • Too Watery: If your beef mixture is too liquidy, cook it a bit longer to allow the sauce to thicken.
  • Overstuffed Wraps: If the lettuce tears, use larger leaves or add less filling.
  • Flavorless Beef: Always season your beef before adding the sauce for maximum flavor.

Variations to Try

Feeling adventurous? Here are some delicious variations of the original recipe:

  • Spicy Teriyaki Beef: Add sriracha or red pepper flakes to the beef mixture for a spicy kick.
  • Vegetarian Version: Substitute ground beef with textured vegetable protein (TVP) or mushrooms for a plant-based twist.
  • Asian Chicken Wraps: Swap the beef for shredded rotisserie chicken for a quick alternative.
  • Quinoa & Veggie Wraps: Use cooked quinoa and assorted veggies for a healthy grain-based wrap.

Storage and Make-Ahead Instructions

Want to prep in advance? Here’s how to store and make your wraps ahead of time:

  • Refrigerate: Store leftover beef mixture in an airtight container in the fridge for up to 3 days.
  • Freezing: You can freeze the beef mixture for up to 3 months. Thaw overnight before reheating.
  • Assemble Before Serving: It’s best to assemble the wraps just before serving to maintain the lettuce crunch.

Frequently Asked Questions

Got questions? We’ve got answers!

  • Can I use lettuce other than romaine? Absolutely! Butter lettuce or even cabbage leaves work well.
  • How can I make this dish gluten-free? Use tamari instead of soy sauce to keep it gluten-free.
  • What can I serve with these wraps? Try pairing with a side of tropical fruit salad or steamed rice.
  • Can I add more vegetables? Yes! Feel free to toss in bell peppers, snap peas, or water chestnuts for extra crunch.
  • Is this recipe kid-friendly? Definitely! Kids love the fun of wrapping their own food.
  • How long does it take to make? From start to finish, about 30 minutes!
  • Can I reheat leftovers? Yes, reheat the beef mixture in a skillet over low heat until warmed through.
  • Can I make these wraps ahead of time? You can prepare the beef mixture in advance but assemble the wraps just before serving.

Nutritional Tips and Dietary Adaptations

Let’s talk nutrition! Here’s how to make your Teriyaki Beef Lettuce Wraps even healthier:

  • Lean Meat: Opt for lean cuts of beef or alternative proteins like turkey or chicken.
  • Load Up on Veggies: Increase the amount of shredded carrots or add other colorful veggies for more nutrients.
  • Low-Sugar Options: Use a low-sugar teriyaki sauce to keep the sweetness in check.

Equipment Recommendations

Here’s what you’ll need to get started:

  • Non-Stick Skillet: A good-quality skillet ensures even cooking and easy cleanup.
  • Whisk: For mixing your teriyaki sauce to perfection.
  • Measuring Cups and Spoons: Accurate measurements lead to delicious outcomes.
  • Chopping Board: Essential for prepping your vegetables.

Serving Suggestions

Ready to serve your masterpiece? Here are some ideas:

  • Side Salad: Serve with a refreshing cucumber salad for a light meal.
  • Rice Bowl: Create a rice bowl using the beef mixture and fresh toppings.
  • Dipping Sauce: Offer additional teriyaki sauce or a spicy mayo on the side.

Now that you have all the tools to create the best Teriyaki Beef Lettuce Wraps, it’s time to get cooking! Enjoy the process, embrace the flavors, and remember that cooking is all about having fun. Happy cooking!

Teriyaki Beef Lettuce Wraps

Prep Time 10 minutes
Cook Time 10 minutes
Total Time 20 minutes
Servings 4 servings
Calories 250
Delicious and healthy lettuce wraps filled with savory teriyaki beef, perfect for a quick meal or appetizer.

Ingredients

Meat

  • 1 pound ground beef
  • 1 cup low-sodium soy sauce
  • 2 tablespoons honey or maple syrup
  • 1 tablespoon rice vinegar
  • 1 tablespoon sesame oil
  • 2 cloves garlic, minced
  • 1 inch fresh ginger, grated
  • 1 medium carrot, shredded
  • 0.5 cup green onions, finely chopped
  • 8 large lettuce leaves
  • sesame seeds for garnish
  • fresh cilantro for garnish

Instructions 

  • Cook ground beef in a skillet until browned, then drain excess fat.
  • Whisk together soy sauce, honey, rice vinegar, sesame oil, garlic, and ginger.
  • Pour sauce over beef, simmer 3-5 minutes, then stir in carrots and green onions.
  • Spoon beef mixture into lettuce leaves, garnish with sesame seeds and cilantro.

Notes

Use fresh ingredients for best flavor and consider adding a splash of lime for extra zest.
Calories: 250kcal
Cost: $15
Course: Appetizer
Cuisine: Asian
Keyword: Beef

Transform Your Dinner with Dairy-Free Cashew Cream Cajun Chicken Pasta!

Get ready to elevate your weeknight dinners with a dish that’s not just easy to make but also bursting with flavor! Our Dairy-Free Cashew Cream Cajun Chicken Pasta is a delightful twist on a classic favorite. Packed with zest, colorful veggies, and a creamy sauce that will make your taste buds dance, this recipe is perfect for anyone seeking a healthy, satisfying meal without compromising on taste. Let’s dive into the details and make this flavorful adventure happen!

Why You’ll Love This Recipe

Here are five reasons why this Dairy-Free Cashew Cream Cajun Chicken Pasta will become a staple in your kitchen:

  • Flavor Explosion: This dish combines bold Cajun spices with the creaminess of cashew sauce, creating a unique flavor profile that’s both comforting and exciting.
  • Health-Conscious: With no dairy and gluten-free pasta options, this recipe caters to various dietary needs while still being indulgent.
  • Quick & Easy: Ready in under 30 minutes, it’s perfect for busy weeknights when you want something delicious without the fuss.
  • Customizable: Feel free to add your favorite veggies or proteins, making this dish versatile for all tastes!
  • Meal Prep Friendly: This pasta dish is great for meal prep, allowing you to enjoy a healthy lunch or dinner throughout the week.

Ingredient Breakdown

Let’s take a closer look at the ingredients that will make this dish shine, along with some handy substitutions:

  • Cashews: 3/4 cup raw cashews (for a nut-free option, use sunflower seeds).
  • Gluten-Free Pasta: 12 ounces of your choice (brown rice, chickpea, or lentil pasta are excellent choices).
  • Olive Oil: 3 tablespoons, divided (can substitute with avocado oil for a higher smoke point).
  • Chicken Breasts: 1 pound, cut into bite-sized pieces (for a vegetarian option, use tofu or tempeh).
  • Bell Peppers: 1/2 each of yellow and red peppers, thinly sliced (zucchini or broccoli can be used instead).
  • Onion: 1/2 small yellow onion, finely diced (green onions or shallots work well too).
  • Garlic: 3 cloves, chopped (garlic powder can be used in a pinch).
  • Tomato Paste: 2 tablespoons (can substitute with diced tomatoes for a lighter sauce).
  • Spices: A mix of onion powder, garlic powder, oregano, smoked paprika, and thyme to create the Cajun spice blend. Feel free to adjust based on your heat preference.
  • Broth: 1.5 cups, either vegetable or chicken (you can even use water in a pinch).
  • Nutritional Yeast: 2 tablespoons for a cheesy flavor (optional but recommended).
  • Salt & Pepper: To taste (always taste as you go to adjust flavors).

How to Make Dairy-Free Cashew Cream Cajun Chicken Pasta

Side perspective of a bowl filled with dairy-free Cajun chicken pasta.

Step-by-Step Instructions

Follow these steps for a creamy, delicious pasta dish that’s sure to impress!

  • In a heat-proof bowl, cover the raw cashews with just boiled water and let them soak for at least 30 minutes. For a quick method, simmer on the stove for about 10 minutes until pale and plump.
  • Drain the cashews and set aside, reserving about 3/4 cup of the cooking water.
  • In a large skillet, heat 1 tablespoon of olive oil over medium heat. Add the chicken pieces, sprinkle with 1 teaspoon of Cajun seasoning, and cook until golden brown and cooked through. Remove from the pan and set aside.
  • Add another tablespoon of olive oil to the same skillet, then sauté the onions and bell peppers for 3-4 minutes, until tender.
  • Stir in garlic and tomato paste, cooking for another minute until the mixture is fragrant.
  • In a blender, combine the soaked cashews, reserved cooking water, and remaining spices. Blend until smooth and creamy.
  • Add the cooked pasta, chicken, and cashew cream sauce to the skillet. Stir to combine and let simmer for 2-3 minutes, adding more reserved pasta water if needed to reach desired consistency.
  • Serve hot, garnished with fresh parsley if desired.

Pro Tips for Best Results

Here are some expert insights to ensure your Cajun Chicken Pasta turns out perfectly:

  • Soaking Cashews: The longer you soak, the creamier the sauce. Aim for at least 30 minutes; however, you can soak overnight for even better results.
  • Season to Taste: Always taste your sauce as you cook! Adjust spices and salt to meet your flavor preferences.
  • Don’t Overcook the Chicken: Cook the chicken until just done to prevent it from becoming dry. It will continue cooking slightly when mixed with the sauce.
  • Reserve Pasta Water: This starchy water is a game changer for achieving the perfect sauce consistency. Use it wisely!
  • Vegetable Variations: Feel free to toss in seasonal veggies like spinach, zucchini, or mushrooms for added nutrition and flavor.
  • Try Different Proteins: Experiment with shrimp or sausage for a twist on the classic recipe.
  • Make It Spicy: Add more cayenne or a dash of hot sauce for an extra kick!
  • Storage Tips: Store leftovers in an airtight container in the fridge for up to 3 days. Reheat gently on the stove with a splash of broth or water.

Common Mistakes & Troubleshooting

Here are some pitfalls to avoid and how to ensure your dish is a success:

  • Cashews Not Blended Smoothly: Make sure to soak them long enough and blend thoroughly. If needed, add a bit more water to achieve the desired creaminess.
  • Overcooked Vegetables: Cook veggies just until tender to maintain their vibrant color and crunch.
  • Too Thick Sauce: If your sauce is too thick, gradually add more reserved pasta water until you reach your desired consistency.
  • Flavor Is Off: If the dish lacks flavor, consider adding more spices, salt, or a splash of lemon juice for brightness.

Variations of Cajun Chicken Pasta

Mix things up with these creative variations:

  • Pasta Primavera: Add seasonal vegetables like asparagus, cherry tomatoes, and peas for a fresh twist.
  • Seafood Cajun Pasta: Swap chicken for shrimp or crab for a delightful seafood version!
  • Vegan Cajun Pasta: Replace chicken with chickpeas or lentils, and use vegetable broth for a fully plant-based meal.
  • Spicy Vegan Alfredo: Incorporate a touch of sriracha or hot sauce into the cashew cream for an extra spicy kick!

Storage and Make-Ahead Instructions

Make your week easier with these storage tips:

  • Refrigeration: Store any leftovers in an airtight container for up to 3 days. Reheat gently on the stove with a splash of broth or water.
  • Freezing: This pasta dish can be frozen, although the texture may change slightly. Store in a freezer-safe container for up to 2 months.
  • Make-Ahead: Prep the cashew cream and chop your veggies a day in advance to save time on busy nights!

Frequently Asked Questions

Curious about Cajun Chicken Pasta? Here are some common questions:

  • Can I make this recipe vegan? Yes! Simply substitute chicken for chickpeas or tofu and use vegetable broth.
  • What if I don’t have cashews? You can use sunflower seeds or silken tofu for a creamy sauce.
  • Can I use regular pasta? Absolutely! Just be mindful if you’re catering to gluten allergies.
  • How spicy is this pasta? The spice level can be adjusted based on your preference—feel free to add more or less cayenne or Cajun seasoning!
  • How can I make it creamier? Blend the cashew sauce longer and add more reserved pasta water to achieve your desired creaminess.
  • What’s the best way to store leftovers? Keep leftovers in an airtight container in the fridge for up to 3 days for the best flavor and texture.
  • Can I add more vegetables? Absolutely! Feel free to add any veggies you love or have on hand.
  • Is this dish kid-friendly? Yes! The creamy sauce and flavorful spices are usually a hit with kids.

Nutrition Tips and Dietary Adaptations

This dish is not only delicious but can also be tailored to fit your nutritional goals:

  • Protein Boost: Add beans or lentils for a plant-based protein kick.
  • Low Carb Option: Use spiralized zucchini or spaghetti squash instead of traditional pasta.
  • Increase Fiber: Choose whole grain or legume-based pasta to increase fiber content.

Equipment Recommendations

For best results, here’s what you’ll need:

  • High-Speed Blender: Essential for achieving a smooth cashew cream.
  • Large Skillet: A broad pan will allow for even cooking of the chicken and vegetables.
  • Pasta Pot: A big pot for boiling pasta is crucial for keeping everything flowing smoothly.

Serving Suggestions

Complete your meal with these serving ideas:

  • Fresh Herbs: Garnish with chopped parsley or cilantro for a fresh finish.
  • Side Salad: Pair with a crisp green salad for a refreshing contrast.
  • Crusty Bread: Serve with whole grain or gluten-free bread to soak up the creamy sauce.

Conclusion

Dive into the delightful world of flavors with our Dairy-Free Cashew Cream Cajun Chicken Pasta! This recipe is more than just a meal; it’s an experience filled with vibrant ingredients and wholesome goodness. Whether you’re cooking for family or treating yourself to a cozy dinner, this dish proves that healthy eating can be packed with excitement and satisfaction. So grab your apron, gather your ingredients, and let’s make mealtime a fun adventure!

Cashew Cream Cajun Chicken Pasta - Dairy Free!

Prep Time 15 minutes
Cook Time 20 minutes
Total Time 35 minutes
Servings 4 servings
Calories 650
A creamy, dairy-free Cajun chicken pasta with a rich cashew sauce and vibrant peppers, perfect for a flavorful weeknight dinner.

Ingredients

Dairy-Free Cashew Cream

  • 3/4 cup raw cashews (soaked for at least 30 minutes)
  • 12 ounces gluten free pasta
  • 3 tablespoons olive oil (divided)
  • 1 pound boneless skinless chicken breasts (cut into bite-sized pieces)
  • 1/2 small yellow onion (finely diced)
  • 1/2 large red pepper (thinly sliced)
  • 1/2 large yellow or orange pepper (thinly sliced)
  • 3 cloves garlic (chopped)
  • 2 tablespoons tomato paste
  • 1 teaspoon onion powder
  • 1 teaspoon garlic powder
  • 1 teaspoon dried oregano
  • 1 teaspoon smoked paprika
  • ¼ teaspoon dried thyme
  • Pinch or two cayenne (optional)
  • 2 tablespoons Cajun seasoning (can replace onion powder, garlic powder, oregano, paprika, thyme)
  • 1 1/2 cups broth (chicken or vegetable)
  • 2 tablespoons nutritional yeast
  • 1 1/2 teaspoons kosher salt (or to taste)
  • 1/2 teaspoon black pepper (or to taste)

Parsley

Instructions 

  • Soak cashews in boiling water for 30 minutes, then drain, reserving 3/4 cup of water.
  • Cook chicken with Cajun seasoning until cooked through; set aside.
  • Sauté vegetables for 3-4 minutes, then add spices and tomato paste, cooking until fragrant.
  • Blend soaked cashews with reserved water until smooth, then add to the skillet with cooked pasta and chicken. Simmer until sauce thickens, adding more broth or water as needed.
  • Garnish with parsley and serve hot.

Notes

Reserve pasta water to adjust sauce consistency and enhance flavor.
Calories: 650kcal
Cost: $15
Course: Main Course
Cuisine: American
Keyword: Chicken, pasta, Vegan