Author

Ryan

Browsing

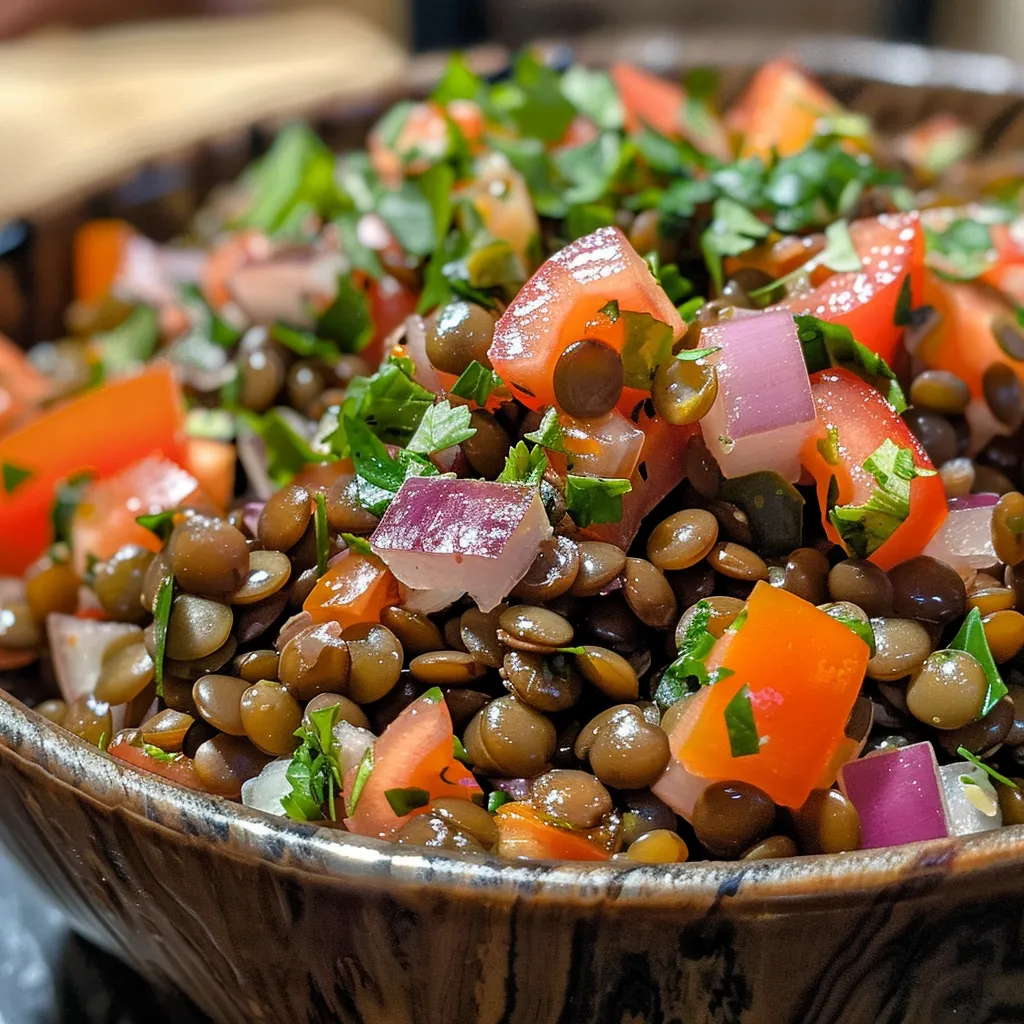
Discover the Vibrant World of Cold Lentil Salad

Welcome to a culinary adventure where flavor meets nutrition! This Vibrant & Zesty Cold Lentil Salad is not just a meal; it’s a celebration of colors and textures that will liven up your dining table. Packed with hearty lentils and a rainbow of fresh veggies, this salad is perfect for meal prep or a delightful side dish. Ready to dive in? Let’s explore why this salad is a must-try!

Why You’ll Love This Recipe

This cold lentil veggie salad is not only visually stunning but also incredibly nutritious. Here are five reasons to whip up this dish:

  • High Protein Content: Lentils are a fantastic source of plant-based protein, making this salad a filling option that supports muscle growth and recovery.
  • Rich in Fiber: This salad is packed with fiber from lentils and vegetables, promoting digestive health and keeping you satiated longer.
  • Flavor Explosion: The combination of vibrant veggies and zesty dressing creates a lively flavor profile that will excite your taste buds.
  • Versatile Meal Prep: Perfect for busy weeks, this salad can be made ahead and stored in the fridge, making it a go-to for quick lunches or dinners.
  • Customizable: Feel free to mix and match ingredients based on what you have on hand, ensuring you can enjoy this salad anytime!

Ingredient Breakdown

Let’s delve into the ingredients that make this salad so special. Each component adds its own unique flavor and nutritional profile:

  • 1 cup green lentils: Rinsed well, these provide a hearty base and are rich in protein.
  • 1 cup brown lentils: Also rinsed, they add texture and can be replaced with black beluga lentils for a stunning visual contrast.
  • 1 medium red bell pepper: Diced for sweetness and crunch; yellow bell pepper is a great alternative.
  • 1 medium yellow bell pepper: Adds more color and flavor; feel free to swap with orange for sweetness.
  • 2 cups shredded red cabbage: Offers a delightful crunch and is packed with antioxidants.
  • 1 medium grated carrot: Adds natural sweetness and vibrant color.
  • 1 cup cherry tomatoes: Halved for juiciness and a pop of flavor.
  • ¼ cup extra-virgin olive oil: The base for our vinaigrette to enhance flavor and healthy fats.
  • 2 tablespoons fresh lemon juice: Brightens the salad and adds a refreshing zing.
  • 1 tablespoon Dijon mustard: Provides depth and tang; opt for whole grain mustard for a different texture.
  • 1 tablespoon honey or agave syrup: Sweetens the dressing; use agave for a vegan option.
  • Sea salt and black pepper: To taste, enhancing all the flavors.
  • ¼ cup fresh parsley: Chopped, for garnish and added freshness.
  • ¼ cup fresh mint leaves: A fragrant addition that elevates the freshness of the salad.

Pro Tips for Perfecting Your Salad

A side view of a fresh cold lentil and veggie salad highlighting its textures and colors.

Want to elevate your salad game? Here are some expert insights:

  • Rinse Lentils Thoroughly: Prevent mushiness by rinsing lentils well before cooking.
  • Flavor the Cooking Water: Add bay leaves, garlic, or broth to the cooking water for extra flavor.
  • Chill Before Serving: Let your salad sit in the fridge for at least an hour to allow flavors to meld.
  • Fresh Herbs Are Key: Always use fresh herbs for the best flavor; dried herbs won’t have the same impact.
  • Adjust the Dressing: Taste and adjust the acidity or sweetness of the vinaigrette to your liking.
  • Add Crunch: Include nuts or seeds like sunflower seeds or chopped walnuts for added texture.
  • Store Properly: Use airtight containers to keep your salad fresh in the fridge for up to 5 days.
  • Mix and Match: Feel free to experiment with seasonal vegetables to keep things exciting!

Common Mistakes and Troubleshooting

Even the best chefs make mistakes sometimes! Here are some common pitfalls and how to avoid them:

  • Overcooked Lentils: Keep an eye on your lentils; they should be tender but not falling apart.
  • Too Much Dressing: Start with less dressing and add more as needed to avoid sogginess.
  • Ignoring Seasoning: Don’t forget to season your salad; a little salt and pepper can elevate the flavors.
  • Using Stale Ingredients: Always choose fresh produce for the best taste and nutrition.

Delicious Variations to Try

One of the best things about this salad is its versatility. Here are some fun variations to keep your meals exciting:

  • Mediterranean Twist: Add feta cheese, kalamata olives, and a sprinkle of oregano for a Mediterranean flair.
  • Spicy Kick: Toss in diced jalapeños or a splash of hot sauce to heat things up.
  • Quinoa Boost: Mix in cooked quinoa for an extra protein punch and a different texture.
  • Fruit Fusion: Incorporate diced apples or pears for a sweet contrast to the savory elements.

Storage and Make-Ahead Instructions

This salad is perfect for meal prep! Here’s how to store it:

  • Make Ahead: Prepare the salad up to 3 days in advance. Store in an airtight container in the fridge.
  • Dress Separately: For best results, keep the vinaigrette separate until you’re ready to serve.
  • Freezing: While this salad is best enjoyed fresh, you can freeze the lentils if you need to. Just thaw and toss with fresh veggies when ready to eat!

Frequently Asked Questions

Curious about this salad? Here are some common questions answered:

  • Can I use only one type of lentil? Yes, feel free to use just green or brown lentils if that’s what you have!
  • How long does this salad last in the fridge? It can last up to 5 days if stored properly in an airtight container.
  • Can I add protein to this salad? Absolutely! Grilled chicken, chickpeas, or tofu are great additions.
  • Is this salad gluten-free? Yes, all ingredients are naturally gluten-free!
  • What can I serve with this salad? It pairs wonderfully with grilled meats, sandwiches, or as a stand-alone lunch.
  • Can I make this salad vegan? Yes, simply substitute honey with agave syrup.
  • How do I make this salad more filling? Add grains like quinoa or serve it with whole-grain bread.
  • What dressing can I use instead of vinaigrette? A tahini dressing or avocado dressing would also be delicious options!

Nutritional Tips and Dietary Adaptations

This salad is not just delicious; it’s also a powerhouse of nutrients. Consider these tips for dietary adaptations:

  • Plant-Based: Perfect for vegans and vegetarians, providing ample protein from lentils.
  • Low-Carb Option: Skip the grains if you’re following a low-carb diet.
  • High-Fiber Diet: This salad is naturally high in fiber, supporting digestive health.
  • Heart-Healthy: Olive oil offers beneficial fats that can promote heart health.

Essential Equipment for Preparation

To make this salad, you’ll need:

  • Medium Pot: For cooking lentils.
  • Cutting Board: Essential for chopping vegetables.
  • Sharp Knife: To make quick work of dicing and slicing.
  • Mixing Bowl: For combining all the delicious ingredients.
  • Airtight Containers: For storing your salad in the fridge.

Serving Suggestions

Ready to serve? Here are some ideas to make your meal even more enjoyable:

  • Garnish with Fresh Herbs: A sprinkle of parsley or mint adds a beautiful touch.
  • Serve Cold: This salad is best enjoyed chilled, so make sure to refrigerate before serving.
  • Pair with Grilled Proteins: It complements grilled chicken, fish, or even veggie burgers perfectly!
  • Use as a Filling: Load it into wraps or pita for a fun lunch option.

Conclusion: A Celebration of Flavor and Nutrition

There you have it—your ultimate guide to creating a Vibrant & Zesty Cold Lentil Salad! With its vibrant colors, bold flavors, and numerous health benefits, this salad is sure to become a staple in your kitchen. So gather your ingredients, unleash your creativity, and enjoy the delightful experience of cooking! Remember, healthy eating should never be boring, and with this dish, you’re well on your way to proving that!

Crisp & Colorful Cold Lentil & Veggie Salad for Easy Meal Prep

Prep Time 15 minutes
Cook Time 20 minutes
Total Time 35 minutes
Servings 4 servings
Calories 350
A vibrant and nutritious salad perfect for quick meal prep, combining lentils and fresh vegetables with a tangy dressing.

Ingredients

Dry Lentils

  • 1 cup green lentils (rinsed well)
  • 1 cup brown lentils (rinsed well)

Vegetables

  • 1 medium red bell pepper (diced)
  • 1 medium yellow bell pepper (diced)
  • 2 cups shredded red cabbage
  • 1 medium grated carrot
  • 1 cup cherry tomatoes (halved)

Dressing

  • ¼ cup extra-virgin olive oil (or other light oil)
  • 2 tablespoons fresh lemon juice (or lime juice)
  • 1 tablespoon Dijon mustard (or whole grain mustard)
  • 1 tablespoon honey or agave syrup (substitute with agave for vegan)
  • to taste sea salt
  • to taste black pepper

Garnish

  • ¼ cup fresh parsley (for garnish)
  • ¼ cup fresh mint leaves (for garnish)

Instructions 

  • Cook the lentils in boiling water until tender, about 20 minutes. Drain and let cool.
  • In a large bowl, combine cooked lentils, diced bell peppers, shredded cabbage, grated carrot, and halved cherry tomatoes.
  • Whisk together olive oil, lemon juice, mustard, honey, salt, and pepper to make the dressing.
  • Pour dressing over the salad and toss to combine.
  • Garnish with chopped parsley and mint leaves before serving.

Notes

This salad can be stored in the refrigerator for up to 2 days, making it perfect for meal prep.
Calories: 350kcal
Cost: $15
Course: Salad
Cuisine: international
Keyword: Healthy, Lentils, Vegetables

Why Honey BBQ Chicken Rice Will Become Your New Favorite Dish

If you’re looking for a meal that combines convenience, flavor, and nutrition, look no further than Honey BBQ Chicken Rice. This dish is not just another recipe; it’s a culinary adventure that will tantalize your taste buds while keeping your health goals in check. With tender, juicy chicken coated in a sweet and smoky BBQ glaze served over fluffy rice, this meal is perfect for busy weeknights or meal prepping for the week ahead. Let’s dive into why this dish deserves a starring role in your kitchen!

Why You’ll Love This Recipe

  • Quick to Prepare: This recipe takes less than 30 minutes from start to finish, making it ideal for busy schedules.
  • Flavor Explosion: The combination of honey, BBQ sauce, and spices creates a sticky sweet glaze that’s incredibly satisfying.
  • One-Pan Wonder: Everything cooks in the same skillet, which means fewer dishes and less cleanup!
  • Customizable: Whether you prefer brown rice or quinoa, this recipe allows for easy substitutions.
  • Meal Prep Friendly: Make a big batch for leftovers that taste just as good reheated!

Ingredient Breakdown

Let’s get into the nitty-gritty of what you need for this flavor-packed dish. Here’s a detailed look at each ingredient, including possible substitutions to suit your taste or dietary preferences.

  • 1.5 lb boneless skinless chicken breasts: The star of the dish! You can substitute with thighs for a richer flavor or tofu for a plant-based option.
  • 1½ cups long-grain white rice (uncooked): Swapping in brown rice will add more fiber but requires more liquid and cooking time.
  • 3 cups chicken broth: Vegetable broth works great for a vegetarian version.
  • ⅓ cup honey: Agave syrup or maple syrup can be used for a vegan alternative.
  • ½ cup BBQ sauce: Choose your favorite brand or make your own for a personal touch.
  • 2 tbsp soy sauce: Tamari serves as a gluten-free substitute.
  • 1 tbsp apple cider vinegar: For a tangy kick; lemon juice can also work.
  • 2 tbsp olive oil: Feel free to use avocado oil for a high smoke point.
  • 4 garlic cloves, minced: Fresh garlic is ideal, but garlic powder is a quick alternative.
  • 1½ tsp smoked paprika: This adds depth; regular paprika can be used if you don’t have smoked.
  • 1 tsp onion powder: Enhances the savory flavor; can be substituted with fresh onion.
  • 1 tsp black pepper: Adjust to taste.
  • ¾ tsp salt: Always taste as you go!
  • ½ tsp chili flakes (optional): For those who like a little heat!
  • ¼ cup green onions, sliced: Fresh herbs like cilantro or parsley can also brighten the dish.
  • 2 tbsp fresh parsley or cilantro, chopped: Adds freshness and color!
  • 1 tbsp sesame seeds (optional): For a nice crunch; omit if you prefer a smooth texture.

Step-By-Step Instructions

Juicy Honey BBQ chicken served over fluffy white rice, topped with chopped herbs and spices.

Now, let’s bring it all together with these straightforward steps that will have you savoring your creation in no time!

  1. Rinse the rice: Start by rinsing the rice until the water runs mostly clear. This removes excess starch for fluffy rice.
  2. Cook the rice: In a saucepan, combine the rinsed rice, chicken broth, and a pinch of salt. Bring to a boil, then reduce heat to low, cover, and simmer for 15 minutes. Let it rest for 5 minutes before fluffing with a fork.
  3. Prepare the sauce: In a bowl, whisk together honey, BBQ sauce, soy sauce, apple cider vinegar, minced garlic, smoked paprika, onion powder, black pepper, chili flakes, and salt until smooth.
  4. Sear the chicken: Heat olive oil in a large skillet over medium-high heat. Pat chicken dry and season lightly with salt and pepper. Sear each side for 4-5 minutes until golden brown.
  5. Simmer with sauce: Reduce heat to medium and pour the prepared sauce over the chicken. Simmer for 6-8 minutes, turning the chicken occasionally to coat until it’s fully cooked and the sauce is sticky.
  6. Slice & serve: Remove the chicken and let it rest for 5 minutes. Slice or cube it, then return to the skillet to coat with the sauce. Serve the chicken over rice, drizzling with extra sauce and garnishing with green onions, herbs, and sesame seeds.

Pro Tips for the Perfect Dish

  • Use a meat thermometer: Chicken should reach an internal temperature of 165°F for safety.
  • Let it rest: Allowing the chicken to rest before slicing helps retain its juices.
  • Adjust sweetness: If you prefer a less sweet glaze, reduce the amount of honey or choose a less sweet BBQ sauce.
  • Experiment with spices: Don’t be afraid to add your favorite spices or herbs to the sauce for added flavor.
  • Batch it up: This recipe doubles easily, making it perfect for meal prepping!
  • Leftovers are magic: The flavors meld beautifully overnight, making leftovers even tastier.
  • Pair with veggies: Add steamed or roasted veggies to your chicken and rice for a complete meal.
  • Play with garnishes: Try adding sliced jalapeños or avocado for extra flair!

Common Mistakes and Troubleshooting

Even the best chefs encounter challenges! Here are some tips to help you avoid common pitfalls:

  • Overcooking the chicken: Keep an eye on the cooking time to prevent dryness; it should be golden and juicy.
  • Rice not fluffy: Ensure you rinse the rice thoroughly to remove excess starch.
  • Too salty: If your dish tastes too salty, balance it with a splash of vinegar or a touch of honey.
  • Burnt sauce: If you notice the sauce starting to stick, lower the heat and add a splash more chicken broth.

Flavor Variations

Feel free to mix things up! Here are some variations to keep your meals exciting:

  • Spicy Sriracha BBQ: Add Sriracha to the sauce for a spicy kick!
  • Pineapple BBQ Chicken: Toss in pineapple chunks for a tropical twist.
  • Teriyaki Style: Replace BBQ sauce with teriyaki sauce for a different flavor profile.
  • Herb-Infused Rice: Cook rice with bay leaves or add herbs to the broth for extra flavor.

Storage and Make-Ahead Instructions

This Honey BBQ Chicken Rice is perfect for meal prep! Here’s how to store and reheat:

  • Refrigeration: Store leftovers in an airtight container for up to 4 days.
  • Freezing: Freeze portions in airtight containers for up to 3 months. Thaw overnight in the fridge before reheating.
  • Reheating: Reheat in the microwave with a splash of chicken broth or water to keep it moist.

Frequently Asked Questions

Got questions? We’ve got answers! Here are some common inquiries about Honey BBQ Chicken Rice:

  • Can I use frozen chicken? Yes! Just adjust cooking times and ensure it reaches 165°F.
  • What type of rice is best? Long-grain white rice is traditional, but brown rice or quinoa can also be used.
  • Can I make this vegan? Absolutely! Substitute chicken with tofu or chickpeas and use vegetable broth.
  • How do I make it spicy? Add chili flakes or Sriracha to the sauce for heat.
  • What’s the best way to serve it? Serve it in a bowl, garnished with green onions, herbs, and sesame seeds.
  • How can I bulk it up? Add steamed or roasted vegetables for a nutritious boost!
  • Can it be made ahead of time? Yes! It stores well in the fridge or freezer for meal prep.
  • Is it gluten-free? Use gluten-free soy sauce (tamari) to make it gluten-free.

Nutrition Tips and Dietary Adaptations

This dish is not only delicious but can also be tailored to fit various dietary needs:

  • High Protein: This recipe is rich in protein thanks to the chicken, making it great for muscle recovery.
  • Low Carb: Use cauliflower rice instead of traditional rice to lower the carb count.
  • Heart-Healthy: Choosing skinless chicken and healthy fats like olive oil promotes heart health.

Equipment Recommendations

To create this dish, you’ll need some essential kitchen tools:

  • Large Skillet: A non-stick skillet is ideal for easy cooking and cleanup.
  • Measuring Cups and Spoons: Accurate measurements ensure the right balance of flavors.
  • Cutting Board and Knife: Essential for prepping your chicken and ingredients.
  • Rice Cooker (optional): If you love perfectly cooked rice, a rice cooker is a great investment!

Serving Suggestions

This Honey BBQ Chicken Rice is incredibly versatile. Here are some serving ideas:

  • Fresh Salad: Pair it with a crunchy salad for a refreshing contrast.
  • Steamed Veggies: Broccoli, bell peppers, or green beans add color and nutrition.
  • Garlic Bread: Serve with garlic bread for a comforting meal.
  • Fruit Salad: A light fruit salad can be a sweet finish to your meal.

Conclusion

In just a few simple steps, you can create a dish that’s not only delicious but also packed with nutrition. Honey BBQ Chicken Rice is perfect for those who want to eat well without sacrificing flavor. Try it out, and let your taste buds dance with delight!

Fast & Flavor-Packed Honey BBQ Chicken Rice

Prep Time 10 minutes
Cook Time 30 minutes
Total Time 40 minutes
Servings 4 servings
Calories 650
A quick and delicious dish combining tender chicken, flavorful honey BBQ sauce, and fluffy rice for a satisfying meal.

Ingredients

Protein

  • 1.5 lb boneless skinless chicken breasts

Grains

  • 1.5 cups long-grain white rice (uncooked)

Broth & Sauces

  • 3 cups chicken broth
  • cup honey
  • ½ cup BBQ sauce
  • 2 tbsp soy sauce
  • 1 tbsp apple cider vinegar
  • 2 tbsp olive oil
  • 4 cloves garlic, minced
  • 1.5 tsp smoked paprika
  • 1 tsp onion powder
  • 1 tsp black pepper
  • ¾ tsp salt
  • ½ tsp chili flakes (optional)
  • ¼ cup green onions, sliced
  • 2 tbsp fresh parsley or cilantro, chopped
  • 1 tbsp sesame seeds (optional)

Instructions 

  • Cook rice in chicken broth until tender, then fluff and set aside.
  • Mix honey, BBQ sauce, soy sauce, vinegar, garlic, paprika, onion powder, pepper, chili flakes, and salt to make the sauce.
  • Sear chicken in oil until golden, then simmer with sauce until cooked and sticky.
  • Rest, slice or cube chicken, then toss in sauce and serve over rice. Garnish with green onions, herbs, and sesame seeds.

Notes

For extra flavor, marinate chicken beforehand or add a squeeze of lime before serving.
Calories: 650kcal
Cost: $15
Course: Main Course
Cuisine: American
Keyword: BBQ, Chicken, Rice

Kickstart Your Day with a Burst of Flavor!

Welcome to the vibrant world of healthy smoothies! If you’re looking to energize your mornings with a delicious and nutritious drink, then look no further than our Tropical Sunrise Smoothie. This delightful blend of frozen mango, pineapple, and creamy Greek yogurt is not just refreshing; it’s a powerhouse of nutrients that will make you feel like you’re basking in a tropical paradise. In this article, we’ll explore everything you need to know to make this smoothie your new go-to breakfast!

Why You’ll Love This Tropical Sunrise Smoothie

This smoothie isn’t just about taste; it packs a nutritional punch! Here are five compelling reasons to sip on this tropical treat:

  • Refreshing Flavor: The combination of sweet mango and tart pineapple creates an invigorating flavor that awakens your senses.
  • Energy Boost: With natural sugars from fruit and healthy fats from yogurt, this smoothie provides sustained energy throughout your morning.
  • Rich in Nutrients: Packed with vitamins C and A, this smoothie supports your immune system and promotes healthy skin.
  • Quick and Easy: In just five minutes, you can blend this nutrient-rich breakfast, making it perfect for busy mornings.
  • Customizable Options: This smoothie is versatile—add your favorite ingredients or swap out for what you have available!

Ingredients Breakdown

Let’s dive into the delicious components of your Mango Pineapple Breakfast Smoothie:

  • 1 cup frozen mango chunks: Sweet, tropical, and full of vitamins A and C.
  • 1 cup frozen pineapple chunks: Adds a tartness that balances the sweetness of mango.
  • 1 banana: Provides natural sweetness and a creamy texture.
  • 1 cup coconut water: Hydrating and rich in electrolytes, perfect for a refreshing kick.
  • 1/2 cup Greek yogurt: Adds creaminess and protein, making it a complete meal.

Substitutions: If you don’t have an ingredient on hand, here are some alternatives:

  • Fruit: Swap mango or pineapple for other frozen fruit like berries or peaches.
  • Coconut Water: Use regular water or almond milk for a different base.
  • Greek Yogurt: Try plant-based yogurt or any other yogurt you prefer.
  • Banana: Avocado can be used for creaminess without the sweetness.

How to Make Your Tropical Sunrise Smoothie

Side view of a creamy mango pineapple breakfast smoothie with fruit pieces on top.

Now that you have your ingredients ready, let’s get blending!

  1. Combine Ingredients: In a blender, add the frozen mango, frozen pineapple, banana, coconut water, and Greek yogurt.
  2. Blend Until Smooth: Blend on high speed until the mixture is creamy and smooth, with no chunks remaining.
  3. Serve: Pour the smoothie into two glasses and enjoy immediately. Optionally, top with chia seeds or shredded coconut for an extra flair!

Pro Tips for the Best Smoothie

To ensure your smoothie turns out perfectly every time, consider these expert tips:

  • Use Frozen Fruit: Frozen fruit not only enhances the texture but also makes your smoothie cold and refreshing.
  • Adjust Thickness: If your smoothie is too thick, add more coconut water until you reach your desired consistency.
  • Sweetness Level: If you prefer a sweeter smoothie, add a drizzle of honey or maple syrup.
  • Boost the Protein: Toss in a scoop of your favorite protein powder for a post-workout meal.
  • Mix in Greens: For added nutrition, blend in a handful of spinach or kale; you won’t even taste it!
  • Make Ahead: Prepare smoothie packs by portioning out ingredients in freezer bags to save time on busy mornings.
  • Experiment with Superfoods: Add chia seeds, flaxseeds, or spirulina for an extra health boost.
  • Mind Your Blending Time: Blend just long enough to combine ingredients without overheating them.

Common Mistakes and Troubleshooting

Even the best chefs make mistakes! Here are some common pitfalls and how to avoid them:

  • Too Thick: If your smoothie is too thick, simply add more coconut water or any liquid of your choice.
  • Too Runny: To thicken, add more frozen fruit or a tablespoon of Greek yogurt.
  • Not Sweet Enough: Balance flavors with a little honey or a sweet fruit like ripe banana.
  • Not Blending Smoothly: Ensure your blender is powerful enough and blend in stages if necessary.

Delicious Variations to Try

Why stick to one recipe? Here are some exciting variations to keep things fresh:

  • Berry Blast: Replace mango and pineapple with mixed berries for a tangy twist.
  • Green Paradise: Add a handful of spinach and a kiwi for a vibrant green smoothie.
  • Peanut Butter Delight: Blend in a tablespoon of peanut butter for a creamy, nutty flavor.
  • Coconut Dream: Use coconut milk instead of coconut water and add shredded coconut for a tropical experience.

Storage and Make-Ahead Instructions

Your smoothie can be prepared in advance to make your mornings even easier! Here’s how:

  • Make-Ahead Smoothie Packs: Portion out your ingredients in freezer bags and freeze. In the morning, just blend with coconut water.
  • Storing Leftovers: If you have leftover smoothie, store it in an airtight container in the fridge for up to 24 hours. Shake or stir well before drinking.

Nutritional Information

Here’s a quick look at the nutritional benefits of your Tropical Sunrise Smoothie:

  • Calories: Approximately 250 per serving
  • Protein: About 10g from Greek yogurt
  • Fiber: Around 5g from fruit
  • Vitamins: High in vitamin C, vitamin A, and potassium

Frequently Asked Questions

Got questions? We’ve got answers! Here’s a round-up of common queries about this smoothie:

  • Can I use fresh fruit instead of frozen? Yes, but you may need to add ice to achieve the right texture.
  • How can I make this smoothie vegan? Substitute Greek yogurt with a plant-based yogurt and ensure the protein powder is vegan.
  • Can I add more protein? Absolutely! A scoop of protein powder works great.
  • What can I use instead of coconut water? You can use regular water, almond milk, or even oat milk.
  • Is this smoothie good for weight loss? Yes, it’s nutrient-dense and can be part of a balanced diet.
  • How many servings does this recipe make? This recipe makes about 2 servings.
  • Can I add greens without changing the flavor? Yes, spinach or kale blends well without overpowering the fruit flavors.
  • How long can I store the smoothie in the fridge? For the best taste, consume it within 24 hours.

Essential Equipment for Smoothie Making

Having the right tools makes all the difference. Here’s what you’ll need:

  • High-Powered Blender: Essential for achieving a creamy texture.
  • Measuring Cups: To ensure perfect ingredient ratios.
  • Spatula: Handy for scraping down the sides of the blender.
  • Glass or Mason Jars: Perfect for storing smoothies if you make ahead.

Serving Suggestions

Make your smoothie experience even more delightful with these serving ideas:

  • Garnish: Top with chia seeds, shredded coconut, or fresh fruit slices for added texture.
  • Pair with Snacks: Enjoy with a handful of nuts or a slice of whole-grain toast for a balanced meal.
  • Presentation: Serve in a fun glass with a colorful straw to bring a smile to your morning!

Conclusion: Sip into Paradise!

Your Tropical Sunrise Smoothie is more than just a drink; it’s a burst of energy and flavor that can transform your mornings. With endless variations and a host of health benefits, this smoothie can easily fit into your lifestyle. So grab your blender, let your creativity flow, and enjoy the tropical vibes one sip at a time!

Mango Pineapple Breakfast Smoothie

Prep Time 5 minutes
Total Time 5 minutes
Servings 2 glasses
Calories 250
A refreshing and nutritious smoothie perfect for a quick breakfast or snack, combining tropical flavors with creamy yogurt.

Ingredients

Fruits

  • 1 cup frozen mango chunks
  • 1 cup frozen pineapple chunks
  • 1 piece banana

Liquid

  • 1 cup coconut water

Dairy

  • 1/2 cup Greek yogurt

Instructions 

  • Combine all ingredients in a blender.
  • Blend until smooth and creamy.
  • Pour into glasses and serve.

Notes

You can top with chia seeds or shredded coconut for extra flavor.
Calories: 250kcal
Cost: $10
Course: Breakfast
Cuisine: Tropical
Keyword: Smoothie

Indulge in Creamy Potato Salad Bliss

If you’re ready to elevate your summer gatherings, BBQs, or even a casual weeknight dinner, this creamy potato salad is your ticket to culinary delight! Packed with flavor and made with fresh ingredients, this recipe is not just another side dish—it’s a star player at the table. With Yukon Gold potatoes, a zesty dressing, and a sprinkle of fresh herbs, you’ll create a dish that dances on your taste buds and brings everyone back for seconds. Let’s dive into the scrumptious world of potato salad!

Why You’ll Love This Creamy Potato Salad

This creamy potato salad isn’t just any old recipe; it’s a culinary experience that will have your friends and family raving! Here are five reasons why it stands above the rest:

  • Flavor Explosion: The combination of sour cream and mayonnaise creates a rich, creamy dressing that perfectly complements the potatoes.
  • Fresh Ingredients: With fresh dill and crunchy veggies, each bite is a burst of flavor and texture.
  • Quick and Easy: With just a few simple steps, you can whip up this dish in no time, making it perfect for busy weeknights.
  • Versatile Serving Options: Serve it cold, as a side, or top it with grilled chicken for a complete meal!
  • Make-Ahead Friendly: This creamy potato salad tastes even better after sitting, making it ideal for meal prep or potlucks.

Essential Ingredients for Your Creamy Potato Salad

Gather these ingredients to create your culinary masterpiece. Each component plays a vital role in achieving that dreamy, creamy texture.

  • 2 pounds Yukon Gold potatoes: These potatoes are creamy and buttery, making them perfect for salads.
  • 1 cup mayonnaise: The backbone of your dressing, providing richness and creaminess.
  • 1/2 cup sour cream: Adds a tangy twist that balances the flavors beautifully.
  • 1/4 cup finely chopped celery: For a crunchy texture and fresh taste.
  • 1/4 cup finely chopped red onion: Adds sharpness and color to the mix.
  • 2 tablespoons chopped fresh dill: A must for that refreshing herbaceous flavor!
  • 1 tablespoon Dijon mustard: For a subtle kick of spice and depth of flavor.
  • 1 tablespoon apple cider vinegar: Brightens the dressing and balances the richness.
  • 1 teaspoon salt and 1/2 teaspoon black pepper: Essential for seasoning and bringing the flavors together.

Feel free to customize! If you’re looking for lighter options, swap out the mayonnaise for Greek yogurt or use a vegan mayo for plant-based goodness.

How to Make This Creamy Potato Salad

Close-up of a creamy potato salad, highlighting diced potatoes and fresh herbs.

Ready to get cooking? Here’s how to bring this creamy potato salad to life in just a few simple steps:

  1. Prep the Potatoes: Place the cubed Yukon Gold potatoes in a large pot and cover them with cold water. Add a pinch of salt to enhance flavor.
  2. Cook: Bring the water to a boil, then reduce the heat and simmer until the potatoes are fork-tender, about 10-15 minutes.
  3. Drain and Cool: Drain the potatoes well in a colander and let them cool completely. This prevents the dressing from becoming too runny.
  4. Make the Dressing: In a large mixing bowl, whisk together the mayonnaise, sour cream, chopped celery, red onion, dill, Dijon mustard, apple cider vinegar, salt, and pepper until smooth.
  5. Combine: Add the cooled potatoes to the dressing mixture. Gently fold until all the potatoes are evenly coated.
  6. Chill: Cover the bowl with plastic wrap and refrigerate for at least 1 hour to let the flavors meld.

Pro Tips for Potato Salad Perfection

Take your creamy potato salad to the next level with these expert insights:

  • Choose the Right Potato: Yukon Gold potatoes are ideal, but red potatoes or fingerlings work well too for a different texture.
  • Don’t Overcook: Keep an eye on the potatoes while they cook; overcooking makes them mushy. Aim for fork-tender!
  • Chill Time is Key: Letting the salad chill for a few hours allows the flavors to develop and marry beautifully.
  • Mix Gently: Avoid breaking the potatoes by folding them into the dressing gently.
  • Add-ins Galore: Experiment with add-ins like bacon bits, hard-boiled eggs, or pickles for extra flavor!
  • Fresh Herbs Matter: Always use fresh herbs when possible; they elevate the dish significantly.
  • Adjust Seasoning: Always taste before serving; you might want to add a little more salt or pepper!
  • Presentation Counts: Serve in a beautiful bowl and garnish with extra dill or a sprinkle of paprika for a pop of color.

Common Mistakes and Troubleshooting

Even the best chefs make mistakes! Here’s how to troubleshoot common issues:

  • Too Runny: If your salad dressing is too watery, you can thicken it by adding a touch more mayonnaise or sour cream.
  • Flavorless Dish: Always season your potatoes and dressing well. Taste and adjust as needed.
  • Mushy Potatoes: Prevent this by cooking them until just fork-tender and letting them cool properly before mixing.

Delicious Variations to Try

Shake things up with these tasty variations to your creamy potato salad:

  • Herbed Potato Salad: Mix in fresh parsley, chives, or basil for a garden-fresh taste.
  • Bacon and Cheddar: Add crispy bacon bits and shredded cheddar for a heartier option.
  • Spicy Kick: Toss in diced jalapeños or a dash of hot sauce for those who enjoy a spicy twist.
  • Vegan Delight: Substitute vegan mayo and sour cream for a plant-based version that’s just as creamy.

Storing and Make-Ahead Instructions

This creamy potato salad is perfect for meal prep! Here’s how to store it:

  • Refrigerator: Keep in an airtight container for up to 3 days. The flavors will continue to improve!
  • Freezing: Not recommended; the texture of the potatoes and dressing will change once frozen.
  • Make Ahead: Prepare the salad a day in advance. Just stir well before serving to refresh the texture.

Frequently Asked Questions About Creamy Potato Salad

Got questions? We’ve got answers! Here are some common queries about creamy potato salad:

  • Can I make creamy potato salad ahead of time? Yes! It tastes even better after a day in the fridge.
  • Can I freeze creamy potato salad? It’s not recommended due to texture changes.
  • What type of potatoes are best for potato salad? Yukon Gold potatoes work best for their creamy texture.
  • Can I use Greek yogurt instead of mayonnaise? Absolutely! It will give a tangy flavor and lower the calories.
  • What can I add to potato salad for extra flavor? Consider adding ingredients like capers, olives, or mustard.
  • How long can potato salad sit out? It should not sit out for more than 2 hours to ensure food safety.
  • Is potato salad gluten-free? Yes, as long as you use gluten-free ingredients.
  • Can I make this potato salad without sour cream? Yes! You can substitute with more mayonnaise or a vegan alternative.

Nutritional Insights and Dietary Adaptations

For those keeping an eye on nutrition, here’s what you should know:

  • Calories: This creamy potato salad is rich but can be adjusted for lighter options.
  • Protein Boost: Add hard-boiled eggs or grilled chicken to increase protein content.
  • Low-Carb Option: Use cauliflower instead of potatoes for a low-carb version, keeping the flavors intact.

Equipment Recommendations

To make your cooking experience seamless, here are some essential tools:

  • Large Pot: For boiling the potatoes effectively.
  • Colander: For draining the potatoes after cooking.
  • Mixing Bowl: A large bowl for mixing the dressing and potatoes.
  • Whisk: For blending the dressing ingredients smoothly.

Serving Suggestions

This creamy potato salad pairs beautifully with a variety of dishes:

  • Grilled Meats: Perfect alongside burgers, chicken, or ribs at your summer BBQ!
  • Picnic Treat: An ideal side for picnics and potlucks.
  • Vegetarian Delight: Serve with a hearty veggie burger for a satisfying meal.

In conclusion, this creamy potato salad recipe is a must-try for anyone looking to add a vibrant, flavorful side dish to their meals. With its delightful texture and taste, you’ve got a crowd-pleaser that’s sure to impress. So grab those ingredients, roll up your sleeves, and let the cooking adventure begin. Happy cooking!

Dreamy Creamy Potato Salad: 7 Steps to Pure Bliss

Prep Time 15 minutes
Cook Time 15 minutes
Total Time 30 minutes
Servings 4 servings
Calories 350
A deliciously creamy potato salad perfect for any occasion, combining fresh ingredients with a tangy dressing.

Ingredients

Main

  • 2 pounds Yukon Gold potatoes, peeled and cut into 1-inch cubes
  • 1 cup mayonnaise
  • 1/2 cup sour cream
  • 1/4 cup finely chopped celery
  • 1/4 cup finely chopped red onion
  • 2 tablespoons chopped fresh dill
  • 1 tablespoon Dijon mustard
  • 1 tablespoon apple cider vinegar
  • 1 teaspoon salt
  • 1/2 teaspoon black pepper

Instructions 

  • Place potatoes in boiling water with a pinch of salt; cook until fork-tender.
  • Drain and cool the potatoes completely.
  • Mix mayonnaise, sour cream, celery, onion, dill, mustard, vinegar, salt, and pepper in a bowl.
  • Add cooled potatoes to the dressing and gently fold to coat.
  • Cover and refrigerate for at least 1 hour before serving.

Notes

For extra flavor, sprinkle with additional dill before serving.
Calories: 350kcal
Cost: $15
Course: Side Dish
Cuisine: American
Keyword: Potato, Salad

Unleash the Flavor: Shrimp and Asparagus Stir-Fry with Mushrooms

Welcome to your new favorite weeknight dinner! This Shrimp and Asparagus Stir-Fry with Mushrooms is not just quick and easy; it’s a delightful explosion of flavor, color, and nutrition that will have everyone at the table asking for seconds. Packed with vibrant vegetables and succulent shrimp, this dish is a perfect example of how healthy eating can be both simple and delicious. Ready to dive in? Let’s get started!

Why You’ll Love This Recipe

Here are just a few reasons why this shrimp and asparagus stir-fry will become a staple in your cooking repertoire:

  • Quick and Easy: Ready in just 20 minutes, this dish is perfect for busy weeknights.
  • Flavor-Packed: The combination of garlic, ginger, and soy sauce elevates the natural tastes of shrimp and vegetables.
  • Healthy Ingredients: Low in calories but high in nutrients, this meal is both satisfying and nourishing.
  • Versatile: Easily adaptable to suit your taste by swapping in your favorite vegetables or proteins.
  • Meal Prep Friendly: Great for leftovers, making it an excellent choice for meal prep enthusiasts.

Key Ingredients Breakdown

To make this scrumptious dish, you will need a handful of fresh ingredients. Here’s a detailed look at each one, along with some substitutions:

  • Shrimp (1 pound): Use peeled and deveined shrimp for convenience. You can substitute with chicken or tofu for a different protein option.
  • Asparagus (1 bunch): Trimmed and cut into 2-inch pieces, asparagus adds a delightful crunch. Feel free to replace it with green beans or broccoli.
  • Mushrooms (8 ounces): Sliced mushrooms bring an earthy flavor. Try using shiitake or oyster mushrooms for a unique twist.
  • Olive Oil (2 tablespoons): For sautéing. Avocado oil also works great!
  • Garlic (3 cloves, minced): Fresh garlic adds a punch of flavor. Garlic powder can be used in a pinch, but fresh is best.
  • Soy Sauce (2 tablespoons): A must-have for umami flavor. Use tamari for a gluten-free option.
  • Sesame Oil (1 tablespoon): Adds a nutty aroma to the dish. Coconut aminos can be a fantastic alternative.
  • Ginger (1 teaspoon, minced): Fresh ginger enhances the dish’s freshness. Ground ginger could be used, but fresh is recommended for the best taste.

How to Make Shrimp and Asparagus Stir-Fry

Side view of a delicious shrimp, asparagus, and mushroom stir-fry on a white plate, glistening with sauce.

Let’s get cooking! Follow these simple steps to whip up your stir-fry:

  1. Heat olive oil in a large skillet over medium heat.
  2. Add garlic and ginger, sautéing for 1 minute until fragrant.
  3. Introduce the shrimp to the skillet and cook until they turn pink, about 3-4 minutes.
  4. Add asparagus and mushrooms, stir-frying for 5-7 minutes until tender.
  5. Stir in soy sauce and sesame oil, cooking for an additional 2 minutes.
  6. Serve hot and enjoy your delicious meal!

Pro Tips for the Perfect Stir-Fry

Want to elevate your stir-fry game? Here are some expert tips:

  • High Heat: Make sure your skillet is hot enough before adding ingredients to achieve that perfect sear.
  • Don’t Overcrowd: Cook in batches if necessary; overcrowding can lead to steaming instead of stir-frying.
  • Prep Ahead: Chop all ingredients before you start cooking to streamline the process.
  • Use Fresh Produce: Fresh vegetables ensure maximum flavor and nutrition.
  • Experiment with Sauces: Try adding oyster sauce or chili sauce for a different flavor profile!
  • Garnish Wisely: Top your stir-fry with sesame seeds or green onions for an extra touch.
  • Adjust Seasoning: Always taste and adjust the seasoning before serving to suit your palate.
  • Don’t Overcook: Keep veggies crisp by cooking just until tender.

Common Mistakes to Avoid

Even the best chefs can make mistakes! Here are some common pitfalls and how to avoid them:

  • Overcooking the Shrimp: Cook until just pink for the best texture.
  • Using Stale Ingredients: Fresh ingredients make all the difference in flavor.
  • Skipping the Prep: Always prep ingredients beforehand to avoid chaos.
  • Ignoring Cooking Times: Each ingredient has a different cooking time; add them accordingly.

Delicious Variations

Feeling adventurous? Here are some fun variations to try:

  • Spicy Shrimp Stir-Fry: Add red pepper flakes or sriracha for a kick!
  • Vegetable Medley: Incorporate bell peppers, snap peas, or baby corn for more color.
  • Teriyaki Twist: Substitute soy sauce with teriyaki sauce for a sweeter flavor.
  • Quinoa Bowl: Serve over quinoa instead of rice for a heartier meal.

Storage and Make-Ahead Instructions

Want to save some for later? Here’s how to store and reheat your stir-fry:

  • Refrigerate: Store leftovers in an airtight container for up to 3 days.
  • Freeze: This dish can be frozen for up to 2 months. Just ensure it’s cooled before freezing.
  • Reheat: Microwave or reheat in a skillet over medium heat, adding a splash of water to prevent drying out.

Frequently Asked Questions

Got questions? We’ve got answers!

  • Can I use frozen shrimp? Yes! Just ensure they are thawed before cooking.
  • What can I substitute for asparagus? Broccoli, snow peas, or bell peppers work well.
  • Is this meal gluten-free? Use tamari instead of soy sauce to make it gluten-free.
  • How can I make it vegetarian? Substitute shrimp with tofu or tempeh.
  • Can I add nuts? Absolutely! Cashews or almonds add a nice crunch.
  • What is the best way to serve this dish? Serve over rice, quinoa, or noodles for a complete meal.
  • Can I make this ahead of time? Yes, prep ingredients in advance for a quick cook later!
  • Is it okay to use different oils? Yes, feel free to use avocado or coconut oil!

Nutrition Tips and Dietary Adaptations

For those mindful of nutrition, here are some tips:

  • Low-Calorie Option: Use less oil or cook with a non-stick spray.
  • Protein Boost: Add extra shrimp or incorporate edamame for additional protein.
  • High-Fiber Version: Serve with brown rice or quinoa for added fiber.
  • Dairy-Free: This recipe is naturally dairy-free, perfect for those with lactose intolerance.

Equipment Recommendations

To make your cooking experience smooth, here’s what you’ll need:

  • Non-Stick Skillet: Ideal for easy cooking and cleaning.
  • Sharp Knife: For quick and efficient chopping of ingredients.
  • Cutting Board: A sturdy surface for all your prep work.
  • Measuring Spoons: To ensure accurate measurements of sauces and oils.

Serving Suggestions

Want to elevate your meal even further? Consider these serving ideas:

  • Garnish: Top with sliced green onions or sesame seeds for added flavor.
  • Pairing: Serve with a side of steamed rice or a fresh salad.
  • Drink: A light sparkling water or herbal tea complements the dish beautifully.

So there you have it! This Shrimp and Asparagus Stir-Fry with Mushrooms is not just a meal, it’s an experience! Whether you’re cooking for yourself or impressing guests, this dish has all the makings of a winner. Dive into the kitchen, embrace the creativity, and enjoy every bite. Happy cooking!

Shrimp and Asparagus Stir-Fry with Mushrooms: A Quick Recipe

Prep Time 10 minutes
Cook Time 15 minutes
Total Time 25 minutes
Servings 4 servings
Calories 250
A quick and flavorful stir-fry combining shrimp, asparagus, and mushrooms, perfect for a healthy weeknight dinner.

Ingredients

Protein

  • 1 pound shrimp, peeled and deveined

Vegetables

  • 1 bunch asparagus, trimmed and cut into 2-inch pieces
  • 8 ounces mushrooms, sliced

Oils & Sauces

  • 2 tablespoons olive oil
  • 2 tablespoons soy sauce
  • 1 tablespoon sesame oil
  • 1 teaspoon ginger, minced
  • 3 cloves garlic, minced

Instructions 

  • Heat olive oil in a large skillet over medium heat.
  • Add garlic and ginger, sauté for 1 minute.
  • Add shrimp and cook until pink, about 3-4 minutes.
  • Add asparagus and mushrooms, stir-fry for 5-7 minutes until tender.
  • Stir in soy sauce and sesame oil, cook for 2 minutes.
  • Serve hot.

Notes

For extra flavor, add a sprinkle of sesame seeds or chopped green onions before serving.
Calories: 250kcal
Cost: $15
Course: Main Course
Cuisine: Asian
Keyword: shrimp

Why You Need This Vibrant & Crunchy Cold Lentil Salad in Your Life

Are you ready to unlock a world of flavor, nutrition, and versatility? This Vibrant & Crunchy Cold Lentil Salad is not just a meal; it’s an experience! Bursting with colorful veggies and zesty dressing, this salad is perfect for meal prep or a quick, nourishing lunch. Packed with protein and fiber, it’ll keep you energized and satisfied for hours. Let’s dive into why this salad deserves a spot on your table!

Why You’ll Love This Recipe

  • Nutritious Powerhouse: Lentils are loaded with protein, fiber, and essential nutrients, making this salad a healthy choice for anyone looking to boost their diet.
  • Meal Prep Friendly: This salad can be made in advance and stored in the refrigerator, staying fresh for up to five days. Perfect for busy weeks!
  • Vibrant and Colorful: The mix of red and yellow bell peppers, red cabbage, and cherry tomatoes makes this salad visually stunning, ensuring you eat with your eyes first.
  • Customizable to Your Taste: Whether you want an extra kick with jalapeños or a sweeter touch with honey, this salad is easily adaptable to suit your preferences.
  • Simple and Quick to Make: With minimal cooking and prep time, you can whip up this salad in no time, making it ideal for a last-minute meal.

Ingredient Breakdown for Your Cold Lentil Salad

Let’s talk ingredients! This salad is not only delicious but also flexible. Here’s what you need:

  • 1 cup Green Lentils: No substitutions advised for optimal texture.
  • 1 cup Brown Lentils: Feel free to use black beluga lentils for visual contrast.
  • 1 each Red Bell Pepper: Substitute with yellow bell pepper or roasted sweet potatoes for added sweetness.
  • 1 each Yellow Bell Pepper: Can replace with an additional red bell pepper or cucumber for crunch.
  • 2 cups Red Cabbage: Cucumber or radish can substitute for a different crunch.
  • 1 each Carrot: Can be omitted or replaced with shredded zucchini for a refreshing twist.
  • 1 cup Cherry Tomatoes: Substitute with diced cucumber or halved radishes for variety.
  • 3 tablespoons Extra-Virgin Olive Oil: No direct substitute; can use avocado oil for a different flavor profile.
  • 2 tablespoons Lemon Juice: Lime juice works as an alternative for a zesty kick.
  • 1 tablespoon Dijon Mustard: Can replace with yellow mustard or omit for a simpler dressing.
  • 1 tablespoon Honey or Agave Syrup: Use maple syrup for a vegan option.
  • to taste Sea Salt & Black Pepper: These enhance flavors and balance the salad.
  • 1/4 cup Fresh Parsley: Can substitute with cilantro or basil for a different herbal note.
  • 1/4 cup Fresh Mint Leaves: Omit or substitute with fresh basil for a unique twist.

Expert Tips for the Best Cold Lentil Salad

Side view of a fresh, cold lentil salad filled with various veggies.
  • Rinse Your Lentils: Rinsing your lentils before cooking helps remove any debris and promotes even cooking.
  • Flavor Your Cooking Liquid: Add a bay leaf, onion, or garlic to the water while cooking lentils to infuse flavor directly into the lentils.
  • Chill for Flavor: Allowing the salad to chill in the refrigerator for 30 minutes before serving lets the flavors meld beautifully.
  • Don’t Skip the Dressing: The dressing is crucial for tying all the flavors together—don’t skimp on it!
  • Mix Before Serving: Give your salad a good toss before serving to ensure every bite is packed with flavor.
  • Keep It Crisp: If you make this salad ahead of time, add delicate ingredients like tomatoes just before serving to keep them fresh.
  • Try Different Aromatics: Experiment with garlic, shallots, or fresh herbs to elevate your salad’s flavor profile.
  • Adjust Texture: If you prefer a creamier dressing, whisk in a dollop of Greek yogurt or tahini.

Common Mistakes and Troubleshooting

Even the best chefs make mistakes in the kitchen! Here are some common pitfalls to avoid:

  • Overcooking Lentils: Keep a close eye on your lentils; they should be tender but not mushy. Aim for about 20-25 minutes of cooking time.
  • Skipping the Dressing: Don’t skip the dressing; it’s what brings the salad to life! Use a hearty amount for maximum flavor.
  • Ignoring Seasoning: Always taste your salad before serving to adjust the salt and pepper as needed.
  • Not Storing Properly: Store your salad in an airtight container to maintain freshness for up to five days in the refrigerator.

Delicious Variations to Try

Feeling adventurous? Here are some fun variations to keep your cold lentil salad exciting:

  • Mediterranean Twist: Add feta cheese, olives, and a sprinkle of oregano for a Mediterranean flair.
  • Spicy Kick: Toss in some diced jalapeños or a splash of hot sauce for a spicy version.
  • Quinoa Addition: Mix in cooked quinoa for a protein boost and added texture.
  • Asian-Inspired: Incorporate sesame oil, soy sauce, and edamame for an Asian twist on your salad.

Storing and Make-Ahead Instructions

This salad is perfect for meal prep! Here’s how to store it:

  • Refrigeration: Store in an airtight container in the refrigerator for up to five days.
  • Make Ahead: You can prepare the lentils and chop the vegetables a day in advance; just mix the dressing right before serving.

Comprehensive FAQ

Got questions? We’ve got answers! Here are some frequently asked questions about this recipe:

  • Can I use canned lentils? Yes! Just rinse and drain them, and adjust the cooking time accordingly.
  • Can I freeze the salad? It’s best enjoyed fresh; freezing may alter the texture of the veggies.
  • What can I serve with this salad? This salad pairs beautifully with grilled chicken, fish, or as a standalone dish.
  • Is this salad vegan? Absolutely! Just use agave syrup instead of honey for a fully vegan option.
  • How long does it take to prepare? You can have this salad ready in about 30 minutes, perfect for a quick meal.
  • Can I add other vegetables? Yes! Feel free to incorporate your favorite seasonal veggies.
  • What’s the best way to serve this salad? Serve it cold or at room temperature for the best flavor.
  • Can I add protein? Definitely! Try adding grilled chicken, chickpeas, or tofu for extra protein.

Nutritional Tips and Dietary Adaptations

This salad is not only delicious but also packed with nutritional benefits:

  • High in Protein: Lentils provide a great source of plant-based protein to keep you full.
  • Rich in Fiber: The fiber content supports digestive health and keeps you feeling satisfied.
  • Gluten-Free: This recipe is naturally gluten-free, making it suitable for those with gluten sensitivities.
  • Low-Calorie Option: This salad is nutrient-dense but low in calories, perfect for weight management.

Essential Equipment for Preparation

To whip up this amazing salad, here’s what you’ll need:

  • Medium Pot: For cooking the lentils.
  • Cutting Board: A sturdy surface for chopping vegetables.
  • Sharp Knife: To make quick work of your veggies.
  • Mixing Bowl: For combining all your ingredients.
  • Whisk: To mix up the dressing thoroughly.

Serving Suggestions to Elevate Your Experience

To make your meal even more delightful, consider these serving suggestions:

  • Top with Nuts or Seeds: Add crunch with toasted walnuts, almonds, or sunflower seeds.
  • Pair with Grilled Proteins: Serve alongside grilled chicken, shrimp, or fish for a balanced meal.
  • Wrap It Up: Use this salad as a filling for wraps or sandwiches for a portable lunch option.
  • Garnish with Fresh Herbs: A sprinkle of fresh herbs like cilantro or parsley elevates the flavor.

Conclusion: A Salad to Love

There you have it! This Vibrant & Crunchy Cold Lentil Salad is your new go-to for healthy, exciting meals. Full of flavor, color, and nutrition, it’s perfect for any occasion, whether you need a quick lunch, a meal prep option, or a delightful side dish. Get ready to impress your taste buds and fuel your body with this delicious recipe. Enjoy your cooking adventure!

Crisp & Colorful Cold Lentil & Veggie Salad You’ll Love

Prep Time 15 minutes
Cook Time 20 minutes
Total Time 35 minutes
Servings 4 servings
Calories 350
This vibrant and healthy lentil salad combines fresh vegetables and herbs for a refreshing meal or side dish.

Ingredients

Green Lentils

  • 1 cup Green Lentils (No substitutions advised for optimal texture.)

Brown Lentils

  • 1 cup Brown Lentils (Feel free to use black beluga lentils.)

Red Bell Pepper

  • 1 each Red Bell Pepper (Substitute with yellow bell pepper or roasted sweet potatoes.)

Yellow Bell Pepper

  • 1 each Yellow Bell Pepper (Can replace with an additional red bell pepper or cucumber.)

Red Cabbage

  • 2 cups Red Cabbage (Cucumber or radish can substitute.)

Carrot

  • 1 each Carrot (Can be omitted or replaced with shredded zucchini.)

Cherry Tomatoes

  • 1 cup Cherry Tomatoes (Substitute with diced cucumber or halved radishes.)

Extra-Virgin Olive Oil

  • 3 tablespoons Extra-Virgin Olive Oil (No direct substitute; can use avocado oil.)

Lemon Juice

  • 2 tablespoons Lemon Juice (Lime juice works as an alternative.)

Dijon Mustard

  • 1 tablespoon Dijon Mustard (Can replace with yellow mustard or omit.)

Honey or Agave Syrup

  • 1 tablespoon Honey or Agave Syrup (Use maple syrup for a vegan option.)

Sea Salt & Black Pepper

  • to taste Sea Salt & Black Pepper (Enhances flavors.)

Fresh Parsley

  • 1/4 cup Fresh Parsley (Can substitute with cilantro or basil.)

Fresh Mint Leaves

  • 1/4 cup Fresh Mint Leaves (Omit or substitute with fresh basil.)

Instructions 

  • Cook the lentils until tender, then drain and let cool.
  • Chop the vegetables and herbs as described.
  • In a large bowl, combine cooked lentils, chopped vegetables, and herbs.
  • Whisk together olive oil, lemon juice, mustard, honey, salt, and pepper, then toss with the salad.
  • Serve immediately or chill for 30 minutes for enhanced flavor.

Notes

This salad is best enjoyed fresh but can be stored in the refrigerator for up to 2 days.
Calories: 350kcal
Cost: $15
Course: Salad
Cuisine: international
Keyword: Lentils

Unleash the Flavor: Your Guide to Sweet Chili Chicken & Brussels Sprouts in the Air Fryer!

Welcome to a culinary adventure that transforms the way you think about healthy meals! Today, we’re diving into a dish that’s not only quick and easy to prepare, but also bursting with flavor: Sweet Chili Chicken and Brussels Sprouts made in the air fryer. This recipe is a perfect example of how nutritious eating can be exciting and satisfying. In just a flash, you’ll have a vibrant plate that’s sure to impress your taste buds and fill your belly with goodness!

Whether you’re a busy professional, a parent juggling schedules, or just someone who loves delicious food, this recipe has something for everyone. You’ll discover how the air fryer locks in the flavors while giving you that satisfying crisp without the fuss of traditional frying. Let’s jump right in!

Why You’ll Love This Recipe

This dish isn’t just another recipe; it’s a celebration of flavor, nutrition, and convenience! Here are five compelling reasons to make Sweet Chili Chicken & Brussels Sprouts your next go-to meal:

  • Quick Cooking Time: Ready in under 30 minutes, making it perfect for weeknight dinners or last-minute meal prep!
  • Flavor-Packed: The combination of sweet chili sauce with tender chicken and crispy Brussels sprouts creates a mouthwatering experience.
  • Healthy & Nutritious: Packed with protein and essential nutrients, this dish supports a balanced diet without sacrificing taste.
  • One-Pan Wonder: Minimal cleanup required! Everything cooks together in the air fryer, saving you time and effort.
  • Customizable: Easily swap out ingredients to fit your dietary preferences or use whatever veggies you have on hand.

Ingredients You’ll Need

Let’s gather our ingredients! Here’s what you’ll need to whip up this delightful meal:

  • 12 oz Brussels sprouts: Stemmed and halved for even cooking and maximum crispiness.
  • 1 Tablespoon Olive oil: For that perfect golden char and to help the spices adhere.
  • 1 teaspoon Kosher salt: Enhances all the flavors naturally; add more to taste.
  • 1 teaspoon Black pepper: Gives a subtle kick to the dish.
  • 1 lb Boneless skinless chicken breast: Diced small for quick cooking and ideal texture.
  • 1 Tablespoon Chili oil: Adds depth of flavor with a bit of heat.
  • 2 teaspoons Ground ginger: A warm spice that complements the sweetness.
  • 1 teaspoon Garlic powder: For that aromatic boost.
  • 1 teaspoon Chili powder: Introduces a rich, smoky flavor.
  • 1/4 cup Sweet chili sauce: The star of the dish—sweet, tangy, and utterly delicious!

Feel free to get creative! Here are some substitutions you can consider:

  • Brussels sprouts: Replace with broccoli or green beans if desired.
  • Chicken breast: Use chicken thighs for a juicier option.
  • Chili oil: Substitute with sesame oil for a different flavor profile.
  • Sweet chili sauce: Try a homemade version or use teriyaki sauce for a twist.

Step-by-Step Instructions

Side view of a delicious plate featuring Air Fryer Sweet Chili Chicken alongside halved Brussels sprouts, with a glossy sauce.

Ready to cook? Follow these easy steps to create your Sweet Chili Chicken & Brussels Sprouts:

  1. Preheat your air fryer to 375°F (190°C) for optimal cooking.
  2. In a large mixing bowl, combine the Brussels sprouts, olive oil, salt, and pepper. Toss until well coated.
  3. Add the diced chicken to the bowl along with the chili oil, ginger, garlic powder, and chili powder. Mix thoroughly to combine.
  4. Transfer the mixture to the air fryer basket, spreading it out evenly for even cooking.
  5. Cook for 12-15 minutes, shaking the basket halfway through to ensure everything cooks evenly.
  6. Once cooked, drizzle the sweet chili sauce over the chicken and sprouts, tossing gently to coat.
  7. Serve hot, garnished with extra chili sauce if desired!

Pro Tips for Success

Want to take your dish to the next level? Check out these expert insights:

  • Uniform Cutting: Ensure the Brussels sprouts and chicken are cut into similar sizes for even cooking.
  • Don’t Crowd the Basket: Cook in batches if necessary to maintain that perfect crispiness.
  • Use Fresh Ingredients: Fresh spices and produce will enhance the flavor significantly.
  • Adjust the Spice Level: Add more or less chili powder depending on your heat preference.
  • Monitor Cooking Time: Cooking times may vary based on your air fryer model, so keep an eye on it!
  • Let it Rest: Allow the dish to sit for a couple of minutes after cooking to let the flavors meld.
  • Use a Meat Thermometer: Check that the chicken is cooked to an internal temperature of 165°F (75°C).

Common Mistakes and Troubleshooting

Even the best chefs can run into hiccups! Here’s how to avoid common pitfalls:

  • Overcooked Chicken: If your chicken is dry, reduce the cooking time or check for doneness earlier.
  • Soggy Brussels Sprouts: Ensure they are well coated in oil and not overcrowded in the air fryer.
  • Too Sweet: If the dish is overly sweet, balance it with a squeeze of lemon or lime juice.

Variations to Try

Feeling adventurous? Here are some variations to spice things up:

  • Spicy Sweet Chili: Add sliced jalapeños to the mix for an extra kick.
  • Teriyaki Twist: Swap sweet chili sauce for teriyaki sauce for a different flavor profile.
  • Veggie Medley: Mix in bell peppers and snap peas for more color and crunch.
  • Herb Infusion: Toss in some fresh herbs like cilantro or basil right before serving for freshness.

Storage and Make-Ahead Instructions

Want to make this dish in advance? Here’s how to store it:

  • Refrigerator: Store leftovers in an airtight container for up to 3 days.
  • Freezer: Can be frozen for up to 2 months. Thaw in the fridge overnight before reheating.
  • Reheating: Reheat in the air fryer at 350°F (175°C) for about 5-7 minutes for best results.

Frequently Asked Questions

Got questions? We’ve got answers! Here are some FAQs about this recipe:

  • Can I use frozen Brussels sprouts? Yes, just adjust the cooking time accordingly.
  • Is this recipe gluten-free? Make sure your sweet chili sauce is gluten-free if that’s a concern!
  • What can I serve with this dish? It pairs well with rice, quinoa, or a crisp salad.
  • Can I make this in the oven? Absolutely! Roast at 400°F (200°C) for 25-30 minutes, tossing halfway through.
  • How can I make it more filling? Serve it over a bed of rice or add more protein like edamame.
  • Is it suitable for meal prep? Yes, it stores well and can be divided into meal prep containers!
  • Can I add other proteins? Definitely! Shrimp or tofu would also be delicious in this recipe.
  • What makes air frying healthier? It uses significantly less oil than traditional frying, making it a healthier option!

Nutritional Tips and Dietary Adaptations

This recipe is not only delicious but also nutritious! Here are some tips for dietary adaptations:

  • Low-Carb Option: Skip the sauce or use a sugar-free alternative for a keto-friendly dish.
  • Vegetarian Version: Swap chicken for chickpeas or tempeh for a plant-based meal.
  • Protein Boost: Add nuts or seeds as a topping for extra crunch and protein.

Essential Equipment Recommendations

To create this dish, you’ll need:

  • Air Fryer: A reliable air fryer is key for achieving that crispy texture.
  • Mixing Bowl: For combining ingredients easily.
  • Meat Thermometer: Ensures your chicken is cooked to perfection!

Serving Suggestions

Once your Sweet Chili Chicken & Brussels Sprouts are ready, it’s time to serve! Here are some ideas:

  • Garnish with Green Onions: Fresh green onions add a pop of color and flavor.
  • Serve with Rice: A scoop of jasmine or brown rice makes this dish even more satisfying.
  • Pair with a Salad: A refreshing side salad can balance the flavors beautifully.

Now, you’re equipped with everything you need to create a scrumptious, healthy meal that’s sure to become a favorite in your household! Remember, cooking is all about experimenting and having fun, so don’t be afraid to make it your own. Enjoy your delicious creation!

Air Fryer Sweet Chili Chicken and Brussels Sprouts

Prep Time 10 minutes
Cook Time 15 minutes
Total Time 25 minutes
Servings 4 servings
Calories 450
A quick and flavorful dish combining crispy Brussels sprouts and tender chicken glazed with sweet chili sauce, perfect for a healthy weeknight dinner.

Ingredients

Vegetables

  • 12 oz Brussels sprouts (stemmed and halved)
  • 1 Tablespoon Olive oil
  • 1 teaspoon Kosher salt (plus extra for seasoning)
  • 1 teaspoon Black pepper

Protein

  • 1 lb Boneless skinless chicken breast (diced small)
  • 1 Tablespoon Chili oil
  • 2 teaspoons Ground ginger
  • 1 teaspoon Garlic powder
  • 1 teaspoon Chili powder
  • 1/4 cup Sweet chili sauce (plus more for serving)

Instructions 

  • Toss Brussels sprouts with olive oil, salt, and pepper. Air fry at 375°F (190°C) for 10 minutes.
  • In a bowl, combine chicken, chili oil, ginger, garlic powder, chili powder, and half of the sweet chili sauce.
  • Add seasoned chicken to the air fryer and cook at 375°F (190°C) for 8-10 minutes until cooked through.
  • Mix cooked chicken with remaining sweet chili sauce.
  • Serve chicken over roasted Brussels sprouts, drizzled with extra chili sauce if desired.

Notes

For extra flavor, sprinkle with chopped green onions or sesame seeds before serving.
Calories: 450kcal
Cost: $15
Course: Main Course
Cuisine: American
Keyword: air fryer, brussels sprouts, Chicken

Unleash Flavor with This Shrimp and Asparagus Stir Fry

Are you ready to bring excitement back to your dinner table? Dive into a vibrant Shrimp and Asparagus Stir Fry that’s bursting with flavor and ready in a flash! This delightful dish combines succulent shrimp, crunchy asparagus, and a zesty sauce that’ll make your taste buds sing. Perfect for busy weeknights or a lively dinner party, this recipe proves that healthy cooking can be simple, bold, and absolutely delicious. Let’s get started!

Why You’ll Love This Recipe

  • Quick and Easy: With a total prep and cook time of just 20 minutes, you can whip this dish up in no time, making it perfect for those busy evenings.
  • Nutritious Ingredients: Packed with protein from shrimp and vitamins from asparagus, this stir fry is a powerhouse of nutrition.
  • Flavor Explosion: The combination of soy sauce, ginger, and garlic creates a mouth-watering sauce that ties all the ingredients together beautifully.
  • Customizable: Whether you want to add more veggies or spice it up with extra heat, this recipe is flexible to suit your taste.
  • Visually Stunning: The vibrant colors of shrimp and asparagus make this dish not just tasty but also a feast for the eyes.

Ingredient Breakdown

Let’s dive into what you need for this scrumptious stir fry. Each ingredient plays a crucial role in creating the perfect dish!

  • Shrimp: 1 lb large shrimp, peeled and deveined. Rich in protein, shrimp is a low-calorie option packed with nutrients like selenium and vitamin B12.
  • Asparagus: 1 lb fresh asparagus, trimmed and cut into 2-inch pieces. This green veggie is loaded with vitamins A, C, and K, plus fiber.
  • Oil: 3 tablespoons vegetable oil (or peanut oil for extra flavor). This helps to sear the shrimp and adds a nice depth of flavor.
  • Garlic and Ginger: 3 cloves garlic, minced, and 1 tablespoon fresh ginger, minced. These aromatics provide a fragrant base for the sauce.
  • Green Onions: 2 green onions, sliced diagonally. They add a mild onion flavor and a pop of color.
  • Sauces: 3 tablespoons soy sauce (use tamari for gluten-free), 1 tablespoon oyster sauce (or vegetarian mushroom sauce), and 1 teaspoon sesame oil. These ingredients create the tasty sauce that coats the stir fry.
  • Thickener: 1 teaspoon cornstarch mixed with 2 tablespoons chicken broth or water. This combo helps thicken the sauce for a glossy finish.
  • Red Pepper Flakes: 1/2 teaspoon (optional). For those who like a little kick!
  • Garnishes: 1 tablespoon sesame seeds and fresh cilantro leaves. These add a lovely finishing touch.

How to Make It: Step-by-Step Directions

Side view of a delicious shrimp and asparagus stir fry on a plate, garnished with sesame seeds and cilantro.

Ready to stir things up? Follow these simple steps to create your own delicious Shrimp and Asparagus Stir Fry!

  • Prepare the Sauce: Whisk together soy sauce, oyster sauce, sesame oil, cornstarch, and chicken broth in a small bowl until the cornstarch completely dissolves.
  • Season the Shrimp: Pat the shrimp completely dry with paper towels and lightly season them with salt and pepper.
  • Heat Your Wok: Heat 2 tablespoons of oil in a large wok or skillet over high heat until it shimmers and just begins to smoke.
  • Cook the Shrimp: Add shrimp in a single layer and let them sear undisturbed for 2 minutes until they develop a golden crust. Flip and cook for another 1-2 minutes until pink and just cooked through. Transfer to a plate and set aside.
  • Stir-Fry the Asparagus: Add the remaining tablespoon of oil to the same wok. Add asparagus and stir-fry for 2-3 minutes until bright green and crisp-tender.
  • Add Aromatics: Push asparagus to one side of the wok and add minced garlic and ginger to the empty space. Stir-fry for 30 seconds until fragrant, then mix everything together.
  • Finish the Dish: Return the shrimp to the wok, give the sauce a quick stir, and pour it over everything. Toss everything together for 1-2 minutes until the sauce thickens and coats all the ingredients.

Pro Tips for Perfecting Your Stir Fry

  • High Heat is Key: Cooking on high heat ensures your shrimp and veggies get that perfect sear without steaming.
  • Don’t Overcrowd the Pan: If your wok is too crowded, everything will steam rather than fry. Cook in batches if necessary.
  • Prep Ahead: Chop everything beforehand to make the cooking process quick and easy.
  • Fresh Ingredients Matter: Use the freshest shrimp and asparagus for the best flavor and texture.
  • Experiment with Sauces: Don’t hesitate to try different sauces like teriyaki or sweet chili for a twist!
  • Add Crunch: Consider adding nuts like cashews or peanuts for an additional texture contrast.
  • Use Leftovers Wisely: This dish is great for using up any leftover veggies you have lying around.
  • Adjust Spice Levels: Feel free to increase or decrease the red pepper flakes based on your heat preference.

Common Mistakes to Avoid

  • Using Frozen Shrimp: Fresh shrimp delivers better flavor and texture. If you must use frozen, ensure they are fully thawed and drained.
  • Overcooking Vegetables: Asparagus should be bright and crisp. Overcooking will lead to mushy veggies.
  • Neglecting to Prep: Forgetting to prep ingredients can lead to chaos in the kitchen. Have everything ready to go!
  • Ignoring the Sauce: Make sure to whisk the sauce well so the cornstarch dissolves completely for a smooth consistency.

Delicious Variations to Try

  • Vegetarian Delight: Substitute shrimp with tofu for a plant-based meal that’s equally satisfying.
  • Spicy Kick: Add sliced jalapeños or a splash of sriracha for an extra kick.
  • Mixed Veggie Stir Fry: Throw in additional vegetables like bell peppers, carrots, or snap peas for a vibrant mix.
  • Coconut Curry Twist: Stir in coconut milk and curry powder for a creamy, exotic flavor profile.

Storage and Make-Ahead Instructions

This dish is best enjoyed fresh, but if you have leftovers, follow these tips:

  • Refrigeration: Store in an airtight container in the fridge for up to 3 days.
  • Reheating: Gently reheat in a pan over medium heat, adding a splash of water or broth to keep it moist.
  • Make-Ahead: You can prepare the sauce and chop the veggies a day in advance. Just cook the shrimp and asparagus right before serving.

Frequently Asked Questions

  • Can I use frozen shrimp? Yes, but make sure they are fully thawed and patted dry before cooking.
  • What other vegetables can I add? Bell peppers, snap peas, or carrots are great additions!
  • Can I make this dish gluten-free? Absolutely! Use tamari instead of soy sauce and ensure all other ingredients are gluten-free.
  • How can I make this dish spicier? Add more red pepper flakes or fresh chili peppers to your liking.
  • Can I prepare this recipe ahead of time? Yes! You can prep the sauce and chop the veggies in advance.
  • Is this recipe suitable for meal prep? Yes! Just store it in portioned containers for easy reheating.
  • What can I serve with this stir fry? Serve it over rice, quinoa, or noodles for a complete meal.
  • How long will leftovers last? Leftovers can be stored in the fridge for up to 3 days.

Nutritional Benefits and Dietary Adaptations

This Shrimp and Asparagus Stir Fry isn’t just a treat for the taste buds; it’s also packed with nutritional benefits:

  • High in Protein: Shrimp provides a lean source of protein, essential for muscle repair and growth.
  • Rich in Vitamins: Asparagus offers vitamins A, C, E, and K, which are vital for immune function and skin health.
  • Low in Calories: This dish is low in calories, making it perfect for those watching their weight.
  • Healthy Fats: The use of sesame oil adds healthy fats that support heart health.

Essential Equipment Recommendations

To make your cooking experience smooth and enjoyable, here are some must-have tools:

  • Wok or Large Skillet: Ideal for even cooking and high heat stir-frying.
  • Sharp Knife: Essential for precise chopping of your ingredients.
  • Cutting Board: A sturdy surface for all your chopping needs.
  • Measuring Cups and Spoons: For accurate ingredient measurements, ensuring your dish turns out perfect every time.
  • Whisk: To blend your sauce ingredients smoothly.

Serving Suggestions

This Shrimp and Asparagus Stir Fry is versatile and can be served in several delightful ways:

  • Over Rice: Serve it over fluffy white rice, brown rice, or cauliflower rice for a low-carb option.
  • With Noodles: Toss it with your favorite noodles for a satisfying meal.
  • Garnished: Top with fresh cilantro and sesame seeds for an extra burst of flavor and a beautiful presentation.
  • As Part of a Meal: Pair with a light soup or salad for a balanced dining experience.

Conclusion

Now that you’ve mastered this vibrant Shrimp and Asparagus Stir Fry, you’re equipped to impress yourself and your guests alike! Remember, healthy cooking doesn’t have to be boring. With this recipe, you can enjoy a nutritious, flavorful meal in just minutes. So grab your ingredients, fire up that wok, and let’s get cooking! Enjoy your culinary adventure!

Shrimp and Asparagus Stir Fry

Prep Time 10 minutes
Cook Time 10 minutes
Total Time 20 minutes
Servings 4 servings
Calories 250
A quick and flavorful stir-fry combining succulent shrimp with crisp asparagus, perfect for a healthy weeknight dinner.

Ingredients

Protein

  • 1 lb large shrimp, peeled and deveined

Vegetables

  • 1 lb fresh asparagus, trimmed and cut into 2-inch pieces

Oils & Sauces

  • 3 tablespoons vegetable oil (or peanut oil for extra flavor)
  • 3 cloves garlic, minced
  • 1 tablespoon fresh ginger, minced
  • 3 tablespoons soy sauce (use tamari for gluten-free)
  • 1 tablespoon oyster sauce (or vegetarian mushroom sauce)
  • 1 teaspoon sesame oil
  • 1 teaspoon cornstarch
  • 2 tablespoons chicken broth or water
  • 1/2 teaspoon red pepper flakes (optional)
  • 1 tablespoon sesame seeds (for garnish)

Garnish

  • Fresh cilantro leaves (for garnish)

Instructions 

  • Whisk soy sauce, oyster sauce, sesame oil, cornstarch, and chicken broth until smooth.
  • Pat shrimp dry, season lightly, and sear in hot oil for 2 minutes per side until golden and cooked through. Set aside.
  • Add remaining oil, stir-fry asparagus for 2-3 minutes until bright green.
  • Add garlic and ginger, cook for 30 seconds until fragrant, then combine with shrimp and sauce. Toss to coat and cook 1-2 minutes until sauce thickens.

Notes

Serve immediately, garnished with sesame seeds and cilantro for extra flavor.
Calories: 250kcal
Cost: $15
Course: Main Course
Cuisine: Asian
Keyword: shrimp

Unleashing Flavor: Your Ultimate Guide to Chicken Caprese Salad

Welcome to the vibrant world of Chicken Caprese Salad, where every bite bursts with freshness and flavor! This delightful dish harmonizes juicy chicken, creamy mozzarella, and the ever-refreshing taste of basil, all drizzled with a rich balsamic glaze. Whether you’re looking for a quick weeknight dinner or a standout dish for your next gathering, this recipe covers all bases—it’s nutritious, satisfying, and oh-so-delicious!

In this comprehensive guide, you’ll learn everything from the basic recipe to exciting variations that will keep your taste buds dancing. Let’s dive into why you’ll love this salad and how to make it shine on your plate!

Why You’ll Love This Recipe

  • Quick Prep Time: Whip up this salad in less than 30 minutes, making it perfect for busy weeknights or impromptu gatherings!
  • Nutritious Ingredients: Packed with protein from chicken and vitamins from fresh veggies, this salad is as healthy as it is tasty.
  • Flavorful Combinations: The sweet balsamic glaze complements the savory chicken, creating a balanced flavor profile that’s sure to impress.
  • Versatile Dish: Perfect as a main course or a side salad, you can easily adjust portions to fit your needs.
  • Meal Prep Friendly: Make it ahead of time for quick lunches or dinners throughout the week!

Ingredients Breakdown

Let’s talk about what goes into making this Chicken Caprese Salad a standout!

  • 2 tbsp Balsamic vinegar: This adds a tangy sweetness—perfect for marinating the chicken.
  • 1 tbsp Olive oil: Use high-quality extra-virgin olive oil for a richer flavor.
  • 1/2 tsp Garlic powder: This will enhance the savory notes of the chicken.
  • 1 tsp Dried basil: Adds depth—a great way to infuse flavor without fresh herbs.
  • 1/2 tsp Dried oregano: Complements the basil and brings a Mediterranean flair.
  • 1 tsp Sea salt: Essential for bringing out all the flavors.
  • 1/4 tsp Black pepper: A pinch of heat that rounds out the dressing.
  • 4 (8-oz) Boneless skinless chicken breasts: The star of this dish—juicy and tender!
  • 5 cups Romaine lettuce (chopped): Adds crispness and a refreshing crunch.
  • 1 cup Cherry tomatoes (halved): Bursting with sweetness, they’re the perfect addition!
  • 1/2 cup Fresh mozzarella balls: Creamy and rich, these elevate the salad.
  • 1/4 cup Fresh basil (cut into ribbons): Fresh basil provides that iconic Caprese flavor.
  • 1/4 cup Balsamic glaze: For drizzling, it ties all the flavors together beautifully.

How to Make Chicken Caprese Salad

Vibrant Chicken Caprese Salad featuring sliced chicken, fresh veggies, and mozzarella balls.

Now that you know what goes into this salad, let’s get cooking! Follow these simple steps:

  1. In a large bowl, whisk together balsamic vinegar, olive oil, garlic powder, dried basil, dried oregano, sea salt, and black pepper. Add the chicken breasts, turning to coat in the marinade. Set aside for at least 10 minutes, or refrigerate for up to 8 hours for maximum flavor.
  2. Cook chicken breasts in your preferred method—air fryer or oven—until fully cooked (check out linked guides for precise cook times!).
  3. Let the chicken rest for 5 minutes, then slice against the grain to keep it juicy.
  4. Prepare the balsamic glaze (or use store-bought for convenience) and set aside.
  5. In a large salad bowl, combine romaine lettuce, cherry tomatoes, mozzarella balls, and sliced chicken.
  6. Sprinkle with fresh basil ribbons and drizzle generously with balsamic glaze before serving.

Pro Tips for Perfection

  • Marinate Longer: For more intense flavor, marinate the chicken overnight.
  • Use Fresh Ingredients: Whenever possible, fresh mozzarella and basil will elevate the dish.
  • Don’t Overcook
  • Make Your Own Balsamic Glaze: Simmer balsamic vinegar in a saucepan until it reduces and thickens for a homemade touch.
  • Balance Your Flavors: Adjust the sweetness of the balsamic glaze based on your taste preferences.
  • Layering is Key: Start with lettuce, then add chicken, cheese, and tomatoes for a beautiful presentation.
  • Consider Texture: Add nuts like pine nuts or walnuts for a crunchy contrast.
  • Temperature Matters: Serve the salad slightly warm for a comforting experience.

Common Mistakes & Troubleshooting

Even the best chefs make mistakes. Here are some tips to avoid common pitfalls:

  • Dry Chicken: Overcooking chicken will result in dryness. Use a meat thermometer to ensure it reaches 165°F.
  • Too Much Dressing: Start with a small amount of dressing and add more as needed to avoid sogginess.
  • Old Ingredients: Ensure your produce is fresh—wilted lettuce or overripe tomatoes can ruin the dish.

Variations on Chicken Caprese Salad

Want to mix things up? Here are some exciting variations:

  • Caprese Chicken Bowl: Serve over quinoa or brown rice for a heartier meal.
  • Grilled Vegetable Caprese: Add grilled zucchini, bell peppers, or asparagus for extra flavor and texture.
  • Caprese Pasta Salad: Toss your salad ingredients with cooked pasta for a filling side dish.
  • Caprese Wrap: Use a whole wheat wrap to make a portable version of this salad for lunch!

Storage & Make-Ahead Instructions

Want to prepare ahead of time? Here’s how:

  • Refrigerate Chicken: Store cooked chicken in an airtight container for up to 4 days.
  • Keep Dressing Separate: To maintain freshness, store the dressing separately and drizzle it just before serving.
  • Assembly: If prepping ahead, assemble the salad without dressing and add it right before eating.

Frequently Asked Questions

  • Can I use chicken thighs instead of breasts? Absolutely! Thighs will add more flavor and juiciness.
  • What can I substitute for mozzarella? Try feta cheese or goat cheese for a different flavor profile.
  • Is this salad gluten-free? Yes, all ingredients are naturally gluten-free!
  • How do I make the salad vegan? Substitute chicken with grilled tofu and use a vegan cheese alternative.
  • Can I make this salad in advance? Yes, but keep the dressing separate until ready to serve.
  • What’s the best way to store leftovers? Keep in an airtight container in the fridge for up to 3 days.
  • Can I use dried basil instead of fresh? Yes, but fresh basil offers a brighter flavor.
  • How can I add more fiber? Include beans like chickpeas or black beans to increase fiber and protein.

Nutritional Tips and Dietary Adaptations

This Chicken Caprese Salad isn’t just tasty; it’s packed with nutrition!

  • Protein Power: With chicken and mozzarella, this salad is a protein powerhouse—great for muscle repair and energy!
  • Fresh Veggies: Loaded with vitamins and antioxidants from the romaine and tomatoes, it supports your overall health.
  • Low Carb Option: Skip the mozzarella and serve over a bed of leafy greens for a low-carb meal.

Equipment Recommendations

To make the most of this recipe, consider having the following tools on hand:

  • Air Fryer or Oven: For perfectly cooked chicken every time.
  • Mixing Bowls: Great for marinating and mixing salad ingredients.
  • Sharp Knife: Essential for slicing chicken and chopping veggies.
  • Salad Spinner: Helps wash and dry your leafy greens quickly.

Serving Suggestions

For a complete meal, try pairing your Chicken Caprese Salad with:

  • Crusty Bread: A slice of sourdough or whole-grain bread complements the salad beautifully.
  • Grilled Veggies: A side of grilled vegetables enhances the fresh flavors of the salad.
  • Wine Pairing: A crisp white wine, like Sauvignon Blanc, pairs perfectly with this dish.

Conclusion

There you have it—the definitive guide to creating a show-stopping Chicken Caprese Salad that’s not only delicious but also a feast for the eyes! With its vibrant colors and fresh flavors, this salad will quickly become a staple in your kitchen. Now, grab your ingredients, channel your inner chef, and let’s make healthy eating a joyful adventure!

Chicken Caprese Salad

Prep Time 15 minutes
Cook Time 20 minutes
Total Time 35 minutes
Servings 4 servings
Calories 450
A fresh and flavorful salad combining grilled chicken, mozzarella, tomatoes, and basil, drizzled with balsamic glaze for a delightful meal.

Ingredients

Marinade

  • 2 tbsp Balsamic vinegar
  • 1 tbsp Olive oil
  • 1/2 tsp Garlic powder
  • 1 tsp Dried basil
  • 1/2 tsp Dried oregano
  • 1 tsp Sea salt
  • 1/4 tsp Black pepper

Chicken

  • 4 8-oz Boneless skinless chicken breasts

Salad

  • 5 cups Romaine lettuce (chopped)
  • 1 cup Cherry tomatoes (halved)
  • 1/2 cup Fresh mozzarella balls
  • 1/4 cup Fresh basil (cut into ribbons)
  • 1/4 cup Balsamic glaze

Instructions 

  • Whisk together balsamic vinegar, olive oil, garlic powder, basil, oregano, salt, and pepper. Marinate chicken for at least 10 minutes.
  • Cook chicken in air fryer or oven until done, then rest and slice.
  • Combine lettuce, tomatoes, mozzarella, and chicken in a bowl. Top with basil and drizzle with balsamic glaze.

Notes

Use fresh ingredients for best flavor and consider marinating the chicken longer for more tenderness.
Calories: 450kcal
Cost: $15
Course: Salad
Cuisine: Italian-American
Keyword: caprese, Chicken, Salad

Why Chicken Fajita Bowls Are a Must-Try!

If you’re looking for a deliciously vibrant meal that packs a flavorful punch while being super easy to prepare, then look no further! Chicken fajita bowls are not just a feast for the eyes but also a powerhouse of nutrients. Imagine juicy chicken, colorful bell peppers, and zesty toppings all piled high over a bed of fluffy rice. Let’s dive into why this recipe is a game-changer for your dining table!

  • Quick and Easy: These chicken fajita bowls come together in just 30 minutes. Perfect for busy weeknights!
  • Customizable: Whether you’re a meat lover or a veggie enthusiast, swap in your favorite proteins or add extra veggies to suit your taste.
  • Meal Prep Friendly: Ideal for meal prep! Prepare components in advance and assemble when ready to eat for a fresh, flavorful meal.
  • Health Boost: Packed with lean protein, fiber-rich beans, and fresh veggies, this bowl is a nutritious choice that doesn’t compromise on taste.
  • Family-Friendly: Kids and adults alike will love digging into these colorful bowls, making it a hit at the dinner table!

Ingredients Breakdown

Here’s what you’ll need to create this delicious bowl, plus some easy substitutions to cater to your pantry and preferences:

  • Chicken: 1½ lbs boneless, skinless chicken breasts, sliced. Substitution: Feel free to use turkey or tofu for a lighter option!
  • Olive Oil: 2 tablespoons for marinating. Substitution: Avocado oil or coconut oil work well too.
  • Lime Juice: 2 tablespoons for added zest. Substitution: Lemon juice can be used if lime isn’t available.
  • Spices: 1 teaspoon each of chili powder, cumin, paprika, and garlic powder. Substitution: Your favorite taco seasoning can also work!
  • Vegetables: 1 red, 1 green, and 1 yellow bell pepper, plus 1 large onion, all sliced. Substitution: Mix in zucchini or corn for extra crunch.
  • Bowls: 3 cups cooked rice (white, brown, or cilantro-lime) and 1 cup black beans (drained and rinsed). Substitution: Quinoa or cauliflower rice for a low-carb option.
  • Toppings: Choose from avocado, salsa, sour cream, cilantro, and shredded cheese. Customization: Get creative with toppings like jalapeños or pickled onions!

Step-by-Step Cooking Instructions

Time to bring the magic to life in the kitchen! Follow these easy steps for a mouthwatering chicken fajita bowl:

  1. Marinate the Chicken: In a bowl, combine chicken with olive oil, lime juice, spices, salt, and pepper. Let it sit for at least 10 minutes to absorb those flavors.
  2. Cook the Chicken: Heat a large skillet over medium-high heat. Cook the chicken for 6–8 minutes until browned and cooked through. Remove and set aside.
  3. Sauté Veggies: In the same skillet, add sliced peppers and onions. Cook for about 5–7 minutes until tender-crisp and slightly charred.
  4. Combine: Return the chicken to the skillet and toss with the sautéed vegetables. Heat through for 2–3 minutes.
  5. Assemble the Bowls: Divide cooked rice among bowls. Top with chicken, sautéed veggies, black beans, corn, and your choice of toppings.

Pro Tips for Perfect Bowls!

Side view of a Chicken Fajitas Bowl with vibrant vegetables and toppings, served in a white bowl.

Want to elevate your chicken fajita bowls to the next level? Check out these expert insights:

  • Keep it Colorful: Use a mix of bell peppers for a vibrant display and maximum flavor.
  • Don’t Overcrowd the Pan: Cook chicken and veggies in batches if necessary to ensure even cooking.
  • Resting Time: Allow the chicken to rest for a few minutes after cooking for juicier slices.
  • Layer Flavors: Don’t hesitate to add a splash of hot sauce or a sprinkle of cheese before serving for an extra kick!
  • Store Smart: Keep components separate in the fridge to maintain freshness throughout the week.

Common Mistakes and Troubleshooting

Even seasoned cooks can run into hiccups. Here’s how to avoid common pitfalls:

  • Dry Chicken: If your chicken turns out dry, it may have been overcooked. Aim for an internal temperature of 165°F.
  • Undercooked Veggies: Ensure your veggies have enough time to sauté; they should be tender yet crisp.
  • Too Spicy: If the dish is too spicy for your taste, balance it with a dollop of sour cream or yogurt.

Delicious Variations to Try

Mix it up with these scrumptious variations!

  • Steak Fajita Bowls: Swap chicken for thinly sliced steak marinated in the same spices.
  • Veggie Fajita Bowls: Go meatless with grilled mushrooms, zucchini, and extra bell peppers.
  • Seafood Fajita Bowls: Use shrimp or fish for a refreshing twist on the classic.
  • Breakfast Fajita Bowls: Top with scrambled eggs and avocado for a hearty brunch option!

Storage and Make-Ahead Instructions

Want to enjoy these bowls throughout the week? Here’s how to store and prepare in advance:

  • Make-Ahead: Prepare the chicken and veggies a day in advance. Store them in airtight containers in the fridge.
  • Freezer-Friendly: Cooked chicken and veggies can be frozen for up to 3 months. Thaw overnight in the fridge before reheating.
  • Leftover Storage: Keep leftover assembled bowls in airtight containers for 3–4 days in the fridge. Reheat in the microwave when ready to enjoy!

Frequently Asked Questions

Got questions? We’ve got answers!

  • Can I use frozen chicken? Absolutely! Just ensure it’s fully thawed before marinating and cooking.
  • What can I use instead of rice? Quinoa, cauliflower rice, or even a bed of greens make fantastic bases!
  • How spicy are these bowls? You control the spice! Adjust the chili powder to your preference.
  • Can I make these vegetarian? Yes! Substitute chicken with grilled tofu or tempeh for a delicious vegetarian option.
  • How many calories are in a chicken fajita bowl? Approximately 500 calories, depending on toppings and portion sizes.
  • Can I add other veggies? Definitely! Feel free to include any vegetables you love.
  • How long does it take to cook? Prep and cook time combined is around 30 minutes.
  • What’s the best way to serve? Serve immediately for the best flavor, or pack for lunch!

Nutritional Tips and Dietary Adaptations

This dish is naturally nutritious, but here are some tips for dietary needs:

  • Gluten-Free: All ingredients are gluten-free; just double-check your spice blends!
  • Dairy-Free: Omit cheese or use a dairy-free alternative.
  • Higher Protein: Add extra beans or chickpeas for a protein boost.
  • Low-Carb: Swap out rice for cauliflower rice and skip the beans.

Essential Equipment for Success

Here’s what you’ll need to whip up these delicious bowls:

  • High-Quality Skillet: A good non-stick skillet ensures even cooking and easy cleanup.
  • Cutting Board: Essential for prepping your chicken and veggies safely.
  • Sharp Knife: A sharp knife will make slicing chicken and vegetables a breeze.
  • Measuring Cups and Spoons: For precise ingredient measurements and consistent results.

Serving Suggestions

Want to elevate your dining experience? Here are some ideas to make these bowls even more delightful:

  • Pair with a Salad: Serve alongside a fresh salad for a refreshing contrast.
  • Chips and Salsa: Add a side of tortilla chips and salsa for a crunchy, fun twist.
  • Refreshing Beverages: A zesty limeade or a light beer complements the flavors beautifully.

Conclusion

There you have it! The ultimate chicken fajita bowl recipe that’s bursting with flavor, nutrition, and fun. Whether you’re preparing a quick weeknight dinner or meal prepping for the week ahead, these bowls are sure to impress. So grab those ingredients, unleash your inner chef, and let the fiesta begin! Happy cooking!

Chicken Fajitas Bowl

Prep Time 10 minutes
Cook Time 15 minutes
Total Time 25 minutes
Servings 4 servings
Calories 550
A flavorful and customizable bowl featuring marinated chicken, sautéed peppers and onions, served over rice with tasty toppings.

Ingredients

Chicken & Fajitas

  • 1.5 lbs boneless, skinless chicken breasts, sliced
  • 2 tablespoons olive oil
  • 2 tablespoons lime juice
  • 1 teaspoon chili powder
  • 1 teaspoon cumin
  • 1 teaspoon paprika
  • 0.5 teaspoon garlic powder
  • 0.5 teaspoon onion powder
  • to taste Salt and black pepper
  • 1 red bell pepper sliced
  • 1 green bell pepper sliced
  • 1 yellow bell pepper sliced
  • 1 large onion (sliced)

Bowls

  • 3 cups cooked rice (white, brown, or cilantro-lime)
  • 1 cup black beans, drained and rinsed
  • 1 cup corn (grilled or canned)

Optional toppings

  • as desired avocado, salsa, sour cream, cilantro, shredded cheese

Instructions 

  • Toss chicken with olive oil, lime juice, chili powder, cumin, paprika, garlic powder, onion powder, salt, and pepper.
  • Cook chicken in a skillet for 6–8 minutes until browned; remove and set aside.
  • Sauté peppers and onions in the same skillet for 5–7 minutes until tender and slightly charred.
  • Return chicken to skillet, toss with vegetables, and heat through.
  • Divide rice into bowls, top with chicken, beans, corn, and desired toppings.

Notes

Feel free to customize toppings for added flavor and texture.
Calories: 550kcal
Cost: $15
Course: Main Course
Cuisine: Mexican
Keyword: Bowl, Chicken, Fajitas