Author

Ryan

Browsing

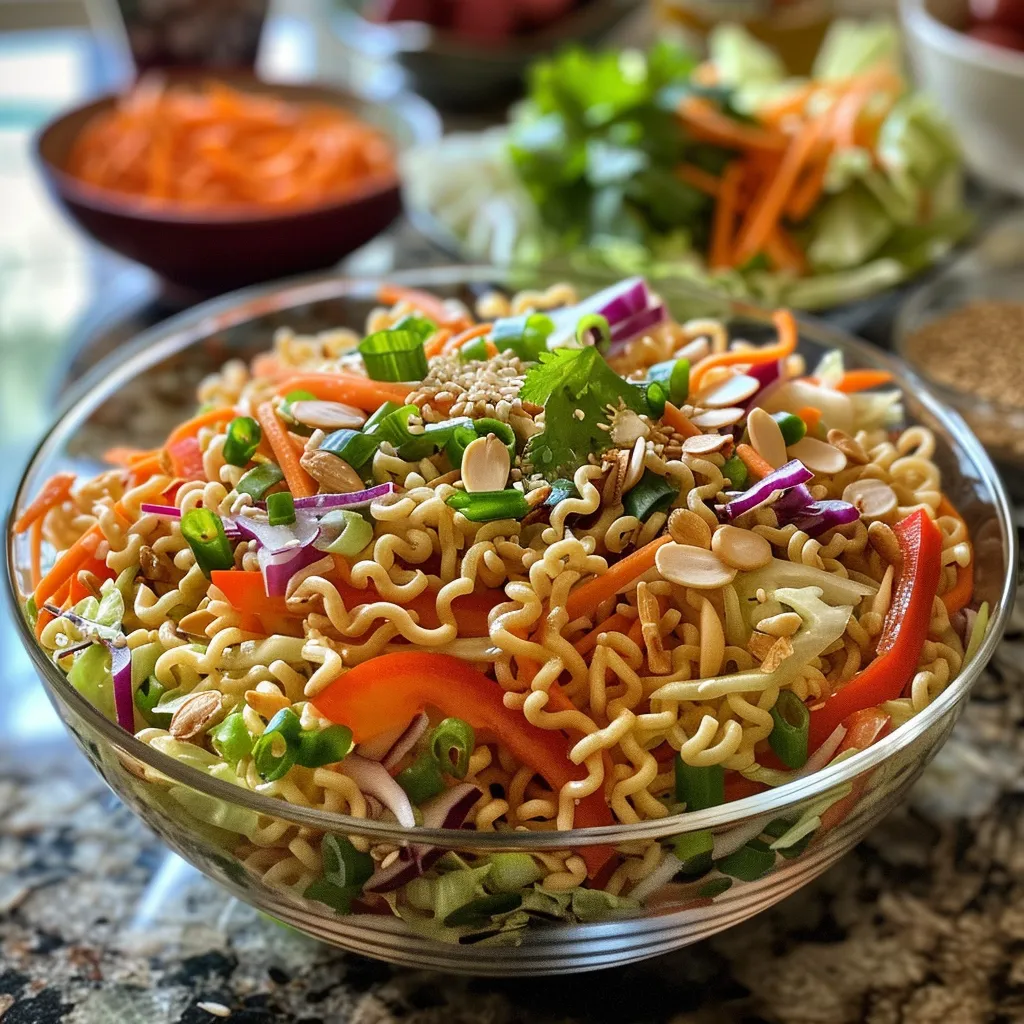
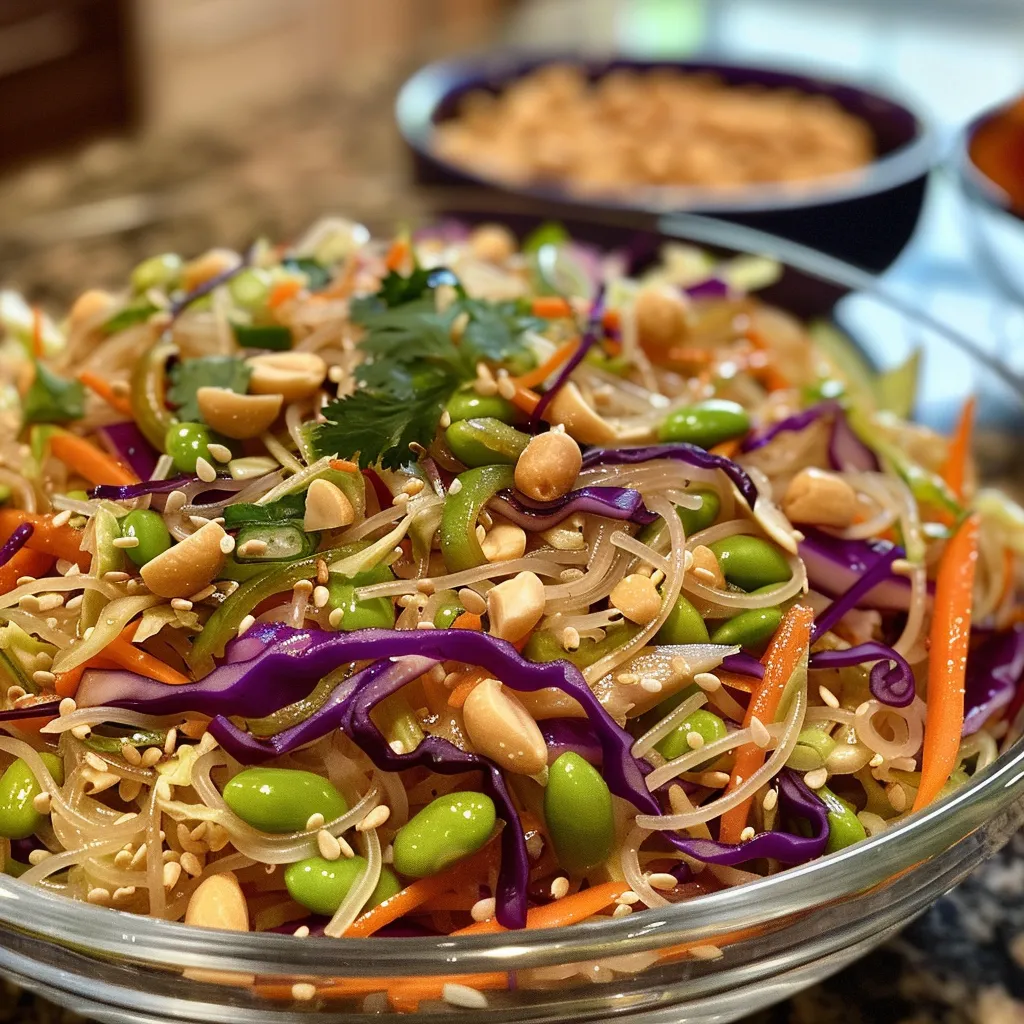
If you’re on the hunt for a quick, nutritious meal that dances with flavor, look no further than this vibrant Thai Peanut Noodle Salad! Combining the chewy delight of rice noodles with the richness of creamy peanut butter, this dish is not just a salad; it’s a culinary celebration! In less than 30 minutes, you can create a dish that’s not only satisfying but also bursting with fresh veggies and zesty lime. Let’s dive into why this recipe is your new weeknight hero!

Why You’ll Love This Recipe

  • Quick & Easy: Get your meal on the table in under 30 minutes, perfect for busy weeknights or sudden cravings.
  • Flavor Explosion: The combination of peanut dressing, fresh veggies, and lime juice creates a vibrant taste that’s better than takeout!
  • Nutritious & Filling: Packed with protein from edamame and healthy fats from peanuts, this salad keeps you energized.
  • Meal Prep Friendly: Make ahead of time and store it in the fridge for a grab-and-go lunch that stays fresh for days.
  • Customizable: Easily swap in your favorite veggies and proteins for a personalized twist on this classic dish.

Ingredient Breakdown

Here’s what you need to whip up this delightful salad:

  • 8 oz Rice noodles: Preferably rice stick noodles for the best chew. You can also use whole wheat or gluten-free options for a twist!
  • 2 cups Purple cabbage: Adds a gorgeous color and satisfying crunch. Feel free to substitute with green cabbage if that’s what you have.
  • 1 cup Carrots: Shredded for sweetness and texture. You can also use bell peppers for a different flavor profile.
  • 1 cup Edamame beans: Shelled for that protein boost. If you can’t find edamame, chickpeas work well too!
  • 4 scallions: Thinly sliced for a mild onion flavor that enhances the freshness.
  • 1/2 cup Cilantro: Freshly chopped to bring that bright, herbaceous touch. You can replace it with parsley if cilantro isn’t your thing.
  • 1/2 cup Peanuts: Toasted for that essential nutty crunch! Almonds can be a great substitute.

Peanut Dressing

The heart of this dish lies in the creamy peanut dressing. Here’s what you’ll need:

  • 1/2 cup Creamy peanut butter: The base of your dressing. Opt for natural, unsweetened for the best flavor!
  • 3 tbsp Soy sauce: For that essential savory depth and umami kick.
  • 1 tbsp Maple syrup: Balances the savory notes with a touch of natural sweetness.
  • 1 tbsp Sesame oil: Adds a nutty aroma and rich flavor that ties everything together.
  • 2 tbsp Lime juice: Freshly squeezed for a zesty kick that brightens up the dish.

How to Make Thai Peanut Noodle Salad

Side angle of a delicious Thai Peanut Noodle Salad showcasing rice noodles, shredded cabbage, and carrots.

Ready to make this delicious salad? Follow these simple steps:

  1. **Cook the noodles:** Boil water and cook your rice noodles according to package instructions. Drain and rinse under cold water to stop the cooking process.
  2. **Prepare the dressing:** In a bowl, whisk together the peanut butter, soy sauce, maple syrup, sesame oil, and lime juice until smooth.
  3. **Combine the salad:** In a large bowl, toss the cooled noodles with the purple cabbage, carrots, edamame, scallions, cilantro, and peanuts.
  4. **Dress it up:** Pour the peanut dressing over the salad and toss to combine. Adjust seasoning to taste.
  5. **Serve:** Enjoy it immediately or chill it in the refrigerator for later!

Expert Tips

  • Don’t overcook the noodles: They should be al dente; they’ll soften further when mixed with the dressing.
  • Adjust the dressing: Feel free to add more lime juice if you prefer a tangier profile!
  • Mix it up: Add grilled chicken, shrimp, or tofu for extra protein.
  • Store correctly: Keep leftovers in an airtight container in the refrigerator for up to 4 days.
  • Garnish creatively: Top with sesame seeds or extra crushed peanuts for added texture and flavor.

Common Mistakes & Troubleshooting

Avoid these common pitfalls to ensure your salad shines:

  • Overdressing: Too much dressing can make the salad soggy. Start with a little and add more as needed.
  • Skipping the rinse: Not rinsing the noodles can lead to a sticky mess. Make sure to rinse them well!
  • Ignoring freshness: Use fresh produce for the best flavor and texture. Wilted veggies will dull the salad.

Variations to Try

Feeling adventurous? Here are some fun twists on the original recipe:

  • Shrimp Thai Peanut Noodle Salad: Toss in some sautéed shrimp for a protein-packed meal.
  • Spicy Thai Peanut Salad: Add a dash of sriracha or red pepper flakes for a kick!
  • Grilled Chicken Peanut Noodle Salad: Substitute grilled chicken strips for a heartier option.
  • Vegan Delight: Swap the peanut butter for almond butter and use tamari instead of soy sauce for a vegan twist!

Storage & Make-Ahead Instructions

Want to enjoy this salad later? Here’s how to store it:

  • In the refrigerator: Store in an airtight container for up to 4 days. The flavors meld beautifully over time!
  • Make ahead: Prepare all ingredients in advance and combine just before serving for the freshest taste.
  • Freezing: Not recommended due to the texture of the noodles and veggies after thawing.

Comprehensive FAQ

  • Can I use different noodles? Absolutely! Feel free to substitute with spaghetti or even zucchini noodles.
  • Is this salad gluten-free? Use gluten-free soy sauce and rice noodles for a GF version.
  • How can I make this low-calorie? Reduce the amount of peanut butter and peanuts, or use less dressing.
  • Can I add fruits? Yes! Mango or pineapple would add a sweet twist to this dish.
  • What can I serve with this salad? It pairs wonderfully with grilled proteins or as a side with Asian dishes.
  • How long does it last? It stays fresh for about 4 days in the fridge.
  • Can I make this salad vegan? Yes! Ensure all ingredients, especially the dressing, are vegan-friendly.
  • What’s the best way to reheat? This salad is best enjoyed cold, so reheating isn’t necessary!

Nutrition Tips & Dietary Adaptations

This Thai Peanut Noodle Salad is not just delicious; it’s also packed with nutrition:

  • Protein-rich: Edamame and peanuts provide essential protein and healthy fats.
  • High in fiber: The veggies add a great source of dietary fiber, promoting digestive health.
  • Low in refined sugars: Using natural sweeteners like maple syrup keeps this dish wholesome.

Equipment Recommendations

To make your cooking experience seamless, here are some handy tools:

  • Large Pot: For boiling the noodles.
  • Mixing Bowl: A big bowl for tossing all the ingredients together.
  • Whisk: Essential for mixing the peanut dressing smoothly.

Serving Suggestions

Serve your exquisite salad in a big bowl or platter, garnished with extra peanuts and cilantro for that wow factor! You can also pair it with:

  • Grilled Chicken: For a complete meal packed with protein.
  • Spring Rolls: Add a fresh and crunchy side to your meal.
  • Fresh Fruit: A side of watermelon or mango complements the flavors beautifully.

In conclusion, this Thai Peanut Noodle Salad is a fantastic option for those looking to spice up their meal routine while keeping it healthy and fun! Whether you’re prepping for a busy week or hosting friends, this dish is sure to impress. So grab your ingredients, unleash your inner chef, and enjoy the vibrant flavors of Thailand right at home!

Easy Thai Peanut Noodle Salad Better Than Takeout

Prep Time 15 minutes
Cook Time 5 minutes
Total Time 20 minutes
Servings 4 servings
Calories 450
A vibrant and flavorful noodle salad packed with fresh vegetables and a creamy peanut sauce, perfect for a quick and satisfying meal.

Ingredients

Noodles

  • 8 oz Rice noodles (Preferably rice stick noodles)

Vegetables

  • 2 cups Purple cabbage (Shredded)
  • 1 cup Carrots (Shredded)
  • 1 cup Edamame beans (Shelled)

Garnishes

  • 4 scallions Scallions (Thinly sliced)
  • 0.5 cup Cilantro (Freshly chopped)
  • 0.5 cup Peanuts (Toasted)

Sauce ingredients

  • 0.5 cup Creamy peanut butter
  • 3 tbsp Soy sauce
  • 1 tbsp Maple syrup
  • 1 tbsp Sesame oil
  • 2 tbsp Lime juice (Freshly squeezed)

Instructions 

  • Cook rice noodles according to package instructions, then drain and set aside.
  • In a large bowl, combine shredded cabbage, carrots, edamame, and sliced scallions.
  • In a small bowl, whisk together peanut butter, soy sauce, maple syrup, sesame oil, and lime juice to make the sauce.
  • Pour the sauce over the vegetables and noodles, tossing to combine.
  • Garnish with toasted peanuts and chopped cilantro before serving.

Notes

For extra flavor, add a dash of chili flakes or lime zest.
Calories: 450kcal
Cost: $15
Course: Salad
Cuisine: Thai
Keyword: peanut

Elevate Your Lunch Game with Crunchy Asian Ramen Noodle Salad!

Looking to spice up your lunch routine? Dive into this vibrant and crunchy Asian Ramen Noodle Salad that’s not only a feast for the eyes but also a powerhouse of flavors! Packed with fresh veggies, hearty ramen noodles, and a zingy dressing, this dish is the perfect balance of taste and nutrition. Whether you’re meal prepping for the week or whipping up a quick lunch, this salad will leave you feeling energized and satisfied.

Why You’ll Love This Recipe

This Crunchy Asian Ramen Noodle Salad isn’t just another salad; it’s a game-changer! Here are five compelling reasons to fall in love with it:

  • Quick & Easy: Ready in just 20 minutes! Perfect for busy days when you want a nutritious meal without the fuss.
  • Flavor Explosion: The combination of sweet, savory, and tangy flavors from the dressing elevates the salad to a whole new level.
  • Customizable: You can easily adapt this salad by adding your favorite proteins or swapping out veggies to make it your own!
  • Meal Prep Friendly: This salad holds up well in the fridge, making it an ideal choice for meal prepping.
  • Vibrant Colors: The colorful mix of ingredients not only looks stunning but also ensures a variety of nutrients!

Ingredients for Crunchy Asian Ramen Noodle Salad

Let’s break down the ingredients you’ll need to whip up this delicious salad:

  • 3 tablespoons rice vinegar: Adds a tangy flavor to the dressing.
  • 1 tablespoon soy sauce: Provides a savory depth to the dish.
  • 1 ½ tablespoons honey or sugar: Balances the acidity of the vinegar.
  • ¼ cup vegetable or avocado oil: For a rich, smooth dressing.
  • 1 teaspoon sesame oil: Enhances the nutty flavor profile.
  • Salt and pepper, to taste: Essential for seasoning.
  • 1 (16 oz) bag coleslaw mix: A convenient way to add crunch and color!
  • 2 packs uncooked ramen noodles: Discard the seasoning packets and break the noodles into small pieces.
  • ½ cup sliced almonds: Toasted for added texture and flavor.
  • ¼ cup sunflower seeds (optional): For extra crunch.
  • 3 green onions, thinly sliced: Adds freshness and a mild onion flavor.
  • 1 cup shelled edamame or shredded rotisserie chicken (optional): For a protein boost!
  • 1 tablespoon sesame seeds (optional): A beautiful garnish that adds a nutty flavor.

Step-by-Step Instructions

Side perspective of a colorful salad featuring ramen noodles, greens, and toppings.

Follow these simple steps to create your salad masterpiece:

  • Preheat your oven to 350°F (175°C).
  • Break the ramen noodles into small pieces and spread them on a baking sheet with the almonds and sunflower seeds. Toast for 7–9 minutes, stirring halfway through. Allow to cool.
  • In a small bowl or jar, whisk together the oil, rice vinegar, soy sauce, honey, sesame oil, salt, and pepper to create the dressing.
  • In a large bowl, combine the coleslaw mix, green onions, and any protein you choose to add.
  • Add the cooled ramen mixture and toss everything together.
  • Pour the dressing over the salad just before serving and toss well to coat. Garnish with sesame seeds if desired.

Pro Tips for the Best Salad

Want to take your salad to the next level? Check out these expert insights:

  • Toast the Noodles: Don’t skip toasting the ramen noodles! It enhances their flavor and gives that perfect crunch.
  • Use Fresh Ingredients: Fresh greens and veggies will make your salad taste vibrant and delicious.
  • Dress Just Before Serving: To maintain the salad’s crunchiness, add the dressing right before you dig in.
  • Customize Your Protein: Feel free to add chickpeas, tofu, or grilled shrimp based on your dietary preferences.
  • Make It Gluten-Free: Use gluten-free ramen noodles or rice noodles for a gluten-free version.
  • Experiment with Add-Ins: Consider adding bell peppers, cucumbers, or snap peas for extra crunch and flavor!
  • Storing Leftovers: Keep leftover salad in an airtight container, but store the dressing separately to keep everything fresh.
  • Garnish Creatively: Use chopped cilantro or mint for an aromatic touch!

Common Mistakes & Troubleshooting

Here are a few pitfalls to avoid:

  • Overcooking the Noodles: Keep an eye on the noodles while toasting; burnt noodles can ruin the texture.
  • Too Much Dressing: Start with a little dressing and add more as needed to avoid sogginess.
  • Skipping the Toasting Step: This is key for achieving that delightful crunch!

Variations to Try

Make this salad your own by trying out these variations:

  • Spicy Twist: Add a teaspoon of sriracha or chili oil to the dressing for a kick.
  • Asian Chicken Salad: Incorporate shredded rotisserie chicken for a heartier meal.
  • Vegetarian Delight: Swap in chickpeas or tofu for a plant-based protein option.
  • Crunchy Thai Salad: Add chopped peanuts and cilantro for a Thai-inspired spin.

Storage & Make-Ahead Instructions

This salad is perfect for meal prep! Here’s how to store it:

  • Refrigerate: Store in an airtight container for up to 3 days.
  • Keep Dressing Separate: Store the dressing in a separate jar to maintain the salad’s crunch.
  • Make-Ahead Tip: You can prepare all the ingredients ahead of time and assemble the salad just before serving.

Comprehensive FAQ

Got questions? We’ve got answers!

  • 1. Can I make this salad ahead of time? Yes! Just keep the dressing separate until you’re ready to serve.
  • 2. How long does this salad last in the fridge? It can last up to 3 days in an airtight container.
  • 3. What can I substitute for ramen noodles? Try using rice noodles or quinoa for a gluten-free option.
  • 4. Can I add more vegetables? Absolutely! Feel free to add any veggies you love.
  • 5. Is this salad suitable for meal prep? Yes, it’s great for meal prep, just store the dressing separately.
  • 6. How can I make it vegan? Use maple syrup instead of honey and skip any animal proteins.
  • 7. What can I use instead of soy sauce? You can use tamari or coconut aminos for a gluten-free alternative.
  • 8. Can I serve this salad warm? While it’s typically served cold, you can enjoy it warm if you prefer!

Nutrition Tips and Dietary Adaptations

Looking to make this salad even healthier? Here are some tips:

  • Add More Fiber: Incorporate beans or lentils for an extra fiber boost.
  • Go Low-Carb: Swap ramen noodles for spiralized zucchini or cauliflower rice.
  • Boost Your Vitamins: Include more colorful veggies like bell peppers and carrots to increase nutrient density.

Equipment Recommendations

For this recipe, you’ll need some kitchen essentials:

  • Baking Sheet: For toasting the ramen and nuts.
  • Mixing Bowls: To combine ingredients easily.
  • Whisk or Jar: For mixing the dressing thoroughly.
  • Sharp Knife: To chop veggies and proteins efficiently.

Serving Suggestions

Wondering how to serve this salad? Here are some ideas:

  • Picnic Delight: Perfect for outdoor gatherings or potlucks.
  • As a Side Dish: Serve alongside grilled chicken or fish for a complete meal.
  • Light Lunch: Enjoy it on its own for a refreshing and satisfying lunch option.

In conclusion, this Crunchy Asian Ramen Noodle Salad is not just a meal but a canvas for creativity in the kitchen! With endless customization options and vibrant flavors, it’s the perfect dish to add to your repertoire. Get ready to impress your friends and family with this delightful and nutritious salad. Happy cooking!

Crunchy Asian Ramen Noodle Salad

Prep Time 10 minutes
Cook Time 10 minutes
Total Time 20 minutes
Servings 4 servings
Calories 350
A vibrant and crunchy salad combining ramen noodles, fresh vegetables, and a tangy Asian-inspired dressing for a quick and flavorful meal.

Ingredients

Dressing

  • 3 tablespoons rice vinegar
  • 1 tablespoon soy sauce
  • 1.5 tablespoons honey or sugar
  • 0.25 cup vegetable or avocado oil
  • 1 teaspoon sesame oil
  • to taste Salt and pepper

Salad

  • 1 16 oz bag coleslaw mix or shredded cabbage + carrots
  • 2 packs uncooked ramen noodles (discard seasoning)
  • 0.5 cup sliced almonds
  • 0.25 cup sunflower seeds (optional)
  • 3 green onions thinly sliced green onions
  • 1 cup shelled edamame or shredded rotisserie chicken (optional)
  • 1 tablespoon sesame seeds (optional)

Instructions 

  • Preheat oven to 350°F (175°C).
  • Break ramen into small pieces, spread with almonds and sunflower seeds on a baking sheet, and toast for 7–9 minutes. Let cool.
  • Whisk together oil, rice vinegar, soy sauce, honey, sesame oil, salt, and pepper to make the dressing.
  • Combine coleslaw mix, green onions, and protein if using in a large bowl. Add cooled ramen mixture and toss.
  • Pour dressing over salad, toss well, and garnish with sesame seeds if desired.

Notes

For extra protein, add shredded rotisserie chicken or edamame.
Calories: 350kcal
Cost: $15
Course: Salad
Cuisine: Asian
Keyword: Noodle, ramen, Salad

Discover the Ultimate Big Mac Salad: A Flavor-Packed Twist on a Classic Favorite!

Welcome to the culinary playground where healthy meets delicious! If you’re craving the iconic flavors of a Big Mac but want to skip the drive-thru, you’ve landed in the right place. This vibrant Big Mac Salad packs all the savory goodness of a burger into a fresh, crunchy salad. Perfect for busy days and meal prep, this dish is not just nutritious but also a feast for the eyes!

In this article, we’ll dive deep into why you’ll love this recipe, explore ingredient breakdowns, share expert tips, and provide variations that cater to dietary preferences. Let’s get started!

Why You’ll Love This Recipe

  • Quick to Prepare: This hearty salad can be ready in just 20 minutes, making it a perfect weeknight meal or a quick lunch option.
  • Flavor Explosion: Each bite delivers that nostalgic Big Mac taste, featuring a creamy special sauce that ties everything together.
  • Customizable: Whether you’re gluten-free, paleo, or simply looking to swap in your favorite veggies, this salad is flexible enough to cater to your needs.
  • Meal Prep Friendly: Make a big batch for the week, and you’ll be set with healthy lunches that keep you energized.
  • Kid-Approved: Even the pickiest eaters will love this fun twist on a classic, making mealtime a breeze!

Ingredients Breakdown

Let’s take a closer look at the ingredients that make this salad a standout:

Main Ingredients:

  • 1 tablespoon neutral flavored oil: Options like avocado or olive oil work best for cooking the beef.
  • 1 pound lean ground beef: Choose 85/15 or 90/10 for a balance of flavor and health.
  • Salt and pepper: Essential for seasoning the beef to perfection.
  • Mayonnaise: The base of our creamy dressing; feel free to use a lighter version or Greek yogurt for a healthier twist.
  • Ketchup and dill pickle relish: Key components of the special sauce—a must for that authentic taste!

Toppings:

  • Chopped romaine lettuce: This serves as the fresh base of your salad, providing crunch and nutrition.
  • Shredded cheddar cheese: Adds creaminess and flavor—swap for a dairy-free alternative if needed.
  • Diced tomatoes and thinly sliced onions: Fresh veggies that elevate the dish.
  • Dill pickle slices: For that classic burger crunch!

Expert Cooking Tips

Side angle shot of a colorful Big Mac Salad, showcasing tomatoes, pickles, and dressing.

Here are some pro tips to ensure your Big Mac Salad is a knockout:

  • Brown the beef well: A good sear adds depth of flavor to your salad, so don’t rush this step!
  • Cool the beef slightly: Letting the beef cool before assembling the salad helps prevent wilting the lettuce.
  • Mix the dressing ahead of time: For the best flavor, let the special sauce sit in the fridge for at least 30 minutes.
  • Layer ingredients smartly: Start with lettuce, then add warm beef and cheese to help the cheese melt slightly.
  • Substitute wisely: If you’re out of an ingredient, feel free to swap with something similar that you have on hand.

Common Mistakes to Avoid

To help you nail this recipe, here are some common pitfalls and how to avoid them:

  • Under-seasoning: Be generous with salt and pepper to enhance the flavors.
  • Using cold beef: Adding warm beef helps the cheese melt and makes the salad more cohesive.
  • Skipping the dressing: The special sauce is non-negotiable; it’s what makes this salad a Big Mac salad!
  • Overloading on toppings: Balance is key; too many toppings can overwhelm the salad.

Variations to Try

Here are some fun twists on the classic Big Mac Salad:

  • Paleo Big Mac Salad: Replace the mayonnaise with avocado or cashew cream, and use grass-fed beef.
  • Gluten-Free Big Mac Salad: Ensure all sauces and condiments are gluten-free; this recipe is naturally gluten-free with the right ingredients.
  • Big Mac Salad Bowl: Serve the salad in a bowl layered with guacamole for a creamy twist.
  • Vegetarian Big Mac Salad: Swap the beef for quinoa or black beans for a plant-based option.

Storage & Make-Ahead Instructions

This salad is perfect for meal prep! Here’s how to store it:

  • In the fridge: Keep the salad components separate until you’re ready to eat. Store the beef and dressing in airtight containers for up to 4 days.
  • Freezing: While the salad itself doesn’t freeze well, you can freeze cooked beef for up to 3 months. Thaw and reheat before serving.

FAQ: Your Big Mac Salad Questions Answered

  • Can I use ground turkey instead of beef? Yes! Ground turkey or chicken works well for a leaner option.
  • Is this salad keto-friendly? Absolutely! Just ensure your dressing and other ingredients align with your keto goals.
  • What’s the best way to reheat leftover beef? Microwave in short bursts or reheat on the stovetop until warmed through.
  • Can I add other veggies? Definitely! Feel free to throw in cucumbers, bell peppers, or any of your favorites.
  • How can I make it dairy-free? Use dairy-free cheese or omit it altogether for a lighter salad.
  • What other dressings can I use? Try a yogurt-based dressing or a vinaigrette for a different flavor profile.
  • Can I make the special sauce ahead of time? Yes! It can be made a day in advance for enhanced flavor.
  • Is this recipe suitable for kids? Absolutely! It’s a fun way to get them to eat their veggies while enjoying familiar flavors.

Nutrition Tips & Dietary Adaptations

This Big Mac Salad not only satisfies cravings but can also be tailored to fit various dietary needs:

  • Low-Carb Option: Keep it as-is or add extra leafy greens for a filling, low-carb meal.
  • High-Protein Boost: Add beans or chickpeas for a plant-based protein addition.
  • Low-Fat Version: Use leaner ground beef (90/10) and a light mayo.

Essential Kitchen Equipment

To make your salad-making process a breeze, here’s what you’ll need:

  • Large Skillet: For cooking the ground beef.
  • Mixing Bowls: For preparing the salad and dressing.
  • Sharp Knife: For chopping veggies efficiently.
  • Cutting Board: A must for any kitchen prep.

Serving Suggestions

Serve your Big Mac Salad in style! Here are some fun ideas:

  • Layer in a Jar: Perfect for meal prep—layer ingredients in a mason jar for a grab-and-go lunch.
  • Serve with Whole Grain Bread: A slice of whole grain bread or a bun on the side can complement the meal.
  • Add a Fresh Fruit Salad: Pairing with a light fruit salad can enhance the freshness!

In closing, the Big Mac Salad is not just a meal; it’s an experience! Packed with flavor and customizable to your heart’s content, it’s perfect for anyone looking to enjoy the classic taste of a Big Mac in a healthier way. So, grab your ingredients and get ready to whip up a salad that’s as fun to make as it is to eat!

Big Mac Salad

Prep Time 15 minutes
Cook Time 10 minutes
Total Time 25 minutes
Servings 4 servings
Calories 650
A delicious salad inspired by the classic Big Mac, combining fresh vegetables with a flavorful beef and special sauce dressing.

Ingredients

Main ingredients

  • 1 tablespoon neutral flavored oil (avocado oil, olive oil, etc.)
  • 1 pound lean ground beef (85/15 or 90/10 preferred)
  • 1 teaspoon salt (more or less to taste)
  • ½ teaspoon freshly cracked black pepper (more or less to taste)
  • ½ cup mayonnaise (see Notes)
  • 1 tablespoon ketchup (see Notes)
  • 2 tablespoons dill pickle relish
  • 1 teaspoon dried minced onion
  • 1 teaspoon white vinegar
  • 2 teaspoons sugar (see Notes)
  • ¼ teaspoon salt (more or less to taste)
  • 6 cups chopped romaine lettuce
  • 1 cup shredded cheddar cheese
  • ½ cup diced tomatoes
  • ½ cup thinly sliced onions (white or red)
  • ½ cup dill pickle slices

Instructions 

  • Cook the ground beef with salt and pepper until browned, then drain excess fat.
  • Mix mayonnaise, ketchup, relish, minced onion, vinegar, sugar, and salt to make the sauce.
  • In a large bowl, combine chopped lettuce, beef, cheese, tomatoes, onions, and pickles.
  • Drizzle with the sauce and toss gently to combine.
  • Serve immediately or chilled.

Notes

For best flavor, use high-quality mayonnaise and fresh vegetables.
Calories: 650kcal
Cost: $15
Course: Main Course
Cuisine: American
Keyword: Beef, Dinner, Salad

Experience the Crunch: Asian Cucumber Sesame Salad Awaits!

Dive into a refreshing burst of flavor with this Asian Cucumber Sesame Salad! Packed with crunchy veggies and zesty dressing, it’s the perfect quick meal that’s both healthy and delicious. This salad is not just a side; it’s a vibrant celebration of textures and tastes that will light up your plate and your palate. In just a few minutes, you can whip up this dish that’s rich in nutrients while being easy on the eyes and the taste buds!

Why You’ll Love This Recipe

Here are five irresistible reasons to make this Asian Cucumber Sesame Salad your go-to recipe:

  • Quick and Easy: With minimal prep time, you can have a delicious dish on the table in under 30 minutes.
  • Vibrant Nutrition: Bursting with vitamins and minerals, this salad is a powerhouse of health benefits, perfect for your daily dose of greens!
  • Versatile Base: This recipe serves as a fantastic base that you can customize with your favorite protein or additional veggies.
  • Low FODMAP Friendly: Perfect for those who need to manage their digestive health without sacrificing flavor.
  • Meal Prep Champion: Great for make-ahead meals that store well and taste even better the next day!

Ingredients Breakdown

Let’s explore the ingredients that make this salad shine, along with some tasty substitutions!

  • Cucumbers: Use 2 large seedless cucumbers for the best crunch. If you’re feeling adventurous, try using Persian cucumbers for a sweeter flavor.
  • Carrots: 2 large carrots add vibrant color and a natural sweetness. Spiralize or julienne them for a fun twist!
  • Sweet Pepper: 1 chopped sweet pepper enhances the salad’s crunch. Consider red, yellow, or orange for a pop of color!
  • Seshame Seeds: 1 tablespoon of sesame seeds (white or black) adds nutty flavor and an extra layer of texture.
  • Cilantro: Fresh cilantro brings a burst of freshness. If you’re not a fan, swap it with fresh parsley or mint!
  • Rice Vinegar: 2 tablespoons for a tangy kick. Apple cider vinegar can also work if you’re out of rice vinegar.
  • Lime Juice: Freshly squeezed lime juice brightens up the dish. If you don’t have lime, lemon juice is a good substitute.
  • Coconut Aminos or Soy Sauce: For a gluten-free option, use 1 tablespoon of Coconut Aminos; otherwise, traditional soy sauce or tamari works beautifully.
  • Maple Syrup: 1 tablespoon adds a hint of sweetness; feel free to substitute with honey or sugar if you prefer.
  • Sesame Oil: 1 tablespoon for that signature nutty flavor; don’t skip this ingredient!
  • Red Pepper Flakes: A pinch (or more, if you dare!) adds a delightful kick. Adjust to your heat preference!

How to Make Asian Cucumber Sesame Salad

Side view of a colorful salad featuring cucumbers, carrots, and sesame seeds.

Ready to create your culinary masterpiece? Follow these simple steps:

  1. **Prepare the Cucumbers:** Trim the ends of the cucumbers and spiralize them or use a julienne peeler. Place the sliced cucumbers in a colander, sprinkle with 1 teaspoon of kosher salt, and let them sit for about 5-10 minutes to draw out excess moisture.
  2. **Chop the Veggies:** While the cucumbers are draining, spiralize or peel the carrots and chop the sweet pepper into bite-sized pieces. This is also a great time to prepare your dressing!
  3. **Dry the Cucumbers:** After the cucumbers have sat for about 10 minutes, spread them out on paper towels and gently pat dry to remove excess moisture.
  4. **Mix It Up:** In a large mixing bowl, combine the cucumber noodles, carrots, and sweet peppers. Add 2-3 tablespoons of your dressing and toss until everything is well-coated.
  5. **Garnish and Serve:** Top with sliced green onion, sesame seeds, and cilantro. Serve immediately for the best texture and flavor!

Pro Tips for Perfecting Your Salad

To elevate your salad game, keep these expert insights in mind:

  • Salting the Cucumbers: Salting the cucumbers not only flavors them but also helps achieve a crisp texture by drawing out excess water.
  • Dress Just Before Serving: For the freshest taste and texture, dress the salad right before serving to avoid sogginess.
  • Customize Your Crunch: Add more crunchy veggies like radishes or bell peppers for varied textures and flavors.
  • Make It a Meal: Toss in shredded chicken, tofu, or chickpeas to transform this salad into a hearty main dish.
  • Storage Tips: If you have leftovers, store them in an airtight container in the refrigerator for up to 2 days. The flavors will intensify!
  • Experiment with Dressings: Feel free to experiment with different dressings; a peanut dressing can add a delicious twist!
  • Use Fresh Ingredients: Fresh veggies make a world of difference in flavor; try to use the best quality ingredients you can find.
  • Mind the Portions: If making for a crowd, consider doubling the recipe to ensure there’s enough to go around!

Common Mistakes and Troubleshooting

Even the best chefs can encounter hiccups. Here’s how to avoid common pitfalls:

  • Too Watery: If your salad ends up watery, you probably didn’t let the cucumbers drain long enough. Remember to salt and let sit!
  • Overdressing: Start with less dressing, as you can always add more. You want the salad coated, not swimming!
  • Using Old Veggies: Always use fresh produce for the best flavor and crunch. Wilted veggies will ruin your salad!
  • Skipping the Chill: For an extra refreshing dish, chill your salad ingredients before mixing.

Variations to Explore

Feel free to get creative! Here are some variation ideas:

  • Spicy Twist: Add sliced jalapeños or a drizzle of sriracha for a spicy kick.
  • Herb Infusion: Incorporate fresh herbs like mint or basil for a fragrant twist.
  • Protein-Packed: Include grilled shrimp, chicken, or edamame to turn your salad into a complete meal.
  • Fruit Fusion: Add diced mango or pineapple for a sweet contrast to the savory flavors.

Storage and Make-Ahead Instructions

Make your life easier by prepping this salad in advance:

  • Prep Ahead: You can chop the veggies and prepare the dressing a day in advance. Just combine everything when you’re ready to serve!
  • Storage: Keep the salad in an airtight container in the fridge for up to 2 days. The flavors will meld beautifully!
  • Refrigerate Dressing: Store dressing separately and add it right before serving to maintain the salad’s crispness.

Frequently Asked Questions

Here are some common questions about making this salad:

  • Can I use regular cucumbers? Yes! Just be sure to remove the seeds if they’re large to avoid excess moisture.
  • Is this salad gluten-free? Yes, if you use Coconut Aminos or gluten-free soy sauce.
  • Can I make this salad vegan? Absolutely! This recipe is naturally vegan as is.
  • What can I serve with this salad? It pairs well with grilled proteins, rice dishes, or as a refreshing side to any Asian-inspired meal.
  • How can I add more flavor? Consider marinating the cucumbers in the dressing for 30 minutes before serving.
  • What’s the best way to chop vegetables? Use a sharp knife for clean cuts, or a mandoline for perfectly uniform slices!
  • How long does this salad last? It’s best consumed fresh, but leftovers can be stored in the fridge for 1-2 days.
  • Can I freeze this salad? It’s not recommended, as the texture of fresh veggies doesn’t hold up well in freezing.

Nutrition Tips and Dietary Adaptations

This salad is not only delicious but also packed with nutritional benefits:

  • Low Calorie: A great option for light meals without sacrificing flavor.
  • High Fiber: Vegetables provide dietary fiber that supports digestive health.
  • Rich in Antioxidants: Fresh veggies are loaded with antioxidants that promote overall wellness.
  • Customizable: Easily adapt to fit various dietary needs, making it suitable for most anyone!

Equipment Recommendations

For the best results, here are some kitchen tools to consider:

  • Spiralizer: A spiralizer makes creating veggie noodles a breeze, adding fun to your plate!
  • Mandoline Slicer: This tool helps achieve even slices for a professional finish.
  • Mixing Bowls: Use large bowls for tossing ingredients without mess.
  • Colander: Essential for draining excess moisture from the cucumbers.

Serving Suggestions

Elevate your dining experience by pairing this salad with:

  • Grilled Chicken: A perfect protein complement that enhances the flavors.
  • Rice Dishes: Serve alongside jasmine or brown rice for a filling meal.
  • Asian-Inspired Recipes: It pairs beautifully with stir-fries or sushi.
  • Light Appetizers: Serve it as part of a fresh appetizer spread at gatherings!

In conclusion, this Asian Cucumber Sesame Salad is your go-to recipe for vibrant, nutritious meals that can be whipped up in a flash. With its refreshing crunch and zesty dressing, it’s sure to become a favorite in your kitchen. So grab your veggies, let your creativity flow, and enjoy a burst of flavor that’s both healthy and fun!

Asian Cucumber Sesame Salad

Prep Time 15 minutes
Cook Time 5 minutes
Total Time 20 minutes
Servings 4 servings
Calories 150
A fresh and crunchy salad combining crisp cucumbers, carrots, and peppers, dressed with sesame and lime for a vibrant flavor.

Ingredients

Vegetables

  • 2 large seedless cucumbers (trim ends and spiralize)
  • 2 large carrots (spiralize or peel)
  • 1 sweet pepper chopped sweet pepper

Seasonings & Seeds

  • 1 teaspoon kosher salt
  • 1 tablespoon sesame seeds (white or black)
  • 1 green onion sliced green part only
  • 2 tablespoons cilantro (chopped)

Dressing

  • 2 tablespoons rice vinegar
  • 1 tablespoon lime juice (about half a lime)
  • 1 tablespoon Coconut Aminos or soy sauce (paleo or gluten free)
  • 1 tablespoon maple syrup (can sub with honey or sugar)
  • 1 teaspoon grated ginger
  • 1 tablespoon sesame oil
  • pinch red pepper flakes to taste

Instructions

Notes

Adjust salt and spice to taste. Best enjoyed fresh.
Calories: 150kcal
Cost: $10
Course: Salad
Cuisine: Asian
Keyword: cucumber, Sesame

A Flavor Explosion: Why This Peach Corn Burrata Salad Will Become Your Go-To Summer Dish!

Welcome to a culinary adventure that captures the essence of summer right on your plate! Our Peach Corn Burrata Salad is not just a dish; it’s a vibrant symphony of flavors that brings together juicy peaches, sweet grilled corn, and creamy burrata cheese, all balanced with a spicy jalapeño kick. This week, I’m excited to share with you why this salad will become a staple in your meal plan, whether you’re hosting a summer get-together or just whipping up a quick weeknight dinner.

In under 30 minutes, you can dive into a bowl of this refreshing salad that tastes like sunshine and happiness. Are you ready to impress your taste buds and those of your loved ones? Let’s break down everything you need to know about this delicious dish!

Why You’ll Love This Recipe

  • Summer Freshness: This salad showcases peak summer produce, with juicy peaches and sweet corn that burst with flavor.
  • Quick and Easy: Perfect for busy weeknights, you can whip this salad up in just 20 minutes!
  • Flavor Harmony: The creamy burrata contrasts beautifully with the sweetness of the corn and peaches, creating a delightful flavor explosion.
  • Healthy and Nourishing: Packed with vitamins and nutrients, this dish is a guilt-free indulgence.
  • Perfect for Any Occasion: Whether you’re having a picnic, hosting a BBQ, or enjoying a quiet dinner at home, this salad fits right in!

Ingredient Breakdown

To create this stunning salad, you’ll need the following ingredients:

  • Grilled Corn: Freshly grilled corn adds sweetness and texture. If you don’t have fresh corn, frozen corn can work as well.
  • Peaches: Look for ripe, juicy peaches to bring that summery sweetness. Don’t hesitate to substitute with nectarines if preferred!
  • Jalapeño: For those who like a kick, jalapeño adds a spicy contrast. You can adjust the amount or leave it out for milder flavor.
  • Burrata Cheese: This creamy cheese is the star of the show, offering a rich texture that elevates the salad. If burrata is unavailable, mozzarella can be a suitable substitute.

Pro Tips for Perfecting Your Salad

Side view of a colorful salad displaying juicy peaches, grilled corn, jalapeño, and burrata cheese.

Want to take your Peach Corn Burrata Salad to the next level? Here are my top expert insights:

  • Choose the Right Peaches: Opt for slightly firm, ripe peaches that won’t fall apart when sliced.
  • Grill with Care: If grilling corn, char it just enough to bring out its sweetness without overdoing it.
  • Enhance Flavor: Drizzle with a light balsamic reduction or olive oil for a flavor boost.
  • Texture Matters: Mix in some crunchy nuts like almonds or pecans for added texture.
  • Herb Infusion: Fresh basil or mint can elevate the freshness of the dish.
  • Prep Ahead: You can grill corn and slice peaches in advance to make assembly quicker.
  • Experiment with Dressings: A zesty lime vinaigrette can also complement the salad beautifully.
  • Serving Temperature: Serve the salad chilled for the best taste experience.

Avoiding Common Mistakes

Even the best chefs make mistakes! Here are a few common pitfalls to avoid:

  • Overripe Peaches: Make sure your peaches are ripe but not mushy to maintain the salad’s structure.
  • Undercooking the Corn: Ensure corn is grilled until lightly charred for maximum sweetness.
  • Too Much Dressing: Don’t drown the salad in dressing; a light drizzle is best to let the ingredients shine.
  • Ignoring Seasoning: Always season your salad with salt and pepper to enhance flavors.

Variations to Try

If you want to mix things up, here are some delicious variations to consider:

  • Peach & Fig Combo: Add sliced fresh figs for a unique twist.
  • Grilled Chicken: Toss in some grilled chicken for added protein.
  • Nuts & Seeds: Incorporate sunflower seeds or walnuts for added crunch.
  • Vegan Option: Replace burrata with a creamy avocado or vegan cheese.

Storage and Make-Ahead Instructions

This salad is best enjoyed fresh, but if you have leftovers, here’s how to store them:

  • Refrigerate: Store in an airtight container in the fridge for up to 2 days.
  • Prep Ahead: You can grill the corn and slice the peaches a day in advance; just assemble right before serving.
  • Keep Dressing Separate: If prepping ahead, store the dressing separately to avoid sogginess.

FAQ: Your Burning Questions Answered

  • Can I use frozen corn? Yes, just ensure it’s thawed and drained before use.
  • How do I pick ripe peaches? Look for slightly soft, fragrant peaches with a vibrant color.
  • Is burrata cheese healthy? Yes, it’s a source of protein and calcium, but enjoy in moderation due to its fat content.
  • What’s a good dressing for this salad? A simple olive oil and balsamic vinegar mix works excellently!
  • Can I make this salad vegan? Absolutely! Use avocado or a plant-based cheese alternative.
  • How long does this salad last in the fridge? It’s best within 2 days, but can be stored for up to 3 days if properly sealed.
  • Can I add other fruits? Yes! Feel free to experiment with strawberries or blueberries.
  • What should I serve with this salad? It pairs beautifully with grilled meats, seafood, or as a standalone meal!

Nutrition Tips and Dietary Adaptations

This salad not only delights your palate but also nourishes your body! Here’s how to adapt it:

  • Low-Calorie Option: Skip the cheese or use a lighter cheese alternative.
  • Gluten-Free: This salad is naturally gluten-free, making it suitable for various diets.
  • Keto-Friendly: Omit the corn for a lower-carb version and add more greens.
  • High-Protein Variation: Add grilled chicken or chickpeas for a protein boost.

Essential Equipment

Here’s what you’ll need to prepare this salad:

  • Grill or Grill Pan: For perfectly grilled corn.
  • Sharp Knife: For easy slicing of peaches and jalapeños.
  • Cutting Board: A sturdy surface to prepare your ingredients.
  • Mixing Bowl: To toss everything together beautifully.

Serving Suggestions

Serve your Peach Corn Burrata Salad in a large bowl for sharing, or plate individually for a more formal presentation. Pair it with:

  • Grilled Chicken: For a heartier meal.
  • Crusty Bread: To soak up the delicious juices.
  • Sparkling Water: A refreshing drink to complement the flavors.

Now that you have all the tools to create this delectable Peach Corn Burrata Salad, it’s time to gather your ingredients and get cooking! Remember, the kitchen is your playground—so let’s make this summer a flavorful one!

Enjoy the vibrant flavors, and happy cooking!

Peach + Corn + Burrata Salad

Prep Time 10 minutes
Cook Time 15 minutes
Total Time 25 minutes
Servings 4 people
Calories 350
A fresh and vibrant salad combining sweet peaches, smoky grilled corn, spicy jalapeño, and creamy burrata for a delightful summer dish.

Ingredients

Vegetables

  • 2 ears corn (fresh or frozen)
  • 2 peaches peaches (ripe and juicy)
  • 1 jalapeño jalapeño (seeded and sliced)

Dairy

  • 8 oz burrata (fresh)

Instructions 

  • Grill the corn until charred, then cut kernels off the cob.
  • Slice peaches and jalapeño thinly.
  • Combine grilled corn, peaches, jalapeño, and burrata in a bowl.
  • Toss gently and season with salt and pepper to taste.
  • Serve immediately for best freshness.

Notes

For extra flavor, drizzle with honey or balsamic glaze before serving.
Calories: 350kcal
Cost: $12
Course: Salad
Cuisine: American
Keyword: Peach

Discover the Vibrant World of Tuna Niçoise Salad

Welcome to a delicious adventure with the Tuna Niçoise Salad, where each bite is a celebration of flavor, color, and nutrition! This vibrant dish combines fresh ingredients and bold flavors, making it the perfect meal for busy weekdays or leisurely weekends. Whether you’re enjoying it as a light lunch or a hearty dinner, this salad packs a nutritional punch that you’ll love. Let’s dive into why this Tuna Niçoise Salad is not just a meal but a delightful experience!

Why You’ll Love This Recipe

  • Balanced Nutrition: Packed with protein-rich tuna, fiber-filled green beans, and healthy fats from olives, this salad supports a balanced diet.
  • Quick and Easy: With straightforward preparation steps, you can whip this up in under 30 minutes, making it perfect for any busy day.
  • Meal Prep Friendly: This salad holds up well in the fridge, making it ideal for meal prep or leftovers.
  • Flavor Explosion: The combination of **tangy lemon vinaigrette**, savory anchovies, and the creaminess of hard-boiled eggs creates a mouthwatering experience.
  • Customizable: With various ingredient options and substitutions, you can tailor this salad to your taste preferences and dietary needs!

Essential Ingredients for an Authentic Tuna Niçoise Salad

To create the perfect Tuna Niçoise Salad, you’ll need the following ingredients:

  • 12 small new potatoes: Boiled until tender for a satisfying base.
  • 8 ounces fresh green beans: Blanched to retain their crispness and vibrant color.
  • 8 ounces cherry tomatoes: Halved for sweetness and freshness.
  • 1 can canned tuna in olive oil: Drained, with some oil reserved for flavor; or use fresh tuna steaks for a gourmet touch.
  • 4 hard-boiled eggs: Cooked to perfection, adding protein and creaminess.
  • 1/3 cup Niçoise or Kalamata olives: For a briny kick that complements the other ingredients.
  • 4 anchovy fillets: Optional, but they add a deep umami flavor.
  • 2 tablespoons olive oil: For dressing and cooking, enhancing the overall flavor.
  • 1 tablespoon lemon juice: Freshly squeezed for a zesty punch.
  • 1 teaspoon Dijon mustard: Essential for emulsifying the vinaigrette.
  • 1/2 teaspoon anchovy paste: Adds depth to the dressing.
  • Salt and pepper: To taste.
  • 2 tablespoons fresh herbs: Such as parsley or thyme, for garnish.

How to Prepare a Flavorful Tuna Niçoise Salad

A vibrant Tuna Niçoise salad featuring tuna, eggs, and fresh greens, presented beautifully.

Let’s get cooking! Follow these simple steps to assemble your Tuna Niçoise Salad:

  1. Boil the new potatoes in salted water until tender, about 15 minutes. Drain and cool.
  2. Blanch the green beans briefly in boiling water, then immediately plunge into ice water to keep their crispness and color. Drain well.
  3. If using fresh tuna, sear it quickly on each side in a hot skillet with olive oil until just cooked on the outside but still juicy inside. Let it rest. If using canned tuna, drain and reserve some olive oil for flavor.
  4. Cook eggs in simmering water for 9-11 minutes to achieve a hard-boiled texture. Cool in ice water, then peel and slice.
  5. In a bowl, whisk together Dijon mustard, lemon juice, olive oil, anchovy paste, salt, and pepper until emulsified to make the vinaigrette.
  6. On a large platter or bowl, arrange the potatoes, green beans, cherry tomatoes, olives, anchovy fillets, and tuna.
  7. Top with sliced hard-boiled eggs, drizzle with the dressing, and garnish with fresh herbs before serving.

Pro Tips for a Perfect Tuna Niçoise Salad

  • Use high-quality tuna: Opt for oil-packed tuna for maximum flavor and a better texture.
  • Salt your potato water: This enhances the flavor of the potatoes right from the start.
  • Dress just before serving: To keep the ingredients fresh and avoid sogginess, wait until you’re ready to serve to add the dressing.
  • Customize your proteins: Feel free to substitute tuna with grilled chicken or chickpeas for a vegetarian option.
  • Extra crunch: Add toasted nuts or seeds for an additional layer of texture.
  • Fresh herbs: Experiment with different herbs like basil or dill for a unique flavor twist.
  • Keep it colorful: Incorporate a variety of colorful vegetables like bell peppers or radishes for visual appeal.
  • Batch prep: Make extra vinaigrette to use on other salads throughout the week!

Common Mistakes and Troubleshooting

Even the best cooks can make mistakes! Here are some common pitfalls and how to avoid them:

  • Overcooking the eggs: Ensure you follow the timing for perfectly hard-boiled eggs—too long, and they’ll be rubbery.
  • Undercooking the potatoes: Test for tenderness with a fork to avoid crunchy bites.
  • Salad dressing too thick: If your vinaigrette is too thick, whisk in a little water or more olive oil to reach your desired consistency.
  • Too much salt: Always taste the salad before serving to adjust the seasoning!

Variations of Tuna Niçoise Salad

This salad is incredibly versatile! Try these variations to keep things exciting:

  • Mediterranean Twist: Add feta cheese, artichoke hearts, and sun-dried tomatoes for a Mediterranean flair.
  • Spicy Kick: Toss in sliced jalapeños or a hint of sriracha in your vinaigrette for some heat.
  • Vegan Option: Substitute tuna with chickpeas or tofu, and skip the eggs to create a plant-based version.
  • Grilled Veggies: Add grilled zucchini and bell peppers for a smoky flavor punch.

Storage and Make-Ahead Instructions

This Tuna Niçoise Salad is perfect for meal prep! Here’s how to store it:

  • Refrigeration: Store in an airtight container for up to 3 days. Keep the dressing separate until ready to serve to maintain freshness.
  • Make-Ahead: Prepare all components (vegetables, eggs, tuna) ahead of time and assemble just before serving.

Comprehensive FAQ

  • Can I use canned tuna instead of fresh? Yes! Canned tuna is a convenient and flavorful option.
  • Is this salad suitable for gluten-free diets? Yes, as long as you ensure all ingredients, including the dressing, are gluten-free.
  • How far in advance can I prepare this salad? You can prepare the components a day in advance but dress it just before serving.
  • Can I use different vegetables in this salad? Absolutely! Feel free to mix and match based on your preferences.
  • How do I prevent the salad from becoming soggy? Dress the salad just before serving and keep ingredients separate until then.
  • What’s the best way to store leftovers? Keep them in an airtight container in the fridge for up to 3 days.
  • Can I add more protein to this salad? Yes! Consider adding grilled chicken, shrimp, or extra beans for additional protein.
  • How can I make this salad more filling? Add quinoa or farro for a hearty twist.

Nutritional Tips and Dietary Adaptations

This salad is not only delicious but can also be adapted to meet various dietary needs:

  • Low-carb option: Skip the potatoes and add more greens like spinach or arugula.
  • Dairy-free: Omit any cheese and ensure the dressing is dairy-free.
  • Protein-rich: Add legumes or extra eggs to boost protein content.

Equipment Recommendations

To make this Tuna Niçoise Salad, you’ll need:

  • Large pot: For boiling potatoes and eggs.
  • Skillet: For searing tuna if using fresh.
  • Mixing bowls: For preparing the dressing and assembling the salad.
  • Whisk: To emulsify the dressing.
  • Knife and cutting board: For chopping veggies and slicing eggs.

Serving Suggestions

Serve this Tuna Niçoise Salad as a main dish or alongside crusty bread for a complete meal. Pair it with a glass of chilled white wine or sparkling water for a refreshing touch. Enjoy this dish any time of year, making it a delightful addition to your culinary repertoire!

In conclusion, Tuna Niçoise Salad not only excites your taste buds but also nourishes your body. With its vibrant ingredients, bold flavors, and endless possibilities for customization, it’s a dish that’s bound to impress. So, roll up your sleeves, gather your ingredients, and let the culinary adventure begin!

Tuna Niçoise Salad Recipe

Prep Time 15 minutes
Cook Time 15 minutes
Total Time 30 minutes
Servings 4 servings
Calories 450
A vibrant and classic French salad featuring tuna, fresh vegetables, and a tangy vinaigrette, perfect for a light yet satisfying meal.

Ingredients

Vegetables

  • 12 small new potatoes (boiled until tender)
  • 8 ounces fresh green beans (blanched)
  • 8 ounces cherry tomatoes (halved)

Protein

  • 1 can canned tuna in olive oil (drained, reserve some oil)
  • 4 pieces hard-boiled eggs (sliced)
  • 1/3 cup Niçoise or Kalamata olives (pitted)
  • 4 fillets anchovy fillets (adds umami)

Dressing

  • 2 tablespoons olive oil (for dressing and searing tuna)
  • 1 tablespoon lemon juice (freshly squeezed)
  • 1 teaspoon Dijon mustard (for vinaigrette)
  • 1/2 teaspoon anchovy paste (for emulsification)

Seasonings

  • to taste salt and pepper
  • 2 tablespoons fresh herbs (parsley or thyme, for garnish)

Instructions 

  • Boil potatoes in salted water until tender, then drain and cool.
  • Blanch green beans briefly, then plunge into ice water to keep crispness. Drain well.
  • If using fresh tuna, sear in a hot skillet with olive oil until just cooked, then rest. For canned tuna, drain and reserve some oil.
  • Cook eggs in simmering water for 9-11 minutes, cool, peel, and slice.
  • Whisk together Dijon mustard, lemon juice, olive oil, anchovy paste, salt, and pepper to make vinaigrette.
  • Arrange potatoes, green beans, cherry tomatoes, olives, anchovies, and tuna on a platter. Top with sliced eggs, drizzle with dressing, and garnish with herbs.

Notes

For best flavor, use high-quality ingredients and serve immediately.
Calories: 450kcal
Cost: $15
Course: Salad
Cuisine: French
Keyword: Tuna

Welcome to your new favorite dish! The best Greek salad recipe is not just a salad; it’s a vibrant celebration of fresh ingredients that brings a burst of flavor to your table. With its colorful veggies, tangy feta, and zesty dressing, this dish is perfect for any occasion. Whether you’re prepping for a summer barbecue, a quick weeknight dinner, or a delightful lunch, this salad is your go-to for a refreshing meal that dances on your taste buds!

Why You’ll Love This Recipe

Let’s dive into what makes this Greek salad recipe a true standout:

  • Quick to Prepare: Whip this salad up in just 15 minutes, making it ideal for busy weeknights when you want something fresh and satisfying.
  • Packed with Nutrients: Bursting with colorful vegetables, this salad is loaded with vitamins, minerals, and antioxidants, making it a healthy choice you can feel good about.
  • Flavor Explosion: The combination of crisp veggies, tangy feta, and a zesty dressing creates a delightful taste explosion in every bite.
  • Customizable: This recipe is versatile. Feel free to add your favorite ingredients or swap out veggies based on what you have on hand.
  • Perfect for Meal Prep: Make a big batch ahead of time, and enjoy it throughout the week! Just keep the dressing separate until you’re ready to serve.

Ingredients You’ll Need

Gather these fresh ingredients to create the best Greek salad:

  • 1 green bell pepper: Cut into 1″ pieces for that perfect crunch.
  • ¾ English cucumber: Peeled, seeded, and quartered for a refreshing flavor.
  • 5 Roma tomatoes: Cut into 1″ pieces to add vibrant color.
  • ¼ cup red onion: Thinly sliced for a mild, sweet crunch.
  • ½ cup Kalamata olives: Whole and pitted for that authentic Mediterranean taste.
  • 8 ounces feta cheese: Cut into ½” chunks, bringing a creamy richness to the dish.
  • ⅓ cup olive oil: Use high-quality extra virgin for the best flavor.
  • 3½ tablespoons apple cider vinegar: A tangy kick that balances the salad.
  • 2 cloves garlic: Minced for an aromatic touch.
  • 1½ teaspoons dried oregano: For that quintessential Greek flavor.
  • 1 teaspoon dried dill: Adds a fresh herbaceous note.
  • 1 teaspoon salt and ½ teaspoon pepper: To taste, enhancing all the flavors.

How to Make the Best Greek Salad

Ready to dive into the fun part? Let’s make this vibrant dish!

  1. Wash and prepare all vegetables by cutting them into bite-sized pieces.
  2. In a large bowl, combine the green bell pepper, cucumber, tomatoes, red onion, Kalamata olives, and feta cheese. Toss gently to mix.
  3. In a separate bowl or jar, whisk together olive oil, apple cider vinegar, minced garlic, oregano, dill, salt, and pepper.
  4. Pour the dressing over the salad mixture and toss gently until everything is evenly coated.
  5. Let the salad sit for about 30 minutes to allow flavors to meld before serving.

Pro Tips for Making the Best Greek Salad

A colorful assortment of Greek salad ingredients arranged beautifully, highlighting the fresh produce.

Elevate your Greek salad skills with these expert insights:

  • Fresh Ingredients: Always choose the freshest vegetables available. They make a huge difference in taste!
  • Feta Magic: Opt for feta cheese packed in brine instead of crumbled. It has a creamier texture and richer flavor.
  • Chill Out: Let your salad chill in the fridge for at least 30 minutes. This allows the flavors to develop beautifully.
  • Dress Smart: Dress your salad just before serving to keep the veggies crisp and fresh.
  • Herb Power: Experiment with fresh herbs like parsley or mint for an exciting twist.
  • Olive Variety: Try different types of olives, such as green olives or mixed olives, for varied flavors.
  • Customize: Don’t hesitate to add proteins like grilled chicken or chickpeas for a heartier meal.
  • Seasonal Veggies: Use seasonal vegetables to keep things fresh and interesting all year round.

Common Mistakes and Troubleshooting

Avoid these pitfalls to ensure your Greek salad shines:

  • Overdressing: Too much dressing can make the salad soggy. Start with less and add more if needed.
  • Soft Veggies: Ensure your veggies are crisp; avoid overripe tomatoes as they can turn mushy.
  • Skipping the Chill: Don’t skip chilling the salad! It’s essential for flavor development.
  • Ignoring Quality: The quality of your olive oil and feta can make or break your salad. Invest in good ingredients.

Variations to Try

If you’re feeling adventurous with your Greek salad, here are some tasty variations:

  • Quinoa Greek Salad: Swap out some of the veggies with cooked quinoa for added protein and texture.
  • Greek Pasta Salad: Add cooked pasta to the mix for a filling twist on the classic salad.
  • Mediterranean Chickpea Salad: Toss in some chickpeas for an extra protein boost and a heartier meal.
  • Grilled Greek Salad: Grill your vegetables for a smoky flavor that adds a new dimension to this classic dish.

Storage and Make-Ahead Instructions

Want to prepare ahead? Here’s how to store your salad:

  • Make-Ahead: Most of the salad can be prepared in advance, but keep the dressing separate until serving to maintain crispness.
  • Storage: Store any leftovers in an airtight container in the fridge for up to 3 days. The flavors will meld even more!
  • Refreshing Tip: If the salad starts to wilt, add a splash more dressing to revive it before serving.

Comprehensive FAQ

Here are some frequently asked questions about this Greek salad recipe:

  • Can I use different cheese?: Absolutely! Feta is traditional, but you can try goat cheese or even mozzarella.
  • Is this salad vegan?: Yes, simply omit the feta cheese or use a vegan cheese substitute.
  • Can I add protein?: Of course! Grilled chicken, shrimp, or chickpeas are all excellent additions.
  • How long does it last in the fridge?: The salad keeps well for up to 3 days, but it’s best enjoyed fresh.
  • Can I use bottled dressing?: While homemade is best, a quality bottled Greek dressing can work in a pinch!
  • What’s the best way to cut vegetables?: Aim for uniform sizes to ensure even flavor and texture in every bite.
  • Do I need to peel cucumbers?: It depends on your preference! English cucumbers are often sweeter and less bitter without peeling.
  • Can I include fruits?: Yes! Adding fruits like watermelon or berries can offer a delightful twist.

Nutrition Tips and Dietary Adaptations

Here are some ways you can adapt this salad to meet various dietary needs:

  • Low-Carb Option: Skip the starchy vegetables and focus on leafy greens and proteins.
  • Gluten-Free: This recipe is naturally gluten-free! Just double-check the ingredients.
  • Dairy-Free: Replace feta with a nut-based cheese or skip it entirely if you prefer.
  • Heart-Healthy: Use a lighter dressing and opt for fewer olives to reduce sodium.

Equipment Recommendations

To make your salad-making experience seamless, consider these tools:

  • Sharp Knife: A good quality chef’s knife will make cutting vegetables quick and easy.
  • Cutting Board: A sturdy cutting board offers a safe surface for food prep.
  • Mixing Bowl: A large mixing bowl helps you toss all the ingredients together effortlessly.
  • Whisk or Jar: Use a whisk or a jar with a lid to mix the dressing thoroughly.

Serving Suggestions

Pair your Greek salad with these delicious options:

  • Grilled Meats: Serve alongside grilled chicken, lamb, or fish for a complete meal.
  • Fresh Bread: Pair with crusty bread or pita for sopping up the dressing.
  • Soup: A light soup, like tomato or lentil, complements the salad beautifully.
  • Quinoa or Rice: Serve it over a bed of quinoa or brown rice for added heartiness.

Conclusion

Now that you have all the secrets to making the best Greek salad, it’s time to bring this colorful, refreshing dish to your kitchen! With its vibrant ingredients and delicious flavor, this salad is not just a meal; it’s a celebration of healthy eating. So grab those fresh veggies and dive into the ultimate Greek salad experience. Enjoy every bite, and remember: healthy food can be fun, flavorful, and exciting!

Best Greek Salad Recipe

Prep Time 15 minutes
Total Time 15 minutes
Servings 4 servings
Calories 250
A fresh and flavorful Greek salad perfect for a quick, healthy meal or side dish.

Ingredients

Vegetables

  • 1 piece green bell pepper (cut into 1" pieces)
  • 0.75 piece English cucumber (peeled, seeded, quartered)
  • 5 pieces roma tomatoes (cut into 1" pieces)
  • 0.25 cup red onion (thinly sliced)
  • 0.5 cup kalamata olives (whole and pitted)
  • 8 ounces feta cheese (cut into ½" chunks)
  • 0.33 cup olive oil
  • 3.5 tablespoons apple cider vinegar
  • 2 cloves garlic (minced)
  • 1.5 teaspoons dried oregano
  • 1 teaspoon dried dill
  • 1 teaspoon salt
  • 0.5 teaspoon pepper

Instructions 

  • Wash and cut all vegetables into bite-sized pieces.
  • Combine vegetables and feta in a large bowl and toss gently.
  • Whisk together olive oil, vinegar, garlic, herbs, salt, and pepper for the dressing.
  • Pour dressing over the salad and toss to coat.
  • Let sit for 30 minutes before serving to meld flavors.

Notes

This salad is best enjoyed fresh but can be stored in the fridge for a few hours.
Calories: 250kcal
Cost: $12
Course: Salad
Cuisine: Greek
Keyword: Vegetables

Welcome to the Vibrant World of Niçoise Salad!

Are you ready to dive into a dish that brings the sun-soaked flavors of France right to your kitchen? The Niçoise Salad is not just a salad; it’s a celebration of fresh ingredients and bold tastes that can energize your day and tantalize your taste buds. Made with greens, protein, and an array of colorful veggies, this salad is as nutritious as it is delicious. Whether you’re a seasoned chef or a cooking newbie, you’ll find this recipe easy to follow and packed with exciting flavors. Let’s unleash your culinary creativity and make this classic French dish together!

Why You’ll Love This Recipe

  • Quick and Easy: Whip up this salad in just 30 minutes, making it a perfect choice for a busy weeknight dinner or a fancy brunch.
  • Nutritious and Balanced: Packed with protein from tuna and eggs, plus a variety of vitamins from fresh vegetables, it’s a well-rounded meal.
  • Customizable: Tailor the ingredients to your taste and dietary preferences—there’s no wrong way to enjoy a Niçoise!
  • Meal Prep Friendly: Perfect for making ahead; it stores well and tastes even better after the flavors meld.
  • Visually Stunning: The vibrant colors and textures make this salad a feast for the eyes, perfect for impressing guests or treating yourself!

Ingredient Breakdown with Substitutions

To create the perfect Niçoise Salad, you’ll need the following ingredients. Don’t worry if you’re missing something; I’ve included some easy substitutions!

  • Greens: 6 cups of green leaf lettuce or mixed greens. Substitution: Spinach or arugula works beautifully too!
  • Eggs: 3 large eggs (hard-boiled and peeled). Substitution: For a vegan option, use tofu or chickpeas for protein.
  • Tuna: 5 ounces of canned tuna in olive oil (drained). Substitution: Fresh tuna steak, grilled or seared, can elevate the dish.
  • Cherry Tomatoes: 1 ¾ cups, halved. Substitution: Diced regular tomatoes or roasted red peppers add a different flair.
  • Olives: ½ cup pitted black olives. Substitution: Green olives or capers can add a tangy twist.
  • Green Onion: 1, sliced into rounds. Substitution: Chives or shallots for a milder onion flavor.
  • Anchovy Fillets: 1 tablespoon, chopped. Substitution: Skip it for a vegetarian version, or use miso paste for umami.
  • Olive Oil: 3 tablespoons for dressing. Substitution: Avocado oil or any light oil can also work.
  • Seasoning: Salt and black pepper to taste.

How to Make a Classic Niçoise Salad

A colorful Niçoise salad arranged with mixed greens, tuna, halved cherry tomatoes, and garnished with black olives and green onions.

Ready to get cooking? Follow these simple steps to assemble your Niçoise Salad!

  1. Prep the Base: Tear or chop the greens into bite-size pieces and toss them into a large salad bowl.
  2. Add the Tomatoes: Wash and slice the cherry tomatoes in half. Add them to the bowl with the greens.
  3. Olives and Onion Time: Toss in the black olives and thinly sliced green onion for a little bite and briny goodness.
  4. Get Anchovy with It: Chop up the anchovies and sprinkle them in. Don’t skip this—they bring the umami magic!
  5. Dress It Up: Drizzle in the olive oil and sprinkle with salt. Gently toss everything to combine and evenly coat the ingredients—do this before adding the tuna and eggs so they stay pretty on top.
  6. Tuna Time: Gently place the drained tuna on top of the salad. Keep it in chunks for maximum drama!
  7. Finish with Eggs: Slice the hard-boiled eggs in half or quarters and place them artfully (or casually—your call) around the salad.
  8. Final Touch: Add a crack of black pepper and a final splash of olive oil if you’re feeling generous. Serve immediately and act like you’re dining beachside in Nice!

Pro Tips for a Perfect Niçoise Salad

  • Fresh Ingredients: Always use the freshest ingredients you can find for the best flavor and nutrition.
  • Don’t Skip the Anchovies: They add a depth of flavor that elevates the dish—trust me on this!
  • Chill Your Ingredients: For a refreshing salad, chill your greens and dressing before assembling.
  • Presentation Matters: Layer your ingredients artfully for that Instagram-worthy look!
  • Experiment with Dressings: Try adding a squeeze of lemon or a splash of balsamic vinegar for extra zing.
  • Texture Variety: Consider adding roasted nuts or seeds for crunch!
  • Season Appropriately: Taste as you go and adjust salt and pepper to your liking.
  • Vegan Twist: For a plant-based version, swap tuna for chickpeas and use vegan mayo in your dressing.

Common Mistakes and Troubleshooting

Even the best chefs make mistakes! Here’s how to avoid common pitfalls when making your Niçoise Salad:

  • Overcooked Eggs: Aim for soft-boiled eggs with a slightly runny center for the best flavor.
  • Too Much Dressing: Less is more; start with a small amount and add more as needed.
  • Missing Ingredients: Don’t skip the anchovies or olives; they are key to the authentic flavor!
  • Wilting Greens: Dress the salad just before serving to keep everything fresh and crisp.

Variations to Make It Your Own

One of the best parts about Niçoise Salad is how versatile it is! Here are some fun variations to try:

  • Asian-Inspired: Use sesame oil, add edamame, and top with shredded carrots and radishes.
  • Greek Twist: Add feta cheese, cucumbers, and a squeeze of lemon for a Mediterranean flair.
  • Spicy Kick: Toss in some sliced jalapeños or a dash of sriracha for heat.
  • Grain Bowl: Serve it over a bed of quinoa or farro for a hearty meal.

Storage and Make-Ahead Instructions

Want to prepare your salad in advance? Here’s how to store it properly:

  • Make-Ahead: Prep the salad components (greens, toppings) separately. Combine just before serving to keep everything fresh.
  • Storage: Store any leftovers in an airtight container in the refrigerator for up to 2 days. Note that the greens may wilt over time.
  • Freezing: It’s best not to freeze this salad due to the texture changes in the vegetables.

Frequently Asked Questions

Let’s tackle some common questions about Niçoise Salad:

  • Can I use frozen tuna? Yes, just ensure it’s properly thawed and cooked before adding to the salad.
  • Is this salad gluten-free? Absolutely! All the ingredients are gluten-free, making it a great option for those with gluten sensitivities.
  • What’s the best way to hard-boil eggs? Boil water, add eggs, simmer for 9-12 minutes, then shock in ice water.
  • Can I make this vegan? Yes! Replace tuna with chickpeas and use a vegan mayo or tahini dressing.
  • How long can I keep leftovers? Leftovers can be stored in the fridge for up to 2 days, but enjoy fresh for the best taste.
  • What types of olives are best? Black olives are traditional, but feel free to experiment with green olives for a different flavor!
  • Can I add other vegetables? Definitely! Feel free to include bell peppers, cucumbers, or radishes for extra crunch.
  • What’s the traditional dressing for Niçoise Salad? A simple vinaigrette made from olive oil, vinegar, salt, and pepper is classic!

Nutritional Tips and Dietary Adaptations

This salad is rich in nutrients, making it a fantastic choice for a healthy lifestyle:

  • High in Protein: The combination of tuna and eggs offers a great source of protein, essential for muscle repair and growth.
  • Loaded with Vitamins: Fresh vegetables provide vitamins A, C, and K, supporting your immune system and skin health.
  • Healthy Fats: Olive oil is a source of monounsaturated fats, which are heart-healthy.
  • Low Carb Option: Skip the potatoes often found in traditional recipes for a lower-carb version.

Essential Equipment for Your Niçoise Salad

To create your stunning salad, here are a few kitchen tools you’ll need:

  • Large Salad Bowl: Perfect for tossing all your vibrant ingredients together.
  • Sharp Knife: Essential for slicing your vegetables and eggs with precision.
  • Cutting Board: A sturdy surface to prepare your ingredients safely.
  • Whisk: For mixing your vinaigrette to perfection.

Serving Suggestions

Wondering how to serve your Niçoise Salad? Here are some ideas:

  • Pair with Crusty Bread: A slice of fresh baguette or sourdough is perfect for soaking up the flavors.
  • Wine Pairing: Enjoy with a chilled rosé or a crisp Sauvignon Blanc to complement the dish.
  • Make It a Meal: Serve it alongside grilled chicken or fish for a heartier option.

Conclusion

Now that you have all the tools and tips to create an unforgettable Niçoise Salad, it’s time to get cooking! Remember, the kitchen is your creative playground—don’t be afraid to experiment and make this recipe your own. Eating healthy can be exciting, and with this vibrant French classic, you’ll fall in love with nutritious meals all over again. Enjoy every bite, and bon appétit!

Niçoise Salad

Prep Time 15 minutes
Cook Time 10 minutes
Total Time 25 minutes
Servings 4 servings
Calories 350
A vibrant and classic French salad featuring fresh greens, tuna, eggs, and briny olives, perfect for a light yet satisfying meal.

Ingredients

greens

  • 6 cups green leaf lettuce or mixed greens
  • 3 large eggs (hard-boiled and peeled)
  • 5 ounces canned tuna in olive oil (drained)
  • 1 ¾ cups cherry tomatoes (halved)
  • ½ cup pitted black olives
  • 1 green onion sliced into rounds
  • 1 tablespoon chopped anchovy fillets
  • 3 tablespoons olive oil
  • to taste Salt Salt
  • to taste Black pepper Black pepper

Instructions 

  • Tear or chop greens and toss into a large bowl.
  • Add halved cherry tomatoes, black olives, sliced green onion, and chopped anchovies. Toss gently.
  • Drizzle with olive oil, season with salt, and toss to coat.
  • Place drained tuna on top and arrange halved eggs around the salad.
  • Finish with black pepper and a splash of olive oil. Serve immediately.

Notes

Use high-quality canned tuna for best flavor.
Calories: 350kcal
Cost: $15
Course: Salad
Cuisine: French
Keyword: Eggs, Olives, Tuna

Welcome to a vibrant culinary adventure! This Easy Creamy Coleslaw recipe is not just any ordinary side dish—it’s your ticket to a flavor explosion that pairs beautifully with everything from barbecued meats to picnic sandwiches. Packed with fresh cabbage and sweet carrots, this coleslaw is a creamy delight that promises to elevate any meal. Whether you’re hosting a summer cookout or simply looking for a crunchy companion to your dinner, this recipe is here to bring joy to your table. Let’s dive into why you’ll love this creamy coleslaw and how to make it shine!

Why You’ll Love This Recipe

  • Quick and Easy: With minimal prep and just 8 simple ingredients, you can whip up this coleslaw in no time. Perfect for busy weeknights or spontaneous get-togethers!
  • Flavor-Packed: The combination of creamy dressing, crunchy cabbage, and sweet carrots creates a delightful medley of flavors that will tantalize your taste buds.
  • Versatile Side Dish: This recipe pairs wonderfully with grilled chicken, burgers, or even as a topping for tacos, making it an excellent addition to any meal.
  • Healthy Ingredients: Fresh cabbage and carrots are loaded with vitamins and fiber, making this coleslaw a nutritious choice that doesn’t skimp on flavor.
  • Make-Ahead Friendly: Prepare this coleslaw a day in advance! The flavors meld beautifully, and it saves you time when entertaining.

Ingredient Breakdown

Now, let’s explore the ingredients that make this creamy coleslaw a standout:

  • 4 cups Finely shredded green cabbage: Fresh and crisp for best texture. You can also experiment with red cabbage for a pop of color!
  • 1 cup Grated carrots: Adds sweetness and color. Feel free to substitute with other grated vegetables like zucchini for a unique twist.
  • 1 cup Mayonnaise: Provides creaminess. For a lighter option, try Greek yogurt or a vegan mayo alternative.
  • 2 tablespoons Apple cider vinegar: Balances the creaminess of the dressing. This adds a zesty kick that brightens the flavors.
  • 1 tablespoon Granulated sugar: Enhances sweetness. You can adjust the amount based on your taste preferences or use honey for a natural sweetener.
  • 0.5 teaspoon Salt: To taste. A little salt helps to enhance the flavors of the vegetables.
  • 1 pinch Black pepper: To taste. Freshly cracked black pepper adds a touch of heat.

How to Make Your Easy Creamy Coleslaw

Creating this coleslaw is as easy as 1-2-3! Follow these simple steps:

  1. Gather all ingredients and ensure the cabbage is fresh.
  2. Finely shred the cabbage into thin strips.
  3. Grate the carrots until you have approximately 1 cup.
  4. In a mixing bowl, combine mayonnaise, apple cider vinegar, and sugar. Whisk until smooth.
  5. Add salt and pepper to the dressing and adjust seasoning as needed.
  6. In a large bowl, combine shredded cabbage and grated carrots. Pour dressing over and toss gently.
  7. Cover and refrigerate for at least 30 minutes to allow flavors to meld.
  8. Stir before serving and enjoy as a side dish or topping!

Pro Tips for Making the Best Coleslaw

Close-up of a vibrant coleslaw with cabbage and carrots, garnished with a creamy dressing.
  • Fresh Ingredients: Always use the freshest vegetables for the best texture and taste.
  • Chill Time: Allow the coleslaw to chill for at least 30 minutes before serving. This enhances the flavor and texture.
  • Texture Balance: For an extra crunch, add ingredients like chopped apples, radishes, or even nuts.
  • Flavor Adjustments: Taste and adjust the dressing to your liking. More vinegar for tang, more sugar for sweetness—make it your own!
  • Pre-Shredded Options: If you’re short on time, consider using pre-shredded coleslaw mix available in stores.
  • Serving Temperature: Serve it chilled for the best refreshing experience, especially on hot days!
  • Experiment with Herbs: Adding fresh herbs like dill or parsley can elevate the flavor profile.
  • Storage Tips: Store in an airtight container to keep it fresh longer.

Common Mistakes and Troubleshooting

Even the best chefs can make mistakes! Here are some common pitfalls to avoid:

  • Overdressing: Don’t drown the coleslaw in dressing. Start with less and add more if needed.
  • Soggy Coleslaw: Avoid letting it sit too long after dressing or it’ll become soggy. Serve promptly or store separately.
  • Cutting Consistency: Ensure uniform cuts for an even texture; uneven pieces can lead to a mixed experience.
  • Skipping the Chill: Don’t skip the chilling time! This is crucial for letting the flavors meld.

Variations to Try

Feeling adventurous? Here are some fun variations of this creamy coleslaw recipe:

  • Vegan Coleslaw: Substitute mayonnaise for vegan mayo or create a cashew-based dressing for a creamy texture.
  • Spicy Coleslaw: Add diced jalapeños or a dash of hot sauce to the dressing for a spicy kick!
  • Fruit-Infused Coleslaw: Toss in diced apples or pineapple for a sweet and tangy twist.
  • Asian-Inspired Slaw: Incorporate sesame oil, soy sauce, and cilantro for an exciting flavor profile.

Storage and Make-Ahead Instructions

This coleslaw is perfect for meal prep! Here’s how to store it:

  • Refrigeration: Store in an airtight container in the fridge for up to 3 days. The flavors will continue to develop!
  • Make-Ahead: Prepare the coleslaw a day in advance. Just add the dressing right before serving to keep it fresh.
  • Freezing: While it’s not recommended to freeze coleslaw due to texture changes, you can freeze the dressing separately.

Comprehensive FAQ

Let’s address some common questions about this easy creamy coleslaw:

  • Can I use a different type of cabbage? Absolutely! Napa cabbage or red cabbage can add unique flavors and colors.
  • Is this coleslaw gluten-free? Yes! All ingredients are naturally gluten-free.
  • How can I make it less creamy? Reduce the amount of mayonnaise and substitute with more vinegar or yogurt.
  • Can I add other vegetables? Certainly! Bell peppers, green onions, or radishes can add great crunch.
  • How do I make it sweeter? Add more sugar or a splash of a sweeter vinegar.
  • What’s the best way to shred cabbage? A sharp knife, a box grater, or a food processor work well for achieving thin, uniform slices.
  • Can I serve this coleslaw warm? It’s best served chilled, but you can let it sit out for a short time before serving.
  • What should I serve with coleslaw? Try it alongside grilled meats, sandwiches, or as a topping for tacos!

Nutrition Tips and Dietary Adaptations

This coleslaw is not only delicious but also nutritious! Here are some tips:

  • Boost Fiber: Add in chopped nuts or seeds for extra fiber and healthy fats.
  • Low-Calorie Option: Use Greek yogurt instead of mayonnaise for a lighter dressing.
  • Allergy Adjustments: Always check labels for allergens, especially with pre-made ingredients.
  • Portion Control: Enjoy in moderation as part of a balanced meal to maintain nutritional goals.

Equipment Recommendations

To make your coleslaw-making experience seamless, here are some handy tools:

  • Sharp Chef’s Knife: Essential for finely shredding cabbage.
  • Box Grater or Food Processor: Speeds up the grating process for carrots.
  • Mixing Bowls: Use various sizes for prepping and mixing ingredients.
  • Whisk: Perfect for blending your dressing ingredients smoothly.

Serving Suggestions

Now that your coleslaw is ready, here are some creative ways to serve it:

  • As a Side Dish: Serve alongside grilled chicken, sausages, or burgers for a classic BBQ feel.
  • In Tacos: Use as a crunchy topping for fish or chicken tacos for added zest.
  • With Sandwiches: Add as a refreshing layer in sandwiches or wraps.
  • As a Salad Base: Mix with your favorite greens for a hearty salad.

So there you have it! This Easy Creamy Coleslaw is bound to be a hit at your next gathering or family dinner. With its vibrant flavors and simple preparation, it’s a recipe that promises to make healthy eating exciting and enjoyable. Now, roll up your sleeves and get ready to create a coleslaw masterpiece that your friends and family will love!

Easy Creamy Coleslaw

Prep Time 10 minutes
Total Time 10 minutes
Servings 4 servings
Calories 150
A quick and delicious side dish featuring crunchy cabbage and sweet carrots in a creamy dressing.

Ingredients

Vegetables

  • 4 cups Finely shredded green cabbage (Fresh and crisp for best texture.)
  • 1 cup Grated carrots (Adds sweetness and color.)
  • 1 cup Mayonnaise (Provides creaminess.)
  • 2 tablespoons Apple cider vinegar (Balances the creaminess.)
  • 1 tablespoon Granulated sugar (Enhances sweetness.)
  • 0.5 teaspoon Salt (To taste.)
  • 1 pinch Black pepper (To taste.)

Instructions 

  • Shred cabbage and grate carrots.
  • Mix mayonnaise, vinegar, and sugar until smooth.
  • Add salt and pepper to the dressing.
  • Combine cabbage and carrots, then toss with dressing.
  • Refrigerate for 30 minutes before serving.

Notes

For extra flavor, add a splash of lemon juice or a handful of chopped fresh herbs.
Calories: 150kcal
Cost: $8
Course: Side Dish
Cuisine: American
Keyword: coleslaw

Discover the Vibrant World of Healthy Coleslaw!

Welcome to your new favorite dish that’s bursting with color, crunch, and nutrition! This healthy coleslaw is not just a side dish; it’s a celebration of fresh ingredients and bold flavors. Whether you’re hosting a summer barbecue, preparing a weeknight dinner, or simply looking to elevate your lunch, this coleslaw recipe is a fantastic choice. Packed with shredded cabbage, vibrant carrots, and a creamy yogurt dressing, it’s a dish that’s as easy to make as it is delicious to eat. Let’s dive deep into the world of this healthy coleslaw and explore why it’s going to become a staple in your kitchen!

Why You’ll Love This Recipe

This isn’t just any coleslaw; it’s a delightful medley of flavors and textures that will have you coming back for more. Here are five reasons to whip up this healthy coleslaw recipe:

  • Nutritious Ingredients: Loaded with essential vitamins and minerals, this coleslaw is a powerhouse of nutrition. Cabbage and carrots provide fiber, vitamin C, and antioxidants.
  • Quick and Easy Preparation: With just a few simple steps, you can have this coleslaw ready in no time. It’s perfect for those busy weeknight dinners!
  • Customizable Flavors: Feel free to experiment with different vegetables and dressings! This recipe is versatile enough to suit any palate.
  • Perfect for Meal Prep: This coleslaw stores well, making it an excellent option for meal prep. It can be made ahead and enjoyed throughout the week.
  • Mayo-Free Delight: For those who aren’t fans of traditional mayo-based coleslaw, this recipe uses Greek yogurt to create a creamy dressing without all the fat!

Ingredients Breakdown

Let’s take a closer look at the ingredients that make this coleslaw not just healthy but absolutely delicious:

  • 6 cups green cabbage (shredded): The base of our coleslaw, providing crunch and nutrition. Substitute with Napa cabbage for a milder flavor.
  • 2 cups red cabbage (shredded): Adds color and a slightly sweeter taste. You can use more green cabbage if you prefer.
  • 1 cup carrots (shredded): For sweetness and a pop of orange. You can use pre-shredded carrots for convenience.
  • 1/2 cup Greek yogurt: This creamy base replaces mayonnaise, providing protein and probiotics. You can use plant-based yogurt for a vegan option.
  • 1/4 cup extra virgin olive oil: Adds richness and healthy fats. Consider avocado oil for a different flavor.
  • 2 tablespoons apple cider vinegar: For tanginess. You can also use white wine vinegar if that’s what you have on hand.
  • 1 tablespoon maple syrup: A touch of natural sweetness to balance the acidity. Honey can be used instead if desired.
  • 1 teaspoon garlic clove (minced): For an aromatic kick. Feel free to omit if you prefer a milder flavor.
  • 1/2 teaspoon salt: Enhances all the flavors. Adjust according to your taste.
  • 1/4 teaspoon black pepper: Adds a bit of heat. You can use freshly cracked pepper for the best flavor.

How to Make Healthy Coleslaw

Side angle photo of colorful coleslaw with shredded vegetables including green cabbage, red cabbage, and carrots.

Ready to turn these fresh ingredients into a delicious dish? Follow these simple steps:

  • Step 1: In a small bowl, mix together the Greek yogurt, olive oil, apple cider vinegar, maple syrup, minced garlic, salt, and pepper to create the dressing.
  • Step 2: In a large bowl, combine the shredded green cabbage, red cabbage, and carrots. Pour the dressing over the vegetables and toss until everything is well coated.
  • Step 3: Serve immediately as a refreshing side dish, or cover and refrigerate for up to 4 hours to allow the flavors to meld.

Pro Tips for the Best Coleslaw

Want to take your coleslaw to the next level? Here are some expert insights:

  • Chill Before Serving: If you can, let your coleslaw sit in the refrigerator for at least an hour before serving. This allows the flavors to develop and the cabbage to soften slightly.
  • Experiment with Add-Ins: Consider adding in sliced almonds, sunflower seeds, or dried cranberries for extra texture and flavor.
  • Adjust Sweetness: Taste your dressing before adding it to the cabbage. If it’s too tangy, add a little more maple syrup. If it’s too sweet, add a splash more vinegar.
  • Use Fresh Ingredients: Fresh, crisp vegetables make all the difference. Look for vibrant, firm cabbages and bright carrots.
  • Don’t Skip the Salt: A little salt goes a long way in enhancing the flavors of your coleslaw. Don’t be afraid to adjust to your taste!
  • Make it Ahead: This coleslaw is great for meal prep. Just keep the dressing separate until you’re ready to serve to maintain the crunch.
  • Mix It Up: Try adding different types of cabbage or even kale for a unique twist!
  • Use a Food Processor: If you have one, a food processor can make shredding the cabbage and carrots super quick and easy!
  • Mind the Dressing: If you find the dressing too thick, add a tablespoon of water or additional vinegar to reach your desired consistency.

Common Mistakes and Troubleshooting

Even the best recipes can have hiccups! Here’s how to avoid common coleslaw pitfalls:

  • Too Watery? If your coleslaw turns out watery, it’s likely due to the salt drawing out moisture from the cabbage. To fix this, try draining the coleslaw or using less salt next time.
  • Too Tart? If the dressing is too tangy for your taste, add a bit more maple syrup or Greek yogurt to balance it out.
  • Too Sweet? If the coleslaw is too sweet, adding a bit more vinegar can help cut through the sweetness.
  • Not Crunchy Enough? If your coleslaw lacks crunch, ensure your veggies are fresh and crisp. You might also try adding some chopped nuts or seeds for extra texture.

Variations of Healthy Coleslaw

The beauty of coleslaw is its versatility! Here are some creative variations to try:

  • Asian-Inspired Slaw: Add chopped green onions, sesame oil, and a splash of soy sauce. Top with sesame seeds for crunch.
  • Spicy Coleslaw: Incorporate diced jalapeños or a dash of hot sauce into the dressing for a kick.
  • Tropical Slaw: Mix in diced pineapple or mango for a sweet and fruity twist. Pair with a coconut yogurt dressing.
  • Creamy Avocado Slaw: Swap the Greek yogurt for mashed avocado for a rich, creamy texture with a healthy twist.

Storage and Make-Ahead Instructions

Planning to make your coleslaw ahead of time? Here’s how to store it properly:

  • Refrigeration: Store leftover coleslaw in an airtight container in the refrigerator for up to 4 days.
  • Make-Ahead: You can prepare the slaw up to a day in advance. Just keep the dressing separate until you’re ready to serve to maintain the crunchiness of the cabbage.
  • Freezing: While it’s not recommended to freeze coleslaw due to the texture of the cabbage, you can freeze the dressing separately to use later.

Frequently Asked Questions

Got questions? We’ve got answers! Here are some common inquiries about this healthy coleslaw:

  • Is coleslaw healthy? Yes! This healthy coleslaw is made with fresh vegetables and a yogurt-based dressing, making it a nutritious choice.
  • Can I make this coleslaw vegan? Absolutely! Simply substitute the Greek yogurt with a plant-based yogurt or mashed avocado.
  • How long does coleslaw last? When stored properly in the refrigerator, it can last for up to 4 days.
  • Can I use bagged coleslaw mix? Sure! A pre-packaged coleslaw mix can save time, just make sure it’s fresh!
  • What can I serve with coleslaw? This coleslaw pairs beautifully with grilled meats, sandwiches, or as part of a picnic spread.
  • Can I add fruits to my coleslaw? Yes! Adding fruits like apples or pineapple can enhance the flavor and texture of your coleslaw.
  • What type of cabbage is best for coleslaw? Green cabbage is the most common, but red cabbage or Napa cabbage can add unique flavors and colors.
  • How can I make my coleslaw crunchier? Use fresh, crisp vegetables and store the dressing separately until serving to maintain crunch.

Nutrition Tips and Dietary Adaptations

This coleslaw is not only tasty but also adaptable to various dietary needs:

  • Low-Carb Version: Skip the carrots or reduce the quantity to lower the carbohydrate content.
  • Gluten-Free: This recipe is naturally gluten-free! Just ensure that any additional ingredients you add are also gluten-free.
  • Protein Boost: Add chickpeas or shredded chicken for an extra protein punch!

Equipment Recommendations

To make this coleslaw, you don’t need fancy gadgets, but a few tools can make the process easier:

  • Sharp Knife: A good chef’s knife will help you shred your cabbage and carrots quickly and evenly.
  • Cutting Board: A sturdy cutting board provides a safe surface to chop your veggies.
  • Large Mixing Bowl: Essential for mixing your ingredients without making a mess.
  • Small Bowl for Dressing: A separate bowl is great for whisking together your dressing ingredients.

Serving Suggestions

How you serve your coleslaw can elevate the dining experience! Here are some fun ideas:

  • As a Side Dish: Serve alongside grilled chicken or fish for a refreshing contrast.
  • In Tacos: Use this coleslaw as a crunchy topping for fish or pulled pork tacos.
  • On Sandwiches: Add a scoop to your favorite sandwiches for an extra layer of flavor and texture.
  • As a Salad Base: Use it as a base for a hearty salad by adding protein like grilled chicken or quinoa.

In conclusion, this ultimate healthy coleslaw recipe is not only a feast for the eyes but also a delicious and nutritious addition to your meals. It’s easy to prepare, customizable, and perfect for any occasion. So grab your ingredients and get ready to crunch into vibrant wellness!

Healthy Coleslaw

Prep Time 10 minutes
Total Time 10 minutes
Servings 4 servings
Calories 180
A fresh and nutritious coleslaw made with shredded vegetables and a tangy yogurt-based dressing, perfect for a light side dish.

Ingredients

Vegetables

  • 6 cups green cabbage (shredded)
  • 2 cups red cabbage (shredded)
  • 1 cup carrots (shredded)

Dressing

  • 1/2 cup greek yogurt
  • 1/4 cup extra virgin olive oil
  • 2 tablespoons apple cider vinegar
  • 1 tablespoon maple syrup
  • 1 teaspoon garlic clove (minced)
  • 1/2 teaspoon salt
  • 1/4 teaspoon black pepper

Instructions 

  • Mix yogurt, olive oil, vinegar, maple syrup, garlic, salt, and pepper to make the dressing.
  • Place shredded green cabbage, red cabbage, and carrots in a large bowl.
  • Pour the dressing over the vegetables and toss to combine.
  • Serve immediately or refrigerate for up to 4 hours.

Notes

For extra crunch, add some chopped nuts or seeds.
Calories: 180kcal
Cost: $12
Course: Side Dish
Cuisine: American
Keyword: Healthy, Vegetables