Author

Ryan

Browsing

Welcome to the Flavor Fiesta of Chicken Fajita Bowls!

Hey there, food lovers! If you’re on the hunt for a dish that’s as colorful as it is delicious, you’ve landed in the right place. Our Sizzling Chicken Fajita Bowls are not just a meal—they’re a vibrant celebration of flavor and nutrition that will have your taste buds dancing!

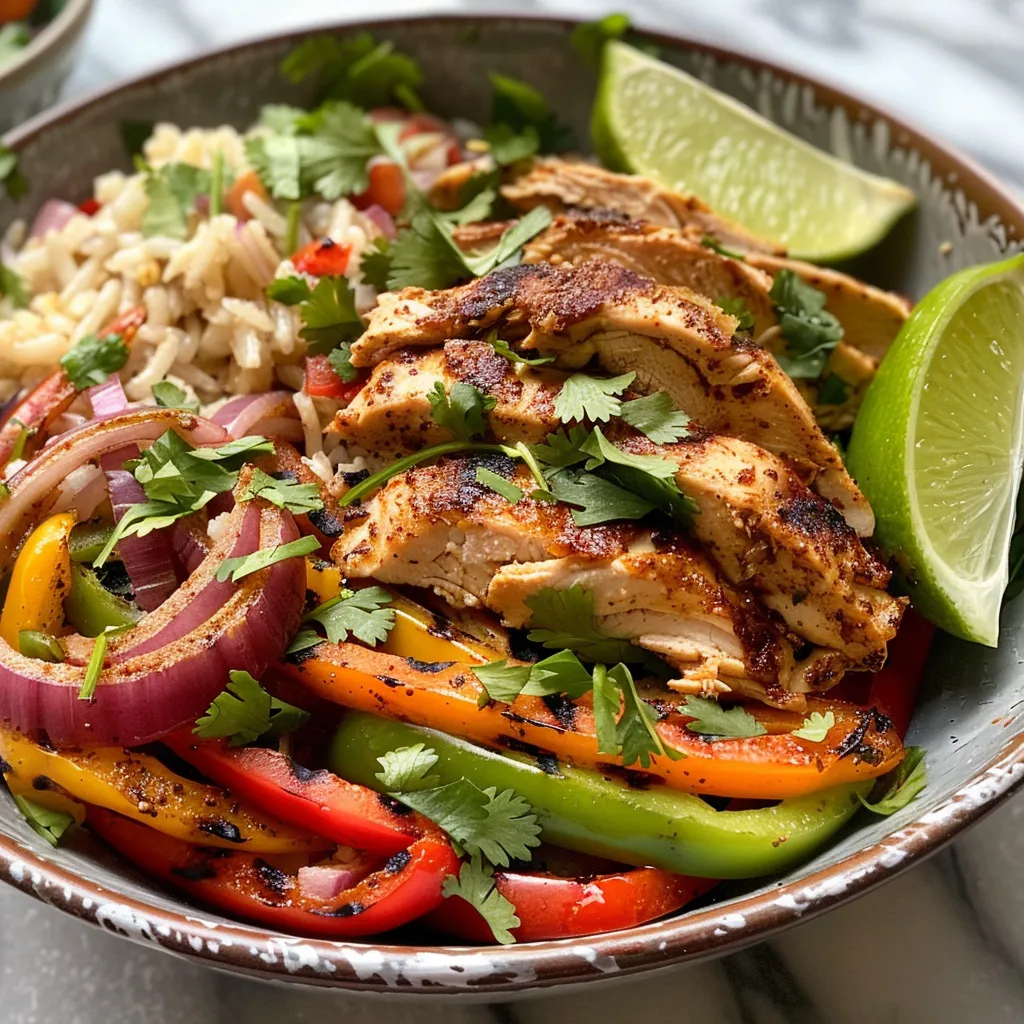
Imagine juicy, seasoned chicken paired with crisp bell peppers and sweet onions, all piled high on a fluffy base of rice or cauliflower rice. Topped off with zesty lime and fresh cilantro, this dish is perfect for busy weeknights or a fun weekend cooking adventure. Plus, it’s quick to whip up, making it a fantastic choice for anyone looking to eat healthy while still enjoying bold flavors.

Ready to dive into this culinary fiesta? Let’s get started!

Why You’ll Love This Recipe

  • Quick and Easy: This recipe comes together in under 30 minutes, perfect for those busy weeknights when time is of the essence!
  • Versatile: Customize your chicken fajita bowls with various proteins like shrimp, steak, or even plant-based options like tofu or tempeh.
  • Meal Prep Friendly: Make a big batch ahead of time! These bowls store well in the fridge and can be reheated easily for quick lunches or dinners.
  • Flavor-Packed: Each bite is bursting with flavor from the fajita seasoning, fresh lime, and sautéed veggies that will light up your palate.
  • Healthy and Nutritious: Packed with lean protein, colorful veggies, and wholesome grains or grains alternatives, these bowls are both satisfying and nourishing.

Ingredients You’ll Need

To whip up these Sizzling Chicken Fajita Bowls, gather the following ingredients:

  • Chicken breast or thighs: Choose your favorite cut for juicy, flavorful meat.
  • Bell peppers: Use a mix of red, yellow, and green for a beautiful rainbow effect.
  • Onions: Sweet onions add wonderful flavor.
  • Fajita seasoning: You can use store-bought or make your own blend!
  • Rice or cauliflower rice: Your choice of base—try brown rice for more fiber or cauliflower rice for a low-carb option.
  • Olive oil: For cooking and enhancing flavors.
  • Lime juice: Freshly squeezed for that zesty kick.
  • Fresh cilantro: A sprinkle on top makes everything pop!
  • Salt and pepper: Essential for seasoning.

**Ingredient Substitutions:** If you’re looking to make some swaps, here are a few ideas:

  • **Protein alternatives:** Swap chicken for shrimp, beef, or tofu.
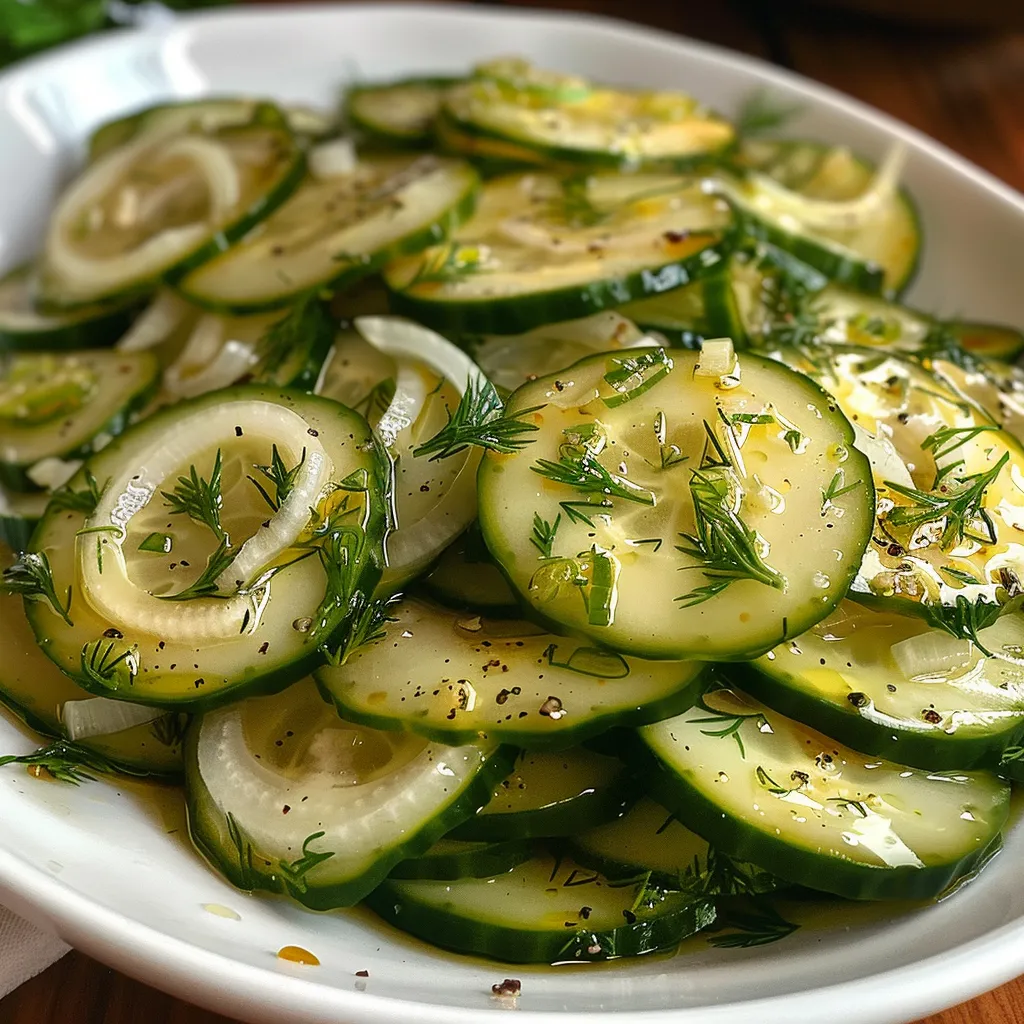
  • **Veggie options:** Add zucchini, mushrooms, or corn for extra texture and flavor.
  • **Grain choices:** Use quinoa or farro instead of rice for an earthy base.

How to Make Chicken Fajita Bowls

Juicy Chicken Fajita Bowl featuring colorful vegetables and lime on a wooden table.

Follow these simple steps to create your mouthwatering chicken fajita bowls:

  1. Prepare your ingredients: Slice bell peppers and onions into thin strips. Cut the chicken into bite-sized pieces.
  2. Season the chicken: In a bowl, toss the chicken with fajita seasoning, salt, pepper, and a drizzle of olive oil until evenly coated.
  3. Cook the veggies: Heat a skillet over medium-high heat with olive oil. Sauté the peppers and onions until tender, about 5-7 minutes.
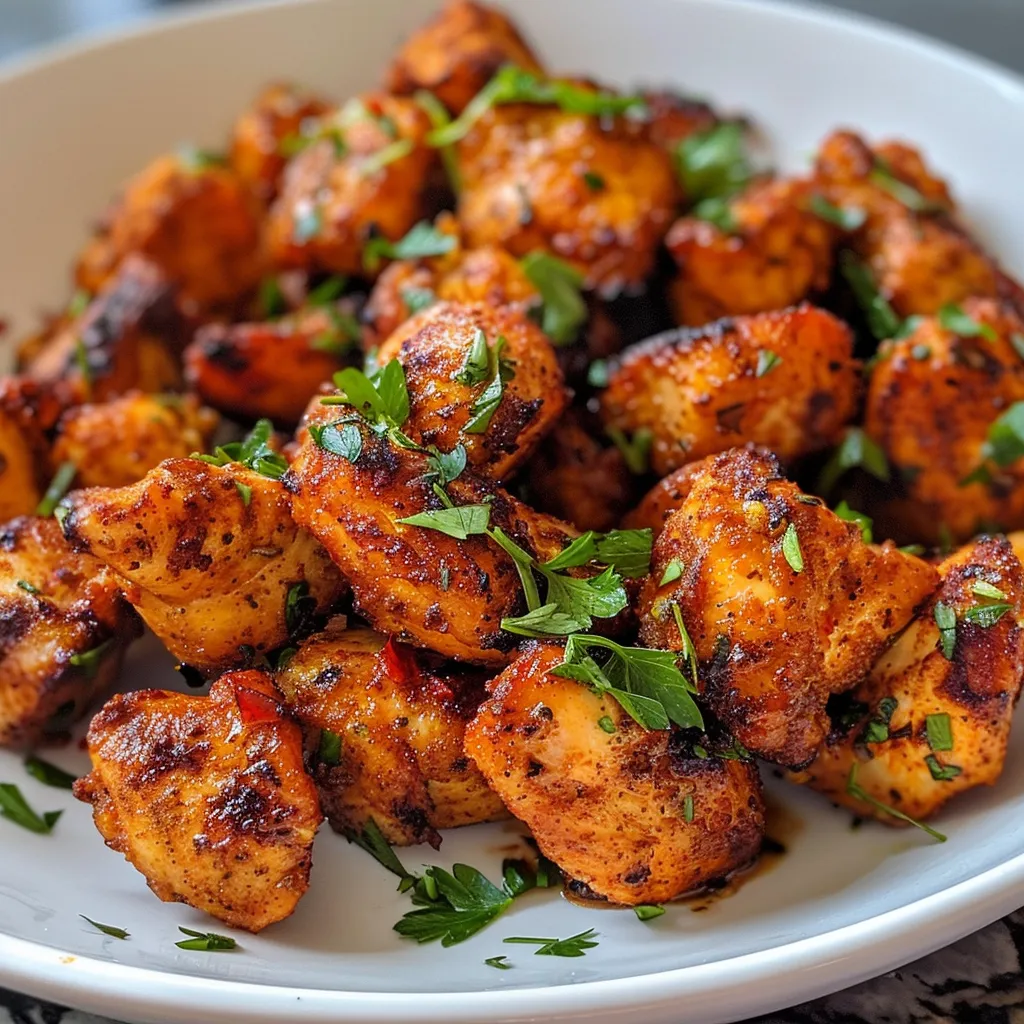
  4. Cook the chicken: Push the veggies to one side of the pan and add the chicken pieces, cooking until browned and cooked through, around 6-8 minutes.
  5. Prepare the rice: While the chicken cooks, prepare your rice or cauliflower rice according to package instructions.
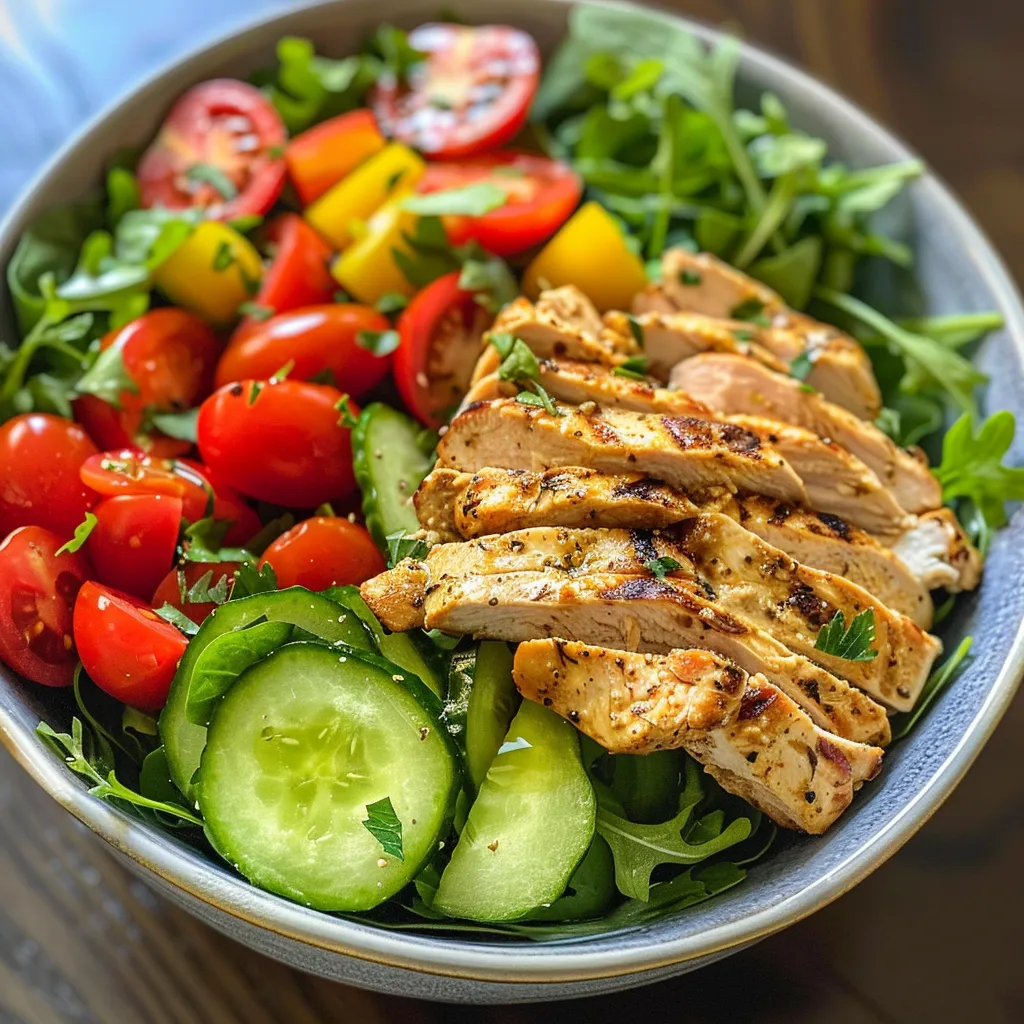
  6. Assemble the bowls: Start with a base of rice, then layer chicken and sautéed veggies on top. Finish with a squeeze of lime juice and a sprinkle of chopped cilantro.

Pro Tips for Making Chicken Fajita Bowls

  • Use fresh ingredients: Fresh veggies and herbs elevate the dish and add vibrant flavors.
  • Don’t overcrowd the pan: Cook the chicken and veggies in batches if necessary to achieve that perfect char and avoid steaming.
  • Marinate for flavor: For an extra flavor boost, marinate the chicken for 30 minutes before cooking.
  • Experiment with toppings: Get creative with toppings like avocado, salsa, shredded cheese, or Greek yogurt to add layers of flavor.
  • Keep it balanced: Aim for a good mix of protein, carbs, and healthy fats to make it a well-rounded meal.
  • Make it spicy: Add jalapeños or a sprinkle of chili powder for heat!
  • Cook in a cast-iron skillet: For the best sear on your chicken and veggies, a cast-iron skillet is a game-changer.
  • Adjust seasoning: Taste as you go and adjust the seasoning, especially if using homemade fajita seasoning.

Common Mistakes and Troubleshooting

To help you achieve the best results with your chicken fajita bowls, here are a few common pitfalls and how to avoid them:

  • Overcooking the chicken: Keep an eye on the chicken to prevent it from drying out. It should be cooked to an internal temperature of 165°F.
  • Undercooking the veggies: Make sure your veggies are tender and slightly caramelized for maximum flavor.
  • Skipping the lime juice: Don’t omit the lime juice; it brightens the dish and enhances all the flavors!

Variations to Try

Feeling adventurous? Here are some delicious variations of chicken fajita bowls to keep things exciting:

  • Steak Fajita Bowl: Swap chicken for thinly sliced skirt steak, seasoned and cooked to your preference.
  • Shrimp Fajita Bowl: Use shrimp instead of chicken, and cook for just 3-4 minutes for quick and succulent bites.
  • Vegetarian Fajita Bowl: Replace chicken with grilled portobello mushrooms or jackfruit for a satisfying plant-based option.
  • Breakfast Fajita Bowl: Top your fajita bowl with scrambled eggs or a fried egg for a hearty breakfast twist!

Storage and Make-Ahead Instructions

These chicken fajita bowls are perfect for meal prep! Here’s how to store and reheat:

  • Storing: Keep cooked chicken, veggies, and rice in separate airtight containers in the fridge for up to 4 days.
  • Reheating: To reheat, microwave each component separately or heat in a skillet over medium heat until warmed through.
  • Make-Ahead: You can prep the chicken and veggies a day in advance. Just cook when you’re ready to eat!

Frequently Asked Questions

  • Can I use frozen chicken? Yes! Just ensure it’s fully thawed and cooked through.
  • What sides go well with fajita bowls? Serve with tortilla chips, a side salad, or a refreshing salsa.
  • How can I make this recipe gluten-free? Use gluten-free fajita seasoning and ensure your rice is gluten-free.
  • What can I use instead of fajita seasoning? You can make your own using chili powder, cumin, garlic powder, and paprika.
  • Can I freeze fajita bowls? Yes, freeze the chicken and veggies in an airtight container for up to 2 months. Cooked rice can also be frozen.
  • How can I add more veggies? Add zucchini, corn, or even black beans for extra nutrition!
  • Is this dish kid-friendly? Absolutely! The flavors are mild, and kids love building their own bowls.
  • How many calories are in a chicken fajita bowl? It varies, but on average, a bowl contains around 500 calories, depending on ingredients and portion sizes.

Nutrition Tips and Dietary Adaptations

To make your chicken fajita bowls even healthier, consider these tips:

  • Go whole grain: Choose brown rice or quinoa for added fiber and nutrients.
  • Add healthy fats: Incorporate avocado or a dollop of Greek yogurt for creaminess and healthy fats.
  • Load up on veggies: The more colorful your bowl, the more vitamins and minerals you’re packing in!

Equipment Recommendations

To make your cooking experience seamless, here are a few tools that can help:

  • Sharp knife: For easy and precise vegetable slicing.
  • Cutting board: A good cutting board makes food prep a breeze.
  • Cast iron skillet: Perfect for achieving that beautiful sear on your chicken and veggies.
  • Measuring spoons: For accurate seasoning and oil measurements.

Serving Suggestions

Serve your chicken fajita bowls with a variety of toppings and sides to create a festive meal:

  • Guacamole: Creamy avocado dip adds richness and flavor.
  • Pico de gallo: Fresh salsa brightens up the dish.
  • Shredded cheese: A sprinkle of cheese adds a delicious, melty touch.
  • Fresh lime wedges: Extra lime for those who love a zesty kick!

Now that you’ve got all the tips, tricks, and variations, it’s time to jump into your kitchen and create these Sizzling Chicken Fajita Bowls. Enjoy the vibrant flavors and the joy of cooking! Let’s make healthy eating a celebration!

Chicken Fajita Bowls

Prep Time 10 minutes
Cook Time 15 minutes
Total Time 25 minutes
Servings 4 servings
Calories 450
Enjoy a flavorful and colorful Chicken Fajita Bowl, perfect for a quick and satisfying meal.

Ingredients

Protein

  • 2 pounds Chicken breast or thighs
  • 3 bell peppers Bell peppers (red, yellow, and green) (sliced into strips)
  • 1 onion Onions (sliced into strips)
  • 2 tablespoons Fajita seasoning
  • 2 cups Rice or cauliflower rice (cooked according to package instructions)
  • 1 tablespoon Olive oil
  • 1 lime Lime juice (freshly squeezed)
  • 0.25 cup Fresh cilantro (chopped)
  • to taste Salt and pepper

Instructions 

  • Slice bell peppers and onions; cut chicken into bite-sized pieces.
  • Toss chicken with fajita seasoning, salt, pepper, and olive oil.
  • Sauté peppers and onions in a skillet with olive oil until tender, 5-7 minutes.
  • Add chicken to the skillet; cook until browned and cooked through, 6-8 minutes.
  • Prepare rice or cauliflower rice as per package instructions.
  • Assemble bowls with rice, chicken, veggies, lime juice, and cilantro.

Notes

For extra flavor, add a dollop of sour cream or shredded cheese.
Calories: 450kcal
Cost: $15
Course: Main Course
Cuisine: Mexican
Keyword: Chicken, Fajita

Experience Tropical Bliss in a Glass

Get ready to transform your smoothie game with this deliciously creamy Mango Pineapple Smoothie! This drink is a vibrant explosion of tropical flavors that transports you straight to a beachside paradise. Perfect for breakfast or a refreshing snack, it combines the natural sweetness of frozen mango and pineapple with the creaminess of coconut milk. In this guide, we’ll explore everything you need to know about making the ultimate mango pineapple smoothie, packed with nutritional benefits and mouthwatering variations!

Why You’ll Love This Recipe

This mango pineapple smoothie isn’t just delicious—it’s also packed with incredible benefits. Here are a few reasons why you’ll adore this recipe:

  • Quick and Easy: Whip up this smoothie in just 5 minutes with minimal prep—perfect for busy mornings!
  • Nutritious & Healthy: Loaded with vitamins from fresh fruit, it’s a fantastic way to boost your daily intake of essential nutrients.
  • Vegan-Friendly: With no dairy, this smoothie is suitable for a variety of dietary lifestyles!
  • Customizable Recipe: Easily adapt the ingredients to create your unique flavor profile—add greens, protein, or superfoods!
  • Refreshing & Hydrating: Perfect for hot summer days, it provides hydration along with energy to keep you going.

Ingredients for Your Tropical Delight

Let’s break down what you’ll need for this smoothie, along with some handy substitutions:

  • 1 cup frozen mango: Adds natural sweetness and creaminess. Substitution: Use fresh mango if you prefer.
  • 1 cup frozen pineapple: Brings a tart, juicy tropical flavor. Substitution: Fresh pineapple works too, just add a bit of ice for thickness.
  • 1 ripe banana: Enhances texture and natural sweetness. Substitution: Avocado for creaminess or another banana if you want it sweeter.
  • 3/4 cup coconut milk: Makes the smoothie ultra-creamy. Substitution: Almond or oat milk for a different flavor.
  • 1/2 cup water: Helps blend everything smoothly. Substitution: Use juice for extra flavor.
  • 1 tablespoon lime juice (optional): Adds a citrusy kick. Substitution: Lemon juice if you have it on hand.

How to Make the Perfect Mango Pineapple Smoothie

Side view of a thick mango pineapple smoothie, showcasing its creamy texture and bright yellow color.

Ready to blend? Here’s a step-by-step guide to crafting your smoothie:

  • Step 1: Add the frozen mango, frozen pineapple, banana, coconut milk, water, and optional lime juice to a blender.
  • Step 2: Blend on high speed until smooth and creamy, about 60 seconds.
  • Step 3: Check the texture. Add more liquid if it’s too thick, or more frozen fruit for a thicker result.
  • Step 4: Taste and adjust. Add more lime juice for tang or a bit of sweetener if needed.
  • Step 5: Pour into glasses and serve immediately while cold.

Pro Tips for the Best Smoothie Every Time

Want to elevate your smoothie-making skills? Here are some expert insights:

  • Use frozen fruit: It gives a smooth, creamy texture without needing ice.
  • Balance flavors: Adjust sweetness with honey or maple syrup if your fruits aren’t ripe enough.
  • Boost nutrition: Add a scoop of protein powder or nut butter for extra protein!
  • Experiment with greens: Toss in a handful of spinach or kale for a nutrient boost without altering the flavor.
  • Chill your ingredients: Keep your fruits in the freezer to ensure a refreshing, frosty drink.
  • Mix it up: Don’t hesitate to switch out the fruits based on what you have at home!
  • Invest in a quality blender: A powerful blender will make your smoothies ultra-smooth and creamy.
  • Perfect portioning: Use a measuring cup for consistent results every time.

Common Mistakes & Troubleshooting

Even the best chefs can make mistakes! Here’s how to avoid common pitfalls:

  • Too thick: Add more liquid gradually until you reach your desired consistency.
  • Too sweet: Balance it out with a splash of lime or lemon juice.
  • Seeds or chunks: Blend longer to ensure a smoother texture, or strain if necessary.
  • Not enough flavor: More fruits or a splash of vanilla can enhance the taste significantly.

Delicious Variations to Try

Don’t be afraid to get creative! Here are some fun variations:

  • Green Tropical Smoothie: Add a handful of spinach and a green apple for an earthy twist.
  • Mango Pineapple Protein Smoothie: Incorporate a scoop of vanilla protein powder for a post-workout treat.
  • Berry Tropical Fusion: Blend in a handful of strawberries or blueberries for a vibrant color and taste.
  • Creamy Coconut Delight: Substitute regular coconut milk with coconut cream for a richer texture.

Storage & Make-Ahead Instructions

Planning ahead? Here’s how to store your smoothie:

  • Make-ahead packs: Pre-portion your ingredients in freezer bags for a quick grab-and-blend option.
  • Storing leftovers: If you have extra smoothie, store it in an airtight container in the fridge for up to 24 hours. Shake well before drinking.
  • Freezing smoothies: Freeze in ice cube trays for a quick, refreshing addition to future smoothies.

Nutritional Benefits & Dietary Adaptations

This mango pineapple smoothie not only tastes amazing but also packs a nutritional punch. Here’s what you get:

  • High in vitamins: Rich in Vitamin C from mango and pineapple, supporting a healthy immune system.
  • Potassium-rich: Bananas provide potassium, essential for heart health and muscle function.
  • Healthy fats: Coconut milk offers healthy fats that keep you satiated and energized.

Equipment Recommendations

To make your smoothie-making experience seamless, here’s what you’ll need:

  • High-speed blender: Invest in a quality blender for the smoothest results.
  • Measuring cups and spoons: Ensure accurate ingredient measurement for consistent flavor.
  • Reusable straws: Add a touch of fun while being eco-friendly!

Serving Suggestions

Now that you have your smoothie ready, consider these fun serving ideas:

  • Garnish: Top with shredded coconut, fresh mint, or a slice of lime for a tropical touch.
  • Pair with snacks: Enjoy alongside a handful of nuts, granola bars, or yogurt for a balanced meal.
  • Serve in style: Use fun, colorful glasses to make your smoothie feel even more special!

Frequently Asked Questions

Here are some common questions about mango pineapple smoothies:

  • Can I make this smoothie ahead of time? Yes! Just store it in an airtight container in the fridge for up to 24 hours.
  • Is this smoothie suitable for weight loss? Absolutely! It’s low in calories but high in nutrients, making it a great choice.
  • Can I use fresh fruit instead of frozen? Yes, but you’ll need to add ice to achieve the right consistency.
  • Can I add protein powder? Yes! A scoop of your favorite protein powder can be a great addition.
  • What if I don’t have coconut milk? Any non-dairy milk can substitute, such as almond or oat milk.
  • How can I make this smoothie sweeter? You can add honey, maple syrup, or an extra ripe banana.
  • Can I add vegetables? Definitely! Spinach or kale can be added without altering the flavor significantly.
  • How can I make it more filling? Adding oats or nut butter can help keep you full longer.

In conclusion, this Mango Pineapple Smoothie is not just a drink; it’s a celebration of tropical flavors and wholesome ingredients! With its vibrant taste and numerous health benefits, you’re bound to make it a staple in your kitchen. So grab your blender and get ready to indulge in a deliciously refreshing experience that makes healthy eating fun and exciting!

Mango Pineapple Smoothie

Prep Time 5 minutes
Total Time 5 minutes
Servings 2 cups
Calories 250
A refreshing and tropical smoothie combining sweet mango, tangy pineapple, and creamy coconut milk for a perfect healthy treat.

Ingredients

Fruits

  • 1 cup frozen mango (adds natural sweetness and creaminess)
  • 1 cup frozen pineapple (brings a tart, juicy tropical flavor)
  • 1 ripe banana banana (enhances texture and natural sweetness)
  • 3/4 cup coconut milk (makes the smoothie ultra-creamy)
  • 1/2 cup water (helps blend everything smoothly)
  • 1 tablespoon lime juice (optional, adds a citrusy kick)

Instructions 

  • Add all ingredients to a blender.
  • Blend until smooth, about 60 seconds.
  • Adjust consistency with more liquid or frozen fruit as needed.
  • Taste and add lime juice or sweetener if desired.
  • Pour into glasses and serve immediately.

Notes

For a creamier texture, use full-fat coconut milk.
Calories: 250kcal
Cost: $10
Course: Breakfast, Snack
Cuisine: Tropical
Keyword: Mango, Pineapple, Smoothie

Indulge in Guilt-Free Decadence with No Bake Brownie Bites

Welcome to the world of scrumptious, easy-to-make no bake brownie bites! This delightful recipe combines rich chocolate flavor with wholesome ingredients, making it the perfect treat for any occasion. Whether you’re looking for a quick snack, a dessert for a gathering, or just a delicious way to satisfy your chocolate cravings, these no bake brownie bites are here to impress! In just a few simple steps, you can whip up these decadent delights without ever turning on your oven. Let’s dive into why you’ll love this recipe!

Why You’ll Love This Recipe

These no bake brownie bites are not just a treat for your taste buds; they come packed with benefits that make them an ideal choice for your next snack. Here’s why you’ll want to make them:

  • Quick and Easy: Ready in under 30 minutes! You can whip these up without any hassle, making them perfect for last-minute cravings.
  • Guilt-Free Indulgence: With wholesome ingredients like heat-treated flour and natural sweeteners, you can enjoy these bites without the guilt.
  • Customizable: Feel free to swap out ingredients! Whether you prefer peanut butter, different types of chocolate, or even some added nuts, the options are endless.
  • No Oven Required: Skip the heat! These bites are made entirely without baking, making them a great choice for hot summer days.
  • Perfect for Meal Prep: Make a batch and store them in the fridge for a quick grab-and-go snack throughout the week.

Ingredient Breakdown: What You’ll Need

Let’s gather the ingredients for these delightful no bake brownie bites! Here’s what you’ll need, along with some substitutions to cater to your dietary preferences:

  • 1 cup all-purpose flour: Ensure it’s heat-treated (see note below). For gluten-free options, use almond flour or coconut flour.
  • 1/4 cup Dutch process cocoa powder: This adds a rich chocolate flavor. Feel free to use raw cacao for a healthier option.
  • 1/2 teaspoon salt: A pinch to enhance sweetness and balance the flavors.
  • 1 cup semi-sweet chocolate chips: You can substitute with dark chocolate chips or sugar-free options.
  • 6 tablespoons unsalted butter: Swap with coconut oil for a dairy-free version.
  • 1/2 cup granulated sugar: For a healthier alternative, consider using maple syrup or coconut sugar.
  • 3/4 cup light brown sugar: Adds moisture and richness. Use coconut sugar for a lower glycemic index.
  • 1/4 cup heavy cream: Substitute with coconut cream for a dairy-free treat.
  • 1 teaspoon vanilla extract: Essential for flavor. Use pure vanilla for the best taste.
  • 1/2 cup mini chocolate chips: For added texture; you can omit if desired.
  • 2 cups milk chocolate chips: Use dark or semi-sweet chocolate for a richer flavor.
  • 2 teaspoons coconut oil: Helps in melting the chocolate smoothly.

Note: To heat-treat flour, bake it in an oven at 350°F for 5-10 minutes or microwave it for 1 minute, ensuring it reaches a temperature of 165°F. This step is crucial for safety!

Step-by-Step Instructions: How to Make No Bake Brownie Bites

Side view of rich No Bake Brownie Bites garnished with chocolate chips.

Ready to dive in? Follow these simple steps to create your no bake brownie bites:

  1. Heat Treat the Flour: Begin by heat treating the all-purpose flour. This crucial step eliminates any harmful bacteria. Allow it to cool completely to room temperature.
  2. Mix Dry Ingredients: In a medium bowl, combine the cooled heat-treated flour, Dutch cocoa powder, and salt. Stir until well mixed and set aside.
  3. Melt Chocolate and Butter: In a microwave-safe bowl, combine the semi-sweet chocolate chips and butter. Microwave in 30-second intervals, stirring well until fully melted and smooth.
  4. Combine Wet Ingredients: In a mixing bowl, beat the melted chocolate mixture with granulated sugar and brown sugar on medium speed until smooth. Add heavy cream and vanilla extract, mixing until light and creamy.
  5. Combine Ingredients: Gradually add the dry ingredient mixture to the wet ingredients, mixing until just combined. Be careful not to overmix. Gently fold in mini chocolate chips.
  6. Shape the Bites: Using a tablespoon, scoop out portions of the brownie batter and roll them into balls. Place them on a tray and chill in the fridge for at least 15 minutes to firm up.
  7. Prepare the Chocolate Coating: Line a baking sheet with parchment paper. In a microwave-safe bowl, combine the milk chocolate chips and coconut oil. Microwave in 20-second bursts, stirring until fully melted.
  8. Coat the Bites: Dip each chilled brownie ball into the melted chocolate, ensuring it’s fully coated. Tap off excess chocolate and place on the lined baking sheet.
  9. Set and Serve: Allow the chocolate coating to set at room temperature. Enjoy immediately, or store them in the fridge for up to 4 days.

Pro Tips for Perfect Brownie Bites

To ensure your no bake brownie bites turn out perfectly, consider these helpful tips:

  • Chill Time: Don’t skip the chilling step! It helps the brownie bites firm up and makes them easier to coat.
  • Texture Adjustments: If your batter seems too wet, add a bit more heat-treated flour. If too dry, add a splash more heavy cream.
  • Even Coating: For a smoother chocolate coating, ensure your melted chocolate isn’t too thick. Adjust with coconut oil as necessary.
  • Experiment with Flavors: Add a pinch of espresso powder to enhance the chocolate flavor or mix in your favorite nuts or dried fruits!
  • Storage Tips: Store uncoated bites in the freezer for longer shelf life. They taste delicious straight from the freezer!
  • Presentation: For a festive touch, decorate with colorful sprinkles or a dusting of cocoa powder before serving.
  • Batch Size: Feel free to double or triple the recipe if you’re making treats for a party or gathering—everyone will want some!
  • Nut Butter Twist: For a nutty flavor, substitute some butter with your favorite nut butter—peanut butter or almond butter work great!

Common Mistakes and Troubleshooting

If you encounter any issues while making your brownie bites, here’s how to troubleshoot common problems:

  • Too Soft: If the bites are too soft and can’t hold their shape, increase the chilling time or add more flour.
  • Chocolate Not Coating: If the chocolate is too thick, it may not adhere well. Thinning with coconut oil will help.
  • Chocolates Cracking: If the chocolate coating cracks, it may have cooled too quickly. Try to coat them while the chocolate is still warm and pliable.
  • Flavor Off: Always taste as you go! Adjust sweetness or flavor with more vanilla or a pinch of salt if it needs balance.

Variations to Try

Get creative with these variations to make your brownie bites uniquely yours:

  • Nutty Brownie Bites: Fold in finely chopped walnuts or almonds for added crunch and flavor.
  • Protein-Packed Bites: Stir in a scoop of your favorite protein powder for a post-workout treat.
  • Vegan Version: Substitute all dairy with plant-based alternatives like coconut cream and nut butter.
  • Mint Chocolate Bites: Add a few drops of peppermint extract to the batter for a refreshing twist!

Storage and Make-Ahead Instructions

These brownie bites are perfect for making ahead of time. Here’s how to store them:

  • Refrigerator: Store in an airtight container in the fridge for up to 4 days.
  • Freezer: For longer storage, freeze uncoated brownie bites. They can last up to 3 months in the freezer. Let them thaw in the fridge before serving!

Comprehensive FAQ

Got questions? Let’s clear up some common inquiries about these no bake brownie bites:

  • Can I use other types of flour? Yes! You can substitute all-purpose flour with almond flour or coconut flour. Just remember to adjust the quantity as needed.
  • Are these bites gluten-free? If you use gluten-free flour, then yes! Just make sure all other ingredients are also gluten-free.
  • Can I add protein powder? Absolutely! Just replace a small portion of the flour with protein powder for a boost.
  • How do I make these dairy-free? Use coconut oil instead of butter and coconut cream instead of heavy cream.
  • What if I don’t like chocolate? Try making peanut butter bites by omitting the cocoa powder and adding extra peanut butter!
  • Can I use natural sweeteners? Yes! Honey, maple syrup, or agave syrup can be used, but you may need to adjust the dry ingredients accordingly.
  • Can I make these ahead of time? Of course! They store well in the fridge for up to 4 days and can be frozen for longer storage.
  • How do I serve them? Enjoy them chilled, decorate with toppings, or even serve alongside a scoop of ice cream for an indulgent treat!

Nutrition Tips and Dietary Adaptations

If you’re looking for healthier options, consider these dietary adaptations:

  • Reduce Sugar: Cut down on sugars by using ripe bananas or applesauce in the recipe.
  • Add Fiber: Incorporate ground flaxseed or chia seeds for extra fiber and nutrients.
  • Boost Protein: Use Greek yogurt as a dip or mix in some nuts for added protein content.

Essential Equipment Recommendations

To make these no bake brownie bites, here’s what you’ll need:

  • Mixing Bowls: A medium bowl for mixing dry ingredients and a larger bowl for wet ingredients.
  • Microwave-Safe Bowl: For melting chocolate and butter.
  • Measuring Cups and Spoons: Accurate measurements are key to your recipe’s success!
  • Tray: A baking tray or cookie sheet lined with parchment paper for chilling the bites.
  • Silicone Spatula: Perfect for scraping down sides and mixing ingredients thoroughly.

Serving Suggestions

These no bake brownie bites are versatile and can be served in various ways:

  • As a Snack: Perfect for a quick energy boost during the day or after a workout.
  • For Dessert: Serve alongside fresh fruit or a dollop of whipped cream for a fun twist!
  • At Parties: Present them on a platter with a variety of toppings for guests to choose from!

Conclusion: A Delicious Journey Awaits

Now that you have the ultimate guide to making irresistibly decadent no bake brownie bites, it’s time to unleash your inner chef! These bites are not only easy to make, but they’re also customizable, nutritious, and downright delicious. Gather your ingredients, channel your creativity, and enjoy the satisfaction of making a treat that’s both wholesome and indulgent. Remember, cooking should be fun and exciting, and with these brownie bites, you’re on your way to creating something truly special. Happy cooking!

No Bake Brownie Bites Recipe

Prep Time 20 minutes
Cook Time 10 minutes
Total Time 30 minutes
Servings 24 pieces
Calories 150
Delight in these easy, no-bake brownie bites that are perfect for a quick treat or party snack. Made with simple ingredients, they offer a rich, fudgy flavor in every bite.

Ingredients

Dried ingredients

  • 1 cup all-purpose flour (heat treated) (see note 1)
  • 1/4 cup Dutch process cocoa powder (see note 2)
  • 1/2 teaspoon salt
  • 1 cup semi-sweet chocolate chips
  • 6 tablespoons unsalted butter
  • 1/2 cup granulated sugar
  • 3/4 cup light brown sugar
  • 1/4 cup heavy cream
  • 1 teaspoon vanilla extract
  • 1/2 cup mini chocolate chips
  • 2 cups milk chocolate chips (or semi-sweet or dark) (see note 3)
  • 2 teaspoons coconut oil (or shortening)

Instructions 

  • Heat treat the flour by microwaving or baking to reach 165°F, then cool completely.
  • Mix cooled flour with cocoa powder and salt; set aside.
  • Melt semi-sweet chocolate chips and butter in 30-second intervals, stirring until smooth (~1.5 min).
  • Beat melted mixture with sugars, then add cream and vanilla until creamy.
  • Combine dry and wet ingredients, fold in mini chocolate chips, then chill for 15 minutes.
  • Form batter into balls, dip in melted milk chocolate with coconut oil, then set to harden.

Notes

Chill the brownie bites for best texture and enjoy within 3-4 days or freeze for longer storage.
Calories: 150kcal
Cost: $15
Course: Dessert
Cuisine: American
Keyword: brownie, chocolate, no-bake

Unleash Flavor with This Healthy Chicken and Hummus Salad Bowl

Welcome to a culinary adventure where vibrant flavors and nutritious ingredients collide! This Healthy Chicken and Hummus Salad Bowl is not just a meal; it’s a celebration of fresh produce, lean protein, and creamy goodness. Perfect for busy days or a leisurely lunch, this bowl is your new go-to for a quick and satisfying meal. Let’s dive into why this recipe will become an instant favorite in your kitchen!

Why You’ll Love This Recipe

This isn’t just another salad; it’s a bowl brimming with benefits! Here’s why you’ll find yourself coming back for more:

  • Quick and Easy: Ready in under 20 minutes, this recipe is perfect for those on-the-go moments when hunger strikes!
  • Nutritious Powerhouse: Packed with vitamins and minerals from fresh veggies and lean chicken, it’s a nutritious meal that fuels your body.
  • Creamy Deliciousness: The creamy hummus adds a rich texture that elevates the whole dish, making every bite a delight.
  • Customizable: Easily swap in your favorite vegetables or protein sources to make it your own. Explore endless possibilities!
  • Perfect for Meal Prep: Make a big batch ahead of time for quick lunches throughout the week without losing flavor or freshness.

Ingredients You’ll Need

Gather these vibrant ingredients for a delicious experience:

  • 2 cups Mixed salad greens (e.g., spinach, arugula, romaine)
  • 1 cup Cherry tomatoes, halved
  • 1/2 cup Cucumber, diced
  • 1/2 cup Bell pepper, diced
  • 1 cup Cooked chicken breast, shredded
  • 1/2 cup Hummus
  • 2 tablespoons Olive oil
  • 1 tablespoon Lemon juice
  • Salt and pepper, to taste

Ingredient Substitutions & Tips

Side perspective of a healthy salad bowl filled with mixed greens, cherry tomatoes, and shredded chicken.

Want to tailor this bowl to your taste? Here are some substitutions and tips:

  • Greens: Substitute kale or mixed baby greens for a different flavor.
  • Protein Swap: Use grilled shrimp, crispy tofu, or roasted chickpeas for vegetarian options.
  • Veggies Galore: Add in shredded carrots, radishes, or avocado for extra crunch and creaminess.
  • Hummus Varieties: Experiment with flavored hummus like roasted red pepper or garlic for a twist!
  • Oil Alternatives: Swap olive oil for avocado oil for a unique flavor profile.

How to Make Your Healthy Chicken and Hummus Salad Bowl

Creating this bowl is as easy as 1-2-3! Follow these steps for a delicious outcome:

  1. In a large mixing bowl, combine the mixed salad greens, halved cherry tomatoes, diced cucumber, and diced bell pepper to create the fresh vegetable base for your salad.
  2. Layer the shredded cooked chicken breast evenly over the mixed salad vegetables to add lean, filling protein.
  3. Pour the olive oil and lemon juice over the salad, then season with salt and pepper to taste, enhancing the flavor and texture.
  4. Add a generous scoop of hummus in the center of the salad, providing creaminess and rich flavor.
  5. Gently toss all the ingredients together to combine the flavors well and serve immediately for the freshest taste.

Pro Tips for Perfect Results

Get ready to impress with these expert insights:

  • Use Fresh Ingredients: Fresh produce not only enhances flavor but also boosts nutrition.
  • Prep Ahead: Chop your vegetables the night before to save time during busy days.
  • Make It Vibrant: Incorporate a variety of colors in your salad to maximize nutrients and visual appeal.
  • Experiment with Dressings: Try a tahini dressing or balsamic vinaigrette for a different flavor profile.
  • Balance Flavors: Adjust the lemon juice and seasoning to suit your taste preferences.
  • Go for Texture: Mix in crunchy nuts or seeds for added texture and health benefits.
  • Controlled Toss: Toss gently to keep your salad looking fresh and not mushy.
  • Presentation Matters: Serve in a colorful bowl to make the dish pop visually!

Common Mistakes to Avoid

To ensure your salad bowl shines, steer clear of these pitfalls:

  • Overdressing: Too much dressing can drown out the fresh flavors—keep it light!
  • Using Wilting Greens: Always opt for fresh greens to avoid a sad, soggy salad.
  • Skipping the Seasoning: Don’t forget to season your salad; it makes a world of difference!
  • Using Cold Ingredients: Let your ingredients come to room temperature for a more cohesive flavor.
  • Neglecting Texture: A good salad has a mix of textures—crunchy, creamy, and tender!

Variations to Spice Things Up

Feeling adventurous? Here are some fun variations to try:

  • Greek Twist: Add feta cheese, olives, and a sprinkle of oregano for a Mediterranean flair.
  • Spicy Kick: Incorporate sliced jalapeños or a drizzle of sriracha for some heat!
  • Asian Influence: Use sesame oil, add edamame, and top with sesame seeds for an Asian-inspired bowl.
  • Tex-Mex Style: Mix in black beans, corn, and avocado for a Southwestern twist.

Storage and Make-Ahead Instructions

This salad bowl is perfect for meal prepping! Here’s how to store it:

  • Keep the ingredients separate until you’re ready to eat to maintain freshness. Store the salad base in one container and the protein and dressing in another.
  • Assemble in individual bowls for quick grab-and-go lunches throughout the week.
  • When stored properly, the salad base can last up to 3 days in the fridge, while the cooked chicken can last up to 4 days.

Comprehensive FAQ

Here are some frequently asked questions to enhance your experience:

  • Can I make this salad vegan? Absolutely! Swap the chicken for chickpeas or tofu and use a vegan hummus.
  • How long can I store this salad? When stored properly, it can last up to 3 days in the fridge.
  • What dressing pairs well with this salad? Olive oil and lemon juice work great, but feel free to try balsamic vinaigrette or tahini dressing!
  • Can I use frozen vegetables? Yes, just make sure to thaw and drain them before adding to the salad.
  • What’s the best way to shred chicken? Use two forks or a stand mixer to shred cooked chicken easily.
  • Can I double this recipe? Definitely! Just scale up the ingredients for a larger crowd.
  • Is this salad gluten-free? Yes, all ingredients are gluten-free, making it a great option for those with dietary restrictions.
  • Can I add cheese to this recipe? Yes! Feta or goat cheese would add a delicious creamy element.

Nutrition Tips and Dietary Adaptations

This salad is not only tasty but also nutritious! Here are some adaptations:

  • Low-Carb: Skip the hummus or use a low-carb version to reduce carbohydrates.
  • Keto-Friendly: Add avocado and nuts for healthy fats while keeping carbs low.
  • High-Protein: Boost protein by adding quinoa or more chicken.
  • Heart-Healthy: Choose olive oil and add walnuts or almonds for added omega-3s.

Equipment Recommendations

Make your cooking experience smooth with these helpful tools:

  • Sharp Knife: For easy chopping of vegetables.
  • Cutting Board: A sturdy surface for all your chopping needs.
  • Mixing Bowls: Essential for combining your ingredients seamlessly.
  • Measuring Cups: For accurate ingredient measurements.
  • Storage Containers: To keep your salad fresh and organized in the fridge.

Serving Suggestions

Pair your salad bowl with these delightful sides:

  • Whole Grain Pita Bread: A perfect accompaniment for dipping into the creamy hummus.
  • Fruit Salad: Fresh fruit adds a sweet contrast to the savory bowl.
  • Soup: A light soup makes for a comforting starter or side.
  • Herbed Quinoa: For a heartier meal, serve with a side of herbed quinoa.

This Healthy Chicken and Hummus Salad Bowl is not just a dish; it’s a canvas for creativity in your kitchen! With endless variations and nutritious ingredients, you can easily make it your own. Embrace the joy of cooking and let this flavorful bowl inspire your healthy eating journey!

Healthy Chicken and Hummus Salad Bowl Recipe

Prep Time 10 minutes
Total Time 10 minutes
Servings 2 servings
Calories 350
A nutritious and delicious salad bowl combining fresh vegetables, lean chicken, and creamy hummus for a satisfying meal.

Ingredients

Vegetables

  • 2 cups Mixed salad greens (e.g., spinach, arugula, romaine)
  • 1 cup Cherry tomatoes, halved
  • 0.5 cup Cucumber, diced
  • 0.5 cup Bell pepper, diced
  • 1 cup Cooked chicken breast, shredded

Dressing

  • 0.5 cup Hummus
  • 2 tablespoons Olive oil
  • 1 tablespoon Lemon juice
  • to taste Salt and pepper

Instructions 

  • Combine salad greens, cherry tomatoes, cucumber, and bell pepper in a large bowl.
  • Layer shredded chicken over the vegetables.
  • Drizzle olive oil and lemon juice, then season with salt and pepper.
  • Add a scoop of hummus in the center.
  • Toss gently to combine and serve immediately.

Notes

For extra flavor, add fresh herbs or a dash of paprika.
Calories: 350kcal
Cost: $15
Course: Salad
Keyword: Chicken, Healthy, Hummus

Why This Zesty Lemon Herb Cod Will Be Your New Favorite Dish

Are you ready to elevate your dinner game with a dish that combines fresh flavors, vibrant colors, and wholesome nutrition? Look no further than our Zesty Lemon Herb Cod! This recipe is not just a meal; it’s an experience packed with zesty lemon, fragrant herbs, and flaky cod fillets that will make your taste buds dance. Whether you’re preparing a quick weeknight dinner or impressing guests, this dish is both simple and sophisticated. Let’s dive into the details!

Why You’ll Love This Recipe

This Lemon Herb Baked Cod is a winner for several reasons:

  • Quick Preparation: Ready in just 25 minutes, making it perfect for busy weeknights.
  • Nutritious and Delicious: Rich in omega-3 fatty acids, cod is a heart-healthy choice packed with protein.
  • Flavor Explosion: The combination of lemon, garlic, and fresh herbs creates a bright flavor profile that elevates the dish.
  • Versatile Serving Options: Pair it with your favorite sides—rice, salad, or roasted veggies—for a complete meal.
  • Make-Ahead Potential: Prep it in advance and simply bake when you’re ready to eat.

Ingredients You’ll Need

To whip up this delightful dish, gather these ingredients:

  • 4 cod fillets (about 6 oz each): The star of the show, providing a mild and flaky base.
  • 2 tablespoons olive oil: Adds richness and helps the herbs stick to the fish.
  • 2 cloves garlic, minced: For that aromatic punch!
  • 1 teaspoon dried oregano: A classic herb that complements the lemon beautifully.
  • 1 teaspoon dried thyme: Adds a subtle earthiness.
  • 1 teaspoon dried basil: For a hint of sweetness.
  • 1/2 teaspoon paprika: Gives a pop of color and a subtle smokiness.
  • Salt and black pepper to taste: Essential for enhancing the flavors.
  • 1 lemon: Thinly sliced, plus more for serving—zesty goodness!
  • 1/4 cup fresh parsley, chopped: Adds a fresh touch and vibrant color.
  • 1 cup cherry tomatoes, halved: Sweet and juicy, they make the dish even more colorful.
  • 2 tablespoons fresh lemon juice: To brighten up the whole dish.

Step-by-Step Instructions for Perfect Lemon Herb Baked Cod

Juicy baked cod fillets with herbs, lemon slices, and a sprinkle of fresh parsley.

Follow these simple steps to create a culinary masterpiece:

  1. Preheat your oven to 400°F (200°C). This ensures an even bake.
  2. Mix the herb and garlic oil: In a small bowl, combine olive oil, minced garlic, dried oregano, thyme, basil, paprika, salt, and black pepper.
  3. Prepare the cod fillets: Place the cod fillets in a baking dish and brush the herb and garlic mixture generously over each fillet.
  4. Add lemon and tomatoes: Layer thin lemon slices on top of the fillets and scatter halved cherry tomatoes around them. Drizzle everything with fresh lemon juice.
  5. Bake: Place in the oven and bake for 12-15 minutes, or until the fish is opaque and flakes easily with a fork.
  6. Garnish and serve: Remove from oven and sprinkle freshly chopped parsley over the top. Serve immediately with lemon wedges for an extra zesty kick.

Pro Tips for the Best Lemon Herb Baked Cod

Want to ensure your cod turns out perfect every time? Check out these expert insights:

  • Use Fresh Herbs: Fresh herbs elevate the flavor profile significantly. If you have them available, go for fresh thyme, basil, and parsley.
  • Check for Doneness: Cod is done when it’s opaque and flakes easily. Avoid overcooking to maintain its moisture.
  • Experiment with Flavors: Feel free to add a splash of white wine or a sprinkle of red pepper flakes for an extra kick.
  • Choose Quality Cod: Fresh, wild-caught cod is preferable for the best flavor and texture.
  • Let It Rest: Allow the cod to rest for a couple of minutes after baking; this helps lock in moisture.
  • Add a Crunch: Top with toasted breadcrumbs or nuts for a delightful crunch.
  • Pair with Sides: Consider serving over a bed of quinoa or alongside roasted asparagus for a well-rounded meal.
  • Make It Ahead: Prep the cod and store it in the fridge up to 2 hours before baking for easy weeknight dinners.

Common Mistakes to Avoid

Even the best recipes can go awry; here are pitfalls to watch out for:

  • Overcooking the Fish: This will result in dry, rubbery cod. Keep an eye on your cooking time!
  • Skipping the Oil: Olive oil is essential for keeping the cod moist and flavor-rich.
  • Ignoring the Herbs: Don’t skimp on the seasoning! The herbs are key to making this dish sing.
  • Using Frozen Cod: If possible, opt for fresh cod for the best taste and texture.

Delicious Variations to Try

Feeling adventurous? Here are some tasty variations to mix things up:

  • Spicy Lemon Herb Cod: Add a teaspoon of cayenne pepper or red pepper flakes for a spicy kick.
  • Citrus Burst Cod: Incorporate orange or lime slices along with the lemon for a zesty twist.
  • Herb-Crusted Cod: Top the cod with a mixture of breadcrumbs, parmesan cheese, and herbs before baking for a crispy crust.
  • Garlic Butter Cod: Drizzle melted garlic butter over the cod for extra richness and flavor.

Storage and Make-Ahead Instructions

Want to prepare this dish in advance? Here’s how:

  • Storage: Store leftover baked cod in an airtight container in the fridge for up to 3 days.
  • Reheating: Gently reheat in the oven at 350°F (175°C) for about 10 minutes or until heated through.
  • Make Ahead: Assemble the dish, cover, and refrigerate for up to 2 hours before baking.

Frequently Asked Questions (FAQ)

Got questions? We have answers!

  • Can I use a different type of fish? Yes, feel free to substitute with tilapia, haddock, or salmon!
  • What should I serve with this cod? It pairs well with steamed vegetables, rice, or a fresh salad.
  • Can I freeze the leftovers? Yes, but it’s best enjoyed fresh. If freezing, wrap tightly and consume within a month.
  • What can I use instead of cod? Any mild, flaky fish like sole or snapper works great!
  • How do I know when the cod is cooked? The fish should be opaque and flake easily when tested with a fork.
  • Can I make this recipe in advance? Yes! You can prepare the cod and store it in the fridge before baking.
  • Is this recipe gluten-free? Yes, all the ingredients are gluten-free!
  • What type of olive oil should I use? Extra virgin olive oil is preferred for its flavor and health benefits.

Nutritional Benefits and Dietary Adaptations

This Lemon Herb Baked Cod is not only flavorful but packed with health benefits:

  • Low-Calorie Option: Each serving is low in calories, making it a great choice for weight management.
  • Rich in Omega-3s: Cod is an excellent source of omega-3 fatty acids, promoting heart health.
  • High in Protein: Each fillet provides a substantial amount of protein, essential for muscle repair and growth.
  • Low-Carb Friendly: This dish fits perfectly into a low-carb or keto diet.
  • Dairy-Free: It’s naturally dairy-free, catering to those with lactose intolerance.

Essential Equipment for Cooking Cod

To make this recipe hassle-free, here’s what you’ll need:

  • Baking Dish: A glass or ceramic dish works best for even cooking.
  • Mixing Bowl: For combining the herb and garlic oil.
  • Brush or Spoon: To spread the herb mixture on the cod.
  • Measuring Cups and Spoons: To measure your ingredients accurately.
  • Oven Mitts: Safety first when removing hot dishes from the oven!

Serving Suggestions for Your Flavorful Cod

Looking for the perfect sides to round out this meal? Here are some ideas:

  • Garlic Mashed Potatoes: Creamy and comforting, they pair perfectly with the cod.
  • Quinoa Salad: A nutritious base that complements the fish beautifully.
  • Roasted Asparagus: Adds a crunchy, vibrant side that balances the meal.
  • Fresh Green Salad: Light and refreshing, it enhances the dish’s flavors.

In conclusion, our Zesty Lemon Herb Cod is not just a dinner option; it’s a culinary adventure waiting to happen. With its vibrant flavors, quick preparation, and health benefits, this dish will quickly become a staple in your kitchen. So, roll up your sleeves and dive into this delightful recipe. Happy cooking!

Lemon Herb Baked Cod

Prep Time 10 minutes
Cook Time 15 minutes
Total Time 25 minutes
Servings 4 servings
Calories 250
Enjoy a light, flavorful baked cod dish infused with fresh herbs, lemon, and cherry tomatoes for a healthy and delicious meal.

Ingredients

Protein

  • 24 oz cod fillets (about 6 oz each)
  • 2 tablespoons olive oil
  • 2 cloves garlic, minced
  • 1 teaspoon dried oregano
  • 1 teaspoon dried thyme
  • 1 teaspoon dried basil
  • 0.5 teaspoon paprika
  • to taste Salt and black pepper
  • 1 lemon lemon, thinly sliced (plus more for serving)
  • 0.25 cup fresh parsley, chopped
  • 1 cup cherry tomatoes, halved
  • 2 tablespoons fresh lemon juice

Instructions 

  • Preheat oven to 400°F (200°C). Mix olive oil, garlic, herbs, paprika, salt, and pepper to make the herb oil.
  • Spread the herb oil over the cod fillets and place in a baking dish. Top with lemon slices and cherry tomatoes around.
  • Bake for 12-15 minutes until fish flakes easily. Drizzle lemon juice and sprinkle parsley before serving.

Notes

Serve with extra lemon wedges for added zest.
Calories: 250kcal
Cost: $15
Course: Main Course
Cuisine: American
Keyword: fish

Unleash Your Inner Chef with Crispy Air Fryer Chicken Bites!

Are you ready to transform your snacking game? These crispy air fryer chicken bites are not just a treat; they’re your ticket to delectable, healthy eating that doesn’t compromise on flavor! Perfectly seasoned, packed with protein, and easy to whip up in less than 30 minutes, these bites are the ultimate choice for a quick meal or snack. Let’s dive into the why, how, and what that makes these chicken bites a must-try!

Why You’ll Love This Recipe

  • Quick and Efficient: From prep to plate in about 20 minutes, these chicken bites are perfect for busy weeknights!
  • Healthier Alternative: Enjoy crispy chicken without the guilt. The air fryer reduces the need for excess oil, making these bites low-fat yet full of flavor.
  • Flavor Explosion: A blend of spices ensures that every bite is bursting with savory goodness—smoky, spicy, and oh-so-delicious!
  • Customizable: You can easily swap out spices or ingredients to cater to your taste preferences or dietary needs.
  • Family-Friendly: Kids and adults alike will love these bites, making them a hit for family dinners or gatherings!

Essential Ingredients for Air Fryer Chicken Bites

Getting started is easy! Here’s what you’ll need:

  • 3 large boneless skinless chicken breasts: Cut into 1.5-inch pieces for uniform cooking.
  • 1 1/2 tablespoons olive oil: This helps the spices adhere and promotes browning.
  • Spices: 1 teaspoon each of paprika, chili powder, and dried parsley; 1/2 teaspoon onion powder; 1/4 teaspoon garlic powder; and a pinch of red pepper flakes for a kick.
  • Salt and black pepper: To taste, enhancing the chicken’s natural flavors.
  • Cooking spray: A light coating prevents sticking and keeps the chicken crispy!

How to Make Air Fryer Chicken Bites: Step-by-Step

Juicy chicken pieces seasoned and crispy, captured from the side.

Follow these simple steps to achieve chicken perfection:

  1. Preheat your air fryer: Set it to 380°F (193°C) to ensure even cooking.
  2. Prepare the chicken: In a medium bowl, mix the chicken pieces with olive oil and all the spices until well coated.
  3. Spray the air fryer basket: Use your preferred cooking spray to prevent sticking and ensure a crispy finish.
  4. Arrange the chicken: Place the seasoned pieces in a single layer in the air fryer basket. Avoid overcrowding—cook in batches if needed!
  5. Cook: Set the timer for 10 minutes. Shake the basket halfway through for even cooking and browning.
  6. Serve hot: Enjoy these delicious bites immediately! Pair them with potato wedges or a fresh salad for a complete meal.

Pro Tips for Perfect Air Fryer Chicken Bites

  • Preheat Matters: Always preheat your air fryer to lock in juices and achieve that perfect crisp.
  • Uniform Size: Cut chicken pieces evenly (about 1.5 inches) for consistent cooking.
  • Don’t Skip the Oil: A light coating of oil helps create that beautiful golden crust.
  • Shake it Up: Remember to shake the basket halfway through cooking for even browning.
  • Experiment with Spices: Feel free to mix and match spices based on what you have on hand!
  • Batch Cooking: If you have a larger batch, cook in multiple batches for optimal crispiness.
  • Rest Before Serving: Allow the chicken to rest for a minute after cooking for juicier bites.
  • Use a Meat Thermometer: Ensure the internal temperature reaches 165°F (74°C) for food safety.

Common Mistakes and Troubleshooting

Even the best chefs make mistakes! Here are some common pitfalls and how to avoid them:

  • Overcrowding: If the basket is too full, the chicken won’t crisp up properly. Cook in smaller batches!
  • Not Preheating: Skipping preheating can lead to uneven cooking. Always preheat your air fryer!
  • Skipping Oil: Not using oil can result in dry chicken. A little oil goes a long way!
  • Ignoring Temperature: Always check that your chicken reaches the safe internal temperature.

Delicious Variations to Try

Spice things up with these tasty variations:

  • Buffalo Chicken Bites: Toss cooked bites in buffalo sauce for a spicy twist!
  • Honey Garlic Chicken Bites: Coat cooked chicken bites in a mixture of honey and garlic for a sweet and savory flavor.
  • BBQ Chicken Bites: Glaze with your favorite BBQ sauce before serving for a smoky flavor.
  • Herb-Crusted Chicken Bites: Add fresh herbs like rosemary or thyme into the spice mix for an aromatic touch.

Storage and Make-Ahead Instructions

Planning ahead? Here’s how to store your chicken bites:

  • Refrigerate: Store leftovers in an airtight container in the fridge for up to 4 days.
  • Reheat: To maintain crispiness, reheat in the air fryer at 350°F (175°C) for about 5 minutes.
  • Make-Ahead: You can marinate the chicken pieces in spices and oil a day in advance. Just store them in the refrigerator!

Frequently Asked Questions

  • Can I use frozen chicken? Yes! Just increase the cooking time by a few minutes.
  • What can I serve with these chicken bites? They pair wonderfully with salads, dips, or as part of a meal prep bowl!
  • Are these chicken bites gluten-free? Yes, as long as you use gluten-free seasonings.
  • Can I make these in the oven? Absolutely! Bake at 400°F (200°C) for about 20-25 minutes, flipping halfway.
  • How do I know when they’re done? Use a meat thermometer; they should reach 165°F (74°C).
  • Can I reheat leftovers? Yes! Use the air fryer for best results!
  • How spicy are these chicken bites? Adjust the red pepper flakes to control the heat level to your preference.
  • What’s the best air fryer brand? Popular brands include Philips, Ninja, and Cosori; choose one that fits your cooking needs!

Nutritional Insights and Dietary Adaptations

These air fryer chicken bites are not only tasty but also nutritious! Here are some insights:

  • Protein-Rich: Chicken breast is a fantastic source of lean protein, helping to keep you full and satisfied.
  • Low-Carb: Perfect for low-carb diets or those watching their carb intake.
  • Customizable: Make them dairy-free by avoiding cheese and substituting with a dairy-free option if needed.
  • High in Vitamins: The spices used are packed with antioxidants, contributing to overall health.

Equipment Recommendations

To make the most of this recipe, here’s what I recommend:

  • Air Fryer: Invest in a quality air fryer for optimal results—look for adjustable temperature settings.
  • Meat Thermometer: Essential for ensuring your chicken reaches safe cooking temperatures.
  • Mixing Bowls: Have a few different sizes for mixing ingredients and marinating chicken.
  • Cooking Spray: A non-stick spray or an oil sprayer will help prevent sticking during cooking.

Serving Suggestions to Elevate Your Meal

Serve your crispy chicken bites with these delightful accompaniments:

  • Fresh Salads: Pair with a crisp green salad topped with your favorite dressing for a refreshing meal!
  • Dipping Sauces: Try ranch, honey mustard, or a tangy BBQ sauce for an added flavor boost!
  • Vegetable Sides: Roasted veggies or a side of sweet potato fries complement these bites perfectly.
  • Meal Prep Bowls: Include quinoa or brown rice, steamed veggies, and chicken bites for a balanced meal!

In conclusion, these crispy air fryer chicken bites are more than just a recipe; they’re an invitation to explore healthy eating the fun way! With their vibrant flavors and endless customization options, you can enjoy them as a snack, appetizer, or main dish, all while keeping things nutritious. So grab your air fryer and let’s get cooking—your taste buds will thank you!

Air Fryer Chicken Bites Recipe

Prep Time 10 minutes
Cook Time 10 minutes
Total Time 20 minutes
Servings 4 servings
Calories 250
Enjoy crispy, flavorful chicken bites cooked effortlessly in your air fryer, perfect for a quick snack or meal.

Ingredients

Chicken

  • 3 large boneless skinless chicken breasts (cut into 1.5 inch pieces)
  • 1.5 tablespoons olive oil
  • 1 teaspoon paprika
  • 1 teaspoon chili powder
  • 1 teaspoon dried parsley
  • 0.5 teaspoon onion powder
  • 0.25 teaspoon garlic powder
  • 0.25 teaspoon red pepper flakes
  • to taste Salt and black pepper
  • Cooking spray (e.g. Misto)

Instructions 

  • Preheat air fryer to 380°F (193°C).
  • Mix chicken with oil and spices until evenly coated.
  • Spray air fryer basket with cooking spray.
  • Arrange chicken in a single layer; cook at 380°F (193°C) for 10 minutes, shaking halfway.
  • Serve hot with preferred sides.

Notes

For extra crispiness, lightly spray chicken with cooking spray before cooking.
Calories: 250kcal
Cost: $15
Course: Appetizer, Main Course
Cuisine: American
Keyword: air fryer, Chicken, Crispy

Welcome to the Zesty World of Cucumber Vinegar Salad!

Are you ready to dive into a refreshing experience with our Cucumber Vinegar Salad? This salad is not just a side dish; it’s a flavor explosion that will elevate your meals with its crunchy texture and tangy taste. In this article, we’ll explore how to make the best cucumber salad, packed with flavor and nutrition, making it perfect for any occasion—be it a summer barbecue, a family dinner, or a quick lunch. Let’s get chopping and mixing!

Why You’ll Love This Recipe

This cucumber vinegar salad is a winner for so many reasons:

  • Quick and Easy: With minimal prep time, you can whip this up in under 15 minutes!
  • Light and Refreshing: Perfect for hot days, this salad will keep you cool and energized.
  • Versatile: Enjoy it as a side dish, topping for grilled meats, or even as a light lunch on its own.
  • Nutritious: Packed with fresh vegetables, this salad is low in calories yet high in vitamins.
  • Make-Ahead Friendly: Prepare it a day in advance for flavors that deepen and improve overnight.

Ingredients You’ll Need

To make this cucumber and vinegar salad, gather the following ingredients:

  • 2 English cucumbers (thinly sliced): These are crisp and sweet, perfect for salads.
  • 1 small white onion (thinly sliced): Adds a mild onion flavor that complements the cucumbers beautifully.
  • 1/2 cup white vinegar: The star of the show, providing that necessary tang.
  • 4 tablespoons fresh dill (chopped): Brings a burst of freshness to your salad.
  • 2 tablespoons granulated sugar: Balances the acidity of the vinegar.
  • 1/2 teaspoon each salt and pepper: Essential for seasoning and enhancing flavors.

Pro Tips for the Perfect Salad

Side view of a refreshing Cucumber Vinegar Salad with a glossy appearance from the vinegar dressing.

Let’s make sure your cucumber vinegar salad is a hit with these expert insights:

  • Use a mandolin: For perfectly even slices of cucumber, a mandolin can be a game-changer.
  • Chill before serving: Allow the salad to sit in the fridge for at least 30 minutes to let the flavors meld together.
  • Adjust sweetness: Feel free to tweak the sugar based on your taste preference—more for a sweeter salad, less for a tangier bite!
  • Fresh herbs: Experiment with other herbs like parsley or cilantro for a different flavor profile.
  • Vinegar variety: Try using apple cider vinegar for a sweeter taste or rice vinegar for a milder flavor.
  • Make it spicy: Add a pinch of red pepper flakes or diced jalapeños for an extra kick!
  • Presentation matters: Serve in a clear bowl to showcase the vibrant colors of the salad.
  • Pair it right: This salad pairs wonderfully with grilled chicken, fish, or even as a topping for tacos.

Common Mistakes and Troubleshooting

Even a simple recipe can have pitfalls. Here’s how to avoid them:

  • Too watery: If your salad becomes watery, try salting the cucumbers before mixing. Let them sit for 10 minutes, then drain excess liquid.
  • Overdressing: Start with less vinegar and add more to taste. You can always add more, but you can’t take it away!
  • Not enough flavor: If the salad tastes bland, boost it with more salt, pepper, or a splash of lemon juice.

Variations to Spice Things Up

Don’t be afraid to get creative! Here are some fun variations of this classic cucumber salad:

  • Asian Cucumber Salad: Add sesame oil, soy sauce, and sprinkle with sesame seeds for an Asian twist.
  • Greek Style: Mix in feta cheese, kalamata olives, and cherry tomatoes for a Mediterranean flair.
  • Spicy Cucumber Salad: Incorporate chili flakes and cilantro for a spicy and zesty version.
  • Fruit Fusion: Toss in diced mango or watermelon for a sweet and refreshing salad perfect for summer.

Storage and Make-Ahead Instructions

This cucumber vinegar salad is perfect for meal prep. Here’s how to store it:

  • Refrigeration: Store in an airtight container in the fridge for up to 3 days. The flavors will enhance over time!
  • Freezing: Not recommended, as cucumbers lose their crunch when frozen.
  • Make-Ahead: Assemble the salad a day in advance, allowing it to sit overnight for the best flavor.

Frequently Asked Questions

Here are some common queries about this salad:

  • How long should I let the salad sit in the fridge before serving? Aim for at least 30 minutes, but overnight is even better!
  • Can I make this salad ahead of time? Absolutely! It’s best when flavors meld together over time.
  • Can I use regular cucumbers instead of English cucumbers? Yes, but you might want to peel them to reduce bitterness.
  • How do I slice the cucumbers thinly? A sharp knife or mandolin will do the trick for uniform slices.
  • Can I use frozen dill if I don’t have fresh dill? Yes, but fresh dill provides the best flavor.
  • What if I don’t have white vinegar? Apple cider vinegar or rice vinegar can be great substitutes!
  • Can I add protein to this salad? Definitely! Grilled chicken or shrimp can turn this into a filling meal.
  • Is this salad gluten-free? Yes, all the ingredients are naturally gluten-free!

Nutritional Tips and Dietary Adaptations

This salad packs a nutritional punch, and here are a few tips to keep it healthy:

  • Low-Calorie: With only a handful of ingredients, this salad is low in calories and high in flavor.
  • Vegan-Friendly: This recipe is completely plant-based, making it suitable for vegans.
  • Low-Carb Option: It’s naturally low in carbs, perfect for those on a low-carb diet.

Equipment Recommendations

Here’s what you’ll need to make this salad successful:

  • Sharp Knife or Mandolin: For thin, even slices of cucumbers and onions.
  • Mixing Bowl: A large bowl for combining all your ingredients.
  • Measuring Cups and Spoons: For accurate measurements of vinegar, sugar, and seasonings.

Serving Suggestions

This cucumber vinegar salad can elevate any meal. Here are some ideas:

  • Grilled Meats: Serve next to grilled chicken, steak, or fish for a refreshing contrast.
  • On Tacos: Use it as a topping for tacos to add crunch and flavor.
  • With Rice Dishes: Pair it with rice or grain bowls for added texture and taste.

Conclusion

Now that you know how to make the ultimate cucumber vinegar salad, it’s time to get into the kitchen! This recipe is not only delicious but also a versatile addition to your meal planning. Remember, healthy eating can be fun and inventive, so don’t hesitate to experiment with flavors and ingredients. Enjoy your refreshing salad and feel free to share your experiences below. Happy cooking!

Cucumber Vinegar Salad

Prep Time 10 minutes
Total Time 40 minutes
Servings 4 servings
Calories 50
A refreshing and tangy cucumber salad perfect for hot days or as a side dish.

Ingredients

Vegetables

  • 2 pieces English cucumbers (thinly sliced)
  • 1 small white onion (thinly sliced)
  • 0.5 cup white vinegar
  • 4 tablespoons fresh dill (chopped)
  • 2 tablespoons granulated sugar
  • 0.5 teaspoon salt (each)
  • 0.5 teaspoon pepper (each)

Instructions 

  • Slice cucumbers into thin slices.
  • Thinly slice the onion into half rings.
  • Combine cucumbers, onions, dill, vinegar, sugar, salt, and pepper in a bowl.
  • Cover and refrigerate for at least 30 minutes, preferably overnight.
  • Serve with a slotted spoon, seasoning with additional salt and pepper if desired.

Notes

Use fresh dill for the best flavor and refrigerate to enhance the tangy taste.
Calories: 50kcal
Cost: $8
Course: Side Dish
Cuisine: international
Keyword: cucumber

Unleash Your Flavor: The Ultimate Chicken Avocado Corn Salad Recipe!

Welcome to the vibrant world of healthy cooking, where the kitchen is your canvas and every ingredient is a splash of color! Today, we’re diving into a dish that’s not just a feast for the eyes but also a powerhouse of flavors—the Chicken Avocado Corn Salad! Whether you’re looking for a quick lunch, a refreshing dinner option, or a stunning side dish for your next gathering, this salad has got you covered. Packed with protein, vibrant ingredients, and a zesty dressing, it’s a fantastic way to fuel your day. Let’s get cooking!

Why You’ll Love This Recipe

  • Quick & Easy: This salad can be whipped up in under 30 minutes, making it perfect for busy weeknights or last-minute gatherings.
  • Flavor Explosion: The combination of sweet corn, creamy avocado, and perfectly seasoned grilled chicken creates a burst of flavor in every bite.
  • Nutritious & Filling: Packed with protein from the chicken and healthy fats from the avocado, this salad is both satisfying and nutritious.
  • Versatile: Whether served as a main dish or a side, this salad fits seamlessly into any meal plan. You can even customize it with your favorite ingredients!
  • Make-Ahead Friendly: Perfect for meal prep! You can make it ahead of time and store it in the fridge for an easy grab-and-go option.

The Ingredients

Let’s break down the ingredients for our Chicken Avocado Corn Salad. Here’s what you’ll need:

  • 1 pound boneless skinless chicken breasts
  • 1 1/2 teaspoons chili powder
  • 1/2 teaspoon cumin
  • 1/2 teaspoon garlic powder
  • Salt and freshly ground black pepper to taste
  • 2 cups corn (fresh or frozen)
  • 2 medium avocados, diced
  • 1 jalapeño, seeded and diced
  • 1/2 cup diced red onion
  • 1/4 cup chopped cilantro
  • 1 1/2 tablespoons olive oil
  • 1 1/2 tablespoons honey
  • 1/4 cup lime juice
  • 1 teaspoon additional chili powder
  • 1/2 teaspoon ground cumin
  • Salt and freshly ground black pepper to taste

Ingredient Substitutions

  • Chicken: Swap for grilled shrimp, tofu, or chickpeas for a vegetarian option.
  • Corn: If fresh corn isn’t available, canned or frozen corn works just as well.
  • Avocado: For a creamy alternative, try using diced mango or a dollop of Greek yogurt.
  • Cilantro: Substitute with parsley or omit if you’re not a fan!

How to Make Chicken Avocado Corn Salad

Juicy Chicken Avocado Corn Salad featuring diced avocados, corn, and chicken.

Ready to bring this beautiful salad to life? Let’s get started!

Step-by-Step Instructions

  1. Grill the Chicken: Preheat your grill to medium-high heat (around 400-425°F). Season your chicken breasts with the mixed spices (chili powder, cumin, garlic powder, salt, and pepper). Grill the chicken for about 6-7 minutes on each side, flipping halfway. Make sure the internal temperature reaches 165°F. Let it rest for 5-10 minutes before slicing it into bite-sized pieces.
  2. Prepare the Vinaigrette: While the chicken is grilling, combine the olive oil, honey, lime juice, and remaining spices in a jar. Shake or whisk until well combined.
  3. Combine Ingredients: In a large bowl, add the corn, diced avocados, jalapeño, red onion, cilantro, and grilled chicken. Pour the vinaigrette over the salad and gently toss everything together. Adjust seasoning with salt and pepper as needed.

Pro Tips for the Best Salad

  • Perfectly Grilled Chicken: For juicy chicken, let it rest after grilling to keep all those delicious juices inside!
  • Fresh Ingredients: Always use fresh, high-quality ingredients for the best flavor. Ripe avocados and seasonal corn are key!
  • Vinaigrette Variations: Feel free to experiment with your vinaigrette by adding a dash of hot sauce or swapping honey for maple syrup.
  • Texture Matters: Make sure your avocado is perfectly ripe for that creamy texture that complements the crunch of the corn.
  • Make Ahead: This salad is great for meal prep! Just keep the vinaigrette separate until ready to serve to maintain the freshness of the ingredients.
  • Chill Time: Letting the salad chill for about 30 minutes in the fridge allows the flavors to meld beautifully.
  • Garnish: Top with additional cilantro or a sprinkle of feta cheese for an extra flavor boost!
  • Seasoning: Always taste your salad before serving. Adjust the seasoning as needed to suit your palate.

Common Mistakes and Troubleshooting

Even the best chefs make mistakes! Here’s how to avoid common pitfalls:

  • Overcooking Chicken: Keep an eye on the grill! Overcooked chicken can become dry. Use a meat thermometer for precision.
  • Brown Avocado: To prevent browning, toss diced avocados with lime juice as soon as you cut them.
  • Dressing Too Thick: If your vinaigrette is too thick, whisk in a bit of water or additional lime juice until you reach your desired consistency.
  • Unbalanced Flavor: If the salad tastes bland, a pinch more salt or an extra squeeze of lime juice can do wonders!

Variations of the Chicken Avocado Corn Salad

Get creative! Here are some fun variations to keep things interesting:

  • Southwestern Twist: Add black beans, diced bell peppers, and corn chips for a crunchy texture.
  • Fruit Fusion: Incorporate diced mango or pineapple for a sweet tropical vibe.
  • Spicy Kick: Add chopped jalapeños or drizzle with sriracha for a spicy twist.
  • Quinoa Power: Mix in cooked quinoa for added protein and a hearty texture.

Storage and Make-Ahead Instructions

Want to enjoy your salad throughout the week? Here’s how to store it:

  • Refrigerate leftovers in an airtight container for up to 2 days. The avocados may brown slightly, so it’s best enjoyed fresh!
  • For meal prep, store the salad and vinaigrette separately. Combine just before serving for optimal freshness.

Frequently Asked Questions

  • Can I use canned corn instead of fresh? Yes! Canned corn works just as well. Just rinse and drain before adding.
  • What can I substitute for chicken? Grilled shrimp, tofu, or chickpeas are great alternatives to chicken.
  • How long does the salad last in the fridge? It’s best eaten within 2 days, but the avocados may brown after that.
  • Can I make this salad vegan? Absolutely! Just omit the chicken and use chickpeas or grilled vegetables instead.
  • What dressing goes well with this salad? The provided vinaigrette works perfectly, but a light ranch or yogurt-based dressing can be delicious too!
  • Is this salad gluten-free? Yes, all the ingredients are naturally gluten-free!
  • How can I add more protein? Consider adding beans, nuts, or seeds for an extra protein boost.
  • Can I freeze this salad? It’s not recommended to freeze the salad due to the avocados and texture changes, but you can freeze the chicken separately.

Nutritional Tips and Dietary Adaptations

This Chicken Avocado Corn Salad is not just delicious; it’s also packed with nutrients! Here are some tips to maximize its health benefits:

  • Increase Fiber: Add more vegetables like bell peppers or spinach for extra fiber and vitamins.
  • Healthy Fats: The avocado provides healthy monounsaturated fats, but you can also add nuts or seeds for crunch.
  • Protein Boost: If you’re looking for more protein, consider adding quinoa or beans to the mix.
  • Low-Carb Option: For a low-carb version, skip the corn and add more greens.

Equipment Recommendations

To make this salad, you’ll need a few kitchen essentials:

  • Grill or Grill Pan: Essential for achieving that perfect grilled chicken flavor.
  • Mixing Bowl: A large bowl for combining all your fresh ingredients.
  • Whisk or Jar: For mixing the vinaigrette quickly and efficiently.
  • Cutting Board & Knife: To chop your veggies and chicken with ease.

Serving Suggestions

Now that you’ve prepared your scrumptious salad, here are some serving ideas:

  • As a Main Dish: Serve it on its own for a hearty meal.
  • With Tortilla Chips: Pair it with tortilla chips for a crunch factor.
  • On a Bed of Greens: Serve it over a bed of mixed greens for an extra veggie boost.
  • Wrap It Up: Use it as a filling in whole wheat wraps for a portable meal.

In conclusion, the Vibrant Chicken Avocado Corn Salad is a delightful and nutritious addition to your meal repertoire. It’s the perfect blend of flavors, textures, and nutrients that will leave you feeling energized and satisfied. So, roll up your sleeves, gather your ingredients, and let’s make healthy cooking fun! Enjoy every colorful bite and the joy of sharing this recipe with friends and family!

Chicken Avocado Corn Salad

Prep Time 15 minutes
Cook Time 20 minutes
Total Time 35 minutes
Servings 4 servings
Calories 450
A fresh and flavorful salad combining grilled chicken, creamy avocados, and sweet corn, perfect for a quick and healthy meal.

Ingredients

Protein

  • 1 pound boneless skinless chicken breasts

Spices and seasonings

  • 1.5 teaspoons chili powder
  • 0.5 teaspoon cumin
  • 0.5 teaspoon garlic powder
  • Salt and freshly ground black pepper to taste Salt and pepper

Vegetables and fruits

  • 2 cups corn
  • 2 medium avocados (diced)
  • 1 Jalapeño seeded and diced
  • 0.5 cup diced red onion
  • 0.25 cup chopped cilantro

Dressing

  • 1.5 tablespoons olive oil
  • 1.5 tablespoons honey
  • 0.25 cup lime juice
  • 1 teaspoon chili powder
  • 0.5 teaspoon ground cumin
  • Salt and freshly ground black pepper to taste Salt and pepper

Instructions 

  • Preheat grill to medium-high. Season chicken with spices, salt, and pepper. Grill until cooked through, then rest and dice.
  • Mix dressing ingredients in a jar and shake until combined.
  • Combine corn, avocado, red onion, jalapeño, cilantro, and chicken in a bowl. Toss with vinaigrette and season to taste.

Notes

For extra flavor, marinate the chicken with spices before grilling.
Calories: 450kcal
Cost: $15
Course: Salad
Cuisine: American
Keyword: avocado, Chicken, corn

Welcome to the world of indulgence without the guilt! Get ready to dive into a **delicious adventure** with my recipe for No-Bake Brownie Bites. These bites are rich, chocolatey, and oh-so-simple to make! Packed with wholesome ingredients, they’re the perfect guilt-free snack for any time of day. Whether you’re looking for a quick treat after a long day, a healthy option for your lunch box, or a sweet addition to your next gathering, these brownie bites are here to steal the show. Let’s get started!

Why You’ll Love This Recipe

  • Quick and Easy: In just 30 minutes, you can whip up a batch of these delightful treats without ever turning on the oven.
  • Nutritious Ingredients: Made with wholesome components like oats and nuts, these bites are not just tasty but also packed with nutrients.
  • Customizable Flavors: Get creative! You can mix in your favorite add-ins, from dried fruits to nut butters, making each batch uniquely yours.
  • Perfect for Meal Prep: These bites store well in the fridge, making them an ideal option for busy weeks ahead.
  • Kid-Friendly: With a rich chocolate flavor and no baking involved, they’re sure to be a hit with the little ones!

Ingredients Breakdown

Here’s what you’ll need for this delectable recipe:

  • 1 cup chopped walnuts or almonds (optional): These nuts add a satisfying crunch and healthy fats. You can substitute with any nut or seed of your choice.
  • 2½ cups pitted Medjool dates: They serve as a natural sweetener and binder. If your dates are dry, soak them in warm water for 10 minutes to soften.
  • 1 cup unsweetened cocoa powder: This ingredient gives the bites their rich chocolate flavor. For a twist, try using carob powder instead.
  • 1 cup old-fashioned rolled oats: Oats provide fiber and texture. You can use gluten-free oats if needed.
  • 1 tsp vanilla extract: Vanilla enhances the overall flavor profile. Use pure vanilla extract for the best results.
  • ⅛ tsp salt: A pinch of salt balances the sweetness and deepens the chocolate flavor.
  • 2 tbsp milk (dairy or non-dairy): This helps adjust the mixture’s consistency. Almond, coconut, or oat milk are great substitutes.
  • Toppings (optional): Shredded coconut, cocoa powder, or chopped nuts can elevate the bites’ presentation and texture.

How to Make No-Bake Brownie Bites

Ready to bring these brownie bites to life? Follow these straightforward steps:

  1. Step 1: Prepare your ingredients
    Start by measuring out your ingredients. If your dates are dry, soak them in warm water for 10 minutes to soften, then drain well.
  2. Step 2: Blend the base
    In a food processor, combine oats and nuts (if using). Pulse until finely ground. Add in the cocoa powder, salt, and vanilla, pulsing until everything is mixed evenly.
  3. Step 3: Add the dates
    Add the softened dates into the processor and blend until a thick, sticky dough forms. You may need to scrape down the sides once or twice.
  4. Step 4: Adjust texture
    If the mixture seems too dry, add milk one tablespoon at a time. You want it to stick together when pressed between your fingers.
  5. Step 5: Roll into bites
    Using a tablespoon or small scoop, portion out the dough and roll it into balls. The warmth of your hands helps form the perfect shape.
  6. Step 6: Optional coating
    Roll the finished bites in cocoa powder, shredded coconut, or finely chopped nuts for added texture and flair.
  7. Step 7: Chill
    Pop them in the fridge for about 10–15 minutes to firm up. Then they’re ready to eat, pack, or share!

Pro Tips for Perfect Brownie Bites

Side view of delicious No-Bake Brownie Bites arranged on a plate, showing a rich chocolate texture.
  • Measuring Dates: For best results, use packed dates when measuring. This ensures the right amount of sweetness and moisture.
  • Texture Check: If the mixture is too crumbly, don’t hesitate to add a bit more milk until you reach the desired consistency.
  • Flavor Boost: Consider adding a scoop of protein powder for an extra nutritional kick—perfect for post-workout snacks!
  • Mix It Up: Feel free to experiment with different nut butters, such as almond or cashew, for an exciting twist.
  • Serving Size: Roll smaller bites for a lower-calorie option or larger ones for a more decadent treat.
  • Chilling Time: Allowing the bites to chill not only firms them up but also enhances their flavor as the ingredients meld together.
  • Storage Tips: Store the bites in an airtight container in the fridge for up to a week, or freeze for longer storage.
  • Presentation: For a fun party treat, arrange the bites on a colorful platter and sprinkle with toppings for a visual feast!

Common Mistakes and Troubleshooting

Even the best chefs can make mistakes! Here are a few common pitfalls and how to avoid them:

  • Too Dry: If your mixture crumbles when rolling, it’s likely too dry. Add a tablespoon of milk at a time until it holds together.
  • Over-processing: Blending too long can create a paste instead of a dough. Stop pulsing as soon as the mixture is combined.
  • Not Sweet Enough: If you find the bites lack sweetness, blend in a few more dates or a drizzle of honey or maple syrup.
  • Sticking to Hands: To prevent the mixture from sticking, wet your hands slightly before rolling.

Variations to Try

Feeling adventurous? Here are some fun variations to customize your No-Bake Brownie Bites:

  • Peanut Butter Bliss: Add ¼ cup of peanut butter to the mix for a creamy, nutty flavor that pairs perfectly with chocolate.
  • Mint Chocolate: Stir in a few drops of peppermint extract for a refreshing twist that’s reminiscent of mint brownies.
  • Berry Brownie Bites: Fold in dried raspberries or cherries for a pop of fruity flavor that contrasts beautifully with the chocolate.
  • Spicy Chocolate: Incorporate a dash of cayenne or chili powder for an unexpected kick that elevates the chocolate flavor.

Storage and Make-Ahead Instructions

Want to keep these delicious bites on hand? Here’s how to store them:

  • Refrigerator: Keep the bites in an airtight container in the fridge for up to a week. They make an excellent grab-and-go snack!
  • Freezing: For longer storage, freeze the bites on a baking sheet first, then transfer to a freezer-safe bag or container. They can last up to 3 months!
  • Defrosting: When you’re ready to enjoy, simply let them sit at room temperature for about 10-15 minutes before eating.

Frequently Asked Questions (FAQs)

  • Can I use different nuts? Absolutely! Feel free to substitute with your favorite nuts or even seeds like sunflower or pumpkin.
  • Are these bites gluten-free? Yes, as long as you use certified gluten-free oats, these brownie bites are gluten-free!
  • How do I know when they’re ready to eat? Once chilled, they should be firm to the touch and hold their shape when rolled.
  • Can I add protein powder? Yes! Adding protein powder is a great way to boost the nutritional content of your bites.
  • What’s the best way to serve these? They can be served as is, or you can garnish them with extra toppings for a fun presentation.
  • How long do these bites last? In the fridge, they’ll last up to a week; in the freezer, they can last up to 3 months.
  • Can I use other sweeteners? Yes, you can substitute dates with maple syrup or agave nectar, but you may need to adjust the dry ingredients accordingly.
  • What if I don’t have a food processor? You can use a high-powered blender, but it may take a little longer to achieve the right consistency.

Nutritional Tips and Dietary Adaptations

These brownie bites are not just tasty; they can be tailored to fit various dietary needs:

  • Vegan-Friendly: This recipe is naturally vegan if you use non-dairy milk and omit any animal-based toppings.
  • Protein-Packed: Adding a scoop of protein powder can help meet your fitness goals without compromising on flavor.
  • Low-FODMAP: Substitute the Medjool dates with ripe banana or maple syrup in moderation for a low-FODMAP option.
  • Nut-Free: Omit the nuts and add seeds for crunch or replace them with sunflower seed butter for creaminess.

Essential Equipment Recommendations

To make these No-Bake Brownie Bites, you’ll need:

  • Food Processor: A sturdy food processor is essential for blending the ingredients into the perfect dough.
  • Measuring Cups and Spoons: Accurate measurements ensure consistent results every time.
  • Baking Sheet: Use a baking sheet to chill the bites before storing them in the fridge for easy access.
  • Small Scoop: A small cookie scoop makes portioning out the bites quick and easy.

Serving Suggestions

Looking to elevate your serving game? Here are a few ideas:

  • Platter Presentation: Arrange the bites on a colorful platter and top with a variety of garnishes for a stunning display.
  • Pair with Fruits: Serve alongside fresh fruits like strawberries or bananas for a balanced snack.
  • Dip Options: Provide melted dark chocolate or yogurt for dipping to enhance the experience.
  • Make It a Gift: Pack them in a jar with a cute ribbon and give them as a healthy gift for friends and family.

With these amazing No-Bake Brownie Bites, you’re not just making a snack; you’re creating memories filled with deliciousness and joy. So roll up your sleeves, gather your ingredients, and let’s make healthy eating an exciting adventure! Thank you for joining me in this culinary journey—now go forth and enjoy your delightful creations!

No-Bake Brownie Bites

Prep Time 15 minutes
Total Time 15 minutes
Servings 12 pieces
Calories 150
These delicious no-bake brownie bites are a quick and healthy treat, perfect for satisfying your sweet tooth without any baking.

Ingredients

Optional Nuts

  • cups pitted Medjool dates
  • 1 cup unsweetened cocoa powder
  • 1 cup old-fashioned rolled oats
  • 1 tsp vanilla extract
  • tsp salt
  • 2 tbsp milk (dairy or non-dairy)

Toppings (optional)

  • shredded coconut, cocoa powder, chopped nuts (for rolling)

Instructions 

  • Soften dates if dry, then blend with oats, cocoa, salt, and vanilla until combined.
  • Add milk gradually to form a sticky dough.
  • Roll mixture into small balls and coat with toppings if desired.
  • Chill in the fridge for 10-15 minutes before serving.

Notes

Store in an airtight container in the fridge for up to a week.
Calories: 150kcal
Cost: $10
Course: Dessert
Keyword: Healthy, no-bake, snack

Unleashing Flavor: Your New Favorite Crunchy Asian Chicken Salad

Welcome to a culinary adventure that’s bursting with exciting flavors and vibrant colors! Today, we’re diving into the world of the Crunchy Asian Chicken Salad, a dish that combines tender chicken, crunchy veggies, and a zesty peanut dressing. This salad is not just food; it’s a celebration of fresh ingredients and bold tastes that will make your taste buds dance. Whether you’re looking for a quick lunch, a hearty dinner, or a meal prep superstar, this salad has got you covered!

Let’s explore why this salad is a must-try, the key ingredients you’ll need, and how to whip it up with ease. Trust me, once you’ve tasted it, you’ll be hooked!

Why You’ll Love This Salad

  • Quick and Easy: With minimal prep time, you can have this flavorful dish ready in just 30 minutes, making it perfect for busy weeknights.
  • Nutritious and Satisfying: Packed with protein and fiber, this salad keeps you full and energized without compromising on taste.
  • Meal Prep Friendly: Storing well in the fridge, this salad is an ideal choice for make-ahead lunches that stay delicious for days.
  • Vibrant and Colorful: A feast for the eyes, the combination of purple cabbage, carrots, and red bell pepper not only looks great but offers a variety of nutrients.
  • Customizable: Easily swap in your favorite veggies or proteins to make this salad your own!

Ingredient Breakdown: What You Need

Let’s get into the nitty-gritty of what makes this Asian Chicken Crunch Salad so delightful. Here’s what you’ll need:

  • 1 pound chicken breast: Tender and juicy, this is your protein powerhouse!
  • 1/4 cup low sodium soy sauce or tamari: For a savory umami kick that marinates the chicken beautifully.
  • 3 cups shredded purple cabbage: Adds crunch and vibrant color.
  • 3 cups shredded green cabbage: Brings a refreshing crunch that complements the other ingredients.
  • 1 cup shredded carrot: Adds sweetness and extra crunch.
  • 1 red bell pepper: Sliced into strips for a pop of color and sweet flavor.
  • 1/2 cup shelled edamame: A fantastic source of plant-based protein and a fun texture!
  • 3 tablespoons natural creamy peanut butter: For a rich, nutty dressing that ties everything together.
  • 2 tablespoons honey: A touch of sweetness to balance the savory flavors.

These ingredients work together to create a dish that’s not only delicious but visually appealing as well. But what if you’re missing something? Here are some easy substitutions:

  • Chicken: Swap for grilled tofu or chickpeas for a plant-based option.
  • Peanut butter: Use almond butter or sunflower seed butter for nut-free variations.
  • Honey: Maple syrup is a great vegan alternative!
  • Vegetables: Feel free to add in cucumbers, snap peas, or any seasonal veggies you love!

How to Make Your Crunchy Asian Chicken Salad

Side view of a salad bowl filled with shredded cabbage, carrots, edamame, and chicken, highlighting fresh ingredients.

Now that you’ve gathered all your ingredients, let’s get cooking! Follow these simple steps to create your salad:

  • Step 1: Cut the chicken into small cubes and marinate it in the soy sauce for at least 30 minutes. Add in garlic, ginger, and a splash of sesame oil for extra flavor.
  • Step 2: While the chicken marinates, prepare the dressing by whisking together peanut butter, honey, soy sauce, garlic, ginger, and a bit of warm water to thin it out.
  • Step 3: Shred the cabbages and carrots, and mix them together in a large bowl. This salad is all about that crunch!
  • Step 4: Cook the marinated chicken in a skillet over medium heat until browned and cooked through, about 5-7 minutes.
  • Step 5: Let everything cool slightly before tossing the salad with your desired amount of dressing and adding the chicken on top.

Pro Tips for Perfect Execution

To elevate your salad game, consider these expert tips:

  • Marinate Longer: For deeper flavor, marinate the chicken for a few hours or overnight.
  • Texture Matters: Use a variety of vegetables to enhance the crunch; fresh snap peas or crunchy bell peppers are fantastic additions!
  • Dress Wisely: Dress the salad just before serving to keep the veggies crisp.
  • Serve It Right: This salad is perfect as a main dish or a side; pair it with grilled meats for a complete meal.
  • Save the Dressing: Store any leftover dressing in the fridge for up to a week!

Common Mistakes and Troubleshooting

Even the best chefs make mistakes! Here are some common pitfalls and how to avoid them:

  • Overcooking the Chicken: Ensure your chicken is just cooked through for the best texture. Use a meat thermometer if needed!
  • Too Much Dressing: Start with a little dressing and add more to taste. You can always add more, but you can’t take it away!
  • Limp Vegetables: Fresh, crisp veggies are essential. Use the freshest ingredients you can find!

Delicious Variations to Try

Want to switch things up? Here are some fun variations to keep it fresh:

  • Spicy Kick: Add sliced jalapeños or a dash of chili flakes to the dressing for a fiery flavor!
  • Crunchy Noodles: Toss in some crispy chow mein noodles for an extra crunch.
  • Fruit Fusion: Add sliced oranges or mandarin segments for a sweet contrast.
  • Herb Infusion: Fresh cilantro or basil can add an aromatic twist to your salad.

Storage and Make-Ahead Instructions

This salad is a fantastic meal prep option! Here’s how to store it:

  • In the Fridge: Store the salad in an airtight container for up to 3 days. Keep the dressing separate until you’re ready to eat.
  • Make-Ahead: You can prepare the chicken and chop the veggies a day in advance. Just mix everything together right before serving!

Frequently Asked Questions

To wrap up, let’s tackle some common questions about this recipe:

  • Can I make this salad vegan? Absolutely! Substitute the chicken with tofu and use maple syrup instead of honey.
  • What can I serve this salad with? It pairs wonderfully with grilled chicken, fish, or even as a standalone lunch!
  • How can I make the dressing smoother? Blend the dressing ingredients in a food processor for a super smooth consistency.
  • Can I use different vegetables? Yes! Feel free to experiment with whatever fresh veggies you have on hand.
  • Is this salad suitable for meal prep? Definitely! It keeps well in the fridge and can be enjoyed throughout the week.
  • What’s the best way to serve it? Serve chilled for the best experience, especially on warm days.
  • Can I add nuts or seeds? Yes! Chopped peanuts or sesame seeds can add an extra crunch and nutty flavor.
  • How do I know when the chicken is cooked? The chicken should reach an internal temperature of 165°F (74°C).

Nutritional Tips and Dietary Adaptations

Here are some nutritional tips to enhance the health factor of your salad:

  • Boost Fiber: Add more veggies or include beans for added fiber and nutrients.
  • Lower Sodium: Use low-sodium soy sauce or coconut aminos to reduce sodium intake.
  • Healthy Fats: Incorporate avocado slices for healthy fats and creaminess.

Essential Equipment for Success

To make this salad a breeze, here’s what you’ll need:

  • Sharp Knife: For easily chopping veggies and chicken.
  • Cutting Board: A clean, sturdy surface for all your chopping needs.
  • Mixing Bowls: A large bowl for mixing and a smaller one for the dressing.
  • Skillet: A non-stick skillet works best for cooking the chicken evenly.
  • Whisk: Essential for emulsifying the dressing ingredients.

Serving Suggestions

Now that your salad is ready, how can you serve it? Here are a few ideas:

  • Standalone Lunch: Enjoy it as a filling, nutritious meal on its own.
  • Side Dish: Serve alongside grilled meats or vegetarian dishes for a balanced dinner.
  • Picnic Delight: Pack it for outdoor gatherings—it travels well and is a crowd-pleaser!

In conclusion, the Crunchy Asian Chicken Salad is more than just a meal; it’s an invitation to explore flavors and enjoy the process of cooking. With its vibrant ingredients, delicious dressing, and endless customization options, this salad is sure to become a regular in your kitchen. So grab those ingredients, unleash your inner chef, and let’s make healthy eating exciting!

Asian Chicken Crunch Salad

Prep Time 15 minutes
Cook Time 10 minutes
Total Time 25 minutes
Servings 4 servings
Calories 450
A vibrant and crunchy salad combining marinated chicken with fresh vegetables and a creamy peanut dressing, perfect for a light yet satisfying meal.

Ingredients

Protein

  • 1 pound chicken breast
  • 1/4 cup low sodium soy sauce or tamari

Vegetables

  • 3 cups shredded purple cabbage
  • 3 cups shredded green cabbage
  • 1 cup shredded carrot
  • 1 red bell pepper sliced into strips
  • 1/2 cup shelled edamame

Dressing

  • 3 tablespoons natural creamy peanut butter
  • 2 tablespoons honey

Instructions 

  • Cut chicken into small cubes and marinate in soy sauce for at least 30 minutes.
  • Whisk together peanut butter, honey, soy sauce, and water to make dressing.
  • Shred cabbages and carrots; combine in a large bowl.
  • Cook marinated chicken in a skillet until browned and cooked through.
  • Let everything cool slightly; toss salad with dressing and top with cooked chicken.

Notes

For extra crunch, add chopped peanuts or sesame seeds.
Calories: 450kcal
Cost: $15
Course: Salad
Cuisine: Asian
Keyword: Chicken