Author

Ryan

Browsing

Freshness in a Flash: Discover the Joy of a 10-Minute Caprese Salad!

Welcome to the vibrant world of the Caprese salad, where fresh ingredients dance together in a delightful symphony of flavor! This 10-Minute Caprese Salad is not just a dish; it’s a celebration of simplicity and nutrition that will tantalize your taste buds and elevate your culinary game. Perfect for busy weeknights, impromptu gatherings, or a quick lunch, this recipe brings the essence of Italy right to your kitchen! In this article, we’ll take a deep dive into everything you need to know about making the perfect Caprese salad, including its rich history, health benefits, and tips for crafting an unforgettable experience.

Why You’ll Love This Recipe

This Caprese salad recipe is not only quick to prepare but also packed with benefits that make it a must-try. Here are five reasons to get excited:

  • Time-Saving Delight: Ready in just 10 minutes, this salad is your go-to solution for last-minute meals.
  • Fresh and Flavorful: Experience the vibrant taste of ripe tomatoes, creamy mozzarella, and fragrant basil in every bite.
  • Nutritious Goodness: With fresh ingredients, this salad is rich in vitamins and antioxidants, making it a healthy choice.
  • Versatile Serving Options: Enjoy it as a starter, side dish, or even a light main course!
  • Easy Customization: With simple substitutions and variations, you can make this salad your own!

Ingredients Breakdown

Let’s explore the key ingredients that make this Caprese salad shine:

  • Tomatoes: Use 3 ripe tomatoes, sliced. Opt for heirloom or vine-ripened tomatoes for the best flavor. If you’re looking for alternatives, cherry tomatoes are a great option!
  • Fresh Mozzarella: An essential component, 8 oz of fresh mozzarella should be sliced. Look for “bocconcini” for small balls or a larger ball that can be sliced. Avoid pre-shredded varieties for the freshest taste.
  • Basil Leaves: A handful of fresh basil leaves adds aromatic freshness. Choose vibrant green leaves, avoiding any wilted ones. Italian basil is traditional, but feel free to explore other varieties.
  • Balsamic Glaze: Two tablespoons of balsamic glaze add a tangy sweetness that complements the salad beautifully.
  • Olive Oil: Drizzle two tablespoons of high-quality olive oil over the top for a rich flavor boost.
  • Salt and Pepper: Season to taste! These simple additions enhance the flavors of the fresh ingredients.

Feel free to get creative! You can substitute the mozzarella with burrata for an ultra-creamy texture or add a sprinkle of crushed red pepper for a kick.

Step-by-Step Instructions

Colorful layers of sliced tomatoes and mozzarella drizzled with balsamic glaze and olive oil.

Creating your Caprese salad is a breeze! Follow these simple steps:

  1. Layer the sliced tomatoes, mozzarella, and basil leaves on a serving platter in an alternating pattern.
  2. Drizzle the olive oil and balsamic glaze over the salad generously.
  3. Season with salt and pepper, adjusting to your personal taste.
  4. Serve immediately as a starter or a light snack. Enjoy the fresh flavors!

Expert Pro Tips for the Perfect Caprese

To take your Caprese salad to the next level, consider these expert tips:

  • Choose Seasonal Ingredients: Fresh, in-season tomatoes and basil will elevate the flavor profile immensely.
  • Slice with Care: Use a sharp knife to slice tomatoes and mozzarella for clean cuts and a beautiful presentation.
  • Experiment with Oils: While olive oil is traditional, consider flavored oils like basil-infused or garlic oil for a unique twist.
  • Chill Ingredients: For an extra refreshing bite, chill your tomatoes and mozzarella before assembly.
  • Balance Flavors: Don’t be shy with the salt and pepper; they bring out the flavors of your ingredients!
  • Garnish Wisely: Finish off your salad with a sprinkle of sea salt or a few microgreens for an elegant touch.
  • Presentation Matters: Arrange your ingredients artfully for a stunning visual appeal.
  • Go Gourmet: Add a sprinkle of pine nuts or a few olives for an upscale touch!

Common Mistakes and Troubleshooting

Even the best of us make mistakes in the kitchen! Here are common pitfalls to avoid:

  • Using Low-Quality Ingredients: The Caprese salad is all about freshness. Avoid using old or out-of-season produce.
  • Skipping the Seasoning: Don’t forget the salt and pepper! They are essential for enhancing the dish’s overall taste.
  • Overdressing the Salad: While olive oil and balsamic glaze are delicious, too much can overwhelm the delicate flavors.
  • Not Layering Correctly: Make sure to alternate your layers for a balanced bite every time.

Delicious Variations to Try

Looking for something a bit different? Here are some fun variations to consider:

  • Caprese Skewers: Thread cherry tomatoes, mozzarella balls, and basil leaves onto skewers for a fun appetizer.
  • Grilled Caprese Salad: Grill the tomatoes and mozzarella for a smoky flavor that adds depth to the dish.
  • Caprese Pasta Salad: Toss the ingredients with cooked pasta for a hearty meal that’s perfect for potlucks.
  • Avocado Caprese: Add sliced avocado for a creamy texture and additional nutrients!

Storage and Make-Ahead Instructions

Want to prepare your salad in advance? Here’s how to store it properly:

  • Refrigerate: Store any leftover salad in an airtight container in the fridge for up to two days. Keep the dressing separate to prevent sogginess.
  • Make Ahead: You can slice the ingredients a few hours in advance; just wait to assemble until you’re ready to serve.

Frequently Asked Questions

Here are some common questions about Caprese salad:

  • What is the best type of tomato for Caprese salad? Heirloom or vine-ripened tomatoes are ideal due to their rich flavor.
  • Can I use dried basil instead of fresh? While fresh is best, dried basil can be used in a pinch, though the flavor will be less vibrant.
  • How can I make this salad vegan? Swap the mozzarella for a vegan cheese alternative or use marinated tofu.
  • What type of olive oil should I use? A high-quality extra virgin olive oil will provide the best flavor.
  • Can I add other ingredients? Absolutely! Feel free to add olives, artichokes, or even grilled chicken for added flavor!
  • Is Caprese salad gluten-free? Yes, all the ingredients are naturally gluten-free!
  • How do I prevent my salad from getting soggy? Keep the dressing separate until you’re ready to serve.
  • How many servings does this recipe make? This recipe serves 2-3 as a starter or side dish.

Nutritional Information and Dietary Adaptations

This Caprese salad is not only delicious but also nutritious! Here’s a quick overview:

  • Low-Calorie Option: Each serving is approximately 200 calories, making it a great light meal.
  • Rich in Antioxidants: Tomatoes and basil are loaded with vitamins and minerals, particularly vitamin C.
  • Healthy Fats: Olive oil provides heart-healthy monounsaturated fats.
  • Low-Carb Friendly: Perfect for those following a low-carb diet.

Incorporate this salad into a balanced diet, pairing it with whole grains or lean proteins for a complete meal.

Essential Equipment for Making Caprese Salad

While this recipe is simple, having the right tools can make a difference:

  • Sharp Knife: A good chef’s knife is essential for cleanly slicing tomatoes and mozzarella.
  • Cutting Board: Use a sturdy cutting board to prepare your ingredients.
  • Serving Platter: A beautiful serving platter enhances presentation.

Serving Suggestions

Caprese salad is versatile and pairs wonderfully with many dishes:

  • As a Starter: Serve it before a main course for a refreshing beginning.
  • Alongside Grilled Meats: It complements grilled chicken, steak, or fish beautifully.
  • With Crusty Bread: Pair it with fresh bread for a delightful texture contrast.

Now that you’re well-equipped with all the knowledge to create the ultimate 10-Minute Caprese Salad, it’s time to roll up your sleeves and get cooking! Remember, cooking is all about fun and creativity, so don’t hesitate to make this recipe your own. Enjoy the fresh flavors and the joy of sharing this delightful dish with friends and family!

10-Minute Caprese Salad

Prep Time 5 minutes
Total Time 5 minutes
Servings 4 people
Calories 250
A quick and delicious Italian-inspired salad featuring fresh tomatoes, mozzarella, and basil, perfect for a light snack or starter.

Ingredients

Main

  • 3 pieces ripe tomatoes (sliced)
  • 8 oz fresh mozzarella (sliced)
  • to taste Fresh basil leaves
  • 2 tablespoons balsamic glaze
  • 2 tablespoons olive oil
  • to taste Salt and pepper (to taste)

Instructions 

  • Layer tomato slices, mozzarella, and basil leaves on a serving platter.
  • Drizzle olive oil and balsamic glaze over the top.
  • Season with salt and pepper.
  • Serve immediately as a starter or light snack.

Notes

Use fresh ingredients for the best flavor.
Calories: 250kcal
Cost: $10
Course: Appetizer
Cuisine: Italian
Keyword: Basil, Mozzarella, tomato

Get Ready to Elevate Your Picnic Game with Guy Fieri’s Macaroni Salad!

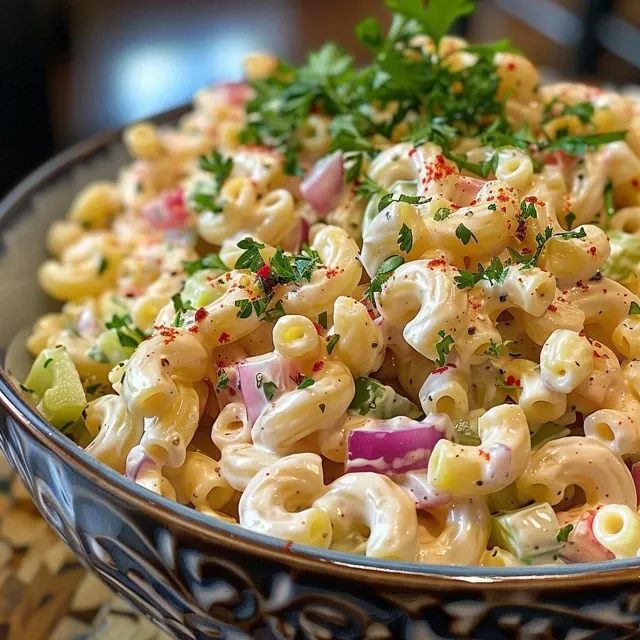
If you’re looking to add a burst of flavor to your next picnic or BBQ, then look no further! This Guy Fieri Macaroni Salad is a vibrant and delicious dish that combines creamy textures with crunchy vegetables. In just a few simple steps, you’ll have a crowd-pleasing salad that’s perfect for any summer gathering. Let’s dive into why this recipe is not just any macaroni salad, but a game-changer that will keep everyone coming back for more!

Why You’ll Love This Guy Fieri Macaroni Salad

  • Flavor Explosion: The combination of creamy mayo and tangy apple cider vinegar creates a symphony of flavors that dance on your palate.
  • Easy to Prepare: With just a handful of ingredients and simple steps, you can whip this up in no time!
  • Perfect for Any Occasion: Whether it’s a picnic, BBQ, or potluck, this salad fits seamlessly into any menu.
  • Customizable: Feel free to mix in your favorite veggies or proteins to make it your own—there are no rules here!
  • Make-Ahead Friendly: This mac salad can be made ahead of time, allowing the flavors to meld together while chilling in the fridge.

Ingredients for Guy Fieri Macaroni Salad

Gather these fresh ingredients for a salad that’s bursting with color and flavor:

  • 2 cups elbow macaroni: The classic choice for macaroni salad, offering the perfect bite.
  • 1/2 cup mayonnaise: The creamy base that provides richness and smoothness.
  • 1/4 cup sour cream: Adds a delightful tang that balances the richness of the mayo.
  • 2 tbsp apple cider vinegar: For that zesty kick that brightens up the salad.
  • 1 tbsp Dijon mustard: Enhances the flavor profile with a subtle spiciness.
  • 1/2 cup diced red bell pepper: Adds sweetness and a pop of color.
  • 1/2 cup diced celery: Introduces a satisfying crunch.
  • 1/4 cup diced red onion: Provides sharpness that complements the other flavors.
  • 1/4 cup chopped fresh parsley: Freshens up the dish with an herbal note.
  • 1/2 tsp salt: Essential for enhancing the overall flavor.
  • 1/4 tsp black pepper: Adds just the right amount of heat.

How to Make Guy Fieri Macaroni Salad

Side view of creamy macaroni salad with vibrant vegetables.

Follow these simple steps to create your own delicious macaroni salad:

Step 1: Cook the Macaroni

In a large pot, bring salted water to a boil. Add the elbow macaroni and cook for about 7-8 minutes until al dente. Drain and rinse under cold water to stop the cooking process.

Step 2: Prepare the Dressing

In a large mixing bowl, combine the mayonnaise and sour cream, whisking until smooth. Add the apple cider vinegar and Dijon mustard, blending until fully incorporated.

Step 3: Combine Ingredients

Add the cooled macaroni to the dressing. Fold in the diced red bell pepper, celery, red onion, and parsley until everything is well coated.

Step 4: Chill Before Serving

Cover the bowl with plastic wrap and refrigerate for at least one hour. This allows the flavors to meld beautifully!

Pro Tips for the Best Guy Fieri Macaroni Salad

  • Don’t Overcook the Pasta: Aim for al dente macaroni to keep the salad from becoming mushy.
  • Chill Well: Letting the salad chill not only enhances the flavors but also makes it refreshingly cool.
  • Experiment with Add-ins: Try adding diced pickles, olives, or even cooked bacon for an extra flavor twist.
  • Keep it Colorful: Use a variety of colorful veggies to make the salad visually appealing.
  • Adjust the Creaminess: Feel free to use Greek yogurt instead of sour cream for a lighter version.
  • Use Fresh Ingredients: Fresh veggies will elevate the taste and texture of your salad.
  • Don’t Skip the Vinegar: It adds the necessary zing that balances the richness of the mayo and sour cream.
  • Mix Before Serving: Give the salad a good stir before serving to redistribute the dressing.

Common Mistakes and Troubleshooting

Even the best chefs can run into a few hiccups! Here are some common pitfalls to avoid:

  • Overcooked Pasta: This can lead to a mushy salad. Always cook pasta according to package instructions.
  • Too Much Dressing: If your salad feels overly creamy, start with less dressing and add more as needed.
  • Not Chilling Long Enough: If you serve it right away, the flavors won’t have enough time to meld.
  • Underseasoned Salad: Taste and adjust the seasoning, adding more salt and pepper if necessary.

Variations of Guy Fieri Macaroni Salad

Feel free to customize this mac salad to suit your taste preferences:

  • Tuna Macaroni Salad: Add a can of drained tuna for a protein-packed twist.
  • Veggie-Packed Mac Salad: Toss in peas, corn, or shredded carrots for added nutrition.
  • Spicy Mac Salad: Stir in some chopped jalapeños or a dash of hot sauce for a kick.
  • Herbed Mac Salad: Add fresh dill or basil for an aromatic boost.

Storage and Make-Ahead Instructions

This macaroni salad is perfect for meal prep! Here’s how to store it:

  • In the Fridge: Store leftovers in an airtight container for up to 3 days.
  • Make Ahead: Prepare the salad a day in advance for optimal flavor.
  • Freezing Not Recommended: Creamy salads don’t freeze well, so it’s best enjoyed fresh.

Comprehensive FAQ about Guy Fieri Macaroni Salad

  • What ingredients are in Guy Fieri’s macaroni salad? This salad features elbow macaroni, mayonnaise, sour cream, and a mix of crunchy veggies.
  • Can I customize this salad? Absolutely! Feel free to add your favorite ingredients.
  • How long can I store macaroni salad? It can last in the fridge for up to 3 days.
  • Can I use Greek yogurt instead of sour cream? Yes, Greek yogurt is a great substitute for a lighter option.
  • Is this salad gluten-free? You can make it gluten-free by using gluten-free pasta.
  • Can I make this salad vegan? Yes, substitute mayo with vegan mayo, and omit the sour cream.
  • How do I make it spicier? Add chopped jalapeños or a splash of hot sauce to the dressing.
  • What should I serve with this salad? It pairs well with grilled meats, sandwiches, or as part of a buffet spread!

Nutritional Tips and Dietary Adaptations

This macaroni salad can be adapted to fit various dietary needs:

  • Low-Fat Version: Use low-fat mayo and Greek yogurt.
  • Gluten-Free Option: Swap the pasta for gluten-free varieties.
  • Vegan Alternative: Use vegan mayo and omit dairy products.
  • Protein Boost: Add cooked chickpeas or shredded chicken for extra protein.

Essential Equipment for Making Macaroni Salad

To create this delightful salad, you’ll need:

  • Large Pot: For boiling the macaroni.
  • Mixing Bowl: A big bowl for combining all the ingredients.
  • Whisk: For blending the dressing smoothly.
  • Measuring Cups and Spoons: To ensure accurate measurements for your ingredients.

Serving Suggestions

To truly make this salad shine, consider these serving ideas:

  • Garnish: Top with fresh parsley or a sprinkle of paprika for color.
  • Pair with Proteins: Serve alongside grilled chicken or burgers for a complete meal.
  • Buffet Style: Place in a large bowl at your next gathering for guests to serve themselves.
  • On a Bed of Greens: Serve over a bed of lettuce for a fresh twist.

Now that you have everything you need to create this unforgettable Guy Fieri Macaroni Salad, grab your ingredients and get ready to impress your friends and family. Cooking can be a fun adventure, and with this recipe, you’re bound to have an exciting culinary experience. Enjoy every bite, and remember – the kitchen is your playground!

Guy Fieri Macaroni Salad

Prep Time 15 minutes
Cook Time 10 minutes
Total Time 25 minutes
Servings 6 servings
Calories 350
A creamy and flavorful macaroni salad perfect for picnics and gatherings, with fresh vegetables and a tangy dressing.

Ingredients

Pasta

  • 2 cups elbow macaroni

Dressing

  • 1/2 cup mayonnaise
  • 1/4 cup sour cream
  • 2 tbsp apple cider vinegar
  • 1 tbsp Dijon mustard

Vegetables and herbs

  • 1/2 cup diced red bell pepper
  • 1/2 cup diced celery
  • 1/4 cup diced red onion
  • 1/4 cup chopped fresh parsley
  • 1/2 tsp salt
  • 1/4 tsp black pepper

Instructions 

  • Cook the macaroni in boiling salted water for 7-8 minutes, then drain and rinse with cold water.
  • Mix mayonnaise, sour cream, vinegar, and mustard until smooth.
  • Combine cooled pasta with dressing and fold in vegetables and parsley.
  • Cover and refrigerate for at least an hour before serving.

Notes

For extra flavor, add a dash of paprika or chopped pickles.
Calories: 350kcal
Cost: $15
Course: Salad
Cuisine: American
Keyword: macaroni, Salad

Discover the Joy of a Fresh Summer Garden Salad

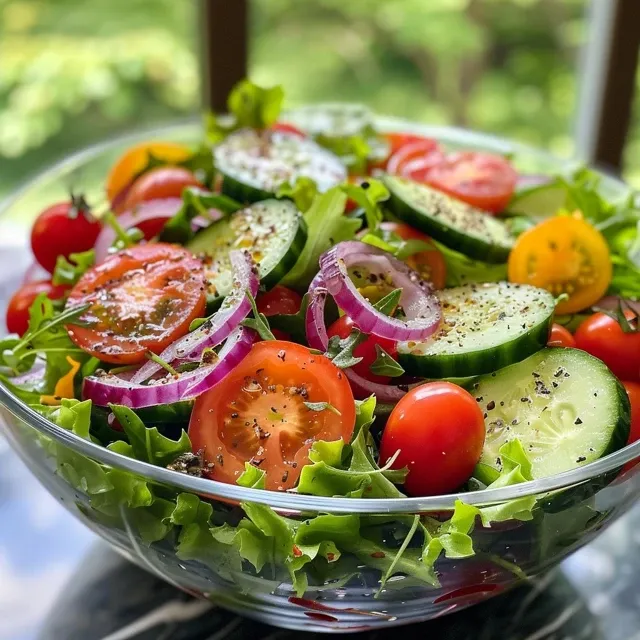
Welcome to your culinary playground! This summer, let’s dive into a world bursting with flavors, colors, and the invigorating freshness of a garden salad. In just a few steps, you can create a dish that’s not only visually stunning but also packed with nutrients and taste. This garden salad recipe is perfect for picnics, barbecues, or as a light lunch that makes you feel energized and alive!

By embracing the vibrant ingredients of summer, you’ll enjoy every bite of this salad. Whether you’re a seasoned chef or just starting, this recipe will inspire you to celebrate the season’s bounty while keeping health at the forefront.

Why You’ll Love This Recipe

This garden salad isn’t just about looks; it’s a powerhouse of benefits! Here’s why it will quickly become a favorite:

  • Quick Preparation: With minimal chopping and mixing, you can whip this up in under 15 minutes!
  • Customizable: Feel free to add your favorite proteins or veggies, making it uniquely yours!
  • Seasonal Freshness: Using in-season produce guarantees the best flavors and nutritional content.
  • Light and Refreshing: Perfect for hot days, this salad offers a cool respite while keeping you satisfied.
  • Health Benefits: Packed with vitamins and minerals, this salad supports overall health and wellness.

Ingredients Breakdown

Let’s take a closer look at the ingredients that make this salad a star:

  • 1 bag of leafy greens: A mix of romaine, spinach, and arugula provides a crunchy base rich in vitamins A and K.
  • 1 cup cherry tomatoes, halved: These sweet gems add a juicy burst and are rich in antioxidants.
  • 1 cucumber, sliced: Crisp and refreshing, cucumbers hydrate and add a satisfying crunch.
  • 1 small red onion, thinly sliced: Adds a zesty kick and is packed with anti-inflammatory properties.
  • 1 tbsp apple cider vinegar: This tangy dressing enhances flavor and aids digestion.
  • 3 tbsp extra virgin olive oil: A healthy fat that helps absorb nutrients and adds richness.
  • 1/2 tsp Dijon mustard: Provides a delightful tang that elevates the dressing.
  • 1/2 tsp salt: Enhances flavors while keeping it healthy.
  • 1/2 tsp black pepper: Adds warmth and depth to the salad.

Pro Tips for Perfecting Your Salad

Fresh garden salad arranged elegantly, showcasing colorful ingredients like cherry tomatoes and sliced cucumbers.

Ready to make the most of your garden salad experience? Here are some expert tips:

  • Use Fresh Ingredients: Always choose the freshest produce for the best taste and nutrients.
  • Chill Before Serving: Letting your salad chill for 30 minutes enhances the flavors and makes it extra refreshing.
  • Mix Dressings in Advance: Prepare your dressing ahead of time to let the flavors meld for a more robust taste.
  • Experiment with Textures: Add nuts, seeds, or croutons for an exciting crunch!
  • Balance Flavors: Aim for a mix of sweet, salty, and tangy elements to keep every bite interesting.
  • Don’t Overdress: Start with a little dressing; you can always add more if needed!
  • Mind the Order: Toss the salad gently to avoid bruising your greens.
  • Use Seasonal Ingredients: Incorporate whatever is fresh and in season for the best results.

Common Mistakes and Troubleshooting

Even the best chefs make mistakes! Here’s how to avoid common pitfalls:

  • Overcrowding the Bowl: If your salad is too full, it’s tough to mix. Use a larger bowl!
  • Using Old Ingredients: Freshness matters! Ensure everything is crisp and vibrant.
  • Skipping the Dressing: A great salad needs a good dressing to tie it all together. Don’t skip this step!
  • Not Allowing Time to Marinate: If you have time, let the salad sit for a bit to enhance the flavors.

Fun Variations to Try

Feel like switching things up? Here are some delightful variations on this garden salad:

  • Protein-Packed Version: Add grilled chicken, chickpeas, or feta cheese for a satisfying meal.
  • Fruit-Infused Salad: Toss in sliced strawberries, apples, or peaches for a sweet twist.
  • Grain Bowl Hybrid: Mix in cooked quinoa or farro for a hearty, nutritious option.
  • Asian-Inspired Salad: Swap the dressing for a sesame vinaigrette and add edamame and mandarin oranges.

Storage and Make-Ahead Instructions

Your garden salad can be prepped in advance! Here’s how to store it:

  • Make Ahead: Prepare the ingredients and store them separately. Combine just before serving.
  • Storage: Keep leftover salad in an airtight container in the fridge for up to 2 days. Add dressing just before serving to maintain freshness.

Frequently Asked Questions

Got questions? We’ve got answers! Here are some FAQs about this garden salad:

  • Can I use different greens? Absolutely! Feel free to mix and match your favorite leafy greens.
  • How can I make it vegan? Simply omit any animal products and use a plant-based dressing.
  • What can I substitute for olive oil? Avocado oil or any light oil can work well if you prefer.
  • Is this salad gluten-free? Yes, all the ingredients in this recipe are gluten-free!
  • How do I make the dressing creamier? Add a tablespoon of Greek yogurt or silken tofu for a creamy dressing.
  • Can I add herbs? Fresh herbs like basil or parsley add amazing flavor and freshness!
  • How long does it take to make? It takes about 15 minutes to prepare!
  • Can I use canned vegetables? While fresh is best, canned options can work in a pinch but may alter the flavor.

Nutritional Tips and Dietary Adaptations

Want to take your salad to the next level? Here’s how to maximize nutrition:

  • Increase Fiber: Add beans or lentils to boost fiber content for better digestion.
  • Reduce Sodium: Use low-sodium dressings or herbs instead of salt to flavor your salad.
  • Vitamin Boost: Incorporate a variety of colorful vegetables to get a full spectrum of vitamins and minerals.
  • Healthy Fats: Include avocado or nuts to enhance heart health.

Essential Equipment Recommendations

Here’s what you need to create your salad masterpiece:

  • Large Mixing Bowl: A big bowl makes mixing easier and prevents spills.
  • Sharp Knife: A good knife is essential for chopping veggies quickly and safely.
  • Cutting Board: Protects your countertops and provides a stable surface for chopping.
  • Whisk: For blending your dressing ingredients smoothly.
  • Salad Tongs: Handy for tossing and serving your salad effortlessly.

Serving Suggestions

Want to impress your guests? Here are some serving ideas:

  • On a Platter: Serve your salad on a large platter for a stunning presentation.
  • With Grilled Proteins: Pair it with grilled chicken, shrimp, or tofu for a balanced meal.
  • As a Side Dish: This salad complements any main course beautifully!
  • In a Jar: Layer ingredients in a jar for a fun, portable lunch option!

Now that you’re equipped with all the tips, tricks, and tools to make the ultimate summer garden salad, it’s time to get cooking! Embrace the joy of fresh ingredients and let your creativity shine in the kitchen. Remember, cooking should be fun, colorful, and delicious. Enjoy every moment, and most importantly, enjoy every bite of your vibrant garden salad!

Garden Salad: A Fresh Summer Recipe

Prep Time 10 minutes
Total Time 10 minutes
Servings 4 people
Calories 150
A light and refreshing garden salad perfect for summer days, combining fresh vegetables with a tangy vinaigrette.

Ingredients

Leafy greens

  • 1 bag leafy greens

Cherry tomatoes

  • 1 cup cherry tomatoes, halved

Cucumber

  • 1 cucumber cucumber, sliced

Red onion

  • 1 small red onion red onion, thinly sliced

Apple cider vinegar

  • 1 tbsp apple cider vinegar

Extra virgin olive oil

  • 3 tbsp olive oil

Dijon Mustard

  • 1/2 tsp Dijon Mustard

Salt

  • 1/2 tsp salt

Black pepper

  • 1/2 tsp black pepper

Instructions 

  • Combine leafy greens, cherry tomatoes, cucumber, and red onion in a large bowl.
  • Whisk together vinegar, olive oil, Dijon mustard, salt, and pepper in a separate bowl.
  • Drizzle dressing over salad and toss. Serve immediately.

Notes

Use fresh ingredients for best flavor.
Calories: 150kcal
Cost: $10
Course: Salad
Cuisine: American
Keyword: Vegetables

Discover the Magic of Macaroni Salad: A Flavorful Adventure!

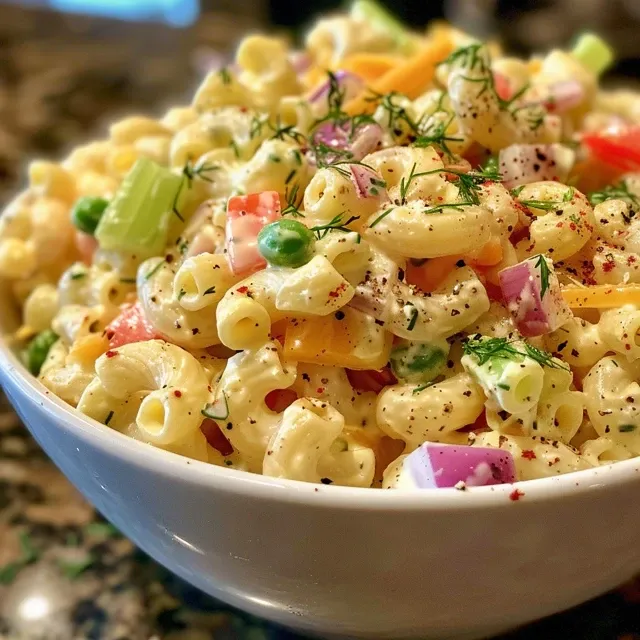
Welcome to the vibrant world of macaroni salad! This easy macaroni salad recipe is not just another side dish; it’s a culinary canvas where you can unleash your creativity. With its colorful medley of fresh vegetables and creamy dressing, each bite is a celebration of flavor and nutrition. Perfect for picnics, barbecues, or quick weeknight dinners, this dish transforms simple ingredients into a fun and nourishing experience. So, let’s dive in and explore why I love this easy macaroni salad and how you can make it a staple in your kitchen!

Why You’ll Love This Recipe

  • Quick and Easy: This macaroni salad comes together in under 30 minutes, making it a perfect choice for busy weeknights or last-minute gatherings.
  • Customizable: You can easily adjust the ingredients to suit your taste or dietary needs, ensuring everyone at the table is happy!
  • Vibrant Colors: The combination of fresh vegetables not only adds flavor but also makes your dish visually appealing—perfect for impressing guests!
  • Perfect for Meal Prep: This salad stores well in the fridge, making it an excellent option for meal prep or leftovers.
  • Kid-Friendly: With its creamy dressing and fun textures, this salad is a hit with kids and adults alike, making it a family favorite!

Ingredients That Shine

Let’s break down the ingredients for this delightful macaroni salad:

  • 1 lb elbow macaroni: The base of our salad; you can substitute with whole wheat or gluten-free pasta for a healthier option.
  • 6 oz cheddar cheese (cubed): Adds a creamy, cheesy flavor; feel free to use a dairy-free cheese for a vegan twist.
  • 1/2 red onion (minced): Offers a sharp flavor; you can swap it with green onions for a milder taste.
  • 4 celery stalks (diced): Adds crunch; you can use diced cucumbers for a refreshing alternative.
  • 1 red bell pepper (diced): A sweet addition; any color bell pepper works wonderfully!
  • 1 cup frozen peas: No need to thaw, they add a pop of color and sweetness.
  • 1/2 cup mayo: The creamy base; you can substitute with Greek yogurt for a healthier option.
  • 1/4 cup apple cider vinegar: Provides a tangy kick; lemon juice is a great substitute!
  • 1/4 cup fresh dill: For a burst of flavor; feel free to use dried dill if fresh isn’t available.
  • 2 tablespoons sugar: Balances the acidity; adjust to taste or omit if you prefer.
  • 2 tablespoons Dijon mustard: Adds depth; yellow mustard can also work.
  • 1 teaspoon salt and 1 teaspoon pepper: Essential seasonings to enhance flavor.

Steps to Create Your Masterpiece

A colorful bowl of macaroni salad with a variety of ingredients visible.
  1. Cook the elbow macaroni according to package instructions until al dente. Drain and rinse under cold water to prevent stickiness and overcooking.
  2. In a large mixing bowl, combine the cooked pasta with cubed cheese, minced onion, diced celery, diced bell pepper, and frozen peas.
  3. In a separate small bowl, whisk together mayonnaise, apple cider vinegar, dill, sugar, Dijon mustard, salt, and pepper until smooth.
  4. Pour the dressing over the pasta mixture and toss until everything is well coated. Cover the bowl with plastic wrap and chill for at least one hour before serving. Enjoy your vibrant macaroni salad!

Pro Tips for the Perfect Macaroni Salad

  • Chill to Perfection: Letting the salad chill for at least one hour allows the flavors to meld beautifully.
  • Adjust to Taste: Feel free to tweak the dressing ingredients to find your perfect balance of flavor!
  • Mix It Up: Experiment with different cheeses or add-ins like bacon bits or hard-boiled eggs for extra protein.
  • Keep It Fresh: Fresh herbs elevate the dish; consider adding parsley or basil for a fragrant touch.
  • Don’t Overcook the Pasta: Aim for al dente to ensure it holds its shape and texture in the salad.
  • Presentation Matters: Serve in a colorful bowl or garnish with extra dill for a visually appealing dish!
  • Make It Ahead: This salad keeps well in the fridge for up to 3 days, making it perfect for meal prep!
  • Experiment with Dressings: Try different dressings like ranch or vinaigrette for a unique spin on this classic!

Common Mistakes and Troubleshooting

Even the best chefs make mistakes! Here’s how to troubleshoot common issues:

  • Too Dry: If your salad feels dry, add a splash of vinegar or a bit more mayo to moisten it up.
  • Overly Tangy: If you find it too tangy, balance it with a little sugar or honey.
  • Flavorless: Always taste as you go! Adjust salt and pepper to enhance the flavor.
  • Too Many Veggies: If you added too many vegetables, consider doubling the dressing to keep it balanced.

Delicious Variations to Try

Get creative with your macaroni salad! Here are some fun variations:

  • Italian-Style: Add sliced black olives, cherry tomatoes, and mozzarella balls for an Italian twist.
  • Spicy Southwest: Mix in diced jalapeños, corn, and a chipotle dressing for a spicy kick.
  • Classic Tuna Macaroni Salad: Fold in canned tuna for a protein-packed meal.
  • Greek Macaroni Salad: Incorporate feta cheese, cucumbers, and Kalamata olives for a Mediterranean flair.

Storage and Make-Ahead Instructions

This macaroni salad is perfect for make-ahead meals:

  • In the Fridge: Store in an airtight container in the fridge for up to 3 days. The flavors will deepen over time!
  • Freezing: I don’t recommend freezing macaroni salad, as the texture may change upon thawing.
  • Make-ahead Tip: Prepare the salad a day in advance for enhanced flavor.

Frequently Asked Questions

  • Can I use different pasta types? Absolutely! Any small pasta works, like shells or rotini.
  • What can I substitute for mayo? Greek yogurt or a vegan mayo are great alternatives!
  • How long can I store macaroni salad? Up to 3 days in the fridge, stored properly.
  • Can I add meat? Yes! Chicken, ham, or bacon can elevate the dish.
  • Is this recipe gluten-free? Use gluten-free pasta for a gluten-free version.
  • Can I make it vegan? Yes! Substitute cheese and mayo with vegan alternatives.
  • What herbs can I add? Fresh dill, parsley, or chives work wonderfully!
  • How can I make it more filling? Add protein like chickpeas or tuna!

Nutritional Tips and Dietary Adaptations

This vibrant macaroni salad can be tailored to fit various dietary needs:

  • Low-Calorie Option: Use low-fat mayo or Greek yogurt to cut calories.
  • Higher Protein: Add beans or grilled chicken for a protein boost.
  • Gluten-Free: Choose gluten-free pasta to accommodate dietary restrictions.
  • Vegan-Friendly: Use plant-based mayo and cheese substitutes.

Essential Kitchen Equipment

To create your macaroni salad, make sure you have:

  • Large Pot: For boiling the elbow macaroni.
  • Mixing Bowls: One large for the salad and a smaller one for the dressing.
  • Measuring Cups and Spoons: For accurate ingredient measurements.
  • Whisk: To mix the dressing smoothly.

Serving Suggestions

This macaroni salad shines as a side dish, but it can also be a star on its own! Here are some serving ideas:

  • Picnic Delight: Serve alongside grilled meats and fresh fruits for a perfect picnic spread.
  • Barbecue Companion: Pair with burgers or hot dogs at your next summer barbecue.
  • Light Lunch: Enjoy it as a standalone dish with a side of fresh greens for a light lunch.

Conclusion: Your New Go-To Recipe!

This easy macaroni salad is a delightful, colorful, and nutritious addition to any meal. With its endless possibilities for customization, you can make this dish uniquely yours every time. Whether you’re hosting a summer barbecue, preparing for a picnic, or simply looking for a quick weeknight dinner, this macaroni salad will not disappoint. So grab your ingredients and get ready to create a dish that’s not just food, but a celebration of flavor! Happy cooking!

Easy Macaroni Salad

Prep Time 15 minutes
Cook Time 10 minutes
Total Time 25 minutes
Servings 6 servings
Calories 350
A quick and delicious macaroni salad perfect for picnics and gatherings. Creamy, crunchy, and flavorful, it's a crowd-pleaser!

Ingredients

Pasta

  • 1 lb elbow macaroni
  • 6 oz cheddar cheese (cubed)
  • 0.5 red onion red onion (minced)
  • 4 stalks celery stalks (diced)
  • 1 red bell pepper red bell pepper (diced)
  • 1 cup frozen peas
  • 0.5 cup mayo
  • 0.25 cup apple cider vinegar
  • 0.25 cup fresh dill
  • 2 tablespoons sugar
  • 2 tablespoons Dijon mustard
  • 1 teaspoon salt
  • 1 teaspoon pepper

Instructions 

  • Cook pasta until al dente, then rinse with cold water and drain.
  • Mix cooked pasta with cheese, onion, celery, bell pepper, and peas.
  • Whisk together mayo, vinegar, dill, sugar, mustard, salt, and pepper.
  • Pour dressing over pasta mixture and toss. Chill for at least 1 hour before serving.

Notes

For extra flavor, add chopped fresh herbs or a squeeze of lemon before serving.
Calories: 350kcal
Cost: $10
Course: Salad
Cuisine: American
Keyword: macaroni

Welcome to Your Ultimate Taco Salad Experience!

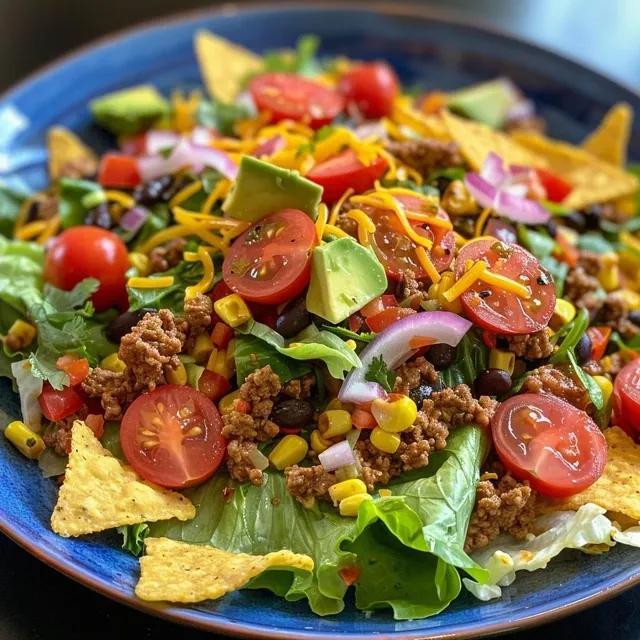
Are you ready to dive into a flavor-packed adventure with my irresistible Taco Salad Fiesta? This vibrant dish combines fresh ingredients, seasoned taco meat, and a zesty dressing that makes healthy eating not just nutritious but a celebration of taste! Whether you’re meal prepping for a busy week, hosting friends, or simply craving something delicious, this recipe covers all bases. Let’s get cooking!

Why You’ll Love This Recipe

  • Quick and Easy: Ready in just 30 minutes, this taco salad is perfect for busy weekdays.
  • Versatile Ingredients: Use ground beef, turkey, or a plant-based alternative to suit your taste preferences.
  • Customizable Toppings: Make it your own with toppings like avocado, cheese, or your favorite salsa!
  • Fresh and Flavorful: Packed with colorful veggies and zesty flavors, this salad is a feast for both the eyes and the palate.
  • Healthy and Satisfying: A great balance of protein, fiber, and healthy fats to keep you energized!

Ingredients Breakdown

Let’s gather our ingredients for this delightful Taco Salad:

  • 1 lb ground beef (or turkey/plant-based meat): Choose your protein based on dietary needs.
  • 1 packet taco seasoning (or homemade blend): For a flavor punch, you can easily make a homemade seasoning!
  • 1 tbsp olive oil: This helps to cook the meat and adds healthy fats.
  • 6 cups chopped romaine lettuce: This salad is the base, offering a crunchy texture.
  • 1 cup cherry tomatoes, halved: For a burst of color and sweetness.
  • 1 cup black beans, rinsed and drained: Adds protein and fiber to the dish.
  • 1 cup corn kernels (fresh, frozen, or canned): Sweet corn balances the flavors beautifully.
  • 1/2 cup red onion, finely chopped: Adds sharpness and crunch.
  • 1 cup shredded cheddar or Mexican cheese blend: Melty goodness on top!
  • 1 avocado, diced: Creaminess that takes the salad over the top.
  • 2 cups crushed tortilla chips: For that delightful crunch!
  • 1/2 cup sour cream (or Greek yogurt): Creamy dressing to tie it all together.
  • 1/4 cup salsa: Adds a zesty kick and flavor depth.
  • 2 tbsp lime juice: Brightens up the salad with its citrusy freshness.
  • 1 tsp chili powder: A little heat to wake up your taste buds.
  • Salt and pepper to taste: Essential for enhancing flavors.

Step-by-Step Directions

Side view of a juicy taco salad featuring vibrant ingredients like tomatoes, avocado, and cheese.

Follow these easy steps to create your Taco Salad Fiesta:

  1. In a large skillet, heat olive oil over medium heat. Add the ground beef and cook until browned, breaking it apart with a spoon. Drain any excess fat.
  2. Sprinkle in taco seasoning and a splash of water, then stir and simmer for 2–3 minutes until the mixture is well coated and fragrant.
  3. In a small bowl, whisk together sour cream, salsa, lime juice, chili powder, salt, and pepper. Adjust the seasoning to your liking.
  4. In a large serving bowl, add chopped romaine lettuce. Top it with tomatoes, black beans, corn, and red onion. Toss lightly to combine.
  5. Spoon the seasoned beef over the salad.
  6. Sprinkle shredded cheese, diced avocado, and crushed tortilla chips generously on top.
  7. Pour the dressing over the salad just before serving, then gently toss everything together to coat.
  8. Serve immediately while the meat is warm and the chips are crunchy.

Pro Tips for Taco Salad Success

  • Fresh Ingredients: Use the freshest vegetables you can find for maximum flavor.
  • Meal Prep: Make the taco meat ahead of time and store it in the fridge to save time during the week.
  • Customize: Feel free to add your favorite toppings such as jalapeños, olives, or hot sauce!
  • Layering: For a stunning presentation, layer the ingredients in a trifle dish.
  • Crunch Factor: Add tortilla chips just before serving to maintain their crunch.
  • Chill the Dressing: Prepare the dressing ahead of time and chill for a refreshing taste!
  • Don’t Skip the Lime: A squeeze of fresh lime just before serving elevates the flavor!
  • Leftovers: Store leftovers in an airtight container for a quick lunch option.

Taco Salad Variations

Want to switch things up? Here are some tasty variations:

  • Vegetarian Taco Salad: Replace meat with lentils or quinoa for a plant-based twist.
  • Southwestern Taco Salad: Add avocado, cilantro, and a chipotle dressing for a smoky flavor.
  • Tex-Mex Taco Salad: Incorporate grilled corn, jalapeños, and pepper jack cheese for a spicy kick.
  • Nacho Taco Salad: Use nacho cheese sauce instead of shredded cheese for a cheesy delight.

Storage and Make-Ahead Instructions

You can easily prepare parts of this Taco Salad ahead of time!

  • Meat: Cook and store the taco meat in an airtight container in the fridge for up to 4 days.
  • Veggies: Chop veggies in advance and keep them in separate containers to stay fresh.
  • Dressing: Whisk together and store in a sealed jar in the fridge for up to a week.
  • Assemble: When ready to serve, combine all components to maintain freshness and crunch!

Frequently Asked Questions

  • Can I make this taco salad ahead of time? Yes! Prepare the ingredients separately and assemble just before serving.
  • What can I use instead of ground beef? Turkey, chicken, or a plant-based option like lentils work great!
  • How long does leftover taco salad last? Leftovers can last in the fridge for about 2-3 days in an airtight container.
  • Can I freeze taco salad? It’s best to freeze only the meat and toppings separately for freshness.
  • What toppings can I add to my taco salad? Consider olives, jalapeños, or even a sprinkle of feta cheese!
  • Is taco salad healthy? Yes! It is packed with protein, fiber, and vitamins from the fresh ingredients.
  • Can I use a different type of cheese? Absolutely! Feel free to swap in your favorite cheese.
  • How spicy is this taco salad? The spice level can be adjusted based on the amount of chili powder and salsa you use.

Nutrition Tips and Dietary Adaptations

This Taco Salad can easily be adapted to fit various dietary needs:

  • Low-Carb: Skip the tortilla chips and add more veggies like bell peppers or cucumbers.
  • Gluten-Free: Ensure your taco seasoning is gluten-free and use corn chips.
  • Dairy-Free: Substitute cheese and sour cream with dairy-free alternatives.
  • High-Protein: Add additional beans or grilled chicken to up the protein content.

Essential Equipment for Taco Salad

Make your cooking experience smooth with the right tools:

  • Large Skillet: For browning your meat perfectly.
  • Mixing Bowl: Perfect for tossing the salad together.
  • Whisk: To combine your dressing ingredients well.
  • Cutting Board: Essential for chopping fresh vegetables efficiently.

Serving Suggestions

This taco salad is great as a standalone meal, but here are some fun serving ideas:

  • With a Side of Cornbread: A hearty addition to complement the flavors.
  • As a Wrap: Scoop the salad into tortillas for a fun wrap option!
  • Pair with a Refreshing Drink: Serve with iced tea or a fruity mocktail for a complete meal.

Conclusion: Dive Into the Fiesta!

Your Taco Salad Fiesta is not just a meal; it’s an adventure full of flavor and fun! With every crunchy bite, you’ll experience the joy of healthy eating without the sacrifice of taste. So gather your ingredients, get creative, and make this dish your own. Here’s to colorful plates and vibrant flavors—happy cooking!

Traditional Taco Salad

Prep Time 10 minutes
Cook Time 15 minutes
Total Time 25 minutes
Servings 4 servings
Calories 650
A flavorful and hearty salad combining seasoned ground meat, fresh vegetables, and crunchy chips, perfect for a quick and satisfying meal.

Ingredients

Meat and Seasonings

  • 1 lb ground beef (or turkey/plant-based meat)
  • 1 packet taco seasoning (or homemade blend)
  • 1 tbsp olive oil

Salad Vegetables

  • 6 cups chopped romaine lettuce
  • 1 cup cherry tomatoes, halved
  • 1 cup black beans, rinsed and drained
  • 1 cup corn kernels (fresh, frozen, or canned)
  • 1/2 cup red onion, finely chopped

Cheese and Toppings

  • 1 cup shredded cheddar or Mexican cheese blend
  • 1 avocado diced
  • 2 cups crushed tortilla chips

Dressing

  • 1/2 cup sour cream (or Greek yogurt)
  • 1/4 cup salsa
  • 2 tbsp lime juice
  • 1 tsp chili powder
  • to taste Salt and pepper

Instructions 

  • Cook ground meat with olive oil until browned; add taco seasoning and simmer briefly.
  • Mix sour cream, salsa, lime juice, chili powder, salt, and pepper to make dressing.
  • Combine lettuce, tomatoes, beans, corn, and onion in a bowl; toss lightly.
  • Top salad with cooked meat, cheese, avocado, and crushed chips.
  • Pour dressing over and toss gently; serve immediately.

Notes

For a healthier option, use Greek yogurt instead of sour cream and opt for baked chips.
Calories: 650kcal
Cost: $15
Course: Main Course
Cuisine: Mexican
Keyword: Salad, Taco

Discover the Joy of a Vibrant High-Protein Chickpea Quinoa Salad!

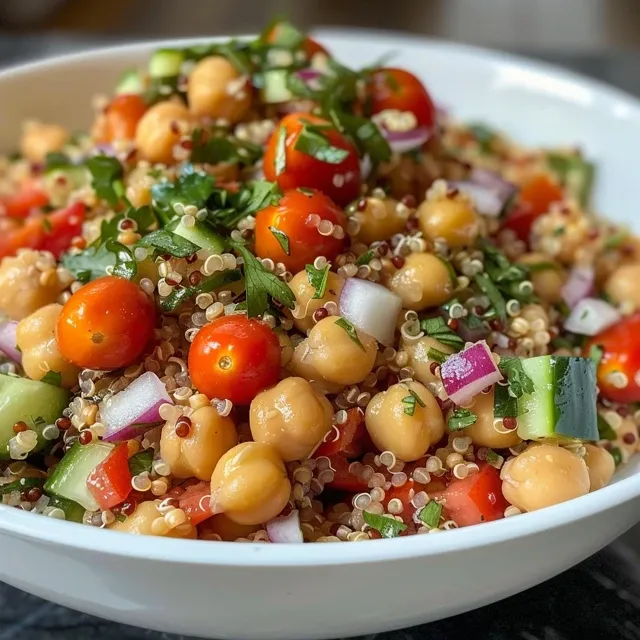
Welcome to a culinary adventure that will transform your meal prep and refresh your taste buds! Our High-Protein Chickpea Quinoa Salad is not just a salad; it’s an energizing experience packed with flavor, nutrition, and excitement. If you’ve been searching for a way to elevate your healthy eating game, you’re in the right place. In the next few minutes, you’ll learn how to create a salad that’s not only nourishing but also bursting with personality. Let’s dive into what makes this salad a must-try!

Why You’ll Love This Recipe

This salad is more than just a meal; it’s a celebration of healthy eating! Here are five reasons why you’ll fall in love with this recipe:

  • High Protein Powerhouse: With chickpeas and quinoa, this salad is loaded with protein, perfect for fueling your day.
  • Flavor Explosion: The combination of fresh vegetables, zesty lemon juice, and spices creates a mouthwatering experience in every bite.
  • Meal Prep Friendly: Easily prepare this salad in advance and enjoy it throughout the week, making healthy eating a breeze.
  • Vibrant Colors and Textures: The visual appeal of this salad is irresistible, featuring a rainbow of fresh ingredients that make your plate pop.
  • Customizable: Tailor this salad to your taste buds! With various substitutions and additions, you can make it your own.

Ingredient Breakdown and Substitutions

Let’s explore the ingredients that make this salad a nutritional powerhouse, along with some easy substitutions to suit your preferences.

  • Chickpeas: 30 ounces (2 (15-ounce) cans, drained, and rinsed) – for a creamy texture and hearty protein. Substitution: White beans or black beans can work in a pinch.
  • Quinoa: 1 cup dry quinoa or 4 cups cooked – a complete protein and gluten-free grain. Substitution: Try brown rice or farro for a different flavor.
  • Fresh Vegetables: 5 medium Roma tomatoes (diced), 1 long English cucumber (diced), and 1 1/2 cups diced red onion – for crunch and freshness. Substitution: Any seasonal veggies you love, such as bell peppers or carrots.
  • Hemp Seeds: 1/2 cup plus 1 tablespoon (optional) – for healthy fats and a nutty flavor. Substitution: Chopped nuts or sunflower seeds for crunch.
  • Olive Oil: 1/4 cup plus 1/2 tablespoon – provides richness and helps dress the salad beautifully. Substitution: Avocado oil or sunflower oil.
  • Lemon Juice: 1/4 cup plus 3 tablespoons – for brightness and acidity. Substitution: Apple cider vinegar or lime juice for a twist.
  • Spices: Dash of paprika and garlic powder (optional) – to enhance flavor. Substitution: Cumin or chili powder for a different spice profile.
  • Salt: To taste – essential for bringing out the flavors.

Expert Tips for a Flawless Salad

A close-up of a colorful chickpea quinoa salad with fresh herbs and vegetables in a rustic setting.

To ensure your salad turns out perfectly every time, keep these pro tips in mind:

  • Rinse Quinoa: Always rinse your quinoa before cooking to remove its natural bitterness. This step ensures you have fluffy, delicious grains.
  • Chill Your Ingredients: For a refreshing salad, chill your vegetables and cooked quinoa before combining.
  • Adjust to Taste: Don’t be afraid to tweak the seasoning! Taste as you go to find your perfect balance.
  • Roast Chickpeas for Crunch: If you prefer a protein punch, roast your chickpeas for added texture and flavor.
  • Layer for Meal Prep: If you’re making jars, layer the ingredients from heaviest to lightest to keep everything fresh.
  • Use a Zesty Dressing: Whisk together olive oil, lemon juice, and spices for a quick dressing that ties the flavors together.
  • Incorporate Fresh Herbs: Add fresh herbs like cilantro or parsley for an extra burst of flavor and freshness.
  • Tweak the Texture: Play around with different vegetables and textures for variety each time you make it.

Common Mistakes and Troubleshooting

Even the best chefs make mistakes! Here are some common pitfalls and how to avoid them:

  • Overcooked Quinoa: Follow package instructions closely to avoid mushy quinoa. Perfectly cooked quinoa should be fluffy and slightly chewy.
  • Too Much Dressing: Start with a little and add more as needed. It’s easier to add than to fix a soggy salad!
  • Skipping the Seasoning: Don’t skip salt! It’s crucial for enhancing the flavors of your ingredients.
  • Not Enough Protein: If you’re looking for more protein, consider adding grilled chicken, tofu, or more chickpeas.

Delicious Variations to Try

Here are some fun variations to keep things exciting:

  • Mediterranean Twist: Add feta cheese, olives, and artichoke hearts for a Mediterranean flavor explosion.
  • Spicy Kick: Incorporate jalapeños or a spicy dressing to give it a heat boost.
  • Asian-Inspired: Toss in edamame, sesame seeds, and a soy-ginger dressing for an Asian flair.
  • Seasonal Veggie Medley: Use seasonal veggies like zucchini, bell peppers, or asparagus for a fresh twist.

Storage and Make-Ahead Instructions

This salad is perfect for meal prep! Here’s how to store it:

  • Refrigerate: Store in an airtight container in the fridge for up to 5 days.
  • Make Ahead: Assemble all ingredients except dressings and crunchy toppings. Add dressing just before serving to keep everything fresh.
  • Mason Jar Method: Layer your ingredients in mason jars for easy grab-and-go lunches.

Comprehensive FAQ

Got questions? We’ve got answers! Here are the most frequently asked questions:

  • Can I use canned chickpeas?: Absolutely! Canned chickpeas are a convenient option. Just drain and rinse before using.
  • How can I make this salad vegan?: This recipe is already vegan! Just ensure your substitutions are plant-based.
  • What can I use instead of quinoa?: Brown rice, farro, or even couscous can be great substitutes!
  • Can I freeze this salad?: It’s best enjoyed fresh, but you can freeze the quinoa and chickpeas separately.
  • What’s the best dressing to use?: A simple olive oil and lemon juice dressing works wonders!
  • How do I know when quinoa is cooked?: Quinoa is done when it’s fluffy and the germ ring has separated, about 15 minutes.
  • Can I add cheese?: Yes! Feta or goat cheese would be delicious additions.
  • How can I make this salad spicy?: Add diced jalapeños or a splash of hot sauce for a kick!

Nutritional Tips and Dietary Adaptations

Enhance the nutritional profile of your salad with these tips:

  • Boost Fiber: Add more vegetables like kale or spinach for added fiber and vitamins.
  • Healthy Fats: Consider adding avocado for creamy texture and healthy fats.
  • Protein Power: Include grilled chicken, tofu, or even nuts for an extra protein boost.

Equipment Recommendations

Here’s what you’ll need to create this salad:

  • Measuring Cups and Spoons: For accurate ingredient measurements.
  • Mixing Bowls: Essential for combining ingredients.
  • Strainer: Useful for draining canned chickpeas and tomatoes.
  • Cooking Pot: For cooking the quinoa.
  • Mason Jars: Perfect for meal prep and storage!

Serving Suggestions

When it comes to serving this salad, the options are endless! Here are some ideas:

  • As a Main Course: Serve it as a hearty main dish for lunch or dinner.
  • Side Dish: Pair it with grilled meats or fish for a nutritious side.
  • Picnic Delight: Bring it along for picnics or potlucks; it’s always a hit!
  • In Salad Jars: Perfect for on-the-go lunches, just shake and enjoy!

In conclusion, our High-Protein Chickpea Quinoa Salad is not just a recipe; it’s an invitation to explore the joy of healthy cooking. With its vibrant flavors, nutritional benefits, and endless customization options, you’ll find that embracing healthy eating can be both fun and fulfilling. So grab your ingredients and let’s get cooking—your taste buds will thank you!

High-Protein Chickpea Quinoa Salad

Prep Time 15 minutes
Cook Time 20 minutes
Total Time 35 minutes
Servings 4 servings
Calories 450
A nutritious and flavorful salad combining chickpeas, quinoa, fresh vegetables, and herbs, perfect for a healthy meal or meal prep.

Ingredients

Chickpeas

  • 30 ounces chickpeas (drained and rinsed) (or 3 cups cooked)
  • 0.25 cup extra-virgin olive oil (plus more for drizzling)
  • 0.5 tablespoon extra-virgin olive oil (additional for dressing)
  • 1 cup dry quinoa (or 4 cups cooked)
  • 5 medium Roma tomatoes (diced (about 8 ounces))
  • to taste salt
  • 0.25 cup lemon juice (about 3 medium lemons)
  • 1 long English cucumber diced cucumber (about 3 cups)
  • 1.5 cups diced red onion (about 1 medium)
  • 0.5 cup hemp seeds (or hearts (optional))
  • 1 cup chopped fresh cilantro

Instructions 

  • Preheat oven to 425ºF. Dry chickpeas, toss with paprika, garlic powder, salt, and olive oil, then roast for 15 minutes. Broil for 3 minutes until crispy.
  • Cook quinoa according to package instructions, then let cool for 5 minutes and fluff with a fork.
  • Drain and toss tomatoes with salt; set aside to drain excess liquid.
  • Combine cooked quinoa, chickpeas, tomatoes, cucumber, red onion, cilantro, hemp seeds, and dressing. Toss to combine and serve.

Notes

For extra flavor, roast chickpeas until crispy and adjust salt and lemon juice to taste.
Calories: 450kcal
Cost: $15
Course: Salad
Cuisine: Mediterranean
Keyword: High-Protein

Dive into Flavor: Why This BBQ Chicken Salad is Your New Favorite!

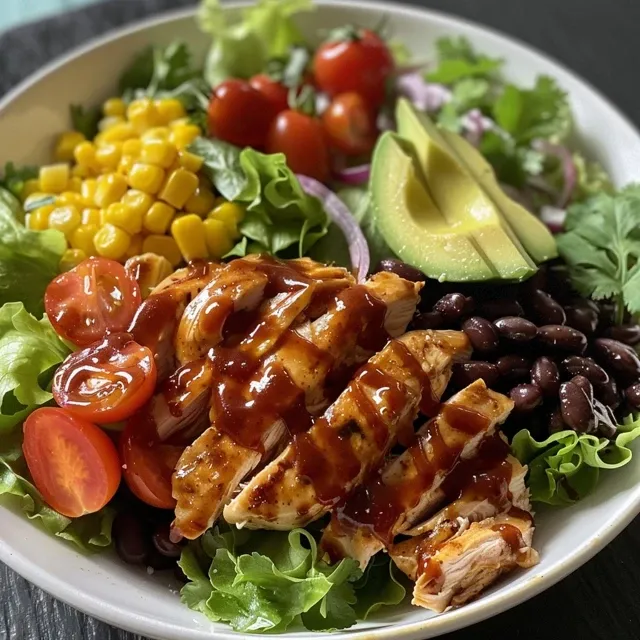
Welcome to a culinary adventure that will transform your lunch or dinner table! This BBQ Chicken Salad with Creamy Avocado Dressing is not just a meal; it’s an experience bursting with flavor, nutrition, and vibrant colors. Combining the smoky essence of grilled chicken with the freshness of salad greens and a luscious avocado dressing, this dish will excite your taste buds and make healthy eating feel effortless and enjoyable.

In this article, we’ll explore why you’ll love this recipe, dive deep into the ingredients, and provide expert tips to take your cooking to the next level. Ready to make some magic in your kitchen? Let’s go!

Why You’ll Love This Recipe

  • Quick and Easy: This BBQ chicken salad can be prepared in just 30 minutes, making it perfect for busy weeknights or spontaneous gatherings.
  • Packed with Nutrition: Loaded with protein from chicken, fiber from beans, and healthy fats from avocado, this salad is a powerhouse of nutrients.
  • Flavor Explosion: The combination of smoky grilled chicken and creamy avocado dressing creates an irresistible flavor profile that excites your palate.
  • Versatile and Customizable: This recipe can easily be modified to include your favorite ingredients or dietary needs, whether you prefer a vegan option or a gluten-free twist.
  • Meal Prep Friendly: Make a big batch to enjoy throughout the week. Store it in an airtight container for easy grab-and-go lunches or dinners!

Ingredient Breakdown

Let’s take a closer look at the key ingredients that make this BBQ Chicken Salad a standout choice:

  • Chicken: 2 boneless, skinless chicken breasts are ideal for grilling. You can substitute with thighs for more flavor or even tofu for a vegetarian version.
  • Barbecue Sauce: Use your favorite store-bought BBQ sauce, or try making your own for a personal touch!
  • Mixed Salad Greens: A combination of Romaine, spinach, and arugula adds freshness and texture. Feel free to substitute with kale or your favorite greens.
  • Cherry Tomatoes: These bite-sized delights add sweetness and juiciness. You can also use diced bell peppers for a crunchier texture.
  • Black Beans: A fantastic source of fiber and protein, these beans complement the salad beautifully. Consider using chickpeas for variation.
  • Corn: Fresh, canned, or frozen corn kernels add a sweet crunch. If you’re feeling adventurous, try grilled corn for a smoky flavor!
  • Red Onion: Thinly sliced for a bit of sharpness. If you prefer a milder flavor, soak them in water for a few minutes.
  • Avocado: The star of the creamy dressing! Ripe avocados are essential for that smooth, buttery texture.
  • Greek Yogurt: This provides creaminess while boosting the protein content. You can use a dairy-free yogurt alternative for a vegan option.
  • Lime Juice: Fresh lime juice brightens the dressing and balances out the flavors.
  • Honey: Just a touch of sweetness enhances the dressing. Substitute with maple syrup for a vegan-friendly alternative.
  • Cilantro: Fresh cilantro adds a burst of herbaceous flavor. If you’re not a fan, parsley works great too!

Pro Tips for Perfection

Side view of a delicious BBQ chicken salad with avocado dressing and fresh ingredients.
  • Marinate for Flavor: For an extra layer of flavor, marinate the chicken in BBQ sauce for at least 30 minutes before grilling.
  • Grill Marks: Achieve perfect grill marks by preheating the grill and ensuring the chicken is dry before placing it on the grill.
  • Adjust Consistency: If the avocado dressing is too thick, add a splash of water or more lime juice to reach your desired consistency.
  • Chill Before Serving: Allow the salad to chill in the fridge for 10-15 minutes before serving to let the flavors meld beautifully.
  • Toppings Galore: Top your salad with crispy tortilla strips, sliced jalapeños, or additional cheese for added crunch and flavor.
  • Don’t Skip the Resting: Let the grilled chicken rest for a few minutes after cooking to retain its juices for a tender bite.
  • Even Distribution: Toss the salad thoroughly to ensure every bite is packed with all the delicious elements.
  • Mix and Match: Feel free to swap out ingredients based on what you have on hand. This salad is incredibly forgiving!

Common Mistakes and Troubleshooting

To ensure that your BBQ Chicken Salad turns out perfectly every time, here are some common pitfalls to avoid:

  • Overcooking the Chicken: This can lead to dry meat. Use a meat thermometer to check for doneness; chicken should reach an internal temperature of 165°F.
  • Under-seasoning: Don’t be shy with your seasonings! Salt and pepper enhance the flavors of all the ingredients.
  • Too Much Dressing: Start with a small amount of dressing and gradually add more until you achieve your desired flavor without drowning the salad.
  • Not Letting It Rest: Cutting into the chicken too soon can result in juices running out, leaving you with a dry chicken.
  • Skipping Fresh Ingredients: Fresh herbs and veggies elevate the dish. Don’t settle for stale or wilted produce.

Variations to Try

Get creative with your BBQ Chicken Salad! Here are some exciting variations:

  • Southwestern Style: Add diced avocados, roasted corn, and a spicy chipotle dressing for a zesty twist.
  • Asian-Inspired: Use sesame ginger dressing instead of BBQ sauce, and top with shredded cabbage and mandarin oranges for a fresh crunch.
  • Fruit-Infused: Toss in diced mango or pineapple for a sweet and tangy flavor combination that pairs beautifully with BBQ.
  • Grain Bowl: Serve the salad over quinoa or brown rice for a hearty meal that’s both filling and nutritious.

Storage and Make-Ahead Instructions

This salad is perfect for meal prep! Here’s how to store it properly:

  • Storage: Keep the salad and dressing separate until ready to eat to prevent sogginess. Store in an airtight container in the fridge for up to 3 days.
  • Make-Ahead: You can grill the chicken and prepare the dressing ahead of time. Assemble the salad right before serving for maximum freshness.

Comprehensive FAQ

  • Can I use leftover chicken? Absolutely! Shredded or diced leftover chicken works perfectly in this salad.
  • Can I make this salad vegan? Yes, simply substitute chicken with grilled tofu or chickpeas, and use a plant-based yogurt for the dressing.
  • What kind of BBQ sauce is best? Choose a sauce you love! Sweet, tangy, or smoky varieties all work well.
  • How can I add more fiber? Incorporate additional beans or seeds, like pumpkin or sunflower seeds.
  • What’s the best way to grill chicken? Preheat your grill to medium-high, oil the grates, and don’t flip the chicken until it’s nicely seared.
  • Can I use different greens? Yes! Feel free to mix in kale, mixed baby greens, or even coleslaw mix for variety.
  • How do I know when my chicken is done? Use a meat thermometer. The chicken should reach an internal temperature of 165°F.
  • Can I freeze this salad? It’s best enjoyed fresh, so avoid freezing. However, you can freeze grilled chicken separately.

Nutrition Tips and Dietary Adaptations

This BBQ Chicken Salad is not just delicious; it can also be adapted to meet various dietary needs:

  • Low-Carb: Omit the corn and beans for a lower-carb option.
  • Gluten-Free: Ensure your BBQ sauce is gluten-free and enjoy this salad without worry.
  • High-Protein: Add a scoop of protein powder to the avocado dressing for an extra protein boost.

Essential Equipment for Success

Having the right tools can make all the difference in your cooking experience:

  • Grill or Grill Pan: For achieving those perfect grill marks and smoky flavor.
  • Blender or Food Processor: Essential for whipping up that creamy avocado dressing.
  • Meat Thermometer: To ensure your chicken is cooked to perfection every time.
  • Cutting Board and Chef’s Knife: For easy chopping and preparation of your salad ingredients.

Serving Suggestions

Ready to serve? Here are some fun ideas:

  • Platter Style: Serve the salad on a large platter for sharing at summer barbecues or potlucks.
  • Wrap It Up: Use this salad as a filling for a whole wheat wrap or lettuce cups for a fun twist.
  • Pair with Sides: Complement your salad with a side of sweet potato fries or a light soup for a complete meal.

Conclusion

Your journey into the world of delicious, healthy eating starts here! This BBQ Chicken Salad with Creamy Avocado Dressing is not just a feast for the senses; it’s a celebration of vibrant ingredients that nourish your body and soul. With its rich flavors, easy prep, and endless variations, you’ll find yourself making this dish again and again. So grab your ingredients, fire up that grill, and let’s create something amazing together!

BBQ Chicken Salad with Creamy Avocado Dressing

Prep Time 15 minutes
Cook Time 15 minutes
Total Time 30 minutes
Servings 4 servings
Calories 550
A flavorful and refreshing salad featuring grilled BBQ chicken, fresh vegetables, and a creamy avocado dressing, perfect for a quick and satisfying meal.

Ingredients

Protein

  • 2 pieces boneless, skinless chicken breasts
  • 1 cup barbecue sauce
  • 1 tablespoon olive oil

Salad Greens

  • 6 cups mixed salad greens (e.g., Romaine, spinach, arugula)
  • 1 cup cherry tomatoes, halved
  • 1 cup canned black beans, rinsed and drained
  • 1 cup corn kernels (fresh, canned, or thawed frozen)
  • 1/4 cup red onion, thinly sliced
  • 1 ripe avocado

Dressing

  • 1/4 cup Greek yogurt
  • 2 tablespoons fresh lime juice
  • 1 tablespoon honey
  • to taste Salt and pepper
  • 1/4 cup cilantro, chopped

Instructions 

  • Preheat grill, brush chicken with olive oil, season with salt and pepper.
  • Grill chicken 6-7 minutes per side, brush with barbecue sauce near the end, then rest and slice.
  • Blend avocado, Greek yogurt, lime juice, honey, salt, and pepper until smooth.
  • Combine greens, tomatoes, beans, corn, and onion in a large bowl, toss gently.
  • Top salad with sliced chicken, drizzle with avocado dressing, garnish with cilantro.

Notes

For extra flavor, marinate the chicken in barbecue sauce for 30 minutes before grilling.
Calories: 550kcal
Cost: $15
Course: Main Course, Salad
Cuisine: American
Keyword: avocado, BBQ, Chicken, Salad

Welcome to Your New Favorite Taco Salad Recipe!

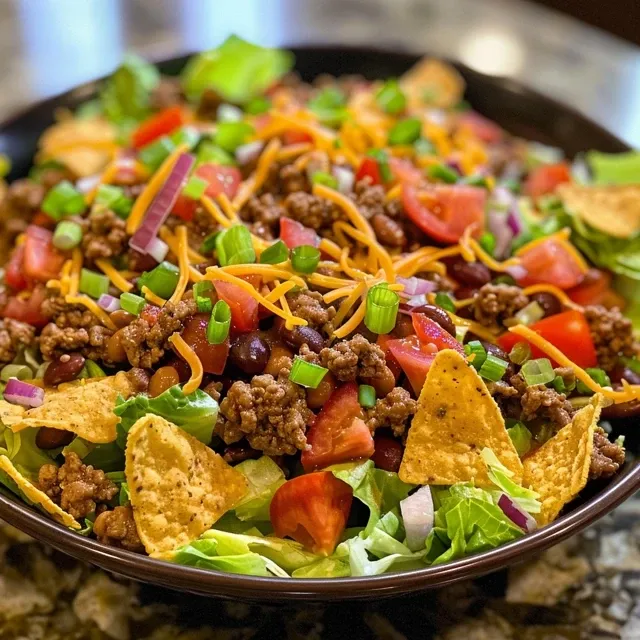
Are you ready to elevate your meal game? Dive into this vibrant taco salad recipe that’s bursting with fresh ingredients and bold flavors! Whether you’re prepping for a busy weeknight dinner or hosting a lively gathering, this salad is your ticket to a deliciously healthy meal that everyone will love. With layers of seasoned ground beef, crisp veggies, and a creamy lime dressing, this taco salad proves that eating well can be both fun and satisfying!

Why You’ll Love This Taco Salad

  • Quick and Easy: Whip this up in under 30 minutes—perfect for busy nights!
  • Customizable: Tailor it to your taste preferences with a variety of toppings and proteins.
  • Meal Prep Friendly: Make ahead for lunches or quick dinners throughout the week.
  • Flavor-Packed: Each bite is a fiesta of flavor, thanks to the zesty dressing and seasoned beef.
  • Healthy Ingredients: Loaded with fresh veggies and lean protein, this salad is both nutritious and satisfying.

Ingredients You’ll Need

Let’s break down the ingredients for this taco salad, so you’ll know exactly what to grab at the store. Don’t forget, substitutions can make this recipe fit your dietary needs!

For the Taco Beef

  • 1 lb (450 g) lean ground beef: Choose a grass-fed option for a richer taste.
  • 1 tbsp olive oil: For sautéing, giving your beef a nice sear.
  • 1 oz (28 g) taco seasoning: A flavor powerhouse! Use store-bought or homemade.
  • ¼ cup (60 ml) water: To help the seasoning blend into the beef.

For the Salad

  • 1 large head romaine: About 8 cups, chopped for a crunchy base.
  • 1 cup cherry tomatoes: Halved for sweetness and color.
  • 1 cup canned black beans: Rinsed and drained for added protein.
  • 1 cup corn kernels: Fresh, frozen, or canned—whatever you have!
  • ½ small red onion: Thinly sliced for a bit of zing.
  • 1 bell pepper: Diced; any color will do!
  • 1 avocado: Sliced or diced for creaminess.
  • 1 cup shredded cheddar: Or Mexican blend for that cheesy goodness.
  • 2 cups tortilla chips: Lightly crushed for crunch and texture.

Creamy Lime Dressing

  • ½ cup sour cream or Greek yogurt: For a tangy base.
  • 2 tbsp mayonnaise: Adds creaminess.
  • Juice of 1 lime: About 2 tbsp for that refreshing zing.
  • 1 tsp taco seasoning: From the beef mixture for flavor consistency.
  • 1 tsp hot sauce: Optional, for those who like it spicy!
  • ¼ tsp salt: To taste.

Step-by-Step Instructions

Delicious taco salad featuring chopped romaine, tomatoes, and avocado.

Now that we have our ingredients ready, let’s get cooking! Follow these simple steps to create your taco salad masterpiece.

  • Make the dressing: In a bowl, whisk together the sour cream, mayonnaise, lime juice, taco seasoning, hot sauce (if using), and salt until smooth. Chill while you prepare the salad.
  • Cook the beef: Heat olive oil in a skillet over medium-high heat. Add the ground beef and cook, breaking it up, until browned (about 6–8 minutes).
  • Season the beef: Stir in the taco seasoning and water, simmering for 1–2 minutes until slightly saucy. Remove from heat.
  • Prep the salad base: In a large bowl, combine the romaine, cherry tomatoes, black beans, corn, red onion, and bell pepper.
  • Add protein & cheese: Top the salad with the warm taco beef and shredded cheese.
  • Dress & toss: Drizzle the creamy lime dressing over the salad; toss gently to coat everything evenly.
  • Finish: Fold in the diced avocado and most of the crushed tortilla chips for added crunch.
  • Serve: Portion into bowls, garnishing with cilantro, remaining chips, and lime wedges. Enjoy immediately!

Pro Tips for the Perfect Taco Salad

  • Chill the dressing: Letting the dressing sit in the fridge enhances the flavors—make it a day ahead if possible!
  • Quality ingredients: Fresh, high-quality produce makes a noticeable difference in taste.
  • Warm beef is key: Serve the beef warm to contrast nicely with the cool salad ingredients.
  • Layered presentation: For a stunning display, layer the ingredients in a large bowl, then toss just before serving.
  • Don’t skip the lime: The acidity from lime juice brightens the flavors and balances the richness.
  • Custom toppings: Consider adding jalapeños, olives, or even a sprinkle of feta for extra flavor!
  • Crunchy chips: Add chips right before serving to maintain their crunch.
  • Make it vegetarian: Swap the beef for grilled mushrooms or lentils for a hearty alternative.

Common Mistakes and Troubleshooting

Even the best cooks can run into hiccups! Here’s how to avoid common mistakes and ensure your taco salad turns out perfectly.

  • Overcooked beef: Cook just until browned; overcooking can dry it out.
  • Watery salad: Drain canned ingredients well to prevent extra moisture from making the salad soggy.
  • Too much dressing: Start with a little dressing and add more as needed to avoid overwhelming the salad.
  • Unbalanced flavors: Taste as you go! Adjust seasoning and acidity to your liking.

Variations to Try

Looking to mix things up? Here are some fun variations to keep your taco salad exciting!

  • Southwest Chicken Salad: Swap ground beef with shredded rotisserie chicken for a lighter option.
  • Vegetarian Fiesta: Use black beans and quinoa as a protein source, and load up on avocados and veggies.
  • Spicy Shrimp Salad: Sauté shrimp in taco seasoning for a seafood twist.
  • Taco Salad Wrap: Serve the salad wrapped in a large tortilla for a portable meal.

Storage and Make-Ahead Instructions

This taco salad is perfect for meal prep! Here’s how to store it:

  • Refrigeration: Store the salad and beef separately in airtight containers for up to 3 days.
  • Make-ahead dressing: The dressing can be prepared and stored in the fridge for up to a week.
  • Assemble on-demand: Keep ingredients prepped and assemble just before serving for freshness.

Frequently Asked Questions

Got questions? We’ve got answers! Here are some FAQs about taco salad.

  • Can I make this salad vegan? Absolutely! Substitute ground beef with lentils or plant-based meat and skip the dairy in the dressing.
  • What can I use instead of taco seasoning? Try a mix of chili powder, cumin, paprika, garlic powder, and onion powder.
  • How do I make it gluten-free? Ensure your tortilla chips are gluten-free and use beans and corn without added gluten.
  • Can I use other proteins? Yes! Ground turkey, chicken, or even tofu work well.
  • What toppings do you recommend? Jalapeños, olives, or even a dollop of guacamole make fantastic additions.
  • How should I store leftovers? Keep the salad and dressing separate in the fridge for up to 3 days.
  • Can I use different greens? Yes! Spinach, kale, or mixed greens can be delicious alternatives.
  • How spicy is this recipe? The spice level can be adjusted based on the amount of hot sauce and taco seasoning you use.

Nutrition Tips and Dietary Adaptations

Here are some tips to keep your taco salad nutritious and delicious!

  • Add more veggies: Incorporate bell peppers, zucchini, or corn for added fiber and nutrients.
  • Go light on cheese: Use reduced-fat cheese or skip it altogether for a lighter option.
  • Use Greek yogurt: It’s a great substitute for sour cream, adding protein while cutting calories.
  • Monitor the chips: Use baked tortilla chips or cut your own from corn tortillas for a healthier crunch.

Equipment Recommendations

Here’s what you’ll need to whip up this delicious taco salad:

  • Skillet: A non-stick skillet makes browning the beef easy and cleanup a breeze.
  • Mixing bowls: Use large bowls for mixing and serving your salad.
  • Whisk: A whisk is essential for creating a smooth dressing.
  • Sharp knife: For chopping vegetables with precision.

Serving Suggestions

This taco salad is versatile, so feel free to pair it with other dishes!

  • Serve with a side of rice: Cilantro lime rice complements the flavors beautifully.
  • Pair it with cornbread: A slice of sweet cornbread balances the savory elements of the salad.
  • Enjoy with a refreshing drink: Pair it with a zesty limeade or a cold beer!

Conclusion

Now that you have all the tips and tricks to create the ultimate taco salad, it’s time to get cooking! This dish is not just a meal; it’s a celebration of flavors and textures that will leave you and your guests delighted. So gather your ingredients, unleash your creativity, and let the fiesta begin! Remember, cooking should be fun, so feel free to experiment and make this recipe your own. Happy cooking!

Taco Salad Recipe

Prep Time 15 minutes
Cook Time 10 minutes
Total Time 25 minutes
Servings 4 servings
Calories 650
A flavorful and easy-to-make taco salad combining seasoned beef, fresh vegetables, and crunchy chips, topped with a creamy lime dressing.

Ingredients

For the taco beef

  • 1 lb lean ground beef
  • 1 tbsp olive oil
  • 1 oz taco seasoning (or chili powder, paprika, cumin, garlic powder, onion powder, salt)
  • 0.25 cup water

For the salad

  • 1 large head romaine, chopped ((about 8 cups / 450 g))
  • 1 cup cherry tomatoes, halved
  • 1 cup canned black beans, rinsed & drained
  • 1 cup corn kernels (fresh, frozen, or canned, drained)
  • ½ small red onion, thinly sliced
  • 1 diced bell pepper
  • 1 avocado sliced or diced
  • 1 cup shredded cheddar or Mexican blend
  • 2 cups tortilla chips, lightly crushed

Fresh cilantro and lime wedges, for serving

  • ½ cup sour cream or Greek yogurt
  • 2 tbsp mayonnaise
  • 1 lime juice (about 2 tbsp)
  • 1 tsp taco seasoning (from above)
  • 1 tsp hot sauce (optional)
  • ¼ tsp salt

Instructions 

  • Whisk sour cream, mayonnaise, lime juice, taco seasoning, hot sauce (if using), and salt until smooth. Chill.
  • Heat oil in a skillet; cook ground beef until browned (6–8 min).
  • Stir in taco seasoning and water; simmer 1–2 min. Remove from heat.
  • Combine romaine, tomatoes, beans, corn, onion, and pepper in a large bowl.
  • Top salad with warm beef, cheese, and drizzle with dressing. Add avocado and most crushed chips; toss gently.
  • Serve immediately, garnished with cilantro, remaining chips, and lime wedges.

Notes

For extra flavor, add a squeeze of lime or hot sauce to taste.
Calories: 650kcal
Cost: $15
Course: Main Course
Cuisine: Mexican
Keyword: Salad, Taco

Unlock the Flavor: Why This Broccoli Salad Will Be Your New Favorite!

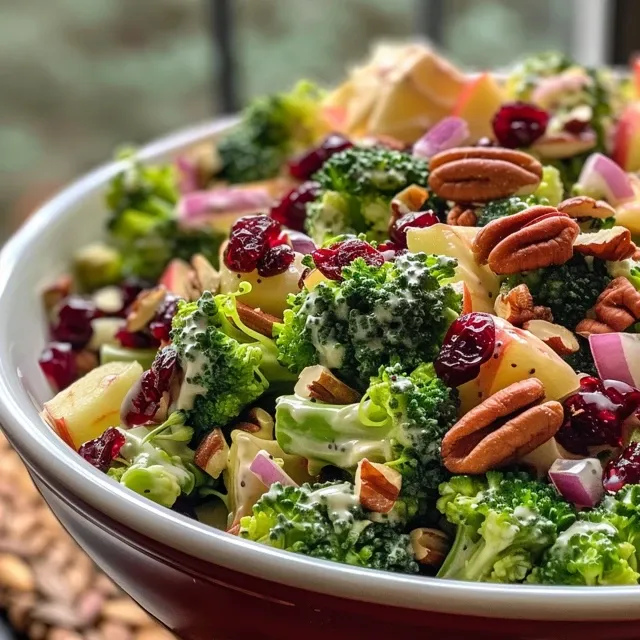
Are you ready to revamp your salad game? The Ultimate Crunchy Broccoli Salad is not just any salad—it’s a vibrant dish bursting with flavor, color, and nutrition! Combining crisp broccoli florets with nutty sunflower seeds and a delightful sweet-tangy dressing, this salad is perfect for a quick lunch or as a show-stopping side at your next gathering. Let’s dive into why this broccoli salad is the best, explore its ingredients, and learn how to create it in your own kitchen!

Why You’ll Love This Recipe

  • Easy Preparation: This salad is incredibly simple to make, taking just 15-20 minutes from start to finish—perfect for those busy weeknights!
  • Nutrition-Packed: Packed with vitamins, minerals, and fiber, this salad is a powerhouse of nutrition! Broccoli is known for its health benefits, including cancer-fighting properties.
  • Flavor Explosion: The combination of the fresh broccoli, sweet raisins, and tangy dressing creates a delightful balance of flavors that will have your taste buds dancing!
  • Visual Appeal: With its bright colors and crunchy textures, this salad is not only delicious but also a feast for the eyes, making it a perfect addition to any table.
  • Versatile Dish: Whether served as a side dish, a light lunch, or even at potlucks, this salad adapts seamlessly to any occasion!

Essential Ingredients Breakdown

Let’s take a closer look at the ingredients that make this salad a winner. Each element contributes to the overall flavor, texture, and nutritional value.

  • 4 cups fresh broccoli florets: The star of the dish! Choose vibrant, green florets for the best flavor and crisp texture.
  • 1/2 cup unsalted sunflower seeds: These add a delightful crunch and nutty flavor. You can substitute with chopped walnuts or pecans if desired.
  • 1/2 cup dried raisins: Sweet raisins bring a lovely contrast to the tangy dressing. Feel free to swap them with dried cranberries for a tart twist!
  • 1/4 cup finely chopped red onion: For a bit of zing! Soaking the onions in cold water helps to mellow their sharpness.
  • 1/2 cup mayonnaise (or Greek yogurt): This forms the creamy base of the dressing. Greek yogurt offers a healthier option with extra protein!
  • 2 tbsp apple cider vinegar: This adds a tangy kick to the dressing, enhancing all the flavors.
  • 2 tbsp honey (or maple syrup): A touch of sweetness to balance the acidity of the vinegar. Maple syrup is a great vegan alternative!
  • Salt and pepper to taste: Essential for enhancing all the flavors in the salad.

Let’s Make It Together!

Side view of colorful broccoli salad featuring onions and a creamy dressing.

Here’s how to whip up this fantastic broccoli salad in just a few easy steps:

  1. Prepare the broccoli by washing and cutting it into bite-sized florets. Be sure they’re dry for better dressing adherence.
  2. In a large bowl, whisk together the mayonnaise, apple cider vinegar, honey, salt, and pepper until smooth.
  3. Add the soaked red onion, sunflower seeds, and raisins to the dressing mixture; stir gently to combine.
  4. Toss in the broccoli florets until well-coated with the dressing.
  5. Chill in the refrigerator for at least 30 minutes before serving to allow flavors to meld. Trust me, it’s worth the wait!

Pro Tips for Perfecting Your Broccoli Salad

  • Fresh is Best: Always use fresh, vibrant broccoli florets. Avoid yellowing or wilting for the best taste.
  • Chill Time: Allow the salad to chill for at least 30 minutes before serving. This lets the flavors blend beautifully!
  • Customize Your Crunch: Experiment with different nuts or seeds to find your favorite combination!
  • Make It Ahead: This salad holds up well in the fridge for a day or two, making it perfect for meal prep!
  • Mix in Fresh Herbs: Consider adding fresh parsley or dill for an extra burst of flavor!
  • Adjust the Sweetness: Tailor the honey or maple syrup to your taste for the perfect flavor balance.
  • Use Greek Yogurt: For a lighter option, substitute mayonnaise with Greek yogurt for a creamy, tangy flavor.
  • Serve Chilled: This salad is best served cold, making it a refreshing choice for summer gatherings!

Common Mistakes and Troubleshooting

Even the best cooks can run into a few hiccups. Here are common mistakes to avoid:

  • Overcooked Broccoli: Be careful not to overcook the broccoli! You want it crunchy, not mushy!
  • Too Much Dressing: Start with a little dressing; you can always add more if needed. You want to coat, not drown!
  • Skipping Chill Time: Resist the urge to skip chilling! This step is crucial for flavor development!

Variations to Spice Up Your Salad

Feel like getting creative? Here are some fun variations to try!

  • Asian-Inspired: Add sesame oil, soy sauce, and chopped scallions for an Asian twist!
  • Cheesy Delight: Sprinkle in some crumbled feta or shredded cheddar for a cheesy version!
  • Protein Boost: Toss in some cooked chicken, chickpeas, or tofu for added protein!
  • Fruit Twist: Substitute raisins with diced apples or oranges for a fruity flair!

Storing & Make-Ahead Instructions

This salad is perfect for meal prep! Here’s how to store it:

  • Refrigeration: Store in an airtight container in the fridge for up to 2 days. The flavors will continue to meld, making it even tastier!
  • Make-Ahead: Prepare the dressing and chop the broccoli ahead of time, then combine just before serving for the freshest taste!

Comprehensive FAQ

  • Can I make this salad ahead of time? Yes! It’s perfect for make-ahead meals. Just store it in the fridge until you’re ready to serve.
  • What can I substitute for mayonnaise? Greek yogurt or a vegan mayo works great for a lighter option!
  • Is it okay to use frozen broccoli? Fresh broccoli is recommended for the best texture, but if frozen is all you have, just thaw and pat dry.
  • How do I make this salad vegan? Use maple syrup instead of honey and substitute the mayonnaise with a plant-based alternative!
  • Can I add meat to this salad? Absolutely! Grilled chicken or bacon bits make great additions for added protein!
  • What’s the best way to serve this salad? Serve it chilled as a side dish or a light lunch; it pairs wonderfully with grilled meats!
  • How long does this salad last in the fridge? It lasts up to 2 days in the refrigerator, but best eaten fresh!
  • Can I use other nuts instead of sunflower seeds? Yes! Chopped walnuts, almonds, or pecans are all delicious alternatives!

Nutritional Tips and Dietary Adaptations

This salad isn’t just delicious; it’s also nutritious! Here are some tips to make it fit your dietary needs:

  • Low-Carb Option: Skip the raisins and use a low-carb sweetener for minimal carbs.
  • High-Protein: Add chickpeas or grilled chicken for a protein-packed version!
  • Gluten-Free: This salad is naturally gluten-free, making it suitable for those with gluten sensitivities!

Recommended Equipment

To make this salad, you’ll need:

  • Large Mixing Bowl: For combining all the ingredients.
  • Whisk: For mixing the dressing smoothly.
  • Knife and Cutting Board: To chop the vegetables and nuts.
  • Airtight Container: For storing leftovers in the fridge.

Serving Suggestions

This salad shines as a side dish but can also stand alone as a light lunch. Pair it with:

  • Grilled Chicken: The salad complements grilled meats beautifully!
  • Sandwiches: Serve alongside a hearty sandwich for a complete meal!
  • Quinoa Bowl: Add it to a quinoa bowl for a balanced and nutritious meal.

Conclusion: Embrace the Joy of Healthy Eating!

With its vibrant colors, delicious flavors, and crunchy textures, the Ultimate Crunchy Broccoli Salad is a dish you’ll want to bring to every gathering and enjoy on busy weeknights. By following this comprehensive guide, you can create your own version that’s not only healthy but also a joy to eat! Embrace the creativity of cooking and make healthy eating an exciting adventure!

The Best Broccoli Salad

Prep Time 15 minutes
Total Time 15 minutes
Servings 4 servings
Calories 250
A fresh and crunchy broccoli salad with a sweet and tangy dressing, perfect for any occasion.

Ingredients

Main

  • 4 cups fresh broccoli florets
  • 1/2 cup unsalted sunflower seeds
  • 1/2 cup dried raisins
  • 1/4 cup finely chopped red onion (soaked in cold water)
  • 2 tbsp mayonnaise (or Greek yogurt)
  • 2 tbsp apple cider vinegar
  • 2 tbsp honey (or maple syrup)
  • to taste Salt and pepper

Instructions 

  • Wash and cut broccoli into bite-sized florets; dry thoroughly.
  • Mix mayonnaise, vinegar, honey, salt, and pepper in a bowl until smooth.
  • Add red onion, sunflower seeds, and raisins to the dressing; stir gently.
  • Toss broccoli with the dressing until well coated.
  • Chill for at least 30 minutes before serving.

Notes

For extra flavor, let the salad sit in the refrigerator for a few hours before serving.
Calories: 250kcal
Cost: $12
Course: Salad
Cuisine: American
Keyword: broccoli