Author

Ryan

Browsing

Welcome to Your New Favorite Salad Adventure!

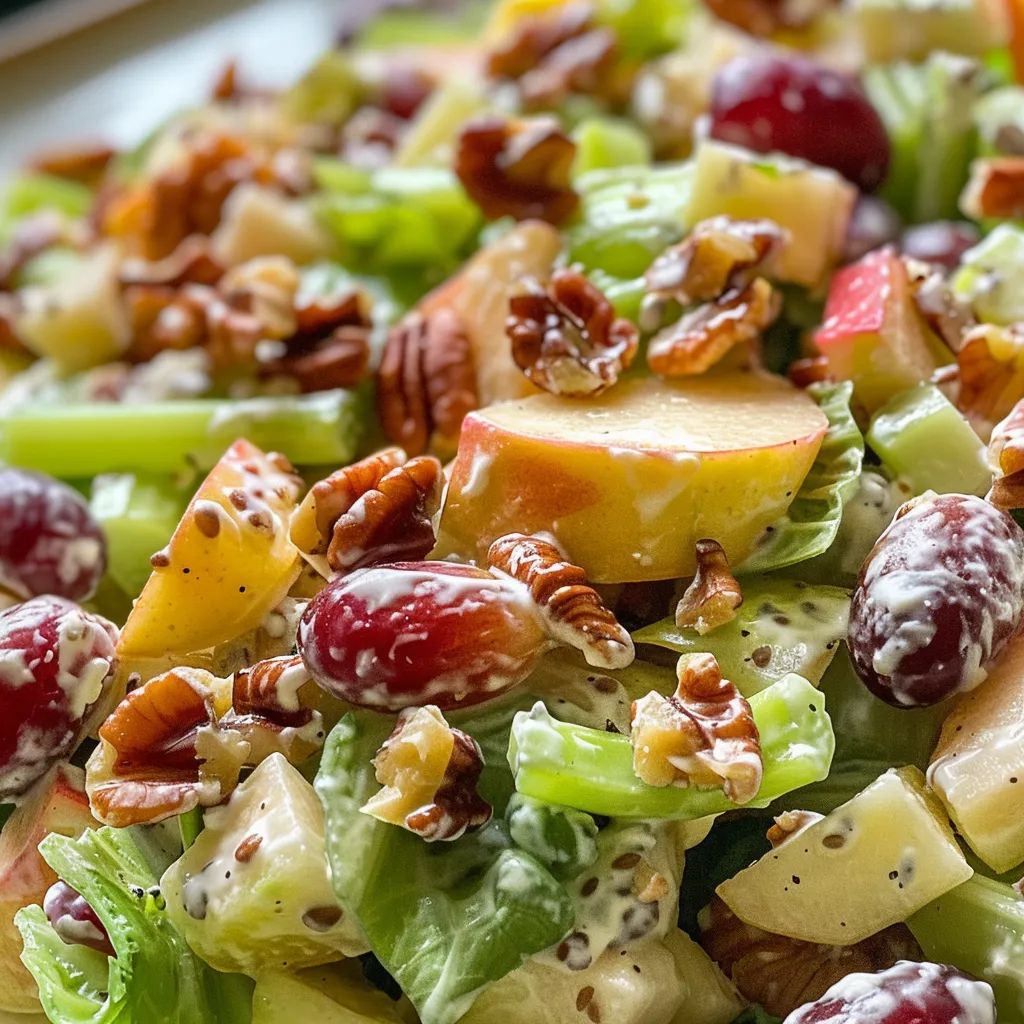
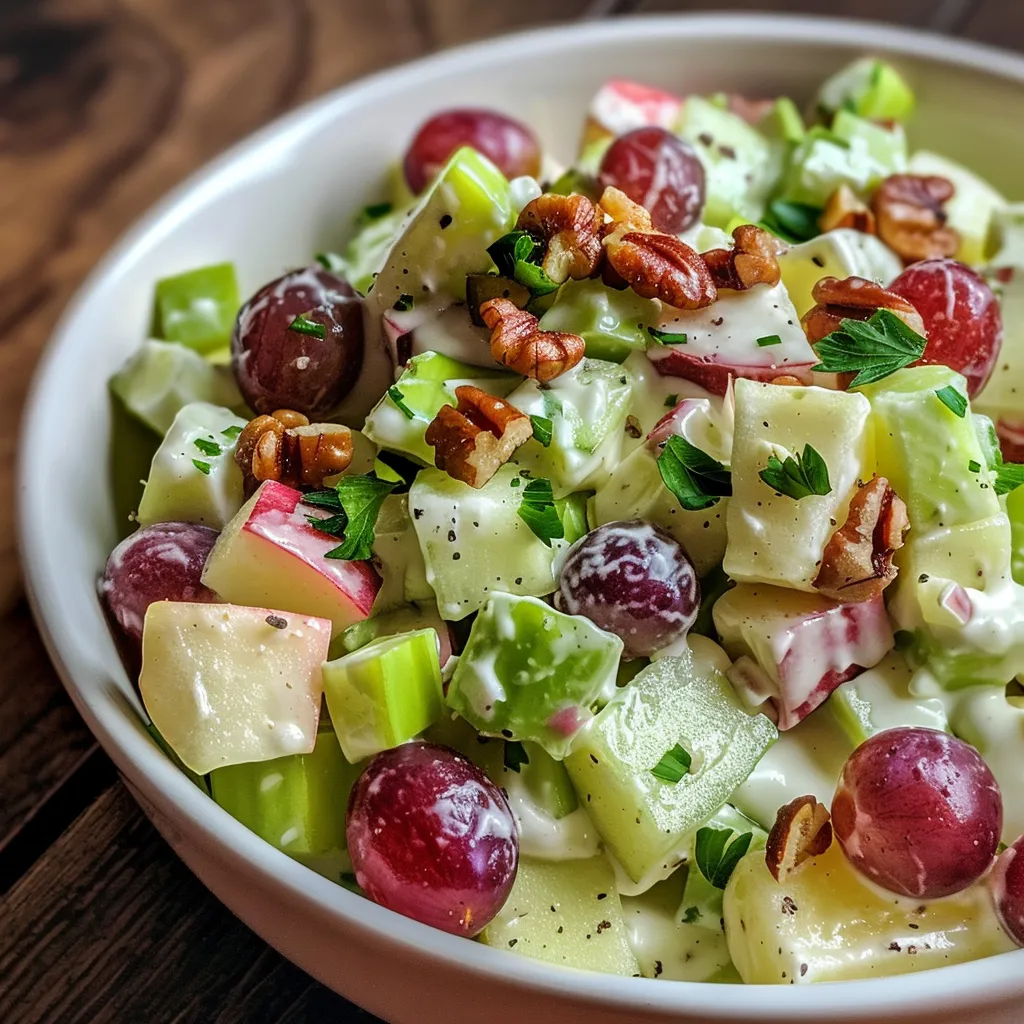
Are you ready to take your taste buds on a vibrant, refreshing journey? The Waldorf Salad is not just a dish; it’s a celebration of flavors that makes healthy eating an exciting adventure! This Waldorf Salad with Yogurt combines crisp apples, juicy grapes, and crunchy toasted walnuts, all enveloped in a creamy dressing that transforms each bite into a delightful experience. Whether you’re looking for a nutritious side or a satisfying main dish, this salad promises to deliver flavor and fun!

Why You’ll Love This Recipe

This isn’t just any salad; it’s a symphony of textures and tastes. Here are five reasons why this Waldorf Salad will become a staple in your kitchen:

  • Nutritious Ingredients: Packed with vitamins and minerals, this salad is a powerhouse of nutrition.
  • Variety of Flavors: The sweet apples and grapes contrast beautifully with the nutty walnuts and creamy dressing, making every bite exciting.
  • Versatile Dish: Perfect as a side for grilled chicken or as a light lunch on its own. You can customize it to fit any occasion!
  • Quick & Easy: With just a handful of ingredients and straightforward steps, you can whip up this salad in no time!
  • Make Ahead Friendly: This salad tastes even better after chilling, making it an ideal choice for meal prep or gatherings.

Ingredients Breakdown

To create your Waldorf Salad, you’ll need the following ingredients:

  • 2 large crisp red apples: Choose a sweet variety like Honeycrisp or Fuji for the best flavor.
  • 1 cup plain Greek yogurt: Provides a creamy texture and is a healthy source of protein.
  • ½ cup mayonnaise: For richness; you can substitute with a vegan mayo if desired.
  • 1 tablespoon fresh lemon juice: Adds brightness and helps prevent the apples from browning.
  • 1 cup celery stalks, finely diced: Adds crunch and a refreshing flavor.
  • 1 cup seedless red grapes, halved lengthwise: Sweet and juicy, they complement the apples perfectly.
  • ¾ cup walnuts, roughly chopped: Toasted for an irresistible crunch and nutty flavor.
  • ¼ cup raisins: For a touch of natural sweetness.
  • 2 tablespoons honey: Adjust to taste; maple syrup can be a great substitute for a vegan option.
  • ½ teaspoon salt: Enhances all the flavors.
  • ¼ teaspoon black pepper: Adds a hint of spice.
  • 2 tablespoons fresh parsley, minced: For garnish and fresh flavor.

Pro Tips for the Perfect Salad

Side perspective of a vibrant Waldorf salad with creamy yogurt, showcasing apples, grapes, and celery.

To ensure your Waldorf Salad turns out perfectly every time, keep these tips in mind:

  • Use fresh ingredients: Fresh apples and grapes provide the best flavor and texture.
  • Toast the walnuts: Toasting enhances their flavor. Aim for a golden brown color, about 8-10 minutes in a 350°F oven.
  • Soak the apples: Prevent browning by soaking the chopped apples in lemon water for 15 minutes.
  • Chill before serving: Allowing the salad to chill for at least 30 minutes helps meld the flavors.
  • Don’t overmix: Gently fold the salad to keep the apples and grapes intact.
  • Customize your dressing: Experiment with different herbs or a splash of yogurt for a tangier dressing.
  • Use a large mixing bowl: This gives you enough space to mix without making a mess.
  • Garnish with extra walnuts: This adds a nice visual element and extra crunch on top!

Common Mistakes and Troubleshooting

Even the best cooks make mistakes! Here are some common pitfalls and how to avoid them:

  • Apples turning brown: Soak them properly in lemon water to keep them vibrant and fresh!
  • Salad too watery: Make sure to drain the apples well after soaking, and don’t skip the drying step.
  • Overly sweet dressing: Adjust the honey to taste; you can always add more but can’t take it out!
  • Too chunky: Ensure even chopping of the ingredients for a better texture.

Delicious Variations

Feel free to mix things up! Here are some tasty variations to keep your meals exciting:

  • Chicken Waldorf Salad: Add shredded rotisserie chicken for extra protein and heartiness.
  • Vegan Waldorf Salad: Substitute Greek yogurt and mayo with plant-based options for a vegan-friendly version.
  • Spicy Waldorf Salad: Add a pinch of cayenne or diced jalapeños for a spicy kick!
  • Fruit-Forward Waldorf: Incorporate additional fruits like diced pears or mandarin oranges for extra sweetness.

Storage and Make-Ahead Instructions

This salad is perfect for meal prep! Here’s how to store it:

  • Refrigerate: Store in an airtight container for up to 3 days. The flavor will intensify as it sits!
  • Make ahead: Prepare the salad a day in advance, but add the dressing just before serving to maintain crunchiness.

Frequently Asked Questions

Got questions? I’ve got answers! Here are some common queries about the Waldorf Salad:

  • Can I use different nuts? Absolutely! Pecans or hazelnuts are great substitutes.
  • Is this salad gluten-free? Yes, all the ingredients are naturally gluten-free!
  • How do I make the dressing lighter? Use low-fat Greek yogurt and reduce the mayo for a lighter dressing.
  • Can I add spices to the dressing? Yes! A hint of curry powder can add an exciting flavor twist.
  • What can I serve with this salad? It pairs wonderfully with grilled meats or can be enjoyed on its own!
  • Can I freeze this salad? It’s best enjoyed fresh; freezing could alter the texture of the apples and grapes.
  • How long does it take to make? Prep time is about 15 minutes, plus a chilling time of at least 30 minutes.
  • Can I use a different dressing? Sure! A vinaigrette could provide a tangy contrast to the sweetness of the fruits.

Nutritional Tips and Dietary Adaptations

This Waldorf Salad is not only delicious but also nutritious! Here are some tips to keep it healthy:

  • Use low-fat dairy: Opt for low-fat Greek yogurt and mayo to reduce calories while keeping it creamy.
  • Increase fiber: Add more celery or toss in some leafy greens for added nutrients.
  • Swap sweeteners: Use stevia or a natural sweetener if you’re watching sugar intake.

Equipment Recommendations

Here’s what you’ll need to create this delightful salad:

  • Large mixing bowl: For combining all your ingredients effortlessly.
  • Small mixing bowl: For whisking together your creamy dressing.
  • Baking sheet: For toasting those walnuts to perfection.
  • Rubber spatula: For gently folding your salad ingredients without bruising them.

Serving Suggestions

When it’s time to serve, here are a few ideas to elevate your presentation:

  • Chic Plating: Serve it in a large bowl garnished with extra parsley and walnuts for a beautiful display.
  • Individual Servings: Consider serving in small mason jars for a fun, portable option!
  • With Proteins: Add grilled chicken or shrimp on top to transform this salad into a heartier meal.

In conclusion, the Waldorf Salad is a timeless dish that’s as delicious as it is nutritious. By integrating vibrant flavors and textures, you’ll not only satisfy your hunger but also delight your palate. So, gather your ingredients and let’s make this salad your new go-to recipe!

Happy cooking! 🌟

Waldorf Salad Recipe with Yogurt

Prep Time 15 minutes
Cook Time 10 minutes
Total Time 25 minutes
Servings 4 servings
Calories 350
A fresh and creamy Waldorf Salad with a healthy twist, combining crisp apples, grapes, celery, and toasted walnuts coated in a tangy yogurt dressing.

Ingredients

Fruits and Vegetables

  • 2 large crisp red apples (cored and chopped into ½-inch pieces)
  • 1 cup plain Greek yogurt
  • ½ cup mayonnaise
  • 1 tablespoon fresh lemon juice
  • 1 cup celery stalks (finely diced)
  • 1 cup seedless red grapes (halved lengthwise)
  • ¾ cup walnuts (roughly chopped)
  • ¼ cup raisins
  • 2 tablespoons honey
  • ½ teaspoon salt
  • ¼ teaspoon black pepper
  • 2 tablespoons fresh parsley (minced)

Instructions 

  • Submerge apple pieces in lemon water for 15 minutes, then drain and dry.
  • Toast walnuts at 350°F for 8-10 minutes until golden, then cool.
  • Mix yogurt, mayonnaise, honey, lemon juice, salt, and pepper until smooth.
  • Combine apples, celery, grapes, raisins, and walnuts in a bowl. Add dressing and fold gently.
  • Refrigerate for 30 minutes, then stir, garnish with parsley, and serve.

Notes

For extra crunch, add sliced almonds or serve with whole-grain crackers.
Calories: 350kcal
Cost: $15
Course: Salad
Cuisine: American
Keyword: apple, Walnut, yogurt

Are you ready to take your meals from ordinary to extraordinary? This creamy coleslaw recipe is your ticket to a flavor explosion! Whether you’re hosting a backyard BBQ, preparing for a picnic, or simply looking for a zesty side dish to elevate your dinner, this coleslaw is a must-try. Packed with crunch and creamy goodness, it’s easy to make and even easier to love. Dive in, and let’s discover how to create a creamy coleslaw that turns heads and tantalizes taste buds!

Why You’ll Love This Recipe

This creamy coleslaw isn’t just a pretty side dish; it’s packed with benefits that make it a staple for any meal:

  • Quick and Easy: With just a few simple ingredients and minimal prep time, you can whip this up in no time!
  • Versatile Flavor: The tangy dressing complements a variety of dishes, making it a perfect pairing with grilled meats, sandwiches, or even as a topping for tacos.
  • Texture Heaven: The crunchiness of the cabbage provides a satisfying bite that balances the creaminess of the dressing.
  • Make-Ahead Friendly: This coleslaw tastes even better after sitting for a while, allowing the flavors to meld beautifully.
  • Customizable: You can easily add your favorite ingredients, making this coleslaw uniquely yours!

Ingredients Breakdown

To create the perfect creamy coleslaw, you’ll need the following ingredients:

  • 1 package (14 ounces) coleslaw mix: This mix typically includes shredded cabbage and carrots. You can also use fresh cabbage if you prefer.
  • 3/4 cup mayonnaise: The foundation of your creamy dressing. For a healthier option, consider Greek yogurt as a substitute.
  • 1/3 cup sour cream: Adds richness and tang. You can use non-dairy sour cream for a vegan alternative.
  • 1/4 cup sugar: Balances the tanginess of the dressing. If you’re looking for a lower-calorie option, try honey or agave syrup.
  • 3/4 teaspoon seasoned salt: Enhances the overall flavor. Regular salt can be used, but adjust to taste.
  • 1/2 teaspoon ground mustard: Adds a subtle zing. Dijon mustard works well here, too.
  • 1/4 teaspoon celery salt: Infuses the dressing with a savory undertone.

Directions to Deliciousness

Follow these simple steps to create your creamy coleslaw:

  1. In a small bowl, whisk together the mayonnaise, sour cream, sugar, seasoned salt, ground mustard, and celery salt until smooth.
  2. In a large bowl, place the coleslaw mix. Pour the dressing over it, and toss to coat thoroughly. Editor’s Tip: If you plan on adding onion, do so sparingly. The onion’s flavor will intensify over time, especially if the coleslaw sits overnight, potentially overpowering the other delicious flavors.
  3. Store the mixture in the fridge, covered, until serving. Editor’s Tip: Coleslaw tastes better the longer it sits. If you can prep it a day ahead, the flavor will be worth the wait. Bear in mind, after several days, it may start to get soggy.

Pro Tips for the Perfect Coleslaw

Side view of a bowl of creamy coleslaw with a rich texture and vibrant ingredients.

Want to ensure your coleslaw is a showstopper? Check out these expert insights:

  • Fresh is Best: Use fresh cabbage and carrots for maximum crunch and flavor.
  • Make it Colorful: Add colored bell peppers or purple cabbage for a vibrant look.
  • Adjust the Sweetness: Taste the dressing before adding to the coleslaw mix and adjust sugar to your preference.
  • Chill Out: Let your coleslaw chill in the fridge for at least an hour before serving for the best flavor.
  • Experiment with Spices: Feel free to add spices like paprika or cayenne for a kick!
  • Texture Variation: Consider adding nuts or seeds for an extra crunch.
  • Vegan Twist: Swap mayo and sour cream for plant-based alternatives to make it vegan-friendly.
  • Use a Food Processor: For quick shredding, use a food processor to chop your cabbage and carrots.

Common Mistakes to Avoid

Even the best cooks can make mistakes! Here are some common pitfalls to dodge:

  • Overdressing: Too much dressing can make the coleslaw soggy. Start with less and add more as needed.
  • Skipping the Chill: Not allowing the coleslaw to sit can result in less flavor. Give it time!
  • Using Old Ingredients: Ensure your cabbage and carrots are fresh for the best texture and taste.
  • Neglecting to Taste: Always taste and adjust seasonings before serving to ensure a balanced flavor.

Coleslaw Recipe Variations

Want to switch things up? Here are some tasty variations to try:

  • Southwestern Coleslaw: Add black beans, corn, and a hint of lime for a zesty twist.
  • Apple & Cranberry Coleslaw: Mix in chopped apples and dried cranberries for a sweet and tangy flavor.
  • Asian-Inspired Coleslaw: Incorporate sesame oil, rice vinegar, and shredded almonds for a unique taste.
  • Spicy Jalapeño Coleslaw: Add finely chopped jalapeños for a kick that pairs well with BBQ.

How to Store Coleslaw

Proper storage is key to keeping your coleslaw fresh:

  • Refrigeration: Store in an airtight container in the fridge for up to 3 days. The flavors will continue to meld, enhancing the taste!
  • Freezing: It’s best not to freeze coleslaw as it can change the texture. However, if necessary, freeze without dressing and add fresh dressing after thawing.

Make-Ahead Instructions

Want to make your life easier? Here’s how to prep ahead:

  • Day Before Serving: Prepare the dressing and store in the fridge. Chop your cabbage and carrots, but keep them separate until serving.
  • Mix Just Before Serving: Combine the dressing with the coleslaw mix the day you’re serving for optimal freshness and crunch.

Frequently Asked Questions (FAQ)

Got questions? We’ve got answers!

  • Can I make coleslaw without mayonnaise? Yes! You can use Greek yogurt, buttermilk, or a vinaigrette for a lighter option.
  • How long does coleslaw last in the fridge? Properly stored, it can last 3-5 days.
  • Can I add fruits to coleslaw? Absolutely! Fruits like apples and grapes add a fun sweetness.
  • What’s the best way to shred cabbage? A sharp knife or a food processor works best for quick and even shreds.
  • Can I use pre-packaged coleslaw mix? Yes! It’s a great shortcut for busy days.
  • What can I serve coleslaw with? Coleslaw pairs wonderfully with BBQ dishes, fried foods, or as a topping for sandwiches.
  • Is coleslaw healthy? It can be! By using fresh vegetables and lighter dressings, you can make a nutritious side.
  • Can I customize the dressing? Yes! Feel free to experiment with different herbs and spices to make it your own.

Nutrition Tips and Dietary Adaptations

This creamy coleslaw can be adapted to fit various dietary needs:

  • Low-Calorie Option: Substitute full-fat mayonnaise with a light version or Greek yogurt.
  • Gluten-Free: This recipe is naturally gluten-free; just ensure all ingredients are certified gluten-free if necessary.
  • Vegan: Use vegan mayonnaise and sour cream to make it plant-based.
  • Low-Carb: Replace sugar with a low-carb sweetener like erythritol.

Essential Equipment

Here’s what you’ll need to whip up this delicious coleslaw:

  • Mixing Bowls: A large bowl for mixing the coleslaw and a smaller one for the dressing.
  • Whisk: For combining the dressing ingredients until smooth.
  • Sharp Knife or Food Processor: For shredding cabbage quickly and easily.
  • Airtight Containers: To store your coleslaw in the fridge and keep it fresh.

Serving Suggestions

Your creamy coleslaw can shine in various settings:

  • As a Side Dish: Serve alongside grilled chicken, burgers, or hot dogs for a classic combo.
  • As a Topping: Layer on tacos, sandwiches, or wraps for added crunch and flavor.
  • In a Bowl: Serve it in a bowl as a standalone dish at parties or picnics.

So there you have it! This creamy coleslaw recipe is your passport to a delicious, colorful, and satisfying side dish. With its crunchy texture and rich flavor, it’s sure to be a crowd-pleaser. Don’t hesitate to experiment with flavors and ingredients to make it your own. Happy cooking!

Creamy Coleslaw

Prep Time 10 minutes
Total Time 10 minutes
Servings 6 servings
Calories 180
A classic side dish with a creamy, tangy flavor that pairs perfectly with grilled meats or sandwiches.

Ingredients

Main

  • 14 ounces coleslaw mix
  • 0.75 cup mayonnaise
  • 0.33 cup sour cream
  • 0.25 cup sugar
  • 0.75 teaspoon seasoned salt
  • 0.5 teaspoon ground mustard
  • 0.25 teaspoon celery salt

Instructions 

  • Whisk mayonnaise, sour cream, sugar, seasoned salt, mustard, and celery salt until smooth.
  • Combine coleslaw mix with the dressing and toss to coat.
  • Cover and refrigerate for at least 1 hour before serving.

Notes

For extra flavor, add a small amount of chopped onion, but do so sparingly as its flavor intensifies over time.
Calories: 180kcal
Cost: $8
Course: Side Dish
Cuisine: American
Keyword: coleslaw

Revitalize Your Plate with a Creamy Coleslaw That Dances with Flavor

Welcome to the exciting world of creamy coleslaw! This vibrant and delicious dish is not just another salad; it’s a flavor explosion that will brighten up your summer picnics, barbecues, and every gathering in between. Imagine crunchy, fresh cabbage and carrots enveloped in a luscious dressing that dances on your taste buds. Ready to dive in? Let’s transform your next meal with this easy-to-make, crowd-pleasing recipe!

Why You’ll Love This Recipe

This creamy coleslaw isn’t just a side dish; it’s an experience. Here are some reasons to fall in love with this dish:

  • Quick and Easy: Whip it up in under 15 minutes! Perfect for busy days or last-minute gatherings.
  • Flavorful Fusion: The combination of fresh vegetables and creamy dressing creates a taste sensation that complements any meal.
  • Customizable: You can easily add your favorite ingredients or make substitutions to suit your taste.
  • Make Ahead: Prepare it in advance to allow flavors to meld, enhancing the deliciousness!
  • Visually Stunning: The vibrant colors of the cabbage and carrots make this dish a feast for the eyes.

Essential Ingredients

Let’s break down the ingredients you need to create this creamy coleslaw:

  • 4 cups green cabbage: Finely shredded for a crunchy base. You can substitute with red cabbage for a pop of color!
  • 2 medium carrots: Grated to add sweetness and texture. Feel free to use other root vegetables like radishes for a twist.
  • 1 cup mayonnaise: The creamy base. For a healthier option, swap with Greek yogurt or a vegan mayo alternative.
  • 2 tbsp apple cider vinegar: Adds tanginess that balances the sweetness of the carrots.
  • 2 tbsp sugar: Enhances the overall flavor. You can replace it with honey or a sugar substitute if desired.
  • ½ tsp salt: To taste; enhances all the flavors.
  • ½ tsp black pepper: For a hint of spice.

Let’s Make It Together!

Side view of a delicious creamy coleslaw, showcasing shredded cabbage and grated carrots.

Ready to get started? Follow these simple steps to whip up your creamy coleslaw:

  1. Finely shred the green cabbage and grate the carrots using a sharp knife or box grater.
  2. In a large bowl, mix together the mayonnaise, apple cider vinegar, and sugar until smooth.
  3. Add the shredded cabbage and grated carrots to the dressing mixture; stir until well coated.
  4. Season with salt and pepper to taste.
  5. Cover and refrigerate for at least 30 minutes before serving to allow the flavors to meld.

Pro Tips for the Best Creamy Coleslaw

Here are some expert insights to help you perfect your coleslaw:

  • Use Fresh Ingredients: Fresh, crisp cabbage and carrots make a world of difference in texture and flavor.
  • Experiment with Dressings: Try adding a splash of lemon juice or a teaspoon of mustard for a unique twist on the dressing.
  • Chill Before Serving: Allowing the coleslaw to chill enhances the flavors and makes it even more refreshing.
  • Mix It Up: Consider adding diced apples, raisins, or nuts for extra texture and flavor.
  • Don’t Overmix: Gently fold the ingredients together to keep the cabbage and carrots crisp.
  • Adjust Seasonings: Taste as you go; don’t hesitate to adjust salt, pepper, or sugar to match your preference.
  • Use the Right Tools: A good knife and a sturdy bowl will make the prep easier and more enjoyable.
  • Store Properly: Keep it in an airtight container in the fridge for up to 3 days for best results.

Common Mistakes and Troubleshooting

Even the best chefs can make mistakes! Here’s how to avoid common pitfalls:

  • Too Watery: If your coleslaw is watery, make sure to drain excess liquid from the cabbage after shredding.
  • Overly Sweet: If it’s too sweet, balance it out by adding a bit more vinegar or salt.
  • Too Creamy: If you find the dressing too heavy, lighten it by mixing in a bit of yogurt or extra vinegar.
  • Not Enough Flavor: If it lacks zing, tweak the seasonings and add more vinegar or spices as needed.

Variations to Try

Feeling adventurous? Here are some delicious variations to shake things up:

  • Spicy Coleslaw: Add diced jalapeños or a dash of hot sauce for a kick!
  • Asian-Inspired Slaw: Use sesame oil instead of mayonnaise and add shredded snap peas and cilantro.
  • Tex-Mex Twist: Mix in black beans, corn, and lime juice for a fiesta in a bowl.
  • Tropical Slaw: Add diced pineapple or mango for a sweet, fruity flavor profile.

Storage and Make-Ahead Instructions

Planning for the future? Here’s how to store your coleslaw:

  • Refrigerate: Store in an airtight container in the fridge for up to 3 days.
  • Make Ahead: You can prepare the coleslaw up to 24 hours in advance. Just keep the dressing separate until ready to serve to maintain crispness.
  • Freezing: For best quality, avoid freezing as it alters the texture of the cabbage.

Comprehensive FAQ

Got questions? We’ve got answers! Here are some frequently asked questions:

  • What is the best type of cabbage for creamy coleslaw? Green cabbage is traditional, but red cabbage adds color and a slight sweetness!
  • Can I make creamy coleslaw ahead of time? Yes! It’s best to prepare it at least 30 minutes in advance to allow flavors to meld.
  • How do I make coleslaw dressing without mayonnaise? Use yogurt or a vinaigrette made with olive oil, vinegar, and seasonings.
  • Can I use pre-packaged coleslaw mix? Absolutely! It saves time and typically contains a good variety of cabbage and carrots.
  • What can I serve with coleslaw? It pairs well with BBQ meats, sandwiches, and grilled dishes.
  • How long does coleslaw last in the fridge? It can last up to 3 days if stored properly in an airtight container.
  • Can I add fruits to coleslaw? Definitely! Apples, raisins, or pineapple can add a delightful sweetness.
  • Is coleslaw gluten-free? Yes, if made with gluten-free ingredients, coleslaw is naturally gluten-free!

Nutrition Tips and Dietary Adaptations

Want to make your coleslaw healthier? Here are some tips:

  • Go Light: Substitute half of the mayonnaise with Greek yogurt for a protein boost and fewer calories.
  • Vegan Option: Use plant-based mayonnaise to keep it vegan-friendly.
  • Increase Fiber: Add more veggies like bell peppers or broccoli to up the fiber content.
  • Low-Sugar Version: Reduce the sugar or use a sugar alternative to make it diabetic-friendly.

Equipment Recommendations

Here’s what you’ll need to bring your creamy coleslaw to life:

  • Sharp Knife or Box Grater: Essential for shredding cabbage and grating carrots.
  • Mixing Bowl: A large bowl for mixing the ingredients together.
  • Whisk: Perfect for blending the dressing until smooth.
  • Storage Container: Airtight containers for storing your coleslaw in the fridge.

Serving Suggestions

Your creamy coleslaw is ready to shine! Here are some creative serving ideas:

  • As a Side Dish: Serve alongside grilled meats, burgers, or sandwiches.
  • In Tacos: Use it as a crunchy topping for fish or pulled pork tacos.
  • In Wraps: Add to wraps for extra crunch and flavor.
  • Garnish: Use it as a colorful garnish on any plate to elevate the presentation.

Conclusion

And there you have it! A creamy coleslaw recipe that’s not only packed with flavor but also offers endless possibilities for customization. Whether you’re serving it at a family gathering or enjoying it on a quiet evening, this vibrant dish is sure to impress. Now, grab your ingredients and let your culinary creativity flourish in the kitchen. Here’s to delicious meals that nourish your body and excite your taste buds!

Creamy Coleslaw

Prep Time 10 minutes
Total Time 10 minutes
Servings 4 servings
Calories 180
A classic side dish with crunchy cabbage and carrots in a creamy, tangy dressing.

Ingredients

Vegetables

  • 4 cups green cabbage, finely shredded
  • 2 medium carrots, grated

Dressing

  • 1 cup mayonnaise
  • 2 tbsp apple cider vinegar
  • 2 tbsp sugar
  • ½ tsp salt (to taste)
  • ½ tsp black pepper (to taste)

Instructions 

  • Shred cabbage and grate carrots.
  • Mix mayonnaise, vinegar, and sugar until smooth.
  • Add vegetables to dressing and stir.
  • Season with salt and pepper.
  • Refrigerate for 30 minutes before serving.

Notes

For extra crunch, add a handful of chopped apples or nuts.
Calories: 180kcal
Cost: $8
Course: Side Dish
Cuisine: American
Keyword: coleslaw

Welcome to your new favorite salad extravaganza! The Niçoise Salad is not just a dish; it’s a culinary adventure bursting with nutrients, colors, and flavors. Imagine sinking your fork into a vibrant plate of fresh veggies, protein-rich tuna, and a zesty dressing that dances on your palate. This easy Niçoise Salad recipe is perfect for any occasion, whether you’re hosting a summer picnic or enjoying a casual dinner at home. Ready to dive in? Let’s get started!

Why You’ll Love This Recipe

This recipe isn’t just about taste; it’s about experience and joy in cooking! Here are five reasons to embrace this delightful dish:

  • Nutrient-Packed: With a medley of fresh vegetables and protein, it’s a well-rounded meal that fuels your body.
  • Quick and Easy: Perfect for busy days, this salad comes together in under 30 minutes!
  • Customizable: Feel free to swap ingredients based on your preferences. Don’t like olives? No problem!
  • Flavor Explosion: The combination of fresh ingredients and a tangy dressing elevates your taste buds.
  • Meal Prep Friendly: Make it ahead of time for a delicious lunch or dinner that’s ready when you are!

Ingredient Breakdown

Let’s take a closer look at the star players in this Niçoise Salad and explore some exciting substitutions:

  • Salad Potatoes: These waxy potatoes hold their shape well. You can substitute with small Yukon Gold or new potatoes.
  • Green Beans: Fresh green beans add a crisp texture. If unavailable, use blanched frozen beans or snap peas.
  • Eggs: Soft-boiled eggs are traditional, but hard-boiled work just as well for a firmer texture.
  • Little Gem Lettuce: For a crunchy base, replace with arugula, spinach, or mixed greens if you prefer.
  • Black Olives: Kalamata olives add richness. If you’re not a fan, consider capers or pickles for a punchy alternative.
  • Tomatoes: Juicy heirloom tomatoes provide sweetness. Cherry tomatoes are a fantastic substitute!
  • Tuna: Canned tuna is classic, but feel free to use seared tuna or grilled chicken for a twist.

How to Make a Classic Niçoise Salad

Follow these simple steps for a stunning salad that’s sure to impress:

  1. Whisk together the dressing ingredients: 1 garlic clove (crushed), 1 tbsp Dijon mustard, juice of 1 lemon, and 6 tbsp olive oil. Season to taste and set aside.
  2. Bring a pot of salted water to a boil. Cook 400g halved salad potatoes for about 15 minutes, adding 100g green beans in the last 4 minutes. Drain and let cool.
  3. Boil 4 eggs for 6 minutes, then immediately run under cold water to stop cooking.
  4. Arrange 2 torn little gem lettuce, 100g black olives, 3 cut tomatoes, and 300g drained tuna on a serving platter. Top with halved eggs and drizzle with dressing.
  5. Serve and enjoy your vibrant creation!

Pro Tips for the Perfect Niçoise Salad

Side angle of a delicious Niçoise salad with juicy ingredients including tuna and eggs.

Want to elevate your Niçoise experience? Here are some insider tips:

  • Fresh is Best: Always use the freshest ingredients you can find for maximum flavor and nutrition.
  • Season Your Water: Adding salt to your boiling water enhances the flavor of your potatoes and beans.
  • Don’t Overcook: Keep your green beans crisp by blanching them briefly before plunging them into cold water.
  • Make Ahead: Prepare the salad components separately and assemble just before serving for the best texture.
  • Experiment with Dressings: Try adding herbs like basil or dill to your vinaigrette for an extra flavor kick.
  • Layer for Flavor: Arrange ingredients in a way that allows diners to enjoy different flavors together on each bite.
  • Garnish Wisely: Add fresh herbs or microgreens on top for a beautiful presentation.
  • Balance is Key: Ensure each bite has a good mix of protein, veggies, and dressing for a complete experience.

Common Mistakes and Troubleshooting

Even the best chefs can run into hiccups! Here are some common pitfalls and how to avoid them:

  • Soggy Salad: Avoid this by allowing your potatoes and beans to cool before assembling.
  • Overcooked Eggs: Stick to 6 minutes for a perfect soft-boiled egg that’s not rubbery.
  • Too Much Dressing: Start with a small amount and add more to taste rather than drowning the salad.
  • Unbalanced Flavors: Taste as you go! Adjust your seasoning and dressing for a harmonious blend.

Variations to Try

Make this salad your own with these fun variations:

  • Seared Tuna Niçoise: Swap canned tuna for fresh seared tuna steaks for a gourmet twist.
  • Salmon Niçoise: Replace tuna with grilled or smoked salmon for a rich flavor.
  • Vegetarian Niçoise: Use chickpeas or tofu instead of tuna for a plant-based protein boost.
  • Mediterranean Twist: Add feta cheese and artichoke hearts for a Mediterranean flair.

Storage and Make-Ahead Instructions

Want to prep this salad for later? Here’s how to store it:

  • Chilled Storage: Store individual components in airtight containers in the fridge for up to 3 days.
  • Assembled Salad: Best eaten fresh, but if you must store it, keep the dressing separate until ready to serve.
  • Make Ahead: You can prepare the potatoes, beans, and eggs a day in advance for an easy assembly.

Comprehensive FAQ

Got questions? Let’s clear up some common queries about the Niçoise Salad:

  • Can I use canned tuna? Absolutely! Canned tuna is traditional and super convenient.
  • What kind of potatoes should I use? Waxy potatoes like salad potatoes or Yukon Gold are best for this recipe.
  • How do I make it gluten-free? This recipe is inherently gluten-free, just check your mustard and dressing ingredients.
  • Can I add more vegetables? Yes! Feel free to add bell peppers, radishes, or any seasonal veggies you love.
  • How can I make it more filling? Add quinoa or farro to the salad for extra fiber and protein.
  • What dressing is best? A simple vinaigrette made with olive oil and lemon works beautifully!
  • Is it suitable for meal prep? Yes, just store each component separately to maintain freshness.
  • Can I serve it warm? While it’s traditionally served cold, you can enjoy it warm if you prefer!

Nutrition Tips and Dietary Adaptations

This Niçoise Salad is a nutritional powerhouse, providing a balance of macronutrients and essential vitamins:

  • Protein-Rich: Tuna and eggs offer high-quality protein for muscle maintenance and repair.
  • Heart-Healthy Fats: Olive oil and olives provide monounsaturated fats that are good for your heart.
  • Fiber-Filled: The variety of vegetables contributes to your daily fiber intake, promoting digestion.
  • Low Carb Option: Skip the potatoes and focus on leafy greens and proteins for a low-carb version.

Equipment Recommendations

For a smooth cooking experience, consider having these kitchen tools on hand:

  • Sharp Knife: A good knife is essential for chopping and prepping ingredients efficiently.
  • Cutting Board: Use a large cutting board for easy prep of your veggies and proteins.
  • Mixing Bowl: A medium-sized bowl is ideal for whisking your dressing.
  • Pot for Boiling: A large pot will help you boil your potatoes and beans perfectly.

Serving Suggestions

Ready to serve? Here are some delightful ideas for presenting your Niçoise Salad:

  • Platter Style: Arrange all ingredients beautifully on a large platter for a family-style meal.
  • Individual Bowls: Serve in individual bowls for a more personal touch.
  • Pair with Bread: Serve alongside crusty French bread to soak up the delicious dressing.
  • Wine Pairing: Enjoy with a chilled Sauvignon Blanc or a light rosé for a refreshing meal.

In conclusion, this Niçoise Salad is more than just a recipe; it’s an invitation to explore flavors, colors, and healthy living. Whether you stick to the classic recipe or make it your own, you’ll find joy in every bite. So grab your ingredients, unleash your inner chef, and let’s make magic happen in the kitchen!

Niçoise Salad {Easy French Classic}

Prep Time 10 minutes
Cook Time 20 minutes
Total Time 30 minutes
Servings 4 servings
Calories 350
A vibrant and classic French Niçoise Salad that's quick to prepare and perfect for a light, flavorful meal.

Ingredients

Dressing

  • 1 clove Garlic (Crushed)
  • 1 tbsp Dijon mustard
  • 1 lemon Juice only
  • 6 tbsp Olive oil

Salad potatoes

  • 400 g Salad potatoes (Halved)

Green beans

  • 100 g Green beans

Eggs

  • 4 Eggs (Boiled for 6 minutes)

Little gem lettuce

  • 2 pieces Little gem lettuce (Torn into large pieces)

Black olives

  • 100 g Black olives

Tomatoes

  • 3 wedges Tomatoes (Cut into wedges)

Tuna

  • 300 g Tuna (drained weight) (Chunks or flaked)

Instructions 

  • Whisk dressing ingredients together, season, and set aside.
  • Cook potatoes for 15 mins, add green beans for last 4 mins, then drain and cool.
  • Boil eggs for 6 mins, then cool under cold water.
  • Arrange all ingredients on a platter, top with eggs and tuna, then spoon over dressing.

Notes

This salad is best served fresh and can be customized with your favorite vegetables or proteins.
Calories: 350kcal
Cost: $12
Course: Salad
Cuisine: French
Keyword: Seafood

Unlock the Joy of Meal Prep: A Flavorful Journey Begins!

Welcome to your ultimate guide on meal prep magic! Whether you’re juggling a busy schedule or just looking to eat healthier, meal prep is your secret weapon. With our energizing recipes, you’ll discover how cooking can be both fun and fulfilling. Let’s dive into the world of vibrant, nutritious meals that keep you fueled throughout the week. Get ready to transform your kitchen into a creative playground where healthy eating is a delightful adventure!

Why You’ll Love This Recipe

Let’s talk about the perks of mastering meal prep! Here’s why you’ll fall head over heels for our energizing meal prep ideas:

  • Time-saving magic: With just a few hours of prep, you’ve got healthy meals ready for the entire week!
  • Flavor-packed variety: Say goodbye to boring meals! Enjoy a colorful array of dishes that excite your taste buds.
  • Health benefits: Control what goes into your meals, ensuring they are nutritious and balanced.
  • Budget-friendly: Meal prepping helps you save money by reducing food waste and encouraging smart grocery shopping.
  • Stress reduction: With meals ready to go, you’ll feel less overwhelmed during busy weekdays.

Ingredient Breakdown: Make It Your Own!

Let’s explore the vibrant ingredients that will elevate your meal prep game. Here’s what you need for our delicious meal prep magic:

  • Base grains: Quinoa, brown rice, or farro—perfect for adding fiber and substance.
  • Proteins: Chicken, chickpeas, or tofu—great for building muscle and keeping you full.
  • Colorful veggies: Spinach, bell peppers, and carrots—packed with vitamins and antioxidants.
  • Flavor boosters: Fresh herbs, spices, and citrus—these will take your meals from bland to grand!

Feel free to swap out any ingredients based on your taste preferences or dietary needs. For instance, if you’re vegan, chickpeas or lentils are fantastic protein substitutes!

Pro Tips for Meal Prep Success

Vibrant meal prep dish showcasing a balanced assortment of healthy ingredients.

Ready to elevate your meal prep game? Here are some expert insights:

  • Batch cooking: Prepare larger quantities of grains and proteins at once to save time.
  • Storage containers: Invest in clear, airtight containers to keep meals fresh and visible.
  • Labeling: Use labels with dates to track freshness of your meals throughout the week.
  • Freeze extras: Don’t hesitate to freeze portions for those busy days when cooking isn’t an option.
  • Mix and match: Create different meals using the same base ingredients to keep things interesting.
  • Spice it up: Keep a variety of spices on hand to change the flavor profile of your meals.
  • Prep once, eat twice: Make double portions of a dish and enjoy leftovers for lunch or dinner.
  • Stay organized: Plan your meals ahead of time to streamline your shopping and prep process.

Avoiding Common Mistakes

Even seasoned meal preppers can make mistakes! Here’s how to sidestep the common pitfalls:

  • Too much variety: Keep it simple with a few core dishes to avoid feeling overwhelmed.
  • Neglecting seasonality: Use seasonal produce for the best flavor and cost-effectiveness.
  • Ignoring portion sizes: Be mindful of serving sizes to prevent overeating or waste.
  • Inadequate storage: Ensure your meals are stored properly to avoid spoilage.

Delicious Variations to Spice Things Up

Feeling adventurous? Here are some fun variations to keep your meal prep exciting:

  • Mediterranean Bowl: Swap your grains for couscous and add olives and feta for a Mediterranean twist.
  • Asian-Inspired Stir Fry: Use jasmine rice, tofu, broccoli, and a savory soy sauce for an Asian flair.
  • Southwestern Fiesta: Black beans, corn, and avocado with a cilantro lime dressing create a zesty flavor.
  • Breakfast Prep: Prepare overnight oats or smoothie packs for a quick, nutritious breakfast option.

Storage and Make-Ahead Instructions

Maximize freshness with these storage tips:

  • Refrigeration: Most meal prep dishes can be stored in the fridge for up to 4 days.
  • Freezing: For longer storage, freeze meals in individual portions for up to 3 months.
  • Thawing: Always thaw in the fridge overnight for best results, then reheat thoroughly before eating.

FAQs: Your Meal Prep Questions Answered

Got questions? We’ve got answers! Here are some common queries about meal prep:

  • How do I get started with meal prep? Begin with simple recipes, plan your meals for the week, and shop accordingly.
  • Can I meal prep for an entire month? Yes! Just ensure meals are frozen properly to maintain freshness.
  • What’s the best way to reheat my meals? Use a microwave or stovetop for even heating, adding a splash of water to prevent drying out.
  • Can I meal prep for a family? Absolutely! Adjust portion sizes and recipes based on your family’s preferences.
  • How do I keep my meals from getting boring? Experiment with different spices, sauces, and preparation methods to keep things lively.
  • Are meal prep recipes healthy? Yes! Meal prep allows you to control ingredients, making it easier to eat healthy.
  • What containers are best for meal prep? Look for BPA-free glass or plastic containers that are microwave and dishwasher safe.
  • How long can I store meal prep in the fridge? Generally, up to 4 days is safe for most meals.

Nutritional Tips and Dietary Adaptations

When it comes to healthy eating, nutrition is key! Here’s how to tailor your meal prep:

  • Protein Power: Consider plant-based proteins like lentils or beans for a vegetarian option.
  • Fiber Boost: Incorporate whole grains and a variety of vegetables to keep meals filling.
  • Healthy Fats: Include sources like avocados, nuts, or olive oil for added richness and satisfaction.

Essential Equipment for Successful Meal Prep

Having the right tools can make meal prep a breeze! Here’s what I recommend:

  • Sharp knives: A good knife set makes chopping and prepping efficient.
  • Cutting boards: Have multiple boards to prevent cross-contamination.
  • Mixing bowls: Opt for various sizes for all your mixing needs.
  • Measuring cups and spoons: Precision is key in cooking!
  • Food processor or blender: Great for sauces, dips, and smoothies.
  • Storage containers: Airtight containers in various sizes ensure your meals stay fresh.

Serving Suggestions: Elevate Your Meal Experience

Ready to serve up some deliciousness? Here are some creative serving ideas:

  • Garnish: Fresh herbs, lemon zest, or nuts can add a beautiful finishing touch.
  • Pair with dips: Hummus, tzatziki, or salsa can enhance your meal and add flavor.
  • Side salads: A simple green salad can complement your meal and add crunch.

So there you have it! Your comprehensive guide to making meal prep not just nutritious, but also exciting and enjoyable. Remember, the kitchen is your canvas—paint it with flavors, colors, and creativity. Happy prepping!

Classic Spaghetti Carbonara

Prep Time 10 minutes
Cook Time 15 minutes
Total Time 25 minutes
Servings 4 servings
Calories 550
A quick and creamy Italian pasta dish made with eggs, cheese, pancetta, and pepper.

Ingredients

Pasta

  • 400 grams spaghetti
  • 150 grams pancetta or bacon (diced)
  • 3 large eggs (beaten)
  • 1 cup Parmesan cheese (grated)
  • 1 teaspoon black pepper (freshly ground)

Other

  • Salt (to taste)

Instructions 

  • Cook spaghetti in boiling salted water until al dente, then drain.
  • Cook pancetta in a skillet until crispy.
  • Mix eggs, Parmesan, and pepper in a bowl.
  • Combine hot pasta with pancetta, then quickly mix in the egg mixture to create a creamy sauce.
  • Serve immediately with extra Parmesan and pepper if desired.

Notes

Use fresh eggs for best flavor and texture.
Calories: 550kcal
Cost: $12
Course: Main Course
Cuisine: Italian
Keyword: pasta

Discover the Joy of a Waldorf Salad: A Fresh Take on a Classic

Welcome to a vibrant culinary adventure with our Healthy Waldorf Salad! This dish is not just a salad; it’s a celebration of flavors and textures that will invigorate your taste buds. Imagine crisp apples, crunchy celery, juicy grapes, and toasted nuts all coming together in a creamy dressing that’s both healthy and satisfying. Whether you’re looking for a quick lunch, a delightful side dish, or a crowd-pleasing potluck option, this salad has you covered. Let’s dive into why you’ll love this recipe and how to make it your own!

Why You’ll Love This Recipe

  • Nutritious and Delicious: Packed with fresh ingredients, this salad is a powerhouse of vitamins and minerals, making it a guilt-free indulgence.
  • No Cooking Required: Perfect for those warm days when you want something refreshing without turning on the stove.
  • Quick and Easy: With just a few simple steps, you can whip up this salad in under 20 minutes!
  • Customizable: From the type of apples to the nuts you choose, this recipe allows you to personalize it to your taste.
  • Make-Ahead Friendly: This salad can be prepared in advance, making it an excellent choice for meal prep or entertaining.

Ingredient Breakdown: The Building Blocks of Flavor

Let’s explore the essential ingredients that make this Waldorf Salad a standout dish, along with some tasty substitutions to suit your preferences.

  • Apples: Use 2 cups of chopped tart apples (like Granny Smith) for a crisp, tangy flavor. Want a sweeter twist? Try Fuji or Honeycrisp apples!
  • Granulated Sugar: Just 1 tablespoon enhances the sweetness. For a healthier option, consider honey or maple syrup.
  • Lemon Juice: 2 teaspoons of lemon juice keeps the apples from browning and adds a refreshing zing. Freshly squeezed is best!
  • Celery: 1 cup of chopped celery provides a satisfying crunch. For a twist, try adding diced cucumber.
  • Grapes: 1 cup of halved grapes (red or green) adds juiciness and color. Dried cranberries can also be a sweet alternative!
  • Nuts: 1/2 cup of toasted walnuts or pecans gives a rich, nutty flavor. If allergies are a concern, sunflower seeds are a great substitute.
  • Whipped Cream: 1/2 cup adds creaminess. For a lighter option, consider Greek yogurt or a dairy-free alternative.
  • Mayonnaise: 1/4 cup binds the salad together. Swap for avocado or a vegan mayo for a healthier twist.
  • Kosher Salt: A pinch (1/2 teaspoon) enhances all the flavors. Adjust to taste!

Pro Tips for a Perfect Waldorf Salad

Side view of a fresh Waldorf salad showcasing chopped apples and celery.

To elevate your salad-making game, here are some expert insights:

  • Choose the Right Apples: For the best flavor, use a mix of tart and sweet apples to create a balance.
  • Prep Ahead: Chop your ingredients a few hours in advance, but toss them with the dressing just before serving to maintain freshness.
  • Chill Before Serving: Let the salad sit in the fridge for about 30 minutes to allow the flavors to meld beautifully.
  • Add Texture: Consider adding a handful of mini marshmallows or coconut flakes for an unexpected crunch and sweetness.
  • Experiment with Dressings: Try adding a splash of balsamic vinegar to your creamy dressing for an extra layer of flavor.
  • Always Taste: Before serving, taste your salad and adjust the seasoning if necessary—salt and lemon juice can make a big difference!
  • Use Fresh Ingredients: Freshly picked produce enhances both taste and nutritional value, so shop local when possible.
  • Go Vegan: Substitute the mayo and cream with cashew cream and coconut yogurt for a fully plant-based dish.

Avoid These Common Mistakes

Even the best cooks can make missteps! Here’s how to avoid common pitfalls:

  • Overmixing: Gently fold the ingredients together to maintain the integrity of the apples and grapes.
  • Using Old Produce: Always opt for the freshest apples and grapes to ensure maximum flavor and crunch.
  • Skipping the Lemon Juice: Don’t forget this step! It not only prevents browning but also adds vital acidity.
  • Neglecting to Toast Nuts: Toasting enhances the nutty flavor. Skipping this step can lead to a lackluster taste.
  • Not Adjusting for Dietary Needs: Be mindful of allergies and dietary preferences—always have alternative ingredients on hand!

Delicious Variations to Try

Feel free to get creative! Here are some variations to inspire your Waldorf Salad:

  • Fruit Medley: Add diced pears or pomegranate seeds for an extra burst of flavor and color.
  • Protein-Packed: Toss in shredded chicken or chickpeas for a heartier meal.
  • Spicy Kick: Add a pinch of chili powder or cayenne pepper to the dressing for a surprising twist.
  • Herb Infusion: Incorporate fresh herbs like parsley or mint to brighten the dish.

Storage and Make-Ahead Instructions

This salad is perfect for meal prep! Here’s how to store it:

  • **Refrigeration**: Store in an airtight container in the fridge for up to 3 days. The flavors will deepen, but the apples will lose some crunch.
  • **Make-Ahead**: Prepare the salad base (fruits and nuts) and dressing separately. Combine them just before serving for optimal freshness.
  • **Freezing**: Not recommended, as the apples and grapes will become mushy upon thawing.

Frequently Asked Questions

Got questions? We’ve got answers! Here are some common queries about the Waldorf Salad:

  • Can I make this salad vegan? Yes! Use plant-based alternatives for mayo and cream.
  • How long does the Waldorf Salad last? It can be stored in the fridge for up to 3 days, but it’s best enjoyed fresh.
  • What can I serve with Waldorf Salad? Pair it with grilled chicken, fish, or as a side to your favorite sandwich.
  • Can I use different nuts? Absolutely! Feel free to substitute with almonds, pistachios, or sunflower seeds.
  • How do I prevent the apples from browning? Toss them with lemon juice immediately after cutting.
  • Is this salad gluten-free? Yes, all the ingredients are naturally gluten-free!
  • Can I add more vegetables? Definitely! Consider adding shredded carrots or bell peppers for added crunch.
  • What is the nutritional value of Waldorf Salad? It’s loaded with vitamins and healthy fats, but specific values depend on your ingredient choices.

Nutrition Tips and Dietary Adaptations

This salad can fit into various dietary lifestyles:

  • Low-Calorie: Replace heavy cream with Greek yogurt or a dairy-free option.
  • Low-Carb: Skip the grapes and sugar, and add more nuts and celery instead.
  • Heart-Healthy: Use avocado oil-based mayo and pack in extra nuts or seeds for healthy fats.

Essential Equipment for Success

Here’s what you’ll need to create this delightful salad:

  • Cutting Board: For chopping your fresh ingredients.
  • Sharp Knife: A good knife makes all the difference in prep time.
  • Mixing Bowl: A large bowl for combining all the ingredients.
  • Whisk: For mixing the dressing smoothly.

Serving Suggestions: Make It a Meal!

Your Waldorf Salad can shine as the star of any meal. Here are some serving ideas:

  • **As a Side Dish**: Complement your main course with this refreshing salad.
  • **On a Bed of Greens**: Serve it atop a bed of spinach or arugula for added nutrients.
  • **With Grains**: Mix it with quinoa or farro for a satisfying lunch bowl.

With its vibrant flavors and nutritious ingredients, this Waldorf Salad is sure to become a staple in your kitchen. Remember, cooking is all about joy, creativity, and sharing great meals with loved ones. So grab your ingredients, channel your inner chef, and let’s make a salad that’s not just healthy, but absolutely delicious!

Healthy Waldorf Salad

Prep Time 15 minutes
Cook Time 5 minutes
Total Time 20 minutes
Servings 4 servings
Calories 250
A light and refreshing salad combining crisp apples, crunchy celery, sweet grapes, and toasted nuts, all coated in a creamy dressing.

Ingredients

Fruits and Vegetables

  • 2 cups chopped tart apples (or 2 whole apples)
  • 1 tablespoon granulated sugar
  • 2 teaspoons lemon juice
  • 1 cup chopped celery
  • 1 cup grapes (cut in half)
  • 1/2 cup toasted walnuts or pecans (coarsely chopped)
  • 1/2 cup whipped cream
  • 1/4 cup mayo
  • 1/2 teaspoon kosher salt

Instructions 

  • Combine chopped apples, celery, grapes, and toasted nuts in a large bowl.
  • In a small bowl, mix mayonnaise, whipped cream, lemon juice, sugar, and salt until smooth.
  • Pour the dressing over the fruit and nut mixture and toss gently to combine.
  • Chill in the refrigerator for at least 10 minutes before serving.

Notes

For a dairy-free version, substitute whipped cream with coconut cream.
Calories: 250kcal
Cost: $10
Course: Salad
Cuisine: American
Keyword: fruit, Healthy, Nut

Delight in Crunchy Coleslaw Bliss

Welcome to the ultimate guide for making the best coleslaw! This crunchy coleslaw recipe brings together the vibrant flavors of crunchy cabbage, sweet carrots, and a zesty dressing, creating a side dish that’s perfect for summer BBQs, family picnics, or any meal that needs a refreshing twist. Whether you’re a seasoned chef or a kitchen novice, you’ll find that this recipe is not only easy to follow but also bursting with flavor. Let’s dive into this exciting and nutritious journey!

Why You’ll Love This Recipe

This coleslaw recipe is a crowd-pleaser for several reasons. Here are just a few benefits that make it stand out:

  • Quick Preparation: In just 10 minutes, you can whip up a delicious coleslaw, making it perfect for last-minute gatherings.
  • Crisp Textures: The combination of shredded cabbage and carrots creates a satisfying crunch that’s delightful in every bite.
  • Versatile Usage: This coleslaw not only complements any meal but also serves as a fantastic topping for sandwiches and tacos.
  • Creamy and Tangy: The unique blend of creamy dressing and tangy flavors ensures a flavor explosion that everyone will love.
  • Make-Ahead Friendly: It’s ideal for meal prepping; the flavors deepen and improve after chilling in the fridge!

Ingredient Breakdown

Let’s explore the components that make this coleslaw both delicious and nutritious. Here’s what you’ll need:

  • ¾ cup mayonnaise: A classic base that adds creaminess.
  • ¼ cup Greek yogurt: Offers a tangy twist while reducing calories.
  • 2½ tablespoons white vinegar: Provides acidity that balances the creamy flavors.
  • ½ teaspoon Dijon mustard: Adds depth and a hint of spice.
  • 3 teaspoons granulated sugar: Sweetens the dressing just enough to enhance the flavors.
  • ½ teaspoon celery seeds: Infuses a subtle flavor that is characteristic of classic coleslaw.
  • ¼ teaspoon onion powder: Adds a gentle onion flavor without overpowering the dish.
  • Salt and pepper: Essential for seasoning to taste.
  • 8 cups coleslaw mix (shredded cabbage and carrots): The star of the show, delivering crunch and color!

If you’re looking for substitutions, try replacing mayonnaise with avocado or using a vinegar-based dressing for a lighter version. You can also swap out Greek yogurt with sour cream for a different flavor profile.

Step-by-Step Instructions

A side view of a fresh coleslaw dish featuring creamy dressing and colorful vegetables.

Now, let’s get cooking! Follow these simple steps to create your coleslaw:

  1. In a medium bowl, whisk together the mayonnaise, Greek yogurt, white vinegar, Dijon mustard, sugar, celery seeds, onion powder, salt, and pepper until smooth.
  2. Place the coleslaw mix in a large serving bowl. Pour the dressing over the slaw and toss to coat evenly.
  3. For the best flavor, cover and refrigerate for at least one hour before serving. This allows the ingredients to meld beautifully!

Pro Tips for the Best Coleslaw

Want to elevate your coleslaw game? Check out these expert insights:

  • Chill Time: Allowing your coleslaw to chill not only develops the flavors but also enhances the texture.
  • Experiment with Add-Ins: Try adding diced apples, raisins, or nuts for a twist on the classic recipe.
  • Fresh Ingredients: Using fresh, high-quality vegetables will enhance the overall taste of your dish.
  • Adjust to Taste: Don’t hesitate to modify the sweetness or acidity level according to your preference.
  • Batch It Up: Make a larger batch for parties; coleslaw keeps well and is always a hit!
  • Use a Food Processor: Shred your cabbage and carrots quickly and uniformly with a food processor, saving time.
  • Get Creative with Dressings: Don’t be afraid to try different dressings; a vinegar-based dressing can add a refreshing touch!
  • Leave the Veggies Crunchy: Don’t overmix the coleslaw; you want to maintain that delightful crunch!

Common Mistakes and Troubleshooting

Even the best chefs make mistakes! Here’s how to avoid common pitfalls:

  • Too Watery: If your coleslaw becomes watery, ensure you drain excess moisture from the shredded cabbage before mixing.
  • Overly Sweet: If your coleslaw ends up too sweet, simply add a splash more vinegar or a pinch of salt to balance the flavors.
  • Flavorless Dressing: Always taste your dressing before adding it to the slaw; adjust seasoning as needed!
  • Too Creamy: If it’s too creamy for your liking, add a bit more coleslaw mix or fresh vegetables to balance it out.

Variations to Try

Get creative! Here are some fun variations of coleslaw to suit different tastes:

  • Apple and Walnut Coleslaw: Add diced apples and chopped walnuts for a sweet crunch.
  • Spicy Sriracha Coleslaw: Mix in Sriracha or your favorite hot sauce for a spicy kick.
  • Asian-Inspired Coleslaw: Use sesame oil and rice vinegar in the dressing, and add sliced almonds and mandarin oranges.
  • Tropical Coleslaw: Incorporate pineapple chunks and coconut for a tropical vibe!

Storage and Make-Ahead Instructions

This coleslaw stores well in the refrigerator. It can last for up to 3 days, but keep in mind that it may lose some crunch over time. For the best texture, follow these tips:

  • Store in an Airtight Container: This prevents the coleslaw from absorbing other flavors in the fridge.
  • Make Ahead: Prepare the dressing in advance and mix it with the slaw just before serving.
  • Freeze with Caution: Avoid freezing as the texture of cabbage and carrots can become mushy upon thawing.

Frequently Asked Questions

Here are some common questions about coleslaw:

  • Can I make coleslaw the day before? Yes, but for the best flavor and texture, mix the dressing with the slaw just before serving.
  • What can I serve with coleslaw? Coleslaw pairs beautifully with grilled meats, sandwiches, and tacos.
  • Is coleslaw healthy? Yes, coleslaw can be healthy, especially with a lighter dressing and fresh vegetables.
  • Can I use vinegar instead of mayonnaise? Absolutely! A vinegar-based dressing can create a lighter, tangy coleslaw.
  • How do I cut cabbage for coleslaw? Cut the cabbage into quarters, remove the core, and thinly slice it into shreds.
  • What is the best type of cabbage for coleslaw? Green cabbage is traditional, but red cabbage or a mix of both adds color and flavor!
  • Can I add other vegetables to coleslaw? Yes, shredded bell peppers, radishes, or even broccoli can enhance your coleslaw.
  • How long can I keep coleslaw in the fridge? It can last for up to 3 days in the refrigerator if stored properly.

Nutritional Tips and Dietary Adaptations

This coleslaw can be adapted to fit various dietary needs:

  • Low-Calorie Option: Substitute full-fat mayonnaise with a light version or Greek yogurt.
  • Vegan Version: Use vegan mayo and skip the Greek yogurt for a completely plant-based dish.
  • Gluten-Free: This recipe is naturally gluten-free; just ensure all ingredients are certified gluten-free.
  • Low-Sugar Modification: Reduce the sugar or use a sugar substitute to make it lower in sugar.

Equipment Recommendations

To make your coleslaw preparation smooth and efficient, consider these essential kitchen tools:

  • Mixing Bowls: A set of different-sized bowls is perfect for mixing ingredients.
  • Whisk: A good whisk helps blend your dressing ingredients smoothly.
  • Sharp Knife: For cutting your cabbage and vegetables with ease.
  • Food Processor: A great tool for quickly shredding cabbage and carrots.
  • Airtight Storage Containers: To store your coleslaw and keep it fresh.

Serving Suggestions

To truly enjoy your coleslaw, here are some delicious serving suggestions:

  • As a Side Dish: Serve it alongside grilled chicken, burgers, or hot dogs for that classic BBQ feel.
  • On Sandwiches: Use coleslaw as a tasty topping for pulled pork or roast beef sandwiches.
  • With Tacos: Add a scoop of coleslaw to fish or shrimp tacos for extra crunch and flavor.
  • As a Salad Base: Use coleslaw as a base and top it with your favorite proteins for a meal!

Conclusion

Making coleslaw doesn’t have to be complicated or boring! With this definitive recipe, you’re equipped to create a vibrant, flavor-packed dish that will elevate any meal. So grab your veggies, whip up that dressing, and enjoy the crunch! Remember, the kitchen is your playground—get creative and make this coleslaw your own. Happy cooking!

Best Coleslaw

Prep Time 10 minutes
Total Time 10 minutes
Servings 8 cups
Calories 250
A creamy and tangy coleslaw perfect for picnics and barbecues. Easy to prepare and full of flavor.

Ingredients

Dressing

  • 0.75 cup mayonnaise
  • 0.25 cup Greek yogurt
  • 2.5 tablespoons white vinegar
  • 0.5 teaspoon Dijon mustard
  • 3 teaspoons granulated sugar
  • 0.5 teaspoon celery seeds
  • 0.25 teaspoon onion powder
  • as needed Salt (to taste)
  • to taste Freshly ground black pepper
  • 8 cups coleslaw mix (shredded cabbage and carrots)

Instructions 

  • Whisk together mayonnaise, Greek yogurt, vinegar, mustard, sugar, celery seeds, onion powder, salt, and pepper until smooth.
  • Pour dressing over coleslaw mix and toss to coat evenly.
  • Cover and refrigerate for at least one hour before serving.

Notes

For extra flavor, add a splash of lemon juice or a pinch of paprika.
Calories: 250kcal
Cost: $10
Course: Side Dish
Cuisine: American
Keyword: coleslaw

Discover the Magic of Pesto Caprese Salad

Are you ready to elevate your snacking game with a dish that bursts with flavor and color? Meet the Pesto Caprese Salad—a vibrant, fresh, and incredibly easy recipe that captures the essence of summer in every bite. This salad is a fantastic way to enjoy the delicious combination of juicy cherry tomatoes, creamy mozzarella, and zesty pesto, all drizzled with a touch of balsamic glaze. In just 5 minutes, you can create a stunning appetizer or side dish that your friends and family will adore. Let’s dive into why this recipe is not just another salad, but a delightful culinary experience!

Why You’ll Love This Recipe

  • Quick and Easy: This salad requires no cooking and comes together in just minutes, making it perfect for busy weeknights or spontaneous gatherings.
  • Flavor Explosion: The combination of sweet cherry tomatoes, rich mozzarella, and aromatic pesto delivers a mouthwatering flavor profile that excites the palate.
  • Versatile Dish: Serve it as a refreshing side dish, a light lunch, or even a gourmet appetizer at your next dinner party.
  • Fresh Ingredients: With simple, high-quality ingredients, this salad showcases the best of Italian cuisine while remaining healthy and nutritious.
  • Customizable: The recipe is easily adaptable; you can add your favorite proteins or grains to make it more filling!

Ingredient Breakdown

To make your own Pesto Caprese Salad, gather the following ingredients:

  • 1 pint grape or cherry tomatoes: Choose the ripest ones for maximum sweetness.
  • 1 teaspoon salt: Enhances the flavors of the salad.
  • 8 ounces fresh mozzarella balls: Opt for high-quality mozzarella for the best texture and taste.
  • 2 tablespoons pesto sauce: You can use store-bought or homemade for a personal touch.
  • 2 to 3 tablespoons extra-virgin olive oil: A drizzle adds richness and depth.
  • Drizzle of balsamic glaze: This sweet and tangy addition elevates the dish.
  • Fresh basil leaves: For garnish and an extra burst of flavor.

Ingredient Substitutions

A close-up view of a Pesto Caprese Salad drizzled with balsamic glaze and garnished with basil.

If you’re missing an ingredient or looking to switch things up, here are some easy substitutions:

  • Tomatoes: Use heirloom tomatoes or even sun-dried tomatoes for a different flavor.
  • Fresh mozzarella: Swap for burrata for an even creamier experience.
  • Pesto sauce: If you don’t have pesto, consider using a homemade vinaigrette or olive oil with herbs.
  • Balsamic glaze: A splash of lemon juice or red wine vinegar can add acidity if you don’t have glaze on hand.

Pro Tips for the Perfect Salad

Follow these expert tips to ensure your Pesto Caprese Salad is always a hit:

  • Use Room Temperature Ingredients: Allow mozzarella to sit at room temperature for about 30 minutes before serving to enhance its creamy texture.
  • Freshness is Key: Use the freshest ingredients possible to elevate the taste of your salad.
  • Don’t Overdress: Drizzle a little olive oil and balsamic glaze right before serving to avoid sogginess.
  • Layer Your Ingredients: For a beautiful presentation, layer tomatoes and mozzarella balls in a serving dish.
  • Experiment with Flavors: Try adding arugula or spinach for a peppery kick, or nuts for added crunch.
  • Make Ahead: Prepare the ingredients in advance, but assemble the salad just before serving to maintain freshness.

Common Mistakes and Troubleshooting

Avoid these pitfalls to ensure your salad is perfect every time:

  • Using Cold Ingredients: Cold mozzarella can be rubbery; always serve it at room temperature.
  • Over-Ripening Tomatoes: Use only ripe tomatoes; overripe ones can be mushy and unappetizing.
  • Too Much Pesto: A little goes a long way. Start with a small amount and add more to taste.
  • Ignoring Balance: Make sure your salad has enough acidity from the balsamic glaze to balance the richness of the mozzarella.

Variations on Pesto Caprese Salad

Here are some fun variations to keep your salad game fresh:

  • Pesto Pasta Caprese: Add cooked pasta to the mix for a heartier meal.
  • Caprese Skewers: Assemble cherry tomatoes, mozzarella, and basil on skewers for easy serving.
  • Grilled Caprese Salad: Grill the tomatoes and mozzarella for a smoky flavor twist.
  • Caprese with Chicken: Top your salad with grilled chicken for a protein boost.

Storage and Make-Ahead Instructions

If you want to prep ahead of time, here’s how to store your salad:

  • Refrigerate Components Separately: Keep tomatoes, mozzarella, and pesto in separate airtight containers for the best results.
  • Assemble Before Serving: Combine everything just before serving to keep the salad fresh and vibrant.
  • Storage Life: The salad is best enjoyed fresh but can be stored in the fridge for up to 1 day without the dressing.

Comprehensive FAQ

Got questions? Here are some common queries about Pesto Caprese Salad:

  • Can I use store-bought pesto? Yes! Store-bought pesto is a fantastic time-saver.
  • Is this salad gluten-free? Absolutely! This salad is naturally gluten-free.
  • What can I pair with this salad? It pairs beautifully with grilled meats, crusty bread, or as part of a buffet spread.
  • Can I make this salad vegan? Yes! Use vegan mozzarella or omit cheese altogether for a delicious vegan version.
  • How do I make homemade pesto? Blend fresh basil, garlic, pine nuts, olive oil, and nutritional yeast for a simple vegan pesto.
  • Can I use different cheese? Yes! Feta or goat cheese can add a unique twist to the salad.
  • Can this salad be served warm? While it’s typically served cold, you can warm the mozzarella slightly for a different experience.
  • How long will this salad last? It’s best eaten fresh, but can last in the fridge for up to a day if stored properly.

Nutritional Tips and Dietary Adaptations

This salad is a nutritious addition to any meal. Here are some tips:

  • Low-Carb Option: Skip the pasta and enjoy it as a low-carb dish.
  • High-Protein Additions: Add grilled chicken or chickpeas for a protein boost.
  • Healthy Fats: The olive oil provides healthy monounsaturated fats, supporting heart health.
  • Vitamins Galore: This salad is packed with vitamins A and C from the tomatoes and basil.

Essential Equipment Recommendations

To make preparation easy, you’ll need a few kitchen essentials:

  • Knife: For chopping tomatoes and slicing mozzarella.
  • Cutting Board: A sturdy cutting board for safe and easy prep.
  • Mixing Bowl: To combine all your ingredients before serving.
  • Measuring Spoons: For precise measurements of pesto and olive oil.

Serving Suggestions

Ready to serve your masterpiece? Here are some fun ideas:

  • Elegant Platter: Arrange the salad on a large serving platter to impress your guests.
  • Individual Cups: Serve in small cups for a charming appetizer at parties.
  • With Grilled Proteins: Pair with grilled chicken, shrimp, or steak for a complete meal.
  • As Part of a Buffet: Add it to a summer BBQ spread alongside other fresh salads and sides.

Final Thoughts

In just five minutes, you can whip up a Pesto Caprese Salad that’s not only delicious but also visually stunning. With its vibrant colors and fresh flavors, this salad is bound to become a staple in your kitchen. So grab your ingredients, unleash your creativity, and enjoy the simple pleasures of cooking and sharing good food. Remember, a healthy lifestyle starts with making delicious food choices that spark joy—let this salad be your next exciting adventure in the kitchen!

Quick Pesto Caprese Salad

Prep Time 10 minutes
Total Time 10 minutes
Servings 4 servings
Calories 250
A fresh and vibrant salad combining juicy cherry tomatoes, creamy mozzarella, and flavorful pesto for a quick and satisfying appetizer or light meal.

Ingredients

Produce

  • 1 pint grape or cherry tomatoes
  • 1 teaspoon salt
  • 8 ounces fresh mozzarella balls
  • 2 tablespoons pesto sauce
  • 2 to 3 tablespoons extra-virgin olive oil (adjust to taste)
  • Drizzle balsamic glaze (for finishing)
  • a few leaves fresh basil leaves

Instructions 

  • Arrange the tomatoes and mozzarella on a serving platter.
  • Drizzle with pesto sauce and olive oil.
  • Season with salt and garnish with basil leaves.
  • Finish with a drizzle of balsamic glaze before serving.

Notes

Use high-quality pesto for the best flavor.
Calories: 250kcal
Cost: $10
Course: Appetizer, Salad
Cuisine: Italian
Keyword: Mozzarella, Pesto, Tomatoes

Unleash the Flavor: Your Ultimate Caesar Salad Journey!

Welcome, culinary adventurers! Get ready to dive into a delicious and vibrant twist on the classic Caesar salad. This recipe is not just a meal; it’s an experience of crunch, zest, and satisfaction that will make your taste buds dance! Packed with a zesty dressing, crunchy homemade croutons, and fresh romaine, we’re elevating your plate in just a few simple steps. Let’s get cooking!

Why You’ll Love This Recipe

This Caesar salad isn’t your average bowl of greens. Here’s why it’s going to become your new favorite:

  • Flavor Explosion: The combination of creamy dressing, tangy lemon juice, and savory anchovy paste creates a symphony of flavors that makes every bite unforgettable.
  • Homemade Croutons: Say goodbye to store-bought! Our crispy, golden croutons add the perfect crunch and can be tailored to your taste.
  • Versatility: This Caesar salad can serve as a side or main dish. Add grilled chicken or chickpeas for a protein punch!
  • Quick and Easy: With minimal prep time, this salad is perfect for busy weeknights or impressing guests at dinner parties.
  • Make Ahead: With the right storage techniques, you can prep this salad in advance, making healthy eating a breeze.

Ingredient Breakdown

Let’s get into the nitty-gritty of what you’ll need for this delicious salad, including some fabulous substitutions to suit your preferences.

For the Dressing:

  • 1 garlic clove, minced: Fresh garlic provides a pungent kick. Substitute with garlic powder for a milder flavor.
  • 1 teaspoon Dijon mustard: This adds depth and spice. Yellow mustard can work in a pinch.
  • 2 teaspoons Worcestershire sauce: A must for umami! Use soy sauce for a vegetarian alternative.
  • 2 tablespoons lemon juice (freshly squeezed): Brightens the dressing. Lime juice is a fun twist!
  • 1 teaspoon anchovy paste (optional, but authentic): For a classic touch, but feel free to omit for a vegetarian version.
  • ½ cup mayonnaise: Creaminess at its best! Greek yogurt can be a healthier alternative.
  • ¼ cup grated Parmesan cheese: Adds richness. Nutritional yeast is a great vegan substitute.
  • Salt and freshly cracked black pepper, to taste: Essential for balancing flavors.

For the Croutons:

  • 2 cups cubed bread (day-old works best): Use any bread you like! Sourdough or whole grain adds great flavor.
  • 2 tablespoons olive oil: Gives the croutons their crispiness. Avocado oil is a healthy substitute.
  • 1 teaspoon garlic powder: For extra flavor! You can skip this if you prefer a milder taste.
  • Pinch of salt: Brings all the flavors together.

For the Salad:

  • 1 large head of romaine lettuce, washed and chopped: The base of our salad! Kale or spinach can be used for a different twist.
  • Shaved or grated Parmesan cheese, for garnish: Adds a beautiful finish to your salad.
  • Freshly ground black pepper, for serving: Enhances the flavors even more!

Instructions: How to Make Your Caesar Salad

Side perspective of a delicious Caesar salad with a creamy dressing and fresh ingredients.

1. Make the Croutons:

Start by preheating your oven to 375°F (190°C). In a mixing bowl, toss your bread cubes with olive oil, garlic powder, and a pinch of salt until evenly coated. Spread them on a baking sheet and bake for 10–12 minutes, flipping halfway through, until golden and crisp. Let them cool while you prep the rest.

2. Prepare the Dressing:

In a medium bowl, whisk together the minced garlic, Dijon mustard, Worcestershire sauce, lemon juice, and anchovy paste (if using). Add the mayonnaise and grated Parmesan, and whisk until smooth and creamy. Season with salt and freshly cracked black pepper to taste.

3. Assemble the Salad:

In a large salad bowl, add the chopped romaine lettuce. Drizzle over the dressing and toss to coat every leaf evenly. Add the cooled croutons and a generous sprinkle of shaved Parmesan.

4. Serve:

Finish with another crack of black pepper and an extra touch of lemon juice if desired. Serve immediately for the best crunch and flavor.

Pro Tips for the Perfect Caesar Salad

Want to level up your salad game? Check out these expert insights:

  • Use Day-Old Bread: It holds up better when toasted, giving you the perfect crunch!
  • Customize Your Greens: Mix in kale or arugula for a nutritional boost and unique flavor.
  • Chill Your Bowl: A cold bowl helps keep your salad crisp longer.
  • Experiment with Proteins: Grilled chicken, shrimp, or chickpeas can transform your salad into a hearty meal.
  • Make Extra Dressing: It keeps well in the fridge and can be used on other salads throughout the week.
  • Don’t Skip the Anchovies: They add a depth of flavor you won’t want to miss, even if you don’t taste them directly.
  • Crunchy Croutons: Let them cool completely before adding to avoid sogginess.
  • Freshly Grated Parmesan: Always opt for freshly grated over pre-shredded for better texture and flavor.

Common Mistakes and Troubleshooting

Even the best chefs make mistakes! Here are common issues and how to fix them:

  • Too Soggy: Make sure your croutons are completely crisp and toss the salad right before serving for the freshest crunch.
  • Flavorless Dressing: Always taste and adjust seasoning with salt and pepper to suit your preference.
  • Overdressing: Start with a small amount of dressing and add more as needed to avoid a soggy salad.

Variations to Spice Things Up

Feeling adventurous? Try these fun variations:

  • Chicken Caesar Salad: Add grilled or baked chicken breast on top for a protein boost.
  • Vegan Caesar Salad: Replace the mayonnaise with tofu or a cashew cream dressing and skip the anchovies.
  • Caesar Pasta Salad: Toss cooked pasta with the salad ingredients for a filling twist.
  • Mexican Caesar Salad: Add black beans, corn, and a sprinkle of taco seasoning for a zesty change!

Storage and Make-Ahead Instructions

This salad is great for meal prep! Here’s how to store it properly:

  • Store Croutons Separately: Keep croutons in an airtight container to maintain their crunch.
  • Dressing Storage: The dressing can be made up to a week in advance and stored in the fridge.
  • Assemble Just Before Serving: For the best flavor and texture, mix everything together just before you’re ready to enjoy.

Nutrition Tips and Dietary Adaptations

Eating healthy doesn’t have to be a chore! Here are some tips:

  • Balance Your Plate: Pair your Caesar salad with a serving of fruit or whole grains for a complete meal.
  • Watch Portion Sizes: Use the dressing sparingly if you’re watching your calorie intake.
  • Dietary Adaptations: This salad is easily adaptable for gluten-free, vegetarian, or dairy-free diets—just swap out the bread, dressing, or cheese as needed!

Equipment Recommendations

Here’s what you’ll need to whip up this fabulous salad:

  • Mixing Bowls: A medium bowl for the dressing and a large one for the salad.
  • Baking Sheet: For toasting those delicious croutons.
  • Whisk: For ensuring your dressing is well-blended and creamy.
  • Salad Tongs: To help toss and serve your salad effortlessly.

Serving Suggestions

This Caesar salad is versatile! Here are some ideas on how to serve it:

  • As a Side Dish: Pair it with grilled meats or seafood for a complete meal.
  • As a Main Course: Add protein like chicken, steak, or chickpeas to make it more filling.
  • With a Side of Bread: Enjoy with crusty bread or garlic knots for a comforting meal.

FAQs About Caesar Salad

Got questions? We’ve got answers! Here are some common queries:

  • Can I make Caesar salad ahead of time? Yes, but toss the salad with dressing just before serving to keep it crisp.
  • What can I substitute for anchovies? You can skip them or use capers for a similar salty flavor.
  • Is Caesar salad healthy? It can be! Use lighter dressings and add more veggies for a nutritious boost.
  • Can I use other greens instead of romaine? Absolutely! Kale, spinach, or mixed greens work well.
  • How do I make this salad gluten-free? Use gluten-free bread for the croutons and check your dressing ingredients.
  • Can I add fruit to my salad? Yes! Sliced apples or pears add a sweet contrast to the savory flavors.
  • What’s the best way to store leftovers? Keep the dressing and salad separately in airtight containers in the fridge.
  • How long does the dressing last? Homemade dressing can last up to a week in the refrigerator.

Now that you have all the tools and tips to make a stellar Caesar salad, it’s time to get cooking! Remember, the kitchen is your playground, so experiment, have fun, and enjoy every bite of this delightful creation. Happy cooking!

Caesar Salad

Prep Time 15 minutes
Cook Time 12 minutes
Total Time 27 minutes
Servings 4 servings
Calories 450
A classic Caesar Salad featuring crunchy croutons, creamy dressing, and fresh romaine lettuce, perfect for a quick and flavorful meal.

Ingredients

For the Dressing

  • 1 clove garlic, minced
  • 1 teaspoon Dijon mustard
  • 2 teaspoons Worcestershire sauce
  • 2 tablespoons lemon juice (freshly squeezed)
  • 1 teaspoon anchovy paste (optional, but authentic)
  • ½ cup mayonnaise
  • ¼ cup grated Parmesan cheese
  • to taste Salt and freshly cracked black pepper

For the Croutons

  • 2 cups cubed bread (day-old works best)
  • 2 tablespoons olive oil
  • 1 teaspoon garlic powder
  • Pinch salt

For the Salad

  • 1 large head romaine lettuce, washed and chopped
  • Shaved or grated Parmesan cheese, for garnish
  • for serving Freshly ground black pepper

Instructions 

  • Preheat oven to 375°F (190°C). Toss bread cubes with olive oil, garlic powder, and salt. Bake for 10–12 minutes until golden. Let cool.
  • Whisk together garlic, mustard, Worcestershire, lemon juice, and anchovy paste. Add mayonnaise and Parmesan, whisk until smooth. Season with salt and pepper.
  • In a large bowl, toss chopped lettuce with dressing. Add croutons and Parmesan. Serve with black pepper and lemon juice if desired.

Notes

For extra flavor, add more Parmesan or anchovy paste to taste.
Calories: 450kcal
Cost: $15
Course: Salad
Cuisine: American
Keyword: Caesar

Unleash the Flavors of Southern Style Creamy Coleslaw

Welcome to your next culinary adventure! If you’re ready to elevate your meal game, look no further than this Southern Style Creamy Coleslaw. This vibrant, crunchy dish is a classic favorite that combines a handful of simple ingredients to create a flavor explosion that dances on your taste buds. Whether you’re hosting a backyard BBQ, bringing a dish to a potluck, or simply wanting a refreshing side for dinner, this coleslaw is your go-to recipe.

In this article, we’ll dive deep into everything you need to know about making the perfect creamy coleslaw. From ingredient breakdowns to pro tips, mouthwatering variations, and even storage solutions, we’ve got you covered. Let’s get cooking!

Why You’ll Love This Recipe

  • Quick and Easy: This creamy coleslaw comes together in no time, making it perfect for busy weeknights or last-minute gatherings.
  • Flavor Packed: The balance of tangy, sweet, and creamy flavors will elevate your meal, impressing even the pickiest of eaters!
  • Versatile Side Dish: Pair it with everything from BBQ ribs to grilled chicken, or enjoy it as a standalone salad. It’s a crowd-pleaser!
  • Healthy and Refreshing: Packed with fresh cabbage and carrots, this dish not only tastes great but is also a nutritious addition to your meal.
  • Customizable: Feel free to make it your own by adding your favorite ingredients or altering the dressing to suit your taste.

Ingredients for Southern Style Creamy Coleslaw

Here’s what you’ll need:

  • 1 head green cabbage: Shredded finely for that perfect crunch.
  • 1 carrot: Shredded to add a touch of sweetness and color.
  • 1/2 cup mayonnaise: The creamy base that brings everything together.
  • 2 tablespoons apple cider vinegar: For a tangy kick that balances the creaminess.
  • 1 tablespoon sugar: A hint of sweetness to enhance the flavors.
  • 1 teaspoon celery seed: Adds a unique flavor profile that’s quintessential in coleslaw.
  • Salt and black pepper to taste: Essential for seasoning and enhancing the overall taste.

Ingredient Substitutions

If you’re looking to mix things up, here are a few substitutions:

  • Greek Yogurt: Swap out mayonnaise for Greek yogurt for a lighter, tangy alternative.
  • Vegan Mayonnaise: Use a plant-based mayo to make this dish vegan-friendly.
  • Honey or Maple Syrup: Replace sugar with honey or maple syrup for a natural sweetener.
  • Red Cabbage: For a colorful twist, use red cabbage instead of green.

How to Make Southern Style Creamy Coleslaw

Side angle of Southern-style coleslaw in a white bowl, showcasing its creamy texture.

Now, let’s get to the fun part—making this delicious coleslaw!

  1. In a large bowl, combine the shredded cabbage and shredded carrot.
  2. In a separate small bowl, whisk together the mayonnaise, apple cider vinegar, sugar, and celery seed.
  3. Pour the dressing over the cabbage and carrot mixture.
  4. Stir well to coat all the vegetables evenly.
  5. Season with salt and pepper to taste.
  6. Cover the bowl and refrigerate for at least 30 minutes to allow the flavors to meld.
  7. Stir again before serving to ensure everything is well mixed.

Pro Tips for Perfect Creamy Coleslaw

  • Chill Time: Allowing the coleslaw to chill helps the flavors develop. Aim for at least 30 minutes but overnight is even better!
  • Shred Your Own Veggies: For the best texture, shred your cabbage and carrots by hand rather than using pre-packaged mixes.
  • Adjust the Dressing: Feel free to tweak the amount of mayo or vinegar based on your taste preference.
  • Add Fresh Herbs: Incorporating fresh herbs like dill or parsley can add a delightful freshness.
  • Texture Matters: For extra crunch, add nuts or seeds like sunflower seeds or sliced almonds.
  • Spice It Up: Add a pinch of cayenne or some chopped jalapeños for a spicy twist.
  • Batch It Up: This recipe is perfect for making larger batches for parties or meal prep.
  • Presentation Counts: Garnish with fresh parsley or chopped green onions for a pop of color before serving.

Common Mistakes and Troubleshooting

Even the best of us can run into a few hiccups while cooking. Here’s how to avoid them:

  • Over-Seasoning: Always start with less salt and pepper and adjust to taste to avoid overpowering the dish.
  • Too Watery: If your coleslaw turns out watery, you may have added too much dressing. Start with less and add more as needed.
  • Flavors Didn’t Meld: If you didn’t chill the coleslaw long enough, the flavors won’t have time to develop fully. Be patient!

Variations on Southern Style Creamy Coleslaw

Feeling adventurous? Here are some fun variations to try:

  • Ranch Coleslaw: Mix in ranch dressing instead of mayonnaise for a zesty twist.
  • Tropical Coleslaw: Add chopped pineapple and shredded coconut for a sweet, tropical flavor.
  • Spicy Jalapeño Coleslaw: Incorporate diced jalapeños for a kick or drizzle with hot sauce.
  • Apple Walnut Coleslaw: Add sliced apples and chopped walnuts for a crunchy, sweet addition.

Storage and Make-Ahead Instructions

Want to get a head start on your meal prep? Here’s how to store your coleslaw:

  • Store in the Fridge: Keep leftover coleslaw in an airtight container in the fridge for up to 3 days.
  • Make Ahead: You can prepare the coleslaw a day in advance. Just hold off on adding the dressing until a few hours before serving to maintain the crunch.
  • Freezer Tips: While it’s best fresh, you can freeze coleslaw for up to a month. Just note that the texture might change when thawed.

Frequently Asked Questions about Southern Style Creamy Coleslaw

Here are some common questions and answers to help you master this dish:

  • Can I use other types of cabbage? Yes! Red cabbage or Napa cabbage can be used for different flavors and colors.
  • Is coleslaw healthy? Absolutely! It’s packed with veggies and can be made healthier by reducing mayo or using yogurt.
  • Can I add other vegetables? Yes! Feel free to add bell peppers, radishes, or other crunchy veggies.
  • How long does coleslaw last? Properly stored, it can last up to 3 days in the fridge.
  • Can I make coleslaw vegan? Yes! Simply use vegan mayonnaise or yogurt.
  • What can I serve with coleslaw? It pairs wonderfully with BBQ, sandwiches, and grilled meats.
  • Can I make it spicy? Yes! Just add jalapeños or hot sauce to give it a kick.
  • What is the best way to cut cabbage for coleslaw? Shred it finely to ensure a satisfying crunch!

Nutritional Tips and Dietary Adaptations

To make this creamy coleslaw even healthier, consider these tips:

  • Use Low-Fat or Greek Yogurt: Swap out traditional mayo for a lighter option.
  • Incorporate More Veggies: Add additional shredded vegetables like zucchini or broccoli for more nutrients.
  • Monitor Sugar Levels: Adjust the sugar content based on your dietary needs.
  • Gluten-Free Option: This coleslaw is naturally gluten-free, making it suitable for various dietary preferences.

Equipment Recommendations

Here’s what you’ll need to whip up this delicious coleslaw:

  • Large Mixing Bowl: For combining ingredients.
  • Whisk: To mix the dressing thoroughly.
  • Grater or Food Processor: For quick and easy shredding of vegetables.
  • Airtight Container: To store your delicious leftovers.

Serving Suggestions

Ready to serve? Here are some delicious pairings:

  • BBQ Ribs: A classic match made in culinary heaven.
  • Grilled Chicken: The perfect contrast to juicy, grilled meats.
  • Sandwiches or Sliders: Add a scoop of coleslaw to your sandwiches for extra crunch.
  • Fish Tacos: Use it as a fresh topping for a zesty twist.

Conclusion

There you have it! With this guide, you’re all set to make the ultimate Southern Style Creamy Coleslaw. So, grab your ingredients and get ready to impress your friends and family with a dish that’s not just easy to make but also bursting with flavor. Remember, cooking should be fun and creative, and this coleslaw is the perfect way to bring joy into your kitchen. Happy cooking!

Southern Style Creamy Coleslaw: a Powerfully Simple Secret at 911Recipes

Prep Time 10 minutes
Total Time 10 minutes
Servings 4 people
Calories 150
This creamy Southern-style coleslaw is a quick and delicious side, perfect for any gathering or barbecue.

Ingredients

Vegetables

  • 1 head green cabbage, shredded
  • 1 piece carrot, shredded

Dressing

  • 0.5 cup mayonnaise
  • 2 tablespoons apple cider vinegar
  • 1 tablespoon sugar
  • 1 teaspoon celery seed
  • to taste Salt and black pepper

Instructions 

  • Combine shredded cabbage and carrot in a large bowl.
  • Whisk together mayonnaise, vinegar, sugar, and celery seed in a small bowl.
  • Pour dressing over vegetables and toss to coat evenly.
  • Season with salt and pepper to taste.
  • Refrigerate for at least 30 minutes before serving.

Notes

For extra crunch, add chopped nuts or apples.
Calories: 150kcal
Cost: $10
Course: Side Dish
Cuisine: Southern American
Keyword: coleslaw