Welcome to the deliciously gooey world of Chocolate Lava Cake! If you’ve ever dreamed of slicing into a dessert that erupts with warm chocolate, you’re in the right place. This guide will not only walk you through the process of creating this indulgent treat but also share everything you need to know to impress your guests or treat yourself! In less than 30 minutes, you can master the art of creating a cake with a molten center that is sure to steal the spotlight. Buckle up as we dive into the sweet details!
Why You’ll Love This Recipe
- Quick to Prepare: With only a handful of ingredients, you can whip this up in just 30 minutes—perfect for last-minute dessert cravings!
- Elegant Presentation: This dessert looks gourmet, making it ideal for impressing guests, yet it requires basic baking skills that anyone can handle.
- Customizable Flavors: Add a dash of espresso or a hint of orange zest to personalize the chocolate flavor, making it uniquely yours.
- Perfect for Any Occasion: Whether it’s a special celebration or a simple weeknight treat, this Chocolate Lava Cake fits the bill for any occasion.
- Decadent Texture: Experience the delightful contrast of a crispy outer layer with a warm, melted center that flows like lava when you dig in!
Ingredients Breakdown
Let’s gather our ingredients! This Chocolate Lava Cake recipe calls for:
- ½ cup unsalted butter (115 g): For a rich, creamy base.
- 4 oz dark chocolate (chopped, 115 g): Choose high-quality chocolate for the best flavor.
- 1 cup powdered sugar: Sweetens the batter while keeping it light.
- 2 large eggs: Provides structure and helps the cake rise.
- 2 large egg yolks: Adds richness and a velvety texture.
- 1 teaspoon vanilla extract: Enhances the overall flavor profile.
- ½ cup all-purpose flour: The backbone of our cake—make sure to measure accurately!
- Pinch of salt: Balances sweetness and enhances flavors.
- Vanilla ice cream (optional for serving): A classic pairing for that extra comfort.
- Powdered sugar (optional for dusting): For that picture-perfect finish.
- Fresh berries (optional for serving): Adds a fresh, tangy contrast to the rich chocolate.
Substitutions
You can easily customize this recipe to fit dietary needs or preferences:
- Dairy-free: Substitute the butter with coconut oil and use dairy-free chocolate.
- Gluten-free: Swap all-purpose flour with a gluten-free flour blend.
- Less Sugar: Reduce powdered sugar by 25% for a less sweet cake without sacrificing texture.
- Egg-free: Use flax eggs (1 tablespoon ground flaxseed mixed with 2.5 tablespoons water equals one egg) for a vegan version.
Step-by-Step Instructions
Now, let’s get baking! Follow these easy steps to create your own indulgent Chocolate Lava Cake:
- Preheat the oven to 425 °F (220 °C). Butter and lightly flour four ramekins and place them on a baking sheet.
- Melt the butter and dark chocolate together in a heatproof bowl. Use the microwave in 20–30 second bursts or a double boiler, stirring until smooth.
- Whisk the powdered sugar into the melted chocolate mixture until well combined.
- Add the eggs and egg yolks one at a time, whisking thoroughly after each addition to ensure a smooth batter.
- Stir in the vanilla extract, then fold in the flour and salt just until combined—be careful not to overmix!
- Divide the batter evenly among the prepared ramekins.
- Bake for 11 to 13 minutes. The edges should be set, but the centers should remain soft and slightly jiggly.
- Let the cakes rest for 1 minute, then carefully invert onto plates or serve directly from the ramekins.
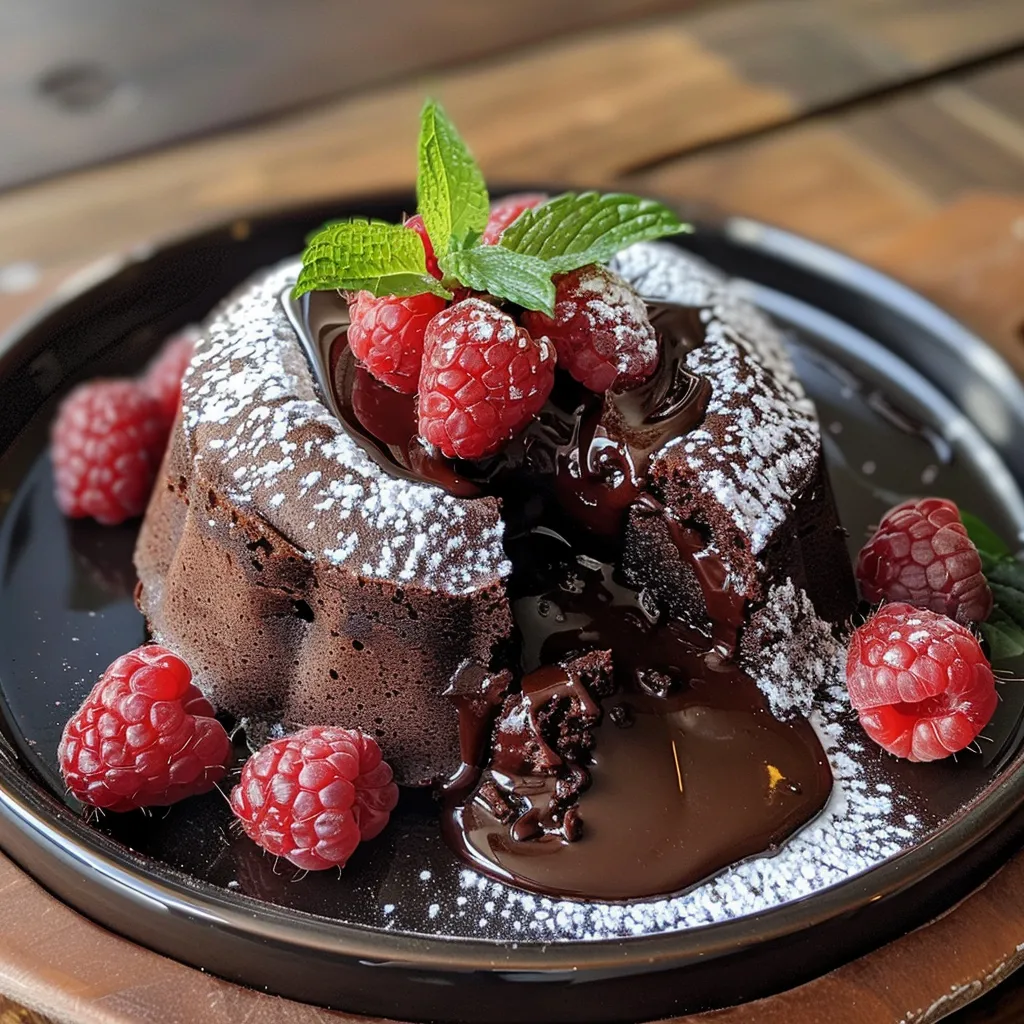
- Dust with powdered sugar or top with vanilla ice cream and fresh berries if desired.
Pro Tips for the Perfect Lava Cake
- Don’t Overbake: The key to that gooey center is to monitor the baking time closely. Remember, the center should still jiggle slightly when you take it out.
- Room Temperature Ingredients: Ensure your eggs and butter are at room temperature for better emulsification.
- Use Quality Chocolate: Opt for a chocolate with at least 60% cocoa for a rich, intense flavor.
- Chill the Ramekins: For an extra touch, chill the ramekins before filling them to help the cakes set perfectly.
- Experiment with Fillings: Consider adding a small piece of chocolate or caramel in the center before baking for an extra surprise!
- Test with a Toothpick: If you’re unsure, poke a toothpick into the edge of the cake; it should come out clean, while the center stays molten.
- Make-Ahead Option: Assemble the batter in the ramekins, cover, and refrigerate for up to a day. Bake when you’re ready!
- Serving Temperature: Serve immediately after baking for the best molten experience!
Common Mistakes & Troubleshooting
Even the best bakers face challenges. Here are some common mistakes to avoid:
- Overmixing the Batter: This can lead to a dense cake rather than a light and airy one. Mix just until combined!
- Incorrect Oven Temperature: Always preheat your oven and consider using an oven thermometer for accuracy.
- Using Cold Ingredients: Cold butter or eggs can affect the batter’s texture. Make sure they’re at room temperature.
- Inconsistent Bake Times: Ovens can vary; check your cake a minute or two earlier to prevent overbaking.
Variations to Try
Feel adventurous? Here are some fun twists on the classic Chocolate Lava Cake:
- Peanut Butter Lava Cake: Add a spoonful of peanut butter in the center for a creamy surprise.
- Mint Chocolate Lava Cake: Stir in a few drops of peppermint extract for a refreshing twist.
- Spicy Chocolate Lava Cake: Add a pinch of cayenne pepper or chili powder for a warm kick!
- Nutty Lava Cake: Fold in chopped nuts like walnuts or hazelnuts for added texture and flavor.
Storage & Make-Ahead Instructions
Want to prepare in advance? Here’s how to store your creations:
- Refrigeration: Store baked Lava Cakes in an airtight container in the fridge for up to 2 days.
- Freezing: Unbaked batter can be frozen in the ramekins. Wrap tightly and freeze for up to 3 months.
- Reheating: To reheat, bake in a preheated oven at 350 °F (175 °C) for 5-10 minutes until heated through.
Comprehensive FAQs
- Can I use milk chocolate instead of dark chocolate? Yes, but the flavor will be sweeter and less intense.
- What if my center isn’t molten? It might be overbaked. Next time, reduce the baking time slightly.
- Can I make this recipe in a muffin tin? Absolutely! Just adjust the baking time accordingly.
- How can I tell if my cakes are done? The edges should be set, but the center should still jiggle when you gently shake the ramekin.
- What’s the best way to serve it? Serve immediately after baking for the best molten experience, topped with ice cream or fresh berries.
- Can I double the recipe? Yes! Just make sure you have enough ramekins and adjust the baking time if using larger ones.
- Is it possible to make these vegan? Yes, substitute eggs with flax eggs and use dairy-free chocolate and butter alternatives.
- What should I do if I don’t have ramekins? Any oven-safe dish can work, but baking times may vary.
Nutrition Tips & Dietary Adaptations
Making smart choices can still lead to indulgent desserts! Here are some tips:
- Choose Dark Chocolate: Opt for chocolate that is at least 60% cocoa for health benefits, including antioxidants.
- Portion Control: Serve in smaller ramekins to help manage portion sizes without sacrificing enjoyment.
- Substitute Sweeteners: Use natural sweeteners like maple syrup or honey for a healthier alternative.
- Add Fruit: Incorporating fresh fruit in your serving enhances nutrients and adds freshness.
Essential Equipment Recommendations
Here’s what you’ll need for success:
- Ramekins: For the perfect presentation and portion control—choose 6 oz ramekins for best results.
- Mixing Bowls: Use both small and large mixing bowls for efficient ingredient combining.
- Whisk: A good whisk is essential for blending ingredients smoothly.
- Oven Thermometer: For precise oven temperature and consistent baking results.
Serving Suggestions
Want to elevate your dessert experience? Here are my favorite serving suggestions:
- Pair with Ice Cream: A scoop of vanilla ice cream on the side is a classic combo that balances the rich chocolate.
- Fresh Berries: Add a handful of strawberries or raspberries for a tangy contrast.
- Chocolate Sauce: Drizzle warm chocolate sauce over the top for an extra decadent touch.
- Mint Leaves: Garnish with fresh mint for a pop of color and refreshing flavor.
Final Thoughts
Creating the perfect Chocolate Lava Cake is not only about indulgence; it’s about the joy of baking and sharing. With this comprehensive guide, you can confidently navigate each step, troubleshoot any hiccups, and impress anyone lucky enough to share this experience with you. Remember, the kitchen is your playground—so have fun experimenting with flavors and presentation. Happy baking, and may your cakes always flow with delicious chocolate goodness!
Chocolate Lava Cake
Ingredients
Butter and Chocolate
- 0.5 cup unsalted butter ((115 g))
- 4 oz dark chocolate ((chopped, 115 g))
Dry Ingredients
- 1 cup powdered sugar
- 2 large eggs
- 2 large egg yolks
- 1 teaspoon vanilla extract
- 0.5 cup all-purpose flour
- Pinch salt
Optional Toppings
- Vanilla ice cream ((optional for serving))
- Powdered sugar ((optional for dusting))
- Fresh berries ((optional for serving))
Instructions
- Preheat oven to 425°F (220°C). Prepare ramekins.
- Melt butter and chocolate, then mix in powdered sugar.
- Whisk in eggs, yolks, vanilla, then fold in flour and salt.
- Divide batter into ramekins and bake for 11-13 minutes.
- Invert onto plates, dust with powdered sugar or serve with ice cream and berries.