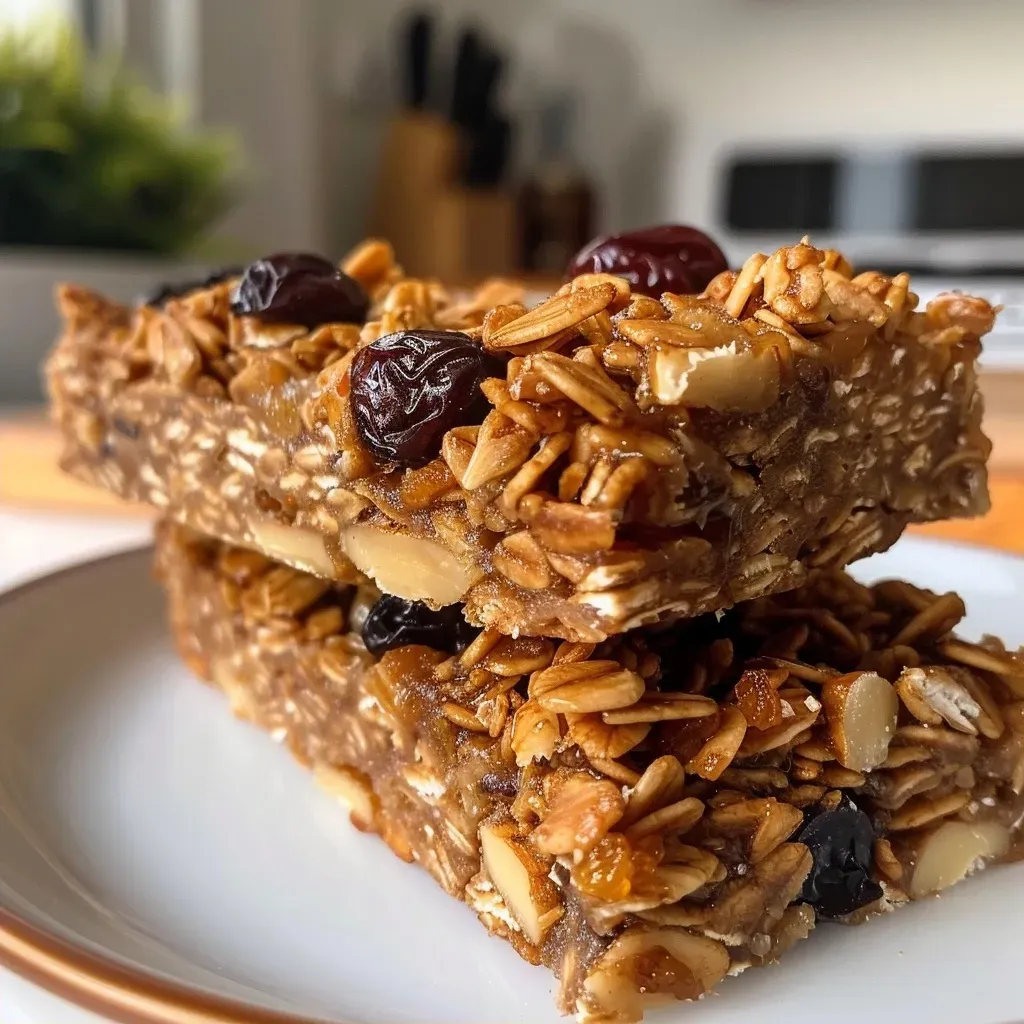
![['Close-up of Maple Syrup Granola Bars with dried fruit and chocolate chips.', 'Side view of delicious granola bars featuring oats, almonds, and chocolate.', 'Appetizing granola bars made with maple syrup, showing chunks of dried cherries and nuts.', 'Juicy Maple Syrup Granola Bars filled with mini chocolate chips and almonds.']](https://recipessalads.com/wp-content/uploads/2026/07/maple-syrup-granola-bars_1_U1.webp "Choco-Cherry Crunch: Irresistible Maple Syrup Granola Bars to Energize Your Day!")
Unleash Your Kitchen Creativity with Homemade Maple Syrup Granola Bars!
Welcome to your new favorite kitchen adventure! If you’re searching for a way to energize your day with a delicious, nutritious snack, you’ve landed in the right place. In this article, we’ll dive into the exciting world of homemade Maple Syrup Granola Bars. Packed with wholesome oats, crunchy almonds, chewy dried cherries, and a hint of chocolate, these bars are not just easy to make, but they also provide a perfect balance of flavor and nutrition. Let’s get started on this fun, flavorful journey!
Why You’ll Love This Recipe
Homemade granola bars bring a wave of benefits to your snack game. Here are just a few reasons why you’ll fall in love with this recipe:
- Quick and Easy: This recipe takes less than 30 minutes of hands-on time, making it accessible even for the busiest of schedules.
- Customizable: Feel free to mix and match your favorite ingredients, whether it’s nuts, dried fruits, or seeds. The possibilities are endless!
- Healthier Choice: Homemade means you control the ingredients—no preservatives, no artificial flavors, just pure goodness.
- Perfect for Meal Prep: Make a batch on the weekend, and you’ll have delicious snacks ready to grab throughout the week.
- Kid-Friendly: With a delightful taste and chewy texture, they’re a hit with kids and adults alike!
Ingredient Breakdown
Let’s take a closer look at the ingredients that make these granola bars shine. Here’s what you’ll need:

★ Recommended Kitchen Tool
Personal Smoothie Blender
Make this recipe even easier with a quality Personal Smoothie Blender — a must-have kitchen staple!
- 2 ½ cups old-fashioned oats: The base of our bars, providing fiber and texture.
- ½ cup chopped almonds: For a delightful crunch and a dose of healthy fats.
- ⅓ cup pure maple syrup: The star ingredient, adding sweetness and flavor. You can substitute with honey if needed.
- ¼ cup butter: Helps bind the bars together and adds richness.
- ½ cup brown sugar: For added sweetness and a hint of caramel flavor.
- ½ tsp pure vanilla extract: Enhances the overall taste.
- ¼ tsp sea salt: Balances the sweetness.
- ½ cup dried cherries: Adds a chewy texture and a pop of fruity flavor.
- ½ cup mini semi-sweet or dark chocolate chips: Because a little chocolate makes everything better!
How to Make Your Granola Bars
Now that you have all your ingredients ready, let’s jump into the easy steps to create these delicious bars:
- Preheat your oven to 350°F (175°C). Line a large baking sheet with foil or parchment paper and set aside.
- Chop the almonds and dried cherries into small pieces.
- Add the oats and chopped almonds to the prepared baking sheet. Bake for 4-5 minutes, stirring halfway through, until lightly toasted. Remove from the oven and let cool.
- In a small saucepan over medium heat, combine the butter, maple syrup, brown sugar, vanilla extract, and salt. Stir until the butter melts and the sugar dissolves.
- Pour this mixture over the cooled oat and almond mixture. Stir until everything is evenly coated.
- Allow the mixture to cool for 5-10 minutes before adding the chocolate chips and dried cherries. Gently mix until evenly distributed.
- Transfer the granola mixture to an 8×8” baking pan lined with parchment paper. Use a spatula to press it firmly into an even layer. This step is crucial for bars that hold together well!
- Place in the freezer for about 30 minutes to set.
- Once set, remove from the pan and cut into bars. You can drizzle additional melted chocolate over the top for a decadent finish!
- Store in the fridge for up to 5-7 days—if they last that long!
Pro Tips for Perfect Granola Bars
To ensure your granola bars turn out perfectly every time, consider these expert insights:
- Use Fresh Ingredients: Make sure your oats and nuts are fresh for the best flavor and texture.
- Don’t Skip the Chilling: Allowing the bars to chill in the freezer helps them firm up, making them easier to cut.
- Press Firmly: Use a spatula to press the mixture firmly into the pan—this helps the bars stick together.
- Add Variety: Experiment with different nuts, seeds, or dried fruits based on your preferences.
- Watch the Oven: Keep an eye on the oats while toasting; you want them golden, not burnt!
- Use a Sharp Knife: When cutting the bars, use a sharp knife for clean edges.
- Try a Different Sweetener: If you’re not a fan of brown sugar, coconut sugar or agave syrup can be great alternatives.
- Store in an Airtight Container: To keep them fresh longer, store them in an airtight container in the fridge.
Common Mistakes and Troubleshooting
Even the best of us can run into a few hiccups when making granola bars. Here are some common issues and how to avoid them:
- Bars Crumbling: If your bars fall apart, try pressing the mixture down more firmly before chilling.
- Too Sweet: Adjust the amount of maple syrup and sugar to your taste if you prefer a less sweet bar.
- Not Chewy Enough: Ensure you’re using old-fashioned oats; quick oats can lead to a drier texture.
- Burnt Nuts: Keep a close watch on your nuts while toasting to prevent burning.
Variations to Try
Want to shake things up? Here are some fun variations to try:
- Nut-Free Version: Replace nuts with seeds such as sunflower or pumpkin seeds.
- Chocolate Lovers: Add cocoa powder to the oat mixture or use chocolate almond butter instead of plain.
- Fruity Twist: Substitute dried cherries for cranberries, apricots, or raisins.
- Spiced Up: Add a pinch of cinnamon or nutmeg for a warm, cozy flavor.
Storage and Make-Ahead Instructions
These granola bars are perfect for meal prep! Here’s how to store them:
- Room Temperature: They can be stored in an airtight container at room temperature for up to 3 days.
- Refrigerator: For longer freshness, keep them in the fridge for up to a week.
- Freezer: Freeze individual bars wrapped tightly in plastic wrap for up to 3 months. Thaw in the fridge overnight before enjoying!
Frequently Asked Questions
Got questions? We’ve got answers! Check out these FAQs:
- Can I use instant oats instead of old-fashioned oats? No, instant oats won’t provide the same chewy texture.
- Can I make these vegan? Yes, substitute butter with coconut oil and use a plant-based chocolate.
- What’s the best way to cut the bars? Use a sharp knife and cut while the bars are cold for clean edges.
- How long will they last? In the fridge, they last about a week; in the freezer, up to 3 months.
- Can I add protein powder? Absolutely! Just reduce the amount of oats slightly to keep the texture right.
- What’s the best way to melt chocolate? Use a microwave in short bursts or a double boiler for even melting.
- Can I use other sweeteners? Yes! Honey, agave, or even date syrup can work well.
- Do I need to bake the oats? Baking enhances flavor but isn’t strictly necessary; you can skip this step if you prefer.
Nutritional Tips and Dietary Adaptations
Want to make these bars even healthier? Here are some tips:
- Whole Grains: Always opt for whole grain oats for added fiber and nutrients.
- Healthy Fats: Use nuts and seeds to incorporate healthy fats into your diet.
- Reduce Sugar: Cut down on the brown sugar or maple syrup for a lower-sugar option.
- Gluten-Free: Swap oats for certified gluten-free oats if you have gluten sensitivities.
Essential Equipment Recommendations
To make the process seamless, keep these tools handy:
- Baking Sheet: Use a large one for toasting oats and nuts.
- Mixing Bowl: A large bowl for combining ingredients is essential.
- Spatula: Handy for pressing the granola mixture into the pan.
- 8×8” Baking Pan: Perfect size for this recipe to create thicker bars.
Serving Suggestions
These bars are incredibly versatile! Here are some serving ideas:
- On-the-Go Snack: Perfect for busy mornings or after workouts.
- Lunchbox Treat: Add them to your kids’ lunchboxes for a wholesome snack.
- Post-Workout Fuel: Pair with a banana for a balanced post-workout snack.
- With Coffee or Tea: Enjoy with your favorite warm beverage for a delightful treat.
Now that you have this comprehensive guide to making your own Maple Syrup Granola Bars, it’s time to hit the kitchen! Embrace your culinary creativity and enjoy the delicious, healthy snacks you’ve prepared. Remember, cooking should be fun, and these bars prove that healthy eating doesn’t have to be boring. Happy snacking!
Maple Syrup Granola Bars (with dried fruit and chocolate!)
Ingredients
Dry ingredients
- 2 ½ cups old-fashioned oats
- 1/2 cup chopped almonds
Wet ingredients
- 1/3 cup pure maple syrup (can substitute honey)
- 1/4 cup butter
- 1/2 cup brown sugar
- 1/2 tsp pure vanilla extract
- 1/4 tsp sea salt
Add-ins
- 1/2 cup dried cherries, chopped
- 1/2 cup mini semi-sweet chips, or dark chocolate chips
Instructions
-
Preheat oven to 350°F (175°C). Line a baking sheet with parchment.
-
Chop almonds and cherries; toast oats and almonds for 4-5 minutes, then toss and bake another 4-5 minutes. Cool in a bowl.
-
In a saucepan, melt butter with maple syrup, brown sugar, vanilla, and salt. Pour over cooled oats and almonds, stir to combine.
-
Press mixture into an 8×8 inch pan lined with parchment. Freeze for 30 minutes.
-
Melt remaining chocolate chips, drizzle over bars, then slice and store in fridge.

![['A close-up view of a juicy boneless turkey breast cooked in a slow cooker.', 'A succulent slice of slow-cooked turkey breast with a shiny glaze, garnished with parsley.', 'A side view of a tender turkey breast, showing its moist texture and rich color.', 'A detailed shot of boneless turkey breast glistening with cranberry sauce and spices.']](https://recipessalads.com/wp-content/uploads/2026/07/slow-cooker-turkey_1_U1-150x150.webp)
![['Side view of a creamy Caramel Apple Smoothie topped with whipped cream and caramel drizzle.', 'Close-up image of a green apple smoothie with caramel sauce, served in a glass with a straw.', 'Delicious Caramel Apple Smoothie showcasing the vibrant green color and whipped cream topping.', 'Frosted glass of caramel apple smoothie garnished with caramel sauce and a fresh apple slice.']](https://recipessalads.com/wp-content/uploads/2026/07/caramel-apple-smoothie_1_U1-150x150.webp)