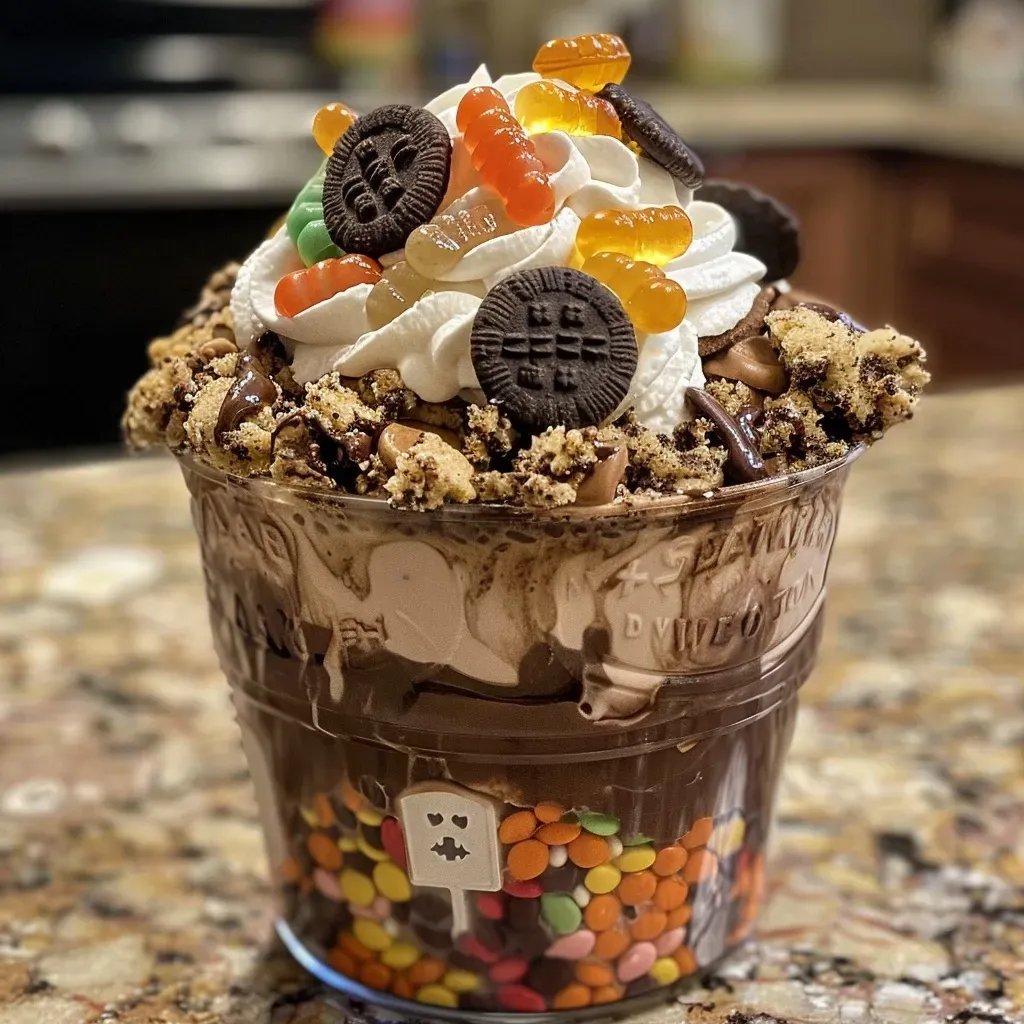
Unleashing the Fun: Dive into Spooktacular Graveyard Dirt Cups!
Are you ready to transform your Halloween gatherings into a delightful spooky experience? Look no further than these Graveyard Dirt Cups! This fun and easy recipe combines creamy chocolate pudding, crunchy cookie crumbs, and playful gummy worms to create a dessert that’s as visually appealing as it is delicious. In a matter of minutes, you can whip up these creepy cute treats that are perfect for impressing your friends and family. Let’s dig into the details and make this Halloween unforgettable!
Why You’ll Love This Recipe
- Easy Preparation: With just a few simple steps, these dirt cups can be made in under 30 minutes, allowing you to spend more time enjoying the festivities.
- Customizable Fun: You can easily switch up the toppings and decorations to suit your Halloween theme, making each cup a unique creation.
- Kid-Friendly: This dessert is perfect for kids and adults alike, combining fun flavors and a playful presentation that will delight everyone.
- Make-Ahead Convenience: Prepare these cups a day in advance, making your party prep a breeze while ensuring they taste fresh and delicious.
- Gorgeous Presentation: These cups look stunning on any dessert table, adding a festive touch to your Halloween spread!
Ingredient Breakdown and Substitutions
Let’s take a closer look at the ingredients that will make your Graveyard Dirt Cups a hit!
- 3 cups cold whole milk: This is the base for your pudding. You can substitute with almond or oat milk for a dairy-free option.
- 2 (3.9 oz) boxes instant chocolate pudding: For a richer flavor, consider using chocolate pudding made with black cocoa.
- 16 chocolate sandwich cookies (crushed, about 1½ cups): Oreo cookies work perfectly, or try gluten-free cookies if needed.
- 1 cup whipped topping: You can use homemade whipped cream for a fresher taste or opt for a dairy-free whipped topping.
- 8 gummy worms: These add a fun, creepy effect! Feel free to swap with other Halloween candy like candy eyes or chocolate spiders.
- 8 oval cookies for tombstones: Decorate with icing to create spooky tombstones, or use store-bought options for convenience.
Steps to Create Your Graveyard Dirt Cups

Now, let’s get to the fun part—making your Graveyard Dirt Cups!
- Step 1: In a mixing bowl, whisk together the cold milk and chocolate pudding for about 2 minutes until it thickens.
- Step 2: Gently fold in the whipped topping until well combined, creating a creamy chocolate mixture.
- Step 3: Begin layering your cups! Start with a layer of the chocolate pudding mixture at the bottom.
- Step 4: Sprinkle a layer of crushed cookies over the pudding to create your “dirt” layer.
- Step 5: Repeat the layers until you fill the cups, ensuring a fun mix of pudding and cookie crumbs.
- Step 6: Press a tombstone cookie into the top layer of the dessert.
- Step 7: Add gummy worms on top, letting them drape over the sides for a spooky effect.
- Step 8: Chill the cups in the refrigerator for at least 1 hour before serving to enhance the flavors.
Pro Tips for Perfect Graveyard Dirt Cups
- Texture Matters: For a more realistic “dirt” texture, crush the cookies into varying sizes—some larger chunks for added crunch!
- Chill Time: Allowing the cups to chill not only enhances the flavor but helps the layers set properly.
- Presentation is Key: Use clear cups to showcase the beautiful layers of pudding and cookies, making them more visually appealing.
- Experiment with Flavors: Feel free to mix in different flavors of pudding or even add a layer of cream cheese for a unique twist!
- Customize Your Toppings: Incorporate other fun Halloween candies, like chocolate skeletons or edible glitter for a magical touch.
- Make It Ahead: These cups can be made up to 24 hours in advance for easy party prep.
- Stay Creative: Encourage kids to help with decorating their cups, allowing them to express their creativity!
- Stay Fresh: Store leftovers in the fridge covered for up to 3 days, keeping the cookie topping crispy.
Common Mistakes and Troubleshooting
Even the best of us make mistakes! Here are some common pitfalls and how to avoid them:
- Overmixing the Pudding: Whisk just until combined to avoid a grainy texture.
- Using Warm Milk: Always use cold milk to ensure your pudding sets properly.
- Not Chilling Long Enough: Give your cups ample time in the fridge to set; one hour is a minimum.
- Too Much Whipped Topping: Balance the whipped topping with the pudding mixture for the perfect creaminess.
Variations to Try
Want to mix things up? Here are some fun variations of your Graveyard Dirt Cups:
- Halloween Candy Crush: Add layers of your favorite Halloween candies for extra texture and flavor.
- Vegan Version: Substitute all dairy products with plant-based alternatives for a delicious vegan treat.
- Chocolate Mint Delight: Use mint chocolate pudding and add crushed mint cookies for a refreshing twist.
- Spooky Spider Cups: Decorate with chocolate spider candies for an extra creepy effect!
Storage and Make-Ahead Instructions
Your Graveyard Dirt Cups can be prepared ahead of time, making them a stress-free dessert option for your Halloween festivities. Here’s how to store them:
- Refrigeration: Keep covered in the fridge for up to 3 days. Note that the cookie topping may soften, so add fresh cookies right before serving.
- Freezing: While it’s not recommended to freeze these cups due to the texture changes, you can freeze the pudding mixture separately and assemble later.
Frequently Asked Questions
Got questions? We’ve got answers! Here’s a helpful FAQ section to clear up any uncertainties:
- Can I use almond milk instead of whole milk?
Absolutely! Almond milk works perfectly for a dairy-free version. - How long can I make these cups in advance?
You can prepare them up to 24 hours in advance for the best results. - Can I use different flavors of pudding?
Yes! Feel free to try vanilla, butterscotch, or even strawberry for a twist. - What if I can’t find gummy worms?
Use any fun candy, like gummy bats or chocolate-covered raisins! - How do I make these gluten-free?
Simply use gluten-free chocolate sandwich cookies to keep this dessert suitable for everyone. - What’s the best way to crush the cookies?
A food processor works best, but placing them in a zip-top bag and smashing them with a rolling pin works too! - Can I make these cups without whipped topping?
Yes! You can replace it with whipped coconut cream or just use additional pudding for a thicker texture. - How can I make these cups look more festive?
Add sprinkles, edible glitter, or spooky decorations to elevate the presentation!
Nutrition Tips and Dietary Adaptations
While these Graveyard Dirt Cups are a fun treat, it’s always good to think about nutrition:
- Portion Control: Serve in smaller cups to keep portions reasonable while still enjoying the fun!
- Adding Fruit: Incorporate layers of fruit like berries or banana slices for added nutrition and flavor.
- Reducing Sugar: Opt for sugar-free pudding and whipped topping for a healthier alternative.
- Boosting Fiber: Consider adding chia seeds or crushed nuts for added fiber and healthy fats.
Equipment Recommendations
To make your Graveyard Dirt Cups effortlessly, here’s a quick list of must-have equipment:
- Mixing Bowls: For whisking and combining ingredients.
- Whisk: Essential for getting that pudding texture just right.
- Clear Cups: Perfect for showcasing your layers of deliciousness.
- Food Processor: For easy crushing of cookies.
- Spatula: Great for folding in whipped topping without deflating it.
Serving Suggestions
When it’s time to serve up your Graveyard Dirt Cups, consider these fun ideas:
- Group Display: Arrange the cups on a festive Halloween platter for a striking presentation.
- Themed Tablecloths: Use Halloween-themed table decorations to enhance the spooky vibe.
- Interactive Dessert Station: Set up a station where guests can decorate their cups with extra toppings.
- Pair with Drinks: Serve with spooky-themed beverages like witch’s brew or pumpkin spice lattes for a complete treat!
With these Graveyard Dirt Cups, your Halloween dessert is sure to be a hit! So gather your ingredients, unleash your creativity, and let the spooky fun begin. Happy Halloween!
Graveyard Dirt Cups
Ingredients
Dairy
- 3 cups cold whole milk
- 2 boxes instant chocolate pudding ((3.9 oz each))
- 16 cookies chocolate sandwich cookies (crushed) ((about 1½ cups))
- 1 cup whipped topping
- 8 pieces gummy worms
- 8 cookies oval cookies for tombstones
Instructions
- Whisk milk with pudding for 2 minutes; fold in whipped topping.
- Layer pudding and crumbs in 8 cups; press a tombstone cookie; add worms.
- Chill for 1 hour.